Coder Social home page Coder Social logo

openworm / muscle_model Goto Github PK

View Code? Open in Web Editor NEW
46.0 46.0 24.0 1.71 MB

Model of C elegans body wall muscle based on Boyle & Cohen 2008

Home Page: http://www.opensourcebrain.org/projects/muscle_model

License: Other

C++ 14.87% Makefile 0.14% MATLAB 18.23% Python 21.93% Shell 0.57% AMPL 5.88% HTML 1.06% Jupyter Notebook 32.50% C 4.83%

muscle_model's Introduction

OpenWorm

Docker Image CI Docker Image Test - quick Docker Image Test Build - Intel drivers

About OpenWorm

OpenWorm aims to build the first comprehensive computational model of Caenorhabditis elegans (C. elegans), a microscopic roundworm. With only a thousand cells, it solves basic problems such as feeding, mate-finding and predator avoidance. Despite being extremely well-studied in biology, a deep, principled understanding of the biology of this organism remains elusive.

We are using a bottom-up approach, aimed at observing the worm behaviour emerge from a simulation of data derived from scientific experiments carried out over the past decade. To do so, we are incorporating the data available from the scientific community into software models. We are also forging new collaborations with universities and research institutes to collect data that fill in the gaps.

You can earn a badge with us simply by trying out this package! Click on the image below to get started. OpenWorm Docker Badge

Quickstart

We have put together a Docker container that pulls together the major components of our simulation and runs it on your machine. When you get it all running it does the following:

  1. Run our nervous system model, known as c302, on your computer.
  2. In parallel, run our 3D worm body model, known as Sibernetic, on your computer, using the output of the nervous system model.
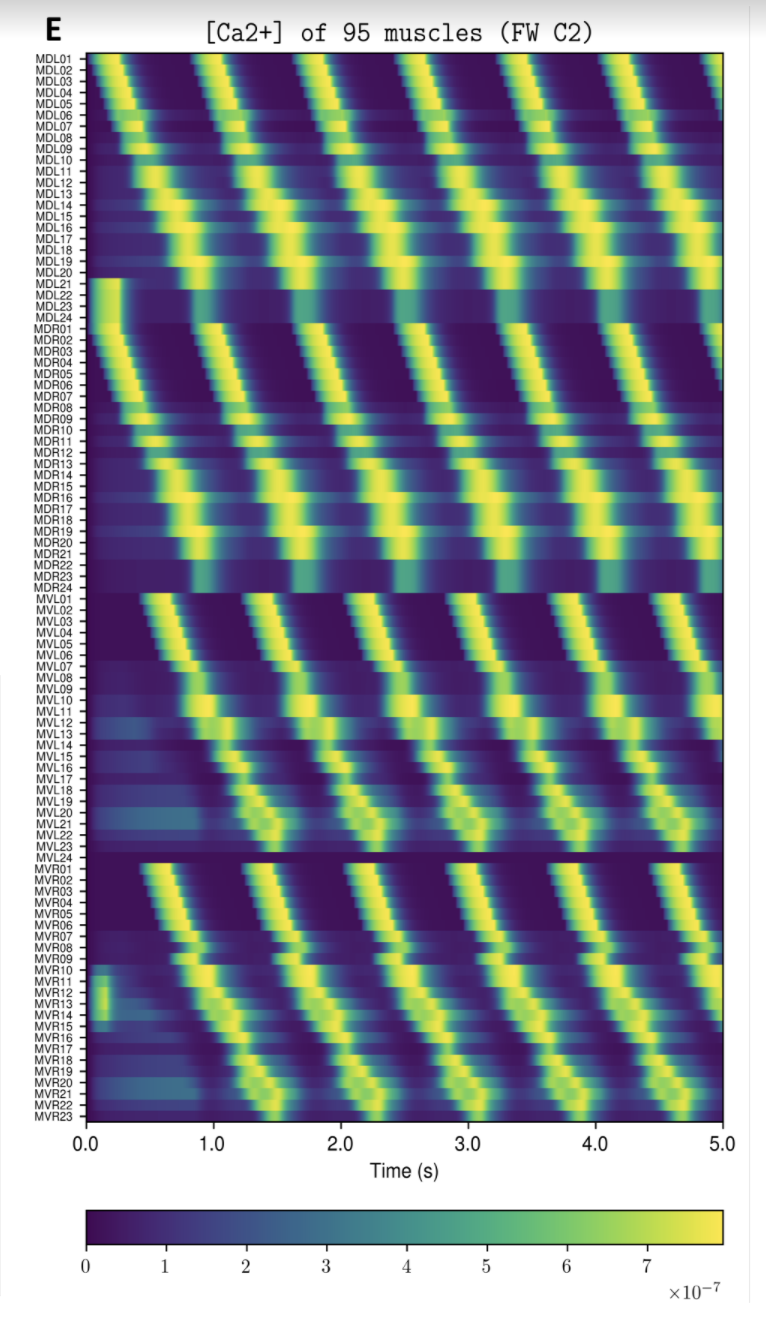
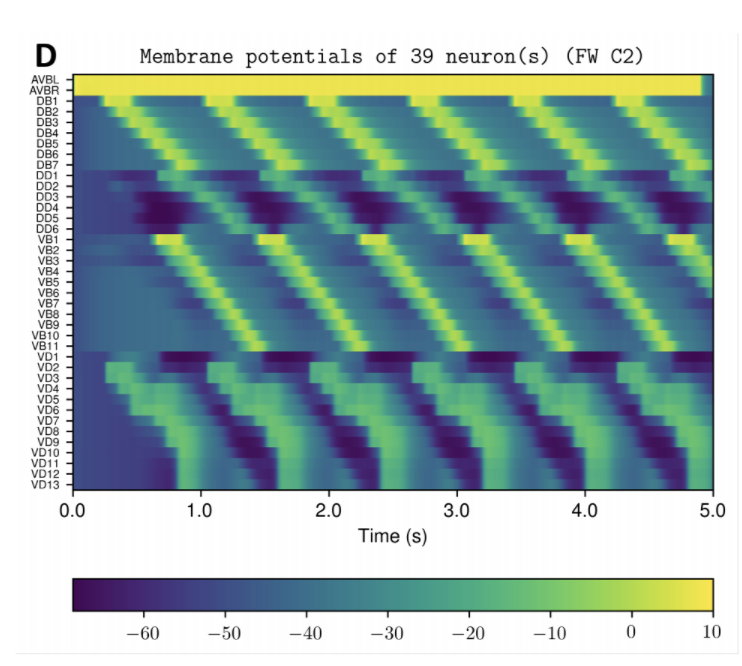
  3. Produce graphs from the nervous system and body model that demonstrate its behavior on your computer for you to inspect.
  4. Produce a movie showing the output of the body model.

Example Output

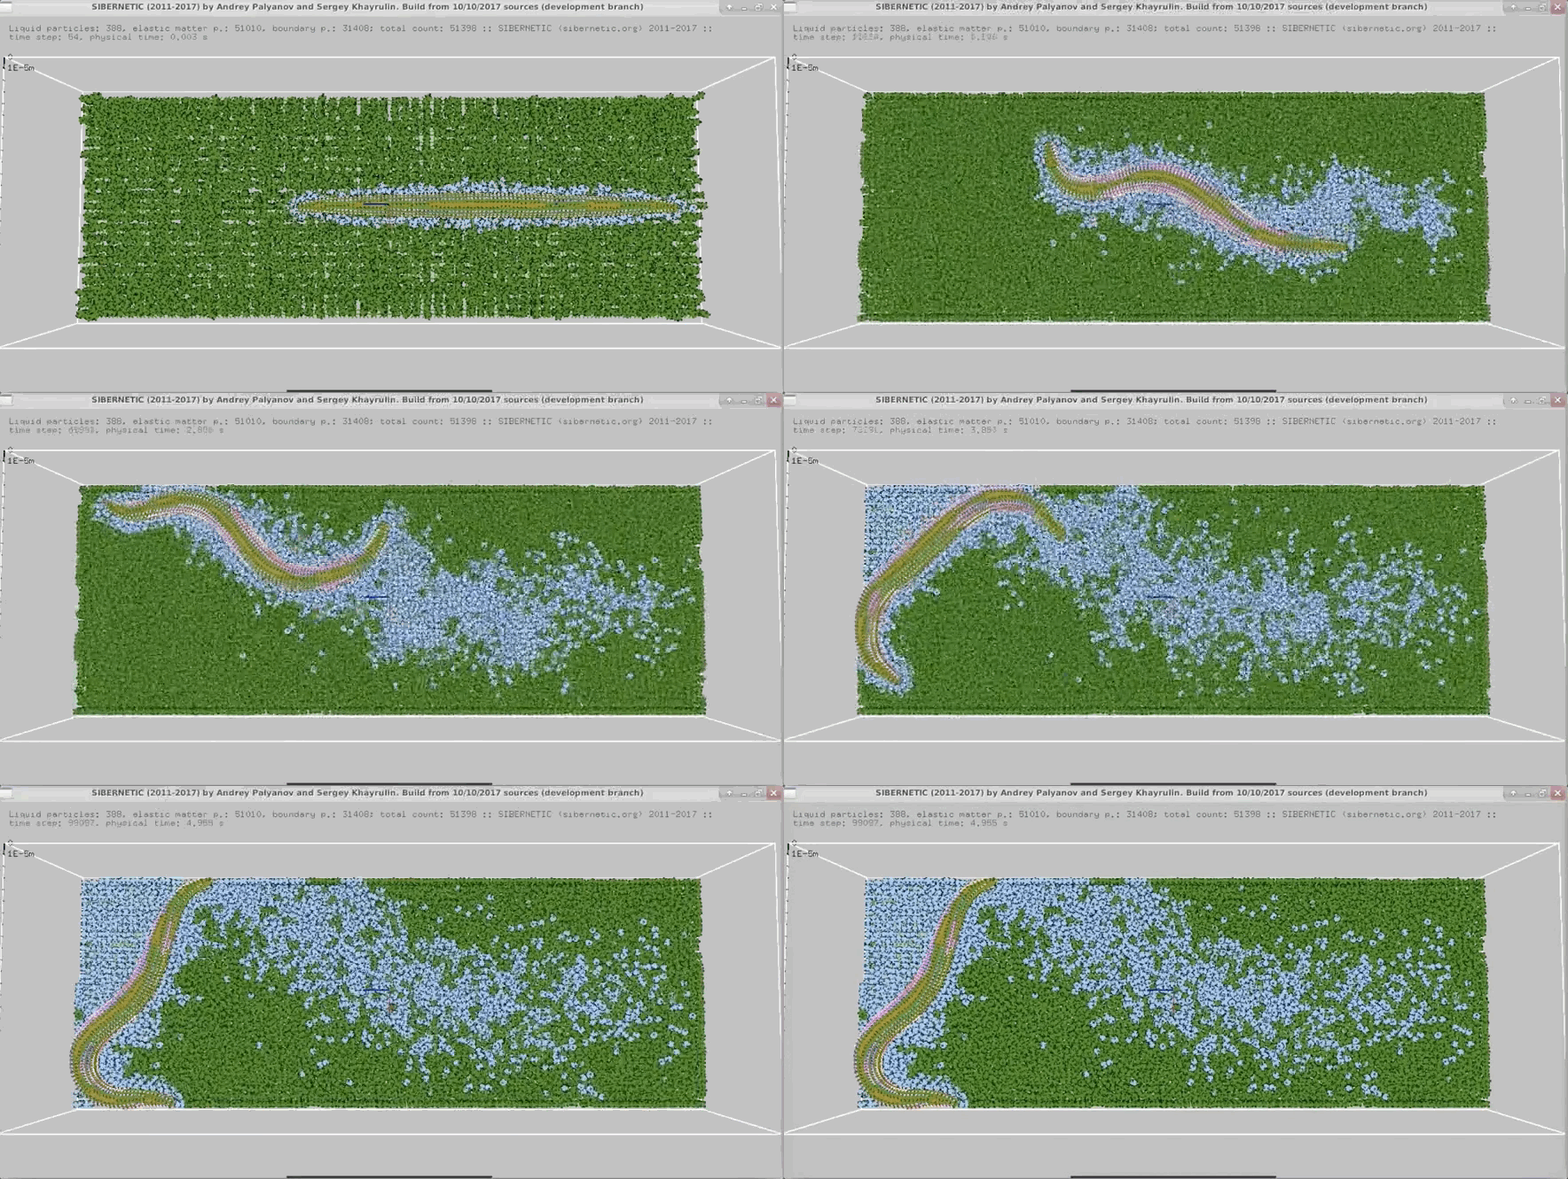
Worm Crawling

NOTE: Running the simulation for the full amount of time would produce content like the above. However, in order to run in a reasonable amount of time, the default run time for the simulation is limited. As such, you will see only a partial output, equivalent to about 5% of run time, compared to the examples above. To extend the run time, use the -d argument as described below.

Installation

Pre-requisites:

  1. You should have at least 60 GB of free space on your machine and at least 2GB of RAM
  2. You should be able to clone git repositories on your machine. Install git, or this GUI may be useful.

To Install:

  1. Install Docker on your system.
  2. If your system does not have enough free space, you can use an external hard disk. On MacOS X, the location for image storage can be specified in the Advanced Tab in Preferences. See this thread in addition for Linux instructions.

Running

  1. Ensure the Docker daemon is running in the background (on MacOS/Windows there should be an icon with the Docker whale logo showing in the menu bar/system tray).
  2. Open a terminal and run: git clone http://github.com/openworm/openworm; cd openworm
  3. Optional: Run ./build.sh (or build.cmd on Windows). If you skip this step, it will download the latest released Docker image from the OpenWorm Docker hub.
  4. Run ./run.sh (or run.cmd on Windows).
  5. About 5-10 minutes of output will display on the screen as the steps run.
  6. The simulation will end. Run stop.sh (stop.cmd on Windows) on your system to clean up the running container.
  7. Inspect the output in the output directory on your local machine.

Advanced

Arguments

  • -d [num] : Use to modify the duration of the simulation in milliseconds. Default is 15. Use 5000 to run for time to make the full movie above (i.e. 5 seconds).

Other things to try

  • Open a terminal and run ./run-shell-only.sh (or run-shell-only.cmd on Windows). This will let you log into the container before it has run master_openworm.py. From here you can inspect the internals of the various checked out code bases and installed systems and modify things. Afterwards you'll still need to run ./stop.sh to clean up.
  • If you wish to modify what gets installed, you should modify Dockerfile. If you want to modify what runs, you should modify master_openworm.py. Either way you will need to run build.sh in order to rebuild the image locally. Afterwards you can run normally.

FAQ

What is the Docker container?

The Docker container is a self-contained environment in which you can run OpenWorm simulations. It's fully set up to get you started by following the steps above. At the moment, it runs simulations and produces visualizations for you, but these visualizations must be viewed outside of the Docker container. While you do not need to know much about Docker to use OpenWorm, if you are planning on working extensively with the platform, you may benefit from understanding some basics. Docker Curriculum is an excellent tutorial for beginners that is straightforward to work through (Sections 1 - 2.5 are plenty sufficient).

Is it possible to modify the simulation without having to run build.sh?

Yes, but it is marginally more complex. The easiest way is to modify anything in the Docker container once you are inside of it - it will work just like a bash shell. If you want to modify any code in the container, you'll need to use an editor that runs in the terminal, like nano. Once you've modified something in the container, you don't need to re-build. However, if you run stop.sh once you exit, those changes will be gone.

How do I access more data than what is already output?

The simulation by default outputs only a few figures and movies to your home system (that is, outside of the Docker container). If you want to access the entire output of the simulation, you will need to copy it from the Docker container.

For example, say you want to extract the worm motion data. This is contained in the file worm_motion_log.txt, which is found in the /home/ow/sibernetic/simulations/[SPECIFIC_TIMESTAMPED_DIRECTORY]/worm_motion_log.txt. The directory [SPECIFIC_TIMESTAMPED_DIRECTORY] will have a name like C2_FW_2018_02-12_18-36-32, and its name can be found by checking the output directory. This is actually the main output directory for the simulation, and contains all output, including cell modelling and worm movement.

Once the simulation ends and you exit the container with exit, but before you run stop.sh, run the following command from the openworm-docker-master folder:

docker cp openworm:/home/ow/sibernetic/simulations/[SPECIFIC_TIMESTAMPED_DIRECTORY]/worm_motion_log.txt ./worm_motion_log.txt

This will copy the file from the Docker container, whose default name is openworm. It is crucial that you do not run stop.sh before trying to get your data out (see below)

What is the difference between exit and stop.sh?

When you are in the Docker Container openworm, and are done interacting with it, you type exit to return to your system's shell. This stops execution of anything in the container, and that container's status is now Exited. If you try to re-start the process using run-shell-only.sh, you will get an error saying that the container already exists. You can choose, at this point, to run stop.sh. Doing so will remove the container and any files associated with it, allowing you to run a new simulation. However, if you don't want to remove that container, you will instead want to re-enter it.

How do I enter a container I just exited?

If you run stop.sh you'll delete your data and reset the container for a new run. If, however, you don't want to do that, you can re-enter the Docker container like this:

docker start openworm                 # Restarts the container
docker exec -it openworm /bin/bash    # Runs bash inside the container

This tells Docker to start the container, to execute commands (exec) with an interactive, tty (-it) bash (bash) shell in the container openworm.

You'll be able to interact with the container as before.

Documentation

to find out more about OpenWorm, please see the documentation at http://docs.openworm.org or join us on Slack.

This repository also contains project-wide tracking via high-level issues and milestones.

muscle_model's People

Contributors

adrianq avatar borismarin avatar brijeshmodi12 avatar gidili avatar gitter-badger avatar msasinski avatar pgleeson avatar rayner avatar rgerkin avatar robbysimpson avatar slarson avatar tarelli avatar vahidgh avatar vellamike avatar

Stargazers

 avatar  avatar  avatar  avatar  avatar  avatar  avatar  avatar  avatar  avatar  avatar  avatar  avatar  avatar  avatar  avatar  avatar  avatar  avatar  avatar  avatar  avatar  avatar  avatar  avatar  avatar  avatar  avatar  avatar  avatar  avatar  avatar  avatar  avatar  avatar  avatar  avatar  avatar  avatar  avatar  avatar  avatar  avatar  avatar  avatar  avatar

Watchers

 avatar  avatar  avatar  avatar  avatar  avatar  avatar  avatar  avatar  avatar  avatar  avatar  avatar  avatar  avatar  avatar  avatar  avatar  avatar  avatar  avatar  avatar  avatar  avatar  avatar  avatar  avatar  avatar  avatar  avatar  avatar  avatar  avatar  avatar  avatar  avatar  avatar  avatar  avatar  avatar  avatar  avatar  avatar  avatar  avatar  avatar  avatar

muscle_model's Issues

Improve Geppetto version of muscle model

A first version of the muscle model is currently out on live.geppetto.org under the default samples. There are still several things that need improving with this. I've asked several questions over in the geppetto samples repo to hopefully get responses from that team on how we can make several of these improvements ourselves:

openworm/org.geppetto.samples#23
openworm/org.geppetto.samples#24
openworm/org.geppetto.samples#25
openworm/org.geppetto.samples#26
openworm/org.geppetto.samples#27

As they get answered, I'll be updating this issue and spinning out some more specific issues to fix each point raised by the questions.

Define parameters for simulated experiment using jNeuroML on the command line, based on the methods that went into the figure

Here's the figure:

screen shot 2015-01-18 at 2 14 00 pm

Key points to test:

  • Run the muscle model in voltage clamp mode
  • modulate voltage for ~1s in a square pulse as shown.
  • should result in initial current amplitude change of ~160 pA
  • should decay to steady state of ~70 pA until voltage is released
  • time constants of decay should match both figures
  • Do the equivalent test for the impulse in the second figure on the right

It is not clear exactly what voltage to modulate to -- therefore use trial and error initially to pick a value that will result in the correct initial current amplitude and test if the other parameters are consistent. Otherwise, work out the correct voltage amount via information in the paper.

direct link to paper

This unit test should be instrumented to run in Travis-CI

FYI @rayner @VahidGh @rgerkin @ahrasheed

Replace jnml in scripts with pynml?

@gsarma and I have been running some things in this repo recently, but we couldn't get jNeuroML to install correctly. If we replaced calls to jnml with pynml they seemed to work fine and produce output.

There are only a few places where we would have to replace this.

@pgleeson Do you think the functionality in pyNeuroML is such that we can do this right now?

Create unit test that verifies correct I/V curve for ca_boyle NML2 channel

We currently have a process to run the iv_analyse.py script on the output of the analyse_ca_boyle.sh script. This produces a figure.

We'd like to augment this process with an automated test that compares the output of iv_analyse with Figure 3A from the paper.

A good candidate to be done with a sciunit test @rgerkin , although anyone who can do this even in a simpler way would make a contribution.

Related to #20. @VahidGh and @rayner this would be the logical next step on the work you have both been doing related to I/V curves.

The unit test should then be instrumented to run on Travis CI in this repo.

problems running main.py

Trying to run this command:

python run.py eval_file0 40.041444758152295 0.0 4514.250191560498 35.2 0.4089 0.6 --compile --plotoverlay

generates some errors in main.py. Most of errors are due to naming parameters, such as:

  • line 87: init() got an unexpected keyword argument 'ion_channels'
    • replacing ion_channels with ion_channel solved the problem
  • line 112: self.cell.leak_current = self.leak
    • we do not have cell attribute
  • NameError: global name 'kinetics' is not defined
    • adding "from neuron import h" and replacing kinetics with h solved the problem
  • AttributeError: muscle_simulation instance has no attribute 'morphology'
    • I guess there is some problem in neuroml.Segment usage

And so on...

Non-reliance on ~/git

The shell scripts rely on things being checked out to ~/git (which, to be fair, is what the README directs) but for those of us that like to put files where we want, can we instead use something like an OPENWORM_HOME shell variable? I'm thinking something like this:

So instead of:

python ~/git/BlueBrainProjectShowcase/Channelpedia/NML2ChannelAnalyse.py...

each script would have something like:

OPENWORM_HOME=${OPENWORM_HOME:-~/git/}
python $OPENWORM_HOME/BlueBrainProjectShowcase/Channelpedia/NML2ChannelAnalyse.py...

The VAR=${VAR:-DEFAULT} syntax lets you use the environment variable or a default if doesn't exist. It works in most shells. This way no one has to set the OPENWORM_HOME variable, but if they want then they can and then put muscle_model in the corresponding location. In general, having an OPENWORM_HOME that refers to the top-level directory for all repos (for those of us interested in more than one repo) could be useful.

If anyone likes this I can patch all the scripts.

Error when trying to use LEMS_Figure2B.xml with jNeuroML

When I try to run the following command, I get an error about a missing "simpleSeriesResistance" parameter for a voltage clamp component. I'm not sure where this is defined or where to add this - any chance you could advise?

The command and output are:

$ jnml LEMS_Figure2B.xml
jNeuroML v0.5.1
Loading: /home/rayner/muscle_model/NeuroML2/LEMS_Figure2B.xml with jLEMS...
org.lemsml.jlems.core.sim.ContentError: no value supplied for parameter: simpleSeriesResistance in Component(id=vClamp1 type=voltageClamp)
Defined attributes: delay=5ms, duration=20ms, targetVoltage=-60mV, seriesResistance=1ohm,
at org.lemsml.jlems.core.type.Component.resolve(Component.java:371)
at org.lemsml.jlems.core.type.Component.resolve(Component.java:217)
at org.lemsml.jlems.core.type.Component.checkResolve(Component.java:194)
at org.lemsml.jlems.core.type.Lems.resolve(Lems.java:154)
at org.lemsml.jlems.core.sim.LemsProcess.readModel(LemsProcess.java:82)
at org.neuroml.export.Utils.readLemsNeuroMLFile(Utils.java:177)
at org.neuroml.export.Utils.loadLemsFile(Utils.java:289)
at org.neuroml.export.Utils.runLemsFile(Utils.java:284)
at org.neuroml.JNeuroML.main(JNeuroML.java:204)
INFO Jun 19,2014 18:40 (INFO) Reading from: /home/rayner/muscle_model/NeuroML2/LEMS_Figure2B.xml

Thanks for any help you can give!

Create tests to catch performance regressions in specific functions

We have been exploring writing tests for catching performance regressions in PyOpenWorm and ChannelWorm.

We need to first decide which functions should be tested for performance and then define reference behavior. The simplest way is to check the performance relative to some simple computation, and later we can have a more sophisticated system for tracking performance and catching regressions.

The bare minimum to close this issue is a file called, e.g. PerformanceTests.py, with a single test and docstrings.

@travs

Add jneuroML to documentation here

@cheelee said:

In the muscle_model repository, NeuroML2 folder. The README.md instructions ask the user to try:
jnml LEMS_Figure2A.xml

but does not explain how one should get hold of jnml. For me, I found it in the jNeuroML repository, cloned it, and followed the README.md instructions there. That appeared to be successful, and I was subsequently able to run from the jNeuroML folder:

./jnml /muscle_model/NeuroML2/LEMS_Figure2A.xml

Create setup.py to install dependencies to run NeuroML2 model

Translate the instructions to install the packages for the NeuroML2 model into a setup.py that can be run once. This should be placed in the NeuroML2 directory

INSTALLDIR=~/git
mkdir $INSTALLDIR
cd $INSTALLDIR
git clone https://github.com/openworm/muscle_model
pip install git+https://github.com/OpenSourceBrain/osb-model-validation
pip install lxml
git clone https://github.com/NeuralEnsemble/libNeuroML.git
cd libNeuroML
git checkout development
python setup.py install
cd ..
git clone https://github.com/LEMS/pylems.git
cd pylems
git checkout development
python setup.py install
cd ..
git clone https://github.com/OpenSourceBrain/OSB_API.git
cd OSB_API/python
python setup.py install
pip install git+https://github.com/purcell/airspeed.git
cd ../..
git clone https://github.com/openworm/BlueBrainProjectShowcase

Print out values from python / matlab implementations and compare with values from NeuroML2

Moved from a follow on to #13

@pgleeson wrote:

It would be great to get another Python script to print out the corresponding values in the python/matlab impls vs the values used for NeuroML2. I've started a script for this here: https://github.com/openworm/muscle_model/blob/master/BoyleCohen2008/PythonSupport/Main_Version/compareToNeuroML2.py and it would be great if someone could look into this a bit more. Eventually the nml2 can be updated to make sure all the values match.

generate I-V plots for ion channels

Following discussions in this issue, in order to compare I-V plots for each ion channel with the corresponding plot from literature, we need some script.
Here we have this one which is not compatible with the last updates (in the new version, something like jnml LEMS_Test_k_fast.xml generates m_inf, m_tau ,etc .dat files, which also lacks h_inf , h_tau .dat files, in the case of Ca ion channel).
Temporally, I wrote this script which in, the out-most generated curve is the needed one, but finally we need some code to generate the plots from LEMS file.

Screenshot for section 2.1 in README

Could someone post a screenshot of the jNeuroML output window (the voltage trace) at the end of section 2.1 of the README? I have an output which is... boring, and I think probably not right.

Which version of libNeuroML?

Which commit or libNeuroML is muscle_model currently built against? I'm pretty sure it's not the current master or development branch, which appear to have been significantly restructured.

Write SciUnit validation tests for muscle_model

This issue can be closed when two tests of connectivity are implemented and incorporated into the test suite using SciUnit

  • Make a README.md for the data we find here so we have references for the data that the model will be constrained again
  • (Optional) Incorporate this data so it can be sourced from PyOpenWorm (cc: @mwatts15 )
  • Using this notebook as a starting point, incorporate the data above.
  • Also incorporate the methods for optimizing the channels so the figures have good overlapping matches from the channelworm fitter for EGL-19 (cc: @VahidGh)
  • (Optional) Incorporate the channel data from ChannelWorm into PyOpenWorm (cc: @mwatts15 )
  • Update .travis.yml for this project to execute the test from the notebook via SciUnit (example) (cc: @rgerkin )

Update README.md with new sections

  • Better introduction to the repository as a whole, its purpose, what it is trying to accomplish
  • Instructions on how to run the vclamp.py and explain its significance to the Boyle/ Cohen paper
  • Instructions on how to run the latest example ion channel models
    • Explanation of what each of the plots actually mean that are generated
    • Explanation of how to derive an I/ V plot and why that's important (ivanalyze.py)
  • Pointer to the journal club material explaining hodgkin huxley dynamics
  • Pointer to the tests that are being automatically run on ion channels
  • Explanation of the context of the synapse and motor neuron and how this is establishing a set of tools to continue modeling on up from here.
  • How to run the Figure.xmls

Recommend Projects

  • React photo React

    A declarative, efficient, and flexible JavaScript library for building user interfaces.

  • Vue.js photo Vue.js

    ๐Ÿ–– Vue.js is a progressive, incrementally-adoptable JavaScript framework for building UI on the web.

  • Typescript photo Typescript

    TypeScript is a superset of JavaScript that compiles to clean JavaScript output.

  • TensorFlow photo TensorFlow

    An Open Source Machine Learning Framework for Everyone

  • Django photo Django

    The Web framework for perfectionists with deadlines.

  • D3 photo D3

    Bring data to life with SVG, Canvas and HTML. ๐Ÿ“Š๐Ÿ“ˆ๐ŸŽ‰

Recommend Topics

  • javascript

    JavaScript (JS) is a lightweight interpreted programming language with first-class functions.

  • web

    Some thing interesting about web. New door for the world.

  • server

    A server is a program made to process requests and deliver data to clients.

  • Machine learning

    Machine learning is a way of modeling and interpreting data that allows a piece of software to respond intelligently.

  • Game

    Some thing interesting about game, make everyone happy.

Recommend Org

  • Facebook photo Facebook

    We are working to build community through open source technology. NB: members must have two-factor auth.

  • Microsoft photo Microsoft

    Open source projects and samples from Microsoft.

  • Google photo Google

    Google โค๏ธ Open Source for everyone.

  • D3 photo D3

    Data-Driven Documents codes.