Coder Social home page Coder Social logo

jkjung-avt / tensorrt_demos Goto Github PK

View Code? Open in Web Editor NEW
1.7K 27.0 542.0 213.09 MB

TensorRT MODNet, YOLOv4, YOLOv3, SSD, MTCNN, and GoogLeNet

Home Page: https://jkjung-avt.github.io/

License: MIT License

Makefile 0.51% C++ 16.33% Python 71.32% Roff 0.43% Shell 4.49% Cuda 4.86% Cython 2.06%
tensorrt yolov4 yolov3 ssd-mobilenet mtcnn googlenet modnet object-detection jetson

tensorrt_demos's Introduction

tensorrt_demos

Examples demonstrating how to optimize Caffe/TensorFlow/DarkNet/PyTorch models with TensorRT.

Highlights:

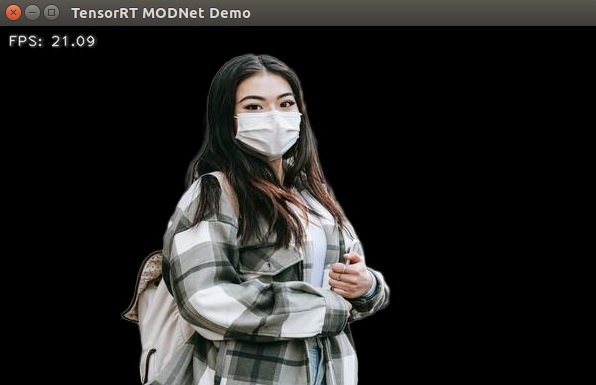
  • Run an optimized "MODNet" video matting model at ~21 FPS on Jetson Xavier NX.
  • Run an optimized "yolov4-416" object detector at ~4.6 FPS on Jetson Nano.
  • Run an optimized "yolov3-416" object detector at ~4.9 FPS on Jetson Nano.
  • Run an optimized "ssd_mobilenet_v1_coco" object detector ("trt_ssd_async.py") at 27~28 FPS on Jetson Nano.
  • Run an optimized "MTCNN" face detector at 6~11 FPS on Jetson Nano.
  • Run an optimized "GoogLeNet" image classifier at "~16 ms per image (inference only)" on Jetson Nano.

Supported hardware:

Table of contents

Prerequisite

The code in this repository was tested on Jetson Nano, TX2, and Xavier NX DevKits. In order to run the demos below, first make sure you have the proper version of image (JetPack) installed on the target Jetson system. For example, Setting up Jetson Nano: The Basics and Setting up Jetson Xavier NX.

More specifically, the target Jetson system must have TensorRT libraries installed.

  • Demo #1 and Demo #2: works for TensorRT 3.x+,
  • Demo #3: requires TensoRT 5.x+,
  • Demo #4 and Demo #5: requires TensorRT 6.x+.
  • Demo #6 part 1: INT8 requires TensorRT 6.x+ and only works on GPUs with CUDA compute 6.1+.
  • Demo #6 part 2: DLA core requires TensorRT 7.x+ (is only tested on Jetson Xavier NX).
  • Demo #7: requires TensorRT 7.x+.

You could check which version of TensorRT has been installed on your Jetson system by looking at file names of the libraries. For example, TensorRT v5.1.6 (JetPack-4.2.2) was present on one of my Jetson Nano DevKits.

$ ls /usr/lib/aarch64-linux-gnu/libnvinfer.so*
/usr/lib/aarch64-linux-gnu/libnvinfer.so
/usr/lib/aarch64-linux-gnu/libnvinfer.so.5
/usr/lib/aarch64-linux-gnu/libnvinfer.so.5.1.6

Furthermore, all demo programs in this repository require "cv2" (OpenCV) module for python3. You could use the "cv2" module which came in the JetPack. Or, if you'd prefer building your own, refer to Installing OpenCV 3.4.6 on Jetson Nano for how to build from source and install opencv-3.4.6 on your Jetson system.

If you plan to run Demo #3 (SSD), you'd also need to have "tensorflow-1.x" installed. You could probably use the official tensorflow wheels provided by NVIDIA, or refer to Building TensorFlow 1.12.2 on Jetson Nano for how to install tensorflow-1.12.2 on the Jetson system.

Or if you plan to run Demo #4 and Demo #5, you'd need to have "protobuf" installed. I recommend installing "protobuf-3.8.0" using my install_protobuf-3.8.0.sh script. This script would take a couple of hours to finish on a Jetson system. Alternatively, doing pip3 install with a recent version of "protobuf" should also work (but might run a little bit slowlier).

In case you are setting up a Jetson Nano, TX2 or Xavier NX from scratch to run these demos, you could refer to the following blog posts.

Demo #1: GoogLeNet

This demo illustrates how to convert a prototxt file and a caffemodel file into a TensorRT engine file, and to classify images with the optimized TensorRT engine.

Step-by-step:

  1. Clone this repository.

    $ cd ${HOME}/project
    $ git clone https://github.com/jkjung-avt/tensorrt_demos.git
    $ cd tensorrt_demos
  2. Build the TensorRT engine from the pre-trained googlenet (ILSVRC2012) model. Note that I downloaded the pre-trained model files from BVLC caffe and have put a copy of all necessary files in this repository.

    $ cd ${HOME}/project/tensorrt_demos/googlenet
    $ make
    $ ./create_engine
  3. Build the Cython code. Install Cython if not previously installed.

    $ sudo pip3 install Cython
    $ cd ${HOME}/project/tensorrt_demos
    $ make
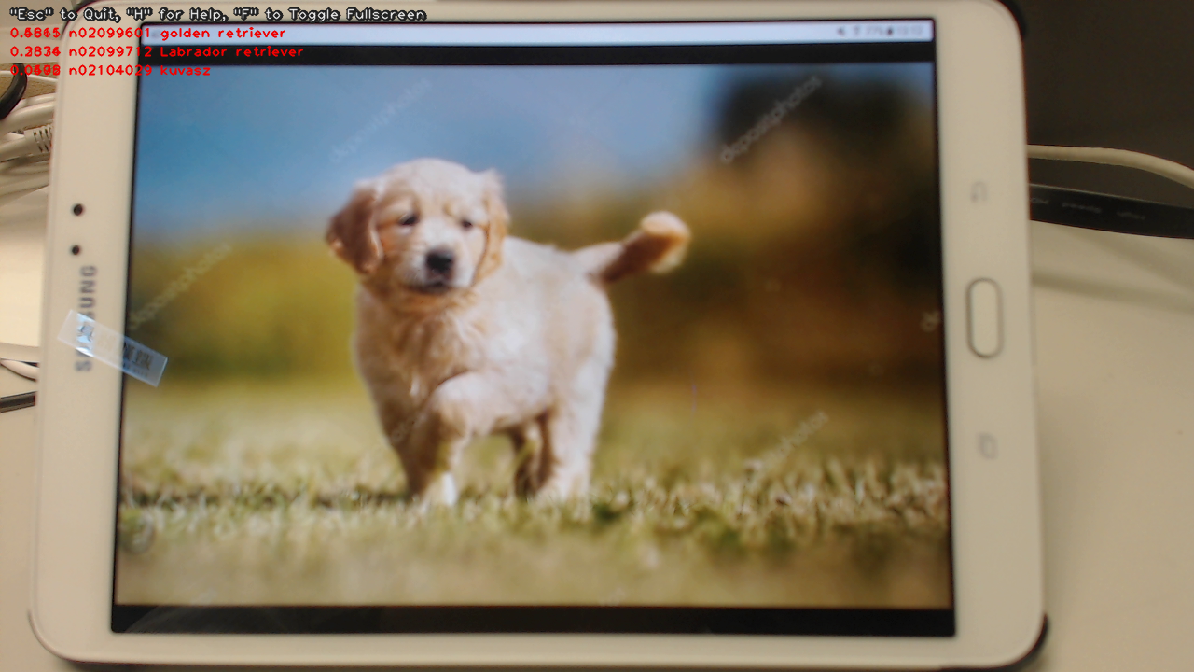
  4. Run the "trt_googlenet.py" demo program. For example, run the demo using a USB webcam (/dev/video0) as the input.

    $ cd ${HOME}/project/tensorrt_demos
    $ python3 trt_googlenet.py --usb 0 --width 1280 --height 720

    Here's a screenshot of the demo (JetPack-4.2.2, i.e. TensorRT 5).

    A picture of a golden retriever

  5. The demo program supports 5 different image/video inputs. You could do python3 trt_googlenet.py --help to read the help messages. Or more specifically, the following inputs could be specified:

    • --image test_image.jpg: an image file, e.g. jpg or png.
    • --video test_video.mp4: a video file, e.g. mp4 or ts. An optional --video_looping flag could be enabled if needed.
    • --usb 0: USB webcam (/dev/video0).
    • --rtsp rtsp://admin:[email protected]/live.sdp: RTSP source, e.g. an IP cam. An optional --rtsp_latency argument could be used to adjust the latency setting in this case.
    • --onboard 0: Jetson onboard camera.

    In additional, you could use --width and --height to specify the desired input image size, and use --do_resize to force resizing of image/video file source.

    The --usb, --rtsp and --onboard video sources usually produce image frames at 30 FPS. If the TensorRT engine inference code runs faster than that (which happens easily on a x86_64 PC with a good GPU), one particular image could be inferenced multiple times before the next image frame becomes available. This causes problem in the object detector demos, since the original image could have been altered (bounding boxes drawn) and the altered image is taken for inference again. To cope with this problem, use the optional --copy_frame flag to force copying/cloning image frames internally.

  6. Check out my blog post for implementation details:

Demo #2: MTCNN

This demo builds upon the previous one. It converts 3 sets of prototxt and caffemodel files into 3 TensorRT engines, namely the PNet, RNet and ONet. Then it combines the 3 engine files to implement MTCNN, a very good face detector.

Assuming this repository has been cloned at "${HOME}/project/tensorrt_demos", follow these steps:

  1. Build the TensorRT engines from the pre-trained MTCNN model. (Refer to mtcnn/README.md for more information about the prototxt and caffemodel files.)

    $ cd ${HOME}/project/tensorrt_demos/mtcnn
    $ make
    $ ./create_engines
  2. Build the Cython code if it has not been done yet. Refer to step 3 in Demo #1.

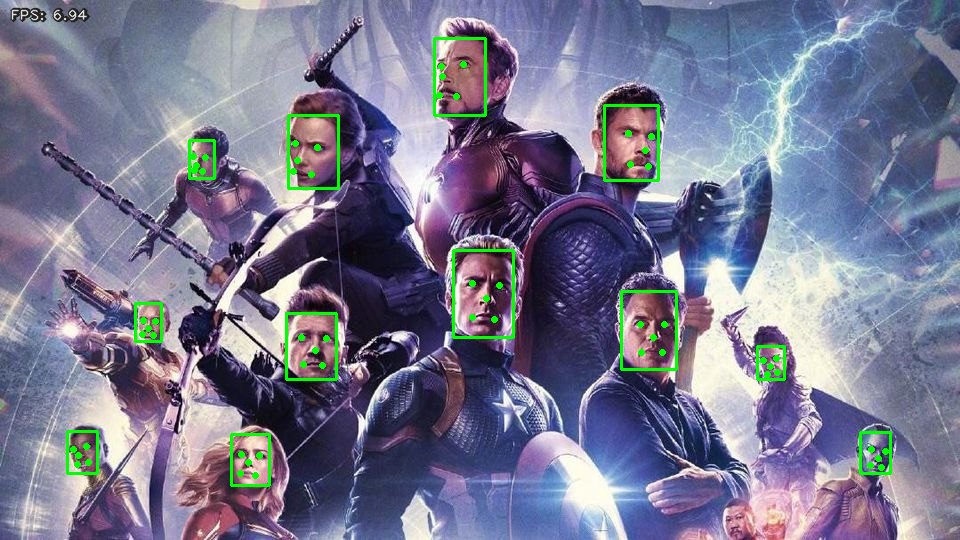
  3. Run the "trt_mtcnn.py" demo program. For example, I grabbed from the internet a poster of The Avengers for testing.

    $ cd ${HOME}/project/tensorrt_demos
    $ python3 trt_mtcnn.py --image ${HOME}/Pictures/avengers.jpg

    Here's the result (JetPack-4.2.2, i.e. TensorRT 5).

    Avengers faces detected

  4. The "trt_mtcnn.py" demo program could also take various image inputs. Refer to step 5 in Demo #1 for details.

  5. Check out my related blog posts:

Demo #3: SSD

This demo shows how to convert pre-trained tensorflow Single-Shot Multibox Detector (SSD) models through UFF to TensorRT engines, and to do real-time object detection with the TensorRT engines.

NOTE: This particular demo requires TensorRT "Python API", which is only available in TensorRT 5.x+ on the Jetson systems. In other words, this demo only works on Jetson systems properly set up with JetPack-4.2+, but not JetPack-3.x or earlier versions.

Assuming this repository has been cloned at "${HOME}/project/tensorrt_demos", follow these steps:

  1. Install requirements (pycuda, etc.) and build TensorRT engines from the pre-trained SSD models.

    $ cd ${HOME}/project/tensorrt_demos/ssd
    $ ./install.sh
    $ ./build_engines.sh

    NOTE: On my Jetson Nano DevKit with TensorRT 5.1.6, the version number of UFF converter was "0.6.3". When I ran "build_engine.py", the UFF library actually printed out: UFF has been tested with tensorflow 1.12.0. Other versions are not guaranteed to work. So I would strongly suggest you to use tensorflow 1.12.x (or whatever matching version for the UFF library installed on your system) when converting pb to uff.

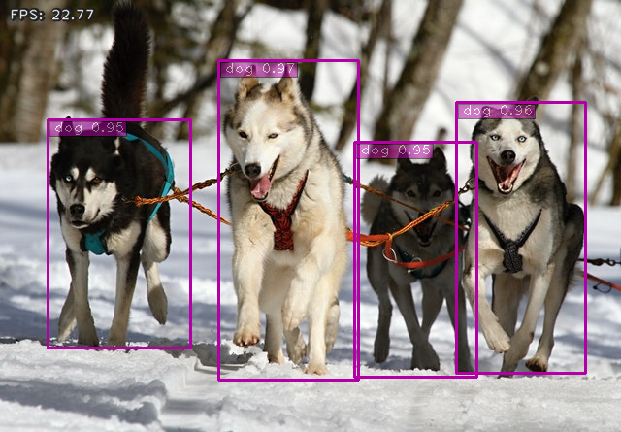
  2. Run the "trt_ssd.py" demo program. The demo supports 4 models: "ssd_mobilenet_v1_coco", "ssd_mobilenet_v1_egohands", "ssd_mobilenet_v2_coco", or "ssd_mobilenet_v2_egohands". For example, I tested the "ssd_mobilenet_v1_coco" model with the "huskies" picture.

    $ cd ${HOME}/project/tensorrt_demos
    $ python3 trt_ssd.py --image ${HOME}/project/tf_trt_models/examples/detection/data/huskies.jpg \
                         --model ssd_mobilenet_v1_coco

    Here's the result (JetPack-4.2.2, i.e. TensorRT 5). Frame rate was good (over 20 FPS).

    Huskies detected

    NOTE: When running this demo with TensorRT 6 (JetPack-4.3) on the Jetson Nano, I encountered the following error message which could probably be ignored for now. Quote from NVIDIA's NVES_R: This is a known issue and will be fixed in a future version.

    [TensorRT] ERROR: Could not register plugin creator: FlattenConcat_TRT in namespace
    

    I also tested the "ssd_mobilenet_v1_egohands" (hand detector) model with a video clip from YouTube, and got the following result. Again, frame rate was pretty good. But the detection didn't seem very accurate though :-(

    $ python3 trt_ssd.py --video ${HOME}/Videos/Nonverbal_Communication.mp4 \
                         --model ssd_mobilenet_v1_egohands

    (Click on the image below to see the whole video clip...)

    Hands detected

  3. The "trt_ssd.py" demo program could also take various image inputs. Refer to step 5 in Demo #1 again.

  4. Referring to this comment, "#TODO enable video pipeline", in the original TRT_object_detection code, I did implement an "async" version of ssd detection code to do just that. When I tested "ssd_mobilenet_v1_coco" on the same huskies image with the async demo program on the Jetson Nano DevKit, frame rate improved 3~4 FPS.

    $ cd ${HOME}/project/tensorrt_demos
    $ python3 trt_ssd_async.py --image ${HOME}/project/tf_trt_models/examples/detection/data/huskies.jpg \
                               --model ssd_mobilenet_v1_coco
  5. To verify accuracy (mAP) of the optimized TensorRT engines and make sure they do not degrade too much (due to reduced floating-point precision of "FP16") from the original TensorFlow frozen inference graphs, you could prepare validation data and run "eval_ssd.py". Refer to README_mAP.md for details.

    I compared mAP of the TensorRT engine and the original tensorflow model for both "ssd_mobilenet_v1_coco" and "ssd_mobilenet_v2_coco" using COCO "val2017" data. The results were good. In both cases, mAP of the optimized TensorRT engine matched the original tensorflow model. The FPS (frames per second) numbers in the table were measured using "trt_ssd_async.py" on my Jetson Nano DevKit with JetPack-4.3.

    TensorRT engine mAP @
    IoU=0.5:0.95
    mAP @
    IoU=0.5
    FPS on Nano
    mobilenet_v1 TF 0.232 0.351 --
    mobilenet_v1 TRT (FP16) 0.232 0.351 27.7
    mobilenet_v2 TF 0.248 0.375 --
    mobilenet_v2 TRT (FP16) 0.248 0.375 22.7
  6. Check out my blog posts for implementation details:

Demo #4: YOLOv3

(Merged with Demo #5: YOLOv4...)

Demo #5: YOLOv4

Along the same line as Demo #3, these 2 demos showcase how to convert pre-trained yolov3 and yolov4 models through ONNX to TensorRT engines. The code for these 2 demos has gone through some significant changes. More specifically, I have recently updated the implementation with a "yolo_layer" plugin to speed up inference time of the yolov3/yolov4 models.

My current "yolo_layer" plugin implementation is based on TensorRT's IPluginV2IOExt. It only works for TensorRT 6+. I'm thinking about updating the code to support TensorRT 5 if I have time late on.

I developed my "yolo_layer" plugin by referencing similar plugin code by wang-xinyu and dongfangduoshou123. So big thanks to both of them.

Assuming this repository has been cloned at "${HOME}/project/tensorrt_demos", follow these steps:

  1. Install "pycuda".

    $ cd ${HOME}/project/tensorrt_demos/yolo
    $ ./install_pycuda.sh
  2. Install version "1.9.0" of python3 "onnx" module. Note that the "onnx" module would depend on "protobuf" as stated in the Prerequisite section.

    $ sudo pip3 install onnx==1.9.0
  3. Go to the "plugins/" subdirectory and build the "yolo_layer" plugin. When done, a "libyolo_layer.so" would be generated.

    $ cd ${HOME}/project/tensorrt_demos/plugins
    $ make
  4. Download the pre-trained yolov3/yolov4 COCO models and convert the targeted model to ONNX and then to TensorRT engine. I use "yolov4-416" as example below. (Supported models: "yolov3-tiny-288", "yolov3-tiny-416", "yolov3-288", "yolov3-416", "yolov3-608", "yolov3-spp-288", "yolov3-spp-416", "yolov3-spp-608", "yolov4-tiny-288", "yolov4-tiny-416", "yolov4-288", "yolov4-416", "yolov4-608", "yolov4-csp-256", "yolov4-csp-512", "yolov4x-mish-320", "yolov4x-mish-640", and custom models such as "yolov4-416x256".)

    $ cd ${HOME}/project/tensorrt_demos/yolo
    $ ./download_yolo.sh
    $ python3 yolo_to_onnx.py -m yolov4-416
    $ python3 onnx_to_tensorrt.py -m yolov4-416

    The last step ("onnx_to_tensorrt.py") takes a little bit more than half an hour to complete on my Jetson Nano DevKit. When that is done, the optimized TensorRT engine would be saved as "yolov4-416.trt".

    In case "onnx_to_tensorrt.py" fails (process "Killed" by Linux kernel), it could likely be that the Jetson platform runs out of memory during conversion of the TensorRT engine. This problem might be solved by adding a larger swap file to the system. Reference: Process killed in onnx_to_tensorrt.py Demo#5.

  5. Test the TensorRT "yolov4-416" engine with the "dog.jpg" image.

    $ cd ${HOME}/project/tensorrt_demos
    $ wget https://raw.githubusercontent.com/pjreddie/darknet/master/data/dog.jpg -O ${HOME}/Pictures/dog.jpg
    $ python3 trt_yolo.py --image ${HOME}/Pictures/dog.jpg \
                          -m yolov4-416

    This is a screenshot of the demo against JetPack-4.4, i.e. TensorRT 7.

    "yolov4-416" detection result on dog.jpg

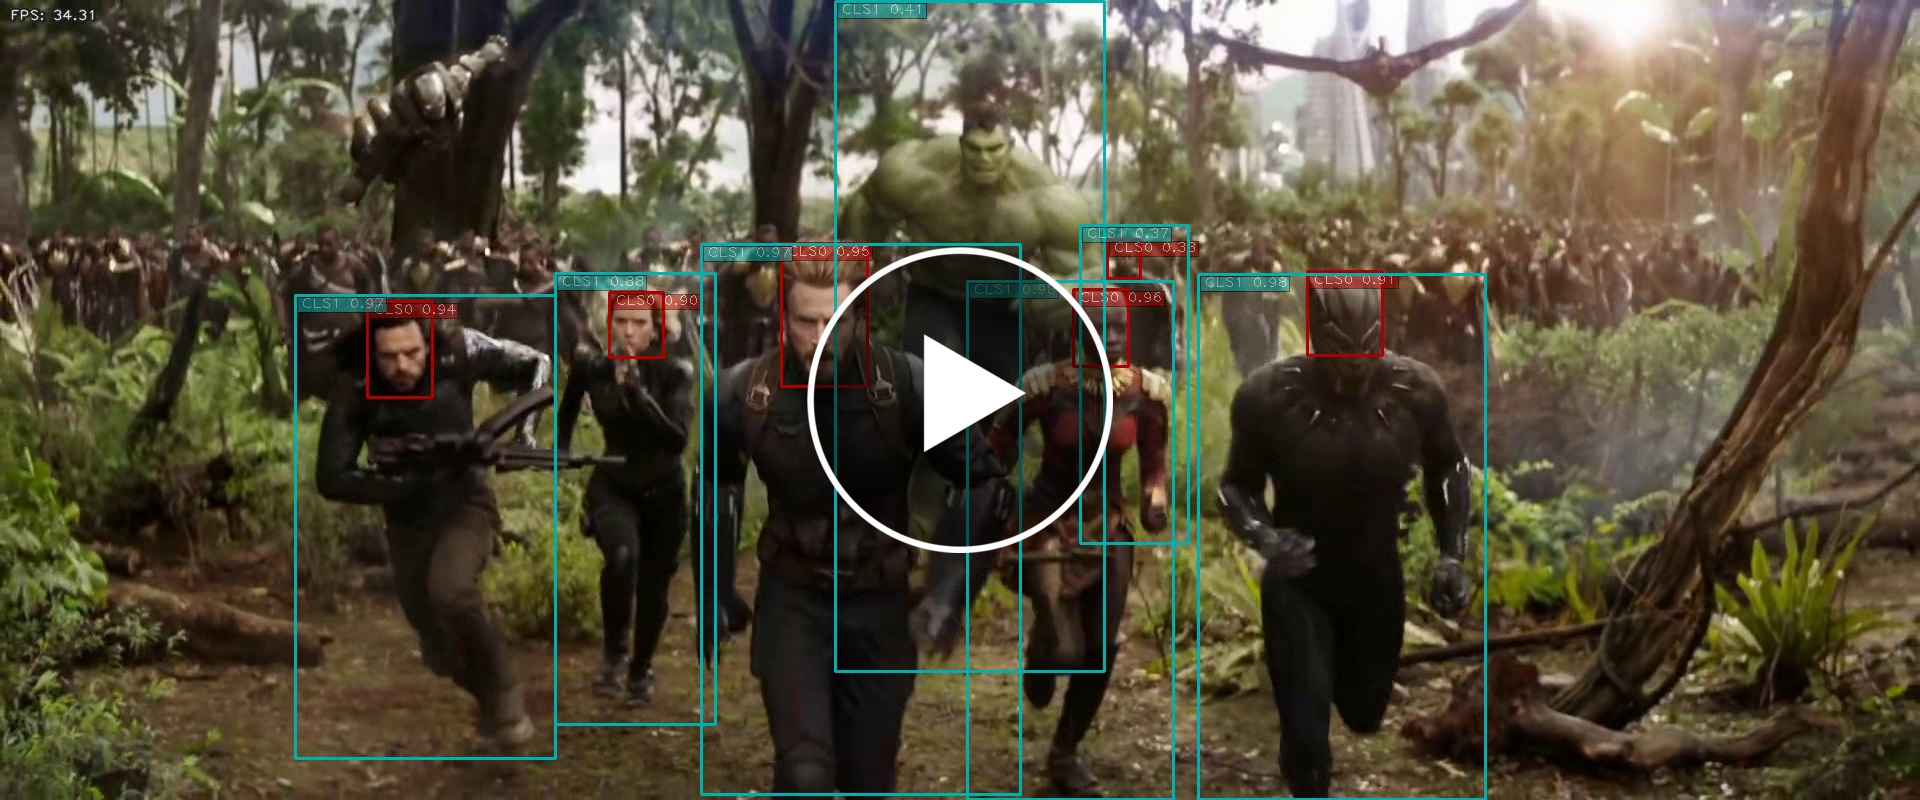
  6. The "trt_yolo.py" demo program could also take various image inputs. Refer to step 5 in Demo #1 again.

    For example, I tested my own custom trained "yolov4-crowdhuman-416x416" TensorRT engine with the "Avengers: Infinity War" movie trailer:

    Testing with the Avengers: Infinity War trailer

  7. (Optional) Test other models than "yolov4-416".

  8. (Optional) If you would like to stream TensorRT YOLO detection output over the network and view the results on a remote host, check out my trt_yolo_mjpeg.py example.

  9. Similar to step 5 of Demo #3, I created an "eval_yolo.py" for evaluating mAP of the TensorRT yolov3/yolov4 engines. Refer to README_mAP.md for details.

    $ python3 eval_yolo.py -m yolov3-tiny-288
    $ python3 eval_yolo.py -m yolov4-tiny-416
    ......
    $ python3 eval_yolo.py -m yolov4-608
    $ python3 eval_yolo.py -l -m yolov4-csp-256
    ......
    $ python3 eval_yolo.py -l -m yolov4x-mish-640

    I evaluated all these TensorRT yolov3/yolov4 engines with COCO "val2017" data and got the following results. I also checked the FPS (frames per second) numbers on my Jetson Nano DevKit with JetPack-4.4 (TensorRT 7).

    TensorRT engine mAP @
    IoU=0.5:0.95
    mAP @
    IoU=0.5
    FPS on Nano
    yolov3-tiny-288 (FP16) 0.077 0.158 35.8
    yolov3-tiny-416 (FP16) 0.096 0.202 25.5
    yolov3-288 (FP16) 0.331 0.601 8.16
    yolov3-416 (FP16) 0.373 0.664 4.93
    yolov3-608 (FP16) 0.376 0.665 2.53
    yolov3-spp-288 (FP16) 0.339 0.594 8.16
    yolov3-spp-416 (FP16) 0.391 0.664 4.82
    yolov3-spp-608 (FP16) 0.410 0.685 2.49
    yolov4-tiny-288 (FP16) 0.179 0.344 36.6
    yolov4-tiny-416 (FP16) 0.196 0.387 25.5
    yolov4-288 (FP16) 0.376 0.591 7.93
    yolov4-416 (FP16) 0.459 0.700 4.62
    yolov4-608 (FP16) 0.488 0.736 2.35
    yolov4-csp-256 (FP16) 0.336 0.502 12.8
    yolov4-csp-512 (FP16) 0.436 0.630 4.26
    yolov4x-mish-320 (FP16) 0.400 0.581 4.79
    yolov4x-mish-640 (FP16) 0.470 0.668 1.46
  10. Check out my blog posts for implementation details:

Demo #6: Using INT8 and DLA core

NVIDIA introduced INT8 TensorRT inferencing since CUDA compute 6.1+. For the embedded Jetson product line, INT8 is available on Jetson AGX Xavier and Xavier NX. In addition, NVIDIA further introduced Deep Learning Accelerator (NVDLA) on Jetson Xavier NX. I tested both features on my Jetson Xavier NX DevKit, and shared the source code in this repo.

Please make sure you have gone through the steps of Demo #5 and are able to run TensorRT yolov3/yolov4 engines successfully, before following along:

  1. In order to use INT8 TensorRT, you'll first have to prepare some images for "calibration". These images for calibration should cover all distributions of possible image inputs at inference time. According to official documentation, 500 of such images are suggested by NVIDIA. As an example, I used 1,000 images from the COCO "val2017" dataset for that purpose. Note that I've previously downloaded the "val2017" images for mAP evaluation.

    $ cd ${HOME}/project/tensorrt_demos/yolo
    $ mkdir calib_images
    ### randomly pick and copy over 1,000 images from "val207"
    $ for jpg in $(ls -1 ${HOME}/data/coco/images/val2017/*.jpg | sort -R | head -1000); do \
        cp ${HOME}/data/coco/images/val2017/${jpg} calib_images/; \
      done

    When this is done, the 1,000 images for calibration should be present in the "${HOME}/project/tensorrt_demos/yolo/calib_images/" directory.

  2. Build the INT8 TensorRT engine. I use the "yolov3-608" model in the example commands below. (I've also created a "build_int8_engines.sh" script to facilitate building multiple INT8 engines at once.) Note that building the INT8 TensorRT engine on Jetson Xavier NX takes quite long. By enabling verbose logging ("-v"), you would be able to monitor the progress more closely.

    $ ln -s yolov3-608.cfg yolov3-int8-608.cfg
    $ ln -s yolov3-608.onnx yolov3-int8-608.onnx
    $ python3 onnx_to_tensorrt.py -v --int8 -m yolov3-int8-608
    
  3. (Optional) Build the TensorRT engines for the DLA cores. I use the "yolov3-608" model as example again. (I've also created a "build_dla_engines.sh" script for building multiple DLA engines at once.)

    $ ln -s yolov3-608.cfg yolov3-dla0-608.cfg
    $ ln -s yolov3-608.onnx yolov3-dla0-608.onnx
    $ python3 onnx_to_tensorrt.py -v --int8 --dla_core 0 -m yolov3-dla0-608
    $ ln -s yolov3-608.cfg yolov3-dla1-608.cfg
    $ ln -s yolov3-608.onnx yolov3-dla1-608.onnx
    $ python3 onnx_to_tensorrt.py -v --int8 --dla_core 1 -m yolov3-int8-608
    
  4. Test the INT8 TensorRT engine with the "dog.jpg" image.

    $ cd ${HOME}/project/tensorrt_demos
    $ python3 trt_yolo.py --image ${HOME}/Pictures/dog.jpg \
                          -m yolov3-int8-608

    (Optional) Also test the DLA0 and DLA1 TensorRT engines.

    $ python3 trt_yolo.py --image ${HOME}/Pictures/dog.jpg \
                          -m yolov3-dla0-608
    $ python3 trt_yolo.py --image ${HOME}/Pictures/dog.jpg \
                          -m yolov3-dla1-608
  5. Evaluate mAP of the INT8 and DLA TensorRT engines.

    $ python3 eval_yolo.py -m yolov3-int8-608
    $ python3 eval_yolo.py -m yolov3-dla0-608
    $ python3 eval_yolo.py -m yolov3-dla1-608
  6. I tested the 5 original yolov3/yolov4 models on my Jetson Xavier NX DevKit with JetPack-4.4 (TensorRT 7.1.3.4). Here are the results.

    The following FPS numbers were measured under "15W 6CORE" mode, with CPU/GPU clocks set to maximum value (sudo jetson_clocks).

    TensorRT engine FP16 INT8 DLA0 DLA1
    yolov3-tiny-416 58 65 42 42
    yolov3-608 15.2 23.1 14.9 14.9
    yolov3-spp-608 15.0 22.7 14.7 14.7
    yolov4-tiny-416 57 60 X X
    yolov4-608 13.8 20.5 8.97 8.97
    yolov4-csp-512 19.8 27.8 -- --
    yolov4x-mish-640 9.01 14.1 -- --

    And the following are "mAP@IoU=0.5:0.95" / "mAP@IoU=0.5" of those TensorRT engines.

    TensorRT engine FP16 INT8 DLA0 DLA1
    yolov3-tiny-416 0.096 / 0.202 0.094 / 0.198 0.096 / 0.199 0.096 / 0.199
    yolov3-608 0.376 / 0.665 0.378 / 0.670 0.378 / 0.670 0.378 / 0.670
    yolov3-spp-608 0.410 / 0.685 0.407 / 0.681 0.404 / 0.676 0.404 / 0.676
    yolov4-tiny-416 0.196 / 0.387 0.190 / 0.376 X X
    yolov4-608 0.488 / 0.736 0.317 / 0.507 0.474 / 0.727 0.473 / 0.726
    yolov4-csp-512 0.436 / 0.630 0.391 / 0.577 -- --
    yolov4x-mish-640 0.470 / 0.668 0.434 / 0.631 -- --
  7. Issues:

    • For some reason, I'm not able to build DLA TensorRT engines for the "yolov4-tiny-416" model. I have reported the issue to NVIDIA.
    • There is no method in TensorRT 7.1 Python API to specifically set DLA core at inference time. I also reported this issue to NVIDIA. When testing, I simply deserialize the TensorRT engines onto Jetson Xavier NX. I'm not 100% sure whether the engine is really executed on DLA core 0 or DLA core 1.
    • mAP of the INT8 TensorRT engine of the "yolov4-608" model is not good. Originally, I thought it was an issue of TensorRT library's handling of "Concat" nodes. But after some more investigation, I saw that was not the case. Currently, I'm still not sure what the problem is...

Demo #7: MODNet

This demo illustrates the use of TensorRT to optimize an image segmentation model. More specifically, I build and test a TensorRT engine from the pre-trained MODNet to do real-time image/video "matting". The PyTorch MODNet model comes from ZHKKKe/MODNet. Note that, as stated by the original auther, this pre-trained model is under Creative Commons Attribution NonCommercial ShareAlike 4.0 license. Thanks to ZHKKKe for sharing the model and inference code.

This MODNet model contains InstanceNorm2d layers, which are only supported in recent versions of TensorRT. So far I have only tested the code with TensorRT 7.1 and 7.2. I don't guarantee the code would work for older versions of TensorRT.

To make the demo simpler to follow, I have already converted the PyTorch MODNet model to ONNX ("modnet/modnet.onnx"). If you'd like to do the PyTorch-to-ONNX conversion by yourself, you could refer to modnet/README.md.

Here is the step-by-step guide for the demo:

  1. Install "pycuda" in case you haven't done so before.

    $ cd ${HOME}/project/tensorrt_demos/modnet
    $ ./install_pycuda.sh
  2. Build TensorRT engine from "modnet/modnet.onnx".

    This step would be easy if you are using TensorRT 7.2 or later. Just use the "modnet/onnx_to_tensorrt.py" script: (You could optionally use "-v" command-line option to see verbose logs.)

    $ python3 onnx_to_tensorrt.py modnet.onnx modnet.engine

    When "onnx_to_tensorrt.py" finishes, the "modnet.engine" file should be generated. And you could go to step #3.

    In case you are using TensorRT 7.1 (JetPack-4.5 or JetPack-4.4), "modnet/onnx_to_tensorrt.py" wouldn't work due to this error (which has been fixed in TensorRT 7.2): UNSUPPORTED_NODE: Assertion failed: !isDynamic(tensorPtr->getDimensions()) && "InstanceNormalization does not support dynamic inputs!". I worked around the problem by building onnx-tensorrt by myself. Here's how you could do it too.

    $ cd ${HOME}/project/tensorrt_demos/modnet
    ### check out the "onnx-tensorrt" submodule
    $ git submodule update --init --recursive
    ### patch CMakeLists.txt
    $ sed -i '21s/cmake_minimum_required(VERSION 3.13)/#cmake_minimum_required(VERSION 3.13)/' \
          onnx-tensorrt/CMakeLists.txt
    ### build onnx-tensorrt
    $ mkdir -p onnx-tensorrt/build
    $ cd onnx-tensorrt/build
    $ cmake -DCMAKE_CXX_FLAGS=-I/usr/local/cuda/targets/aarch64-linux/include \
            -DONNX_NAMESPACE=onnx2trt_onnx ..
    $ make -j4
    ### finally, we could build the TensorRT (FP16) engine
    $ cd ${HOME}/project/tensorrt_demos/modnet
    $ LD_LIBRARY_PATH=$(pwd)/onnx-tensorrt/build \
          onnx-tensorrt/build/onnx2trt modnet.onnx -o modnet.engine \
                                       -d 16 -v
    
  3. Test the TensorRT MODNet engine with "modnet/image.jpg".

    $ cd ${HOME}/project/tensorrt_demos
    $ python3 trt_modnet.py --image modnet/image.jpg

    You could see the matted image as below. Note that I get ~21 FPS when running the code on Jetson Xavier NX with JetPack-4.5.

    Matted modnet/image.jpg

  4. The "trt_modnet.py" demo program could also take various image inputs. Refer to step 5 in Demo #1 again. (For example, the "--usb" command-line option would be useful.)

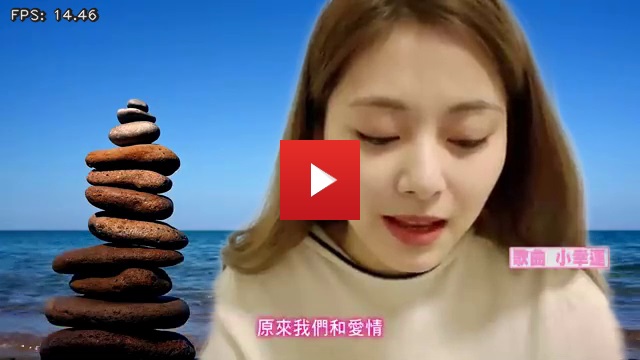
  5. Instead of a boring black background, you could use the "--background" option to specify an alternative background. The background could be either a still image or a video file. Furthermore, you could also use the "--create_video" option to save the matted outputs as a video file.

    For example, I took a Chou, Tzu-Yu video and a beach video, and created a blended video like this:

    $ cd ${HOME}/project/tensorrt_demos
    $ python3 trt_modnet.py --video Tzu-Yu.mp4 \
                            --background beach.mp4 \
                            --demo_mode \
                            --create_video output

    The result would be saved as "output.ts" on Jetson Xavier NX (or "output.mp4" on x86_64 PC).

    Video Matting Demo | TensorRT MODNet

Licenses

  1. I referenced source code of NVIDIA/TensorRT samples to develop most of the demos in this repository. Those NVIDIA samples are under Apache License 2.0.
  2. GoogLeNet: "This model is released for unrestricted use."
  3. MTCNN: license not specified. Note the original MTCNN is under MIT License.
  4. TensorFlow Object Detection Models: Apache License 2.0.
  5. YOLOv3/YOLOv4 models (DarkNet): YOLO LICENSE.
  6. MODNet: Creative Commons Attribution NonCommercial ShareAlike 4.0 license.
  7. For the rest of the code (developed by jkjung-avt and other contributors): MIT License.

tensorrt_demos's People

Contributors

bartoszptak avatar bigjoon avatar brianegge avatar jkjung-avt avatar joelosw avatar philipp-schmidt avatar praneet9 avatar satyajitghana avatar shubham-shahh avatar sivaram1207 avatar vaibhawvipul avatar x123y123 avatar y-okumura-isp avatar

Stargazers

 avatar  avatar  avatar  avatar  avatar  avatar  avatar  avatar  avatar  avatar  avatar  avatar  avatar  avatar  avatar  avatar  avatar  avatar  avatar  avatar  avatar  avatar  avatar  avatar  avatar  avatar  avatar  avatar  avatar  avatar  avatar  avatar  avatar  avatar  avatar  avatar  avatar  avatar  avatar  avatar  avatar  avatar  avatar  avatar  avatar  avatar  avatar  avatar  avatar  avatar  avatar  avatar  avatar  avatar  avatar  avatar  avatar  avatar  avatar  avatar  avatar  avatar  avatar  avatar  avatar  avatar  avatar  avatar  avatar  avatar  avatar  avatar  avatar  avatar  avatar  avatar  avatar  avatar  avatar  avatar  avatar  avatar  avatar  avatar  avatar  avatar  avatar  avatar  avatar  avatar  avatar  avatar  avatar  avatar  avatar  avatar  avatar  avatar  avatar  avatar

Watchers

 avatar  avatar  avatar  avatar  avatar  avatar  avatar  avatar  avatar  avatar  avatar  avatar  avatar  avatar  avatar  avatar  avatar  avatar  avatar  avatar  avatar  avatar  avatar  avatar  avatar  avatar  avatar

tensorrt_demos's Issues

Multiple BBoxes with SSD

Hello Jk,

I have confirmed SSD works with Xavier and is running at 130FPS using async!! Amazing.

Question: When running the SSD demo, are using NMS? It seems when I run it with a live camera feed, there are multiple boxes around each object. This isnt the same issue as when using a single image.

Thanks!

yolov3_onnx, onnx_to_tensorrt.py <tensorrt.tensorrt.Builder object at 0x7f5d678a78>, 0 bug

Hi
I tried this steps.

$ cd ${HOME}/project/tensorrt_demos/yolov3_onnx $ ./download_yolov3.sh $ python3 yolov3_to_onnx.py --model yolov3-tiny-416 $ python3 onnx_to_tensorrt.py --model yolov3-tiny-416

"python3 onnx_to_tensorrt.py --model yolov3-tiny-416" in this step I get the error:

Traceback (most recent call last): File "onnx_to_tensorrt.py", line 119, in <module> main() File "onnx_to_tensorrt.py", line 115, in main _ = build_engine(onnx_file_path, engine_file_path, args.verbose) File "onnx_to_tensorrt.py", line 69, in build_engine with trt.Builder(TRT_LOGGER) as builder, builder.create_network(EXPLICIT_BATCH) as network, trt.OnnxParser(network, TRT_LOGGER) as parser: TypeError: create_network(): incompatible function arguments. The following argument types are supported: 1. (self: tensorrt.tensorrt.Builder) -> tensorrt.tensorrt.INetworkDefinition Invoked with: <tensorrt.tensorrt.Builder object at 0x7f5d678a78>, 0

and I encountered this output during this command. I don't know if there is a problem " python3 yolov3_to_onnx.py --model yolov3-tiny-416"

Layer of type yolo not supported, skipping ONNX node generation. Layer of type yolo not supported, skipping ONNX node generation. graph yolov3-tiny-416 ( %000_net[FLOAT, 1x3x416x416] ) initializers ( %001_convolutional_bn_scale[FLOAT, 16] %001_convolutional_bn_bias[FLOAT, 16] %001_convolutional_bn_mean[FLOAT, 16] %001_convolutional_bn_var[FLOAT, 16] %001_convolutional_conv_weights[FLOAT, 16x3x3x3] %003_convolutional_bn_scale[FLOAT, 32] %003_convolutional_bn_bias[FLOAT, 32] %003_convolutional_bn_mean[FLOAT, 32] %003_convolutional_bn_var[FLOAT, 32] %003_convolutional_conv_weights[FLOAT, 32x16x3x3] %005_convolutional_bn_scale[FLOAT, 64] %005_convolutional_bn_bias[FLOAT, 64] %005_convolutional_bn_mean[FLOAT, 64] %005_convolutional_bn_var[FLOAT, 64] %005_convolutional_conv_weights[FLOAT, 64x32x3x3] %007_convolutional_bn_scale[FLOAT, 128] %007_convolutional_bn_bias[FLOAT, 128] %007_convolutional_bn_mean[FLOAT, 128] %007_convolutional_bn_var[FLOAT, 128] %007_convolutional_conv_weights[FLOAT, 128x64x3x3] %009_convolutional_bn_scale[FLOAT, 256] %009_convolutional_bn_bias[FLOAT, 256]

Can you help me pls. I couldn't convert my yolov3 model to onnx_model.
I plan to use this onnx model to convert it to TRT C++ API

Running MTCNN with tensorrt

I have some confusion here.
I run MTCNN without tensorrt by demo in here : jetson_nano_demo
and compare with your code for MTCNN with tensorrt
I realize when use tensorrt FPS is nearly same

build ssd engine failed

[TensorRT] ERROR: Could not register plugin creator: FlattenConcat_TRT in namespace:
WARNING: To create TensorRT plugin nodes, please use the create_plugin_node function instead.
NOTE: UFF has been tested with TensorFlow 1.14.0.
WARNING: The version of TensorFlow installed on this system is not guaranteed to work with UFF.
UFF Version 0.6.5
=== Automatically deduced input nodes ===
[name: "Input"
op: "Placeholder"
attr {
key: "shape"
value {
shape {
dim {
size: 1
}
dim {
size: 3
}
dim {
size: 300
}
dim {
size: 300
}
}
}
}
]

Using output node NMS
Converting to UFF graph
Warning: No conversion function registered for layer: NMS_TRT yet.
Converting NMS as custom op: NMS_TRT
Warning: No conversion function registered for layer: FlattenConcat_TRT yet.
Converting concat_box_conf as custom op: FlattenConcat_TRT
Traceback (most recent call last):
File "build_engine.py", line 204, in
main()
File "build_engine.py", line 187, in main
debug_mode=DEBUG_UFF)
File "/usr/local/lib/python3.6/site-packages/uff/converters/tensorflow/conversion_helpers.py", line 178, in from_tensorflow
debug_mode=debug_mode)
File "/usr/local/lib/python3.6/site-packages/uff/converters/tensorflow/converter.py", line 94, in convert_tf2uff_graph
uff_graph, input_replacements, debug_mode=debug_mode)
File "/usr/local/lib/python3.6/site-packages/uff/converters/tensorflow/converter.py", line 79, in convert_tf2uff_node
op, name, tf_node, inputs, uff_graph, tf_nodes=tf_nodes, debug_mode=debug_mode)
File "/usr/local/lib/python3.6/site-packages/uff/converters/tensorflow/converter.py", line 47, in convert_layer
return cls.registry_[op](name, tf_node, inputs, uff_graph, **kwargs)
File "/usr/local/lib/python3.6/site-packages/uff/converters/tensorflow/converter_functions.py", line 21, in convert_placeholder
dtype = tf2uff.convert_tf2numpy_dtype(tf_node.attr['dtype'].type)
File "/usr/local/lib/python3.6/site-packages/uff/converters/tensorflow/converter.py", line 103, in convert_tf2numpy_dtype
return tf.as_dtype(dtype).as_numpy_dtype
File "/usr/local/lib/python3.6/site-packages/tensorflow/python/framework/dtypes.py", line 712, in as_dtype
raise TypeError("Cannot convert value %r to a TensorFlow DType." % type_value)
TypeError: Cannot convert value 0 to a TensorFlow DType.

linux 16.04
cuda10.0
cudnn7.6.5
Tensorrt 6.0.1.5
tensorflow 1.12
python 3.6

command line: python3 build_engine.py ssd_mobilenet_v2_egohands

PyCuda logic error on jetson nano with latest image

I have carefully followed your instruction and I can able to run the python yolo/ssd sample code.

But When I integrate the same code into my multi-threaded application I am getting the below error.

yolov3.py", line 282, in allocate_buffers

stream = cuda.Stream()
pycuda._driver.LogicError: explicit_context_dependent failed: invalid device context - no currently active context?

please advise

How to inference own yolo model ?

@jkjung-avt
I try your thoughts in this Disqus post , and put my custom yolo weight & cfg in /yolov3_onnx.
Then excute python3 yolov3_to_onnx.py --model yolov3-416
I got the error below the figure
trt_problem
Can you give me some advice ?
Thanks you a lot ...

The problem of yolov3_onnx

Followed the Demo #4: YOLOv3
when i execute this command at step3
python3 yolov3_to_onnx.py --model yolov3-tiny-416
I got the error below figure
problem_1
I already update my protobuf to a recent version
Do you have any suggestions ?

Unable to get tegra-cam-caffe.py tegra-cam.py?

I read your blog 'How to Capture Camera Video and Do Caffe Inferencing with Python on Jetson TX2' and 'How to Capture and Display Camera Video with Python on Jetson TX2 '
These two files cannot be obtained. I don't want to go through the firewall. Can you send me files by email? I suggest you place a new link without going through the firewall. Thanks!

slow with batch size > 1

Hi,
I set max_batch_size = 3 and I want to speed up model with 3 input image as parallel instead serial,
But I converted the model with batch_size = 3 correctly, when I run trt_ssd.py, I achieve this results:
for 1 batch_size : process time is 0.002 sec with 1080 TI,
for 3 batch_size : process time is 0.006 sec with 1080 TI,
That means the system process as serial not parallel, why?

more Facial landmark in mtcnn

@jkjung-avt ,
Thanks for your work.

how to get 68 points facial landmark (as like dlib) using MTCNN.
currently, it's giving only 5 facial points.
Since I want to do head pose estimation I am need of the other facial points

please advise.

Yolov3 Performance on Xavier Jetpack 4.2.2 TensorRT5

Hi Jk!

What an update you made! Just wanted to let you know that there is no issues with the yolo models... I just want to give you some more numbers all tested on the Xavier.

Yolo-288 (FP16) = ~31 FPS
Yolo-416 (FP16) = ~20 FPS
Yolo-608 (FP16) = ~12 FPS

Thank you for all your hard work and awesome documentation.

Cheers 😄

mtcnn optimization is input dependent

Your optimization of mtcnn is specifically designed for 720p input image. While other size may be scaled or padded to fit into 720p. The failure case may be an input of portrait rather than landscape. In this case, images are heavily squeezed and make it impossible to detect small faces. Is there any plan to make it input independent?

train my caffemodel error

I want to train MobileNet-YOLOv3 caffemodel so that I can transplant it on TX2.
But when I use MobileNet-YOLOv3 to train my dataset, error occurred.

Opened lmdb /home/gzz/data/VOCdevkit/MyDataSet/lmdb/MyDataSet_trainval_lmdb/
I1018 09:27:19.771530 17056 annotated_data_layer.cpp:78] output data size: 4,3,608,608
[libprotobuf ERROR google/protobuf/text_format.cc:274] Error parsing text-format caffe.YoloSegLabel: 4:15: Message type "caffe.YoloSegItem" has no field named "display_name".
F1018 09:27:19.771678 17056 annotated_data_layer.cpp:134] Check failed: ReadProtoFromTextFile(label_map_file_, &label_map_) Failed to read label map file.

How should I do?

Define New Activation Layer

Hi,
I want to use mobilenet_v3 module in my network, and in this module is used HardSwitch activation such this:

def relu6(x):
    return tf.nn.relu(x)

def hard_swish(x):
    return x * tf.nn.relu(x + 3.0) / 6.0

def return_activation(x, nl):
    if nl == 'HS':
        x = Activation(hard_swish)(x)
    if nl == 'RE':
        x = Activation(relu6)(x)
    return x

If I want to convert to UFF and TensorRT, I should use a plugin for these layers? If so, How do I do for writing a custom plugin?

jetson tx2 yolov3_to_onnx.py bug

IMG_4909
I run the script yolov3_to_onnx.py on jetsontx2 with jetpack4.2.1 onnx=1.4.1 and it still show the above code without change.

ssd_inception_v2_coco custom trained model with my own dataset.

I tried with ssd_inception_v2_coco custom trained model with my own dataset and the following error occurred: -

=== Automatically deduced input nodes ===
[name: "Input"
op: "Placeholder"
input: "Cast"
attr {
  key: "dtype"
  value {
    type: DT_FLOAT
  }
}
attr {
  key: "shape"
  value {
    shape {
      dim {
        size: 1
      }
      dim {
        size: 3
      }
      dim {
        size: 418
      }
      dim {
        size: 418
      }
    }
  }
}
]
=========================================

No. nodes: 721
UFF Output written to /home/sys-admin/Downloads/Projects/tensorrt_demos/ssd/tmp_inception_v2_coco.uff
UFF Text Output written to /home/sys-admin/Downloads/Projects/tensorrt_demos/ssd/tmp_inception_v2_coco.pbtxt
[TensorRT] ERROR: UffParser: Validator error: Cast: Unsupported operation _Cast
[TensorRT] ERROR: Network must have at least one output
Traceback (most recent call last):
  File "build_engine.py", line 216, in <module>
    main()
  File "build_engine.py", line 210, in main
    buf = engine.serialize()
AttributeError: 'NoneType' object has no attribute 'serialize'

ssdlite_mobilenet_v2_coco

Hi
I want to convert ssdlite_mobilenet_v2_coco with ./build_engines.sh, I get this error:
For ssd_mobilenet_v2_coco and athor models corectly convert.
AND I set num_classes = 91

python3: nmsPlugin.cpp:54: virtual nvinfer1::Dims nvinfer1::plugin::DetectionOutput::getOutputDimensions(int, const nvinfer1::Dims*, int): Assertion `nbInputDims == 3' failed.
./build_engines.sh: line 5:  7395 Aborted                 (core dumped) python3 build_engines.py ${model}

GStreamer: unable to start pipeline!

I read your blog"How to Capture and Display Camera Video with Python on Jetson TX2"
run command error!
"python3 tegra-cam.py --usb --vid 1 --width 1280 --height 720"

Called with args:
Namespace(image_height=720, image_width=1280, rtsp_latency=200, rtsp_uri=None, use_rtsp=False, use_usb=True, video_dev=1)
OpenCV version: 3.4.0
OpenCV Error: Unspecified error (GStreamer: unable to start pipeline
) in cvCaptureFromCAM_GStreamer, file /home/nvidia/src/opencv-3.4.0/modules/videoio/src/cap_gstreamer.cpp, line 890
VIDEOIO(cvCreateCapture_GStreamer (CV_CAP_GSTREAMER_FILE, filename)): raised OpenCV exception:

/home/nvidia/src/opencv-3.4.0/modules/videoio/src/cap_gstreamer.cpp:890: error: (-2) GStreamer: unable to start pipeline
in function cvCaptureFromCAM_GStreamer

Failed to open camera!

trt_outputs = [output.reshape(shape) for output, shape ValueError: cannot reshape array of size 20577 into shape (1,255,19,19)

(base) tim@tim-System-Product-Name:~/workspace/tensorrt_demos$ python trt_yolov3.py --model yolov3-608 --usb --vid 0
[TensorRT] INFO: Glob Size is 128825344 bytes.
[TensorRT] INFO: Added linear block of size 47316992
[TensorRT] INFO: Added linear block of size 23658496
[TensorRT] INFO: Added linear block of size 11829248
[TensorRT] INFO: Added linear block of size 2957312
[TensorRT] INFO: Added linear block of size 1478656
[TensorRT] INFO: Added linear block of size 739328
[TensorRT] INFO: Found Creator ResizeNearest
[TensorRT] INFO: Found Creator ResizeNearest
[TensorRT] INFO: Deserialize required 1140534 microseconds.
Traceback (most recent call last):
File "trt_yolov3.py", line 96, in
main()
File "trt_yolov3.py", line 88, in main
loop_and_detect(cam, trt_yolov3, conf_th=0.3, vis=vis)
File "trt_yolov3.py", line 56, in loop_and_detect
boxes, confs, clss = trt_yolov3.detect(img, conf_th)
File "/home/tim/workspace/tensorrt_demos/utils/yolov3.py", line 473, in detect
in zip(trt_outputs, self.output_shapes)]
File "/home/tim/workspace/tensorrt_demos/utils/yolov3.py", line 472, in
trt_outputs = [output.reshape(shape) for output, shape
ValueError: cannot reshape array of size 20577 into shape (1,255,19,19)

Unsupported operation Cast in the ssd models

Hi,
your codes run very well, but when I convert the ssdmobilenetv1/2 from tensorflow model zoo, I got this error.
Because this layer unsupported in the TensorRT, I want to convert the .pb model to .onnx model and then convert .onnx model to .uff and .bin, but I got some errors when converting to onnx model.

`NOTE: UFF has been tested with TensorFlow 1.12.0. Other versions are not guaranteed to work
WARNING: The version of TensorFlow installed on this system is not guaranteed to work with UFF.
UFF Version 0.6.3
=== Automatically deduced input nodes ===
[name: "Input"
op: "Placeholder"
input: "Cast"
attr {
key: "dtype"
value {
type: DT_FLOAT
}
}
attr {
key: "shape"
value {
shape {
dim {
size: 1
}
dim {
size: 3
}
dim {
size: 300
}
dim {
size: 300
}
}
}
}
]

Using output node NMS
Converting to UFF graph
Warning: No conversion function registered for layer: NMS_TRT yet.
Converting NMS as custom op: NMS_TRT
WARNING:tensorflow:From /usr/lib/python3.6/dist-packages/uff/converters/tensorflow/converter.py:179: The name tf.AttrValue is deprecated. Please use tf.compat.v1.AttrValue instead.

Warning: No conversion function registered for layer: FlattenConcat_TRT yet.
Converting concat_box_conf as custom op: FlattenConcat_TRT
Warning: No conversion function registered for layer: Cast yet.
Converting Cast as custom op: Cast
Warning: No conversion function registered for layer: GridAnchor_TRT yet.
Converting GridAnchor as custom op: GridAnchor_TRT
Warning: No conversion function registered for layer: FlattenConcat_TRT yet.
Converting concat_box_loc as custom op: FlattenConcat_TRT
No. nodes: 451
UFF Output written to tmp.uff
[TensorRT] ERROR: UffParser: Validator error: Cast: Unsupported operation _Cast
[TensorRT] ERROR: Network must have at least one output
Traceback (most recent call last):
File "main.py", line 44, in
buf = engine.serialize()
AttributeError: 'NoneType' object has no attribute 'serialize'`

Possible to use other caffeemodel ?

Hi, first, thank you for your amazing work, got 15 ms of inference time on my nano, really suprised about it. Was wondering if I could use any other caffeemodel than the one you tell to use ? I would like to recognize stuff like person, cycle or suitcase for exemple.

Best regards !

failed to open camera....

is any fig setting wrong?

$ python3 camera_trt_googlenet.py --usb --vid 0 --width 1280 --height 720
Called with args:
Namespace(crop_center=False, image_height=720, image_width=1280, rtsp_latency=200, rtsp_uri=None, use_rtsp=False, use_usb=True, video_dev=0)
Failed to open camera!

I changed the following one, then it's working fine thought.

def open_cam_usb(dev, width, height):
    gst_str = ('v4l2src device=/dev/video{} ! '
               'video/x-raw, width=(int){}, height=(int){} ! '
               'videoconvert ! appsink').format(dev, width, height)
    # return cv2.VideoCapture(gst_str, cv2.CAP_GSTREAMER)
    return cv2.VideoCapture(0)

Reshape Error while running Inference

Hi , i followed your code and i tried to covert for my model all went good. i used my .cfg file and .weights file, it given all .onnx and .trt file. But the thing is what i cant able to run inference its showing cant be reshape i dont know why? I changed the categories =19 as my number of classes in utils/yolov3.py file

trt_outputs = [output.reshape(shape) for output, shape Value-error: cannot reshape array of size 12168 into shape (1,255,13,13)

please give a detail explanation about the error.

Does tensorrt 4x support converting yolov3 model to onnx?

Hi,
Does tensorrt 4x support converting yolov3 model to onnx?

I have a jetson tx2 development board. My systems:
Ubuntu 16.04
TensorRT 4x
Cuda 9
CuDnn 7

I want to convert my special yolov3 model conveting to onnx model then convert to yolov3.engine.
But When I tried, I got some mistake.
Does tensorrt 4x support converting yolov3 model to onnx then yolov3.engine? and Which onnx version should I install with pip?

Thanks for your help..

AttributeError: 'NoneType' object has no attribute 'serialize'

Hi~
I use https://github.com/ultralytics/yolov3 to trained a 1 class model. when use onnx_to tensorrt.py, meet below error.

ubuntu:~/tensorrt_demos/yolov3_onnx$ python3 onnx_to_tensorrt.py
Loading ONNX file from path yolov3-416.onnx...
Beginning ONNX file parsing
Completed parsing of ONNX file
Building an engine; this may take a while...
[TensorRT] ERROR: ../builder/cudnnBuilderWeightConverters.cpp (555) - Misc Error in operator(): 1 (Weights are outside of fp16 range. A possible fix is to retrain the model with regularization to bring the magnitude of the weights down.)
[TensorRT] ERROR: ../builder/cudnnBuilderWeightConverters.cpp (555) - Misc Error in operator(): 1 (Weights are outside of fp16 range. A possible fix is to retrain the model with regularization to bring the magnitude of the weights down.)
Completed creating engine
Traceback (most recent call last):
File "onnx_to_tensorrt.py", line 119, in
main()
File "onnx_to_tensorrt.py", line 115, in main
_ = build_engine(onnx_file_path, engine_file_path, args.verbose)
File "onnx_to_tensorrt.py", line 99, in build_engine
f.write(engine.serialize())
AttributeError: 'NoneType' object has no attribute 'serialize'

ERROR: nvcc not found with tensorflow-1.15 and jetpack-4.3

Hi,
I used your wheel TensorFlow 1.15 file for install and correctly is install. but when I run ./install.sh in ssd folder, I get this error:

ERROR: nvcc not found
** Patch 'graphsurgeon.py' in TensorRT
patching file /usr/lib/python3.6/dist-packages/graphsurgeon/node_manipulation.py

** Making symbolic link of libflattenconcat.so
** Installation done

I comment this lines in install_pycuda.sh

if ! which nvcc > /dev/null; then
echo "ERROR: nvcc not found"
exit
fi

then I run the

python3 trt_ssd.py --model ssd_mobilenet_v2_egohands --image --filename hand.jpg

The output is ok and correctly I get the result but I get this error during the run the above python command :

[TensorRT] ERROR: Could not register plugin creator: FlattenConcat_TRT in namespace:

I get about 20 FPS when I run trt_ssd.py for ssd_mobilenet_v2_egohands model and I get about 2 27 FPS when I run trt_ssd_async.py, but I get more FPS with Tensorflow-1.12.2 Jetpack-4.2.2, even I get 30 FPS with run python3 trt_ssd.py --model ssd_mobilenet_v2_egohands --image --filename hand.jpg and 35 FPS with trt_ssd_async.py.

what's interesting that when I run the trt_ssd_async.py and trt_ssd.py with Tensorflow0-1.12.2 jetpack-4.2.2, I get almost unit FPS, that's mean, The FPS is changed between 29-32 FPS, but with Tensorflow-1.15.0 jetpack 4.3, The FPS is changed between 13-23 FPS for trt_ssd.py and even trt_ssd_aysnc.py, I don't know why these changes are so great, As my input image the same.

Could not install ONNX on jetson nano

when I execute the below command I am getting below error,

sudo pip3 install onnx==1.4.1

sudo pip3 install onnx==1.4.1
WARNING: The directory '/home/svnano/.cache/pip' or its parent directory is not owned or is not writable by the current user. The cache has been disabled. Check the permissions and owner of that directory. If executing pip with sudo, you may want sudo's -H flag.
Collecting onnx==1.4.1
Downloading onnx-1.4.1.tar.gz (2.9 MB)
|████████████████████████████████| 2.9 MB 6.4 MB/s
Requirement already satisfied: protobuf in /usr/local/lib/python3.6/dist-packages (from onnx==1.4.1) (3.8.0)
Requirement already satisfied: numpy in /home/svnano/.local/lib/python3.6/site-packages (from onnx==1.4.1) (1.18.1)
Requirement already satisfied: six in /home/svnano/.local/lib/python3.6/site-packages (from onnx==1.4.1) (1.14.0)
Requirement already satisfied: typing>=3.6.4 in /usr/local/lib/python3.6/dist-packages (from onnx==1.4.1) (3.7.4.1)
Requirement already satisfied: typing-extensions>=3.6.2.1 in /usr/local/lib/python3.6/dist-packages (from onnx==1.4.1) (3.7.4.1)
Requirement already satisfied: setuptools in /home/svnano/.local/lib/python3.6/site-packages (from protobuf->onnx==1.4.1) (45.1.0)
Building wheels for collected packages: onnx
Building wheel for onnx (setup.py) ... error
ERROR: Command errored out with exit status 1:
command: /usr/bin/python3 -u -c 'import sys, setuptools, tokenize; sys.argv[0] = '"'"'/tmp/pip-install-4t58g49u/onnx/setup.py'"'"'; file='"'"'/tmp/pip-install-4t58g49u/onnx/setup.py'"'"';f=getattr(tokenize, '"'"'open'"'"', open)(file);code=f.read().replace('"'"'\r\n'"'"', '"'"'\n'"'"');f.close();exec(compile(code, file, '"'"'exec'"'"'))' bdist_wheel -d /tmp/pip-wheel-2qq9qqta
cwd: /tmp/pip-install-4t58g49u/onnx/
Complete output (64 lines):
fatal: not a git repository (or any of the parent directories): .git
running bdist_wheel
running build
running build_py
running create_version
running cmake_build
-- Build type not set - defaulting to Release
-- The C compiler identification is GNU 7.4.0
-- The CXX compiler identification is GNU 7.4.0
-- Check for working C compiler: /usr/bin/cc
-- Check for working C compiler: /usr/bin/cc -- works
-- Detecting C compiler ABI info
-- Detecting C compiler ABI info - done
-- Detecting C compile features
-- Detecting C compile features - done
-- Check for working CXX compiler: /usr/bin/c++
-- Check for working CXX compiler: /usr/bin/c++ -- works
-- Detecting CXX compiler ABI info
-- Detecting CXX compiler ABI info - done
-- Detecting CXX compile features
-- Detecting CXX compile features - done
CMake Error at CMakeLists.txt:217 (message):
Protobuf compiler not found
Call Stack (most recent call first):
CMakeLists.txt:248 (relative_protobuf_generate_cpp)

-- Configuring incomplete, errors occurred!
See also "/tmp/pip-install-4t58g49u/onnx/.setuptools-cmake-build/CMakeFiles/CMakeOutput.log".
Traceback (most recent call last):
File "", line 1, in
File "/tmp/pip-install-4t58g49u/onnx/setup.py", line 328, in
'backend-test-tools = onnx.backend.test.cmd_tools:main',
File "/home/svnano/.local/lib/python3.6/site-packages/setuptools/init.py", line 145, in setup
return distutils.core.setup(**attrs)
File "/usr/lib/python3.6/distutils/core.py", line 148, in setup
dist.run_commands()
File "/usr/lib/python3.6/distutils/dist.py", line 955, in run_commands
self.run_command(cmd)
File "/usr/lib/python3.6/distutils/dist.py", line 974, in run_command
cmd_obj.run()
File "/usr/lib/python3/dist-packages/wheel/bdist_wheel.py", line 204, in run
self.run_command('build')
File "/usr/lib/python3.6/distutils/cmd.py", line 313, in run_command
self.distribution.run_command(command)
File "/usr/lib/python3.6/distutils/dist.py", line 974, in run_command
cmd_obj.run()
File "/usr/lib/python3.6/distutils/command/build.py", line 135, in run
self.run_command(cmd_name)
File "/usr/lib/python3.6/distutils/cmd.py", line 313, in run_command
self.distribution.run_command(command)
File "/usr/lib/python3.6/distutils/dist.py", line 974, in run_command
cmd_obj.run()
File "/tmp/pip-install-4t58g49u/onnx/setup.py", line 203, in run
self.run_command('cmake_build')
File "/usr/lib/python3.6/distutils/cmd.py", line 313, in run_command
self.distribution.run_command(command)
File "/usr/lib/python3.6/distutils/dist.py", line 974, in run_command
cmd_obj.run()
File "/tmp/pip-install-4t58g49u/onnx/setup.py", line 190, in run
subprocess.check_call(cmake_args)
File "/usr/lib/python3.6/subprocess.py", line 311, in check_call
raise CalledProcessError(retcode, cmd)
subprocess.CalledProcessError: Command '['/usr/bin/cmake', '-DPYTHON_INCLUDE_DIR=/usr/include/python3.6m', '-DPYTHON_EXECUTABLE=/usr/bin/python3', '-DBUILD_ONNX_PYTHON=ON', '-DCMAKE_EXPORT_COMPILE_COMMANDS=ON', '-DONNX_NAMESPACE=onnx', '-DPY_EXT_SUFFIX=.cpython-36m-aarch64-linux-gnu.so', '/tmp/pip-install-4t58g49u/onnx']' returned non-zero exit status 1.

ERROR: Failed building wheel for onnx
Running setup.py clean for onnx
Failed to build onnx
Installing collected packages: onnx
Running setup.py install for onnx ... error
ERROR: Command errored out with exit status 1:
command: /usr/bin/python3 -u -c 'import sys, setuptools, tokenize; sys.argv[0] = '"'"'/tmp/pip-install-4t58g49u/onnx/setup.py'"'"'; file='"'"'/tmp/pip-install-4t58g49u/onnx/setup.py'"'"';f=getattr(tokenize, '"'"'open'"'"', open)(file);code=f.read().replace('"'"'\r\n'"'"', '"'"'\n'"'"');f.close();exec(compile(code, file, '"'"'exec'"'"'))' install --record /tmp/pip-record-tqgfr9k6/install-record.txt --single-version-externally-managed --compile --install-headers /usr/local/include/python3.6/onnx
cwd: /tmp/pip-install-4t58g49u/onnx/
Complete output (51 lines):
fatal: not a git repository (or any of the parent directories): .git
running install
running build
running build_py
running create_version
running cmake_build
CMake Error at CMakeLists.txt:217 (message):
Protobuf compiler not found
Call Stack (most recent call first):
CMakeLists.txt:248 (relative_protobuf_generate_cpp)

-- Configuring incomplete, errors occurred!
See also "/tmp/pip-install-4t58g49u/onnx/.setuptools-cmake-build/CMakeFiles/CMakeOutput.log".
Traceback (most recent call last):
  File "<string>", line 1, in <module>
  File "/tmp/pip-install-4t58g49u/onnx/setup.py", line 328, in <module>
    'backend-test-tools = onnx.backend.test.cmd_tools:main',
  File "/home/svnano/.local/lib/python3.6/site-packages/setuptools/__init__.py", line 145, in setup
    return distutils.core.setup(**attrs)
  File "/usr/lib/python3.6/distutils/core.py", line 148, in setup
    dist.run_commands()
  File "/usr/lib/python3.6/distutils/dist.py", line 955, in run_commands
    self.run_command(cmd)
  File "/usr/lib/python3.6/distutils/dist.py", line 974, in run_command
    cmd_obj.run()
  File "/home/svnano/.local/lib/python3.6/site-packages/setuptools/command/install.py", line 61, in run
    return orig.install.run(self)
  File "/usr/lib/python3.6/distutils/command/install.py", line 589, in run
    self.run_command('build')
  File "/usr/lib/python3.6/distutils/cmd.py", line 313, in run_command
    self.distribution.run_command(command)
  File "/usr/lib/python3.6/distutils/dist.py", line 974, in run_command
    cmd_obj.run()
  File "/usr/lib/python3.6/distutils/command/build.py", line 135, in run
    self.run_command(cmd_name)
  File "/usr/lib/python3.6/distutils/cmd.py", line 313, in run_command
    self.distribution.run_command(command)
  File "/usr/lib/python3.6/distutils/dist.py", line 974, in run_command
    cmd_obj.run()
  File "/tmp/pip-install-4t58g49u/onnx/setup.py", line 203, in run
    self.run_command('cmake_build')
  File "/usr/lib/python3.6/distutils/cmd.py", line 313, in run_command
    self.distribution.run_command(command)
  File "/usr/lib/python3.6/distutils/dist.py", line 974, in run_command
    cmd_obj.run()
  File "/tmp/pip-install-4t58g49u/onnx/setup.py", line 190, in run
    subprocess.check_call(cmake_args)
  File "/usr/lib/python3.6/subprocess.py", line 311, in check_call
    raise CalledProcessError(retcode, cmd)
subprocess.CalledProcessError: Command '['/usr/bin/cmake', '-DPYTHON_INCLUDE_DIR=/usr/include/python3.6m', '-DPYTHON_EXECUTABLE=/usr/bin/python3', '-DBUILD_ONNX_PYTHON=ON', '-DCMAKE_EXPORT_COMPILE_COMMANDS=ON', '-DONNX_NAMESPACE=onnx', '-DPY_EXT_SUFFIX=.cpython-36m-aarch64-linux-gnu.so', '/tmp/pip-install-4t58g49u/onnx']' returned non-zero exit status 1.
----------------------------------------

ERROR: Command errored out with exit status 1: /usr/bin/python3 -u -c 'import sys, setuptools, tokenize; sys.argv[0] = '"'"'/tmp/pip-install-4t58g49u/onnx/setup.py'"'"'; file='"'"'/tmp/pip-install-4t58g49u/onnx/setup.py'"'"';f=getattr(tokenize, '"'"'open'"'"', open)(file);code=f.read().replace('"'"'\r\n'"'"', '"'"'\n'"'"');f.close();exec(compile(code, file, '"'"'exec'"'"'))' install --record /tmp/pip-record-tqgfr9k6/install-record.txt --single-version-externally-managed --compile --install-headers /usr/local/include/python3.6/onnx Check the logs for full command output.

please advise

Issue while trying with ssd_inception_v2_coco from tensorflow zoo

while converting frozen_inference_graph.pb file to uff format, I downloaded from TensorFlow zoo I got key error: 'image_tensor', can you tell why i am getting this error.

for reference:

UFF Version 0.6.5
=== Automatically deduced input nodes ===
[name: "Input"
op: "Placeholder"
input: "image_tensor:0"
attr {
  key: "dtype"
  value {
    type: DT_FLOAT
  }
}
attr {
  key: "shape"
  value {
    shape {
      dim {
        size: 1
      }
      dim {
        size: 3
      }
      dim {
        size: 300
      }
      dim {
        size: 300
      }
    }
  }
}
]

FasterRCNN possible? [Potential Future Dev]

Hello Jk!

Like usual, awesome work on this repo. I am always learning tons from the work you create.

I have tried to replicate what you did with SSD obj det in this repo but for FasterRCNN... but am not having much luck.. Have you tried to use any Tensorflow object detection API Faster RCNN models with the new Python TensorRT Api?

Please let me know if you were successful or if there is a plan to include this in the next addition to the repo.

Thank you for all your hard work 😄

ssd_inception_v2_coco(custom trained model)

@jkjung-avt - I am trying to convert - ssd_inception_v2_coco(custom trained model) but during runtime its throwing following error.

I am using:-
tensorflow==1.14.0
jetson nano==Jetpack 4.3 [L4T 32.3.1]

for reference:

No. nodes: 720
UFF Output written to /home/sys-admin/Downloads/Projects/tensorrt_demos/ssd/tmp_inception_v2_coco.uff
UFF Text Output written to /home/sys-admin/Downloads/Projects/tensorrt_demos/ssd/tmp_inception_v2_coco.pbtxt
[libprotobuf FATAL /externals/protobuf/aarch64/10.0/include/google/protobuf/repeated_field.h:1408] CHECK failed: (index) < (current_size_):
Traceback (most recent call last):
File "build_engine.py", line 219, in
main()
File "build_engine.py", line 210, in main
parser.parse(spec['tmp_uff'], network)
RuntimeError: CHECK failed: (index) < (current_size_):

build issue when using my own model

Thank you for creating this repo. It's great!

I met an issue when I try to replace your model 'ssd_mobilenet_v1_egohands.pb' with my own trained model. I think the two model should be the same as I also download from TF detection zoon and just retrained with my own data.

When doing the build_engin.sh, I got the following error:
Do you have any ideas about what i need to modify? Many thanks.

amvi@nvidia-nano:~/zhen/tensorrt_demos/ssd$ ./build_engines.sh

  • for model in ssd_mobilenet_v1_egohands
  • python3 build_engine.py ssd_mobilenet_v1_egohands
    [TensorRT] INFO: Plugin Creator registration succeeded - GridAnchor_TRT
    [TensorRT] INFO: Plugin Creator registration succeeded - NMS_TRT
    [TensorRT] INFO: Plugin Creator registration succeeded - Reorg_TRT
    [TensorRT] INFO: Plugin Creator registration succeeded - Region_TRT
    [TensorRT] INFO: Plugin Creator registration succeeded - Clip_TRT
    [TensorRT] INFO: Plugin Creator registration succeeded - LReLU_TRT
    [TensorRT] INFO: Plugin Creator registration succeeded - PriorBox_TRT
    [TensorRT] INFO: Plugin Creator registration succeeded - Normalize_TRT
    [TensorRT] INFO: Plugin Creator registration succeeded - RPROI_TRT
    WARNING:tensorflow:From /usr/lib/python3.6/dist-packages/graphsurgeon/StaticGraph.py:123: FastGFile.init (from tensorflow.python.platform.gfile) is deprecated and will be removed in a future version.
    Instructions for updating:
    Use tf.gfile.GFile.
    WARNING: To create TensorRT plugin nodes, please use the create_plugin_node function instead.
    UFF Version 0.5.5
    === Automatically deduced input nodes ===
    [name: "Input"
    op: "Placeholder"
    attr {
    key: "dtype"
    value {
    type: DT_FLOAT
    }
    }
    attr {
    key: "shape"
    value {
    shape {
    dim {
    size: 1
    }
    dim {
    size: 3
    }
    dim {
    size: 300
    }
    dim {
    size: 300
    }
    }
    }
    }
    ]
    =========================================

Using output node NMS
Converting to UFF graph
Warning: No conversion function registered for layer: NMS_TRT yet.
Converting NMS as custom op: NMS_TRT
Warning: No conversion function registered for layer: FlattenConcat_TRT yet.
Converting concat_box_loc as custom op: FlattenConcat_TRT
Warning: No conversion function registered for layer: GridAnchor_TRT yet.
Converting MultipleGridAnchorGenerator as custom op: GridAnchor_TRT
Warning: No conversion function registered for layer: FlattenConcat_TRT yet.
Converting concat_box_conf as custom op: FlattenConcat_TRT
No. nodes: 450
UFF Output written to /home/camvi/zhen/tensorrt_demos/ssd/tmp_v1_egohands.uff
UFF Text Output written to /home/camvi/zhen/tensorrt_demos/ssd/tmp_v1_egohands.pbtxt
[TensorRT] INFO: UFFParser: parsing Input
[TensorRT] INFO: UFFParser: parsing FeatureExtractor/MobilenetV1/Conv2d_0/weights
[TensorRT] INFO: UFFParser: parsing FeatureExtractor/MobilenetV1/MobilenetV1/Conv2d_0/Conv2D
[TensorRT] INFO: UFFParser: Convolution: add Padding Layer to support asymmetric padding
[TensorRT] INFO: UFFParser: Convolution: Left: 0
[TensorRT] INFO: UFFParser: Convolution: Right: 1
[TensorRT] INFO: UFFParser: Convolution: Top: 0
[TensorRT] INFO: UFFParser: Convolution: Bottom: 1
[TensorRT] INFO: UFFParser: parsing FeatureExtractor/MobilenetV1/Conv2d_0/BatchNorm/gamma
[TensorRT] INFO: UFFParser: parsing FeatureExtractor/MobilenetV1/Conv2d_0/BatchNorm/beta
[TensorRT] INFO: UFFParser: parsing FeatureExtractor/MobilenetV1/Conv2d_0/BatchNorm/moving_mean
[TensorRT] INFO: UFFParser: parsing FeatureExtractor/MobilenetV1/Conv2d_0/BatchNorm/moving_variance
[TensorRT] INFO: UFFParser: parsing FeatureExtractor/MobilenetV1/MobilenetV1/Conv2d_0/BatchNorm/FusedBatchNorm
[TensorRT] INFO: UFFParser: parsing FeatureExtractor/MobilenetV1/MobilenetV1/Conv2d_0/Relu6
[TensorRT] INFO: Setting Dynamic Range for (Unnamed ITensor* 9) to 0.0472441
[TensorRT] INFO: Setting Dynamic Range for (Unnamed ITensor* 11) to 0.0472441
[TensorRT] INFO: UFFParser: parsing FeatureExtractor/MobilenetV1/Conv2d_1_depthwise/depthwise_weights
[TensorRT] INFO: UFFParser: parsing FeatureExtractor/MobilenetV1/MobilenetV1/Conv2d_1_depthwise/depthwise
[TensorRT] INFO: UFFParser: parsing FeatureExtractor/MobilenetV1/Conv2d_1_depthwise/BatchNorm/gamma
[TensorRT] INFO: UFFParser: parsing FeatureExtractor/MobilenetV1/Conv2d_1_depthwise/BatchNorm/beta
[TensorRT] INFO: UFFParser: parsing FeatureExtractor/MobilenetV1/Conv2d_1_depthwise/BatchNorm/moving_mean
[TensorRT] INFO: UFFParser: parsing FeatureExtractor/MobilenetV1/Conv2d_1_depthwise/BatchNorm/moving_variance
[TensorRT] INFO: UFFParser: parsing FeatureExtractor/MobilenetV1/MobilenetV1/Conv2d_1_depthwise/BatchNorm/FusedBatchNorm
[TensorRT] INFO: UFFParser: parsing FeatureExtractor/MobilenetV1/MobilenetV1/Conv2d_1_depthwise/Relu6
[TensorRT] INFO: Setting Dynamic Range for (Unnamed ITensor* 19) to 0.0472441
[TensorRT] INFO: Setting Dynamic Range for (Unnamed ITensor* 21) to 0.0472441
[TensorRT] INFO: UFFParser: parsing FeatureExtractor/MobilenetV1/Conv2d_1_pointwise/weights
[TensorRT] INFO: UFFParser: parsing FeatureExtractor/MobilenetV1/MobilenetV1/Conv2d_1_pointwise/Conv2D
....
[TensorRT] INFO: UFFParser: parsing FeatureExtractor/MobilenetV1/Conv2d_10_depthwise/BatchNorm/moving_variance
[TensorRT] INFO: UFFParser: parsing FeatureExtractor/MobilenetV1/MobilenetV1/Conv2d_10_depthwise/BatchNorm/FusedBatchNorm
[TensorRT] INFO: UFFParser: parsing FeatureExtractor/MobilenetV1/MobilenetV1/Conv2d_10_depthwise/Relu6
[TensorRT] INFO: Setting Dynamic Range for (Unnamed ITensor* 201) to 0.0472441
[TensorRT] INFO: Setting Dynamic Range for (Unnamed ITensor* 203) to 0.0472441
[TensorRT] INFO: UFFParser: parsing FeatureExtractor/MobilenetV1/Conv2d_10_pointwise/weights
[TensorRT] INFO: UFFParser: parsing FeatureExtractor/MobilenetV1/MobilenetV1/Conv2d_10_pointwise/Conv2D
[TensorRT] INFO: UFFParser: parsing FeatureExtractor/MobilenetV1/Conv2d_10_pointwise/BatchNorm/gamma
[TensorRT] INFO: UFFParser: parsing FeatureExtractor/MobilenetV1/Conv2d_10_pointwise/BatchNorm/beta
[TensorRT] INFO: UFFParser: parsing FeatureExtractor/MobilenetV1/Conv2d_10_pointwise/BatchNorm/moving_mean
[TensorRT] INFO: UFFParser: parsing FeatureExtractor/MobilenetV1/Conv2d_10_pointwise/BatchNorm/moving_variance
[TensorRT] INFO: UFFParser: parsing FeatureExtractor/MobilenetV1/MobilenetV1/Conv2d_10_pointwise/BatchNorm/FusedBatchNorm
[TensorRT] INFO: UFFParser: parsing FeatureExtractor/MobilenetV1/MobilenetV1/Conv2d_10_pointwise/Relu6
[TensorRT] INFO: Setting Dynamic Range for (Unnamed ITensor* 211) to 0.0472441
[TensorRT] INFO: Setting Dynamic Range for (Unnamed ITensor* 213) to 0.0472441
[TensorRT] INFO: UFFParser: parsing FeatureExtractor/MobilenetV1/Conv2d_11_depthwise/depthwise_weights
[TensorRT] INFO: UFFParser: parsing FeatureExtractor/MobilenetV1/MobilenetV1/Conv2d_11_depthwise/depthwise
[TensorRT] INFO: UFFParser: parsing FeatureExtractor/MobilenetV1/Conv2d_11_depthwise/BatchNorm/gamma
[TensorRT] INFO: UFFParser: parsing FeatureExtractor/MobilenetV1/Conv2d_11_depthwise/BatchNorm/beta
[TensorRT] INFO: UFFParser: parsing FeatureExtractor/MobilenetV1/Conv2d_11_depthwise/BatchNorm/moving_mean
[TensorRT] INFO: UFFParser: parsing FeatureExtractor/MobilenetV1/Conv2d_11_depthwise/BatchNorm/moving_variance
[TensorRT] INFO: UFFParser: parsing FeatureExtractor/MobilenetV1/MobilenetV1/Conv2d_11_depthwise/BatchNorm/FusedBatchNorm
[TensorRT] INFO: UFFParser: parsing FeatureExtractor/MobilenetV1/MobilenetV1/Conv2d_11_depthwise/Relu6
[TensorRT] INFO: Setting Dynamic Range for (Unnamed ITensor* 221) to 0.0472441
[TensorRT] INFO: Setting Dynamic Range for (Unnamed ITensor* 223) to 0.0472441
[TensorRT] INFO: UFFParser: parsing FeatureExtractor/MobilenetV1/Conv2d_11_pointwise/weights
[TensorRT] INFO: UFFParser: parsing FeatureExtractor/MobilenetV1/MobilenetV1/Conv2d_11_pointwise/Conv2D
[TensorRT] INFO: UFFParser: parsing FeatureExtractor/MobilenetV1/Conv2d_11_pointwise/BatchNorm/gamma
[TensorRT] INFO: UFFParser: parsing FeatureExtractor/MobilenetV1/Conv2d_11_pointwise/BatchNorm/beta
[TensorRT] INFO: UFFParser: parsing FeatureExtractor/MobilenetV1/Conv2d_11_pointwise/BatchNorm/moving_mean
[TensorRT] INFO: UFFParser: parsing FeatureExtractor/MobilenetV1/Conv2d_11_pointwise/BatchNorm/moving_variance
[TensorRT] INFO: UFFParser: parsing FeatureExtractor/MobilenetV1/MobilenetV1/Conv2d_11_pointwise/BatchNorm/FusedBatchNorm
[TensorRT] INFO: UFFParser: parsing FeatureExtractor/MobilenetV1/MobilenetV1/Conv2d_11_pointwise/Relu6
[TensorRT] INFO: Setting Dynamic Range for (Unnamed ITensor* 231) to 0.0472441
[TensorRT] INFO: Setting Dynamic Range for (Unnamed ITensor* 233) to 0.0472441
[TensorRT] INFO: UFFParser: parsing BoxPredictor_0/BoxEncodingPredictor/weights
[TensorRT] INFO: UFFParser: parsing BoxPredictor_0/BoxEncodingPredictor/Conv2D
[TensorRT] INFO: UFFParser: parsing BoxPredictor_0/BoxEncodingPredictor/biases
[TensorRT] INFO: UFFParser: parsing BoxPredictor_0/BoxEncodingPredictor/BiasAdd
[TensorRT] INFO: UFFParser: parsing BoxPredictor_0/Shape
[TensorRT] INFO: UFFParser: parsing BoxPredictor_0/strided_slice/stack
[TensorRT] INFO: UFFParser: parsing BoxPredictor_0/strided_slice/stack_1
[TensorRT] INFO: UFFParser: parsing BoxPredictor_0/strided_slice/stack_2
[TensorRT] INFO: UFFParser: parsing BoxPredictor_0/strided_slice
[TensorRT] INFO: UFFParser: parsing BoxPredictor_0/Reshape/shape/1
[TensorRT] INFO: UFFParser: parsing BoxPredictor_0/Reshape/shape/2
[TensorRT] INFO: UFFParser: parsing BoxPredictor_0/Reshape/shape/3
[TensorRT] INFO: UFFParser: parsing BoxPredictor_0/Reshape/shape
[TensorRT] INFO: UFFParser: parsing BoxPredictor_0/Reshape
[TensorRT] ERROR: UFFParser: Parser error: BoxPredictor_0/Reshape: Reshape: -1 dimension specified more than 1 time
[TensorRT] ERROR: Network must have at least one output
Traceback (most recent call last):
File "build_engine.py", line 218, in
main()
File "build_engine.py", line 212, in main
buf = engine.serialize()
AttributeError: 'NoneType' object has no attribute 'serialize'

Compatibility of TensorRT optimized engine with deepstream-app

Thanks to the Demo #3: SSD, I've successfully made a TensorRT optimized 'engine' of SSD.
However, I got the following error message when I tried to use the engine with NVIDIA's deepstream-app (the deepstream-app can dedicate the TensorRT engine to be used in its pipeline) :

deepstream-app: nvdsiplugin_ssd.cpp:72: FlattenConcat::FlattenConcat(const void, size_t): Assertion `mConcatAxisID == 1 || mConcatAxisID == 2 || mConcatAxisID == 3' failed.
Aborted (core dumped)
*

I'm not familiar with the deepstream-app plugin structure and hope that any expert can explain what is the main cause of this problem and what I should do to use any TensorRT optimized engine in the deepstream pipeline.
(Before, I expected that the deepstream can perform inference by a user dedicated TensorRT optimized engine without any coding or plugin library building.. )

test on file problem

when i test on video ( .mp4 file),it did not stop when video ended,it continued rerun video again

update README

I think you should check README and update it
in MTCNN section,it should be in MTCNN folder instead of GOOGLENET

ERROR: ValueError: not enough values to unpack (expected 2, got 1)

I Have trained model with YOLO v3, I Have two files yolov3.weights and yolov3.cfg.
When I try to run yolov3_to_onnx.py with those files it throws these errors:

Traceback (most recent call last):
File "yolov3_to_onnx.py", line 833, in
main()
File "yolov3_to_onnx.py", line 791, in main
layer_configs = parser.parse_cfg_file(cfg_file_path)
File "yolov3_to_onnx.py", line 92, in parse_cfg_file
layer_dict, layer_name, remainder = self._next_layer(remainder)
File "yolov3_to_onnx.py", line 133, in _next_layer
layer_param_block, remainder = remainder.split('\n\n', 1)
ValueError: not enough values to unpack (expected 2, got 1)

Dynamic Batch Sizes

Hi @jkjung-avt - awesome work with this repo. I think this is the most useful demo I've seen on the nano so far, and your work with the async function is really well done.

I'm wondering if there's an easy way to rebuild the SSD detector engines to take a batch size of (2,3,300,300), or even better to take a dynamic batch size input?

the video stream delays for 300ms

hello, I run this code on my jetson nano for a live stream detect but the video has about 300ms delay, and the fps for me is about 10 with the trt_ssd.py. Do you have there situations, Thanks. I use the jetpack4.2 and tensorrt5.0.6.3,

Mtcnn accuracy problem

Thanks for your work.

I have carefully followed your build instructions and when I run the TensorRT mtcnn face detector on my jetson nano, I am getting low accuracy as like below
code detecting my hand as a face (continuously for some seconds ).

please advise.

image

my finetuned model is much slower

Hi JK,

I tried the model in your repo in Nano, the ssd_mobilenet_v1_egohands, the fps is 20. Then I trained/fine tuned the model with my own data from the same model (from model zoon) and with the same config file (from your hand detection repo). After converting to TRT in nano, the fps is only 12.
Do you have any ideas about what factors that will affect the speed?

UUF Convertor

Hi
I have some question:
1- What's the UUF converter? why we use this converter before converting to the TensorRT engine?
As you know we can convert the Tensorflow forzen graph (.pb) model to TernsorRT engine model directly and no need for UFF convertor, with TensorRT API:

trt_graph = trt.create_inference_graph(
    input_graph_def,
    outputs,
    max_batch_size,
    max_workspace_size_bytes,
    minimum_segment_size, 
    precision_mode="FP16") 

My quesion is that what's advantage of converting .pb (Tensorflow) >> . bin (UFF) >> .pb (TensorRT) instead .pb (Tensorflow) >> .pb (TensorRT)?
2- The TensorRT library is optimization package for optimizing the graph, so the UFF library is optimizer also?
3- what's host memory and cuda memory:

           size = trt.volume(self.engine.get_binding_shape(binding)) * self.engine.max_batch_size
            host_mem = cuda.pagelocked_empty(size, np.float32) 
            cuda_mem = cuda.mem_alloc(host_mem.nbytes)  

as far as I know, binding is the each of graph layers, and we get the size of each graph layers assigne the memory for each layers, but I don't what's host_mem?

TF-TRT vs UFF-TensorRT

Hi,
I found that we can optimize the Tensorflow model in several ways. If I am mistaken, please tell me.

1- Using TF-TRT, This API developer by tensorflow and integreted TensoRT to Tensorflow and this API called as :
from tensorflow.python.compiler.tensorrt import trt_convert as trt
This API can be applied to any tensorflow models (new and old version models) without any converting error, because If this API don't support any new layers, don't consider these layers for TensorRT engines and these layers remain for Tensorflow engine and run on Tensorflow. right?

2- Using TensorRT, This API by developed by NVIDA and is independent of Tenorflow library (Not integrated to Tensorflow), and this API called as:
import tensorrt as trt
If we want to use this api, first, we must converting the tensorflow graph to UFF using uff-convertor and then parse the UFF graph to this API.
In this case, If the Tensorflow graph have unsupported layers we must use plugin or custom code for these layers, right?

3- I don't know, when we work with Tensorflow models, Why we use UFF converter then TensorRT, we can use directly TF-TRT API, right? If so, Are you tested the Tensorflow optimization model from these two method to get same performance? what's advantage of this UFF converter method?

I have some question about the two cases above:
4- I convert the ssd_mobilenet_v2 using two cases, In the case 1, I achieve slight improvement in speed but in the case 2, I achieve more improvement, why?
My opinion is that, In the case 1, The API only consider converting the precision (FP32 to FP16) and merging the possible layers together, But in the case 2, the graph is clean by UFF such as remove any redundant nodes like Asserts and Identity and then converted to tensorrt graph, right?

5- when we convert the trained model files like .ckpt and .meta, ... to frozen inference graph(.pb file), These layers don't remove from graph? only loss states and optimizer states , ... are removed?

slow inference on jetson tx2

i have tested this demo on a jetson tx2 device and inference speed is at 22 fps. i expected better performance on a tx2 than a jetson nano. do you have any insights for achieving better results? and what are the expected speeds on a tx2?

anyone tried it on a tx2 and what were the results?

thanks

Recommend Projects

  • React photo React

    A declarative, efficient, and flexible JavaScript library for building user interfaces.

  • Vue.js photo Vue.js

    🖖 Vue.js is a progressive, incrementally-adoptable JavaScript framework for building UI on the web.

  • Typescript photo Typescript

    TypeScript is a superset of JavaScript that compiles to clean JavaScript output.

  • TensorFlow photo TensorFlow

    An Open Source Machine Learning Framework for Everyone

  • Django photo Django

    The Web framework for perfectionists with deadlines.

  • D3 photo D3

    Bring data to life with SVG, Canvas and HTML. 📊📈🎉

Recommend Topics

  • javascript

    JavaScript (JS) is a lightweight interpreted programming language with first-class functions.

  • web

    Some thing interesting about web. New door for the world.

  • server

    A server is a program made to process requests and deliver data to clients.

  • Machine learning

    Machine learning is a way of modeling and interpreting data that allows a piece of software to respond intelligently.

  • Game

    Some thing interesting about game, make everyone happy.

Recommend Org

  • Facebook photo Facebook

    We are working to build community through open source technology. NB: members must have two-factor auth.

  • Microsoft photo Microsoft

    Open source projects and samples from Microsoft.

  • Google photo Google

    Google ❤️ Open Source for everyone.

  • D3 photo D3

    Data-Driven Documents codes.