[toc]
| host | link | link |
|---|---|---|
| 160 | gitlib | github |
| 175 | gitlib | github |
| mini | gitlib | github |
| mg | gitlib | github |
| 110 | gitlib | github |
- GitHubHosts home next hosts
- GitHub520(推荐) home next hosts
- googlehosts home
本地 hosts 服务获取到的ip是经过本地测试,所以成功率较高。
而且会定时获取最新的ip,尽可能保证访问。
注意,该方案需要结合SwitchHosts一起使用,或者你也可以直接访问地址,手动复制。
执行下面命令, 服务会运行在: http://localhost:8888
curl -L https://github.com/ineo6/hosts/releases/download/v1.0.1/hosts-server-pkg-mac-x64.tar.gz | tar xzvf -
xattr -d com.apple.quarantine ./hosts-server-pkg-mac-x64/hosts-server
./hosts-server-pkg-mac-x64/hosts-server --port=8888执行下面命令, 服务会运行在: http://localhost:8888
curl -L https://github.com/ineo6/hosts/releases/download/v1.0.1/hosts-server-pkg-mac-arm64.tar.gz | tar xzvf -
./hosts-server-pkg-mac-arm64/hosts-server --port=8888执行下面命令, 服务会运行在: http://localhost:8888
curl -L https://github.com/ineo6/hosts/releases/download/v1.0.1/hosts-server-pkg-linuxstatic-x64.tar.gz | tar xzvf -
./hosts-server-pkg-linuxstatic-x64/hosts-server --port=8888执行下面命令, 服务会运行在: http://localhost:8888
curl -L https://github.com/ineo6/hosts/releases/download/v1.0.1/hosts-server-pkg-linuxstatic-arm64.tar.gz | tar xzvf -
./hosts-server-pkg-linuxstatic-arm64/hosts-server --port=8888执行下面命令, 服务会运行在: http://localhost:8888
curl -L https://github.com/ineo6/hosts/releases/download/v1.0.1/hosts-server-pkg-linuxstatic-armv7.tar.gz | tar xzvf -
./hosts-server-pkg-linuxstatic-armv7/hosts-server --port=8888下载 https://github.com/ineo6/hosts/releases/download/v1.0.1/hosts-server-pkg-win-x64.zip ,解压后执行下面命令,服务会运行在: http://localhost:8888
.\hosts-server.exe --port=8888这里推荐使用 SwitchHosts 配置hosts,操作很简单,支持跨平台。
注意:首次使用先备份下本地hosts。
详细介绍可以阅读 SwitchHosts! 还能这样管理hosts,后悔没早点用 。
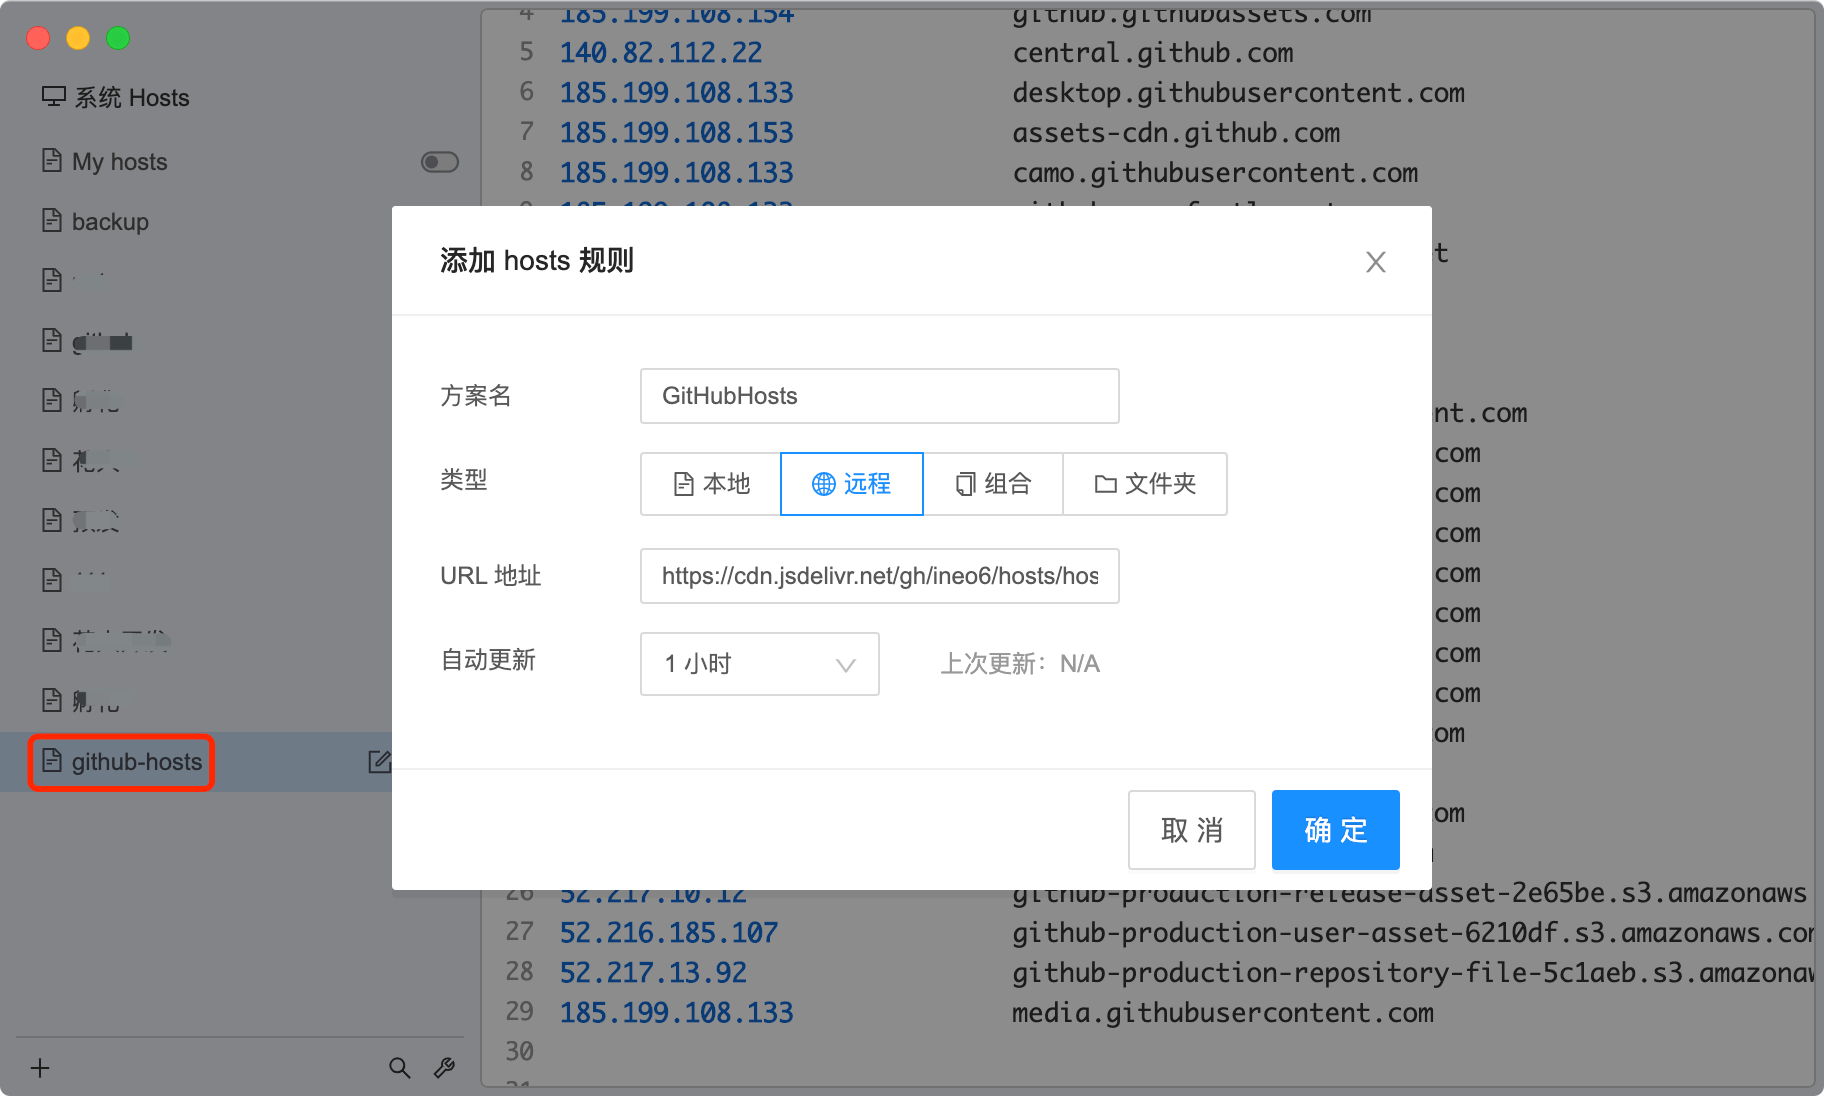
添加一条规则:
- 方案名:GitHub(可以自行命名)
- 类型:远程
- URL 地址:https://gitlab.com/ineo6/hosts/-/raw/master/hosts
- 自动更新:1个小时(时间可自行调整)
这样就可以和最新的hosts保持同步。
hosts文件位置:/etc/hosts。
macOS系统下修改需要按照如下方式:
注意:如果你使用
VS Code,可以直接用VS Code修改和保存,不需要复制文件。
复制hosts文件到桌面上,鼠标右键右击它,选择「打开方式」—「文本编辑」,打开这个hosts文件,把前面的hosts内容复制进来。
然后把你修改好的hosts文件替换掉:/etc/hosts 文件。
注意:如果弹出密码输入框,你需要输入你当前登录账号对应的密码。
最后刷新缓存:
sudo killall -HUP mDNSResponderhosts文件位置:C:/windows/system32/drivers/etc/hosts。
将前文hosts内容追加到hosts文件,然后刷新DNS缓存:
ipconfig /flushdnshosts 文件在每个系统的位置不一,详情如下:
- Windows 系统:
C:\Windows\System32\drivers\etc\hosts - Linux 系统:
/etc/hosts - Mac(苹果电脑)系统:
/etc/hosts - Android(安卓)系统:
/system/etc/hosts - iPhone(iOS)系统:
/etc/hosts
修改方法,把第一步的内容复制到文本末尾:
- Windows 使用记事本。
- Linux、Mac 使用 Root 权限:
sudo vi /etc/hosts。 - iPhone、iPad 须越狱、Android 必须要 root。
大部分情况下是直接生效,如未生效可尝试下面的办法,刷新 DNS:
- Windows:在 CMD 窗口输入:
ipconfig /flushdns - Linux 命令:
sudo nscd restart,如报错则须安装:sudo apt install nscd或sudo /etc/init.d/nscd restart - Mac 命令:
sudo killall -HUP mDNSResponder
Tips: 上述方法无效可以尝试重启机器。


