Everything will be ok in the end, if it’s not ok, it’s not the end.
yangzhixdm / learn Goto Github PK
View Code? Open in Web Editor NEW文章,代码,思考记录,用issues写博客
文章,代码,思考记录,用issues写博客


问题来自官方文档中提到的nextTick,之前一直忙着写组件的东西,没有太关注,现在仔细查了一下Vue的渲染机制
Vue 利用Object.defineProperty 会对data中的属性进行数据劫持。在访问和设置属性的值时,会相应的触发对应的getter的setter方法。那么在重新设置data中属性值时,会相应的触发存储在Dep中的notify方法,并遍历相应的watcher进行update.
  Dep.prototype.notify = function notify() {
    // stabilize the subscriber list first
    var subs = this.subs.slice();
    for (var i = 0, l = subs.length; i < l; i++) {
      subs[i].update();
    }
  };
而 watcher中的update则会触发 queueWatcher
将每个watcher压入到队列中,并且在下一个任务(nextTick)时,开始任务调度(flushSchedulerQueue)。其中waiting 默认为false。
  function queueWatcher(watcher) {
    var id = watcher.id;
    if (has[id] == null) {
      has[id] = true;
      if (!flushing) {
        queue.push(watcher);
      } else {
        // if already flushing, splice the watcher based on its id
        // if already past its id, it will be run next immediately.
        var i = queue.length - 1;
        while (i > index && queue[i].id > watcher.id) {
          i--;
        }
        queue.splice(i + 1, 0, watcher);
      }
      // queue the flush
      if (!waiting) {
        waiting = true;
        nextTick(flushSchedulerQueue);
      }
    }
  }
flushSchedulerQueue中主要执行watcher中run方法,执行更新,并且重置调度状态resetSchedulerState。
所以这里要考虑的时,数据的更新其实是在下一个nextTick中进行处理。
那么需要考虑的是nextTick中做了什么?
在 Vue.js 里是数据驱动视图变化,由于 JS 执行是单线程的,在一个 tick 的过程中,它可能会多次修改数据,但 Vue.js 并不会傻到每修改一次数据就去驱动一次视图变化,它会把这些数据的修改全部 push 到一个队列里,然后内部调用 一次 nextTick 去更新视图,所以数据到 DOM 视图的变化是需要在下一个 tick 才能完成。nextTick 采取的策略是默认走 micro task,对于一些 DOM 交互事件,如 v-on 绑定的事件回调函数的处理,会强制走 macro task。更新任务其实是在当前代码执行之后的下一个事件循环之后才进行更新。
Vue.js 在绑定 DOM 事件的时候,默认会给回调的 handler 函数调用 withMacroTask 方法做一层包装,它保证整个回调函数执行过程中,遇到数据状态的改变,这些改变都会被推到 macro task 中。
对于 macro task 的执行,Vue.js 优先检测是否支持原生 setImmediate,这是一个高版本 IE 和 Edge 才支持的特性,不支持的话再去检测是否支持原生的 MessageChannel,如果也不支持的话就会降级为 setTimeout 0。
  function nextTick(cb, ctx) {
    var _resolve;
    callbacks.push(function () {
      if (cb) {
        try {
          cb.call(ctx);
        } catch (e) {
          handleError(e, ctx, 'nextTick');
        }
      } else if (_resolve) {
        _resolve(ctx);
      }
    });
    if (!pending) {
      pending = true;
      if (useMacroTask) {
        macroTimerFunc();
      } else {
        microTimerFunc();
      }
    }
    // $flow-disable-line
    if (!cb && typeof Promise !== 'undefined') {
      return new Promise(function (resolve) {
        _resolve = resolve;
      });
    }
  }
而这个macroTimerFunc中则是使用了setImmediate/MessageChannel /setTimeout进行实现。
  if (typeof setImmediate !== 'undefined' && isNative(setImmediate)) {
    macroTimerFunc = function macroTimerFunc() {
      setImmediate(flushCallbacks);
    };
  } else if (typeof MessageChannel !== 'undefined' && (isNative(MessageChannel) ||
  // PhantomJS
  MessageChannel.toString() === '[object MessageChannelConstructor]')) {
    var channel = new MessageChannel();
    var port = channel.port2;
    channel.port1.onmessage = flushCallbacks;
    macroTimerFunc = function macroTimerFunc() {
      port.postMessage(1);
    };
  } else {
    /* istanbul ignore next */
    macroTimerFunc = function macroTimerFunc() {
      setTimeout(flushCallbacks, 0);
    };
  }
// Determine microtask defer implementation.
/* istanbul ignore next, $flow-disable-line */
if (typeof Promise !== 'undefined' && isNative(Promise)) {
var p = Promise.resolve();
microTimerFunc = function microTimerFunc() {
p.then(flushCallbacks);
// in problematic UIWebViews, Promise.then doesn't completely break, but
// it can get stuck in a weird state where callbacks are pushed into the
// microtask queue but the queue isn't being flushed, until the browser
// needs to do some other work, e.g. handle a timer. Therefore we can
// "force" the microtask queue to be flushed by adding an empty timer.
if (isIOS) {
setTimeout(noop);
}
};
} else {
// fallback to macro
microTimerFunc = macroTimerFunc;
}<templete>
<div>
<span id="content">{{a}}</span>
</div>
</template>
new Vue({
data() {
return {
a: 1
}
created(){
this.a =1;
console.log(document.getElementById('content').innerHTML;)
}
));
相比于命令式编程关心解决问题的步骤,函数式编程是面向数学的抽象,关心数据(代数结构)之间的映射关系。函数式编程将计算描述为一种表达式求值。
在函数式语言中,函数被称为一等函数(First-class function),与其他数据类型一样,作为一等公民,处于平等地位,可以在任何地方定义,在函数内或函数外;可以赋值给其他变量;可以作为参数,传入另一个函数,或者作为别的函数的返回值。
纯函数是这样一种函数,即相同的输入,永远会得到相同的输出,而且没有任何可观察的副作用。
//不纯
var minimum = 21;  //外部变量会影响checkAge函数的运行结果

var checkAge = function() {
  return age > minimum;
}

//纯函数
var checkAge = function() {
  var minimum = 21;
  return age > minimum;
}
那么关于函数的bind是纯函数的一种实现。
function bind(context) {
  var self = this;
  return function() {
    self.apply(context, arguments);
  }
}

var obj = {
  name: "this is obj"
}

var say = function() {
  console.log(this.name);
}

var fn = say.bind(obj);
//返回一个纯函数方法,即在任何时候,只要输入一样,那么返回的结果都是一样的。

fn(); //this is obj在计算机科学中,柯里化(Currying)是把接受多个参数的函数变换成接受一个单一参数(最初函数的第一个参数)的函数,并且返回接受余下的参数且返回结果的新函数的技术。
function curry(fn) {
  var args = Array.prototype.slice.call(arguments, 1);
  return function() {
    var innerArgs = Array.prototype.slice.call(arguments);
    var finalArag = args.concat(innerArgs);
    return fn.apply(null, finalArag);
  }
}

function add(num1, num2) {
  return num1 + num2;
}

var curryAdd = curry(add, 5); //确定了第一个参数,之后返回一个纯函数
curryAdd(3); //8
也可以如下调用:
var curryAdd = curry(add, 5, 12); //确定二个参数,之后返回一个纯函数
curryAdd(); //17function bind(fn, context) {
var args = Array.prototype.slice.call(arguments, 2);
return function() {
var innerArgs = Array.prototype.slice.call(arguments);
var finalArag = args.concat(innerArgs);
return fn.apply(context, finalArag);
}
}
var handler = {
message: "Event handler",
handlerClick: function(name, event) {
console.log(this.name + ":" + name + ":" + event.type)
}
}
var btn = document.getElementById('my-btn');
EventUtil.addHandler(btn, "click", bind(handler.handlerClick, handler, 'my-btn');var head = doc.getElementsByTagName("head")[0] || doc.documentElement
var scripts = head.getElementsByTagName("script")
var interactiveScript
for (var i = scripts.length - 1; i >= 0; i--) {
var script = scripts[i]
if (script.readyState === "interactive") {
interactiveScript = script
return interactiveScript
}
}the Vuex state can be viewed as a single source of truth for the entire application.
Data is stored inside the state as a single JSON object. For example :
state : {
    name : “John Doe”,
    age : “28”,
}
But how can our components and routes access the data stored in our state? We define Getters inside our Vuex store which returns the data from our store back to our components.
getters : {
  NAME : state => {
    return state.name
  }
}
let name = this.$store.getters.NAMEmutations : {
SET_NAME : (state,payload) => {
state.name = payload,
}
}Mutations are synchronous and we cannot run asynchronous operations such as API calls inside a mutation
Mutations are synchronous but Actions are not
Make it a practice to never commit your Mutations directly. Always use Actions to commit your mutations
Actions are similar to mutation, but instead of mutating the state directly they commit a mutation
actions : {
  SET_NAME : (context,payload){
     context.commit("SET_NAME",payload);
  }
}
consider a case when you have to update the value of name, not just in your state but also on a database running on a remote server. I am pretty sure this is how you are going to use Vuex in a real project 99% of the time. Take a look at the following code snippet.
mutations : {
  SET_NAME : (state,name) => {
    state.name = name
  }
},
actions : {
  SET_NAME : async (context, name) => {
    let { data } = await Axios.post('http://myapiendpoint.com/api/name',{name : name})
    if(data.status == 200){
      context.dispatch('SET_NAME', name)
    }
  }
}最近在看本司徒大神的博客,发现其中很是有还多可以发掘的东西的!
如下:
<!doctype html>
<html lang="en">
<head>
	<meta http-equiv="Content-Type" content="text/html;charset=UTF-8">
	<title>Document</title>
</head>
<body>
	<input type="button" value="call me" id="call-id" alt="1"/>
</body>
<script type="text/javascript">
  var E = {
    on:function(el,type,fn){
      el.addEventListener?
      el.addEventListener(type,fn,false):el.attachEvent("on" + type,function(){
        fn.call(el,window.event);
      })
      /*
      el.addEventListener(type,fn,false):el.attachEvent("on" + type,fn);
      */
    }
  };
  function handler(e){
    //alert(e.getAttribute("alt"));
    alert(this == window);
    alert(e.srcElement);
  }
  E.on(document.getElementById("call-id"),"click",handler);
</script>
</html>
以上被注释的代码,想了很久没有想明白为什么他要采用一种全新的方式去调用,那就是用call ?
包括很多书上都是这样写的,都是直接执行。
于是开始各种搜索,测试之。
发现原来还是有区别的。
在这里,使call去调用:
fn.call(el,window.event);1 第一点,它能够确保,事件对象作为第一个参数被传入,这里直接将window.event传入。(这一点,司徒大神已经说过了)
2 在某些浏览器下,ie678,如果直接调用,会出现 this == window 的情况,这关于这个问题,就不多说了,都是万恶的IE导致的。
那么如果采用call 可以保证this的值指向事件源对象。这对于兼容标准浏览器和IE我想是有一定的用处的。
偶有所得,以记录之,谨防忘记!
[ 后记 ]
这里的使用call 只不过是为了调整作用域,保证在被调用的方法中,this指向调用的对象。
2014年04月21日 18:35:37
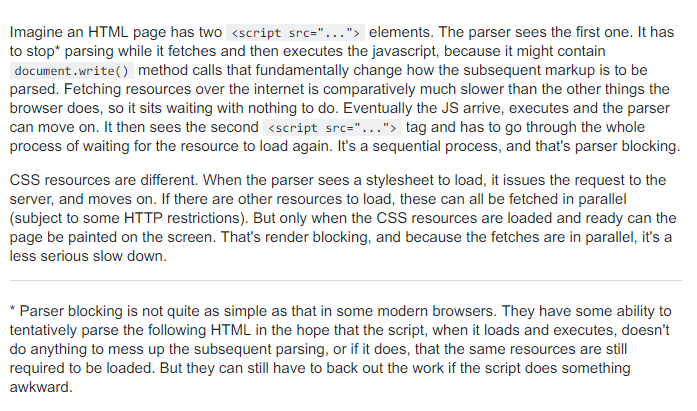
1 加载html
是否会被阻塞?
1 加载css
阻塞问题,是否会阻塞js,以及css加载
加载的过程如何?
边渲染变加载? 还是加载完成之后再渲染(包括CSS树以及dom树过程)?
2 加载js
阻塞的问题,阻塞css ? 阻塞js ?
加载的过程如何?
加载与执行的过程 ? document.write 会导致如何?
同步加载与异步加载?
1 CSS 树
2 DOM树
3 render(渲染)树
4 组合(component )
5 布局
6 重排与重绘
块级作用上下文,以下是来自W3C的官方解释:
Floats, absolutely positioned elements, block containers (such as inline-blocks, table-cells, and table-captions) that are not block boxes, and block boxes with 'overflow' other than 'visible' (except when that value has been propagated to the viewport) establish new block formatting contexts for their contents.
浮动元素,绝对定位元素,以及非块级盒子的块级容器,以及overflow的值不为visible的块级盒子(当这个visible的值直接传播到viewport时会有例外)都会为它们的内容创建一个块级格式化环境。
Box垂直方向的距离由margin决定。属于同一个BFC的两个相邻Box的margin会发生重叠
如果让两个元素不属于同一个BFC,就不会发生margin重叠了。
计算BFC的高度时,内部的浮动元素也会参与计算。可以用来解决float元素导致的父元素坍塌的问题。
之前一直没有弄明白为什么可实现自适应布局?或者说原因是什么?终于在 w3c文档上找到了一段。
The border box of a table, a block-level replaced element, or an element in the normal flow that establishes a new block formatting context (such as an element with 'overflow' other than 'visible') must not overlap the margin box of any floats in the same block formatting context as the element itself. If necessary, implementations should clear the said element by placing it below any preceding floats, but may place it adjacent to such floats if there is sufficient space.
表格的border盒子,块级替换元素,以及一个overflow值不为visible的正常流的元素会创建一个新的BFC,并且这个元素不会与在同一个父BFC中的浮动元素的空白盒子(margin box )相重叠。如果有必要的话,正常的实现应该清除上面的元素,并且把它放在浮动元素的下面,但是也可能放在浮动元素的旁边,如果还有合适的空间的话。
父子组件通信
在vue和react 的mvvm 组件化开发中,父子组件间的通信都同时采用了单向数据流动的方式,不允许子组件直接修改父组件传递下来的props属性的值。
1 单一职权原则,同一个数据尤其是共享的数据,不应该有多处可以进行修改,而是应该修改修改的位置统一在一个位置,这样可以保证数据更好的可控。而这一点也是mvvvm框架所强调的。相当初的jquery事件方案,同一个dom或者一个全局变量,随意一个位置可以触发一个事件,从而修改数据,久而久之系统在运行中,根本就无法知道数据是在哪个位置被修改。
2 谁生产,谁维护,谁产生的这个数据,那么这个数据就谁来维护。父组件中定义的数据,就应该是自己来维护,子组件只需要有读取的权限就可以了,因为这个数据本身就不属于子组件。子组件去修改父组件的值,本身设计就不合理。
兄弟组件通信
和上面一样,我们依旧需要保证数据的一致性。
那么既然是兄弟组件,那么首先考虑的就是把数据给到父组件,兄弟之间都不去操控,让父组件去统一操作。但是这种方式有它存在的问题,就是如果两个兄弟之间层级很深,或者说是兄弟与孙子的关系,那么需要嵌套的关系就更加复杂。
我们还是要保证数据操作的单一性,那么可以考虑拿一个单独的组件出来,我们所有需要共享的数据都由它去生产。子组件需要修改数据时,触发该组件的方法即可。这种方法称为事件总线。不过他的问题是需要单独维护一个组件来处理共享的数据。其实它就是vuex的前身。
vuex或者redux 使用一个单独的区域来存放需要共享处理的变量, 每次数据存在修改,出发dispatch,匹配相应的动作,然后更新数据。
其实都是为了解决数据的单一修改职权问题。
  var onRE = /^@|^v-on:/;
  var dirRE = /^v-|^@|^:/;
  var forAliasRE = /([^]*?)\s+(?:in|of)\s+([^]*)/;
  var forIteratorRE = /,([^,\}\]]*)(?:,([^,\}\]]*))?$/;
var stripParensRE = /^\(|\)$/g;start
end
chars
git init #初始化
git status #查看状态
git add #添加文件列表
git commit -m #提交文件到暂存区
git commit -amend #修改提交的注释
git push #推送代码到远程主机
git pull #拉取远程主机代码,并与本地代码合并
git fetch # 拉去远程主机代码
git remote add origin #添加远程主机git branch <yourbranchname> #基于当前分支建立新分支
git checkout <branchname> #检出分支
git branch -b <yourbranchname> #基于当前分支建立新分支,并检出分支
git merge <yourbranchname> #快速合并合并分支,如果发生冲突就不会自动提交
git merge --no-ff <yourbranchname> #不采用快速合并,如果发生冲突就不会自动提交
git branch -D branchname #删除分支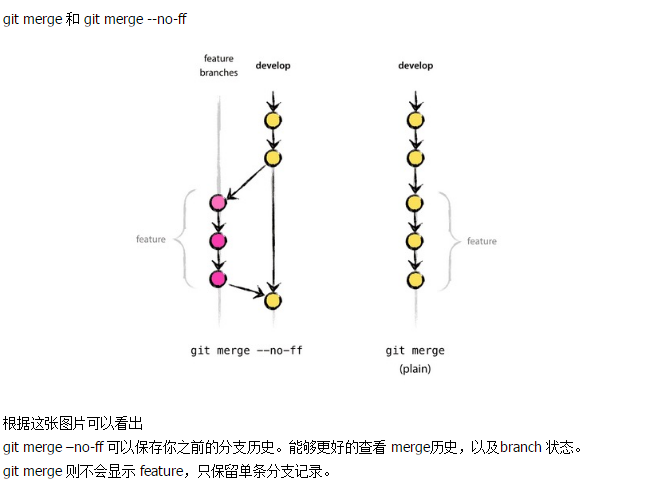
git stash 用来缓存当前暂时保存的分支信息。
假设当前的分支为 originbranch ,要切换的分支为 otherbranch.
则如下:
git stash #暂时保存
git checkout otherbranch #切换分支
git add . #添加文件
git commit -m "some change " #提交
git push origin otherbranch #push
git checkout originbranch #切回分置
git stash pop #恢复
撤销没有push,但已经commit的commit。
git log
git reset --hard commit号call,apply,bind 方法都可以实现方法调用。
call,apply可以用来修改上下文环境,修改this。
var o = {
  name: "this is o",
  say() {
    console.log(this.name);
  }
};
var name = "this is window";
o.say(); // this is o
var say = o.say;
say(); // this is window
say.call(o); //this is o
say.apply(o) // this is o
而bind可以用来修改上下文属性,修改this,只是有一点点区别。
var fn = say.bind(o); //获取传入this值之后的回调方法
fn(); //this is o
手动实现bind方法(精简版)。
var bind = function(context) {
  var self = this;
  return function(){
    self.call(context,arguments);
  }
}call的参数列表为一个一个参数,而apply的第二个参数必须为数组。
而bind则是先传入上下文对象,以及参数列表,然后返回绑定了上下文的方法但并不执行,需要手动调用。
var o = {
  name: 'this is o',
  say(x, y, z) {
    console.log(x, y, z);
  }
}
var name = 'this is name';
var saycall = o.say;
saycall.call(o,1,2,3);
var sayapply = o.say;
sayapply.apply(o,[1,2,3]);
而bind方法如下:
var say = o.say;
var saybind = say.bind(o,1,2); //传入this以及第一个和第二个参数
saybind(3);1 action为动作,分为动作类型与动作回调,而动作回调主要用来确定参数,然后Dispatch.dispatch进行分派
2 调用dispatch方法之后,会出发之前已经在相应的组件store(此组件store已经继承eventEmit)中register的回调。
3 store中注册的回调会判定action.type来执行相关代码,触发(emit)相应的监控回调。
4 view层之前已经绑定过的监控回调被触发,并执行view components中的更新方法。
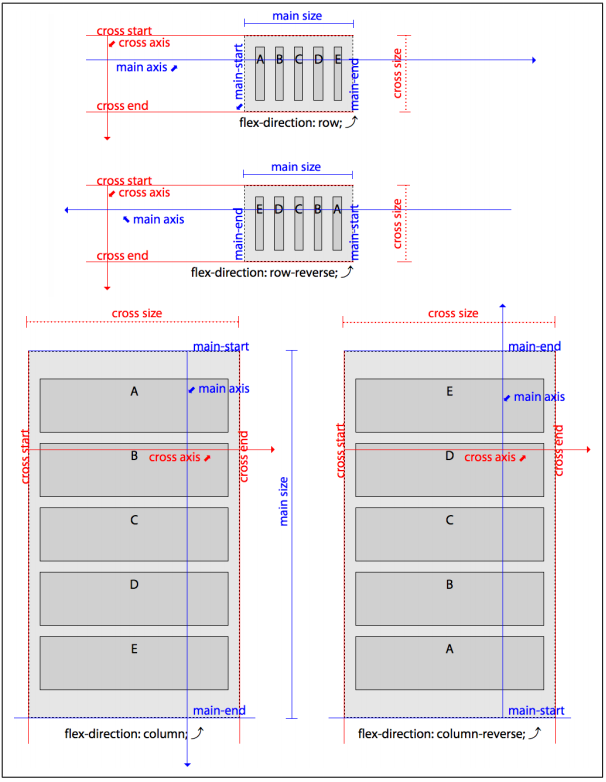
以下内容来自CSS权威指南第四版本。
Flexbox works off of a parent and child relationship. Flexbox layout is activated by declaring display: flex or display: inline-flex on an element. This element becomes a flex container, arranging its children within the space provided and controlling their layout. The children of this flex container become flex items.
Flexbox仅仅影响一对父子元素。可以通过对一个元素使用display:flex或者display: inlne-flex。那么这个元素就会变成一个flex容器,排列它的子元素根据被提供的间隔然后控制它们的布局。flex容器的字元素被称为flex item.
div#one {display: flex;}
div#two {display: inline-flex;}
div {border: 1px dashed; background: silver;}
div > * {border: 1px solid; background: #AAA;}
div p {margin: 0;}

<div id="one">
    <p>flex item with<br>two longer lines</p>
    <span>flex item</span>
    <p>flex item</p>
</div>
<div id="two">
    <span>flex item with<br>two longer lines</span>
    <span>flex item</span>
    <p>flex item</p>
</div>The key thing to keep in mind is that once you set an element to be a flex container,
like the divs in Figure 12-1, it will only flex its immediate children, and not further descendants.
flex容器只会影响它的直接(immediate )子元素,而不会影响其它后代。
Within a flex container, items line up on the main axis.The main axis can either be horizontal or vertical, so you can arrange items into columns or rows. The main axis takes on the directionality set via the writing mode.
The element on which display: flex or display: inline-flex is applied becomes the flex container and generates a flex formatting context for its child elements.
These children are lex items, whether they are DOM nodes, text nodes, or generated content. Absolutely positioned children of flex containers are also flex items, but each is sized and positioned as though it is the only flex item in the flex container.
Values: row | row-reverse | column | column-reverse
Initial: value row
Applies to: Flex containersIf the flex items don’t all fit into the main axis of the flex container, by default the flex items will not wrap, nor will they necessarily resize. Rather, the flex items may shrink if allowed to do so via the flex item’s flex property and/or the flex items may overflow the bounding container box.
Values: nowrap | wrap | wrap-reverse
Initial value: nowrap
Applies to: Flex containers
The flex-wrap property controls whether the flex container is limited to being a single-line container or is allowed to become multiline if needed.
The flex-flow property lets you define the directions of the main and cross axes, and whether the flex items can wrap to more than one line if needed.
Values: <flex-direction> ‖ <flex-wrap>
Initial value: row nowrap
Applies to: Flex containers
The flex-flow shorthand property sets the flex-direction and flex-wrap properties to define the flex container’s wrapping and main and cross axes.
As long as display is set to flex or inline-flex, omitting flex-flow, direction, and flex-wrap is the same as declaring any of the following three,
flex-flow: row;
flex-flow: nowrap;
flex-flow: row nowrap;First: flex items are laid out along the main axis. Flex lines are added in the direction of the cross axis.
关键概念
main axis : The axis along which content flows. In flexbox, this is the direction in which flex items are flowed.
main size: The total length of the content along the main axis.
main start: The end of the main axis from which content begins to flow.
main end: The end of the main axis toward which content flows, opposite the main start.
cross axis: The axis along which blocks are stacked. In flexbox, this is the direction in which new lines of flex items are placed, if flex wrapping is permitted.
cross size: The total length of the content along the cross axis.
cross start: The edge of the cross axis where blocks begin to be stacked.
cross end: The opposite edge of the cross axis from the cross start.
一图胜千言
The default value of nowrap prevents wrapping, so the cross-directions just discussed aren’t relevant when there is no chance of a second flex line.When additional lines are possible—when flex-wrap is set to wrap or wrap-reverse—those lines will be added in the cross direction. The first line is placed at the cross-start, with additional lines being added on the cross-end side.
The justify-content property enables us to direct how flex items are distributed along the main axis of the flex container within each flex line. It is applied to the flex container, not the individual flex items.
指定flex item在flex container中沿着main轴如何排列,该元素只能应用于flex container,不能应用于flex item.
Values: flex-start | flex-end | center | space-between | space-around |
space-evenly
Initial value: flex-start
Applies to: Flex containersWhereas the justify-content defines how flex items are aligned along the flex container’s main axis, the align-items property defines how flex items are aligned along its flex line’s cross axis.
justify-content定义flex item沿着main轴排布,而align-item沿着纵轴排布。
Values: flex-start | flex-end | center | baseline | stretch
Initial value: stretch
Applies to: Flex containersValues: auto | flex-start | flex-end | center | baseline | stretch
Initial value: auto
Applies to: Flex itemsAll the flex items have the align-self’s default value of auto set, meaning they inherit the alignment (in this case, stretch) from the container’s align-items property.
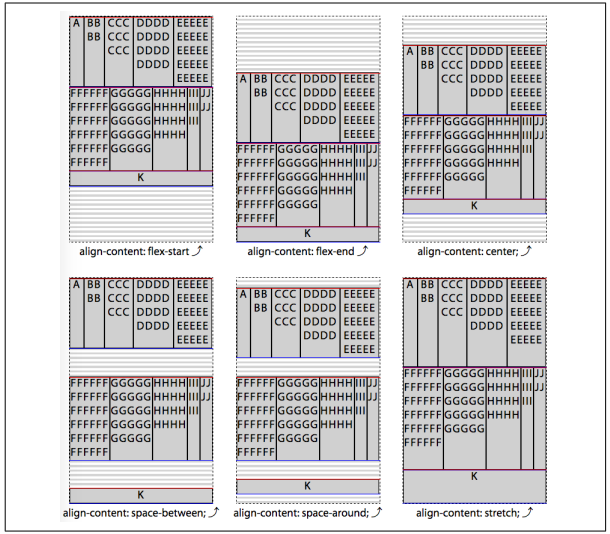
The align-content property aligns a flex container’s lines within a flex container that has extra space in the cross-axis direction, and dictates which direction will have overflow when there is not enough room to fit the flex lines.
Values: flex-start | flex-end | center | space-between | space-around | space-evenly | stretch
Initial value: stretch
Applies to: Multiline lex containers
The align-content property dictates how any extra cross-direction space in a flex container is distributed between and around flex lines. Although the values and concepts are the same, align-content is different from the previously discussed align-items property, which dictates flex item positioning within each flex line
Think of align-content as similar to how justify-content aligns individual items along the main axis of the flex container, but it does it for flex lines with regard to the cross axis of the container. This property only applies to multiline flex containers, having no effect on non-wrapping and otherwise single-line flex containers.
.flex-container {
  display: flex;
  flex-flow: row wrap;
  align-items: flex-start;
  border: 1px dashed;
  height: 480px;
  background-image: url(banded.svg);
}
.flex-items {
    margin: 0;
    flow: 1;
}
We create flex containers simply by adding a display: flex or display: inline-flex to an element that has child nodes. The children of those flex container are called lex items—whether they’re child elements, non-empty text nodes between child elements, or generated content.

The margins of flex items do not collapse. The float and clear properties don’t have an effect on flex items, and do not take a flex item out of flow. In effect, float and clear are ignored when applied to flex items. (However, the float property can still affect box generation by influencing the display property’s computed value.)
aside {
  display: flex;
}
img {
  float: left;
}
<aside>
    <!-- this is a comment -->
    <h1>Header</h1>
    <img src="images/foo.jpg" alt="Foo Master">
    Some text
</aside>
aside {
display: flex;
align-items: center;
}
<aside>
<!-- a comment -->
<h1>Header</h1>
<img src="images/foo.jpg" alt="foo master">
Some text <a href="foo.html">with a link</a> and more text
</aside>While float will not actually float a flex item, setting position: absolute is a different story. The absolutely positioned children of flex containers, just like any other absolutely positioned element, are taken out of the flow of the document.
More to the point, they do not participate in flex layout, and are not part of the document flow. However, they can be impacted by the styles set on the flex container, just as a child can be impacted by a parent element that isn’t a flex container. In addition to inheriting any inheritable properties, the flex container’s properties can affect the origin of the positioning
The absolutely positioned child of a flex container is affected by both the justify-content value of the flex container, and its own align-self value, if there is one.
The order property may not impact where the absolutely positioned flex container child is drawn, but it does impact the order of when it is drawn in relation to its siblings.
The defining aspect of flex layout is the ability to make the flex items “flex”: altering their width or height to fill the available space in the main dimension. A flex con‐tainer distributes free space to its items proportional to their flex grow factor, or shrinks them to prevent overflow proportional to their flex shrink factor.
Declaring the flex shorthand property on a flex item, or defining the individual properties that make up the shorthand, enables authors to define the grow and shrink factors. If there is excess space, you can tell the flex items to grow to fill that space. Or not. If there isn’t enough room to fit all the flex items within the flex container at their defined or default sizes, you can tell the flex items to shrink proportionally to fit into the space. Or not.
Values: [ <flex-grow> <flex-shrink>? ‖ <flex-basis> ] | none
Initial value: 0 1 auto
Applies to: Flex items (children of lex containers)
Percentages: Valid for flex-basis value only, relative to element’s parent’s inner main-axis size
The flex-grow property defines whether a flex item is allowed to grow when there is available space, and, if it is allowed to grow and there is available space, how much will it grow proportionally relative to the growth of other flex item siblings.
Values: <number>
Initial value: 0
Applies to: Flex items (children of lex containers)
The value of flex-grow is always a number. Negative numbers are not valid. You can use non-integers if you like, just as long as they’re zero or greater. The value sets the flex growth factor, which determines how much the flex item will grow relative to the rest of the flex item siblings as the flex container’s free space is distributed.
If there is any available space within the flex container, the space will be distributed proportionally among the children with a nonzero positive growth factor based on the various values of those growth factors.
For example, assume a 750px wide horizontal flex container with three flex items, each set to width: 100px. That means there is a total of 300 pixels of space taken up by the flex items, leaving 450 pixels of “leftover” or available space (since 750 - 300 = 450).
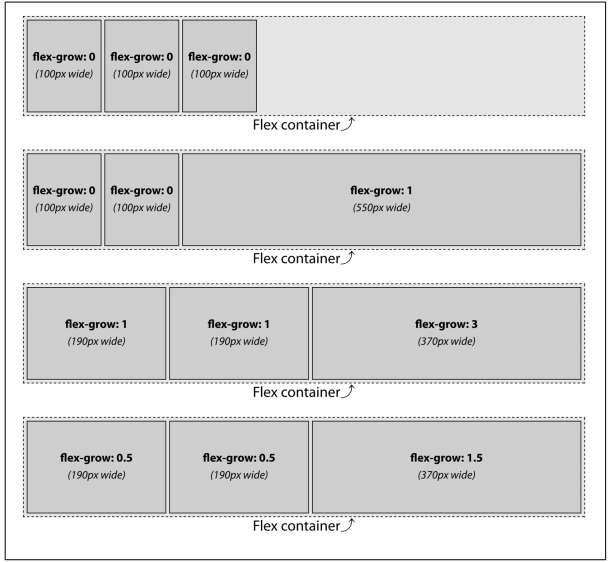
In the second scenario in Figure 12-42, only one of the flex items (the third) has been given a growth factor. The declaration we gave it is flex-grow: 1, but it could be literally any positive number the browser can understand. In this case, with two items having no growth factor and the third having a growth factor, all of the available space is given to the flex item with a growth factor. Thus, the third flex item gets all 450 pixels of available space added to it, arriving at a final width of 550 pixels. The width: 100px applied to it elsewhere in the styles is overridden.
In the third and fourth scenarios, the same flex item widths result despite the differ‐ ing flex growth factors. Let’s consider the third scenario, where the growth factors are 1, 1, and 3. The factors are all added together to get a total of 5. Each factor is then divided by that total to get a proportion. So here, the three values are each divided by five, yielding 0.2, 0.2, and 0.6.
These proportions are each multiplied by the available space to get the amount of growth. Thus:
- 450 px × 0.2 = 90 px
Those are the growth portions added to each flex item’s starting width of 100 pixels. Thus, the final widths are 190 pixels, 190 pixels, and 370 pixels, respectively. The fourth scenario has the same result, because the proportions are the same. Imagine for a moment that we altered the growth factors to be 0.5, 1, and 1.5. Now the math works out such that the first flex item gets one-sixth of the available space, the second gets a third, and the third gets half. This results in the flex items’ final widths being 175, 250, and 425 pixels, respectively. Had we declared growth factors of 0.1, 0.1, and 0.3, or 25, 25, and 75, or really any combination of numbers with a 1:1:3 correspondence, the result would have been identical.
As noted in “Minimum Widths” on page 613, if no width or flex basis is set, the flex basis defaults to auto, meaning each flex item basis is the width of its nonwrapped content. auto is a special value: it defaults to content unless the item has a width set on it, at which point the flex-basis becomes that width. The auto value is discussed in “Automatic Flex Basis” on page 635. Had we not set the width, in this example scenario, with our smallish font size, we would had more than 450 pixels of distributable space along the main axis.
Now let’s consider a case where the flex items have different width values, as well as different growth factors. In Figure 12-43, in the second example, we have flex items that are 100 pixels, 250 pixels, and 100 pixels wide, with growth factors of 1, 1, and 3, respectively, in a container that is 750 pixels wide. This means we have 300 pixels of extra space to distribute among a total of 5 growth factors (since 750 - 450 = 300). Each growth factor is therefore 60 pixels (300 ÷ 5). This means the first and second flex items, with a flex-grow value of 1, will each grow by 60 pixels. The last flex item will grow by 180 pixels, since its flex-grow value is 3.
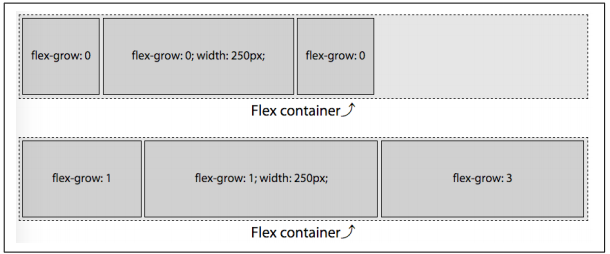
To recap, the available space in the flex container, and the growth factors and final width of each flex item, are:
Available space: 750px - (100px + 250px + 100px) = 300px
Growth factors: 1 + 1 + 3 = 5
Width of each growth factor: 300px ÷ 5 = 60px
When flexed, the width of the flex items, based on their original width and growth
factors, become:
item1 = 100px + (1 × 60px) = 160px
item2 = 250px + (1 × 60px) = 310px
item3 = 100px + (3 × 60px) = 280px
which adds up to 750 pixels.
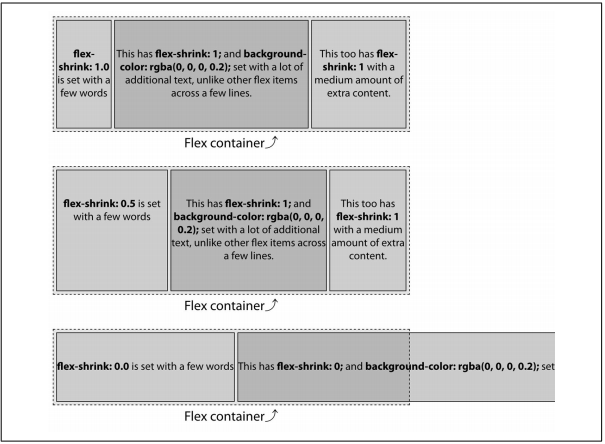
The portion of the flex shorthand property specifies the lex shrink factor. It can also be set via the flex-shrink property.
Values <number>
Initial value 1
Applies to Flex items (children of lex containers)
The shrink factor determines how much a flex item will shrink relative to the rest of its flex-item siblings when there isn’t enough space for them all to fit, as defined by their content and other CSS properties. When omitted in the shorthand flex prop‐ erty value or when both flex and flex-shrink are omitted, the shrink factor defaults to 1. Like the growth factor, the value of flex-shrink is always a number. Negative numbers are not valid. You can use non-integer values if you like, just as long as they’re greater than zero.
Basically, the shrink factor defines how “negative available space” is distributed when there isn’t enough room for the flex items and the flex container isn’t allowed to otherwise grow or wrap.
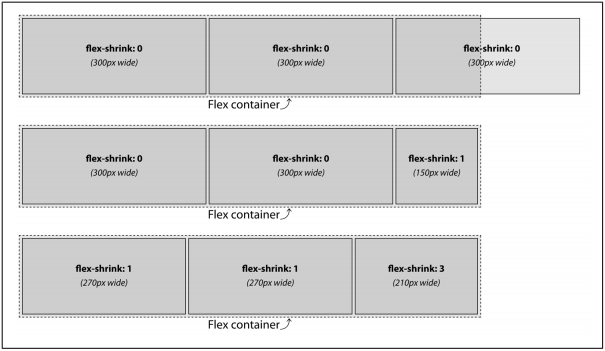
except the flex items are set to width: 300px instead of 100 pixels. We still have a 750-pixels-wide flex container. The total width of the 3 items is 900 pixels, meaning the content starts out 150 pixels wider than the parent flex container. If the items are not allowed to shrink or wrap (see “Wrapping Flex Lines” on page 576), they will burst out from the fixed-size flex container. This is demonstrated in the first example in Figure 12-46: those items will not shrink because they have a zero shrink factor. Instead, they overflow the flex container.
In the second example in Figure 12-46, only the last flex item is set to be able to shrink. The last flex item is thus forced to do all the shrinking necessary to enable all the flex items to fit within the flex container. With 900 pixels worth of content needing to fit into our 750-pixel container, we have 150 pixels of negative available space. The 2 flex items with no shrink factor stay at 300 pixels wide. The third flex item, with a positive value for the shrink factor, shrinks 150 pixels, to end up 150 pixels wide. This enables the 3 items to fit within the container. (In this example the shrink factor was 1, but had it been 0.001 or 100 or 314159.65 or any other positive number the browser could understand, the result would be the same.)
In the third example, we have positive shrink factors for all three flex items:
#example3 flex-item {
  flex-shrink: 1;
}
#example3 flex-item:last-child {
  flex-shrink: 3;
}
As this is the only one of the three flex shorthand properties we declared, this means the flex items will behave as if we had declared the following:
#example3 flex-item {
  flex: 0 1 auto; /* growth defaults to 0, basis to auto */
}
f#example3 flex-item:last-child {
  flex: 0 3 auto;
}
If all items are allowed to shrink, as is the case here, the shrinking is distributed pro‐ portionally based on the shrink factors. This means the larger a flex item’s shrink factor, as compared to the shrink factors of its sibling flex items, the more the item will shrink in comparison. With a parent 750 pixels wide, and 3 flex items with a width of 300 pixels, there are 150 “negative space” pixels that need to be shaved off the flex items that are allowed to shrink (which is all of them in this example). With two flex items having a shrink factor of 1, and one flex item having a shrink factor of 3, we have a total of five shrink factors:
(2 × 1) + (1 × 3) = 5
With 5 shrink factors, and a total of 150 pixels needing to be shaved off all the flex items, each shrink factor is worth 30 pixels:
150px ÷ 5 = 30px
The default flex item size was 300 pixels, leading us to have 2 flex items with a width of 270 pixels each and the last flex item having a width of 210 pixels, which totals 750 pixels:
300px - (1 × 30px) = 270px
300px - (3 × 30px) = 210px
The following CSS produces the same outcome: while the numeric representation of the shrink factors are different, they are proportionally the same, so the flex item widths will be the same:
flex-item {
  flex: 1 0.25 auto;
}
flex-item:last-child {
  flex: 1 0.75 auto;
}
Note that the flex items in these examples will shrink to 210, 210, and 270 pixels, respectively, as long as the content (like media objects or non-wrappable text) within each flex item is not wider than 210, 210, or 270 pixels, respectively. If the flex item contains content that cannot wrap or otherwise shrink in the main-dimension, the flex item will not shrink any further.
Suppose that the first flex items contain a 300-pixels-wide image. That first flex item can not shrink, and other flex items can shrink, therefore it will not shrink, as if it had a null shrink factor. In this case, the first item would be 300 pixels, with the 150 pixels of negative space distributed proportionally based on the shrink factors of the second and third flex items.
That being the case, we have 4 unimpeded shrink factors (one from the second flex item, and three from the third) for 150 pixels of negative space, with each shrink factor being worth 37.5 pixels. The flex items will end up 300, 262.5, and 187.5 pixels respectively, for a total of 750 pixels. The result is illustrated in Figure 12-47:
item1 = 300px - (0 × 37.5px) = 300.0px
item2 = 300px - (1 × 37.5px) = 262.5px
item3 = 300px - (3 × 37.5px) = 187.5px
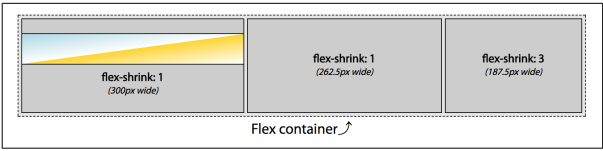
Had the image been 296 pixels wide, that first flex item would have been able to shrink by 4 pixels. The remaining 146 pixels of negative space would then be distributed the among the 4 remaining shrink, yielding 36.5 pixels per factor. The flex items would then be 296, 263.5, and 190.5 pixels wide, respectively.
If all three flex items contained non-wrappable text or media 300 pixels or wider, the none of the three flex items would not shrink, appearing similar to the first example.
The preceding code examples were fairly simple because all the flex items started with the same width. But what if the widths were different? What if the first and last flex items had a width of 250 pixels and the middle flex item had a width of 500 pixels
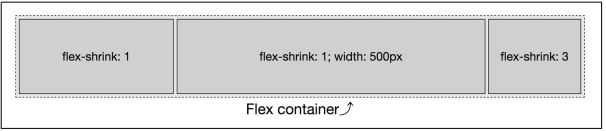
Flex items shrink proportionally relative to both the shrink factor and the flex item’s width, with the width often being the width of the flex item’s content with no wrapping. In Figure 12-48, we are trying to fit 1,000 pixels into a 750 pixels-width flex container. We have an excess of 250 pixels to be removed from 5 shrink factors.
If this were a flex-grow situation, we would simply divide 250 pixels by 5, allocating 50 pixels per growth factor. If we were to shrink that way, we would get flex items 200, 550, and 100 pixels wide, respectively. But that’s not how shrinking actually works.
Here, we have 250 pixels of negative space to proportionally distribute. To get the shrink factor proportions, we divide the negative space by the total of the flex items’ widths (more precisely, their lengths along the main axis) times their shrink factors:

Using this equation, we find the shrink percentage:
= 250px ÷ ((250px × 1) + (500px × 1) + (250px × 3))
= 250px ÷ 1500px
= 0.166666667 (16.67%)
When we reduce each flex item by 16.67% times the value of flex-shrink, we end up with flex items that are reduced by:
item1 = 250px × (1 × 16.67%) = 41.67px
item2 = 500px × (1 × 16.67%) = 83.33px
item3 = 250px × (3 × 16.67%) = 125px
Each reduction is then subtracted from the starting sizes of 250, 500, and 250 pixels, respectively. We thus end up with flex items that are 208.33, 416.67, and 125 pixels wide.
With zero shrink factor, if both the width and flex basis of a flex item at auto, its content will not wrap, even when you think it should. Conversely, any positive shrink value enables content to wrap. Because shrinking is proportional based on shrink factor, if all the flex items have similar shrink factors, the content should wrap over a similar number of lines.
In the three examples shown in Figure 12-49, the flex items do not have a declared width. Therefore, the width is based on the content, because width defaults to auto. The flex container has been made 520 pixels wide, instead of of our usual 750 pixels.
Note that in the first example, where all the items have the same flex-shrink value, all content wraps over four lines. In the second example, the first flex item has a shrink factor half of value of the other flex items, so it wraps the content over (roughly) half the number of lines. This is the power of the shrink factor. In the third example, with no shrink factor, the text doesn’t wrap at all and the flex items overflow the container by quite a bit.
Because the flex property’s shrink factor reduces the width of flex items proportionally, the number of lines of text in the flex items will grow or shrink as the width shrinks or grows, leading to similar height content within sibling flex items when the shrink factors are similar.
In the examples, take the contents of the flex items to be 280, 995, and 480 pixels, respectively—which is the width of the non-wrapping flex items in the third example (as measured by the developer tools, then rounded to make this example a little simpler). This means we have to fit 1,755 pixels of content into a 520 pixels-wide flex container by shrinking the flex items proportionally based on their shrink factor. This means we have 1,235 pixels of negative available space to proportionally distribute.
In our first example, the flex items will end up with the same, or approximately the same, number of text lines. This is because flex items shrink proportionally, based on the width of their content. We didn’t declare any widths, and therefore can’t simply use an explicit element width as the basis for our calculations, as we did in the previous examples. Rather, we distribute the 1,235 pixels of negative space proportionally based on the widths of the content—280, 995, and 480 pixels, respectively. We determine 520 is 29.63% of 1,755. To determine the width of each flex item with a shrink factor of 1, we multiply the
content width of each flex item by 29.63%:
item1 = 280px × 29.63% = 83px
item2 = 995px × 29.63% = 295px
item3 = 480px × 29.63% = 142px
With the default of align-items: stretch (see “Aligning Items” on page 596), a three-column layout will have three columns of equal height. By using a consistent shrink factor for all flex items, you can indicate that the actual content of these three flex items should be of approximately equal height—though, by doing this, the widths of those columns will not necessarily be uniform.
In the second example in Figure 12-49, the flex items don’t all have the same shrink factor. The first flex item will, proportionally, shrink half as much as the others. We start with the same widths: 280, 995, and 480 pixels, respectively, but their shrink factors are 0.5, 1.0, and 1.0. As we know the widths of the content, the shrink factor (X) can be found mathematically
280px + 995px + 480px = 1615px
(0.5 × 280px) + (1 × 995px) + (1 × 480px) = 1235px
X = 1235px ÷ 1615px = 0.7647
We can find the final widths now that we know the shrink factor. If the shrink factor is 76.47%, it means that item2 and item3 will be shrink by that amount, whereas item1 will shrink by 38.23% (because its flex-shrink value is half the others). The amount of shrinkage in each case is, rounded off to the nearest whole number:
item1 = 280px × 0.3823 = 107px
item2 = 995px × 0.7647 = 761px
item3 = 480px × 0.7647 = 367px
Thus, the final widths of the flex items is:
item1 = 280px - 107px = 173px
item2 = 995px - 761px = 234px
item3 = 480px - 367px = 113px
The total combined widths of these 3 flex items is 520 pixels. Adding in varying shrink and growth factors makes it all a little less intuitive. That’s why you likely want to always declare the flex shorthand, preferably with a width or basis set for each flex item. If this doesn’t make sense yet, don’t worry; we’ll cover a few more examples of shrinking as we discuss flex-basis.
redux是类flux的衍生产品,主要解决flux存在的一些问题。
redux具有以下特点:
1 store单一性,唯一数据源
解决flux由于多个store,存在的依赖关系问题,虽然在flux中可以使用waitFor以及dispatchToken等手段解决。
2 状态只读
3 数据改变只能通过纯函数完成
执行过程:
通过Provider组件传递单一数据源Store对象(由于单一数据源,故在程序最顶层处会调用createStore生成数据源),修改数据源操作触发action类型,后通过actionCreator生成action,之后通过dispatch分派给相应的reducer进行处理,reducer根据action 类型进行相应的操作,并返回新的state。而在容器组件中进行对store中的state进行订阅,并将其以props的方式传递给下层的木偶组件。
react-redux解决的问题:
抽离前面提及的对store中的state进行订阅以及数据传递过程,形成connect函数,并允许用户定制mapStateToProps和mapDispatchToProps方法与下层的木偶组件进行通信,之后返回一个高阶组件,允许与木偶组件进行连接,形成新的容器组件。
虽然现在前端已经是webpack,gulp,rollup,ES6 等加载器,但在那个前端加载器一无所有的年代,requirejs,seajs也曾站在巅峰过。最近有时间,来阅读一下曾经的CMD模块加载器的源代码,感受一下大神的思路。
- 并行加载,但是顺序执行,这一点和浏览器的机制一样,其实也相当于是模拟浏览器的机制。
- define 触发执行
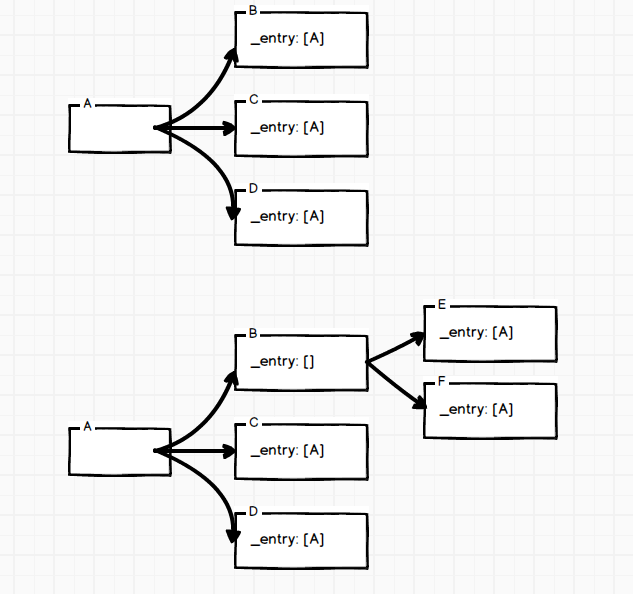
- _entry用来保存入口模块,用来触发factory callback,以及检测remain的值。
- m.fetch用来拉取文件
- addOnload添加onload监听
- onload事件竟然是在代码执行之后才触发
- 异步加载的js , load方法在脚本执行之后触发。
- define之法执行时,解析依赖。
- _remain用来计数,剩下需要加载的模块
- 虽然文件是并行加载,但是factory确实同步执行,factory会被保存起来,直到所有模块加载完成,然后逐一触发。
- 执行方法是在exec中进行
Module.use = function (ids, callback, uri) {
  var mod = Module.get(uri, isArray(ids) ? ids : [ids])

  //_enrty入口模块引用,use方法中将自身模块加入到入口中
  mod._entry.push(mod)
  mod.history = {}
  mod.remain = 1

  //callback方法
  mod.callback = function() {
    var exports = []
    var uris = mod.resolve()

    for (var i = 0, len = uris.length; i < len; i++) {
      exports[i] = cachedMods[uris[i]].exec()
    }

    if (callback) {
      callback.apply(global, exports)
    }

    delete mod.callback
    delete mod.history
    delete mod.remain
    delete mod._entry
  }

  //加载模块
  mod.load()
}
load方法
Module.prototype.load = function() {
  var mod = this

  // If the module is being loaded, just wait it onload call
  if (mod.status >= STATUS.LOADING) {
    return
  }

  mod.status = STATUS.LOADING

  // Emit `load` event for plugins such as combo plugin
  var uris = mod.resolve()
  emit("load", uris)

  //获取依赖模块对象
  for (var i = 0, len = uris.length; i < len; i++) {
    mod.deps[mod.dependencies[i]] = Module.get(uris[i])
  }

  // Pass entry to it's dependencies
  //对依赖的模块进行遍历,设置对应的入口_entry值
  //用来保存入口模块引用,方便模块加载完成之后factory方法的调用
  mod.pass()

  // If module has entries not be passed, call onload
  if (mod._entry.length) {
    mod.onload()
    return
  }

  // Begin parallel loading
  var requestCache = {}
  var m

  for (i = 0; i < len; i++) {
    m = cachedMods[uris[i]]

    if (m.status < STATUS.FETCHING) {
      m.fetch(requestCache)
    }
    else if (m.status === STATUS.SAVED) {
      m.load()
    }
  }

  // Send all requests at last to avoid cache bug in IE6-9. Issues#808
  for (var requestUri in requestCache) {
    if (requestCache.hasOwnProperty(requestUri)) {
      requestCache[requestUri]()
    }
  }
}
pass方法
Module.prototype.pass = function() {
  var mod = this

  var len = mod.dependencies.length

  for (var i = 0; i < mod._entry.length; i++) {
    var entry = mod._entry[i]
    var count = 0
    for (var j = 0; j < len; j++) {
      var m = mod.deps[mod.dependencies[j]]
      // If the module is unload and unused in the entry, pass entry to it
      if (m.status < STATUS.LOADED && !entry.history.hasOwnProperty(m.uri)) {
        entry.history[m.uri] = true
        count++
        m._entry.push(entry)
        if(m.status === STATUS.LOADING) {
          m.pass()
        }
      }
    }
    // If has passed the entry to it's dependencies, modify the entry's count and del it in the module
    if (count > 0) {
      // remain的初始值就是1,表示默认就会有一个未加载的模块,所有需要减1
      entry.remain += count - 1
      // 如果有未加载的依赖项,则移除掉入口模块的entry
      mod._entry.shift() //同上,由于当前模块已经加载,移除模块的_entry
      i-- //元素被移除一个,所以标记退一格
    }
  }
}
pass方法拉取依赖模块,如果依赖模块没有被加载的话,那么就给依赖模块加上_entry入口模块。
并且如果当前模块已经被加载,且还有未加载的依赖项的话,那么当前模块就会移除掉_entry。
那么可以得出,如果当前模块被加载,且没有要加载的依赖项,当前模块的_entry值就不会为0,因为在use方法中一开始就被压入了自身模块。
所以在load方法会对_entry的长度进行判断,经历过pass方法之后,当前模块的_entry长度不为0 ,则当前模块以及依赖模块已经加载ok。
// If module has entries not be passed, call onload
if (mod._entry.length) {
  mod.onload()
  return
}
如果存在依赖没有加载完,那么就会拉取依赖模块.
for (i = 0; i < len; i++) {
  m = cachedMods[uris[i]]

  if (m.status < STATUS.FETCHING) {
    m.fetch(requestCache)
  }
  else if (m.status === STATUS.SAVED) {
    m.load()
  }
}

// Send all requests at last to avoid cache bug in IE6-9. Issues#808
for (var requestUri in requestCache) {
  if (requestCache.hasOwnProperty(requestUri)) {
    requestCache[requestUri]()
  }
}
fetch方法
// 拉取模块
Module.prototype.fetch = function(requestCache) {
  var mod = this
  var uri = mod.uri

  mod.status = STATUS.FETCHING

  // Emit `fetch` event for plugins such as combo plugin
  var emitData = { uri: uri }
  emit("fetch", emitData) //触发fetch事件,通常为保留的plugin事件接口,参考切面编程
  var requestUri = emitData.requestUri || uri

  // Empty uri or a non-CMD module
  if (!requestUri || fetchedList.hasOwnProperty(requestUri)) {
    mod.load()
    return
  }

  if (fetchingList.hasOwnProperty(requestUri)) {
    callbackList[requestUri].push(mod)
    return
  }

  fetchingList[requestUri] = true
  callbackList[requestUri] = [mod]

  // Emit `request` event for plugins such as text plugin
  // 生成一个emitData
  emit("request", emitData = {
    uri: uri,
    requestUri: requestUri,
    onRequest: onRequest,
    charset: isFunction(data.charset) ? data.charset(requestUri) : data.charset,
    crossorigin: isFunction(data.crossorigin) ? data.crossorigin(requestUri) : data.crossorigin
  })

  // 将sendRequest 方法封装给对应的requestCache对象中
  // sendRequest方法实际是调用了seajs的request方法
  // { 'a.js' : sendRequest }
  if (!emitData.requested) {
    requestCache ?
      requestCache[emitData.requestUri] = sendRequest :
      sendRequest()
  }

    // 上面给每一个模块一个方法的原因,应该是由于emitData的值不一样,多个方法,可以将数据存储在闭包内,这样保证了数据的正确性。
  //将onRequest作为callback传入
  function sendRequest() {
    seajs.request(emitData.requestUri, emitData.onRequest, emitData.charset, emitData.crossorigin)
  }

  ....
关于request方法
//是否支持webworker
if (isWebWorker) {
  function requestFromWebWorker(url, callback, charset, crossorigin) {
    // Load with importScripts
    var error
    try {
      importScripts(url)
    } catch (e) {
      error = e
    }
    callback(error)
  }
  // For Developers
  seajs.request = requestFromWebWorker
}
else {
  var doc = document
  var head = doc.head || doc.getElementsByTagName("head")[0] || doc.documentElement
  var baseElement = head.getElementsByTagName("base")[0]

  var currentlyAddingScript

  function request(url, callback, charset, crossorigin) {
    var node = doc.createElement("script")

    if (charset) {
      node.charset = charset
    }

    if (!isUndefined(crossorigin)) {
      node.setAttribute("crossorigin", crossorigin)
    }
    //添加onload方法,将callback传入,其实就是上面说的onRequest方法
    addOnload(node, callback, url)

    node.async = true
    node.src = url

    // For some cache cases in IE 6-8, the script executes IMMEDIATELY after
    // the end of the insert execution, so use `currentlyAddingScript` to
    // hold current node, for deriving url in `define` call
    currentlyAddingScript = node

    // ref: #185 & http://dev.jquery.com/ticket/2709
    baseElement ?
        head.insertBefore(node, baseElement) :
        head.appendChild(node)

    currentlyAddingScript = null
  }

  function addOnload(node, callback, url) {
    var supportOnload = "onload" in node

    if (supportOnload) {
      // 指定load事件回调
      node.onload = onload
      node.onerror = function() {
        emit("error", { uri: url, node: node })
        onload(true)
      }
    }
    else {
      // 指定load事件回调
      node.onreadystatechange = function() {
        if (/loaded|complete/.test(node.readyState)) {
          onload()
        }
      }
    }

    function onload(error) {
      // Ensure only run once and handle memory leak in IE
      node.onload = node.onerror = node.onreadystatechange = null

      // Remove the script to reduce memory leak
      if (!data.debug) {
        head.removeChild(node)
      }

      // Dereference the node
      node = null
      //此处的callback 即为上面传入的回调方法,也就是onRequest方法
      callback(error)
    }
  }

  // For Developers
  seajs.request = request
}
接下来,浏览器会通过异步加载的方式进行加载文件,文件加载之后会先执行模块,这里对模块进行了一定的规范,必须用define进行定义,这样文件执行时,会优先执行define方法。
Module.define = function (id, deps, factory) {
  //前面调整了一下参数
  var argsLen = arguments.length

  // define(factory)
  if (argsLen === 1) {
    factory = id
    id = undefined
  }
  else if (argsLen === 2) {
    factory = deps

    // define(deps, factory)
    if (isArray(id)) {
      deps = id
      id = undefined
    }
    // define(id, factory)
    else {
      deps = undefined
    }
  }

  // Parse dependencies according to the module factory code
  // 对定义的模块中的依赖进行解析,主要用来解析require字段
  if (!isArray(deps) && isFunction(factory)) {
    deps = typeof parseDependencies === "undefined" ? [] : parseDependencies(factory.toString())
  }

  var meta = {
    id: id,
    uri: Module.resolve(id),
    deps: deps,
    factory: factory
  }
  // 这里需要考虑一个点,因为如果是匿名模块的话,当前模块就不存在id,那么就需要用到
  // getCurrentScript方法获取当前文件的uri作为存储标记,因为这个id值在一开始就没传递。如
  // 文件 a.js : define(function(){})
  // Try to derive uri in IE6-9 for anonymous modules
  if (!isWebWorker && !meta.uri && doc.attachEvent && typeof getCurrentScript !== "undefined") {
    var script = getCurrentScript()

    if (script) {
      meta.uri = script.src
    }

    // NOTE: If the id-deriving methods above is failed, then falls back
    // to use onload event to get the uri
  }

  // Emit `define` event, used in nocache plugin, seajs node version etc
  emit("define", meta)

  //当前模块已经加载完成,对模块进行保存
  meta.uri ? Module.save(meta.uri, meta) :
    // Save information for "saving" work in the script onload event
    anonymousMeta = meta
}
define方法执行完毕之后,就会进行触发load方法,也就是开始执行上面提到的onRequest回调。
  // 模块触发load方法是被调用
  function onRequest(error) {
    delete fetchingList[requestUri]
    fetchedList[requestUri] = true

    // Save meta data of anonymous module
    if (anonymousMeta) {
      Module.save(uri, anonymousMeta)
      anonymousMeta = null
    }

    // Call callbacks
   //获取该模块的回调方法,由于同一个模块可能被多处引用,所以此处是一个数组,正常情况下此处应该只有一个值
    var m, mods = callbackList[requestUri]
    delete callbackList[requestUri]
    while ((m = mods.shift())) {
      // When 404 occurs, the params error will be true
      if(error === true) {
        m.error()
      }
      else {
        m.load()
       // 没有错误信息则执行 load方法,表示当前模块已经加载完毕,可以进行安装,
       // 然后又开始遍历其是否存在依赖模块
      }
    }
  }
}
接下来,如果存在依赖模块则会继续进行拉取,如果没有则会触发以下条件
if (mod._entry.length) {
  mod.onload()
  return
}
执行其factory方法。
Module.prototype.onload = function() {
  var mod = this
  mod.status = STATUS.LOADED //设定状态

  // When sometimes cached in IE, exec will occur before onload, make sure len is an number
  for (var i = 0, len = (mod._entry || []).length; i < len; i++) {
    var entry = mod._entry[i] //遍历其关联的入口模块
    if (--entry.remain === 0) { //判定其remain 剩余需要加载的依赖模块是否安装完毕
      entry.callback() //一一执行入口模块的callback,也就是其factory方法
    }
  }

  delete mod._entry
}
那么依赖模块的factory方法是怎么执行的呢?
其实也在其入口模块的callback方法执行的时候进行遍历执行的。可以查看入口中的callback定义。
Module.use = function (ids, callback, uri) {

  ...

  mod.callback = function() {
    var exports = []
    var uris = mod.resolve()

    for (var i = 0, len = uris.length; i < len; i++) {
      exports[i] = cachedMods[uris[i]].exec() //遍历依赖模块并且进行执行其方法
    }

    if (callback) {
      callback.apply(global, exports)
    }

    delete mod.callback
    delete mod.history
    delete mod.remain
    delete mod._entry
  }

  mod.load()
}
这里要注意的是cachedMods对象,这是一个全局对象,而每次调用Module.get的时候,如果不存在模块对象,就会创建一个对象,并保存在cachedMods中。
接下来看一下 exec方法
Module.prototype.exec = function () {
  var mod = this

  // When module is executed, DO NOT execute it again. When module
  // is being executed, just return `module.exports` too, for avoiding
  // circularly calling
  if (mod.status >= STATUS.EXECUTING) {
    return mod.exports
  }

  mod.status = STATUS.EXECUTING

  if (mod._entry && !mod._entry.length) {
    delete mod._entry
  }

  //non-cmd module has no property factory and exports
  if (!mod.hasOwnProperty('factory')) {
    mod.non = true
    return
  }

  // Create require
  var uri = mod.uri

  function require(id) {
    var m = mod.deps[id] || Module.get(require.resolve(id))
    if (m.status == STATUS.ERROR) {
      throw new Error('module was broken: ' + m.uri)
    }
    return m.exec()
  }

  require.resolve = function(id) {
    return Module.resolve(id, uri)
  }

  require.async = function(ids, callback) {
    Module.use(ids, callback, uri + "_async_" + cid())
    return require
  }

  // Exec factory
  // 获取factory 方法
  var factory = mod.factory
  //判断是否是一个函数,是一个方法,则直接执行,
  // 并且把export,require等属性传递过去,修改this为exports
  var exports = isFunction(factory) ?
    factory.call(mod.exports = {}, require, mod.exports, mod) :
    factory

  if (exports === undefined) {
    exports = mod.exports
  }

  // Reduce memory leak
  delete mod.factory

  mod.exports = exports
  mod.status = STATUS.EXECUTED

  // Emit `exec` event
  emit("exec", mod)

  return mod.exports
}
到此 seajs就执行结束了。
Module.save方法
// Save meta data to cachedMods
Module.save = function(uri, meta) {
  var mod = Module.get(uri) //新建一个Module实例,并且存放在cachedMods中,然后设置其属性

  // Do NOT override already saved modules
  if (mod.status < STATUS.SAVED) {
    mod.id = meta.id || uri
    mod.dependencies = meta.deps || []
    mod.factory = meta.factory
    mod.status = STATUS.SAVED

    emit("save", mod)
  }
}
Module.get = function(uri, deps) {
return cachedMods[uri] || (cachedMods[uri] = new Module(uri, deps))
}
// require方法 直接调用 onload方法,并执行
seajs.require = function(id) {
  var mod = Module.get(Module.resolve(id))
  if (mod.status < STATUS.EXECUTING) {
    mod.onload()
    mod.exec()
  }
  return mod.exports
}
define模块之中的 require与require.async方法
  function require(id) {
    var m = mod.deps[id] || Module.get(require.resolve(id))
    if (m.status == STATUS.ERROR) {
      throw new Error('module was broken: ' + m.uri)
    }
    return m.exec()
  }

  require.async = function(ids, callback) {
    Module.use(ids, callback, uri + "_async_" + cid())
    return require
  }
看以看到这里的require方法是直接使用模块,然后调用其exec方法,而require.async则是使用use方法,那么需要重新去异步加载,所以这也是为什么require是同步的,这require.async是异步加载的原因。
最后配上两张对于_entry理解的图
等有时间再来整一张完整的流程图,希望有时间,哈哈哈.....
tips:
1 seajs 中define方法的第二个参数如果被传递,那么会加载该模块但不会执行该factory方法。
当然这也符合cmd的特性,虽然可以提前加载模块但不会立刻执行。
define(id, deps, function(){}2 seajs 中加载依赖方式使用require
define(id, function() {
  require('./a.js');
  //源码中会对require进行解析,并且当前模块factory执行时,会调用对应的require方法,从而执行依赖模块的factory方法
})正着RegExp中方法,用来检测字符串是否与正则匹配,返回ture or false。
正则RegExp中的方法,只返回第一个匹配。
1 当匹配的正则后没有带g时,则返回匹配到的值。
2 当匹配的正则后带有g时,返回一个数组。数组第一个值为完整匹配,后面的值依次为该匹配中第一、第二、第...个分组(反向引用)
var regExp = /(a)(b)(c)/g;
var str = 'abcabc';

regExp.exec(str); //["abc", "a", "b", "c", index: 0, input: "abcabc", groups: undefined]字符串String中方法,返回正则匹配的值。
1 当匹配的正则后没有带g时,则返回匹配到的值。
2 当匹配的正则后带有g时,返回一个数组。数组的值依次为匹配到的值。注意与上面的分组的区别,这里为可以匹配到的多个值。
var regExp = /(a)(b)(c)/g;
var str = 'abcabc';

str.match(regExp); //["abc", "abc"]字符串String中方法,可以对匹配到的值进行操作。
var str = '123ddd';
str.replace(/(\d)/g, function(match, item) {
  return item * 2;
}
//246ddd
var str = '123ddd';
str.replace(/(\d+)(ddd)/g, function(match, item, item2) {
return (item * 2) + ( '(' + item2 + ')' );
});
//"246(ddd)"var str = '123ddd';
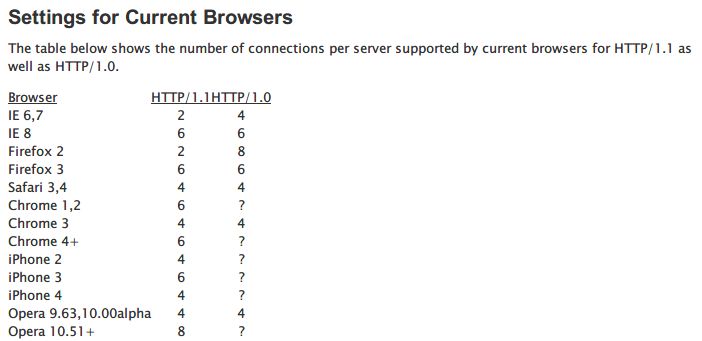
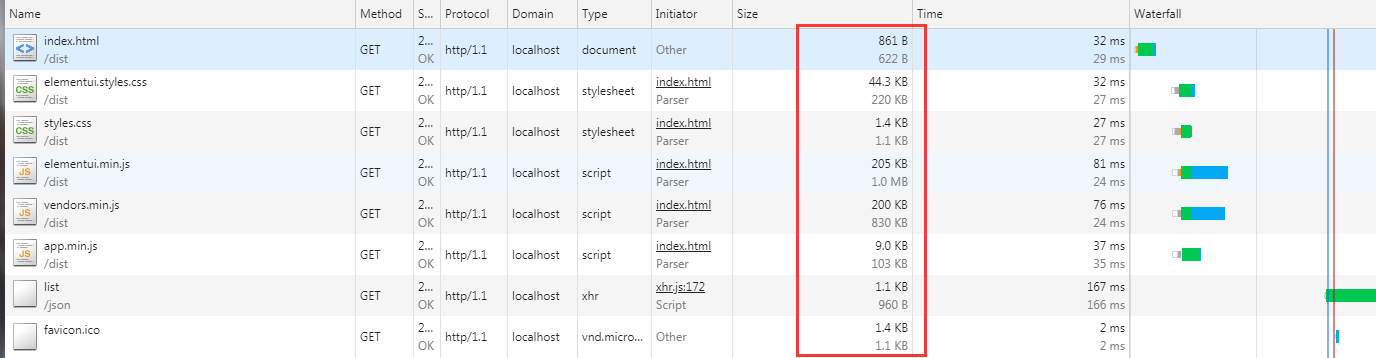
str.replace(/(\d+)(ddd)/g, '($2)[$1]'); //(ddd)[123]在没有keep-alive的时代,每一个请求都需要单独的建立一个连接,每一个连接都需要与服务器握手与挥手的操作。其中效率可想而知。
一图解千愁
注意的点:
1 HTTP1.1中keep-alive,同一个连接在一定的时间内可以被多次请求数据,而这个时间在WEB服务器中可以进行配置。
2 请求的限制数量是针对于同一域名的,同一个域名下的同时连接数量有一定的限制,目前大部分最大连接数量为6个,旧式IE为2个。
3 针对不同的资源,放在不同的域名可以,可以是的资源同时并发加载,一定程度可以缓解请求数量的限制。如果所有资源都放在同一个域名下,那么超出数量的资源,将会排队。如static.ak.fbcdn.net,ssl.gstatic.com
The HTTP 1.1 specification (section 8.1.4) states that browsers should allow at most two concurrent connections per hostname (although newer browsers allow more than that: see Browserscope for a list). If an HTML document contains references to more resources (e.g. CSS, JavaScript, images, etc.) than the maximum allowed on one host, the browser issues requests for that number of resources, and queues the rest. As soon as some of the requests finish, the browser issues requests for the next number of resources in the queue. It repeats the process until it has downloaded all the resources. In other words, if a page references more than X external resources from a single host, where X is the maximum connections allowed per host, the browser must download them sequentially, X at a time, incurring 1 RTT for every X resources. The total round-trip time is N/X, where N is the number of resources to fetch from a host. For example, if a browser allows 4 concurrent connections per hostname, and a page references 100 resources on the same domain, it will incur 1 RTT for every 4 resources, and a total download time of 25 RTTs.
Balance parallelizable resources across hostnames. Requests for most static resources, including images, CSS, and other binary objects, can be parallelized. Balance requests to all these objects as much as possible across the hostnames. If that's not possible, as a rule of thumb, try to ensure that no one host serves more than 50% more than the average across all hosts. So, for example, if you have 40 resources, and 4 hosts, each host should serve ideally 10 resources; in the worst case, no host should serve more than 15. If you have 100 resources and 4 hosts, each host should serve 25 resources; no one host should serve more than 38.
Static content, such as images, JS and CSS files, don't need to be accompanied by cookies, as there is no user interaction with these resources. You can decrease request latency by serving static resources from a domain that doesn't serve cookies. This technique is especially useful for pages referencing large volumes of rarely cached static content, such as frequently changing image thumbnails, or infrequently accessed image archives. We recommend this technique for any page that serves more than 5 static resources. (For pages that serve fewer resources than this, it's not worth the cost of setting up an extra domain.)
To reserve a cookieless domain for serving static content, register a new domain name and configure your DNS database with a CNAME record that points the new domain to your existing domain A record. Configure your web server to serve static resources from the new domain, and do not allow any cookies to be set anywhere on this domain. In your web pages, reference the domain name in the URLs for the static resources.
参考地址
1 HTPP2中提出了二进制数据帧与流传输,并对帧的顺序进行标记
2 HTTP2中不管加载多少文件,,只建立一个连接,并可以将最大请求数拉到服务的最大值。
可以理解为删除方法
最后一个参数为可变参数,用来做增加用,第一个参数为删除元素的index,delnum为偏移量,即删除个数。
delnum可为0,表示不删除。
addItem.... 可省略,表示不添加。
同样为删除方法
start参数为起始索引,end为结束索引。end参数可省略。
如果end参数缺失,则为从start至数组结束皆移除。
如果end为负数,则end的值为数组末尾开始算起的元素。
1 皆可用于删除数组元素
2 splice可用于添加,slice不能
3 slice不操纵原数组,splice修改原数组。
4 slice返回值为删除元素之后的数组,splice返回值为被删除的元素,且原数组已移除需要删除的元素。
learn node js
跨域是浏览器的安全策略所衍生的问题,主要表现为浏览器会对服务端返回的数据进行拦截。
需要注意是即使是在跨域的情况下,请求一样可以发送出去,只是服务端返回的数据被浏览器拦截掉了。
所有即使是请求失败了,但也有可能已经对服务器进行了操作。
http请求分为以下两种请求
请求方法是以下三种方法之一: HEAD, GET, POST
HTTP的头信息不超出以下几种字段:
Accept,
Accept-Language,
Content-Language,
Last-Event-ID,
Content-Type:只限于三个值 application/x-www-form-urlencoded、multipart/form-data、text/plain
对于简单请求,浏览器直接发出CORS请求。具体来说,就是在头信息之中,增加一个Origin字段
复杂请求是那种对服务器有特殊要求的请求,比如请求方法是PUT或DELETE,或者Content-Type字段的类型是application/json
复杂请求的CORS请求,会在正式通信之前,增加一次HTTP查询请求,称为"预检"请求(preflight)。
浏览器发现,这是一个非简单请求,就自动发出一个"预检"请求,要求服务器确认可以这样请求,
"预检"请求用的请求方法是OPTIONS,表示这个请求是用来询问的。头信息里面,关键字段是Origin,表示请求来自哪个源。
除了Origin字段,"预检"请求的头信息包括两个特殊字段。
Access-Control-Request-Method
Access-Control-Request-Headers
服务器收到"预检"请求以后,检查了Origin、Access-Control-Request-Method和Access-Control-Request-Headers字段以后,确认允许跨源请求,就可以做出回应
一旦服务器通过了"预检"请求,以后每次浏览器正常的CORS请求,就都跟简单请求一样,会有一个Origin头信息字段。服务器的回应,也都会有一个Access-Control-Allow-Origin头信息字段。
module.exports = {

    /**
    * Return request header.
    *
    * @return {Object}
    * @api public
    */

    get header() {
        return this.req.headers;
    },

    /**
    * Set request header.
    *
    * @api public
    */

    set header(val) {
        this.req.headers = val;
    }
}1 如果继承extends,必须在子类construstor中调用super方法
2 class中的方法,没有this指针
3 class语法中是语法糖而已,实际还是使用的function进行创建对象
增强的对象字面量
可以在对象字面量里面定义原型
定义方法可以不用function关键字
//通过对象字面量创建对象
var human = {
    breathe() {
        console.log('breathing...');
    }
};
var worker = {
    __proto__: human, //设置此对象的原型为human,相当于继承human
    company: 'freelancer',
    work() {
        console.log('working...');
    }
};
human.breathe();//输出 ‘breathing...’
//调用继承来的breathe方法
worker.breathe();//输出 ‘breathing...’ES6中可以使用,反引号 ` 用来创建字符串,此种方式创建的字符串中可以包含美元符加花括号包裹的变量${varibel},如:
return `${this.protocol}://${this.host}`;https://developer.mozilla.org/en-US/docs/Web/JavaScript/Reference/Operators/Spread_syntax
Spread syntax allows an iterable such as an array expression or string to be expanded in places where zero or more arguments (for function calls) or elements (for array literals) are expected, or an object expression to be expanded in places where zero or more key-value pairs (for object literals) are expected
展开运算符允许将一个
可迭代的变量如数组表达式或者字符串展开到需要0个或多个参数(函数调用)或元素(数组迭代)的位置,或者将一个对象表达式展开到一个需要0个或者多个键值对(对象迭代)的位置。
function sum(x, y, z) {
  return x + y + z;
}

const numbers = [1, 2, 3];

console.log(sum(...numbers));//for function call
// expected output: 6

console.log(sum.apply(null, numbers));
// expected output: 6
for function call
myFunction(...iterableObj);for array literals or strings
[...iterableObj, '4', 'five', 6];For object literals (new in ECMAScript 2018):
let objClone = { ...obj };ES6 新的赋值方案,用来代理原来的手动赋值。包括数组解构(array destructuring)与对象解构(object destructuring)如下:
function foo() {
    return [1,2,3];
}

function bar() {
    return {
        x: 4,
        y: 5,
        z: 6
    };
}

var [ a, b, c ] = foo();
var { x: x, y: y, z: z } = bar();

console.log( a, b, c );             // 1 2 3
console.log( x, y, z );             // 4 5 6
Destructuring symmetrically flips that pattern, so that [a,b,c] on the lefthand side of the = assignment is treated as a kind of "pattern" for decomposing the righthand side array value into separate variable assignments.
一般情况下,我们习惯 [a,b,c] 在 = (赋值号) 右边的这种语法,Destructuring(解构)语法翻转了这种模式,使[a,b,c] 放在了 = 的左边
解构赋值定义了一种特殊的赋值pattern模式,用来分解=(赋值号)右边的数组,并把值赋值给独立的变量。
如果对象属性名和你声明的变量名一样,可以简写如下:
var { x, y, z } = bar();

console.log( x, y, z );             // 4 5 6
但是 { x, ... } 的这种语法是省略了
x:还是:x呢? 我们可以确认是省略了x:当使用简写方式。
既然可以使用缩写方式,那为什么要使用完整的方式呢? 由于完整的方式可以将属性赋值给一个不同的变量名,如:
var { x: bam, y: baz, z: bap } = bar();

console.log( bam, baz, bap );       // 4 5 6
console.log( x, y, z );             // ReferenceError
这里有一个问题需要注意,虽然很微妙,但是在某些情况下非常重要,对象解构 { x : bam, y: baz } 与 字面量对象 { a: b } 是有区别的。
需要注意的是,这里的 {x: bam, y: baz, z: bap} 的模式是 { source : target }的模式。 所有这里直接获取 x,y,z 会报引用错误。
也就是说,这里的x 是对象解构出来的值,而 bam才是用户声明的引用。
而字面量对象采用的模式是 { target: source } 模式,如{ a: b },那么 a是引用,b 是值。
从上也就可以解释为什么使用简写方案时,省略的是
x:,因为 解构模式中右边的值才是表示标识符。
解构destructuring 是一个通用表达式,不只是用来声明变量。
var a, b, c, x, y, z;

[a,b,c] = foo();
( { x, y, z } = bar() );

console.log( a, b, c );             // 1 2 3
console.log( x, y, z );             // 4 5 6
对象解构需要如果前面没有var/let/const 声明符的话,需要加上( ),否则的话会被当成 { } 块级作用域符。
In fact, the assignment expressions (a, y, etc.) don't actually need to be
justvariable identifiers. Anything that's a valid assignment expression is allowed.
实际上,赋值表达式 (a、 y 等 ) 并不必须是变量标识符。任何合法的赋值表达式都可以
var o = {};

[o.a, o.b, o.c] = foo();
( { x: o.x, y: o.y, z: o.z } = bar() );

console.log( o.a, o.b, o.c );       // 1 2 3
console.log( o.x, o.y, o.z );       // 4 5 6
甚至可以在解构中使用计算出的属性表达式
var which = "x",
    o = {};

( { [which]: o[which] } = bar() );

console.log( o.x );
[which]: 这一部分是计算出的属性,结果是 x——要从涉及的对象解构出来作为赋值源的属性。 o[which] 部分就是一个普通的对象键值引用,等价于 o.x 作为赋值的目标。
创建对象映射 / 变换
var o1 = { a: 1, b: 2, c: 3 },
    o2 = {};

( { a: o2.x, b: o2.y, c: o2.z } = o1 );

console.log( o2.x, o2.y, o2.z );    // 1 2 3
映射对象为数组
var o1 = { a: 1, b: 2, c: 3 },
    a2 = [];

( { a: a2[0], b: a2[1], c: a2[2] } = o1 );

console.log( a2 );                  // [1,2,3]
映射数组为对象
var a1 = [ 1, 2, 3 ],
    o2 = {};

[ o2.a, o2.b, o2.c ] = a1;

console.log( o2.a, o2.b, o2.c );    // 1 2 3
重排数组顺序为一个新数组
var a1 = [ 1, 2, 3 ],
    a2 = [];

[ a2[2], a2[0], a2[1] ] = a1;

console.log( a2 );                  // [2,3,1]
甚至可以解决经典的两个数交换问题
var x = 10, y = 20;

[ y, x ] = [ x, y ];

console.log( x, y );                // 20 10
Warning: Be careful: you shouldn't mix in declaration with assignment unless you want all of the assignment expressions also to be treated as declarations. Otherwise, you'll get syntax errors. That's why in the earlier example I had to do var a2 = [] separately from the [ a2[0], .. ] = .. destructuring assignment. It wouldn't make any sense to try var [ a2[0], .. ] = .., because a2[0] isn't a valid declaration identifier; it also obviously couldn't implicitly create a var a2 = [] declaration to use.
注意:你不应该混入声明与赋值,除非你希望所有赋值表达式也被当作是声明。否则你会触发语法错误。这就是为什么我必须在 [ a2[0], ...] 之前定义 var a2 = []. 语句 var [ a2[0], .. ] = .. 是不合法的,因为 a2[0] 不是有效的声明标识符;显然它也不会隐式地创建一个var a2 = [] 声明.
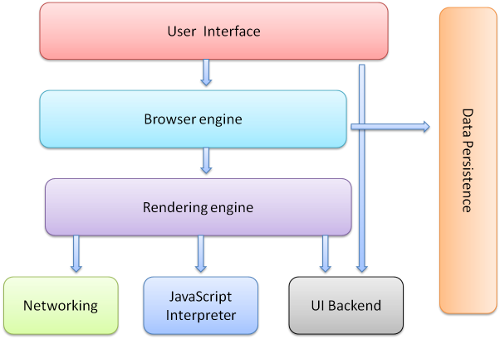
JavaScript引擎本身所做的只不过是在需要的时候,在给定的任意时刻执行程序中的单个代码块。
(需要注意的是,宿主环境不止仅仅只有JavaScript引擎,还有需要的各种模块,比如负责网络的Network Layer,负责渲染的UI Layer 等,JavaScript只是其中的一环而已)。
JavaScript的宿主环境提供了一种机制来处理程序中多个块的执行,且执行每块时调用JavaScript引擎,这种机制被称之为事件循环。
事件循环机制伪代码:
// `eventLoop` is an array that acts as a queue (first-in, first-out)
var eventLoop = [ ];
var event;

// keep going "forever"
while (true) {
  // perform a "tick"
  if (eventLoop.length > 0) {
    // get the next event in the queue
    event = eventLoop.shift();

    // now, execute the next event
    try {
      event();
    }
    catch (err) {
      reportError(err);
    }
  }
}
比如 setTimeout
setTimeout并没有把你的回调方法放挂在事件循环中。而是设定了一个计时器,当计时器到时后,环境会将你的回调方法放在事件循环中,这样在未来某个时刻的tick会摘下并且执行。
如果这时候事件循环中已经有20个项目,那么你的回调就会被等待。它需要排在其它项目的后面。
任务队列,它是挂在事件循环队列的每个tick之后的一个队列。在事件循环的每一个tick中,可通信出现的异步动作不会导致一个完整的新事件加到事件循环队列中,而会在当前tick的任务队列末尾添加一个项目(一个任务)。这就像是在说:“嗨,这里还有一件事将来要做,但要确保在其他任何事发生之前就完成它."
console.log( "A" );

setTimeout( function(){
	console.log( "B" );
}, 0);

// theoretical "Job API"
schedule( function(){
  console.log( "C" );

  schedule( function(){
    console.log( "D" );
  });
});

// 这里输出为 A C D B因为任务处理是在当前事件循环tick的结尾处,且定时器出发是为了调度下一个事件循环tick(如果可用的话)。
tips: 添加到任务队列中的任务处理会在当前tick运行完成之后,再执行当前任务队列中的代码。
以下为微信面试的题目,需要用到流程控制方面的知识。
实现一个LazyMan,可以按照以下方式调用:
LazyMan(“Hank”)输出:
Hi! This is Hank!

LazyMan(“Hank”).sleep(10).eat(“dinner”)输出
Hi! This is Hank!
//等待10秒..
Wake up after 10
Eat dinner~

LazyMan(“Hank”).eat(“dinner”).eat(“supper”)输出
Hi This is Hank!
Eat dinner~
Eat supper~

LazyMan(“Hank”).sleepFirst(5).eat(“supper”)输出
//等待5秒
Wake up after 5
Hi This is Hank!
Eat supper

以此类推。demo:
function LazyMan(name) {

    return new _lazyMan(name);
}

function _lazyMan(name) {
    this.tasks = [];

    var task = function(){
        console.log('Hi! This is ' + name);
    };

    this.tasks.push(task);

    var self = this;
    setTimeout(function(){
        var task = self.tasks.shift();
        task && task();
    },0);
}

_lazyMan.prototype = {
    eat: function(name) {
        var task = function(){
            console.log('eat' + name);
        };

        this.tasks.push(task);
        var self = this;
        setTimeout(function(){
            var task = self.tasks.shift();
            task && task();
        },0);

        return this;
    },
    sleep: function(seconds) {
        var task = function(){
            console.log('Wake up after ' + seconds);
        };

        this.tasks.push(task);
        var self = this;
        setTimeout(function(){
            var task = self.tasks.shift();
            task && task();
        },seconds);

        return this;
    },
    sleepFirst: function(seconds) {
        var task = function(){
            console.log('Wake up after ' + seconds);
        };

        this.tasks.unshift(task);
        var self = this;
        setTimeout(function(){
            var task = self.tasks.shift();
            task && task();
        },seconds);

        return this;
    }
}
var task = self.tasks.shift();
task && task();可以考虑将上面代码提取出来:
_lazyMan.prototype = {
  ...
  nextTick: function() {
    var task = this.tasks.shift();
    task && task();
  }
}{
"color_scheme": "Packages/Theme - Spacegray/base16-ocean.dark.tmTheme",
"detect_indentation": true,
"font_size": 11,
"http_proxy": "http://dev-proxy.oa.com:8080",
"https_proxy": "https://dev-proxy.oa.com:8080",
"ignored_packages":
[
"Vintage"
],
"rulers":
[
80,
100,
120
],
"spacegray_sidebar_font_xlarge": true,
"spacegray_tabs_large": true,
"tab_size": 4,
"theme": "Spacegray.sublime-theme",
"translate_tabs_to_spaces": true,
"folder_exclude_patterns":
[
"node_modules"
]
}
虽然实现有点难看,但是总算是实现了,而且对与promise和async/await也有一些新的理解。
// js 限流器
class Scheduler {

  constructor () {
    this.count = 0
    this.waiting = []
  }

  async add (fn) {
    // 超过
    let promise
    if (this.count >= 2) {
      promise = new Promise(resolve => {
        fn.resolve = resolve
        this.waiting.push(fn)
      })
    } else {
      promise = this.run(fn)
    }
    return promise
  }

  run (fn) {
    this.count ++
    let promise = fn().then(() => {
      this.count --
      console.log('len:', this.waiting.length, `ms: ${new Date().getTime() - start}`)
      if(this.waiting.length > 0) {
        const task = this.waiting.shift()
        // const taksPromise = task()
        //taksPromise.then(() => {
          this.run(task).then(() => {
            task.resolve()
          })
        // })
      }
    })
    return promise
  }
}

const scheduler = new Scheduler()

const timeout = (time) => {
  return new Promise(r => {
    console.log('setTimeout', time)
    setTimeout(r, time)
  })
}

const addTask = (time, order) => {
  scheduler.add(() => {
    return timeout(time)
  }).then(() => {
    console.log(order, `ms: ${new Date().getTime() - start}`)
  })
}

let start = new Date().getTime()

addTask(1000, 1)
addTask(500, 2)
addTask(300, 3)
addTask(400, 4)在vue 进行init之后,将会进入挂载阶段,也就是在created生命周期之后。
Vue.prototype._init = function (options) {

  //some code ...

  initLifecycle(vm);
  initEvents(vm);
  initRender(vm);
  callHook(vm, 'beforeCreate');
  initInjections(vm); // resolve injections before data/props
  initState(vm);
  initProvide(vm); // resolve provide after data/props
  callHook(vm, 'created');

  //some code ...
  if (vm.$options.el) {
    vm.$mount(vm.$options.el);
  }
}Vue.prototype.$mount = function (el, hydrating) {
el = el && inBrowser ? query(el) : undefined;
return mountComponent(this, el, hydrating);
};2.1 首先触发beforeMount周期钩子函数
2.2 生成updataComponent方法
updateComponent = function updateComponent() {
  vm._update(vm._render(), hydrating);
};
2.3 创建一个Wather监听器
new Watcher(vm, updateComponent, noop, null, true /* isRenderWatcher */);updateComponent 方法被赋值给Wather中的getter方法,且生成的Wather为renderWather,然后赋值给vm的wather属性,并push进wathers数组中,进行记录。
然后判定lazy属性,如果非lazy,则调用wather的get方法。
1 当前watcher压入target数组
2 调用getter方法,也就是上面的mountComponent方法。
3 弹出target
4 清除Dep
 Watcher.prototype.get = function get() {
    pushTarget(this);
    var value;
    var vm = this.vm;
    try {
      value = this.getter.call(vm, vm);
    } catch (e) {
      if (this.user) {
        handleError(e, vm, "getter for watcher \"" + this.expression + "\"");
      } else {
        throw e;
      }
    } finally {
      // "touch" every property so they are all tracked as
      // dependencies for deep watching
      if (this.deep) {
        traverse(value);
      }
      popTarget();
      this.cleanupDeps();
    }
    return value;
  };
2.4 回溯调用mounted周期钩子函数,注意这里会涉及到回溯。
调用_update方法进行更新。
updateComponent = function updateComponent() {
  vm._update(vm._render(), hydrating);
};调用render方法,生成vnode,并且指定 parent
如果已经 mounted过了,则触发beforeUpdate周期。
否则开始进行__patch__.
Vue.prototype._update = function (vnode, hydrating) {
  var vm = this;
  if (vm._isMounted) {
    callHook(vm, 'beforeUpdate');
  }
  //some code ...
  if (!prevVnode) {
  // initial render
  vm.$el = vm.__patch__(vm.$el, vnode, hydrating, false , vm.$options._parentElm, vm.$options._refElm);
  vm.$options._parentElm = vm.$options._refElm = null;
  } else {
    vm.$el = vm.__patch__(prevVnode, vnode);
  }
  //some code ...
};__patch__1 如果新旧节点都为vnode,则进行patchNode,这一部分用来用来对比vnode的差异。
2 如果新节点isRealElement(为元素节点),则直接生成一个空的vnode,并且根据元素信息调用createEle,生成新的节点。
oldVnode = emptyNodeAt(oldVnode);在createEle中会进行创建Component.
  vnode.isRootInsert = !nested; // for transition enter check
  if (createComponent(vnode, insertedVnodeQueue, parentElm, refElm)) {
    return;
}这个方法就是根据vnode来创建组件,首先会检测一下vnode.data中有没有hook和init方法,
然后调用init方法,进行创建组建,并传入vnode.
init: function init(vnode, hydrating, parentElm, refElm) {
  if (vnode.componentInstance && !vnode.componentInstance._isDestroyed && vnode.data.keepAlive) {
    // kept-alive components, treat as a patch
    var mountedNode = vnode; // work around flow
        componentVNodeHooks.prepatch(mountedNode, mountedNode);
    } else {
      var child = vnode.componentInstance = createComponentInstanceForVnode(vnode, activeInstance, parentElm, refElm);//创建组件
      child.$mount(hydrating ? vnode.elm : undefined, hydrating);//开始挂载
    }
}根据根据vnode创建Component。
return new vnode.componentOptions.Ctor(options);而这个 vnode.componentOptions.Ctor 就是Vue的构造方法,就是下面这个东西。
function VueComponent(options) {
  this._init(options);
};
创建完成之后,开始挂载生成的子组件,也就是回到了第一步,开始进入递归操作,知道子组件触发了mounted之后,父组件才回溯触发mounted生命周期。
然后进行创建子节点
function createElm(vnode, insertedVnodeQueue, parentElm, refElm, nested, ownerArray, index) {
  //some code ...
  vnode.isRootInsert = !nested; // for transition enter check
    if (createComponent(vnode, insertedVnodeQueue, parentElm, refElm)) {
      return;
    }
  //some code ...
  {
    createChildren(vnode, children, insertedVnodeQueue);
    if (isDef(data)) {
      invokeCreateHooks(vnode, insertedVnodeQueue);
    }
    insert(parentElm, vnode.elm, refElm);
  }
}
function createChildren(vnode, children, insertedVnodeQueue) {
if (Array.isArray(children)) {
{
checkDuplicateKeys(children);
}
for (var i = 0; i < children.length; ++i) {
createElm(children[i], insertedVnodeQueue, vnode.elm, null, true, children, i);
}
} else if (isPrimitive(vnode.text)) {
nodeOps.appendChild(vnode.elm, nodeOps.createTextNode(String(vnode.text)));
}
}重复调用createEle方法进行创建组件,不停的递归调用下去。
然后触发相应的钩子函数invokeCreateHooks,然后执行insert操作。
/**
 * $Id$
 * @title HHJsLib
 * @description 基地Js库基础类
 * @author xjiujiu ([email protected])
 * @create 2012-08-13 9:30:00
 */
(function($) {
  //事件注册及自动初始化工具脚本
  var HHJsLib = window.HHJsLib = function() {
    //事件注册,寄存器[ 主要将需要执行的方法, 都保存到一个数组里面 ]
    var _registered 	= {
      init: []
    };

    return {
      //初始化
      init: function() {
        //[这里会遍历这个寄存器中的数组,然后依次调用]
        $.each(_registered.init, function(loc, item) {
          //item 为一个数组,item[0] 为对象,item[1]为方法
          //call方法,表示用item[0]调用item[1]
          item[1].call(item[0]);
       });
      },
      //内置通过ID来获取元素对象的方法
      $$: function(id) {
        return document.getElementById(id);
      },
      //扩展方法
      //[一个小小的扩展方法,不过依旧存在问题,没有考虑prototype上的方法,
      //这里应该有haswonprotype判断下]
      extend: function(props) {
        for(var i in props) {
          if(undefined != props[i]) {
            this[i] = props[i];
          }
        }
      },
      //事件的注册
      //[这个算是核心了,这里需要是将当前的方法压入存储器中]
      register: function(obj, func, attr) {
        if(!_registered[attr]) {
          _registered[attr] 	= [];
        }
        //向_registered中添加数组.
        _registered[attr].push([obj, func]);
      }
    };
  }();

/*[那么这还有一个注意点,就是这里使用了一个 自启动的方法,返回一个对象,而该对象又有几个方法。
那些方法中又关联中外部函数的存储器对象,所以就有了一个闭包的东西]*/
/*文档加载完成,调用初始化方法初始化,调用init()方法,而在你的子类中,
需要将你的方法注册到这个父类的init数组中来,那么每次加载的时候就会自动加载子类的init()。
这里需要注意的就是子类的init();中需要注册需要用到的方法..如:
  var comments = {
    init:function(){
      this.update();
        this.del();
      },
      update:function(){
        alert("update");
      },
      del:function(){
        alert("delete");
      }
  };
*/
  $(function() { HHJsLib.init(); });
  //这里需要将这个文件第最先加入,否则一切会不起作用。
})(jQuery)
突然想起某位大佬2013年写的JavaScript代码,那个时候是准备要毕业的状态,大部分时间还在写着Java的代码。
上面的这段JavaScript代码,是我第一次见到Js框架代码,第一次发现原来JS代码还可以这么写,当时基本处于懵圈的状态,反复的看了许多次之后,依旧无法理解其中的思路。在思考无数次之后,我终于写出了如上的注释。其实现在看来,上面的注释依旧是不准确的。
其实这不过是一段逻辑相对比较简明的用注册JS的代码片段,但是在当时,我确实大脑一片空白,完全无从下手。
其中涉及到的知识点:
1 js 匿名函数自启动
2 each遍历
3 call方法借用
4 this指向替换
而在当时,以上几点我完全没有了解过,每天不过是写着document.getElementById 的代码。
其实在很多时候,你所见到的东西,你能理解的程度,完全取决于你自身的功力,就当当初第一次翻开jQ源码的时候,就第前几十行代码,都就花了一个多星期,依旧不明其中的道理,只能怪当时自己的功力太浅。
后面意外进入前端行业,看了很多书,很多文档,慢慢的开始深入理解JS编程,以上的这些逻辑也就开始变得简单。
比如说:
最开始的JavaScript秘密花园,记得最开始就是某个人在一个技术群中聊起,要了解JavaScript基础最好,可以看一下三生石写的JavaScript秘密花园,比较系统且易读。后来被我打印成册,细细研读,就算是开启了javascript的入门。
之后在博客园遇到了汤姆大叔写的博文深入理解JavaScript系列讲JS的基础,于是逐篇仔细研究,感觉开启了另外一片天地的感觉。其实当时的深入javascript系统大部分内容都来自javascript高级编程一书,只是当时作为一个小白,根本不知道还有这些书籍。看完整个系列之后,就算是初窥门径了。
后面随着接触的东西越来越多,看的东西就更加的多了:
比如 :
1 javascript高级编程
2 javaScript权威指南
3 你不知道的JavaScript[上中下](经典)
4 javascript模式
5 javascript忍着秘籍(作者是jQ的作者,各种黑科技)
6 javascrpt框架设计(希望越大失望越大)
7 javscript精萃
8 精通正则表达式
9 ES6 标准入门
终于,我能对上面的这段代码,如数家珍了,哈哈哈。
闲来无事的一些想法
之所以有异步,那么一定是某些情况下,同步有一些问题,才会出现异步。
那么异步是什么呢?
那么先看同步出现的问题,同步表示一个人(或者执行环境)在做执行一个任务时是不间断的,后面的任务必须等到前面的任务执行完成才有机会被执行。那么这里的等待时间就被白白的浪费了,既然是等待的时间,那为什么不可以用来去做一些别的事情呢? 比如在排队的时候,完全可以去做一些别的事情,比如看会书,斗会地主都可以。
那么异步是什么情况呢? 异步将一个事情分成了两个阶段,一个当前立刻执行,一个在将来执行(具体在何时执行不清楚,所以出现了事件循环机制) ,就比如在银行取钱,只需要先拿一个号,然后就可以去做别的事情,等到服务员叫到你的事情,再回来处理业务就可以了,不用白白的银行里等待。
那么这里产生了一个问题,对于异步似乎出现了多个线程,而不是之前所说的JavaScript是单线程执行。
其实这里所说的JS是单线程只是说的是JS引擎是单线程执行,而浏览器本身是由多个线程进行控制的。
(另外还有一个点,上面所说的同步即使是在多线程的情况下,也是需要进行等待的,否则就不会有死锁等问题出现了)。
比如一个ajax请求,JS引擎负责执行JS代码,但是发送HTTP请求,以及接收HTTP响应,则是网络层所做的事。JS引擎执行完JS后,通知网络layer发送请求,就给事件循环队列中加入一个callback方法,然后继续执行后面的JS代码,等到网络层接收到请求响应之后,并且JS引擎空闲下来的时候(如果不空闲,就会等待)就调用callback方法。
对于同步的文件加载过程是,先加载,加载成功之后,自动执行。但是对于异步的文件加载,则是先加载,加载之后并不会自动执行,需要手动调用才会执行。
这里是由于同步加载时,宿主环境知道文件何时加载完成,并且宿主环境一直在阻塞等待文件加载。而对于异步的情况则不同,宿主环境只是给了网络层一个信号,加载此文件,(而并不会等待该文件加载完成),然后开始执行后面的代码,那么宿主环境是无法预料到文件何时加载完成,只能通过传递一个callback给到事件循环队列中,当文件加载完成之后,并且浏览器有空闲的时候,触发callback,然后手动执行文件。
require.ensure异步加载模块
require.ensure(['b'], function(require) {
  var c = require('c');//此处如果不调用require(c),那么b中的代码也不会执行

  // Do something special...
});
import方法加载模块方式
import("./module").then(module => {
    return module.default;
  }).catch(err => {
    console.log("Chunk loading failed");
  });
那么为什么import中没有回调方法呢,只是在then中返回了一个模块default.
个人觉得,应该是由于ES模块与CommonJS模块执行的区别才导致了如此的问题。
1 书写方式不同
commonJs引入模块使用require,而ES使用 import
2 输出方式不同
commonJS输出其实是作为一个对象输出,所以使用的是 module.exports或者exports,而ES使用export,虽然单词只是多了一个s,但是可以理解为es每一个输出是一个模块,而commonJS本质则是一个对象。
3 加载方式不同
commonJS在requrie加载里就已经执行代码,则ES则是在编译阶段进行引用,也就是加载加入了一个模块的引用而已。
4 其他
在commonJS加载中,如果修改已经被加载过的模块中的数据,已经引用的模块中不会有变化。
而在ES加载中,则修改会被同步过来,因为上面说是ES加载只是加载了一个引用。而commonJS则是加载了一个复制模块。
由于浏览器安全限制,同源策略。在web中一个页面(资源)想要获取另一个页面(资源)上的数据,就要求两个页面(资源)来自同一个源。而源则是由协议,主机名,端口号组合而成的。所以一个页面要获取另一个页面的数据,就需要相同协议,相同主机名,相同端口才能进行访问。如果出现不同源的请求,则称为跨域请求。
利用script标签的 src属性加载资源没有同源策略的限制。
通过页面创建script标签来资源,而该资源会返回一段script代码,并传入数据,前端加载完成后会直接执行。前端可通过传递一个回调标记,后端使用该标记进行包裹要传入的数据,前端可以直接执行已定义好的对应方法。如:
var node = createElement('<script></script>');
node.src =  "http://www.xdmlib.com/demo/jsonp.php?callback=handler";

node.onload = function(){
  console.log('success');
}

function handler = function(data){
  console.log(data);
}
php 返回结果
handler({retcode: 0,retmsg: 'ok',data: []}需要注意的问题
服务端header进行判断源(origin)是否为允许访问的域名,cors会先发送预检请求判定。
多个子域之间之间iframe通间,可以使用document.domain设置为相同的域名, 来进行通信。
浏览器中不同域的框架之间是不能进行js的交互操作的,不同的框架之间(父子或同辈),是能够获取到彼此的window对象的,但是你拿不到window下面的任何属性和方法。
这个时候,你想要进行在不同的iframe之间进行交互的话,那么可以使用docuemt.domain设置成相同的域名即可。如:
git.xdmlib.com 目录下有一个页面a.html要访问 demo.xdmlib.com下面的b.html
<iframe src="http://demo.xdmlib.com/b.html" id="iframe"/>在a.html和b.html页面中都设置如下代码即可:
document.domain = "xdmlib.com";注意点
如果想要在 iframe中进行发ajax请求,一样会被拦截。如果需要进行发ajax请求,则需要使用一个的隐藏的iframe来做中间代理。原理就是让这个iframe载入一个与你想要通过ajax获取数据的目标页面处在相同的域的页面,所以这个iframe中的页面是可以正常使用ajax去获取你要的数据的,然后就是通过我们刚刚讲得修改document.domain的方法,让我们能通过js完全控制这个iframe,这样我们就可以让iframe去发送ajax请求,然后收到的数据我们也可以获得了
上面提到浏览器可以拿到不同框架的window对象,但是确实取不到window的对象,但是postmessage另外。所以就可以考虑使用postmessage来进行跨域。但存在兼容问题。
window.name则是由于窗口载入的所有的页面共享window.name的值。
大多情况下,跨域请求并不是被浏览器拦截掉,而是可以正常发送到服务端,只是返回来的数据,浏览器由于同源策略会自行拦截掉,不允许访问。即使在跨域的情况下,请求依旧会到达服务器,服务端的操作一样会执行,只是返回的数据客户端会被拦截而已。
但是在某些浏览器下,浏览器会在请求访问之前拦截掉。
如果它走起路来像鸭子,叫起来也是鸭子,那么它就是鸭子
如果他有了管理员的权限,那么他就是管理员。
按权限划分与按角色划分模式。
之前自己的电脑配置了fiddler中抓去https请求一直有问题,公司朋友的电脑也一直有问题,总是找不到原因。
对于之前配置过fiddler的电脑需要先手动清除一下遗留下来的文件。
关闭fiddler,删除C:\Users\Administrator\AppData\Roaming\Microsoft\Crypto\RSA目录下的文件
运行(win +R)目录输入 certmgr.msc , 删除证书目录下的 FiddlerRoot证书。
如果chrome下有代理证书,也记得移除,一般会在该目录下

之后会提示是否需要安装,暂时先选择不安装,选择
否

打开浏览器即可开始捕获请求。
如图可见区域container的总宽度为100%,内部有三个 div,column1宽度是400px,column2和 column3宽度相同。请补充CSS3来实现基于以下dom结构的布局。
已知的Dom结构:
尽可能多地给出垂直、水平居中的CSS实现。
实现一个类的构造器,如 var A = Class(...),同时支持 var a = new A(...) 与 var a = A(...) 两种形式,且支持A类的继承。
使用ES6的Promise对象优化下面代码:
var fs = require('fs');
fs.readFile('sample01.txt', 'utf8', function (err, data) {
fs.readFile('sample02.txt', 'utf8', function (err,data) {
fs.readFile('sample03.txt', 'utf8', function (err, data) {
});
});
});
有一段文本它的内容是:var text=“内容文字…”,文本中包含部分敏感词汇,如 [“86学潮”,“萨德”,“**”]。请编写函数查找到这些敏感词,并将其字体颜色更改为红色。
// 实现一个函数 sort,要求
// 输入:
// {
// "ng": 100,
// "react": 200,
// "vue": 150
// }
// 输出:
// [
// {"name": "ng", "value": 100},
// {"name": "vue", "value": 150},
// {"name": "react", "value": 200}
// ]
function sort(obj) {
}
以下内容来自StackOverflow
1 加密与认证的区别? 双向都是安全的么?
加密是将数据资料加密,使得非法用户即使取得加密过的资料,也无法获取正确的资料内容,所以数据加密可以保护数据,防止监听攻击。其重点在于数据的安全性。
身份认证是用来判断某个身份的真实性,确认身份后,系统才可以依不同的身份给予不同的权限。其重点在于用户的真实性。两者的侧重点是不同的。
加密是对https传输过程中的数据进行加密,保证其不可随意读取。
而认证则是客户端需要判断其连接的服务器是否为真实的服务器,而非中间人代理。
2 为什么需要对称秘钥?
可以使用对称秘钥将数据进行加解密。从而保证非法用户无法读取,真实用户可以读取。
3 为什么对需要非对称秘钥?
但是由于在互联网上直接传递对称秘钥,容易被劫取。故需要考虑如何将对称秘钥传递给客户端。
服务端生成特定的非对称秘钥,并将公钥下发给客户端。客户端使用公钥对数据进行解密,如果可以正常解密成功,如果中间没有中间人攻击的话,那么就证明连接的服务器为真实的服务器。
4 什么又是中间人攻击?
请求中第三方劫取请求,将真实服务器的公钥替换为自己的公钥发给客户端,对于客户端而言,是无感知的。
5 数字证书的意义是什么?
试想如果需要在互联网上进行传递公钥的话,那么就一定会存在中间人的问题。那么如何解决呢?
考虑引入一个大家都任何的第三方认证机构,将真实服务器的公钥使用认证机构的私钥匙进行加密存储为数字证书,然后浏览器厂商在浏览器中默认存储着通用的三方机构的公钥。
这样浏览器在请求之前会获取服务器的证书,然后通过本地的公钥进行解密,如果能够成功解开,就证明是在三方机构认证过的服务器。那么如果没有认证过的中间人想进行冒充的话,由于无过没有三方机构的公钥,就无法获得服务器真正的私钥,且即使中间人进行自己证书,客户端使用三方的公钥解密失败,无法达到欺骗的目的。
那么接下来的问题来了,三方机构多个服务器进行认证,如果一个被认证过的机构进行中间人冒充的话,怎么进行识别呢?
6 数字签名又是什么?
考虑上面的问题,如果一个被认证过的机构进行中间人冒充的话,怎么进行识别呢?
那么就需要保证三方认证机构发给每个服务器带有各自的标记,用来表示自己的身份。而这个标记就是所谓的签名。
认证机构会将服务器的信息采用算法(md5或者sha1)生成一个hash值,然后使用私钥进行加密以证书的方式发放给服务器。页这个hash值就是所谓的签名。客户端使用证书提供的公钥进行解密之后,会对服务器的信息进行一样的算法加密,如果得到的hash值与解密出来的值一致,则证明服务器是可信的。
var fn = function(num) {
    return new Promise(function(resolve, reject) {
        console.log(resolve.toString());
        if (typeof num == 'number') {
            resolve(num);
        } else {
            reject('TypeError');
        }
    })
}

fn(1).then(
    function(){
        console.log('111')
    }
);
之前一直以为 上面的resolve方法就是下面then中传递的方法
    function(){
        console.log('111')
    }
但是根据上面的打印输出的是 [native code],其实这里内部已经编译好的方法。
根据猜想,这里应该是内部实现的一个异步方法,方法内部去异步调用你then方法中传递的回调方法。
如果你没传递的话,那么就是一个空函数。
那么这样逻辑就能够理清楚了。
听说then方法会返回一个新的Promise对象是什么情况呢?
1 http请求
2 状态码
3 http请求过程
4 http请求问题
5 http2
1 history不能直接刷新页面,否则会请求后端,因此需要后端的配合。
2 hash会带有#标记
A device-independent pixel (also: density-independent pixel, dip, dp) is a physical unit of measurement based on a coordinate system held by a computer and represents an abstraction of a pixel for use by an application that an underlying system then converts to physical pixels.
A typical use is to allow mobile device software to scale the display of information and user interaction to different screen sizes. The abstraction allows an application to work in pixels as a measurement, while the underlying graphics system converts the abstract pixel measurements of the application into real pixel measurements appropriate to the particular device. For example, on the Android operating system a device-independent pixel is equivalent to one physical pixel on a 160 dpi screen,[1] while the Windows Presentation Foundation specifies one device-independent pixel as equivalent to 1/96th of an inch.[2]
As dp is a physical unit it has an absolute value which can be measured in traditional units, e.g. for Android devices 1 dp equals 1/160 of inch or 0.15875 mm.
While traditional pixels only refer to the display of information, device-independent pixels may also be used to measure user input such as input on a touch screen device.
关于react 的一些常用操作
react绑定事件不用使用字符串,要使用jsx语法,且使用驼峰语法
<button onClick={activateLasers}>
  Activate Lasers
</button>
事件处理函数不能使用return false阻止默认事件,必须使用 preventDefault
事件调用需要使用this调用,并且需要在 contrustor中进行绑定this
this.handleClick = this.handleClick.bind(this);onClick={this.handleClick}在ES6 class语法中,class内的method是不会默认绑定this(此处有待考证,有可能是因为单独的时候this指向会有问题,而在react中,其方法是单独调用的,故而找不到this如:
class Logger{
    printName(name = 'there'){
        this.print(`hello ${name}`);
    }
    print(text){
        console.log(text);
    }
}

const logger = new Logger();    //实例化
const {printName } = logger;    //printName
printName();
两种解决方案
1 使用 class fields ,此方案为ES7 所支持语法,需要添加 babel-preset-stage-1
.babelrc中添加如下配置
{
    "presets": [
        "env",
        "react",
        "stage-1"
    ],
    "plugins":["transform-class-properties"]
}
handleClick = () => {
console.log('this is:', this);
}不想使用该方案,可以采用第三种方式
2 使用箭头函数在调用的位置
<button onClick={(e) => this.handleClick(e)}>
    Click me
</button>
大多情况下,该方法没有问题,但是如果回调方法被传递给子组件,那么该组件可能会被多次重新render,会产生一定的性能损耗
3 在constructor中手动调用bind
constructor(props) {
    super(props);
    this.handleClick = this.handleClick.bind(this);
}
事件参数传递
<button onClick={(e) => this.deleteRow(id, e)}>Delete Row</button>
<button onClick={this.deleteRow.bind(this, id)}>Delete Row</button>定义state
constructor(props) {
    super(props);
    this.state = {title: 'dd',date: new Date()};
    this.changeTitle = this.changeTitle.bind(this);
}
修改state, react中使用this.setState修改组件本地state
changeTitle(){
    this.setState({
        title: 'DD'
    });
}
tips:
// Wrong
this.state.comment = 'Hello';

// Correct
this.setState({comment: 'Hello'});由于state的值可能是异步的,所以不setState中不能依靠上一个state值来进行计算,如下代码可能会出错
// Wrong
this.setState({
  counter: this.state.counter + this.props.increment //此处需要上一次state的值
});
可以考虑setState接收一个function参数,这个function会把上一次的state作为第一个参数。
// Correct
this.setState((prevState, props) => ({
  counter: prevState.counter + props.increment
}));当你传入对象是,react会自动进行合并,只合并你传入的值,而没有传入的部分则不受影响。
constructor(props) {
    super(props);
    this.state = {
    posts: [],
    comments: []
    };
}componentDidMount() {
fetchPosts().then(response => {
this.setState({
posts: response.posts
});
});
fetchComments().then(response => {
this.setState({
comments: response.comments
});
});
}如上面的代码调用 this.setState({comments}), 会自动会对象进行合并,只会修改 this.state.comments的值,而this.state.posts的值则不受影响。
The Data Flows Down 从下往下数据流
1 props 只读,不能做修改 Cannot assign to read only property 'name' of object '#'
2 需要修改props的值,需要调用parent component中的方法,可以通过props将该方法传递给child component为什么子组件不能修改props的值 ?
主要原因应该是统一修改入口,如果从parent component流入的props数据,child component可以随意修改的话,
那么如果某些时候parent component有更新的话,所有的child component中的数据都会受到影响。
但是如果统一将修改的入口放在parent component上,那么就可以进行统一管理,并且数据每次被修改,都会被感知到。
而在vue中使用事件绑定,react中使用方法传递。3 任何一处修改了props的值,其他组件都会更新
class App extends React.Component{

    constructor(props) {
        super(props);

        this.state = {'name': 'this is state name'}
    }


    changeProps(){
        this.setState({
            name: 'gogo'
        });
    }

    render(){
        return  (
            <div>
                <p>{this.state.name}</p>
                <p>hello</p>
                <Hello name={this.state.name}></Hello>
                <Info name={this.state.name} changeProps={this.changeProps.bind(this)}></Info>
            </div>
        )
    }
}
class Info extends React.Component{ constructor(props) { super(props); } changeProps(){ this.props.changeProps(); } render(){ return (<div> <p>this is info component</p> <p>{this.props.name}</p> <p><input type="button" value="change props" onClick={this.changeProps.bind(this)}/></p> </div>) } }setState
setState会触发相应的生命周期函数
This is because React wants to re-run certain life cycle hooks, [such as] componentWillReceiveProps, shouldComponentUpdate, componentWillUpdate, render, componentDidUpdate, whenever state changes. It would know that the state has changed when you call the setState function. If you directly mutated state, React would have to do a lot more work to keep track of changes and what lifecycle hooks to run etc. So to make it simple React uses setState.
Well, the key differences between
ReactandVueare:1 Vue implements state observation but React doesn’t. But are you sure that it is good for you to observe recursively all component state (how much unnecessary work Vue does in order to observe todo list? At the end of the observation Vue in any case calls its own
setState.2 Vue uses templates but React uses JSX that quite naturally extends vanila JavaScript, so you do not need to study and remember all magic symbols that should be used in vue-templates.
Summarizing, React provides a little bit lower layer of data-flow control then Vue does.
So, if you prefer magic — you should choose Vue, but consider thatredux
1 action中保存操作
2 dispatch 分发操作
3 reducer接收state与action,通过判定action.type的类型进行处理请求
过程,createStore,建立 store与reducers的联系,store,dispatch中传入action的创建方法,返回action,然后reducer根据返回的action的类型进行处理。
import { todoApp } from './reducers'; const store = createStore(todoApp);store.dispatch(addTodo('Learn about actions'));export function addTodo(text) { return { type: ADD_TODO, text } }redux 数据流(data flow)
Redux architecture revolves around a strict unidirectional data flow.(单向数据流)
The data lifecycle in any Redux app follows these 4 steps:
1 You call store.dispatch(action).
Note that a reducer is a pure function. It only computes the next state. It should be completely predictable: calling it with the same inputs many times should produce the same outputs. It shouldn't perform any side effects like API calls or router transitions. These should happen before an action is dispatched.
2 The Redux store calls the reducer function you gave it.
3 The root reducer may combine the output of multiple reducers into a single state tree.
 function todos(state = [], action) {
   // Somehow calculate it...
   return nextState
 }

 function visibleTodoFilter(state = 'SHOW_ALL', action) {
   // Somehow calculate it...
   return nextState
 }

 let todoApp = combineReducers({
   todos,
   visibleTodoFilter
 })
While combineReducers() is a handy helper utility, you don't have to use it; feel free to write your own root reducer!
4 The Redux store saves the complete state tree returned by the root reducer.
数据传递
csrf(cross site request forgery)跨站请求伪造,攻击者在自己的网站(也就是钓鱼网站)伪造请求发送给别人(正常)的服务器。
关于session,与cookie,以及http通信协议。
http协议需要使用seeion以及cookie来保持用户的回话过程,所以会在每次回话的过程中,在cookie中带有session的标记sessionId,通俗称为令牌。
而http在每次请求的过程中,都会默认带上cookie(当然cookie是可以手动禁用的,如果禁用的话,会在url中携带sessionId作为参数)。
正常请求一般都会验证登录态,所以一般无法成功。但是你可能在某些时候已经登录了当前的网站,然后又点开了另外一个网站(钓鱼网站),或许你点击了其中的一个图片或者连接,然后它会向你之前登录的网站发送一个请求,而在这时,http协议是正常会带上cookie里的信息,由于你之前正常登录过,所以请求就被正常执行了。
1 referer校验
2 token校验
3 验证码校验
4 手机验证码验证
5 cookie域限定
6 post请求
o instance of f首先计算f.prototype,然后在o的原型链中查找这个值,如果找到,那么o是f(或者f的父类)的一个实例,表达式返回true,如果f.prototype不在o的原型链中,那么o就不是f的实例,返回false.(关于这一段,权威指南的中文翻译是有问题的,看了半天没看懂,还是得啃原文的)
To evaluate the expression o instanceof f, JavaScript evaluates f.prototype,
and then looks for that value in the prototype chain of o. If it finds it, then o is an
instance of f (or of a superclass of f) and the operator returns true. If f.prototype is not
one of the values in the prototype chain of o, then o is not an instance of f and
instanceof returns false
需要注意的是instance of 判断的是 prototype,而与构造方法没有什么必然的联系。
可以理解为删除方法
最后一个参数为可变参数,用来做增加用,第一个参数为删除元素的index,delnum为偏移量,即删除个数。
delnum可为0,表示不删除。
addItem.... 可省略,表示不添加。
同样为删除方法
start参数为起始索引,end为结束索引。end参数可省略。
如果end参数缺失,则为从start至数组结束皆移除。
如果end为负数,则end的值为数组末尾开始算起的元素。
1 皆可用于删除数组元素
2 splice可用于添加,slice不能
3 slice不操纵原数组,splice修改原数组。
4 slice返回值为删除元素之后的数组,splice返回值为被删除的元素,且原数组已移除需要删除的元素。
果然是一图胜千言呀
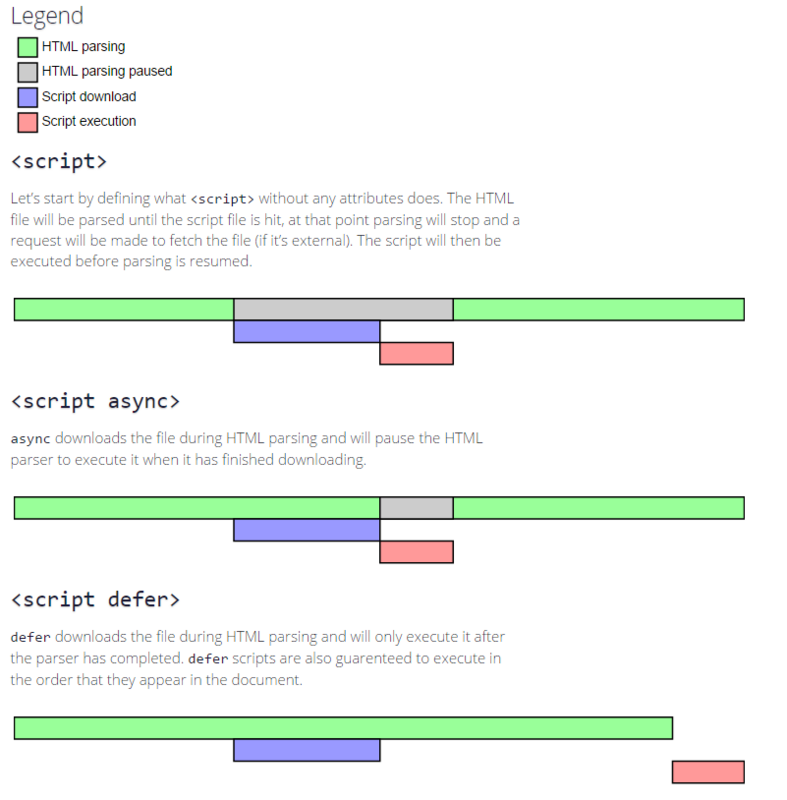
图片转载地址(https://www.growingwiththeweb.com/2014/02/async-vs-defer-attributes.html)
1 状态机,封装了多个内部状态(使用next调用)
2 遍历器对象生成函数,执行Generator函数会返回一个遍历器对象
function* helloWorldGenerator() {
  yield 'hello';
  yield 'world';
  return 'ending';
}

var hw = helloWorldGenerator();
yield 为暂停执行的标记,next方法可以恢复执行。
hw.next()
//{ value: 'hello',  done: false }
hw.next()
//{ value: 'world',  done: false }
hw.next()
//{ value: 'ending',  done: true }
hw.next()
//{ value: undefined,  done: true }
tips: 从第四次之后再调用next都会是一样的值,因为在第三次的时候generator方法已经执行完毕了。
next方法执行逻辑:
1 遇到yield暂停后面的执行,并将紧跟在yield后的表达式的值作为返回的对象的value属性的值。
只会执行yield后面的表达式,如果有赋值操作,会被放到下一次next执行。
如下:
function* foo(){
  yield 'hello';
  console.log('1');
  yield 'word';
  console.log('2');
  yield 'ending';
  console.log('3');
}

var f = foo();
f.next();  //{ value: 'hello' , done: false }
f.next();  // 1 { value: 'world', done: false }
f.next();  // 2 { value: 'ending', done: false }
f.next();  // { value: undefined, done: true }
第一次调用,碰到了yield就会停止后面代码的执行,然后把 'hello'的值作为返回对象的value属性。
第二次调用,先执行console.log(1),然后碰到了yield就会停止后面代码的执行,然后把 'word'的值作为返回对象的value属性。
第三次调用,先执行console.log(2),碰到了yield就会停止后面代码的执行,然后把 'ending'的值作为返回对象的value属性。
第四次调用,generator方法已经执行完毕,然后把 undefined 的值作为返回对象的value属性,并且 done的值为 true。
function* foo(){
  yield func();
  console.log('1');
  yield 'word';
  console.log('2');
  yield 'ending';
  console.log('3');
}

function func(){ return 'func test'}
上面的代码可以看出,紧跟在yield后面的表达式是会被执行的,然后把执行之后的值,作为返回对象的vlalue值。
即时思考 : 这里的yield后面的是直接执行的,如果后面跟一个Promise然后在resolve中执行next,就可以逃离异步的回调地域,以同步的方式书写。
2 下一次调用next方法时再继续往下执行,直到遇到下一条yield语句。
3 如果没有遇到新的yield语句,就一直运行到函数结束,直到遇到return语句为止,并将return语句后面的表达式的值作为返回的对象的value属性值。
4 如果没有return语句,则返回对象的value属性为undefined。
需要注意的是yield语句后面的表达式,只有当调用了next方法、内部指针指向该语句时才会执行。
yield语句本省没有返回值,或者说总是返回undefined,next方法可以携带一个参数,该参数会被当作上一条yield语句的返回值。
var x = 0;
function* foo() {
  var a = yield ++x;
  console.log(x);
  console.log(a);
}

var f = foo();  //返回 generator对象
f.next(); // { value: 1, done: false }
f.next(2); // 把传入的 2 作为赋值给a(此时yield ++x,也就是上一条yield语句了),输出1 2
next方法的参数表示上一条yield语句的返回值,所以第一次使用next方法时不能带有参数,v8引擎会自动忽略第一次使用next方法的参数。可以认为第一次next方法,用来启动遍历器对象,所以不能带参数。
下面的clock就是一个状态机。
var ticking = true;

var clock = function() {
  if(ticking) {
    console.log('Tick');
  }else{
    console.log('Tock');
  }
  ticking = !ticking;
}

clock();
clock();
clock();
clock();

//每运行一次,就切换一次状态。

var clock = function* (_) {
  while(true) {
    yield _;
    console.log('Tick');
    yield _;
    console.log('Tock');
  }
}

var c = clock();
c.next();
c.next();
c.next();
c.next();
c.next();
//每调用一次next就切换一次状态,因为可以使用yield暂停住代码的执行。function* loadUI() {
showLoadingScreen();
yield loadUIDataAsynchronous();
hideLoadingScreen();
}
var loader = loadUI();
loader.next();//加载UI
loader.next();//卸载UIfunction getFoo() {
return new Promise(function(resolve, reject){
resolve('foo');
});
}
var g = function* () {
try {
var foo = yield getFoo();
console.log(foo);
} catch(e) {
console.log(e);
}
}
function run(generator) {
var it = generator();
function go(result) {
if(result.done) {
return result.value;
}
return result.value.then(function(value) {
return go(it.next(value));
},function(error) {
return go(it.throw(error));
})
}
go(it.next());
}
run(g);真没想到gzip压缩的比率能有这么高,简直有点可怕
A declarative, efficient, and flexible JavaScript library for building user interfaces.
🖖 Vue.js is a progressive, incrementally-adoptable JavaScript framework for building UI on the web.
TypeScript is a superset of JavaScript that compiles to clean JavaScript output.
An Open Source Machine Learning Framework for Everyone
The Web framework for perfectionists with deadlines.
A PHP framework for web artisans
Bring data to life with SVG, Canvas and HTML. 📊📈🎉
JavaScript (JS) is a lightweight interpreted programming language with first-class functions.
Some thing interesting about web. New door for the world.
A server is a program made to process requests and deliver data to clients.
Machine learning is a way of modeling and interpreting data that allows a piece of software to respond intelligently.
Some thing interesting about visualization, use data art
Some thing interesting about game, make everyone happy.
We are working to build community through open source technology. NB: members must have two-factor auth.
Open source projects and samples from Microsoft.
Google ❤️ Open Source for everyone.
Alibaba Open Source for everyone
Data-Driven Documents codes.
China tencent open source team.