Coder Social home page Coder Social logo

technologiescollege / blockly-at-rduino Goto Github PK

View Code? Open in Web Editor NEW
125.0 39.0 101.0 119.27 MB

Blockly@rduino : Blockly remix for Arduino. Totally new version, enhanced one !

Home Page: https://technologiescollege.github.io/Blockly-at-rduino/

License: GNU General Public License v2.0

JavaScript 88.63% CSS 0.67% HTML 10.55% PHP 0.15%
arduino education blockly

blockly-at-rduino's Introduction

Thanks for donation with Paypal to help me improve this software.


PROFS FRANCAIS & ASSOCIATIONS

vous pouvez aussi me demander une facture pour que votre établissement me fasse un 'don' officiel par virement bancaire. Je ne fais pas payer de licence mais je compte sur vous pour aider du montant auquel vous estimez ce travail.

Internet Explorer banni ! Internet Explorer banned!

Multilingual version of Blockly@rduino

Blockly@rduino est un programme web, un webware graphique permettant la programmation graphique pour Arduino et sa traduction en code.

Blockly@rduino is a web program, a graphic webware allowing graphic programming for Arduino and its translation into code.

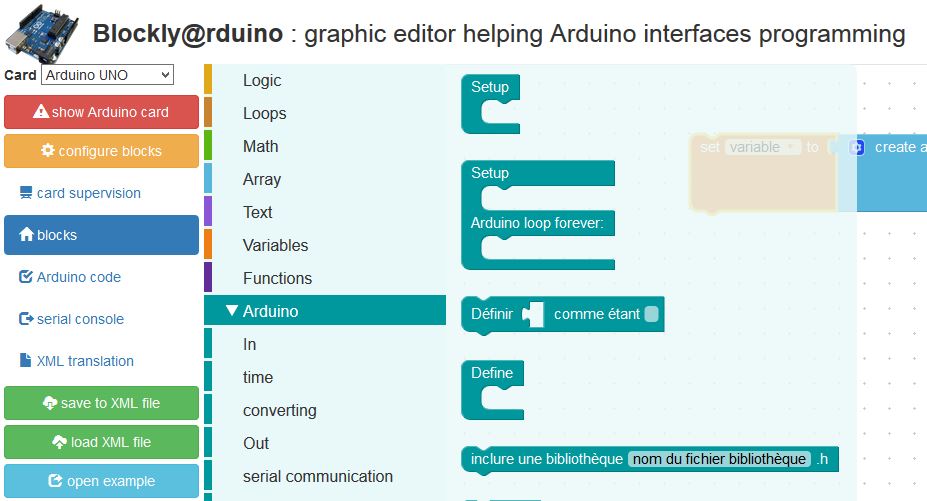
Blockly@rduino est basé sur Blockly, un éditeur de programme graphique par une interface web. Il fournit un seul type de traduction de la programmation graphique (contrairement à Blockly qui traduit en Python, en JavaScript, etc et permet de le simuler en ligne : exemple), pour générer du code à copier coller dans l'EDI Arduino.

Blockly@rduino is based on Blockly, a web-based graphical program editor. It provides a single type of graphical programming translation (unlike Blockly, which translates to Python, JavaScript, etc. and allows you to simulate it online : example), to generate code to be copied and pasted into the Arduino IDE.

Libre à vous de rajouter autant de bibliothèques que voulu grâce à cette notice explicative : http://www.libreduc.cc/wiki/doku.php/fr/arduino/blockly_rduino/creerblocsmultiling

Feel free to add as many libraries as you want thanks to this explanatory note: http://www.libreduc.cc/wiki/doku.php/fr/arduino/blockly_rduino/creerblocsmultiling

Cette version a été réorganisée et améliorée pour la faire utiliser au mieux par des élèves débutants dans le code.

Toutes les remarques sont les bienvenues pour améliorer la syntaxe !

This version has been organized and improved to make it best used by students who are new to the code.

All remarks are welcome to improve the syntax !

Fonctions

  • programmation pour Arduino en drag'n'drop graphique,
  • génère un code totalement compatible avec le code Arduino,
  • interaction des cartes Arduino grâce aux modules rajoutés : plus de 10 blocs spécifiques à des capteurs/actionneurs Grove, ainsi que ceux de TechnoZone51, Bitbloq, et ...
  • possibilité de charger automatiquement des fichiers sur le site grâce aux paramètres de l'adresse URL _(voir les démos ci-dessous).
  • téléversement et console série depuis l'interface web,
  • sauvegarde/lecture de fichiers INO et XML
  • création d'exemples
  • supervision de la carte en temps réel grâce au serveur PyMata-AIO (accessible depuis le panneau de contrôle

Functions

  • programming for Arduino in drag'n'drop graphic
  • generates a code fully compatible with the Arduino code
  • interaction of Arduino boards thanks to the added modules: more than 10 blocks specific to Grove sensors/actuators, as well as those of TechnoZone51, Bitbloq, and ...
  • ability to automatically upload files to the site thanks to the parameters of the URL address _(see the demos below)
  • upload and serial console from the web interface
  • backup/reading of INO and XML files
  • creation of examples
  • real-time supervision of the map thanks to the PyMata-AIO server (accessible from the control panel

Démos

Blockly@rduino est un outil web, un webware par référence aux software, hardware, etc. Vous pouvez le tester/utiliser à l'adresse suivante : http://technologiescollege.github.io/Blockly-at-rduino/

Vous pouvez donc aussi lier directement l'ouverture de la page à l'ouverture d'un fichier XML hébergé (ou tout en local) :

Demos

Blockly@rduino is a web tool, a webware by reference to software, hardware, etc.. You can test/use it at the following address : http://technologiescollege.github.io/Blockly-at-rduino/

So you can also link directly the opening of the page to the opening of a hosted XML file (or all locally) :

Utiliser en local dans son navigateur web

Si vous préfréez l'utiliser en local, il vous suffit de télécharger le code depuis Github (Download Zip) et d'ouvrir le fichier index.html dans votre navigateur.

Vous pouvez l'héberger sur un serveur, et ainsi y faire accéder de nombreux postes en pointant vers ce fichier 'index.html'.

Pour le téléversement et la console série, vous devez télécharger la version 'Electron' : https://github.com/technologiescollege/BlocklyArduino_electrified.

Use locally in your web browser

If you want to use it locally, just download the code from Github (Download Zip) and open the file index.html in your browser.

You can host it on a server, and thus make many computers access it by pointing to this file `index.html'.

For the upload and the serial console, you have to download the 'Electron' version : https://github.com/technologiescollege/BlocklyArduino_electrified.

Auteurs et contributeurs

Programme Blockly : https://developers.google.com/blockly/

Concept d'origine BlocklyDuino : Fred Lin (@gasolin https://github.com/gasolin/BlocklyDuino).

Son projet s'est aussi inspiré de ardublock et modkit.

Fonctions de typage ArduBlockly : Carlos Pereira Atencio (https://github.com/carlosperate/ardublockly).

Intégration de CodeBender : Julien Rat https://github.com/julienrat

Ré-écriture totale et refonte graphique : Olivier Métayer

Julien RAT : CodeBender plugin

Frédéric PICARD : bitbloq, maquette Jeulin, vidéos, etc

Spanish translation : José Manuel Ruiz Gutteriez (blog)

Daniel PERS (site) : FDPlayer, OLED, RGB LED

Bernard REMOND site : téléversement local

blockly-at-rduino's People

Contributors

bzhtitude avatar cparrapa avatar ericskennedy avatar fbseletronica avatar g-reich avatar kseryj avatar macerobotics avatar mfreard avatar nbremond77 avatar neixneji avatar nrv005 avatar olivzed avatar philippebrangier avatar sebcanet avatar tech-rostand avatar

Stargazers

 avatar  avatar  avatar  avatar  avatar  avatar  avatar  avatar  avatar  avatar  avatar  avatar  avatar  avatar  avatar  avatar  avatar  avatar  avatar  avatar  avatar  avatar  avatar  avatar  avatar  avatar  avatar  avatar  avatar  avatar  avatar  avatar  avatar  avatar  avatar  avatar  avatar  avatar  avatar  avatar  avatar  avatar  avatar  avatar  avatar  avatar  avatar  avatar  avatar  avatar  avatar  avatar  avatar  avatar  avatar  avatar  avatar  avatar  avatar  avatar  avatar  avatar  avatar  avatar  avatar  avatar  avatar  avatar  avatar  avatar  avatar  avatar  avatar  avatar  avatar  avatar  avatar  avatar  avatar  avatar  avatar  avatar  avatar  avatar  avatar  avatar  avatar  avatar  avatar  avatar  avatar  avatar  avatar  avatar  avatar  avatar  avatar  avatar  avatar  avatar

Watchers

 avatar  avatar  avatar  avatar  avatar  avatar  avatar  avatar  avatar  avatar  avatar  avatar  avatar  avatar  avatar  avatar  avatar  avatar  avatar  avatar  avatar  avatar  avatar  avatar  avatar  avatar  avatar  avatar  avatar  avatar  avatar  avatar  avatar  avatar  avatar  avatar  avatar  avatar  avatar

blockly-at-rduino's Issues

Pin entry now broken on most blocks

Just updated my fork and now most of the blocks don't have a working way to enter digital or analog pins.
I see an update changed the way pins are being addressed. Is there any way to make both the new way and the old drop-downs work? (Sort of compatibility mode?)
Otherwise, someone needs to go fix all the pin references before this version is usable again.
Also I'd love to be able to use A0-5 as a digital pin, since it is physically possible on the hardware. (I'd just figured out an update to make it work with the old dropdown pin method.)

favicon

dans index.html : href="favicon.bmp" au lieu de href="favicon.png"

Soucis avec la dernière version

J'ai téléchargé la dernière version à partir du Github, et voilà le résultat :
selection_219

Il n'y a plus de correspondance entre les blocs et le code.

Bon courage.

Traduction bluetooth du bloc bluetooth en français.

Le module Groove Bluetooth est mal traduit.
Recevoir une trame bleutooth est correct.
Mais Lire, est faux, il faut écrire Emettre vers bleutooth .... ou quelque chose comme ceci.

Voir ce même module en langue espagnol, qui lui est bien traduit.

Cordialement.

JBE

Erreur avec "mettre la variable à 10" version 18-04-2016

Il semble y avoir un bug avec le générateur de code du bloc mettre variable à.

voici le code:
blocks_erreur_variable

Le message d'erreur généré lorsque que l'on va sur l'onglet code Arduino:
variable_ messageerreur

TypeError: nextBlock.inputList[0].connection is

Et le contournement du problème(cast obligatoire):
blocks_erreur_variable_workaround

problème de typage avec une boucle "compter avec" (for)

Bonjour, Je rencontre un problème avec la boucle for : la variable choisie est typée par défaut "void"

1

code généré :

void i;

void setup() {
  pinMode(i, OUTPUT);
}

void loop() {
  for (i = 1; i <= 10; i=i+1) {
    digitalWrite(i, HIGH);
  }

}

ce code ne passe pas la vérification :

Verification failed. Erreur : (sketch file) sketch.ino:1:6: error: variable has incomplete type 'void' void i;      ^
1 error generated.

Contournement :
Je suis obligé de déclarer manuellement la variable ce qui me crée une alerte dans le bloc for :
2

Le code généré passe la vérification :

int i;

void setup() {
    i = (int)(0);

  pinMode(i, OUTPUT);
}

void loop() {
  for (i = 1; i <= 10; i=i+1) {
    digitalWrite(i, HIGH);
  }

}

Merci Pour ce logiciel qui me permet d'initier mes enfants à la programmation de façon ludique (projet de robot a base de moteurs de dvd et d'un arduino nano que j'avais en stock), ils ont déjà joué avec scratch et blockly@rduino est parfait pour continuer.

Cordialement

Philippe

Arduino Nano Support

Is it compatible with Nano ? If not, is that available in the upcoming updates ?

Example

With the "kit" notion, you need to choose a card AND a block category, so I need to save it in XML file too.
Unless example and save file cannot be opened again...

What about libraries ?

Hello,
Is it possible to include librairies which are not supported by CodeBender ?
Thanks a lot !
Jerome

DHT11

Seb,
Voici donc le message que tu attendais pour occuper un peu de ton temps libre en intégrant la bibliothèque du DHT11 dans Blocky ! Merci à toi.
Christophe

Ordre dans l'initialisation des variables

Bonjour,

tout d'abord, bravo pour votre travail. Nous pensons utiliser Blocky@rduino en option ISN pour l'introduction à l'algorithmique sans passer par l'apprentissage trop abrupt du C pour Arduino.

En testant, nous sommes tomber sur un "os" dans le bloc setup.
blockly
Ce qui donne le code suivant
`int etatBouton;
int LED;
int bouton;

void setup() {
pinMode(bouton, INPUT);
pinMode(LED, OUTPUT);
etatBouton = (int)(HIGH);
LED = (int)(8);
bouton = (int)(2);}
void loop() {
etatBouton = (int)(digitalRead(bouton));
if (etatBouton == HIGH) {
digitalWrite(LED, HIGH); } else {
digitalWrite(LED, LOW);
}}

Par défaut la déclaration des variables se fait après la déclaration des pinMode. ce qui fait qu'en fait les pins ne sont pas reconnus par leurs noms.

Nous avons contourné le problème en insérant une ligne de code manuelle.
Une suggestion pour que ce soit plus propre (avec une déclaration de variable en dehors du bloc setup par exemple mais pas dans le bloc loop comme on le fait en programmation "normale" ?`

Block Switch case génère un void null

Le générateur de code du block switch case génère un void null; en déclaration. Ce qui provoque une erreur de compilation:

sketch.ino:2:6: error: variable has incomplete type 'void'

void null;

Utilisation de variable en argument de chaque bloc

Généraliser à l'ensemble des blocs, le fait de pouvoir accrocher une variable qui précise le numéro de la broche ou sont branchés nos capteurs, ou actionneurs.

Cela est fait en partie pour les modules Groove, mais pas pour toutes (capteurs, écrans...)

Cordialement.

harmoniser fichiers

vérifier catégorie de blocs 'boite à outils locale'
exploser les fichiers de typage dans les dossiers des blocs
rajouter des photos

Pertes des items dans le menu Arduino

Bonjour,
je viens de télécharger la dernière version 24-02-2017 - v2.3 "Kit Cat"et les blocks dans les sous-menus "Arduino/entrées", "Arduino/Communication série" et "Arduino/communication logicielle" ont disparu.

Dans la console Javascript, j'ai l'erreur suivante lorsque je clique sur l'un des sous-menus :
`TypeError: c is undefined[En savoir plus] blockly_compressed.js:1322:254

Je n'ai plus non plus le dropbox pour définir la langue dans l'interface principale.

Je suis sous Firefox 51.0.1

Dites-moi quelles sont les informations utiles pour vous et merci d'avance pour votre aide.

Firmata

Dans Blockly@rduino, il y a un dossier Firmata.
Est ce Blockly@rduino est compatible avec Firmata !
Y a t il une doc pour savoir comment l'utiliser ?
J'ai vu comment installer Firmata+, sur youtube

A plus

Bloc define

La définition d'une variable nous permet de racrrocher à une variable une instruction.
Exemple : #define LED1_allumée digitalWrite( LED, High)
Quand le compilateur rencontre LED_allumée, il substitue LED_allumée par digitalWrite( LED, High). Et cela devient alors beaucoup plus facile pour des élèves grands débutants en algorithmes.

Pourriez vous faire, 2 blocks spécifiques, en s'inspirant de ce qui existe ;

Le premier pour des informations en entrées du microcontrôleur :

selection_168

Qui se lira
Définir BP1 comme étant l'état logique de la broche numérique ( numéro, ou nom de variable), et
tout ceci en un seul bloc.
La broche numérique sera aussi mise en entrées ( INPUT), et ce bloque pourra être mis dans les testes ( en SI... )

Le second pour des informations en sorties du microcontrôleur :
selection_169

Sur le dessin, j'ai mis la variable, LED1_allumée.
C'est donc la même chose que le point 1, crée un Défine pour les sorties, mais avec une information supplémentaire, l'état de la sortie.
De plus, le bloc LED1_allumée, devra se mette dans les actions.
La broche numérique sera aussi mise en sortie.

Ce qui nous donnera en final
selection_170

Et en final, l'algorithme se résumera à l'image ci dessus.
Le professeur font les define qui seront dans le Setup, et les élèves architecturent tout ceci.

Et si en plus on utilise Firmata, alors ...

Ensuite, il faudra voir pour les signaux analogiques...

Bon courage

Sharing blocks and collaborating

I see you left a note on ardublockly: carlosperate/ardublockly#78

Better would be to work together towards common blocks for arduino to use with our blockly versions.
I like the approach of ardublockly very much, so I contributed to that project. It is now fully translatable. Next I keep all my new blocks compatible with ardublockly, and do PR to integrate them in ardublockly.

For example, the component blocks of my version (see arduino block in http://ingegno.be/Manuals/Blockly4Arduino/blockly4Arduino/index_en.html?url=examples/Blink.xml ) are available in
carlosperate/ardublockly#76

We should work together more, instead of having too many projects with their own blocks.

That said, I do wonder how you pulled of the codebender integration. I will check that out, at the moment I need to copy/paste code for that 👍

Problème d'affectation des pins lors de l'utilisation d'une variable avec le bloc "mettre la broche numérique""

Bonjour ,

Je rencontre un problème avec le bloc "mettre la broche numérique ... à l'état logique" lorsque je l'utilise avec une variable pour le numéro de broche (tous les blocs de ce type sont susceptibles d'êtres sujets à ce problème) :
1
le code généré contient "pinMode(MaVariable, OUTPUT);" :

void i;

void setup() {
  pinMode(i, OUTPUT);
}

void loop() {
  for (i = 1; i <= 10; i=i+1) {
    digitalWrite(i, HIGH);
  }

}

Mes pins de sortie ne sont donc pas mise en mode "output"

Contournement (j'utilise deux variables pour mettre en lumière les problèmes rencontrés) :
3
qui me génère :

int i;
int j;

void setup() {
    i = (int)(1);
  j = (int)(0);
  for (j = 1; j <= 10; j=j+1) {
    pinMode(j, OUTPUT);
  }

  pinMode(i, OUTPUT);
}

void loop() {
  for (i = 1; i <= 10; i=i+1) {
    digitalWrite(i, HIGH);
  }

}

Il faut bien penser a initialiser la variable utilisée par le bloc a la valeur d'une des pins utilisée en sortie sinon elle vaut 0 et c'est donc la pin 0 qui est passée a "output"

Je n'ai pas trouvé de bloc pour l'affectation des pins, je suis donc passé par un bloc "ligne de code"

suggestions :

  • Ce bloc ne devrait pas tenter d'affecter des pins si l'argument est une variable
  • Un bloc permettant l'affectation des pins pourrait être créé pour éviter l'utilisation du bloc "ligne de code"

Cordialement

Philippe

Block type CHAR

On peut mettre une variable à Type Char, mais il n'existe pas le bloc du style ' '
Il y a juste " " dans le menu TEXTE.

Fonctionnement en interruption

Voici comment le compilateur accepte le fonctionnement en interruption.
Les modification à apporter sont :
Mettre la fonction
attachInterrupt(2,attachInterrupt_2,RISING);
dans le setup, c'est plus logique

selection_161

De plus la fonction :
digitalPintoInterrup( ), doit rester en commentaire, et ne passer que le numéro de la broche qui sera utilisé en interruption.
J'ai fait le tour de plusieurs sites, et cela confirme l'erreur qu'il y a sur le site Arduino.
Enfin la variable qui sera utilisée dans l'interruption doit être de type *_volatile int *_variable, afin que l'on puisse utiliser cette variable dans les différentes fonctions.

Voici ce que l'on devrait obtenir

volatile int codeur_gauche;
void attachInterrupt_2() {
codeur_gauche = codeur_gauche + 1;
}
void setup() {
pinMode(2, INPUT);
attachInterrupt(2,attachInterrupt_2,RISING);
}

void loop() {

}

ET QUAND LE FONCTIONNEMENT EN INTERRUPTION FONCTIONNERA, ON POURRA L'UTILISER POUR LE MODULE BLUETOOTH (RX en interruption)
BON COURAGE.

Recommend Projects

  • React photo React

    A declarative, efficient, and flexible JavaScript library for building user interfaces.

  • Vue.js photo Vue.js

    🖖 Vue.js is a progressive, incrementally-adoptable JavaScript framework for building UI on the web.

  • Typescript photo Typescript

    TypeScript is a superset of JavaScript that compiles to clean JavaScript output.

  • TensorFlow photo TensorFlow

    An Open Source Machine Learning Framework for Everyone

  • Django photo Django

    The Web framework for perfectionists with deadlines.

  • D3 photo D3

    Bring data to life with SVG, Canvas and HTML. 📊📈🎉

Recommend Topics

  • javascript

    JavaScript (JS) is a lightweight interpreted programming language with first-class functions.

  • web

    Some thing interesting about web. New door for the world.

  • server

    A server is a program made to process requests and deliver data to clients.

  • Machine learning

    Machine learning is a way of modeling and interpreting data that allows a piece of software to respond intelligently.

  • Game

    Some thing interesting about game, make everyone happy.

Recommend Org

  • Facebook photo Facebook

    We are working to build community through open source technology. NB: members must have two-factor auth.

  • Microsoft photo Microsoft

    Open source projects and samples from Microsoft.

  • Google photo Google

    Google ❤️ Open Source for everyone.

  • D3 photo D3

    Data-Driven Documents codes.