Welcome to the AWS_EC2_Scheduler, a product meant to orchestrate the Stopping and Starting of non-trivial workloads.
There are many solutions in the marketplace to Stop and Start individual EC2 instances based on a schedule. However, they are focused on just that, starting and stopping instances, as opposed to entire systems or environments which we refer to as "non-trivial" workloads. The primary Use Case I see in action is a desire to manage at the workload level, not one-off instance level. As such, this Open Source project has been created.
A non-trivial workload is a multi-tier architected solution. A "Workload" by definition contains one or more "Tiers", each of which contains one or more instances. It's important to be able start and stop at the Workload level because non-trivial workloads are complex to start and stop for a variety of reasons, including:
- the dependencies among the tiers,
- the sequencing required to correctly start or stop a tier within the workload,
- the changing membership of instances within the workload,
- the need to exempt specific instances from schedules ad hoc,
- the ability to support last minute workload level scheduling changes, and
- the sheer number of instances involved,
Real world scenarios like the above quickly render per-instance approaches inadequate.
All of the primary, real world scenarios you might wish to entertain will be supported by AWS_EC2_Scheduler because non-trivial workloads are complex, and that is what this product is targeted to address.
You have a need to manage multiple Workloads across various AWS Regions. This is supported out of the box.

In case there is a need for controlling resources in different account from the account where actual Scheduler is running in, the following entries should be added to DynamoDB Workloads table: CrossAccountRole and CrossAccountRoleExternalId. It will allow Scheduler to Assume a Role and perform actions in remote account. Both DynamoDB entries are required for this feature. More details about Assuming roles can be found [here]|(https://docs.aws.amazon.com/IAM/latest/UserGuide/tutorial_cross-account-with-roles.html)
Stopping and Starting instances in an orderly manner may involve starting and stopping Tiers in a particular order, after all, you may not want to start your Web tier without having started your App Server tier or DB tier for that matter, so sequencing may be important for non-trivial workloads. When starting a Tier, you may want to wait for one Tier to complete some initialization prior to sequencing to the next Tier in the dependency chain. So, inter-tier orchestration may be important to you.
In some cases, you may need to scale parts or all your non-trivial workload vertically up or down for various reasons, for example time of day, or seasonal demand. The AWS_EC2_Scheduler supports the ability to vertically scale up or down on a tier by tier basis, with each tier having it's own scaling profile. This allows each tier to be scaled independently, and with independent instance types/sizes. Tiers may have an unlimited number of profiles, so for example you could have a profile for development, performance testing, econonmy, and production modes. When horizontal scaling isn't an option, the AWS_EC2_Scheduler can vertically scale your workload, optimizing your compute and spend.
In many cases you will not need all instances within a tier to be in Running state. While your production profile may require 3 Web Server instances running across 3 Availability Zones, that requirement may not be required for your development environment(s). When that is true, there's no reason to by paying for infrastructure in a triple-AZ HA configuration, when multi-AZ or even single suffices.
The Scheduler has a feature called "Fleet Subsets" which Starts the desired proper subset of instances within a tier based on your specification. For example, under "development" profile, start 50% of the total fleet size. Absolute values are supported as well, so specifying '2' will result in two instances within the Tier being started. Fleet Subsets are Tier specific, for maximum flexibility.
The Scheduler currently supports Scaling Out against running workloads. Should the need arise, you could then scale out a running "development" environment to a "performance" profile without first stopping and restarting the workload. In our example of running under the "development" profile, we can increase the fleet size from 50% to the percentage specified in the "performance" profile, say 75%, and the Scheduler will fire up the required additional instances to accomplish the 75% goal. Currently, the ability to Scale In is not supported. Todo: Add diagram here
Non-trival workloads need to account for the proper treatment of Starting and Stopping instances sitting behind ELB's so as to ensure instances are registered with ELB's after being restarted.
Perhaps you have a particular instance within a Tier which needs to be temporarily exempt from being stopped, in which case you may used advanced features of the AWS_EC2_Scheduler to bypass acting on the instance. The best part is there is no change to the AWS_EC2_Scheduler to accomplish this, and you can add/remove exemptions at any time without touching the AWS_EC2_Scheduler. For more details, see Instance Exemption Details
AWS_EC2_Scheduler does not impose use of any specific Tag Names nor Tag Values. Use your naming conventions and/or existing tags.
The AWS_EC2_Scheduler leverages SNS for key Ops notifications. Subscribe and be advised when the Scheduler publishes key events.
Guides:
There are several primary benefits for leveraging this product:
Reserved instances are great if you require compute 24x7 and saves you on the order of 20-25% versus On-Demand Instances. However, the AWS_EC2_Scheduler can save quite a bit more.
| Solution | Running Time | Sleep Time | Approx Savings |
|---|---|---|---|
| RI | 7 x 24 hrs/day | 0 hours per day | 20-35% versus On-Demand for common instances |
| AWS_EC2_Scheduler | 8 hrs/day no weekends | 16 hours per day + weekends | 76% versus On-Demand |
| AWS_EC2_Scheduler | 18 hrs/day no weekends | 6 hours per day + weekends | 46% versus On-Demand |
| AWS_EC2_Scheduler | 5 x 24 no weekends | weekends only | 28% versus On-Demand |
With the amount of savings achieved, you can more easily consume additional AWS services for other initiatives
AWS Instance Retirement Notifications are a reality that require attention at times you do not control. By Stopping instances daily, they will automatically be moved off of hardware slated for retirement or potentially incurring connectivity failures.
While Autoscaling is typically preferred, there are sometimes constraints that don't allow for this to occur, for example:
- Third party code which is not autoscale friendly, or
- Licensing restrictions
In these and other cases, scaling can assist in certain situations. The AWS_EC2_Scheduler supports the ability to Start an environment under multiple profiles, which allow for specifying different instance types and sizes. Additionally, the Scheduler support Horizontal Scaling out. By doing so, you can scale up when you want/need to, and scale back down when appropriate. A typical use case is performance testing.
Cattle not Pets is best practice, and while idealy through automation an environment can be provisioned and configured from scratch and terminated when testing is complete, there are scenarios where workloads will not be this tolerant. In those cases, the workload should minimally be tolerant enough to be started and stopped frequently, and demonstrate consistency across those (known) states. Running workloads for weeks, months, and in some cases years without interruption is a great recipie for producing Pets.
Optimize your DevOps teams by automating activities such as managing multiple environments through the AWS_EC2_Scheduler. Managing to start and stop them manually, goes against CALMS principles and invites human error. Instead, let the AWS_EC2_Scheduler provide Deterministic, Repeatable, and Consistent results, freeing DevOps team members to focus on more value added activities.
Start here if you already understand the Benefits and Differentiation of AWS_EC2_Scheduler versus the marketplace. This guide will get you up quickly with the most common features you may be interested in. CloudFormation is provided to you in the provisioning/cloudFormation folder.
For a more indept understanding of:
- Usage: Simply refer to the Users Guide section of this doc.
- Reference and Configuration: Simply refer to the Reference Guide section of this doc.
Quick Start Steps:
Basic setup consists of creating the following:
- Two tables in DynamoDB with minimal provisioned read and write Throughput (start with 1 and 1),
- Creation of an SNS topic for distribution of notifications,
- An IAM policy to allow the Scheduler to access the AWS EC2 API, SNS, DynamoDB tables.
You'll be prompted for the following CloudFormation Parameters when launching the stack:
- Your account number,
- Desired bucket name for S3 (temporary use by AWS SSM).
- You can strip out if you do not plan to use and advanced feature called Instance Exemption.
- If you plan to use this feature please read SSM Prerequisites as there are rules regarding what region the bucket needs to live in.
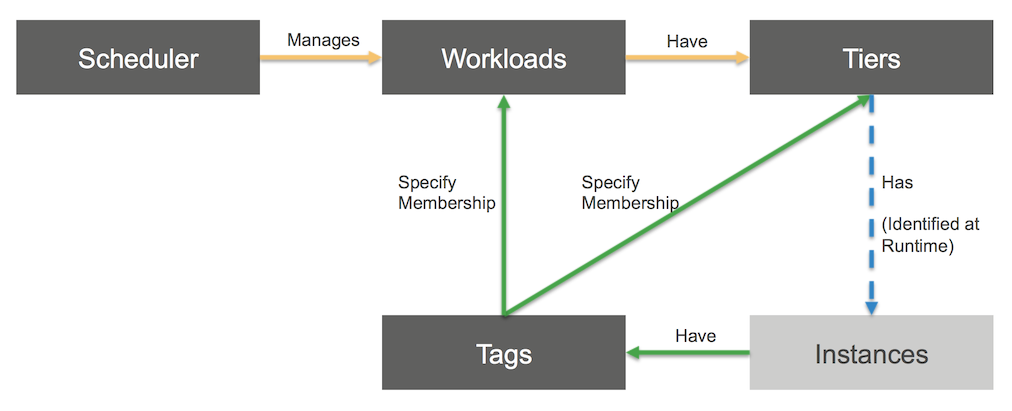
The scheduler works on instances which are members of a given Workload and Tier within the Workload. Membership within a Workload is defined by two tags. The Workload Tag and Value is applied to every instance within the workload, while the Tier Tag and Value defines membership of that instance within a specific tier of the workload. As such the relationship of Workload to Tier is one to many, as is the relationship of Tier to Instance. Here is the Information model:
Tag Requirements on instances: 1. Ensure your workload has a Tag Key and unique Tag Value (e.g. Tag Key Name is "Environment", Tag Value is "ENV001"), and that all instances to be orchestrated for that workload are tagged as such. 1. Ensure each tier within the workload has a unique Tag Key and Tag Value (e.g. Tag Key Name is "Role", Tag Value is "Web", or Tag Value is "DB", etc..)
Warning If you do not follow these guidelines, there's a good chance you'll configure the Scheduler to Stop instances you didn't intend to.
The tables in DynamoDB hold the definition and configuration of the workload (and therefore the tiers as well). There are a number of configuration attributes to utilize depending on your needs. Please refer to the DynamoDB Workload Table section section and DynamoDB Tier Table section to understand what is required versus optional.
For each workload, there is one entry in DynamoDB. Each workload table entry maps to one or more TierSpecification, based on the number of tiers that comprise the workload.
You have two choices to configure your workload:
- Load DynamoDB with your own automation and/or the AWS Management Console, or
- Use The Loader once you've defined the workload using YAML. The Loader will convert and insert the YAML into DynamoDB. (ToDo: Post Loader to repo)
| Checklist Item | Example |
|---|---|
| Decide your Workload's Tag Name | WorkloadName |
| Decide your Workload's Tag Value | ENV001 |
| Decide your Tier's Tag Name | ApplicationRole |
| Decide your Tier Tag Values (plural if two or more Tiers) | Role_DB, Role_App, Role_Web |
Steps:
Configuration options are:
- Mgt Console,
- CLI, or
- "Loader" app + YAML
You may want to configure the Example Workload, by following these simple instructions Provided Example Workload after running the CloudFormation provisioning (optional).
The AWS_EC2_Scheduler is specifically architected for deployment flexibility, to suit your specific use case(s). The software can be leveraged in many ways, with the below being most common (in order):
- IaaS Invocation via cron, and
- PaaS Invocation via Lambda with Scheduling Actions or Step Functions
If running the product on an instance, please address the following dependencies
- Ensure both python 3.x and boto3 are installed.
sudo apt-get install python3-pip pip3 install boto3 - Edit crontab to trigger Orchestrator.py
# Everyday @ 8pm Stop Workload ExampleTestCase
0 20 * * * python3 Orchestrator.py -w ExampleTestCase -r us-west-2 -a Stop
# Everyday @ 8am Start Workload ExampleTestCase
0 8 * * * python3 Orchestrator.py -w ExampleTestCase -r us-west-2 -a Start
If running via Lambda Scheduling Actions:
- python3 and boto3 are preinstalled,
- Ensure Lambda is deployed with an IAM Role that permits Lambda to invoke the required AWS Services (e.g. SNS, DynamoDB). Note: If you ran the CloudFormation script in Stand Up the AWS_EC2_Scheduler Infrastructure, an IAM Policy was created for you. Simply define your IAM Role and attach that Policy to the Role.
Contents:
Below are the usage flags for launching the Orchestrator from the command line:
$ python3 Orchestrator.py -h
usage: Orchestrator.py [-h] -w WORKLOADIDENTIFIER -r DYNAMODBREGION
                       [-a {Stop,Start}] [-t] [-d] [-p SCALINGPROFILE]
                       [-l {critical,error,warning,info,debug,notset}]

Command line parser

optional arguments:
  -h, --help            show this help message and exit
  -w WORKLOADIDENTIFIER, --workloadIdentifier WORKLOADIDENTIFIER
                        Workload Identifier to Action Upon
  -r DYNAMODBREGION, --dynamoDBRegion DYNAMODBREGION
                        Region where the DynamoDB configuration exists. Note:
                        could be different from the target EC2 workload is
                        running
  -a {Stop,Start}, --action {Stop,Start}
                        Action to Orchestrate (e.g. Stop or Start)
  -t, --testcases       Run the test cases
  -d, --dryrun          Run but take no Action
  -p SCALINGPROFILE, --scalingProfile SCALINGPROFILE
                        Resize instances based on Scaling Profile name
  -l {critical,error,warning,info,debug,notset}, --loglevel {critical,error,warning,info,debug,notset}
                        The level to record log messages to the logfile
$ python3 Orchestrator.py -w BotoTestCase1 -r us-west-2 -a Stop
$ python3 Orchestrator.py -w BotoTestCase1 -r us-west-2 -a Start
No Action will be taken. For example, the Stop will not execute as the Dry Run flag is set
$ python3 Orchestrator.py -w BotoTestCase1 -r us-west-2 -a Stop -d
Run the Test Suite - Starts and Stops instances with 90 second delay in-between. Note: this will start and stop instances.
$ python3 Orchestrator.py -w BotoTestCase1 -r us-west-2 -t
Start the workload named BotoTestCase1 in region us-west-2 resizing tier members (instances) per named profile performant. Tiers without this profile name are not resized but are started
$ python3 Orchestrator.py -w BotoTestCase1 -r us-west-2 -p performant -a Start
There is a provided CloudFormation Template Provisioning/TestWorkloadInstances_CF.yaml available, that provisions 4 instances for you to test with. The instances are t2.nanos to minimize cost.
Here is an example workload to get you quickly up to speed. The steps are very straight forward. Simply copy/paste each JSON blob into the named Table using the Management Console (or use the cli if you prefer). Note If you would like to contribute to this project, this is a nice piece to carve out. It would be helpful to craft a simply python script to automate the following.
- Add a DynamoDB Item to the WorkloadSpecification table. Click "Create Item" on Workload Table, change "Tree" to "Text" and paste in the following:
{ "DisableAllSchedulingActions": "0", "WorkloadFilterTagName": "Environment", "WorkloadFilterTagValue": "ENV001", "WorkloadRegion": "us-west-2", "SpecName": "ExampleTestCase", "SNSTopicName": "SchedulerTesting", "SSMS3BucketName": "myBucketName", "SSMS3KeyPrefixName": "ssmRemoteComandResults", "TierFilterTagName": "Role", "VPC_ID": "vpc-xyz" } - Click Save Now, add the Tiers (Web, App, and DB). Pay particular attention to the TierSequence attributes, which must start at zero across the set of Tiers. This is indicating what the sequence for starting / stopping Tiers.
- Add one DynamoDB Item to the TierSpecification table. Click "Create Item" on TierSpecification Table, change "Tree" to "Text" and paste in the following for the DB Tier:
{ "SpecName": "ExampleTestCase", "TierTagValue": "Role_DB", "TierStart": { "TierSequence": "0", "InterTierOrchestrationDelay": "10" }, "TierStop": { "TierSequence": "2", "InterTierOrchestrationDelay": "10" }, "TierScaling": { "default": "t2.large", "profileD": "r4.large" } } - Add one DynamoDB Item to the TierSpecification table. Click "Create Item" on TierSpecification Table, change "Tree" to "Text" and paste in the following for the App Tier:
{ "SpecName": "ExampleTestCase", "TierTagValue": "Role_App", "TierStart": { "TierSequence": "1", }, "TierStop": { "TierSequence": "1", "InterTierOrchestrationDelay": "10" }, "TierScaling": { "default": "t2.nano", "profileB": "t2.medium", "profileC": "t2.large", "profileD": "c4.large" } } - Add one DynamoDB Item to the TierSpecification table. Click "Create Item" on TierSpecification Table, change "Tree" to "Text" and paste in the following for the Web Tier:
{
  "SpecName": "ExampleTestCase",
  "TierTagValue": "Role_Web",
  "TierStart": {
    "TierSequence": "2",
  },
  "TierStop": {
    "TierSequence": "0",
    "InterTierOrchestrationDelay": "10"
  },
  "TierScaling": {
    "default": "t2.nano",
    "profileB": "t2.medium",
    "profileC": "t2.large",
    "profileD": "c4.large"
  }
}
In the example workload, you see the Tag Name for the Workload is Environment. This example Workload consists of 3 Tiers and you can easily see that every Tier Tag Name is ApplicationRole, while each Tier has a different value. Every instance in the Workload belongs to one of {Web, App, or DB} tiers.
ToDo: Add diagram
Enabling this advanced feature will allow you to exclude a specific instance from being Stopped, by setting a flag in the instance's filesystem. Recall, the Scheduler doesn't manage the workload by scheduling instances. Rather at runtime, it visits each Tier within the Workload in the dependency order you specified, and only at that point does it determine instance membership in the tier. As such, the exemption request is handled outside of the context of the Scheduler, who will simply check to see if the exemption was set - by whatever means makes sense for your or your organization.
Please be advised the Scheduler uses pessimistic/risk averse decision making. If for whatever reason the AWS_EC2_Scheduler cannot positively confirm the override file has not been set, it will not stop the instance. With SSM enabled, the Scheduler will only stop an instance if it can confirm the override file is absent. If, for example, the SSM command times-out prior to obtaining a result, that instance will not be stopped. This is by design.
- A slightly more advanced IAM Policy will need to be used to enable these features. Additionally, an IAM Policy will need to be applied to the Instance Profile of the target instances. Please see Enhanced IAM Policies
- Create an S3 bucket for the SSM processing. This bucket will be the temporary storage SSM requires to store results. Note Due to a limitation in SSM, the bucket must exist in the same region as where the target ssm instances (the workload) are running. Otherwise, SSM will not log the result, and as such, this software will poll S3 for 5 minutes per instance waiting for the SSM results to appear in S3, which will never happen. With pessimistic processing, in this scenario the Scheduler will not Stop the instance.
- Configure Lifecycle rules on your bucket for 1 day, as the SSM result files are temporary and not easily accessible by anything other than the AWS_EC2_Scheduler (especially humans). As such once the result is obtained, the file is worthless. 24 hours is plenty of time.
- Network visibility is required to the target instances. If you are running the software outside of EC2, you may need a public IP address on target instances. You can check for network visibility by using the Management Console to run an SSM test command before attempting to use this software. If the Management Console (EC2-->Commands-->Command History-->Run Commmand) Filter doesn't show your targeted instances, then you will likely need to add a Public IP, or assign an EIP. This is an SSM dependency.
For a full set of SSM Prerequsites, look Here
This is an advanced, optional feature. Since the product uses SSM, it will can check for the existence of an "override file" on the instance itself, only if you have configured TierStopOverrideFilename and TierStopOverrideOperatingSystem. When configured and the filename is present on the target instance in the correct location, the product will not stop the instance but rather bypass it. This will be logged in the Orchestrator.log file as well as published via SNS. The content of the override file is immaterial.
You specify the location of the Override File, as well as the Operating System. SSM will simply check whether the file exists in the location you configure. If the file exists, the instance will be bypassed.
SSM will introduce some latency in terms of how quickly the instance is attempted for Stop Action.
Be sure to set the SSM timeout as directed by AWS as they are running the SSM service. By design, this feature uses pessimistic decisioning and if a positive confirmation cannot be obtained, the AWS_EC2_Scheduler will leave the instance running. Therefore when SSM timesout, it will leave the instance running.
A prototypical non-trivial workload might look like this, leveraging many instances participating in various tiers of the architecture to perform various functions. Fleets of instances may sit behind ELB's and leverage other AWS services.

Here is the model explaining the relationship among the AWS_EC2_Scheduler, Workloads, Tiers, Tags, and Instances.
Tags should be applied to relevant instances using your automation of choice (e.g. CloudFormation, terraform, Chef, etc..), which is how the Scheduler will find the workload instances at runtime. And here is what the instance might look once tagged.

The scheduler will Start or Stop your instances on a Tier by Tier basis, for a given Workload. You specify the Tier Dependencies, which sequence the order of execution. For example:

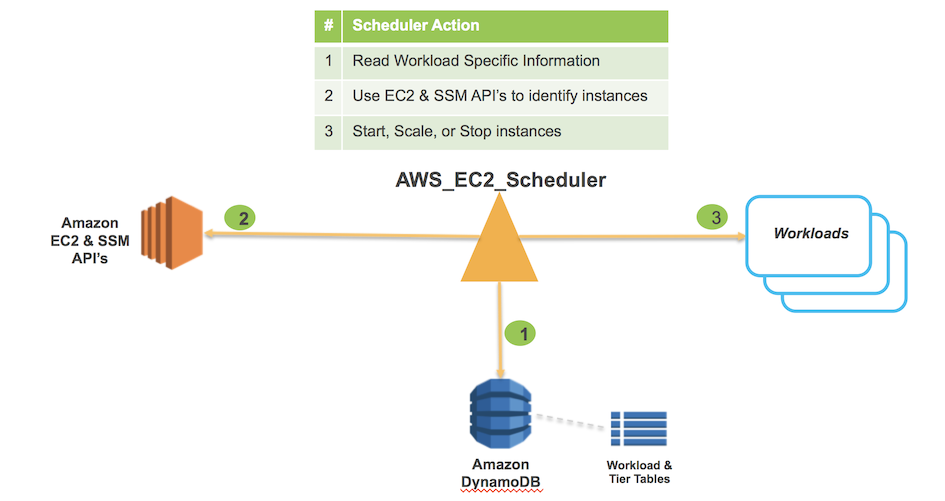
The Scheduler will operate in the following manner:
- Reads Workload specific information from DynamoDB
- Uses EC2 & SSM API’s to identify instance membership within Tiers
- Actions Start, Scale, or Stop on a Tier by Tier basis
All of the configuration details
All of the configuration is stored in DynamodDB. The tables are provisioned for you if you run the CloudFormation template located in the provisioning/cloudFormation folder. The tables are provisioned with a throughput of 1 unit for both write and read (eventual consistency). That will set you back about $0.59/month per table.
| Table Name | Partition Key |
|---|---|
| WorkloadSpecification | SpecName |
For each workload, there is one entry in DynamoDB. Each workload table entry maps to one or more TierSpecification, based on the number of tiers that comprise the workload.
The workload specification contains tier independent configuration of the workload. The way to think about it, is the WorkloadSpecification represents the entire system being managed, which consists of one or more tiers.
| WorkloadTagName | Description | Required? |
|---|---|---|
| WorkloadFilterTagName | The name of the tag key (on the instance) that will be used to group the unique members of this workload. In the example DynamoDB Table, "Environment" is the tag key. | Yes |
| WorkloadFilterTagValue | The tag value identifying the unique set of members within the EnvFilterTagName. In the example DynamoDB Table, "ENV001" is the tag value | Yes |
| WorkloadRegion | The AWS region identifier where the workload runs, not the region where this open source product is executed | Yes |
| SNSTopicName | The name of the topic to publish SSM related statuses. For example, whether the override file was set, or other reasons why an instance will not be stopped. | Yes |
| SpecName | The unique name of the Workload, the key of the WorkloadSpecification table and foreign key of the TierSpecification table | Yes |
| TierFilterTagName | The name of the tag key on the instance used to identify the Tier. | Yes |
| VPC_ID | Recommended parameter to limit the scope of the query for instance matching. | Not required but recommended |
| SSMS3BucketName | The name of the bucket where the SSM results will be places. Note: It is suggested you enable S3 Lifecycle rules on the bucket as the SSM Agent creates a new entry everytime it checks an instance | No. Used only with SSM/Instance Exemption |
| SSMS3BucketName | The path of the S3BucketName | No. Used only with SSM/Instance Exemption |
| ScaleInstanceDelay | Specifies the sleep delay in seconds between the instance resize (Scaling Action) and instance Start. This delay is necessary to address the eventual consistency issue seen on the AWS side when resizing and immediately Starting an instance. | No |
| DisableAllSchedulingActions | When this attribute is present in the Workload Table and has a string value of '1', no processing will occur across the entire workload. This attribute is a global override and results in no actions being taken. Any value other than a string of '1', will be ignored and processing will continue as if the attribute was not even present. | No |
| CrossAccountRole | ARN of the remote account. | No |
| CrossAccountRoleExternalId | External ID of the remote account. | No |
The below JSON is an example of a row in the WorkloadSpecification DynamoDB table. Not all attributes are required.
{
  "DisableAllSchedulingActions": "0",
  "WorkloadFilterTagName": "Environment",
  "WorkloadFilterTagValue": "ENV001",
  "WorkloadRegion": "us-west-2",
  "SpecName": "BotoTestCase1",
  "SNSTopicName": "SchedulerTesting",
  "SSMS3BucketName": "myBucketName",
  "SSMS3KeyPrefixName": "ssmRemoteComandResults",
  "TierFilterTagName": "Role",
  "VPC_ID": "vpc-xyz"
}| Table Name | Partition Key | Sort Key |
|---|---|---|
| TierSpecification | SpecName | TierTagValue |
The tier specification represent the tier-specific configuration. A tier membership is the set of instances that share the same Tier Tag Value. For example, a tier could be "Web", or "App", or "DB", or however your architecture is laid out. Within a tier, there may be one or more instances. As there may be multiple Tiers for a given WorkloadSpecification, each Tier in DynamoDB contains its Workload identifier.
The tier specification is somewhat more complex than the WorkloadSpecification, as it contains nested configuration. That is because a tier has configuration information for Starting, which is different than Stopping, and optionally contains a Scaling section as well.
Here are a few things you need to know about the Tier Specification:
- The name of this tier, is found as the tag value of "TierTagValue" (imagine that).
* Each tier name must be unique - The Tier Sequence indicates this tier's placement is, within the overall sequence.
* Numbering starts at zero * There is no upper bound on sequence number. * In the example below, the Tier named "Role_Web" will be the first tier stopped (e.g. TierSequence == 0) and last tier started, in a 3 tier architecture (e.g. TierSequence is 2)
| TierTagName | Description | Required? |
|---|---|---|
| SpecName | The unique name of the Workload, the key of the WorkloadSpecification table and foreign key of the TierSpecification table | Yes |
| TierTagValue | The name of the Tag Value that will be used as a search target for instances for this particular tier. The Tag Key is specified in the WorkloadSpec. | Yes |
| TierStart | The dictionary containing a specification for the Start Action of the tier | Required to Start Workload |
| TierStop | The dictionary containing a specification for the Stop Action of the tier | Required to Stop Workload |
| TierScaling | The dictionary containing a specification for Scaling a tier. Contains the Profile mapping of user name to instance type and size. Scaling is only used at Start Action time, and is optional. Dictionary is profile name : instance size. If a tier does not contain an Profile as specified on the command line, no scaling action will occur when the tier is started. | Only required to Scale a Tier during Start Action |
| TierSequence | The numeric index within the overall sequence of actioning the WorkloadSpec, for this tier. NOTE The index of the "first" tier to be actioned, starts at 0 (e.g. ZERO), not 1 (one). TierSequence is a child attribute of TierStart or TierStop. | Yes if either TierStart or TierStop is configured |
| TierSynchronization | Indicator specifying whether the Stop command on the instance is executed asynchronously (defalut), or synchronously. Valid values are "True" or "False" | No |
| InterTierOrchestrationDelay | The number of seconds to delay before actioning on the next tier. Typically, you have a sense for how long to wait after the current tier starts or stops before actioning on the next tier. This is where you set that delay, in seconds. Note: This is a string value | No (default value is 5 seconds) |
| TierStopOverrideFilename | The name of the override file in the guest OS to check for existance. If the file exists in the guest OS, the server will not be stopped. | No |
| TierStopOverrideOperatingSystem | The name of the OS in the guest. Valid values are "Linux", or "Windows" | No. Unless you configure TierStopOverrideFilename |
| IgnoreStop | Option to Ignore the Stop Command issued to the workload on a per tier basis. Valid values are True or False |
The below JSON is a row in the TierSpecification DynamoDB table, and can be mapped several DynamoDB Attributes, three of which will contain JSON. This tier, named Role_Web is Started as the third tier (sequence == 2) when the workload starts and is Stopped first. Every instance is checked prior to Stopping (because Instance Exemption was configured and SSM enabled by the Administrator) to determine a file named StopOverride exists in the tmp directory (content of file is irrelevant), and if so the instance will not be stopped. In the event of a Scaling request, with a provided profile name of "profileC", all instances within this tier will first be changed to t2.large prior to Starting. Not all attributes are required.
{
  "SpecName": "BotoTestCase1",
  "TierStart": {
    "TierSequence": "2",
    "TierSynchronization": "False"
  },
  "TierStop": {
    "TierSequence": "0",
    "TierStopOverrideFilename": "/tmp/StopOverride",
    "TierStopOverrideOperatingSystem": "Linux",
    "TierSynchronization": "False",
    "InterTierOrchestrationDelay": "10"
  },
  "TierScaling": {
    "default": "t2.nano",
    "profileB": "t2.medium",
    "profileC": "t2.large",
    "profileD": "c4.large"
  },
  "TierTagValue": "Role_Web"
}
Or, for Windows guest OS ...
{
  "SpecName": "BotoTestCase1",
  "TierStart": {
    "TierSequence": "2",
    "TierSynchronization": "False"
  },
  "TierStop": {
    "TierSequence": "0",
    "TierStopOverrideFilename": "C:\\ignore.txt",
    "TierStopOverrideOperatingSystem": "Windows",
    "TierSynchronization": "False"
  },
  "TierScaling": {
    "default": "t2.nano",
    "profileB": "t2.medium",
    "profileC": "t2.large",
    "profileD": "c4.large"
  },
  "TierTagValue": "Role_Web"
}
Or, example with FleetSubset where profileE will launch 20% of instances and profileF will launch exactly 4 instances...
{
  "SpecName": "BotoTestCase1",
  "TierStart": {
    "TierSequence": "2",
    "TierSynchronization": "False"
  },
  "TierStop": {
    "TierSequence": "0",
    "TierStopOverrideFilename": "/tmp/StopOverride",
    "TierStopOverrideOperatingSystem": "Linux",
    "TierSynchronization": "False",
    "InterTierOrchestrationDelay": "10"
  },
  "TierScaling": {
    "default": "t2.nano",
    "profileB": "t2.medium",
    "profileC": "t2.large",
    "profileD": "c4.large",
    "profileE": {
      "InstanceType": "t2.large",
      "FleetSubset" : 20%"
    },
    "profileF": {
      "InstanceType": "t2.large",
      "FleetSubset" : 4"
    },
  },
  "TierTagValue": "Role_Web"
} | Table Name | Partition Key |
|---|---|
| WorkloadState | Workload |
WorkloadState keeps track of states (Workload name, if any Profile is used, action type and last action time)
| WorkloadState | Description | Required? |
|---|---|---|
| Workload | The Workload name. In the example DynamoDB Table, "ENV001" is the tag value. | Yes |
| LastActionTime | When was the Scheduler last used for this workload. Format is Python datetime.datetime.now() function. In the example DynamoDB Table, it is "2018-11-29 10:15:08" | Yes |
| LastActionType | Last action performed by Scheduler. Can be either Stop or Start | Yes |
| Profile | Profile used on this Workload. Please note that if Stop is used together with Profile (-p), this field won't be updated. Also, if no Profile (-p) is used, this field won't be updated | No |
The below JSON is an example of a row in the WorkloadState DynamoDB table. Not all attributes are required.
{
  "Workload": "ENV001",
  "LastActionTime": "2018-11-29 10:15:08",
  "LastActionType": "Stop",
  "Profile": "Indexation"
}The Enhanced IAM Policy is a superset of the Common IAM Policy and is provisioned for you, using the provided CloudFormation template in the provisioning/cloudFormation folder.
This policy includes everything you'll likely need.
Enable this policy on the instance or Lambda function running the Orchestrator.py
{
    "Version": "2012-10-17",
    "Statement": [
        {
            "Sid": "Stmt1465181592000",
            "Effect": "Allow",
            "Action": [
                "ec2:DescribeInstanceStatus",
                "ec2:DescribeInstances",
                "ec2:ModifyInstanceAttribute",
                "ec2:DescribeTags",
                "ec2:StartInstances",
                "ec2:StopInstances",
                "elasticloadbalancing:DescribeLoadBalancers",
                "elasticloadbalancing:RegisterInstancesWithLoadBalancer",
                "elasticloadbalancing:DeregisterInstancesFromLoadBalancer"
            ],
            "Resource": [
                "*"
            ]
        },
        {
            "Sid": "SNSPublicationClause",
            "Effect": "Allow",
            "Action": [
                "sns:Publish",
                "sns:CreateTopic"
            ],
            "Resource": "arn:aws:sns:us-west-2:<your-account-number-here>:<your-sns-topic(s)>"
        },
        {
            "Sid": "Stmt1465182118000",
            "Effect": "Allow",
            "Action": [
                "dynamodb:GetItem",
                "dynamodb:Query"
            ],
            "Resource": [
                "arn:aws:dynamodb:<region-of-your-dynamodb-tables>:<your-account-number here>:table/WorkloadSpecification",
                "arn:aws:dynamodb:<region-of-your-dynamodb-tables>:<your-account-number here>:table/TierSpecification"
            ]
        }
    ]
}Use this policy if you wish to enable SSM for the Instance Exemption capability. See here: Enabling SSM Enable this policy on the instance or Lambda function running the Orchestrator.py
{
    "Version": "2012-10-17",
    "Statement": [
        {
            "Sid": "Stmt1465181592000",
            "Effect": "Allow",
            "Action": [
                "ec2:DescribeInstanceStatus",
                "ec2:DescribeInstances",
                "ec2:ModifyInstanceAttribute",
                "ec2:DescribeTags",
                "ec2:StartInstances",
                "ec2:StopInstances",
                "elasticloadbalancing:DescribeLoadBalancers",
                "elasticloadbalancing:RegisterInstancesWithLoadBalancer",
                "elasticloadbalancing:DeregisterInstancesFromLoadBalancer"
            ],
            "Resource": [
                "*"
            ]
        },
        {
            "Sid": "SNSPublicationClause",
            "Effect": "Allow",
            "Action": [
                "sns:Publish",
                "sns:CreateTopic"
            ],
            "Resource": "arn:aws:sns:us-west-2:<your-account-number-here>:<your-sns-topic(s)>"
        },
        {
            "Sid": "Stmt1465181721000",
            "Effect": "Allow",
            "Action": [
                "s3:GetObject",
                "s3:ListBucket",
                "s3:GetBucketLocation"
            ],
            "Resource": [
                "arn:aws:s3:::<your-bucket-name-here>",
                "arn:aws:s3:::<your-bucket-name-here>/*"
            ]
        },
        {
            "Sid": "Stmt1465182118000",
            "Effect": "Allow",
            "Action": [
                "dynamodb:GetItem",
                "dynamodb:Query"
            ],
            "Resource": [
                "arn:aws:dynamodb:<region-of-your-dynamodb-tables>:<your-account-number here>:table/WorkloadSpecification",
                "arn:aws:dynamodb:<region-of-your-dynamodb-tables>:<your-account-number here>:table/TierSpecification"
            ]
        },
        {
            "Sid": "Stmt1465183822000",
            "Effect": "Allow",
            "Action": [
                "ssm:SendCommand",
                "ssm:ListDocuments",
                "ssm:DescribeDocument",
                "ssm:GetDocument",
                "ssm:DescribeInstanceInformation",
                "ssm:CancelCommand",
                "ssm:ListCommands",
                "ssm:ListCommandInvocations"
            ],
            "Resource": [
                "*"
            ]
        }
    ]
}If CrossAccountRole and CrossAccountRoleExternalId are enabled, the following IAM Policy needs to be added and attached to IAM role in the target AWS account:
{
    "Version": "2012-10-17",
    "Statement": [
        {
            "Sid": "VisualEditor0",
            "Effect": "Allow",
            "Action": [
                "elasticloadbalancing:DescribeLoadBalancers",
                "ec2:DescribeInstances",
                "ec2:StartInstances",
                "ec2:ModifyInstanceCreditSpecification",
                "ec2:DescribeTags",
                "ec2:ModifyInstanceAttribute",
                "ec2:StopInstances",
                "elasticloadbalancing:DeregisterInstancesFromLoadBalancer",
                "elasticloadbalancing:RegisterInstancesWithLoadBalancer",
                "ec2:DescribeInstanceCreditSpecifications",
                "ec2:DescribeInstanceStatus"
            ],
            "Resource": "*"
        }
]
}
Additionally, when using SSM you will need to enable an IAM Policy on the instances in your Workload. In the case of Windows based instances, SSM is already installed. For Linux, you'll need to deploy the SSM agent and provide the below policy to allow that instance to interact with the AWS SSM service.
Simply attach the AWS Managed Policy called AmazonEC2RoleforSSM to the instance profile under which the linux instance is running.
Here is an example of installting SSM on your linux instances Install SSM on your target instances.
Below is an example for Ubuntu, using UserData
      #!/bin/bash
      cd /tmp
      curl https://amazon-ssm-us-west-2.s3.amazonaws.com/latest/debian_amd64/amazon-ssm-agent.deb -o amazon-ssm-agent.deb
      dpkg -i amazon-ssm-agent.deb
      systemctl start amazon-ssm-agent