sunxinfei / sunxinfei.github.io Goto Github PK
View Code? Open in Web Editor NEW前后端技术相关笔记,已迁移到 Issues 中
Home Page: https://github.com/SunXinFei/sunxinfei.github.io/issues
前后端技术相关笔记,已迁移到 Issues 中
Home Page: https://github.com/SunXinFei/sunxinfei.github.io/issues


先说下trello这种纵列卡片的拖拽布局,很简单,只需要卡片的相对位置顺序,加上css布局即可。
一般情况下,拖拽卡片改变卡片位置有一种泛泛的方式,那就是把最新的index全部交给后台保存,但是弊端很明显,影响数据库字段很多,在trello中,有一套单独的逻辑,来优化这方面的操作:
先说下大前端与前端赋能,这里有一篇winter的文章,里面有一个观点很有趣,就是大前端并不是抢其他工种业务,而是一种赋能,那我们总结下前端赋能的案例,进行理解:
市面上有效赋能的产品或工具:
在此之前先说下nrm,因为国内的开发者一般为了速度,是将自己的npm镜像设为taobao的那个,在这里如果使用该网址,会出现一些错误no_perms Private mode enable, only admin can publish this module:xxx,所以我们需要nrm这个工具来切换我们的NPM源,这点一定要注意。
npm adduser,然后输入用户名,密码,邮箱即可登入成功,登陆成功后,输入npm whoami如果出现了你的用户名,说明你已经成功登陆了。npm init命令,module.exports = require('./lib/test')module.exports = function(){return 'ok'}npm publish
+ [email protected]
You cannot publish over the previously published versions: 1.0.0. : sunxinfei-react-test前端项目的字体文件,尤其是汉字的字体文件还是非常大的,因为不同于英文,只需包含基本的英文字母以及数字之类的即可,一些体积比较小的汉字包含了常用的6500字左右,包含汉字数量越多,汉字质量越高会导致字体文件体积极速膨胀到10M以上,H5手持端以及pc前端页面加载都会显得非常缓慢。尤其是一个页面使用了多个体积庞大的字体文件,会导致加载时间很长。
现象就是用到字体的文本,会一直空白,知道字体加载,才会正常显示。
由于mac中自带python,那么我们可以避开python的安装。
sudo easy_install pip 安装pip;sudo pip install selenium 安装selenium;brew install chromedriver;brew tap caskroom/cask
brew cask install chromedriver
新建test.py,粘贴下面的内容;保存之后使用python test.py执行,即可得到运行结果与爬虫截图。
#-*-  coding:utf-8 -*-
from selenium import webdriver
from selenium.webdriver.chrome.options import Options
#要想调用键盘按键操作需要引入keys包
from selenium.webdriver.common.keys import Keys
import time
chrome_options = Options()
chrome_options.add_argument('--headless')
driver = webdriver.Chrome(chrome_options=chrome_options)
driver.set_window_size(1366, 768)
driver.get("http://www.baidu.com")
# 获取页面名为wraper的id标签的文本内容
data = driver.find_element_by_id('wrapper').text
#打印数据内容
print(data)
print driver.title
#生成页面快照并保存
driver.save_screenshot("baidu.png")
#获取当前页面Cookie
print(driver.get_cookies())
#ctrl+a全选输入框内容
driver.find_element_by_id('kw').send_keys(Keys.CONTROL, 'a')
#ctrl+x剪切输入框内容
driver.find_element_by_id('kw').send_keys(Keys.CONTROL, 'x')

#输入框重新输入内容
driver.find_element_by_id('kw').send_keys(u'百度')

#模拟Enter回车键
driver.find_element_by_id('su').send_keys(Keys.RETURN)
time.sleep(5)

#清空输入框内容
# driver.find_element_by_id('kw').clear()

#生成新的页面快照
driver.save_screenshot('test.png')
#获取当前url
print(driver.current_url)
driver.close()JSX到JS对象的映射:
<div class='box' id='content'>
  <div class='title'>Hello</div>
  <button>Click</button>
</div>
{
tag: 'div',
attrs: { className: 'box', id: 'content'},
children: [
{
tag: 'div',
arrts: { className: 'title' },
children: ['Hello']
},
{
tag: 'button',
attrs: null,
children: ['Click']
}
]
}JSX 到页面到底经过了这样的过程:

为什么不直接从 JSX 直接渲染构造 DOM 结构,而是要经过中间这么一层呢?
第一:我们拿到一个表示UI的结构对象的时候,不一定渲染到浏览器页面中,比如我可以通过react-canvas渲染到canvas,react-app渲染到原生app中,这个也是react-dom单独抽离,没有和react库在一起的原因。
第二:有了这个对象,当数据变化,需要更新组件的时候,非常方便的比较这个JS对象,而不是直接操作DOM结构,减少浏览器重排,提高性能,这也就是所说的虚拟DOM
之前的博客blog.sunxinfei.com,是用hexo搭建的,流量统计、评论系统、图床、发布等等还是比较齐全的,只不过有个弊端就是更换设备,或者临时产生想法不能及时去书写,所以这点相比github的issue就显得有点花哨,github的issue里面包含加入图片和MD语法书写以及评论与回复,还可以加入不同的Labels标签方便文章的管理,对于一般的技术文章足以,之前的blog可以作为一些代码运行效果的展示,纯技术的还是更新在github的issue中,更方便。
/home/uli/project/node_modules/webpack-cli/bin/config-yargs.js:89
                                describe: optionsSchema.definitions.output.properties.path.description,
                                                                           ^

TypeError: Cannot read property 'properties' of undefined
    at module.exports (/home/uli/project/node_modules/webpack-cli/bin/config-yargs.js:89:48)
    at /home/uli/project/node_modules/webpack-cli/bin/webpack.js:60:27
    at Object.<anonymous> (/home/uli/project/node_modules/webpack-cli/bin/webpack.js:515:3)
    at Module._compile (internal/modules/cjs/loader.js:723:30)
    at Object.Module._extensions..js (internal/modules/cjs/loader.js:734:10)
    at Module.load (internal/modules/cjs/loader.js:620:32)
    at tryModuleLoad (internal/modules/cjs/loader.js:560:12)
    at Function.Module._load (internal/modules/cjs/loader.js:552:3)
    at Module.require (internal/modules/cjs/loader.js:659:17)
    at require (internal/modules/cjs/helpers.js:22:18)
这个错误主要是webpack的version导致的,可以写死webpack的版本号,如 "webpack": "4.19.0",注意没有^这个符号,重新npm install安装依赖即可
参考文献 https://techoverflow.net/
nvm方便我们对nodejs进行版本的切换,nvm的github项目地址里面有windows的安装下载链接,主要是mac本这里,注意先删除干净所有的node的文件,然后运行github中所提到的如下命令:
curl -o- https://raw.githubusercontent.com/creationix/nvm/v0.33.8/install.sh | bash
就会git克隆到本地,安装成功之后,运行nvm看看有没有提示信息,如果看到
nvm: command not found,
那么就需要我们如下运行命令:
创建bash_profile 执行命令: touch .bash_profile
打开并编辑bash_profile 执行命令: open .bash_profile
这样我们就获得一个记事本打开的bash_profile,我们在里面粘贴上这个:
export NVM_DIR=~/.nvm
source ~/.nvm/nvm.sh
然后command+s保存,运行source命令:
source .bash-profile
然后输入nvm就可以得到信息了,官方的github的readme中不能解决这个问题,我获得这个解决方案来自于issue中
安装node
sudo wget https://nodejs.org/dist/v10.16.0/node-v10.16.0-linux-x64.tar.xz
sudo xz -d node-v10.16.0-linux-x64.tar.xz
sudo tar -xf node-v10.16.0-linux-x64.tar
命令指向
sudo ln -s  /usr/local/sin_mobile/node-v10.16.0-linux-x64/bin/node /usr/bin/node
sudo ln -s /usr/local/sin_mobile/node-v10.16.0-linux-x64/bin/npm /usr/bin/npm
安装pm2
sudo npm install -g pm2
sudo ln -s /usr/local/sin_mobile/node-v10.16.0-linux-x64/bin/pm2 /usr/local/bin/
下载chrome安装包
sudo wget https://dl.google.com/linux/direct/google-chrome-stable_current_x86_64.rpm
安装chrome安装包
sudo yum localinstall google-chrome-stable_current_x86_64.rpm或sudo rpm -ivh google-chrome-stable_current_x86_64.rpm
Selenium由于不再迭代,现在主流爬虫都使用的--Puppeteer
由于mac中自带python,那么我们可以避开python的安装。
sudo easy_install pip 安装pip;sudo pip install selenium 安装selenium;brew install chromedriver;brew tap caskroom/cask
brew cask install chromedriver
新建test.py,粘贴下面的内容;保存之后使用python test.py执行,即可得到运行结果与爬虫截图。
#-*-  coding:utf-8 -*-
from selenium import webdriver
from selenium.webdriver.chrome.options import Options
#要想调用键盘按键操作需要引入keys包
from selenium.webdriver.common.keys import Keys
import time
chrome_options = Options()
chrome_options.add_argument('--headless')
driver = webdriver.Chrome(chrome_options=chrome_options)
driver.set_window_size(1366, 768)
driver.get("http://www.baidu.com")
# 获取页面名为wraper的id标签的文本内容
data = driver.find_element_by_id('wrapper').text
#打印数据内容
print(data)
print driver.title
#生成页面快照并保存
driver.save_screenshot("baidu.png")
#获取当前页面Cookie
print(driver.get_cookies())
#ctrl+a全选输入框内容
driver.find_element_by_id('kw').send_keys(Keys.CONTROL, 'a')
#ctrl+x剪切输入框内容
driver.find_element_by_id('kw').send_keys(Keys.CONTROL, 'x')

#输入框重新输入内容
driver.find_element_by_id('kw').send_keys(u'百度')

#模拟Enter回车键
driver.find_element_by_id('su').send_keys(Keys.RETURN)
time.sleep(5)

#清空输入框内容
# driver.find_element_by_id('kw').clear()

#生成新的页面快照
driver.save_screenshot('test.png')
#获取当前url
print(driver.current_url)
driver.close()

export const getQueryString = (name) => {
  let regData = location.href.match(`(${name}=)(\\d+)`);
  let queryId = regData && regData[2] || '';
  return queryId;
} /**
* 防抖
* @param {Function} fn 需要延迟运行的的回调函数
**/
export const debounce = (fun,delay) => {
return function (args) {
let that = this
let _args = args
clearTimeout(fun.id)
fun.id = setTimeout(function () {
fun.call(that, _args)
}, delay)
}
}
/**
上面代码可以用箭头函数省略为
*/
export const debounce = (fun,delay) => {
return function (args) {
clearTimeout(fun.id)
fun.id = setTimeout(()=>{
fun.call(this, args)
}, delay)
}
}
//调用地方
/**
* 处理滚动视图的滚动事件
*/
scrollFn(e) {
debounce(this.aaa, 1000)(666);
},
aaa(num){
console.log(this.test,num);
},//截流
/**
* 连续的方法 延迟,如持续输入数据,搜索
* @param {Function} fn 需要延迟运行的的回调函数
**/
let previous = 0
export const throttle = (fn,delay) => {
return function() {
let now = +new Date();
if (now - previous > delay) {
fn.apply(this, arguments);
previous = now;
}
}
}
//调用地方
/**
* 处理滚动视图的滚动事件
*/
scrollFn(e) {
throttle(this.aaa, 1000)(666);
},
aaa(num){
console.log(this.test,num);
},关于防抖(debounce) :在事件触发后的n秒之后,再去执行真正需要执行的函数,如果在这n秒之内事件又被触发,则重新开始计时。常见的操作就是搜索,中间不断的输入,我们都可以忽略,只获取最后停止输入的时候,才去请求后端。。
节流(throttling):规定好一个单位时间,触发函数一次。如果在这个单位时间内触发多次函数的话,只有一次是可被执行的。想执行多次的话,只能等到下一个周期里。常见的操作比如滚动事件,每隔n毫秒,我们去请求,或者拖拽,每隔n毫秒改变dom的位置。还比如resize窗口。
参考:
Advanced-Frontend/Daily-Interview-Question#5
mqyqingfeng/Blog#26
el.dataset可以获取DOM元素中绑定的data-的属性值,比如
<div :data-index="index">
</div>
el.dataset-index 即为index的值
有时阅读源码,会在代码中看到在某个元素前使用 ‘+’ 号,这个操作是将该元素转为Number类型,如果转换失败,那么将得到 NaN。
所以 +new Date 将会调用 Date.prototype 上的 valueOf 方法,而根据 MDN ,Date.prototype.value 方法等同于 Date.prototype.getTime()。所以一下代码效果相同:
console.log(+new Date);
console.log(Number(new Date));
console.log(new Date().getTime());
console.log(new Date().valueOf());
console.log(new Date() * 1);~是位非运算符,
~-1 === 0 表示true;
所以这个符号常用来搭配 indexOf 方法一起使用,比如:
let aaa = 'abcd';
aaa.indexOf('b') === -1; //false 表示aaa中存在b字符
//
Boolean(~aaa.indexOf('b')) // 非零, 即为true,表示aaa中存在b??有效的防止属性的值如果为空字符串或false或0
//等价的写法
const aaa = [1];
(aaa || []).forEach((a) => {
    console.log('aaa', a)
});
aaa?.forEach((a) => {
    console.log('aaa', a)
});

const bbb = null;
(bbb || []).forEach((a) => {
    console.log('bbb', a)
});
bbb?.forEach((a) => {
    console.log('bbb', a)
});

let ccc;
(ccc || []).forEach((a) => {
    console.log('ccc', a)
});
ccc?.forEach((a) => {
    console.log('ccc', a)
});

//一致的结果
let ddd;
console.log('ddd', Object.keys(ddd || [1, 2])); //["0", "1"]
console.log('ddd', Object.keys(ddd ?? [1, 2])); //["0", "1"]

const ggg = null;
console.log('ggg', Object.keys(ggg || [1, 2])); //["0", "1"]
console.log('ggg', Object.keys(ggg ?? [1, 2])); //["0", "1"]

//不一致的结果
const eee = false;
console.log('eee', Object.keys(eee || [1, 2])); //["0", "1"]
console.log('eee', Object.keys(eee ?? [1, 2])); //[]

const fff = 0;
console.log('fff', Object.keys(fff || [1, 2])); //["0", "1"]
console.log('fff', Object.keys(fff ?? [1, 2])); //[]

const hhh = "";
console.log('hhh', Object.keys(hhh || [1, 2])); //["0", "1"]
console.log('hhh', Object.keys(hhh ?? [1, 2])); //[]
}箭头函数的this其实就是包裹它的第一个非箭头函数的函数的this值。因为箭头函数内部没有this。
如果对一些函数比如类内部指向有疑问,Babel转ECMA5看下即可清晰看出箭头函数内this指向。
在JavaScript构造函数中:如果return值类型,那么对构造函数没有影响,实例化对象返回对象;如果return引用类型(数组,函数,对象),那么实例化对象就会返回该引用类型;
vagrant box add laravel/homestead
第一个坑:原本只要如上的命令即可,但由于国内众所周知的网络原因,我们不得不考虑先下载好你需要的box再来添加。
注意! laravel/homestead box项目地址已经变更成
https://app.vagrantup.com/laravel/boxes/homestead
以下地址下载Homestead Box(可以使用下载工具,版本号可以进行替换):
https://app.vagrantup.com/laravel/boxes/homestead/versions/5.1.0/providers/virtualbox.box
这里可以看到所有的版本号:
https://app.vagrantup.com/laravel/boxes/homestead
正如RN中文官网所说的 ---
!!!注意!!!:init 命令默认会创建最新的版本,而目前最新的 0.45 及以上版本需要下载 boost 等几个第三方库编译。这些库在国内即便翻墙也很难下载成功,导致很多人无法运行iOS项目!!!中文网在论坛中提供了这些库的国内下载链接。如果你嫌麻烦,又没有对新版本的需求,那么可以暂时创建0.44.3的版本。
确实如果指定安装0.44.3版本,run ios的启动速度大概在编译了几分钟之后,就会开启demo界面,但是如果是没有指定版本的情况下,run ios 会有一个漫长的下载过程,其实也没有官网所描绘的那么夸张时间长,在翻墙的情况下,大概下载了半个小时,启动了launchPackager.command,编译成功。
android环境配置稍微麻烦一点,但是整体主要容易卡在Android Studio下载jar包,所以官方强调翻墙软件很重要,安装完Android Studio之后,打开会安装下载相关jar包,这段事件很漫长,安装完成之后,需要按照官网所说,检查包依赖是否正确。之后还有一点要注意:如果是虚拟设备中运行,需要提前配置好虚拟设备,并运行起来。
注意第一次运行时需要下载大量编译依赖,耗时可能数十分钟。此过程严重依赖稳定的翻墙工具,否则将频繁遭遇链接超时和断开,导致无法运行。
ios的环境配置在mac中比较简单,只要下载好XCode,注意官网提到的版本差异(新版本会有一个比较长的下载编译的时间)和用到了一部分的翻墙软件,基本上问题不大。

android的环境配置主要是看翻墙软件,如果稳定的话,Android Studio下载包依赖以及react-native run-android命令的安装编译依赖都会顺利通过,看到运行的界面。android还有一点不同的是,如果要用虚拟设备,需要先开启Android Studio中的虚拟设备,然后运行react-native run-android命令,这样才能看到项目。

真机上面摇一摇即可呼起调试,注意如果打开了ios的调试,请完全退出,不然会提示8081端口占用之类的错误。安卓真机需要同时开启enable Live Reload和 enable Hot Reloading才能保证保存js,页面实时刷新。
官方很多文档和源码项目其实已经很旧了,大致为2-4年前的代码,RN的更新速度还是很快的,优先看组件和RN的官方文档,中文翻译文档可能会出现滞后和没有人维护的情况。


access_token
access_token是公众号的全局唯一接口调用凭据,公众号调用各接口时都需使用access_token。开发者需要进行妥善保存。access_token的存储至少要保留512个字符空间。access_token的有效期目前为2个小时,需定时刷新,重复获取将导致上次获取的access_token失效。
公众号和小程序均可以使用AppID和AppSecret调用本接口来获取access_token。AppID和AppSecret可在“微信公众平台-开发-基本配置”页中获得(需要已经成为开发者,且帐号没有异常状态)。调用接口时,请登录“微信公众平台-开发-基本配置”提前将服务器IP地址添加到IP白名单中,点击查看设置方法,否则将无法调用成功。小程序无需配置IP白名单。
jsapi_ticket
生成签名之前必须先了解一下jsapi_ticket,jsapi_ticket是公众号用于调用微信JS接口的临时票据。正常情况下,jsapi_ticket的有效期为7200秒,通过access_token来获取。由于获取jsapi_ticket的api调用次数非常有限,频繁刷新jsapi_ticket会导致api调用受限,影响自身业务,开发者必须在自己的服务全局缓存jsapi_ticket 。
注意事项!!!非常重要!!!
1.签名用的noncestr和timestamp必须与wx.config中的nonceStr和timestamp相同。
2.签名用的url必须是调用JS接口页面的完整URL。
3.出于安全考虑,开发者必须在服务器端实现签名的逻辑。
如出现invalid signature 等错误详见附录5常见错误及解决办法。
说明:access_token和jsapi_ticket都是7200秒的有效期,都需要进行本地保存(redis/文件/数据库),官方示例代码使用的是本地文件保存和读取;后台签名算法中的url必须和最后分享的也就是打开页面的url必须完全一致
a.确认url是页面完整的url(请在当前页面alert(location.href.split('#')[0])确认),包括'http(s)://'部分,以及'?'后面的GET参数部分,但不包括'#'hash后面的部分。
b. 确保你获取用来签名的url是动态获取的,动态页面可参见实例代码中php的实现方式。如果是html的静态页面在前端通过ajax将url传到后台签名,前端需要用js获取当前页面除去'#'hash部分的链接(可用location.href.split('#')[0]获取,而且需要encodeURIComponent),因为页面一旦分享,微信客户端会在你的链接末尾加入其它参数,如果不是动态获取当前链接,将导致分享后的页面签名失败
这里不再多赘述其他的,只是提几点:
前端面对移动端常见的问题是
单元测试的好处就不用多说了,对于敏捷开发的迭代需求或者业务逻辑的重构,有了单元测试之后非常方便的担保业务逻辑平滑过渡,而且单元测试的case的存在,可以有效的说明逻辑,比代码注释更为清晰。在MVVM框架流行的今天,数据驱动DOM使得单元测试更加重要而且可行性更高。
前端单元测试推动是一直有痛点的,包括一些大厂对前端单元测试这个态度不是很统一。原因主要概括为两点:
从而导致业务线前期稳定性靠开发者把控,后面项目逐渐庞大,测试用例又没有时间补贴,或者开发者转了战场。
比较好的处理方式是折中方案,Utils工具类中的方法必须进行单元测试,业务基础组件和项目的基础业务逻辑必须进行单元测试,这样可以很好的避免后期基础的逻辑,手动痛苦地回归case。而目前看来,前端很多项目也确实是这么做的。其他的case则视重要性与时间代价视情况而定了。
参考文献:
为vue项目添加骨架屏
让骨架屏更快渲染
参考项目
引导在项目中属于增加用户体验类,通过下一步、下一步的方式来使用户能够很快的对产品上手,或对产品的一些交互逻辑进行了解。前端增加用户体验类的东西比如有:骨架屏、动画、引导。网上实现的引导方式有很多,现在将实现的方式进行总结。

如图所示,引导一般分为如下几部分构成:

<select>框的混合体。它基于jQuery,具有自动完成功能和本机感觉的键盘导航;用于标记,联系人列表等 //// 使用react-select前端性能优化是特别庞大内容区域,涉及浏览器渲染机制、框架源码、网络请求...这里做一些总结。比较好的总结:google developers
import { DragSource } from 'react-dnd';

class MyComponent {
  /* ... */
}

export default DragSource(type, spec, collect)(MyComponent);//DragSource相当于装饰器
必须,设置好跟dropTarget相同的type字符串,才能够放置。必须,一个js对象,里面有一些拖拽相关的方法。
- beginDrag(props, monitor, component): Required. When the dragging starts, beginDrag is called. You must return a plain JavaScript object describing the data being dragged. What you return is the only information available to the drop targets about the drag source so it's important to pick the minimal data they need to know. You may be tempted to put a reference to the component into it, but you should try very hard to avoid doing this because it couples the drag sources and drop targets. It's a good idea to return something like { id: props.id } from this method.
必须,当拖拽开始时,beginDrag将会被调用,必须在该方法中return一个js对象,这样drop的spec中monitor.getItem()才能拿到,推荐return 一个数据对象如 { id: props.id } 。- endDrag(props, monitor, component): Optional. When the dragging stops, endDrag is called. For every beginDrag call, a corresponding endDrag call is guaranteed. You may call monitor.didDrop() to check whether or not the drop was handled by a compatible drop target. If it was handled, and the drop target specified a drop result by returning a plain object from its drop() method, it will be available as monitor.getDropResult(). This method is a good place to fire a Flux action. Note: If the component is unmounted while dragging, component parameter is set to be null.
可选,当拖拽事件停止时,endDrag将会被调用,一个beginDrag调用就会对应一个endDrag调用。- canDrag(props, monitor): Optional. Use it to specify whether the dragging is currently allowed. If you want to always allow it, just omit this method. Specifying it is handy if you'd like to disable dragging based on some predicate over props. Note: You may not call monitor.canDrag() inside this method.
可选,是否允许被拖拽,如果一直是允许的,可以忽略该方法。注意不能在此方法内调用monitor.canDrag()- isDragging(props, monitor): Optional. By default, only the drag source that initiated the drag operation is considered to be dragging. You can override this behavior by defining a custom isDragging method. It might return something like props.id === monitor.getItem().id. Do this if the original component may be unmounted during the dragging and later “resurrected” with a different parent. For example, when moving a card across the lists in a Kanban board, you want it to retain the dragged appearance—even though technically, the component gets unmounted and a different one gets mounted every time you move it to another list. Note: You may not call monitor.isDragging() inside this method.
可选,注意不能在此方法内调用monitor.isDragging()关于spec方法中的参数
- props: _Your component's current props.
当前组件的props- monitor: An instance of DragSourceMonitor. Use it to query the information about the current drag state, such as the currently dragged item and its type, the current and initial coordinates and offsets, and whether it was dropped yet. Read the DragSourceMonitor documentation for a complete list of monitor methods, or read the overview for an introduction to the monitors.
DragSourceMonitor的实例,用来获取一些当前拖拽的状态,例如当前拖拽的项目,类型,坐标和便宜,是否drop。- component: When specified, it is the instance of your component. Use it to access the underlying DOM node for position or size measurements, or to call setState, and other component methods. It is purposefully missing from isDragging and canDrag because the instance may not be available by the time they are called. If you want these methods to depend on the component's state, consider lifting the state to the parent component, so that you can just use props. Generally your code will be cleaner if you rely on props instead whenever possible. 尽可能的使用props而不是component,代码将会变得很清晰,
必须,collect方法有两个参数connect和monitor可选的参数,如果有性能问题才需要关心。表示鼠标指针的在拖拽操作开始时的xy坐标,浏览器可视范围内的,不考虑滚动条,浏览器可视范围的左上角为(0,0)。表示拖拽的当面DOM在拖动操作开始时的xy坐标,在浏览器可视范围内的,不考虑滚动条,浏览器可视范围的左上角为(0,0)。表示拖拽中鼠标指针的xy坐标,在浏览器可视范围内的, 不考虑滚动条,浏览器可视范围的左上角为(0,0)。拖拽的DOM相对于自身之前所在位置的偏移。完全重合为(0,0)。拖拽的DOM在拖动操作中的xy坐标,放置到可视范围内的左上角为(0,0),不考虑滚动条原生的创建文件夹方法不支持自动创建,需要封装方法递归创建
/**
 * 递归创建文件夹
 * @param {String} dirpath 创建的文件夹路径
*/
export const mkdirs = (dirpath) => {
  if (!fs.existsSync(path.dirname(dirpath))) {
    mkdirs(path.dirname(dirpath));
  }
  fs.mkdirSync(dirpath);
}

/**
 * 递归删除文件
 * @param {String} dirpath 删除的文件夹路径
*/
export const deleteall = (path) => {
  var files = [];
  if (fs.existsSync(path)) {
    files = fs.readdirSync(path);
    files.forEach(function (file, index) {
      var curPath = path + "/" + file;
      if (fs.statSync(curPath).isDirectory()) { // recurse
        deleteall(curPath);
      } else { // delete file
        fs.unlinkSync(curPath);
      }
    });
    fs.rmdirSync(path);
  }
}
//调用
fs.existsSync(realPath) == false && mkdirs(realPath);给定一个整数数组 nums 和一个目标值 target,请你在该数组中找出和为目标值的那两个整数,并返回他们的数组下标。
你可以假设每种输入只会对应一个答案。但是,你不能重复利用这个数组中同样的元素。
示例:
给定 nums = [2, 7, 11, 15], target = 9
因为 nums[0] + nums[1] = 2 + 7 = 9
所以返回 [0, 1]
解题:
/**
 * @param {number[]} nums
 * @param {number} target
 * @return {number[]}
 */
var twoSum = function(nums, target) {
    var result = [];
    var size = nums.length;
    for(var i=0;i<size; i++){
       for(var j=i+1;j<size; j++){
           if(nums[i] + nums[j] === target){
              result= [i,j];
              return result;
            }
        }
    }
    return result;
};var twoSum = function(nums, target) {
let size = nums.length;
let result = [];
for(let i=0;i<size; i++){
let tmpR = target - nums[i];
let targetIndex = nums.lastIndexOf(tmpR);
if( targetIndex !== -1 && targetIndex !== i){
return retult = [i, targetIndex]
}
}
return result;
};
/**
 * @param {number[]} nums
 * @param {number} target
 * @return {number[]}
 */
var twoSum = function(nums, target) {
    let map = {};
    for (let i = 0; i < nums.length - 1; i++) {
        map[target-nums[i]] = i;
        if (nums[i+1] in map) return [map[nums[i+1]], i+1];
    }
};
关于3D相关的一些总结
js为什么是单线程?js语言在设计之初就是单线程的,原因其实也比较简单,js主要是针对浏览器使用,浏览器中单线程能够保证页面中DOM的渲染不出现异常,也正是这个原因,所以在现在新标准允许JavaScript脚本多线程中有一个严格的要求,子线程不能够进行DOM操作,来严格把控住,所以所谓js多线程,也就只能做一些业务上面的运算,比如数量非常大的数据清洗等等。
Philip Roberts的PPT视频《Help, I'm stuck in an event-loop》中已经非常清晰地说明了关于任务队列的讲解:

宏任务一般包括:整体代码script,setTimeout,setInterval, setImmediate。
微任务:Promise,process.nextTick , Object.observe [已废弃], MutationObserver
(()=>{
  console.log('script start') //1

async function async1() {
  await async2()
  console.log('async1 end')//5
}
async function async2() {
  console.log('async2 end') //2
}
async1()

setTimeout(function() {
  console.log('setTimeout')//8
}, 0)

new Promise(resolve => {
  console.log('Promise')//3
  resolve()
})
  .then(function() {
    console.log('promise1')//6
  })
  .then(function() {
    console.log('promise2')//7
  })

console.log('script end')//4
}
)()
https://juejin.im/post/6844903764202094606
浏览器为:
node为:
浏览器环境下,microtask 的任务队列是每个 macrotask 执行完之后执行。而在 Node.js 中,microtask 会在事件循环的各个阶段之间执行,也就是一个阶段执行完毕,就会去执行 microtask 队列的任务。
基于上面的任务队列,settimeOut函数也就可以解释一些参数0之类的问题了,方法先执行主线程中执行栈的方法,settimeout中的方法会放置到任务队列,并且先进先出,执行栈执行完之后,去任务队列中拿出方法放入执行栈去执行,直到结束为止。
其中delay的毫秒参数的含义如下,MDN,里面提到一点很重要实际延迟可能比预期的更长;这一点很容易理解:实际延迟的时间是看该延迟函数方法之前的那些主线程执行栈中方法执行的时间以及队列中放入执行栈去执行的时间。如果两者超出了延迟时间,那么就产生了实际延迟可能比预期的更长的现象,下面是实验代码验证这个观点
delay Optional
The time, in milliseconds (thousandths of a second), the timer should wait before the specified function or code is executed. If this parameter is omitted, a value of 0 is used, meaning execute "immediately", or more accurately, as soon as possible. Note that in either case, the actual delay may be longer than intended; see Reasons for delays longer than specified below.
console.log(1);
setTimeout(function(){console.log(2);}, 0);
setTimeout(function(){console.log(3);}, 0);
console.log(5);
//1
//4
//函数返回undefined
//2
//3(()=>{
console.log(1,Date.now());
setTimeout(function(){console.log(2,Date.now() );}, 1000);
setTimeout(function(){console.log(3,Date.now());}, 0);
console.log(4,Date.now());
})()
//1 1564650928850
//4 1564650928850
//函数返回undefined
//3 1564650929023
//2 1564650929851这个例子验证了一点,1000毫秒的含义,其实表示的是第一次运行到这里是1564650928851左右的时间,等到队列中的方法执行完之后,此时间隔时间如果超过了1000ms,则立即执行,如果低于1000ms,则去等待1000ms之后去执行。
(()=>{
    console.log(1, Date.now());
    setTimeout(function() {
        console.log(2, Date.now());
    }, 100);
    setTimeout(function() {
        console.log(3, Date.now());
    }, 0);
    console.log(4, Date.now());
}
)()
//1 1564651900863
//4 1564651900863
//函数返回undefined
//3 1564651901027
//2 1564651901027这里就验证了,所谓的延迟100ms并不一定是相对延迟了100ms之后,就要去执行,实际延迟可能比预期的更长所以当队列执行到此时,时间已经延迟大于了100ms,所以就立即去执行log 2这个方法。
最近写的项目,工作桌面拖拽布局,项目中涉及到大量卡片的渲染,卡片分组和卡片都可以拖拽,拖拽和渲染都是耗费性能和内存,当卡片量多的时候,发现会出现内存占用过高和浏览器卡顿的现象,需要进行优化。这个项目旧的版本没有引入redux,为了多个组件之间状态的通信管理方便,后面加入了react-redux,所以拖拽优化的过程也涉及到react-redux的一些tips
优化之前要知道在dev开发模式和实际生产模式,性能本身就有差别,在代码不变的情况下,生产模式下的性能更高。
在项目开发时,除了一些基本的影响性能的写法上注意一下,不必上来就开始谈性能,项目上来就着手优化,这样会导致项目在开始阶段束手束脚。性能出现问题再去解决也不迟。一般情况下,处理好shouldComponentUpdate,不该render的不render,性能会出现明显提升,SCU要写好,不然可能会出现该DOM变化的时候,反而不变化的Bug。
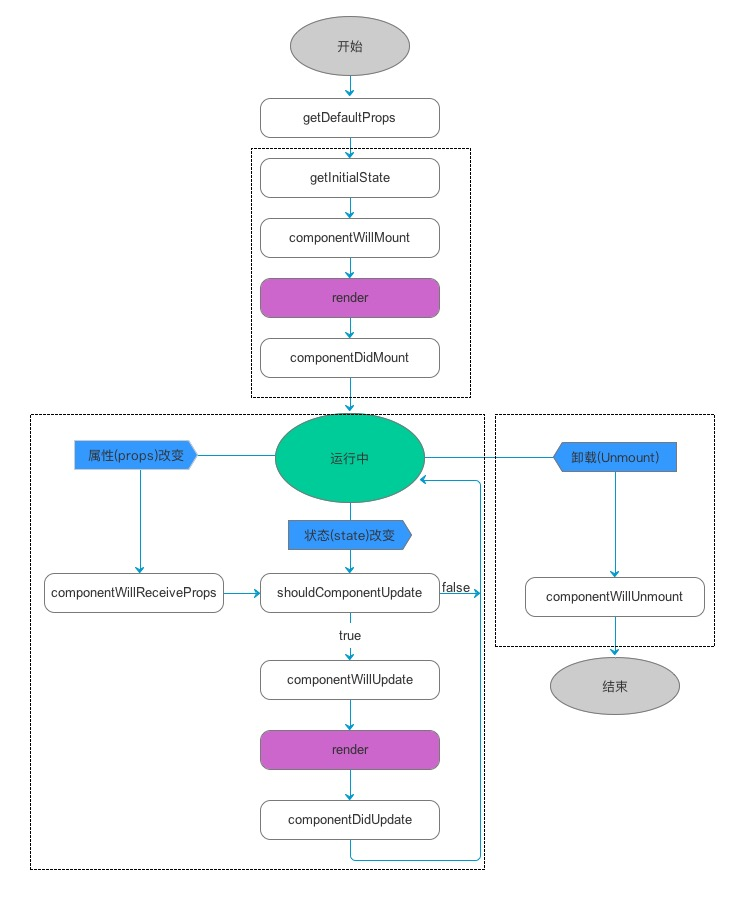
React 构建和维护渲染 UI 的内部表示。它包括你从组件中返回的 React 元素。这些内部状态使得React只有在必要的情况下才会创建DOM节点和访问存在DOM节点,因为对JavaScript对象的操作是比DOM操作更快。这被称为”虚拟DOM”,React Native的基于上述原理。
当组件的 props 和 state 更新时,React 通过比较新返回的元素 和 之前渲染的元素 来决定是否有必要更新DOM元素。如果二者不相等,则更新DOM元素。

这里的nodejs后台依赖为koa,koa不能直接从请求中获取file,我们需要引入一个插件koa-body,koa-body有两种嵌入方式一种是在app.js中使用use,第二种是在路由层面,针对于某个路由嵌入,例如:
router.post('/upload/:interface', koaBody({
  multipart: true,
  encoding: 'gzip',
  onError: (error, ctx) => {
    ctx.body = {
      code: 400,
      error
    };
  },
})
  , InterfaceController.upload)
这里要说明一下,koabody中有formidable属性,通过对该属性配置,其实就可以实现文件的上传以及下载,这里为了让路由层面的代码整洁,所以没有直接在koabody层面上做属性配置,还有一点要值得注意koabody中有formidable属性并不全和node-formidable的api相比,很多属性并不能使用,例如progress、end、error等,这些都没有。
另外一点要注意的是koabody的版本,版本不同会导致按照网上搜到的教程从ctx中获取file的属性层级会不同,我使用的是koabody v4.1.0。
static async upload(ctx) {
   //获取请求中的接口名称
    let interfaceName = ctx.params.interface;
    //获取文件
    const file = ctx.request.files['file'];
   //创建文件reader
    const reader = fs.createReadStream(file.path);
    // 最终要保存到的文件夹目录,这里我放在server的上一层目录,创建api3/public/upload/接口名称的文件夹
    const dir = path.join(path.resolve(__dirname, '../../'), `api3/public/upload/${interfaceName}`);
    // 检查文件夹是否存在如果不存在则递归新建文件夹
    if (fs.existsSync(dir) === false) {
      utils.mkdirs(dir);
    }
    // 重新覆盖 file.path 属性
    file.path = `${dir}/${file.name}`;
   //创建文件流并写入
    const stream = fs.createWriteStream(file.path);
    reader.pipe(stream);
   //返回文件的路径
    ctx.body = {
      code: '1000',
      msg: "上传成功",
      data: {
        path: file.path
      }
    }
  }
这里用到了一个递归创建文件夹的方法
/**
 * 递归创建文件夹
 * @param {String} dirpath 创建的文件夹路径
*/
utils.mkdirs = function mkdirs(dirpath){
  if (!fs.existsSync(path.dirname(dirpath))) {
    mkdirs(path.dirname(dirpath));
  }
  fs.mkdirSync(dirpath);
}
到这里就在koa中实现文件的上传功能,当文件上传成功之后,返回文件的路径
因为国内的开发者一般为了速度,是将自己的npm镜像设为taobao的镜像源,nrm 是一个 NPM 源管理器,相比每次切换时都手动指定相应参数,使用nrm 要方便的多,允许你快速地在NPM 源间切换:
安装
npm install -g nrm
列出可选的源
带 * 的是当前使用的源,上面的输出表明当前源是官方源。
nrm ls
  npm ---- https://registry.npmjs.org/
  cnpm --- http://r.cnpmjs.org/
* taobao - https://registry.npm.taobao.org/
  nj ----- https://registry.nodejitsu.com/
  rednpm - http://registry.mirror.cqupt.edu.cn/
  npmMirror  https://skimdb.npmjs.com/registry/
  edunpm - http://registry.enpmjs.org/
切换源
切换到npm
 nrm use npm
Registry has been set to: https://registry.npmjs.org/
增加源
你可以增加定制的源,特别适用于添加企业内部的私有源。
nrm add <registry> <url> [home]
删除源
nrm del <registry>
测试某个源速度
nrm test taobao
* taobao - 224ms
测试全部源速度
nrm test
  npm ---- 2115ms
  cnpm --- 283ms
* taobao - 267ms
  nj ----- Fetch Error
  rednpm - Fetch Error
  npmMirror  1028ms
  edunpm - Fetch Error
A declarative, efficient, and flexible JavaScript library for building user interfaces.
🖖 Vue.js is a progressive, incrementally-adoptable JavaScript framework for building UI on the web.
TypeScript is a superset of JavaScript that compiles to clean JavaScript output.
An Open Source Machine Learning Framework for Everyone
The Web framework for perfectionists with deadlines.
A PHP framework for web artisans
Bring data to life with SVG, Canvas and HTML. 📊📈🎉
JavaScript (JS) is a lightweight interpreted programming language with first-class functions.
Some thing interesting about web. New door for the world.
A server is a program made to process requests and deliver data to clients.
Machine learning is a way of modeling and interpreting data that allows a piece of software to respond intelligently.
Some thing interesting about visualization, use data art
Some thing interesting about game, make everyone happy.
We are working to build community through open source technology. NB: members must have two-factor auth.
Open source projects and samples from Microsoft.
Google ❤️ Open Source for everyone.
Alibaba Open Source for everyone
Data-Driven Documents codes.
China tencent open source team.