Easy VM creation and management tool: velvet applications in an iron hypervisor
Mulch is a light and practical virtual machine manager, it allows to create and host applications in VMs with a single command line and a simple description file. You can see it as a simple KVM hardened container system.
- What's the point?
- Show me!
- Any more complete example?
- How does it works exactly?
- Show me more features!
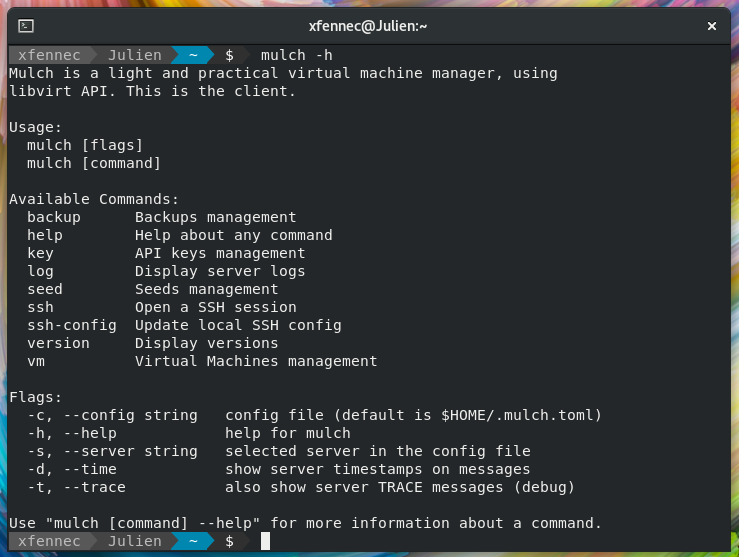
- How do I install the client?
- How do I install the server?
It aims people and organizations who don't want to (or can't) invest too much time in creating their own private cloud, but want a simple solution with great performance.
It features a client-server architecture using a REST API. It's written in Go and use shell scripts to drive VM configuration and application installation.
Mulch relies on libvirt API (KVM) and can share an existing libvirt server or use a dedicated one. No libvirt configuration (or knowledge) is required, Mulch will create and manage needed resources (storage, network). You will only interact with Mulch.

Base Linux images ("seeds") use Cloud-Init so almost every OpenStack compliant image will work out of the box. Default Mulch configuration provides seeds for Debian, Ubuntu and CentOS. Seed images will be downloaded and updated automatically, it is Mulch's job, not yours.
Mulch features an embedded high-performance HTTP / HTTP2 reverse proxy with automatic Let's Encrypt certificate generation for VM hosted Web Applications.
Mulch also provides an SSH proxy providing full access (ssh, scp, port forwarding, …) to VMs for Mulch users.
Here's a minimal VM description file: (TOML format)
# This is a (working) minimalist sample VM definition
name = "mini"
seed = "debian_10"

disk_size = "20G"
ram_size = "1G"
cpu_count = 1
You can then create this VM with:
mulch vm create mini.toml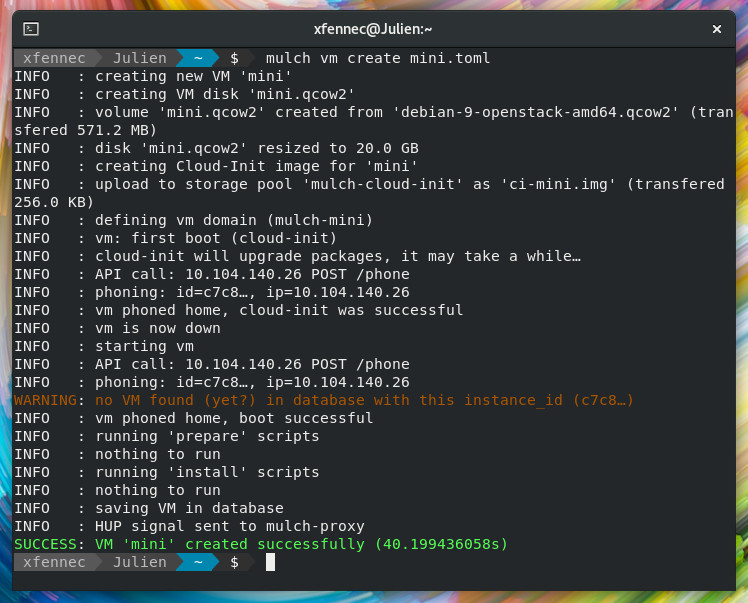
In this example, the VM is up and ready 40 seconds later.
See the complete sample VM configuration file to get a broader view of Mulch features.
Let's see a few interesting samples:
domains = ['test1.example.com']
redirect_to_https = true
redirects = [
    ["www.test1.example.com", "test1.example.com"],
]
Here, incoming requests for DNS domain test1.example.com will be proxied to this
VM on its port 80 as HTTP. You may use another destination port if needed, using test1.example.com->8080 syntax.
Mulch will automatically generate a HTTPS certificate and redirect HTTP requests
to HTTPS (this is the default, false will proxy HTTP too). Requests to www.test1.example.com will be redirected
to test1.example.com (including HTTPS requests). All you have to do is target Mulch server in your DNS zone.
Shell scripts are used at various stages of VM's lifecycle, let's have a look at the prepare step.
# If all prepare scripts share the same base URL, you can use prepare_prefix_url.
# Otherwise, use absolute URL in 'prepare': admin@https://server/script.sh
prepare_prefix_url = "https://raw.githubusercontent.com/OnitiFR/mulch/master/scripts/prepare/"
prepare = [
    # user@script
    "[email protected]",
    "[email protected]",
]
During its creation, the VM will be prepared (see application lifecycle below) using
simple shell scripts. Each script is run as a specific user, either admin (with sudo
privileges) or app (who host the application). Script are downloaded from an URL. Mulch
provides a few sample scripts, but you're supposed to create and host your own specific scripts.
Here, a few comfort settings will be applied to the VM: installing tools we like (powerline, Midnight Commander, …), creating a few command aliases, adding a nice motd, …
The other script will install and configure Apache, PHP and MariaDB, providing a ready-to-use LAMP system. Environment variables are created with DB connection settings, htdocs directory, etc.
It's also possible to define your own environment variables, providing various settings and secrets to your application.
# Define system-wide environment variables
env = [
    ["TEST1", "foo"],
    ["TEST2", "bar"],
]This schema shows the basic Mulch infrastructure:
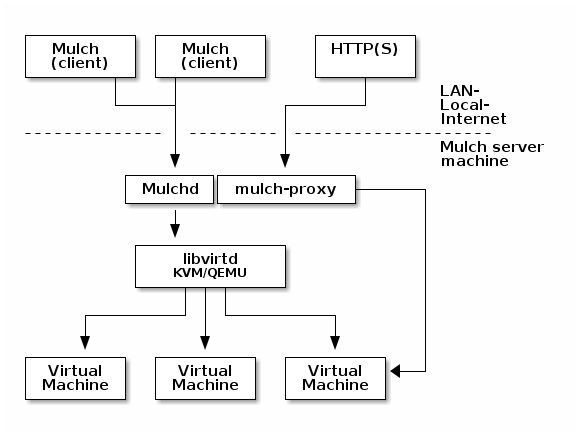
Mulch currently have 3 components :
mulch: the clientmulchd: the server daemonmulch-proxy: the HTTP proxy
Mulchd receive requests from Mulch clients (REST API, HTTP, port 8686) for VM management.
Application serving is done through HTTP(S) requests to mulch-proxy (ports 80 and 443) and
SSH proxied access is done by mulchd (port 8022).
VM have this lifecycle :
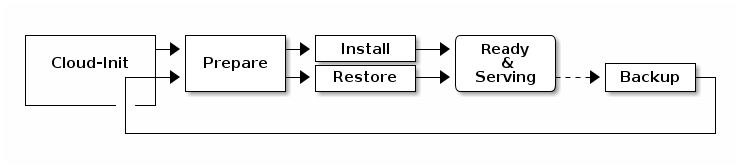
- prepare scripts: prepare the system for the application (install and configure web server, DB server, …)
- install scripts: install and configure the application (download / git clone, composer, yarn, …)
- backup scripts: copy all important data: code, DB, configs, … During backup, a virtual disk is attached to the VM.
- restore scripts: restore the application from the attached disk, copying back code, data, … (see these as backup "symmetric" scripts)
A new VM is channeled through prepare and install steps. If you create a VM from a previous backup, install is replaced by restore. All steps are optional, but missing steps will limit features.
Note that you can modify cloud-init step, but it's used internally by Mulch for VM provisioning (injecting SSH keys, configure "home-phoning", …) and should have no interest to Mulch users.
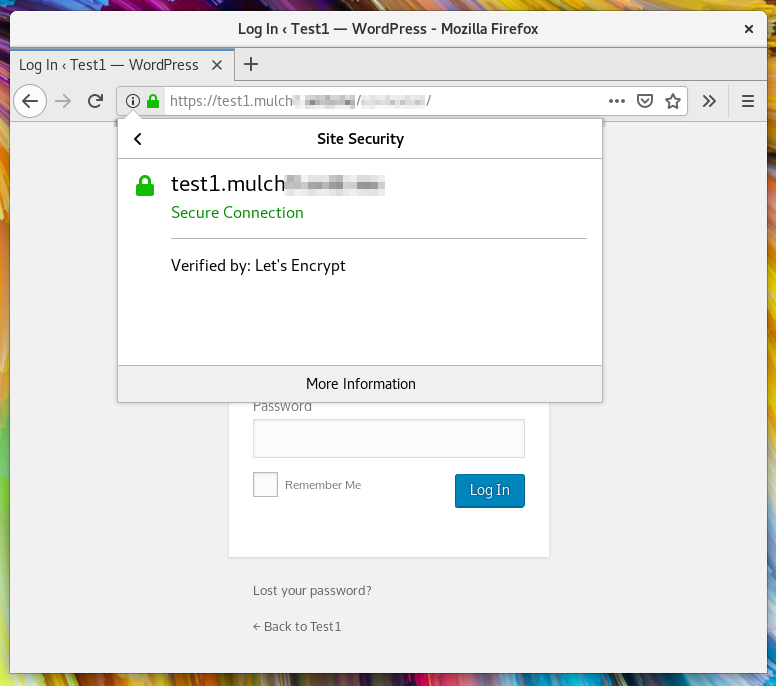
Here's the result of the previously linked sample-vm-full.toml configuration, showing automatic HTTPS certificates:
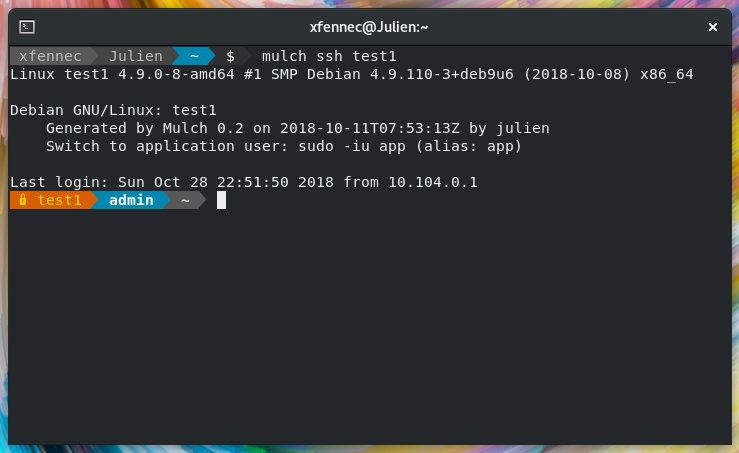
Mulch allow easy SSH connection from mulch client with mulch ssh command. No configuration
is required and the client will retrieve your very own SSH key pair. You may select another user using
the -u / --user flag.
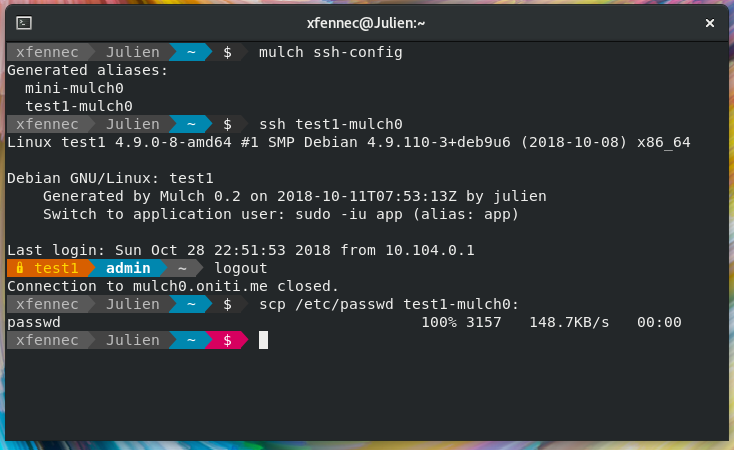
Another feature is SSH alisases generation. Simply call mulch ssh-config command, and aliases
for every VM will be generated. You can then use any usual OpenSSH command/feature: ssh, scp,
port forwarding, …
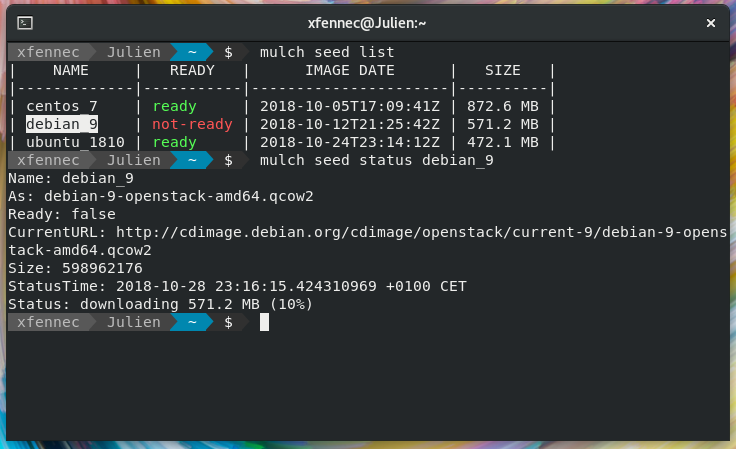
As said previously, seeds are base Linux images for VMs, defined in mulchd.conf server configuration
file:
[[seed]]
name = "ubuntu_1810"
url = "http://cloud-images.ubuntu.com/cosmic/current/cosmic-server-cloudimg-amd64.img"
Mulchd will download images on first boot and each time the image is updated by the vendor.
Mulch requires OpenStack compliant images, and Cloud-Init 0.X is no more supported (so Debian 9 and less are out).
You can create and maintain your own seeds. Mulch will create a ("seeder") VM using a TOML file (based on another seed), prepare the VM, stop it and will then store its disk as a seed (the VM is then deleted).
One usage of this feature is VM creation speedup, since you can pre-install packages. See the following example (ubuntu_1910_lamp.toml) :
[[seed]]
name = "ubuntu_1910_lamp"
seeder = "https://raw.githubusercontent.com/OnitiFR/mulch/master/vm-samples/ubuntu_1910_lamp.toml"
Seeds are automatically rebuild, so everything is kept up to date (base seed, packages, …).
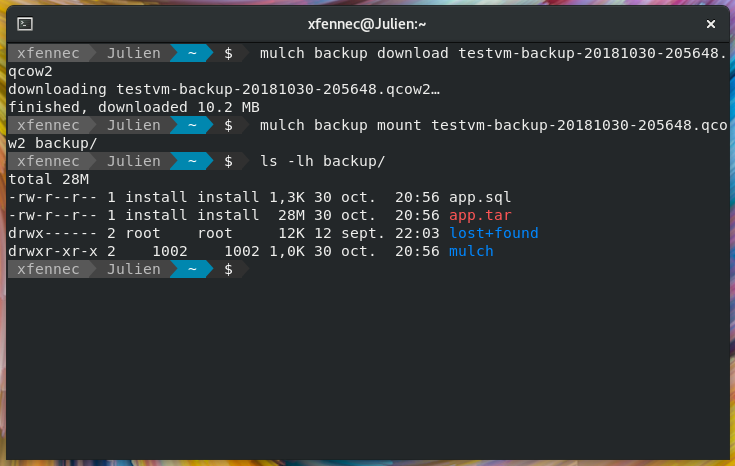
Mulch provides a flexible backup / restore system for your applications and data: archive, duplicate, iterate, CI/CD, …
You can even rebuild your entire VM from an updated seed in one command (see below).
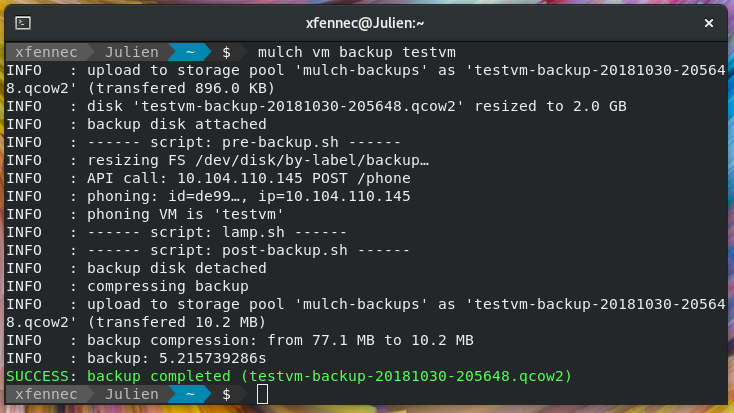
Backups are created by shell scripts (see VM lifecycle above). Backup scripts writes directly to an attached (and mounted) disk. No need to create the backup and then copy it somewhere, all is done is one step. Simpler, faster.
The backup format is Qcow2, a common virtual disk format. This format allows transparent compression, so backup size is very close to the equivalent .tar.gz file.
Restoring a VM only requires a qcow2 backup file and the VM description file.
Since backup are virtual disks, they are writable. It's then easy to download, mount, modify and upload back a backup to Mulch server in a few commands.
Using the backup system, Mulch provides a clean way to rebuild a VM entirely, using a transient backup of itself.
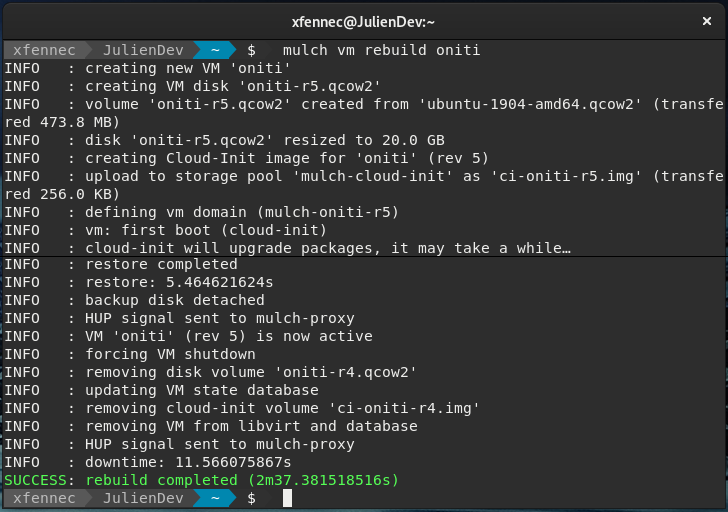
Again, the general idea behind Mulch is to secure Ops by industrializing and simplify such processes ("service reconstructability").
You can configure auto-rebuild for each VM with auto_rebuild setting (daily, weekly, monthly).
When using multiple Mulch instances, a frontal mulch-proxy can be configured to forward traffic to children instances. It makes DNS configuration and VM migration between mulch servers way easier. Thanks to an internal inter-proxy API, everything is managed automatically: create your VM as usual and the parent mulch-proxy will instantly forward requests. And domain name conflicts between instances are automatically checked too.
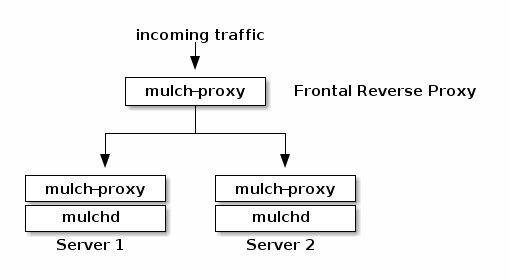
Here's what the parent mulch-proxy configuration will look like:
proxy_chain_mode = "parent"
proxy_chain_parent_url = "https://api.mydomain.tld:8787"
proxy_chain_psk = "MySecretPreShareKey123"
And here's the corresponding configuration for children:
proxy_chain_mode = "child"
proxy_chain_parent_url = "https://api.mydomain.tld:8787"
proxy_chain_child_url = "https://forward.mymulchd.tld"
proxy_chain_psk = "MySecretPreShareKey123"
And that's it.
You can lock a VM, so no "big" operation, like delete or rebuild can be done until the VM is unlocked. Useful for precious VMs.

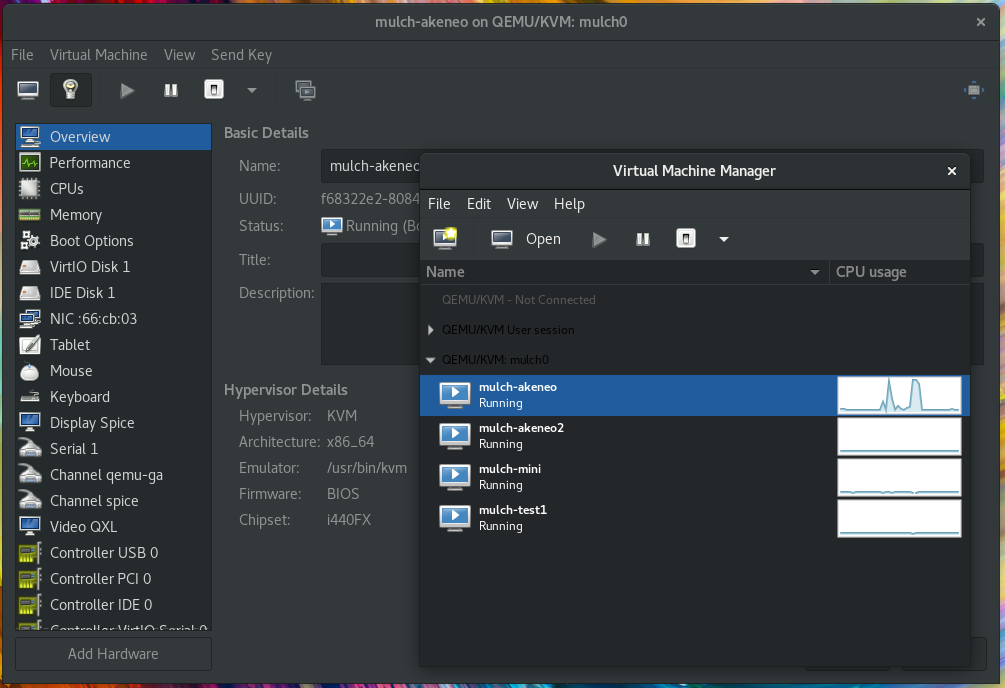
You still have the ability to use any libvirt tool, like virt-manager, to interact with VMs.
You can also use 'do actions' for usual tasks. For instance mulch do myvm db will open your browser and automatically log you in phpMyAdmin (or any other db manager). And with included bash completion, such a command is just a matter of a few key presses !
Install go (sometimes named "golang") and then:
go get -u github.com/OnitiFR/mulch/cmd/mulchUsual Go requirements : check you have go/golang installed and ~/go/bin/ is in your PATH (or copy/link binary in one of your PATH directories; use sudo ln -s /home/$USER/go/bin/mulch /usr/local/bin if you have no idea of how to do this).
That's it, you can now run mulch command. It will show you a sample configuration file (~/.mulch.toml):
[[server]]
name = "my-mulch"
url = "http://192.168.10.104:8686"
key = "gein2xah7keeL33thpe9ahvaegF15TUL3surae3Chue4riokooJ5WuTI80FTWfz2"
Of course, you'll need to get your own API key / server URL (and set file mode to 0600, key is private)
You can define multiple servers and use -s option to select one, or use
default = "my-mulch" as a global setting (i.e. before [[server]]).
First server is the default. Environment variable SERVER is also available.
To install bash completion, you may have a look at mulch help completion, you may
also install ssh aliases right now with mulch ssh-config.
This section is still a WIP.
sudo apt install golang-go
sudo apt install ebtables gawk libxml2-utils libcap2-bin dnsmasq libvirt-daemon-system libvirt-dev
sudo apt install git pkg-config build-essential qemu-kvm
sudo usermod -aG libvirt USER # replace USER by the user running mulchd
sudo dnf install golang git
sudo dnf install qemu-kvm libvirt-client libvirt-devel libvirt-daemon-kvm libvirt-daemon-config-nwfilter
sudo systemctl enable --now libvirtd
sudo usermod -aG libvirt USER # replace USER by the user running mulchd
sudo setfacl -m g:qemu:x /home/USER/
As a user:
go get -u github.com/OnitiFR/mulch/cmd/...cd go/src/github.com/OnitiFR/mulch./install.sh --help(see sample install section)
The install script will give you details about installation: destination, rights, services, …
For a quick demo installation on a blank Ubuntu or Debian system, you may also use this standalone auto-install script (with root privileges):
wget https://raw.github.com/OnitiFR/mulch/master/install/deb_ubuntu_autoinstall.sh
chmod +x deb_ubuntu_autoinstall.sh
./deb_ubuntu_autoinstall.sh


