Coder Social home page Coder Social logo

sgrvinod / a-pytorch-tutorial-to-image-captioning Goto Github PK

View Code? Open in Web Editor NEW
2.7K 2.7K 714.0 12.89 MB

Show, Attend, and Tell | a PyTorch Tutorial to Image Captioning

License: MIT License

Python 100.00%
attention-mechanism computer-vision encoder-decoder image-captioning mscoco pytorch pytorch-tutorial show-attend-and-tell

a-pytorch-tutorial-to-image-captioning's Introduction

This is a PyTorch Tutorial to Image Captioning.

This is the first in a series of tutorials I'm writing about implementing cool models on your own with the amazing PyTorch library.

Basic knowledge of PyTorch, convolutional and recurrent neural networks is assumed.

If you're new to PyTorch, first read Deep Learning with PyTorch: A 60 Minute Blitz and Learning PyTorch with Examples.

Questions, suggestions, or corrections can be posted as issues.

I'm using PyTorch 0.4 in Python 3.6.


27 Jan 2020: Working code for two new tutorials has been added — Super-Resolution and Machine Translation


Contents

Objective

Concepts

Overview

Implementation

Training

Inference

Frequently Asked Questions

Objective

To build a model that can generate a descriptive caption for an image we provide it.

In the interest of keeping things simple, let's implement the Show, Attend, and Tell paper. This is by no means the current state-of-the-art, but is still pretty darn amazing. The authors' original implementation can be found here.

This model learns where to look.

As you generate a caption, word by word, you can see the model's gaze shifting across the image.

This is possible because of its Attention mechanism, which allows it to focus on the part of the image most relevant to the word it is going to utter next.

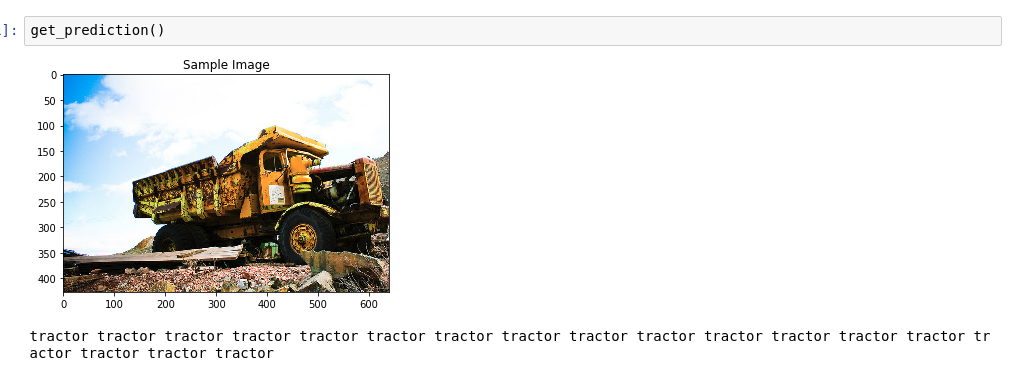
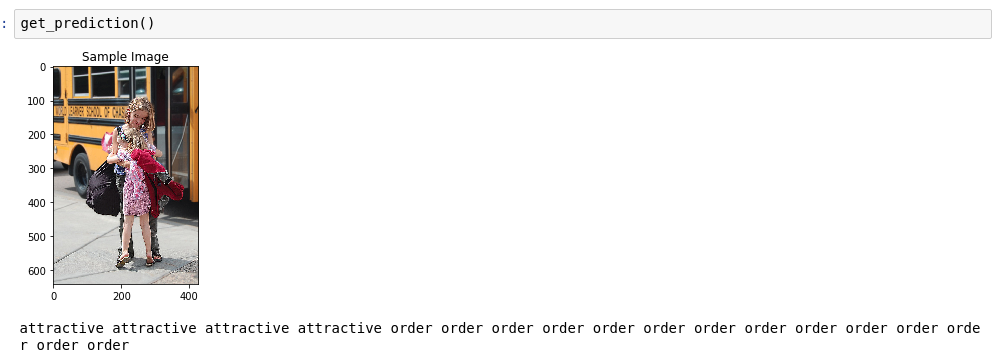
Here are some captions generated on test images not seen during training or validation:


There are more examples at the end of the tutorial.


Concepts

  • Image captioning. duh.

  • Encoder-Decoder architecture. Typically, a model that generates sequences will use an Encoder to encode the input into a fixed form and a Decoder to decode it, word by word, into a sequence.

  • Attention. The use of Attention networks is widespread in deep learning, and with good reason. This is a way for a model to choose only those parts of the encoding that it thinks is relevant to the task at hand. The same mechanism you see employed here can be used in any model where the Encoder's output has multiple points in space or time. In image captioning, you consider some pixels more important than others. In sequence to sequence tasks like machine translation, you consider some words more important than others.

  • Transfer Learning. This is when you borrow from an existing model by using parts of it in a new model. This is almost always better than training a new model from scratch (i.e., knowing nothing). As you will see, you can always fine-tune this second-hand knowledge to the specific task at hand. Using pretrained word embeddings is a dumb but valid example. For our image captioning problem, we will use a pretrained Encoder, and then fine-tune it as needed.

  • Beam Search. This is where you don't let your Decoder be lazy and simply choose the words with the best score at each decode-step. Beam Search is useful for any language modeling problem because it finds the most optimal sequence.

Overview

In this section, I will present an overview of this model. If you're already familiar with it, you can skip straight to the Implementation section or the commented code.

Encoder

The Encoder encodes the input image with 3 color channels into a smaller image with "learned" channels.

This smaller encoded image is a summary representation of all that's useful in the original image.

Since we want to encode images, we use Convolutional Neural Networks (CNNs).

We don't need to train an encoder from scratch. Why? Because there are already CNNs trained to represent images.

For years, people have been building models that are extraordinarily good at classifying an image into one of a thousand categories. It stands to reason that these models capture the essence of an image very well.

I have chosen to use the 101 layered Residual Network trained on the ImageNet classification task, already available in PyTorch. As stated earlier, this is an example of Transfer Learning. You have the option of fine-tuning it to improve performance.

ResNet Encoder

These models progressively create smaller and smaller representations of the original image, and each subsequent representation is more "learned", with a greater number of channels. The final encoding produced by our ResNet-101 encoder has a size of 14x14 with 2048 channels, i.e., a 2048, 14, 14 size tensor.

I encourage you to experiment with other pre-trained architectures. The paper uses a VGGnet, also pretrained on ImageNet, but without fine-tuning. Either way, modifications are necessary. Since the last layer or two of these models are linear layers coupled with softmax activation for classification, we strip them away.

Decoder

The Decoder's job is to look at the encoded image and generate a caption word by word.

Since it's generating a sequence, it would need to be a Recurrent Neural Network (RNN). We will use an LSTM.

In a typical setting without Attention, you could simply average the encoded image across all pixels. You could then feed this, with or without a linear transformation, into the Decoder as its first hidden state and generate the caption. Each predicted word is used to generate the next word.

Decoder without Attention

In a setting with Attention, we want the Decoder to be able to look at different parts of the image at different points in the sequence. For example, while generating the word football in a man holds a football, the Decoder would know to focus on – you guessed it – the football!

Decoding with Attention

Instead of the simple average, we use the weighted average across all pixels, with the weights of the important pixels being greater. This weighted representation of the image can be concatenated with the previously generated word at each step to generate the next word.

Attention

The Attention network computes these weights.

Intuitively, how would you estimate the importance of a certain part of an image? You would need to be aware of the sequence you have generated so far, so you can look at the image and decide what needs describing next. For example, after you mention a man, it is logical to declare that he is holding a football.

This is exactly what the Attention mechanism does – it considers the sequence generated thus far, and attends to the part of the image that needs describing next.

Attention

We will use soft Attention, where the weights of the pixels add up to 1. If there are P pixels in our encoded image, then at each timestep t

You could interpret this entire process as computing the probability that a pixel is the place to look to generate the next word.

Putting it all together

It might be clear by now what our combined network looks like.

Putting it all together

  • Once the Encoder generates the encoded image, we transform the encoding to create the initial hidden state h (and cell state C) for the LSTM Decoder.
  • At each decode step,
    • the encoded image and the previous hidden state is used to generate weights for each pixel in the Attention network.
    • the previously generated word and the weighted average of the encoding are fed to the LSTM Decoder to generate the next word.

Beam Search

We use a linear layer to transform the Decoder's output into a score for each word in the vocabulary.

The straightforward – and greedy – option would be to choose the word with the highest score and use it to predict the next word. But this is not optimal because the rest of the sequence hinges on that first word you choose. If that choice isn't the best, everything that follows is sub-optimal. And it's not just the first word – each word in the sequence has consequences for the ones that succeed it.

It might very well happen that if you'd chosen the third best word at that first step, and the second best word at the second step, and so on... that would be the best sequence you could generate.

It would be best if we could somehow not decide until we've finished decoding completely, and choose the sequence that has the highest overall score from a basket of candidate sequences.

Beam Search does exactly this.

  • At the first decode step, consider the top k candidates.
  • Generate k second words for each of these k first words.
  • Choose the top k [first word, second word] combinations considering additive scores.
  • For each of these k second words, choose k third words, choose the top k [first word, second word, third word] combinations.
  • Repeat at each decode step.
  • After k sequences terminate, choose the sequence with the best overall score.

Beam Search example

As you can see, some sequences (striked out) may fail early, as they don't make it to the top k at the next step. Once k sequences (underlined) generate the <end> token, we choose the one with the highest score.

Implementation

The sections below briefly describe the implementation.

They are meant to provide some context, but details are best understood directly from the code, which is quite heavily commented.

Dataset

I'm using the MSCOCO '14 Dataset. You'd need to download the Training (13GB) and Validation (6GB) images.

We will use Andrej Karpathy's training, validation, and test splits. This zip file contain the captions. You will also find splits and captions for the Flicker8k and Flicker30k datasets, so feel free to use these instead of MSCOCO if the latter is too large for your computer.

Inputs to model

We will need three inputs.

Images

Since we're using a pretrained Encoder, we would need to process the images into the form this pretrained Encoder is accustomed to.

Pretrained ImageNet models available as part of PyTorch's torchvision module. This page details the preprocessing or transformation we need to perform – pixel values must be in the range [0,1] and we must then normalize the image by the mean and standard deviation of the ImageNet images' RGB channels.

mean = [0.485, 0.456, 0.406]
std = [0.229, 0.224, 0.225]

Also, PyTorch follows the NCHW convention, which means the channels dimension (C) must precede the size dimensions.

We will resize all MSCOCO images to 256x256 for uniformity.

Therefore, images fed to the model must be a Float tensor of dimension N, 3, 256, 256, and must be normalized by the aforesaid mean and standard deviation. N is the batch size.

Captions

Captions are both the target and the inputs of the Decoder as each word is used to generate the next word.

To generate the first word, however, we need a zeroth word, <start>.

At the last word, we should predict <end> the Decoder must learn to predict the end of a caption. This is necessary because we need to know when to stop decoding during inference.

<start> a man holds a football <end>

Since we pass the captions around as fixed size Tensors, we need to pad captions (which are naturally of varying length) to the same length with <pad> tokens.

<start> a man holds a football <end> <pad> <pad> <pad>....

Furthermore, we create a word_map which is an index mapping for each word in the corpus, including the <start>,<end>, and <pad> tokens. PyTorch, like other libraries, needs words encoded as indices to look up embeddings for them or to identify their place in the predicted word scores.

9876 1 5 120 1 5406 9877 9878 9878 9878....

Therefore, captions fed to the model must be an Int tensor of dimension N, L where L is the padded length.

Caption Lengths

Since the captions are padded, we would need to keep track of the lengths of each caption. This is the actual length + 2 (for the <start> and <end> tokens).

Caption lengths are also important because you can build dynamic graphs with PyTorch. We only process a sequence upto its length and don't waste compute on the <pad>s.

Therefore, caption lengths fed to the model must be an Int tensor of dimension N.

Data pipeline

See create_input_files() in utils.py.

This reads the data downloaded and saves the following files –

  • An HDF5 file containing images for each split in an I, 3, 256, 256 tensor, where I is the number of images in the split. Pixel values are still in the range [0, 255], and are stored as unsigned 8-bit Ints.
  • A JSON file for each split with a list of N_c * I encoded captions, where N_c is the number of captions sampled per image. These captions are in the same order as the images in the HDF5 file. Therefore, the ith caption will correspond to the i // N_cth image.
  • A JSON file for each split with a list of N_c * I caption lengths. The ith value is the length of the ith caption, which corresponds to the i // N_cth image.
  • A JSON file which contains the word_map, the word-to-index dictionary.

Before we save these files, we have the option to only use captions that are shorter than a threshold, and to bin less frequent words into an <unk> token.

We use HDF5 files for the images because we will read them directly from disk during training / validation. They're simply too large to fit into RAM all at once. But we do load all captions and their lengths into memory.

See CaptionDataset in datasets.py.

This is a subclass of PyTorch Dataset. It needs a __len__ method defined, which returns the size of the dataset, and a __getitem__ method which returns the ith image, caption, and caption length.

We read images from disk, convert pixels to [0,255], and normalize them inside this class.

The Dataset will be used by a PyTorch DataLoader in train.py to create and feed batches of data to the model for training or validation.

Encoder

See Encoder in models.py.

We use a pretrained ResNet-101 already available in PyTorch's torchvision module. Discard the last two layers (pooling and linear layers), since we only need to encode the image, and not classify it.

We do add an AdaptiveAvgPool2d() layer to resize the encoding to a fixed size. This makes it possible to feed images of variable size to the Encoder. (We did, however, resize our input images to 256, 256 because we had to store them together as a single tensor.)

Since we may want to fine-tune the Encoder, we add a fine_tune() method which enables or disables the calculation of gradients for the Encoder's parameters. We only fine-tune convolutional blocks 2 through 4 in the ResNet, because the first convolutional block would have usually learned something very fundamental to image processing, such as detecting lines, edges, curves, etc. We don't mess with the foundations.

Attention

See Attention in models.py.

The Attention network is simple – it's composed of only linear layers and a couple of activations.

Separate linear layers transform both the encoded image (flattened to N, 14 * 14, 2048) and the hidden state (output) from the Decoder to the same dimension, viz. the Attention size. They are then added and ReLU activated. A third linear layer transforms this result to a dimension of 1, whereupon we apply the softmax to generate the weights alpha.

Decoder

See DecoderWithAttention in models.py.

The output of the Encoder is received here and flattened to dimensions N, 14 * 14, 2048. This is just convenient and prevents having to reshape the tensor multiple times.

We initialize the hidden and cell state of the LSTM using the encoded image with the init_hidden_state() method, which uses two separate linear layers.

At the very outset, we sort the N images and captions by decreasing caption lengths. This is so that we can process only valid timesteps, i.e., not process the <pad>s.

We can iterate over each timestep, processing only the colored regions, which are the effective batch size N_t at that timestep. The sorting allows the top N_t at any timestep to align with the outputs from the previous step. At the third timestep, for example, we process only the top 5 images, using the top 5 outputs from the previous step.

This iteration is performed manually in a for loop with a PyTorch LSTMCell instead of iterating automatically without a loop with a PyTorch LSTM. This is because we need to execute the Attention mechanism between each decode step. An LSTMCell is a single timestep operation, whereas an LSTM would iterate over multiple timesteps continously and provide all outputs at once.

We compute the weights and attention-weighted encoding at each timestep with the Attention network. In section 4.2.1 of the paper, they recommend passing the attention-weighted encoding through a filter or gate. This gate is a sigmoid activated linear transform of the Decoder's previous hidden state. The authors state that this helps the Attention network put more emphasis on the objects in the image.

We concatenate this filtered attention-weighted encoding with the embedding of the previous word (<start> to begin), and run the LSTMCell to generate the new hidden state (or output). A linear layer transforms this new hidden state into scores for each word in the vocabulary, which is stored.

We also store the weights returned by the Attention network at each timestep. You will see why soon enough.

Training

Before you begin, make sure to save the required data files for training, validation, and testing. To do this, run the contents of create_input_files.py after pointing it to the the Karpathy JSON file and the image folder containing the extracted train2014 and val2014 folders from your downloaded data.

See train.py.

The parameters for the model (and training it) are at the beginning of the file, so you can easily check or modify them should you wish to.

To train your model from scratch, simply run this file –

python train.py

To resume training at a checkpoint, point to the corresponding file with the checkpoint parameter at the beginning of the code.

Note that we perform validation at the end of every training epoch.

Loss Function

Since we're generating a sequence of words, we use CrossEntropyLoss. You only need to submit the raw scores from the final layer in the Decoder, and the loss function will perform the softmax and log operations.

The authors of the paper recommend using a second loss – a "doubly stochastic regularization". We know the weights sum to 1 at a given timestep. But we also encourage the weights at a single pixel p to sum to 1 across all timesteps T

This means we want the model to attend to every pixel over the course of generating the entire sequence. Therefore, we try to minimize the difference between 1 and the sum of a pixel's weights across all timesteps.

We do not compute losses over the padded regions. An easy way to do get rid of the pads is to use PyTorch's pack_padded_sequence(), which flattens the tensor by timestep while ignoring the padded regions. You can now aggregate the loss over this flattened tensor.

Note – This function is actually used to perform the same dynamic batching (i.e., processing only the effective batch size at each timestep) we performed in our Decoder, when using an RNN or LSTM in PyTorch. In this case, PyTorch handles the dynamic variable-length graphs internally. You can see an example in dynamic_rnn.py in my other tutorial on sequence labeling. We would have used this function along with an LSTM in our Decoder if we weren't manually iterating because of the Attention network.

Early stopping with BLEU

To evaluate the model's performance on the validation set, we will use the automated BiLingual Evaluation Understudy (BLEU) evaluation metric. This evaluates a generated caption against reference caption(s). For each generated caption, we will use all N_c captions available for that image as the reference captions.

The authors of the Show, Attend and Tell paper observe that correlation between the loss and the BLEU score breaks down after a point, so they recommend to stop training early on when the BLEU score begins to degrade, even if the loss continues to decrease.

I used the BLEU tool available in the NLTK module.

Note that there is considerable criticism of the BLEU score because it doesn't always correlate well with human judgment. The authors also report the METEOR scores for this reason, but I haven't implemented this metric.

Remarks

I recommend you train in stages.

I first trained only the Decoder, i.e. without fine-tuning the Encoder, with a batch size of 80. I trained for 20 epochs, and the BLEU-4 score peaked at about 23.25 at the 13th epoch. I used the Adam() optimizer with an initial learning rate of 4e-4.

I continued from the 13th epoch checkpoint allowing fine-tuning of the Encoder with a batch size of 32. The smaller batch size is because the model is now larger because it contains the Encoder's gradients. With fine-tuning, the score rose to 24.29 in just about 3 epochs. Continuing training would probably have pushed the score slightly higher but I had to commit my GPU elsewhere.

An important distinction to make here is that I'm still supplying the ground-truth as the input at each decode-step during validation, regardless of the word last generated. This is called Teacher Forcing. While this is commonly used during training to speed-up the process, as we are doing, conditions during validation must mimic real inference conditions as much as possible. I haven't implemented batched inference yet – where each word in the caption is generated from the previously generated word, and terminates upon hitting the <end> token.

Since I'm teacher-forcing during validation, the BLEU score measured above on the resulting captions does not reflect real performance. In fact, the BLEU score is a metric designed for comparing naturally generated captions to ground-truth captions of differing length. Once batched inference is implemented, i.e. no Teacher Forcing, early-stopping with the BLEU score will be truly 'proper'.

With this in mind, I used eval.py to compute the correct BLEU-4 scores of this model checkpoint on the validation and test sets without Teacher Forcing, at different beam sizes –

Beam Size Validation BLEU-4 Test BLEU-4
1 29.98 30.28
3 32.95 33.06
5 33.17 33.29

The test score is higher than the result in the paper, and could be because of how our BLEU calculators are parameterized, the fact that I used a ResNet encoder, and actually fine-tuned the encoder – even if just a little.

Also, remember – when fine-tuning during Transfer Learning, it's always better to use a learning rate considerably smaller than what was originally used to train the borrowed model. This is because the model is already quite optimized, and we don't want to change anything too quickly. I used Adam() for the Encoder as well, but with a learning rate of 1e-4, which is a tenth of the default value for this optimizer.

On a Titan X (Pascal), it took 55 minutes per epoch without fine-tuning, and 2.5 hours with fine-tuning at the stated batch sizes.

Model Checkpoint

You can download this pretrained model and the corresponding word_map here.

Note that this checkpoint should be loaded directly with PyTorch, or passed to caption.py – see below.

Inference

See caption.py.

During inference, we cannot directly use the forward() method in the Decoder because it uses Teacher Forcing. Rather, we would actually need to feed the previously generated word to the LSTM at each timestep.

caption_image_beam_search() reads an image, encodes it, and applies the layers in the Decoder in the correct order, while using the previously generated word as the input to the LSTM at each timestep. It also incorporates Beam Search.

visualize_att() can be used to visualize the generated caption along with the weights at each timestep as seen in the examples.

To caption an image from the command line, point to the image, model checkpoint, word map (and optionally, the beam size) as follows –

python caption.py --img='path/to/image.jpeg' --model='path/to/BEST_checkpoint_coco_5_cap_per_img_5_min_word_freq.pth.tar' --word_map='path/to/WORDMAP_coco_5_cap_per_img_5_min_word_freq.json' --beam_size=5

Alternatively, use the functions in the file as needed.

Also see eval.py, which implements this process for calculating the BLEU score on the validation set, with or without Beam Search.

Some more examples


The Turing Tommy Test – you know AI's not really AI because it hasn't watched The Room and doesn't recognize greatness when it sees it.


FAQs

You said soft attention. Is there, um, a hard attention?

Yes, the Show, Attend and Tell paper uses both variants, and the Decoder with "hard" attention performs marginally better.

In soft attention, which we use here, you're computing the weights alpha and using the weighted average of the features across all pixels. This is a deterministic, differentiable operation.

In hard attention, you are choosing to just sample some pixels from a distribution defined by alpha. Note that any such probabilistic sampling is non-deterministic or stochastic, i.e. a specific input will not always produce the same output. But since gradient descent presupposes that the network is deterministic (and therefore differentiable), the sampling is reworked to remove its stochasticity. My knowledge of this is fairly superficial at this point – I will update this answer when I have a more detailed understanding.


How do I use an attention network for an NLP task like a sequence to sequence model?

Much like you use a CNN to generate an encoding with features at each pixel, you would use an RNN to generate encoded features at each timestep i.e. word position in the input.

Without attention, you would use the Encoder's output at the last timestep as the encoding for the entire sentence, since it would also contain information from prior timesteps. The Encoder's last output now bears the burden of having to encode the entire sentence meaningfully, which is not easy, especially for longer sentences.

With attention, you would attend over the timesteps in the Encoder's output, generating weights for each timestep/word, and take the weighted average to represent the sentence. In a sequence to sequence task like machine translation, you would attend to the relevant words in the input as you generate each word in the output.

You could also use Attention without a Decoder. For example, if you want to classify text, you can attend to the important words in the input just once to perform the classification.


Can we use Beam Search during training?

Not with the current loss function, but yes. This is not common at all.


What is Teacher Forcing?

Teacher Forcing is when we use the ground truth captions as the input to the Decoder at each timestep, and not the word it generated in the previous timestep. It's common to teacher-force during training since it could mean faster convergence of the model. But it can also learn to depend on being told the correct answer, and exhibit some instability in practice.

It would be ideal to train using Teacher Forcing only some of the time, based on a probability. This is called Scheduled Sampling.

(I plan to add the option).


Can I use pretrained word embeddings (GloVe, CBOW, skipgram, etc.) instead of learning them from scratch?

Yes, you could, with the load_pretrained_embeddings() method in the Decoder class. You could also choose to fine-tune (or not) with the fine_tune_embeddings() method.

After creating the Decoder in train.py, you should provide the pretrained vectors to load_pretrained_embeddings() stacked in the same order as in the word_map. For words that you don't have pretrained vectors for, like <start>, you can initialize embeddings randomly like we did in init_weights(). I recommend fine-tuning to learn more meaningful vectors for these randomly initialized vectors.

decoder = DecoderWithAttention(attention_dim=attention_dim,
                               embed_dim=emb_dim,
                               decoder_dim=decoder_dim,
                               vocab_size=len(word_map),
                               dropout=dropout)
decoder.load_pretrained_embeddings(pretrained_embeddings)  # pretrained_embeddings should be of dimensions (len(word_map), emb_dim)
decoder.fine_tune_embeddings(True)  # or False

Also make sure to change the emb_dim parameter from its current value of 512 to the size of your pre-trained embeddings. This should automatically adjust the input size of the decoder LSTM to accomodate them.


How do I keep track of which tensors allow gradients to be computed?

With the release of PyTorch 0.4, wrapping tensors as Variables is no longer required. Instead, tensors have the requires_grad attribute, which decides whether it is tracked by autograd, and therefore whether gradients are computed for it during backpropagation.

  • By default, when you create a tensor from scratch, requires_grad will be set to False.
  • When a tensor is created from or modified using another tensor that allows gradients, then requires_grad will be set to True.
  • Tensors which are parameters of torch.nn layers will already have requires_grad set to True.

How do I compute all BLEU (i.e. BLEU-1 to BLEU-4) scores during evaluation?

You'd need to modify the code in eval.py to do this. Please see this excellent answer by kmario23 for a clear and detailed explanation.

a-pytorch-tutorial-to-image-captioning's People

Contributors

jason718 avatar kmario23 avatar ngshya avatar sgrvinod avatar

Stargazers

 avatar  avatar  avatar  avatar  avatar  avatar  avatar  avatar  avatar  avatar  avatar  avatar  avatar  avatar  avatar  avatar  avatar  avatar  avatar  avatar  avatar  avatar  avatar  avatar  avatar  avatar  avatar  avatar  avatar  avatar  avatar  avatar  avatar  avatar  avatar  avatar  avatar  avatar  avatar  avatar  avatar  avatar  avatar  avatar  avatar  avatar  avatar  avatar  avatar  avatar  avatar  avatar  avatar  avatar  avatar  avatar  avatar  avatar  avatar  avatar  avatar  avatar  avatar  avatar  avatar  avatar  avatar  avatar  avatar  avatar  avatar  avatar  avatar  avatar  avatar  avatar  avatar  avatar  avatar  avatar  avatar  avatar  avatar  avatar  avatar  avatar  avatar  avatar  avatar  avatar  avatar  avatar  avatar  avatar  avatar  avatar  avatar  avatar  avatar  avatar

Watchers

 avatar  avatar  avatar  avatar  avatar  avatar  avatar  avatar  avatar  avatar  avatar  avatar  avatar  avatar  avatar  avatar  avatar  avatar  avatar  avatar  avatar  avatar  avatar  avatar

a-pytorch-tutorial-to-image-captioning's Issues

About the field image caption

In this field, how long have you been studying, and what publications have been published? I just started researching, can you recommend some publications ?

Sampling method not following the paper?

Hi,

In section 4.3 authors mention that they randomly choose a caption length and then retrieve a minibatch of that length using a previously built dictionary.

Why not using this approach instead of having to pad the captions and order by caption length and then sampling by length in the loop?

Low volatile GPU-Util but high GPU Memory Usage

When I run the code, I find that the volatile GPU-Util is only 2% or 1% while the Memory-Usage is 8 GB. Do you guys know how to achieve a more efficient volatile GPU-Util? Thanks a lot!

SourceChangeWarning

Problem:
C:\Anaconda3\lib\site-packages\torch\serialization.py:425: SourceChangeWarning: source code of class 'torchvision.models.resnet.Bottleneck' has changed. yo
u can retrieve the original source code by accessing the object's source attribute or set torch.nn.Module.dump_patches = True and use the patch tool to r
evert the changes.
warnings.warn(msg, SourceChangeWarning)
C:\Anaconda3\lib\site-packages\torch\serialization.py:425: SourceChangeWarning: source code of class 'torch.nn.modules.batchnorm.BatchNorm2d' has changed.
you can retrieve the original source code by accessing the object's source attribute or set torch.nn.Module.dump_patches = True and use the patch tool to
revert the changes.
warnings.warn(msg, SourceChangeWarning)
C:\Anaconda3\lib\site-packages\torch\serialization.py:425: SourceChangeWarning: source code of class 'torchvision.models.resnet.Bottleneck' has changed. yo
u can retrieve the original source code by accessing the object's source attribute or set torch.nn.Module.dump_patches = True and use the patch tool to r
evert the changes.
warnings.warn(msg, SourceChangeWarning)
C:\Anaconda3\lib\site-packages\torch\serialization.py:425: SourceChangeWarning: source code of class 'models.DecoderWithAttention' has changed. you can ret
rieve the original source code by accessing the object's source attribute or set torch.nn.Module.dump_patches = True and use the patch tool to revert the
changes.
warnings.warn(msg, SourceChangeWarning)
C:\Anaconda3\lib\site-packages\torch\serialization.py:425: SourceChangeWarning: source code of class 'models.Attention' has changed. you can retrieve the o
riginal source code by accessing the object's source attribute or set torch.nn.Module.dump_patches = True and use the patch tool to revert the changes.
warnings.warn(msg, SourceChangeWarning)
C:\Anaconda3\lib\site-packages\torch\serialization.py:425: SourceChangeWarning: source code of class 'torch.nn.modules.linear.Linear' has changed. you can
retrieve the original source code by accessing the object's source attribute or set torch.nn.Module.dump_patches = True and use the patch tool to revert
the changes.
warnings.warn(msg, SourceChangeWarning)
C:\Anaconda3\lib\site-packages\torch\serialization.py:425: SourceChangeWarning: source code of class 'torch.nn.modules.sparse.Embedding' has changed. you c
an retrieve the original source code by accessing the object's source attribute or set torch.nn.Module.dump_patches = True and use the patch tool to reve
rt the changes.
warnings.warn(msg, SourceChangeWarning)
C:\Anaconda3\lib\site-packages\torch\serialization.py:425: SourceChangeWarning: source code of class 'torch.nn.modules.rnn.LSTMCell' has changed. you can r
etrieve the original source code by accessing the object's source attribute or set torch.nn.Module.dump_patches = True and use the patch tool to revert t
he changes.
warnings.warn(msg, SourceChangeWarning)
Traceback (most recent call last):
File "caption.py", line 222, in
seq, alphas = caption_image_beam_search(encoder, decoder, args.img, word_map, args.beam_size)
File "caption.py", line 45, in caption_image_beam_search
image = transform(img) # (3, 256, 256)
File "C:\Anaconda3\lib\site-packages\torchvision\transforms\transforms.py", line 60, in call
img = t(img)
File "C:\Anaconda3\lib\site-packages\torchvision\transforms\transforms.py", line 163, in call
return F.normalize(tensor, self.mean, self.std, self.inplace)
File "C:\Anaconda3\lib\site-packages\torchvision\transforms\functional.py", line 208, in normalize
tensor.sub_(mean[:, None, None]).div_(std[:, None, None])
RuntimeError: Expected object of type torch.cuda.FloatTensor but found type torch.FloatTensor for argument #4 'other'

(empty) E:\Program Files\a-PyTorch-Tutorial-to-Image-Captioning>
(empty) E:\Program Files\a-PyTorch-Tutorial-to-Image-Captioning>python caption.py --img=e:/paper.jpg --model=fake/BEST_checkpoint_coco_5_cap_per_img_5_min_
word_freq.pth.tar --word_map=fake/WORDMAP_coco_5_cap_per_img_5_min_word_freq.json --beam_size=5
C:\Anaconda3\lib\site-packages\torch\serialization.py:425: SourceChangeWarning: source code of class 'models.Encoder' has changed. you can retrieve the ori
ginal source code by accessing the object's source attribute or set torch.nn.Module.dump_patches = True and use the patch tool to revert the changes.
warnings.warn(msg, SourceChangeWarning)
C:\Anaconda3\lib\site-packages\torch\serialization.py:425: SourceChangeWarning: source code of class 'torch.nn.modules.conv.Conv2d' has changed. you can re
trieve the original source code by accessing the object's source attribute or set torch.nn.Module.dump_patches = True and use the patch tool to revert th
e changes.
warnings.warn(msg, SourceChangeWarning)
C:\Anaconda3\lib\site-packages\torch\serialization.py:425: SourceChangeWarning: source code of class 'torch.nn.modules.batchnorm.BatchNorm2d' has changed.
you can retrieve the original source code by accessing the object's source attribute or set torch.nn.Module.dump_patches = True and use the patch tool to
revert the changes.
warnings.warn(msg, SourceChangeWarning)
C:\Anaconda3\lib\site-packages\torch\serialization.py:425: SourceChangeWarning: source code of class 'torchvision.models.resnet.Bottleneck' has changed. yo
u can retrieve the original source code by accessing the object's source attribute or set torch.nn.Module.dump_patches = True and use the patch tool to r
evert the changes.
warnings.warn(msg, SourceChangeWarning)
C:\Anaconda3\lib\site-packages\torch\serialization.py:425: SourceChangeWarning: source code of class 'models.DecoderWithAttention' has changed. you can ret
rieve the original source code by accessing the object's source attribute or set torch.nn.Module.dump_patches = True and use the patch tool to revert the
changes.
warnings.warn(msg, SourceChangeWarning)
C:\Anaconda3\lib\site-packages\torch\serialization.py:425: SourceChangeWarning: source code of class 'models.Attention' has changed. you can retrieve the o
riginal source code by accessing the object's source attribute or set torch.nn.Module.dump_patches = True and use the patch tool to revert the changes.
warnings.warn(msg, SourceChangeWarning)
C:\Anaconda3\lib\site-packages\torch\serialization.py:425: SourceChangeWarning: source code of class 'torch.nn.modules.linear.Linear' has changed. you can
retrieve the original source code by accessing the object's source attribute or set torch.nn.Module.dump_patches = True and use the patch tool to revert
the changes.
warnings.warn(msg, SourceChangeWarning)
C:\Anaconda3\lib\site-packages\torch\serialization.py:425: SourceChangeWarning: source code of class 'torch.nn.modules.sparse.Embedding' has changed. you c
an retrieve the original source code by accessing the object's source attribute or set torch.nn.Module.dump_patches = True and use the patch tool to reve
rt the changes.
warnings.warn(msg, SourceChangeWarning)
C:\Anaconda3\lib\site-packages\torch\serialization.py:425: SourceChangeWarning: source code of class 'torch.nn.modules.rnn.LSTMCell' has changed. you can r
etrieve the original source code by accessing the object's source attribute or set torch.nn.Module.dump_patches = True and use the patch tool to revert t
he changes.
warnings.warn(msg, SourceChangeWarning)
Traceback (most recent call last):
File "caption.py", line 222, in
seq,alphas = caption_image_beam_search(encoder, decoder, args.img, word_map, args.beam_size)
File "caption.py", line 45, in caption_image_beam_search
image = transform(img) # (3, 256, 256)
File "C:\Anaconda3\lib\site-packages\torchvision\transforms\transforms.py", line 60, in call
img = t(img)
File "C:\Anaconda3\lib\site-packages\torchvision\transforms\transforms.py", line 163, in call
return F.normalize(tensor, self.mean, self.std, self.inplace)
File "C:\Anaconda3\lib\site-packages\torchvision\transforms\functional.py", line 208, in normalize
tensor.sub_(mean[:, None, None]).div_(std[:, None, None])
RuntimeError: Expected object of type torch.cuda.FloatTensor but found type torch.FloatTensor for argument #4 'other'

Pytorch and python are installed according to the version you provide.
Why does this happen?
Thank you for your answer.

pretrained models damaged

Hi. The pretrained models you provided are available on the google drive, however, when they are downloaded they cant be opened, and when I try to open or extract, there is a message saying the files are damaged. Is it possible you can check?

Thanks

The question about the vocabulary size.

hello, thanks for your nice code.
Does the length of the vocabulary affect the final result?
because,The length of the vocabulary in other people's work is different from yours on same MSCOCO dataset.

How to generate sentid's for another dataset?

I am trying to train this model using the CUB data set for birds. Therefore I need to create a JSON file like dataset_coco.json for COCO, but for CUB. How would I generate the sentid's for another data set?

Why do you use log_softmax in sampling?

In line 94 in caption.py you use:
scores = F.log_softmax(scores, dim=1)

Could you explain the reason for log_softmax here? You did not use it in forward() method.

More than that, I tried your model on my dataset and got BLEU = 0.16 on test set with that code for captioning. It produced almost similar captions for all images.
But when i removed log_softmax line I got BLEU = 0.60... and I'm a little bit confused with that.

why to use teacher-forcing in function Validate()?

Thank you for your implementation of this paper. I think it might be more reasonable that we could not obtain the corresponding caption of an image during validation, so I could not understand why to use teacher-forcing in function Validate().

some trouble with the input files.

I have found that your COCO json file is different with the origin. Could you please provide the JSON file which is used to generate input files for model?

Converting to ONNX?

I guess since you've tar-ed the pth checkpoint, it is not possible to convert to ONNX.
Is there some way to work around this issue?

TypeError: can't pickle _thread._local objects

Thank you for your code.When I run train.py,I met a problem as following:

C:\Users\Administrator\Anaconda3\lib\site-packages\h5py_init_.py:36: FutureWarning: Conversion of the second argument of issubdtype from float to np.floating is deprecated. In future, it will be treated as np.float64 == np.dtype(float).type.
from ._conv import register_converters as _register_converters
Traceback (most recent call last):
File "C:/image_captioning/code/a-PyTorch-Tutorial-to-Image-Captioning-master/train.py", line 328, in
main()
File "C:/image_captioning/code/a-PyTorch-Tutorial-to-Image-Captioning-master/train.py", line 116, in main
epoch=epoch)
File "C:/image_captioning/code/a-PyTorch-Tutorial-to-Image-Captioning-master/train.py", line 162, in train
for i, imgs, caps, caplens in enumerate(train_loader):
File "C:\Users\Administrator\Anaconda3\lib\site-packages\torch\utils\data\dataloader.py", line 501, in iter
return _DataLoaderIter(self)
File "C:\Users\Administrator\Anaconda3\lib\site-packages\torch\utils\data\dataloader.py", line 289, in init
w.start()
File "C:\Users\Administrator\Anaconda3\lib\multiprocessing\process.py", line 105, in start
self._popen = self._Popen(self)
File "C:\Users\Administrator\Anaconda3\lib\multiprocessing\context.py", line 223, in _Popen
return _default_context.get_context().Process._Popen(process_obj)
File "C:\Users\Administrator\Anaconda3\lib\multiprocessing\context.py", line 322, in _Popen
return Popen(process_obj)
File "C:\Users\Administrator\Anaconda3\lib\multiprocessing\popen_spawn_win32.py", line 65, in init
reduction.dump(process_obj, to_child)
File "C:\Users\Administrator\Anaconda3\lib\multiprocessing\reduction.py", line 60, in dump
ForkingPickler(file, protocol).dump(obj)
TypeError: can't pickle _thread._local objects

Could you give me some advice?

Some trouble in the model.py about fine-tuning

If fine-tuning, only fine-tune convolutional blocks 2 through 4

    for c in list(self.resnet.children())[5:]:
        for p in c.parameters():
             p.requires_grad = fine_tune

These codes are in the models.py. From the code, it fine-tunes from 5 to the end, but the comments show only fine-tune convolutional blocks 2 through 4. Is there some contradiction?

Readme encoder output_size not fully understood

In the code the encoder output size should be :
(batch_size, encoded_image_size, encoded_image_size, 2048)=(batch_size, 14, 14, 2048 )
in the Readme description image :
it is (batch_size, 14, 14, 4096 ) !=(batch_size, 14, 14, 2048 )
is there something i miss or not understanding? Thanks for your valuable work and i am looking forward to your applying !

Pre-trained word embeddings

How can I go about using pre-trained word embeddings for the decoder? I've seen this issue, which mentions it, however, I'm having some difficulties finding a pre-trained model that has the right dimensions (512). How would you recommend going about it?

Thanks

what is the lowest loss we can achieve with this architecture?

I tried to overfitting the model but it seems so hard to achieve

I've minimize the data into 100 image with 1 captions per image
and the lowest loss I can achieve when training in 500 epochs is around 0.9xxx and the loss value is stagnant till 1000 epoch

what is the lowest loss you've achieve @sgrvinod ?

caption.py error

I got this error when i run the code:

Traceback (most recent call last):
File "caption.py", line 200, in
checkpoint = torch.load(args.model)
File "/srv/usr-virtenv/ajengw-env/lib/python3.5/site-packages/torch/serialization.py", line 303, in load
return _load(f, map_location, pickle_module)
File "/srv/usr-virtenv/ajengw-env/lib/python3.5/site-packages/torch/serialization.py", line 459, in _load
magic_number = pickle_module.load(f)
TypeError: file must have 'read' and 'readline' attributes

Can you help me? thanks

Loss function in Stochastic "Hard" Attention

Great tutorial, thanks!
In the case of "Hard" attention, you mentioned in your tutorial that "it is not differentiable" so maybe this is why a new objective function Ls is proposed in the original paper.
Do you know how to implement that new objective function Ls? Will it be an additional loss term in the loss function similar to those in VAE?

Thanks for your attention to this matter.

error in computing the beam search for all images

Hello
I am getting a very weird problem. I am running the beam search function for all the images in the validation loader. However, it stops running the function at random numbers. Here in the image, it stopped at 50, another time, it stopped at 8, another time at 70, and so on....
The image attached demonstrates the problem.
untitled
I even tried it with your eval.py function, and it gives the same error. Attached is the image
capture
It also appears that the beam search function acts differently with random images. You can see that I tried to visualize the beam search for the image in which the iteration stopped at (ex: 16 in image below).
untitled
I also did a try except block to catch how many error where there, as seen below:
try
After debugging, I found out that the reason is that the function never generated the 'end' token. Therefore, as written in the code: (if steps>50): break, the loop breaks in this case. You can see the image attached.
capture
And the funniest thing is that sometimes it completely works! You can observe the image below, where I ran this on the complete dataset, and there were no wrong ones.
capture
I then re-started the program and ran the same thing again, I get 130 wrong ones! Attached below
capturehj
If I visualize the predictions, I get a recursion of predictions that never ends: Attached
capture
Why is this happening? How does it work one time and doesn't the other time? Also any suggestions on how to fix it?

How to recover training at a check point

As you wrote in README, it is possible to use checkpoint flag to start training at a certain point instead of training from scratches, but in code, there is no option for that.

I am supposing that you have not implemented this feature yet, right? So if it is true, please modify your README page, since that really makes us confused.

Some problem in creat_input_files.py

Thank you for your effort to complete the code. When I ran the code 'create_input_files.py' I met some problems which shows in the picture:
image
I have not met the problem like this.Could you give me some advice on how to fix it in your convenient time?

How to do calculate all bleu scores during evaluvaion

Hi,

Thanks for the well-documented code and tutorial. I trained my model from scratch using your code now when I want to evaluate am not sure how to get all the BLEU scores, not just bleu4 as currently in the eval.py.

are the testing images used?

Hi, In your code, you've saved the testing images in a .h5 file. However, you've never used them for evaluation. You've only used the validation images. Do we need to use the testing images for evaluation as well? And Does the paper report results on the testing images?

Do we need to use word2vec?

Hi, I am new to the NLP techniques. I have a question about the word2vec part. As far as I know, when we use the one-hot label to represent each word, do we need to use word2vec technique to create a vector representation for each word?

why are you using pack padded seq if you've already removed the pads in inputs?

Hi. Thanks for your work on "Show Attend and Tell".
In training file, you have used scores, _ = pack_padded_sequence(scores, decode_lengths, batch_first=True) and said that this is to remove the timesteps that we didn't decode at.
However, when feeding in the inputs to the LSTM, you have used: batch_size_t = sum([l > t for l in decode_lengths]), which means originally, you are only taking the effective batch size and not any pads. So i assume there is no need to use pack_padded_sequence in this case?

A question beyond the code itself

Under the help of you few days ago, I successfully run the code and get the results. Thank you again!

This time I wanna ask several questions beyond the code itself:

  1. During the training process, is the supervision loss only cross-entropy loss?
  2. During the training process, for each input image(carrying label), do we have the generated caption by the network?
  3. After the question 2, if I have the generated caption, how can I search for a similar caption and its corresponding image(or several) from the dataset? From your experience, what is the quickest way to accomplish this task?

Sincerely hope for your reply! If I there is anything unclear, we might discuss under this issue.
Thank you again for your help!

Regarding the Attention Addition

Hi @sgrvinod
I would like to ask regarding the addition of the attention in att1 + att2.unsqueeze(1)
att1 is of shape (N, pixels, att_dim)
att2 after unsqueeze is of shape (N,1,att_dim)

When you are adding att1 and att2, then att2 is being expanded automatically to be of the same shape as att1. Therefore, you are adding the same thing for every row of att1 (i.e. all pixels of att1 get added to the same values). Is that how it should be? Or must we multiply att2 with a ones matric to reshape the attention size, as in the following code:

        ones_mx = torch.ones(batch_size], 1, att_dim).to(device) # (batch_size, 1, att_dim)
        hidden_mul = torch.bmm(att2.unsqueeze(2), ones_mx) # (N,49,1 bmm N,1,49) --> (N,49,49) (batch_size,att_dim, att_dim)
        addition_out = F.relu(att1 + hidden_mul)   # (batch_size,49,49)

Or does it not matter?

Thanks

What is the function of sample captions and captions per image

I tried to understand the code but

I don't know what is the function of captions per image and sample captions and why we need that?

Utility.py

    # Sample captions for each image, save images to HDF5 file, and captions and their lengths to JSON files
    seed(123)
    for impaths, imcaps, split in [(train_image_paths, train_image_captions, 'TRAIN'),
                                   (val_image_paths, val_image_captions, 'VAL'),
                                   (test_image_paths, test_image_captions, 'TEST')]:

        with h5py.File(os.path.join(output_folder, split + '_IMAGES_' + base_filename + '.hdf5'), 'a') as h:
            # Make a note of the number of captions we are sampling per image
            h.attrs['captions_per_image'] = captions_per_image

            # Create dataset inside HDF5 file to store images
            images = h.create_dataset('images', (len(impaths), 3, 256, 256), dtype='uint8')

            print("\nReading %s images and captions, storing to file...\n" % split)

            enc_captions = []
            caplens = []

            for i, path in enumerate(tqdm(impaths)):

                # Sample captions
                if len(imcaps[i]) < captions_per_image:
                    captions = imcaps[i] + [choice(imcaps[i]) for _ in range(captions_per_image - len(imcaps[i]))]
                else:
                    captions = sample(imcaps[i], k=captions_per_image)

                # Sanity check
                assert len(captions) == captions_per_image

                # Read images
                img = imread(impaths[i])
                if len(img.shape) == 2:
                    img = img[:, :, np.newaxis]
                    img = np.concatenate([img, img, img], axis=2)
                img = imresize(img, (256, 256))
                img = img.transpose(2, 0, 1)
                assert img.shape == (3, 256, 256)
                assert np.max(img) <= 255

                # Save image to HDF5 file
                images[i] = img

                for j, c in enumerate(captions):
                    # Encode captions
                    enc_c = [word_map['<start>']] + [word_map.get(word, word_map['<unk>']) for word in c] + [
                        word_map['<end>']] + [word_map['<pad>']] * (max_len - len(c))

                    # Find caption lengths
                    c_len = len(c) + 2

                    enc_captions.append(enc_c)
                    caplens.append(c_len)

            # Sanity check
            assert images.shape[0] * captions_per_image == len(enc_captions) == len(caplens)

            # Save encoded captions and their lengths to JSON files
            with open(os.path.join(output_folder, split + '_CAPTIONS_' + base_filename + '.json'), 'w') as j:
                json.dump(enc_captions, j)

            with open(os.path.join(output_folder, split + '_CAPLENS_' + base_filename + '.json'), 'w') as j:
                json.dump(caplens, j)

Datasets.py

# cpi is captions per image

def __getitem__(self, i):
        # Remember, the Nth caption corresponds to the (N // captions_per_image)th image
        img = torch.FloatTensor(self.imgs[i // self.cpi] / 255.)
        if self.transform is not None:
            img = self.transform(img)

        caption = torch.LongTensor(self.captions[i])

        caplen = torch.LongTensor([self.caplens[i]])

        if self.split is 'TRAIN':
            return img, caption, caplen
        else:
            # For validation of testing, also return all 'captions_per_image' captions to find BLEU-4 score
            all_captions = torch.LongTensor(
                self.captions[((i // self.cpi) * self.cpi):(((i // self.cpi) * self.cpi) + self.cpi)])
            return img, caption, caplen, all_captions

Flicker dataset error

Flicker8k dataset error:
Traceback (most recent call last):
File "create_input_files.py", line 22, in
max_len=50)
File "/home/ajeng/Tutorial/image captioning/code/attention/a-PyTorch-Tutorial-to-Image-Captioning/utils.py", line 115, in create_input_files
img = imread(impaths[i])
File "/home/ajeng/anaconda3/envs/pytorch/lib/python3.6/site-packages/numpy/lib/utils.py", line 101, in newfunc
return func(*args, **kwds)
File "/home/ajeng/anaconda3/envs/pytorch/lib/python3.6/site-packages/scipy/misc/pilutil.py", line 164, in imread
im = Image.open(name)
File "/home/ajeng/anaconda3/envs/pytorch/lib/python3.6/site-packages/PIL/Image.py", line 2543, in open
fp = builtins.open(filename, "rb")
FileNotFoundError: [Errno 2] No such file or directory: '/home/ajeng/Tutorial/image captioning/code/attention/a-PyTorch-Tutorial-to-Image-Captioning/caption data/flickr8k/Flicker8k_Dataset/2513260012_03d33305cf.jpg'

Flicker30k dataset error:
Traceback (most recent call last):
File "create_input_files.py", line 32, in
max_len=50)
File "/home/ajeng/Tutorial/image captioning/code/attention/a-PyTorch-Tutorial-to-Image-Captioning/utils.py", line 115, in create_input_files
img = imread(impaths[i])
File "/home/ajeng/anaconda3/envs/pytorch/lib/python3.6/site-packages/numpy/lib/utils.py", line 101, in newfunc
return func(*args, **kwds)
File "/home/ajeng/anaconda3/envs/pytorch/lib/python3.6/site-packages/scipy/misc/pilutil.py", line 164, in imread
im = Image.open(name)
File "/home/ajeng/anaconda3/envs/pytorch/lib/python3.6/site-packages/PIL/Image.py", line 2543, in open
fp = builtins.open(filename, "rb")
FileNotFoundError: [Errno 2] No such file or directory: '/home/ajeng/Tutorial/image captioning/code/attention/a-PyTorch-Tutorial-to-Image-Captioning/caption data/flickr30k/flickr30k_images/1000092795.jpg'

I don't understand why I get this error when i tried it in flicker dataset. Can you help me? Thanks

regarding the bleu score reported

Hi. In the paper, they have reported the blue-4 score as 25. Is this reported score in the paper obtained without using teacher forcing during evaluation?
You mentioned that you have achieved a score of 24.29 with teacher forcing during evaluation, and then you reported 32.95 without teacher forcing (and with using beam search of 3), and that is higher than the paper.
So is the score reported in the paper with or without using teacher forcing during evaluation?

usage

Could you tell me the steps to run these codes, I got a little confused.

regarding attention concatentation in beam search

Hi @sgrvinod ,
While exploring the beam search code, I realized something. In the line:

 seqs_alpha = torch.cat([seqs_alpha[prev_word_inds], alpha[prev_word_inds].unsqueeze(1)],
                               dim=1)  # (s, step+1, enc_image_size, enc_image_size)

you are concatenating the current alphas as follows: alpha[prev_word_inds]
In prev_word_inds, we are taking the filtered word batches (the previous words in which the current predictions belong to). For example, if the prev_word_inds = [0,1,0], that means we are taking the first, second and first previous words, respectively and concatenating the attention maps which were generated according to the input of the first, second and first word. So the attention maps to be concatenated is the first, second and first, because you are using alpha[prev_word_inds]. But realize that if we have [0,1,0], that means the previous first word (0) has generated 2 next words. So what you're doing is taking the SAME attention map for these 2 next words, which are completely different words. How is that possible?
Thanks!

Last layer activation

High, thank you for making such a wonderful tutorial! It helped with my study greatly.

I see that, the linear layer is used to compute the score of each vocab.
as in self.fc = nn.Linear(decoder_dim, vocab_size) .

In other paper, they would use softmax activation, since we are training with
nn.CrossEntropyLoss().to(device)

what are your thoughts on this? Will there be performance increase when linear activation is swapped with softmax? (of course...softmax is computationally expensive with larger vocab size)

are all the functions used?

Hi. Thanks for that Tutorial.
I would like to ask. I have realized some unused functions through the code. In utils file, the function load_embeddings (different from load_pretrained_embeddigns in model.py) is not used. So are they necessary to add them?

Attension Network explanation?

Thanks for you tutorial! I found in READEME.md and
code:

    def forward(self, encoder_out, decoder_hidden):
        """
        Forward propagation.

        :param encoder_out: encoded images, a tensor of dimension (batch_size, num_pixels, encoder_dim)
        :param decoder_hidden: previous decoder output, a tensor of dimension (batch_size, decoder_dim)
        :return: attention weighted encoding, weights
        """
        att1 = self.encoder_att(encoder_out)  # (batch_size, num_pixels, attention_dim)
        att2 = self.decoder_att(decoder_hidden)  # (batch_size, attention_dim)
        att = self.full_att(self.relu(att1 + att2.unsqueeze(1))).squeeze(2)  # (batch_size, num_pixels)
        alpha = self.softmax(att)  # (batch_size, num_pixels)
        attention_weighted_encoding = (encoder_out * alpha.unsqueeze(2)).sum(dim=1)  # (batch_size, encoder_dim)

        return attention_weighted_encoding, alpha

You implement the attension function $f_att(a_i, h_{t-1}$ as below:

added and ReLU activated. A third linear layer transforms this result to a dimension of 1

And I want to know is this your own method or you fellow a paper(could you give me a link)? And will a concat of att1 and att2 be better?

lstmcell GPU OOM

thanks for your tutorial,it is so helpful for a beginner。But i encounter a problem in this line,

code is h, c = decoder.decode_step(torch.cat([embeddings, awe], dim=1), (h, c))

when running the while loop, gpu memory increase gradually, and in tutorial code, batch size is 1,so there is no critical problem。But when i increase the batchsize to 32 or 64,and refer to your test code to write my own test code, GPU is Out of memory.

i can not understand why this code can bring memory increasing. Why didn't I find this problem during the training? Can you explain this phenomenon?

thanks for your reply

predict linear layer's input is just hidden states but in original paper, they combined with [L(word_embed+Wh+Uc)]

Hi,
Thx for your great tutorial with nice guide and code. After I read decoder's code, I found that you just use lstm's hidden states to compute the next word's prob. Following here:
preds = self.fc(self.dropout(h))
In original paper, they combined with last word's vector and transed context vector and hidden states
L(Eyt-1+Wht+Uz) and their Theano's as follows:

logit = get_layer('ff')[1](tparams, proj_h, options, prefix='ff_logit_lstm', activ='linear')
if options['prev2out']:
     logit += emb
if options['ctx2out']:
    logit += get_layer('ff')[1](tparams, ctxs, options, prefix='ff_logit_ctx', activ='linear'
logit = tanh(logit)

They controlled whether to use the other two vectors. So, did you compare the results of using and not using these extra information.
Thx very much!

Predicting to a new image (Teacher Forcing)

From what I understood, your code is not applied to a dataset where you do not have a caption to an input image.

The main problem is: How to apply your DecoderWithAttention to an image without the encoded_captions argument?

I tried to implement a sample method where I would only receive the encoder output, and even though the model achieved good metrics on the COCO dataset during training, its result (without Teacher forcing) are horrible, here are some examples:

screenshot from 2019-01-01 05-52-56
screenshot from 2019-01-01 05-53-02
screenshot from 2019-01-01 05-53-07
screenshot from 2019-01-01 05-53-12
screenshot from 2019-01-01 05-53-17

My sample method is like this:

def sample(self, encoder_out, states=None, max_len=20):
        batch_size = encoder_out.size(0)
        encoder_dim = encoder_out.size(-1)
        vocab_size = self.vocab_size
        
        encoder_out = encoder_out.view(batch_size, -1, encoder_dim)  # (batch_size, num_pixels, encoder_dim)
        num_pixels = encoder_out.size(1)
        
        # Embedding
        preds = torch.zeros([1, 14], dtype=torch.float32).to(device)
        
        # Initialize LSTM state
        h, c = self.init_hidden_state(encoder_out)  # (batch_size, decoder_dim)
        
        decode_lengths = [max_len]
        # Create tensors to hold word predicion scores and alphas
        
        batch_size_t = 1
        predicted_sentence = []
        
        embeddings = self.embedding(torch.Tensor([0]).long().to(device))
            
        for t in range(max(decode_lengths)):
            attention_weighted_encoding, alpha = self.attention(encoder_out[:batch_size_t],
                                                                h[:batch_size_t])
            gate = self.sigmoid(self.f_beta(h[:batch_size_t]))  # gating scalar, (batch_size_t, encoder_dim)
            attention_weighted_encoding = gate * attention_weighted_encoding

            h, c = self.decode_step(
                torch.cat([embeddings, attention_weighted_encoding], dim=1),
                (h[:batch_size_t], c[:batch_size_t]))  # (batch_size_t, decoder_dim)
            outputs = self.fc(self.dropout(h))
            _, max_indx = torch.max(outputs, dim=1)
            
            predicted_sentence.append(max_indx.cpu().numpy()[0].item())
            if (max_indx == 1): # <end> word
                break
                
            embeddings = self.embedding(max_indx)
            
        return predicted_sentence

Pretrained model?

Hi,

Do you have any pre-trained model that we could load to use directly for evaluation on a different dataset?

Also, does it make sense to do transfer learning in recurrent networks?

Thanks!

regarding the batch_size_t

Hi. If I wanted to manually create the output h for the LSTMCell (by just taking the memory cell c and running it through a tanh function and then multiplying it with the gate). Does the batch_size_t need to be included like this? Note: c is the output returned by the LSTMCell.

        ht-1 = self.hidd_gate(h_prev[:batch_size_t])      
        xt = self.inp_gate(current_input)                      
        gt = F.sigmoid(ht-1+ xt )                                
        ht = gt * F.tanh(c)                   # (batch_size, hidden_size)

or do I need to include batch_size_t when activating c as in:

        ht-1 = self.hidd_gate(h_prev[:batch_size_t])      
        xt = self.inp_gate(current_input)                      
        gt = F.sigmoid(ht-1+ xt )                                
        ht = gt * F.tanh(c[batch_size_t])   # (batch_size, hidden_size)

Recommend Projects

  • React photo React

    A declarative, efficient, and flexible JavaScript library for building user interfaces.

  • Vue.js photo Vue.js

    🖖 Vue.js is a progressive, incrementally-adoptable JavaScript framework for building UI on the web.

  • Typescript photo Typescript

    TypeScript is a superset of JavaScript that compiles to clean JavaScript output.

  • TensorFlow photo TensorFlow

    An Open Source Machine Learning Framework for Everyone

  • Django photo Django

    The Web framework for perfectionists with deadlines.

  • D3 photo D3

    Bring data to life with SVG, Canvas and HTML. 📊📈🎉

Recommend Topics

  • javascript

    JavaScript (JS) is a lightweight interpreted programming language with first-class functions.

  • web

    Some thing interesting about web. New door for the world.

  • server

    A server is a program made to process requests and deliver data to clients.

  • Machine learning

    Machine learning is a way of modeling and interpreting data that allows a piece of software to respond intelligently.

  • Game

    Some thing interesting about game, make everyone happy.

Recommend Org

  • Facebook photo Facebook

    We are working to build community through open source technology. NB: members must have two-factor auth.

  • Microsoft photo Microsoft

    Open source projects and samples from Microsoft.

  • Google photo Google

    Google ❤️ Open Source for everyone.

  • D3 photo D3

    Data-Driven Documents codes.