This lab is provided as part of AWS Summit Online, click here to explore the full list of hands-on labs.
ℹ️ You will run this lab in your own AWS account. Please follow directions at the end of the lab to remove resources to avoid future costs.
Kubernetes Ingress is an API resource that allows you manage external or internal HTTP(S) access to Kubernetes services running in a cluster. Amazon Elastic Load Balancing Application Load Balancer (ALB) is a popular AWS service that load balances incoming traffic at the application layer (layer 7) across multiple targets. The lab walks through the steps of setting up ALB Ingress controller, deploying sample application (game 2048) and exposing the application publicly via ALB.
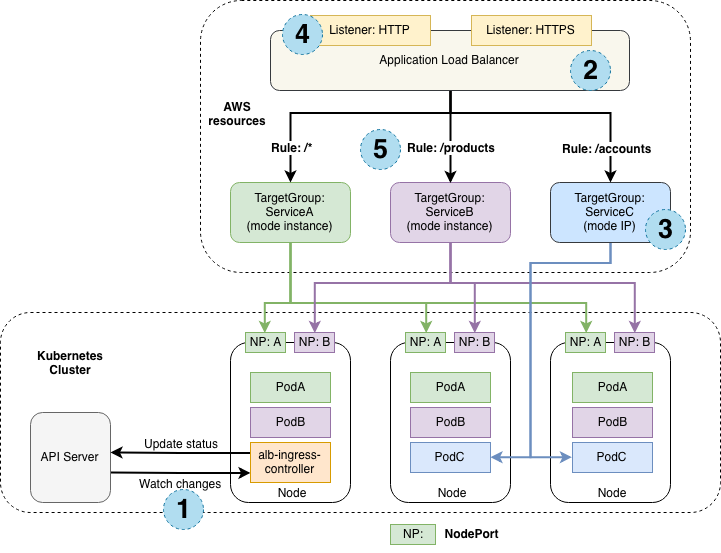
How Kubernetes Ingress works with aws-alb-ingress-controller
The following diagram details the AWS components that the aws-alb-ingress-controller creates whenever an Ingress resource is defined by the user. The Ingress resource routes ingress traffic from the Application Load Balancer(ALB) to the Kubernetes cluster.
ℹ️ This lab has been tested in both N. Virginia (us-east-1) and Sydney (ap-southeast-2) region, although it should work in other regions with EKS service enabled.
-
Download the Cloud9 CloudFormation template.
-
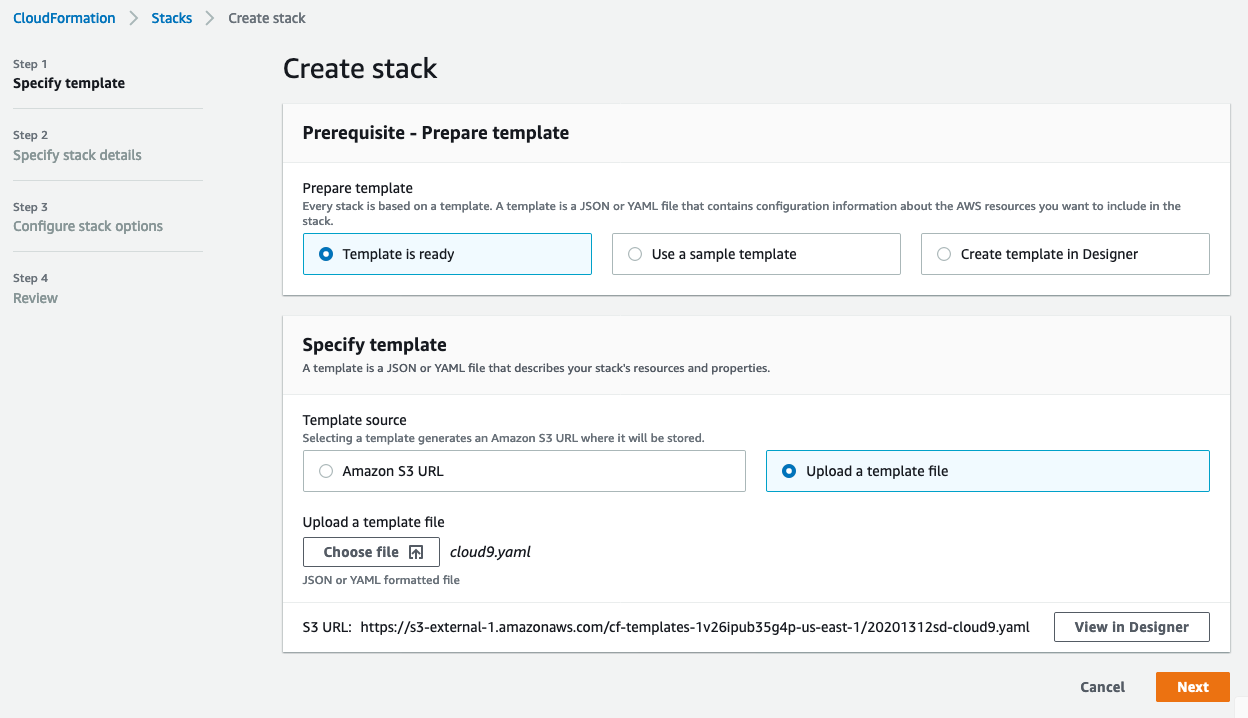
Launch AWS CloudFormation Console to create a new stack.
-
Select Upload a template file and choose the downloaded file, click Next.
-
Set the stack name devlab-eks-alb-2048game and click Next.
-
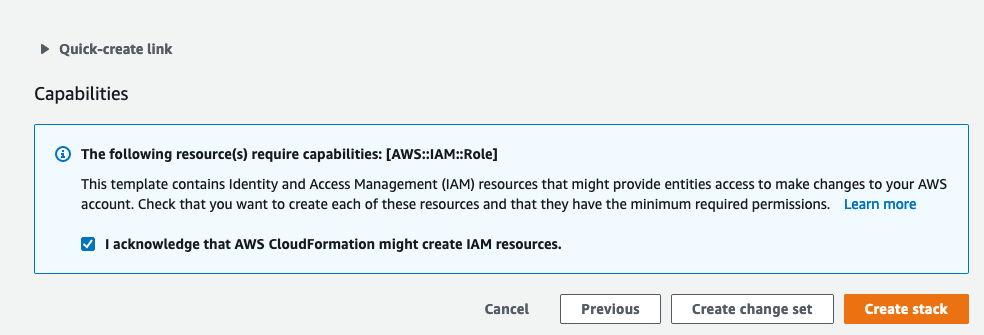
Click Next again to the stack review page, tick I acknowledge that AWS CloudFormation might create IAM resources box and click Create stack.
-
Wait for a few minutes for stack creation to complete.
-
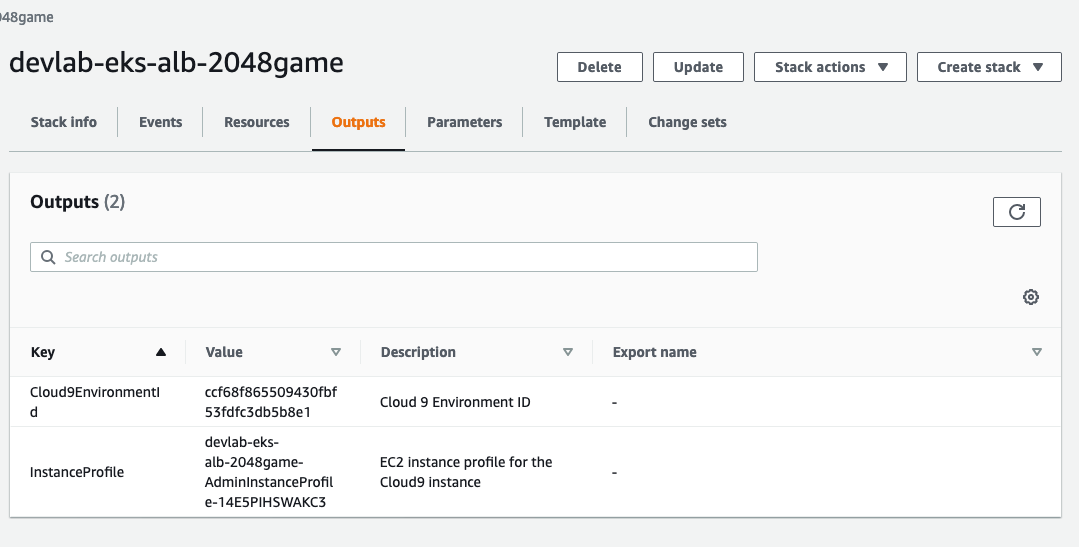
Select the stack and note down the outputs (Cloud9EnvironmentId & InstanceProfile) on outputs tab for next step.
-
Launch AWS EC2 Console.
-
Use stack output value of Cloud9EnvironmentId as filter to find the Cloud9 instance.
-
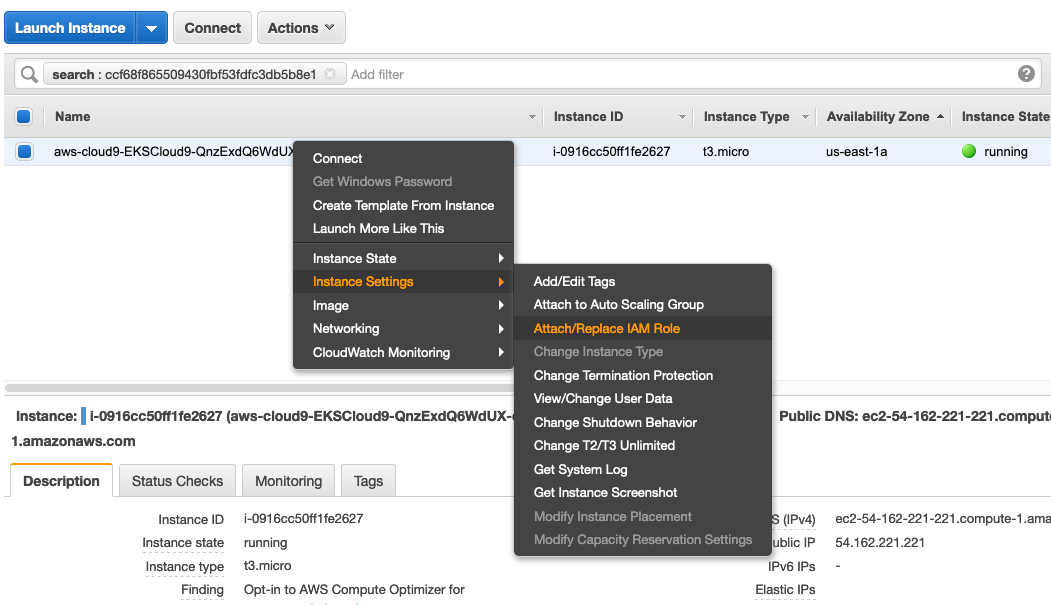
Right click the instance, Instance Settings -> Attach/Replace IAM Role.
-
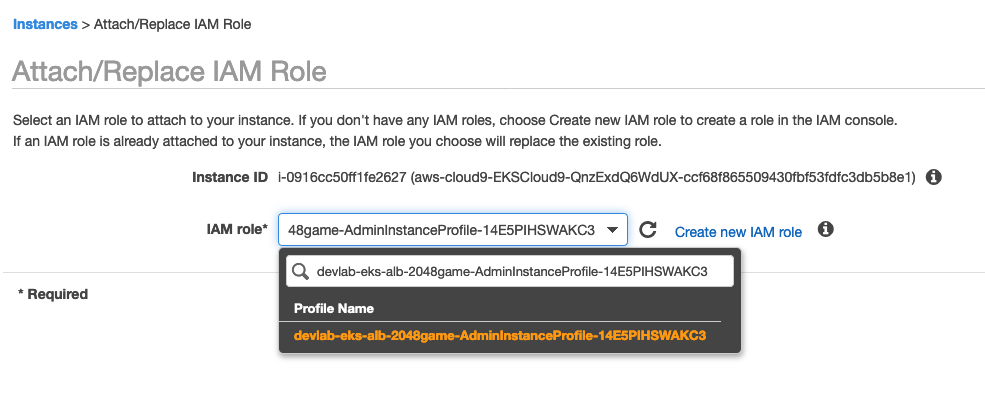
Choose the profile name matches to the InstanceProfile value from the stack output, and click Apply.
-
Launch AWS Cloud9 Console
-
Locate the Cloud9 environment created for this lab and click "Open IDE". The environment title should start with EKSCloud9.
-
At top menu of Cloud9 IDE, click AWS Cloud9 and choose Preferences.
-
At left menu AWS SETTINGS, click Credentials.
-
Disable AWS managed temporary credentials:

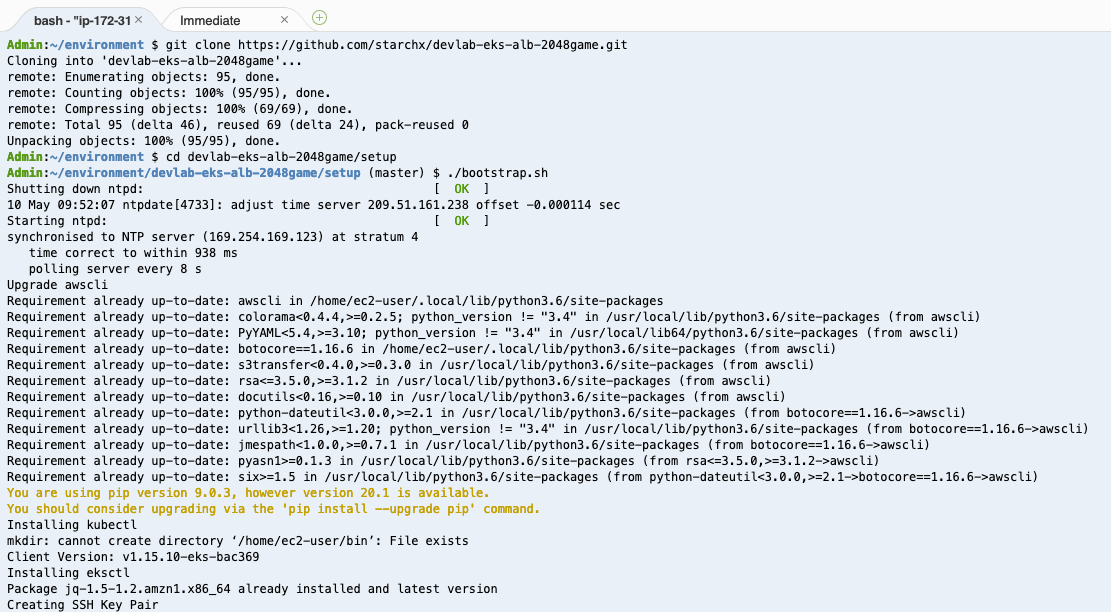
Run commands below on Cloud9 Terminal to clone this lab repository and bootstrap the lab:
git clone https://github.com/starchx/devlab-eks-alb-2048game.git
cd devlab-eks-alb-2048game/setup
./bootstrap.sh
The bootstrap.sh script will:
-
Upgrade AWS CLI to latest version.
-
Install kubectl, eksctl.
-
Create an EKS cluster with eksctl.
-
Set up IAM roles for service accounts for ALB Ingress Controller.
In Cloud 9 environment, maximize the Terminal, and load the profile with this command:
source ~/.bash_profile
Create a Kubernetes service account named alb-ingress-controller in the kube-system namespace, a cluster role, and a cluster role binding for the ALB Ingress Controller to use with the following command.
kubectl apply -f https://raw.githubusercontent.com/kubernetes-sigs/aws-alb-ingress-controller/v1.1.4/docs/examples/rbac-role.yaml
Deploy the ALB Ingress Controller with the following command
kubectl apply -f https://raw.githubusercontent.com/kubernetes-sigs/aws-alb-ingress-controller/v1.1.4/docs/examples/alb-ingress-controller.yaml
ALB Ingress Controller needs to know the EKS cluster name. Open the ALB Ingress Controller deployment manifest for editing with the following command
KUBE_EDITOR="nano" kubectl edit deployment.apps/alb-ingress-controller -n kube-system
Add a line for the cluster name after the --ingress-class=alb line.
spec:
  containers:
  - args:
    - --ingress-class=alb
    - --cluster-name=eks-alb-2048game
Save the file and exit will trigger ALB Ingress Controller pod to redeploy.
Confirm that the ALB Ingress Controller is running with the following command.
kubectl get pods -n kube-system
Expected output:
NAME                                      READY   STATUS    RESTARTS   AGE
alb-ingress-controller-55b5bbcb5b-bc8q9   1/1     Running   0          56s
Create a namespace for 2048 game.
kubectl apply -f https://raw.githubusercontent.com/kubernetes-sigs/aws-alb-ingress-controller/v1.1.4/docs/examples/2048/2048-namespace.yaml
Verify the namespace has been created:
kubectl get ns
Expected output:
NAME              STATUS   AGE
2048-game         Active   42h
default           Active   42h
kube-node-lease   Active   42h
kube-public       Active   42h
kube-system       Active   42h
Create a deployment to run 2048 game application pods.
kubectl apply -f https://raw.githubusercontent.com/kubernetes-sigs/aws-alb-ingress-controller/v1.1.4/docs/examples/2048/2048-deployment.yaml
Verify the deployment has been created:
kubectl get deployment -n 2048-game
Expected output:
NAME              READY   UP-TO-DATE   AVAILABLE   AGE
2048-deployment   5/5     5            5           42h
Create a service to abstract 2048 game application pods.
kubectl apply -f https://raw.githubusercontent.com/kubernetes-sigs/aws-alb-ingress-controller/v1.1.4/docs/examples/2048/2048-service.yaml
Verify the service has been created:
kubectl get service -n 2048-game
Expected output:
NAME           TYPE       CLUSTER-IP      EXTERNAL-IP   PORT(S)        AGE
service-2048   NodePort   10.100.49.101   <none>        80:32667/TCP   42h
Deploy ALB Ingress resource to expose 2048 Game via AWS Application Load Balancer.
kubectl apply -f https://raw.githubusercontent.com/kubernetes-sigs/aws-alb-ingress-controller/v1.1.4/docs/examples/2048/2048-ingress.yaml
After a few minutes, verify that the Ingress resource was created with the following command.
kubectl get ingress/2048-ingress -n 2048-game
Expected output:
NAME           HOSTS   ADDRESS                                                                     PORTS   AGE
2048-ingress   *       7dfe79d3-2048game-2048ingr-6fa0-35333457.ap-southeast-2.elb.amazonaws.com   80      41h
To debug, run the following command to view the Ingress controller log:
kubectl logs -n kube-system deployment.apps/alb-ingress-controller
Navigate to AWS Console Load Balancer page to see the Load Balancer created by ALB Ingress Controller according to the Ingress resource. Wait for Load Balancer to be active before heading to next step.

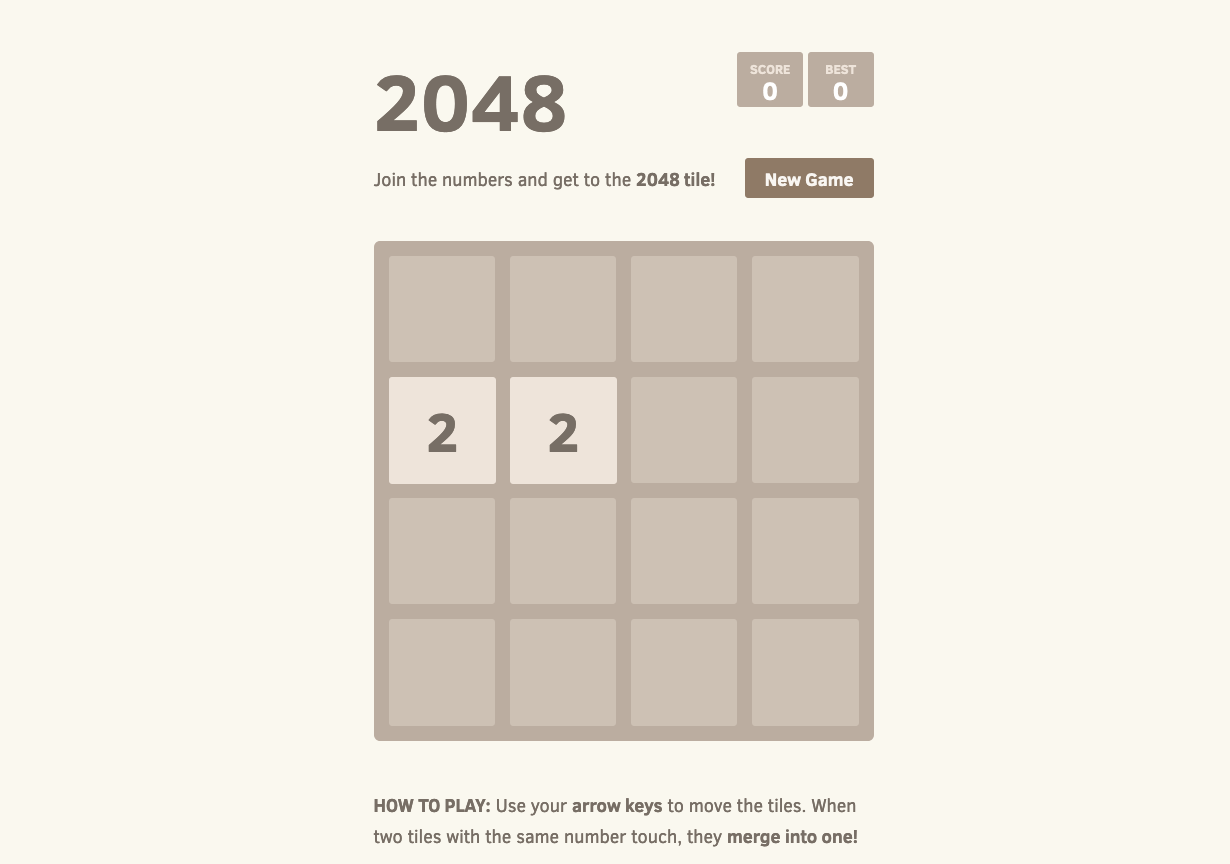
Open a browser and navigate to the ALB endpoint (shown in ADDRESS field from the previous command kubectl get ingress/2048-ingress -n 2048-game output or from AWS Load Balancer Console) to see the 2048 game application.
Run cleanup.sh from Cloud 9 Terminal to delete EKS cluster and its resources. Cleanup script will:
- Delete all the resources installed in previous steps.
- Delete the EKS cluster created via bootstrap script.
./cleanup.sh
Double check the EKS Cluster stack created by eksctl was deleted:
- Launch AWS CloudFormation Console
- Check if the stack eksctl-eks-alb-2048game-cluster still exists.
- If exists, click this stack, in the stack details pane, choose Delete.
- Select Delete stack when prompted.
Delete the Cloud 9 CloudFormation stack named devlab-eks-alb-2048game from AWS Console:
- Launch AWS CloudFormation Console
- Select stack devlab-eks-alb-2048game.
- In the stack details pane, choose Delete.
- Select Delete stack when prompted.

