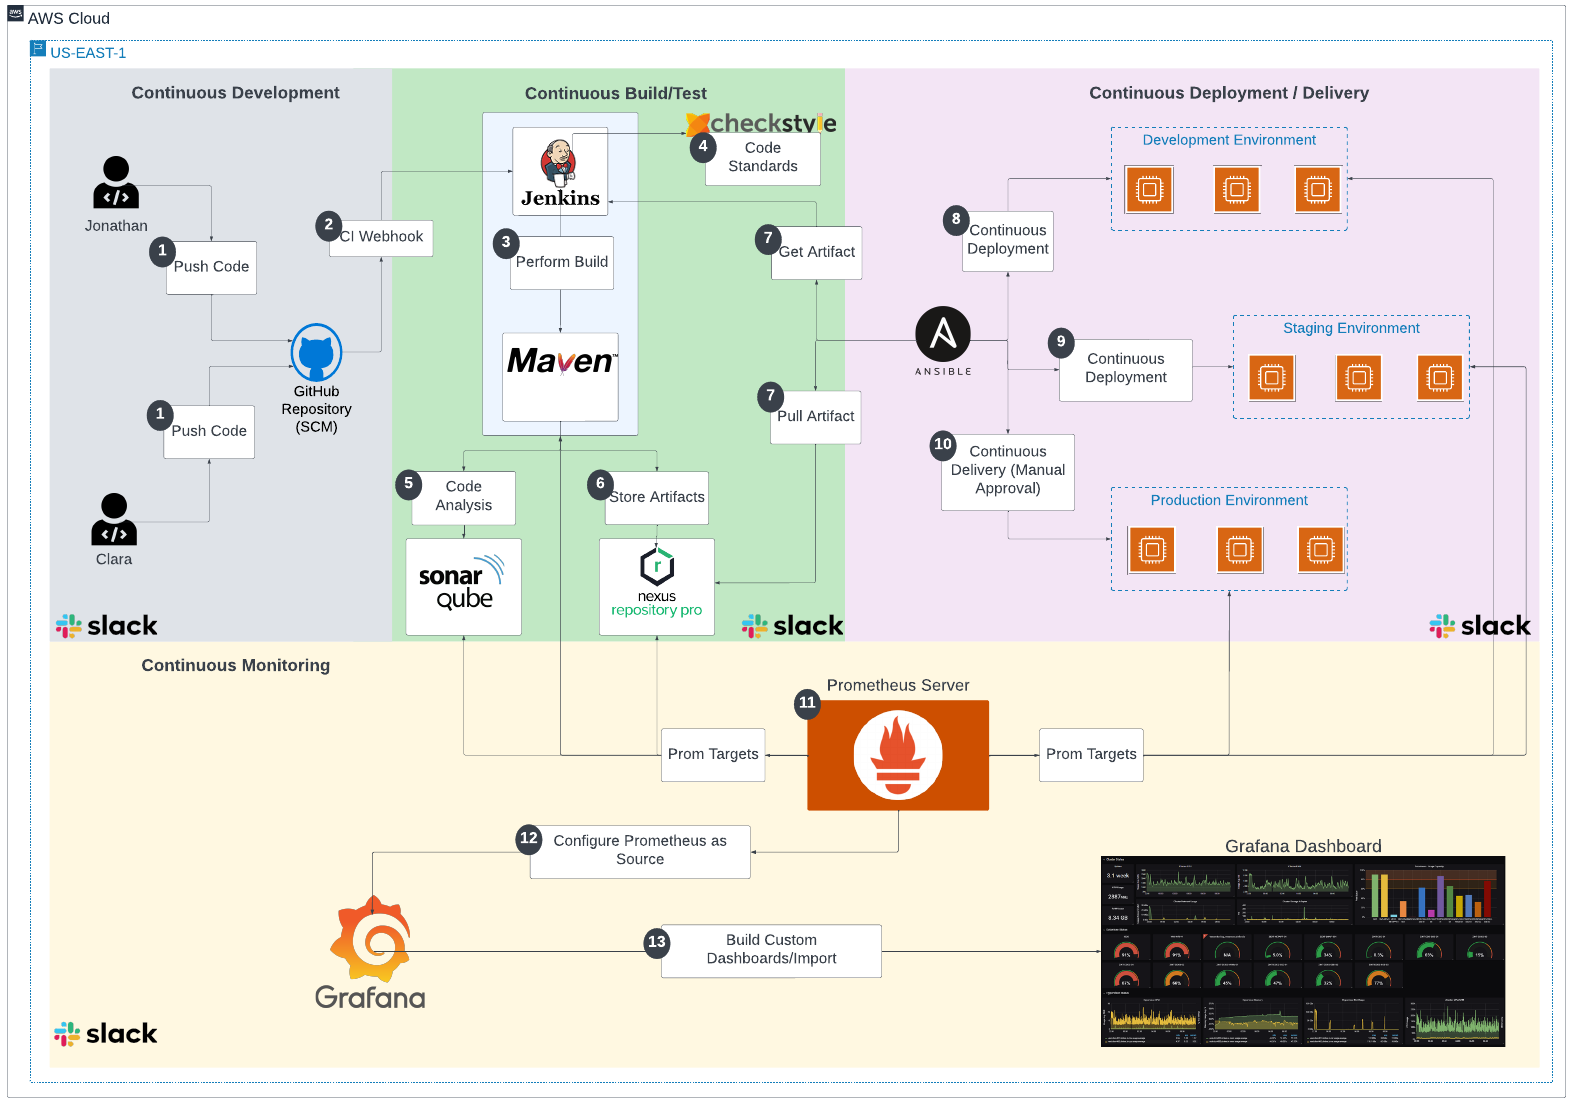
-
Fork GitHub Repository by using the existing repo "devops-fully-automated" (https://github.com/RichieJJ/devops-fully-automated)
- Go to GitHub (github.com)
- Login to your GitHub Account
- Fork repository "devops-fully-automated" (https://github.com/RichieJJ/devops-fully-automated) & name it "devops-fully-automated"
- Clone your newly created repo to your local
-
- Create an Amazon Linux 2 VM instance and call it "Jenkins"
- Instance type: t2.large
- Security Group (Open): 8080, 9100 and 22 to 0.0.0.0/0
- Key pair: Select or create a new keypair
- Attach Jenkins server with IAM role having "AdministratorAccess"
- User data (Copy the following user data): https://github.com/RichieJJ/devops-fully-automated/blob/installations/jenkins-maven-ansible-setup.sh
- Launch Instance
- After launching this Jenkins server, attach a tag as Key=Application, value=jenkins
-
- Create an Ubuntu 20.04 VM instance and call it "SonarQube"
- Instance type: t2.medium
- Security Group (Open): 9000, 9100 and 22 to 0.0.0.0/0
- Key pair: Select or create a new keypair
- User data (Copy the following user data): https://github.com/RichieJJ/devops-fully-automated/blob/installations/sonarqube-setup.sh
- Launch Instance
-
- Create an Amazon Linux 2 VM instance and call it "Nexus"
- Instance type: t2.medium
- Security Group (Open): 8081, 9100 and 22 to 0.0.0.0/0
- Key pair: Select or create a new keypair
- User data (Copy the following user data): https://github.com/RichieJJ/devops-fully-automated/blob/installations/nexus-setup.sh
- Launch Instance
-
- Create 6 Amazon Linux 2 VM instances
- Instance type: t2.micro
- Security Group (Open): 8080, 9100 and 22 to 0.0.0.0/0
- Key pair: Select or create a new keypair
- User data (Copy the following user data): https://github.com/RichieJJ/devops-fully-automated/blob/installations/deployment-servers-setup.sh
- Launch Instance
- After launching this Jenkins servers, attach a tag as Key=Environment, value=dev/stage/prod ( out of 6, each 2 instances could be tagges as one env)
-
- Create Amazon Linux 2 VM instance and call it "Prometheus"
- Instance type: t2.micro
- Security Group (Open): 9090 and 22 to 0.0.0.0/0
- Key pair: Select or create a new keypair
- Attach Jenkins server with IAM role having "AmazonEC2ReadOnlyAccess"
- User data (Copy the following user data): https://github.com/RichieJJ/devops-fully-automated/blob/installations/prometheus-setup.sh
- Launch Instance
-
- Create an Ubuntu 20.04 VM instance and call it "Grafana"
- Instance type: t2.micro
- Security Group (Open): 3000 and 22 to 0.0.0.0/0
- Key pair: Select or create a new keypair
- User data (Copy the following user data): https://github.com/RichieJJ/devops-fully-automated/blob/installations/grafana-setup.sh
- Launch Instance
-
- Join the slack channel https://join.slack.com/t/devopsfullyau-r0x2686/shared_invite/zt-1nzxt7e9z-ChDASWBOysUpa3tH5gi95A
- Join into the channel "#team-devops"
- Generate Team Subdomain & Integration Token Credential ID (workspace --> channel --> drop-down --> integrations --> Add an App --> Jenkins CI --> Click on Install/View --> Configuration --> Add to Slack --> Select Channel #team-devops --> Store Team subdomain & Integration Token Credential ID which can be used later on)
-
Copy your Jenkins Public IP Address and paste on the browser = ExternalIP:8080
- Login to your Jenkins instance using your Shell (GitBash or your Mac Terminal)
- Copy the Path from the Jenkins UI to get the Administrator Password
- Run:
sudo cat /var/lib/jenkins/secrets/initialAdminPassword - Copy the password and login to Jenkins
- Run:
- Plugins: Choose Install Suggested Plugings
- Provide
- Username: admin
- Password: admin
- Name and Email can also be admin. You can use
adminall, as its a poc.
- Continue and Start using Jenkins
-
- Click on "Manage Jenkins"
- Click on "Plugin Manager"
- Click "Available"
- Search and Install the following Plugings "Install Without Restart"
- SonarQube Scanner
- Prometheus metrics
- CloudBees Disk Usage Simple
- Slack Notification
- Once all plugins are installed, select Restart Jenkins when installation is complete and no jobs are running
-
- Click on New Item
- Enter an item name: app-cicd-pipeline & select the category as Pipeline
- Now scroll-down and in the Pipeline section --> Definition --> Select Pipeline script from SCM
- SCM: Git
- Repositories
- Repository URL: FILL YOUR OWN REPO URL (that we created by importing in the first step)
- Branch Specifier (blank for 'any'): */main
- Script Path: Jenkinsfile
- Save
-
-
Click on Manage Jenkins --> Global Tool Configuration
JDK --> Add JDK --> Make sure Install automatically is enabled -->
Note: By default the Install Oracle Java SE Development Kit from the website make sure to close that option by clicking on the image as shown below.

- Click on Add installer
- Select Extract .zip/.tar.gz --> Fill the below values
- Name: localJdk
- Download URL for binary archive: https://download.java.net/java/GA/jdk11/13/GPL/openjdk-11.0.1_linux-x64_bin.tar.gz
- Subdirectory of extracted archive: jdk-11.0.1
-
Maven --> Add Maven --> Make sure Install automatically is enabled --> Install from Apache --> Fill the below values
- Name: localMaven
- Version: Keep the default version as it is
-
-
-
Click on Manage Jenkins --> Manage Credentials --> Global credentials (unrestricted) --> Add Credentials
-
- Kind: Secret text : Generating SonarQube secret token - Login to your SonarQube server (http://sonarserver-public-ip:9000, with the credentials username: admin & password: admin) - Click on profile --> My Account --> Security --> Tokens - Generate Tokens: Fill jenkins-token - Click on Generate - Copy the token
- Secret: Fill the secret token value that we have created on the SonarQube server
- ID: sonarqube-token
- Description: sonarqube-token
- Click on Create
-
- Kind: Username with password
- Username: admin
- Enable Treat username as secret
- Password: admin
- ID: nexus-credentials
- Description: nexus-credentials
- Click on Create
-
- Kind: Username with password
- Username: ansadmin
- Enable Treat username as secret
- Password: ansadmin
- ID: ansible-deploy-server-credentials
- Description: ansible-deploy-server-credentials
- Click on Create
-
- Kind: Secret text
- Secret: Place the Integration Token Credential ID (Note: Generate for slack setup)
- ID: slack-token
- Description: slack-token
- Click on Create
-
-
-
1)  - Click on Manage Jenkins --> Global Tool Configuration
    - Go to section SonarQube servers --> **Add SonarQube **
    - Name: **SonarQube**
    - Server URL: http://REPLACE-WITH-SONARQUBE-SERVER-PRIVATE-IP:9000          (replace SonarQube privat IP here)
    - Click on Save

2)  - Click on Manage Jenkins --> Configure System
    - Go to section Prometheus
    - Collecting metrics period in seconds: **15**
    - Click on Save

3)  - Click on Manage Jenkins --> Configure System
    - Go to section Slack
    - Use new team subdomain & integration token credentials created in the above slack joining step
    - Workspace: **Replace with Team Subdomain value** (created above)
    - Credentials: select the slack-token credentials (created above)
    - Default channel / member id: #general
    - Click on Save

Copy your SonarQube Public IP Address and paste on the browser = ExternalIP:9000
-
- Login into SonarQube
- Go to Administration --> Configuration --> Webhooks --> Click on Create
- Name: Jenkins-Webhook
- URL: http://REPLACE-WITH-JENKINS-PRIVATE-IP:8080/sonarqube-webhook/ (replace Jenkins private IP here)
- Click on Create
Copy your Nexus Public IP Address and paste on the browser = http:://NexusServerExternalIP:8081
-
- SSH into Nexus server
- Execute
sudo cat /opt/nexus/sonatype-work/nexus3/admin.password - Copy the default password
- Now login into Nexus console with the username: admin & password (copied from the SSH above)
- Once signed in fill the below details in the setup wizard
- New password: admin
- Confirm password: admin
- Configure anonymus access: Select Disable anonymus access
- Click on Finish
-
- Once login to the Nexus server, click on Settings icon --> Repository --> Repositories
- Click on Create repository
- Select maven2(group)
- Name: maven_project
- Scroll-down to Group section & select all the available repositories (maven-snapshots, maven-public, maven-releases, maven-central) as members Hint: You can select one repo at a time and click on > symbol to add the repo as group member.
- Once all the repositories are added to the group, click on Create repository
Nothing to be done for the Ansible setup as the jenkins server already created with the ansible instllation and the deployment servers have the required ansadmin users for the deployment.
Copy your Prometheus Public IP Address and paste on the browser = http:://PrometheusServerExternalIP:9090
Note: Prometheus setup is also full automated, so just verifying the health of servers are required
-
- Once prometheus accessed --> Status --> Targets (for the health checkup)
- Once prometheus accessed --> Status --> Configuration (for the config file verification)
Copy your Grafana Public IP Address and paste on the browser = http:://GrafanaServerExternalIP:3000
-
- Once the UI Opens pass the following username and password
- Username: admin
- Password: admin
- New Username: admin
- New Password: admin
- Save and Continue
- Once the UI Opens pass the following username and password
-
- Once you get into Grafana, follow the below steps to Import a Dashboard into Grafana to visualize your Infrastructure/App Metrics
- Click on "Configuration/Settings" on your left
- Click on "Data Sources"
- Click on "Add Data Source"
- Select Prometheus
- Underneath HTTP URL: http://PrometheusPrivateIPaddress:9090
- Click on "SAVE and TEST"
- Once you get into Grafana, follow the below steps to Import a Dashboard into Grafana to visualize your Infrastructure/App Metrics
-
- Navigate to "Create" on your left (the
+sign)- Click on "Import"
- Download the required NodeExporter dashboard JSON in the link https://grafana.com/api/dashboards/1860/revisions/27/download ( #Ref: https://grafana.com/grafana/dashboards/1860-node-exporter-full/)
- Click on Upload JSON file and upload the file downloaded in the above step -
- Scrol down to "Prometheus" and select the "Data Source" you defined ealier which is "Prometheus"
- CLICK on "Import"
- Save
- Refresh your Grafana Dashbaord
- Click on the "Drop Down" for "Host" and select any of the "Instances(IP)"
- Navigate to "Create" on your left (the
-
- Navigate to "Create" on your left (the
+sign)- Click on "Import"
- Copy the following link: https://grafana.com/grafana/dashboards/9964 ( #Ref: https://grafana.com/grafana/dashboards/9964-jenkins-performance-and-health-overview/)
- Paste the above link where you have "Import Via Grafana.com"
- Click on Load (The one right beside the link you just pasted)
- Scrol down to "Prometheus" and select the "Data Source" you defined ealier which is "Prometheus"
- CLICK on "Import"
- Save
- Refresh your Grafana Dashbaord
- Click on the "Drop Down" for "Host" and select any of the "Instances(IP)"
- Navigate to "Create" on your left (the
-
- Access your repo devops-fully-automated on github
- Goto Settings --> Webhooks --> Click on Add webhook
- Payload URL: http://REPLACE-JENKINS-SERVER-PUBLIC-IP:8080/github-webhook/ (Note: The IP should be public as GitHub is outside of the AWS VPC where Jenkins server is hosted)
- Click on Add webhook
-
- Access your jenkins server, pipeline app-cicd-pipeline
- Once pipeline is accessed --> Click on Configure --> In the General section --> Select GitHub project checkbox and fill your repo URL of the project devops-fully-automated.
- Scroll down --> In the Build Triggers section --> Select GitHub hook trigger for GITScm polling checkbox
Once both the above steps are done click on Save.
-
-
Go back to your local, open your "devops-fully-automated" project on VSCODE
-
Open "Jenkinsfile" & Replace the SonarQube server private ip on line number 69
-
Save the changes in both files
-
Finally push changes to repo
git add .git commit -m "relevant commit message"git push
-
-
-
Go back to your local, open your "devops-fully-automated" project on VSCODE
-
Open "pom.xml" & Replace the nexus server private ip on line numbers 32 & 36
-
Open nexus-setup/settings.xml & Replace the nexus server private ip on line numbers 21
-
Save the changes in both files
-
Finally push changes to repo
git add .git commit -m "relevant commit message"git push
-


