Copyright (C) 2014 Google Inc.
The App Engine Managed VMs hosting environment lets you run App Engine applications on configurable Compute Engine Virtual Machines (VMs). This VM-based hosting environment offers more flexibility and provides more CPU and memory options. Applications that run on Managed VMs are not subject to Java and Python runtime restrictions, and they have access to all the Compute Engine machine types. You can also add third-party libraries and frameworks to your application.
Managed VMs instances are Docker-container-based, and with the Beta gcloud SDK, it is now possible to edit the Dockerfile configuration used by a module's instances.
This tutorial walks through the use of Managed VMs and the new gcloud SDK for a Java Web Application. It shows how you can test Managed VMs locally as well as deploy using the new SDK; and shows how to use a non-default Dockerfile.
The code for this tutorial is here: https://github.com/GoogleCloudPlatform/appengine-java-vm-guestbook-extras. It includes several stages of a sample app.
The first stage of the example shows how you can 'escape the App Engine sandbox' by using some Java libraries that don't run on App Engine.
The second stage shows how you can edit a Managed VM module's Dockerfile to further configure its instances. In this case, we'll install a linux utility, and also write to the instances' local filesystem.
The third stage shows how you can install Java 8 on your Managed VM instance via Dockerfile config.
First, complete the following steps:
-
Create your project and have it enabled for Managed VMs.
-
Install Docker/boot2docker. Full instructions are provided on the Docker site for installing Docker on different operating systems.
- Mac OS X: http://docs.docker.io/installation/mac/
- Windows: http://docs.docker.io/installation/windows/
- Other operating systems: https://docs.docker.com/installation/
Note: make sure your VirtualBox VM has 2Gb or RAM (or more). Otherwise, the Java runtime may have issues.
It is a good idea to become familar with the Docker environment as the Managed VMs development environment and deployment environment in the Cloud is based on it. You can learn more at https://www.docker.com/.
-
Download and install the Beta build of the Google Cloud SDK.
-
Install the Cloud SDK
appcomponent:$ gcloud components list $ gcloud components update app -
You can also download the App Engine base Docker images that will be used (make sure boot2docker is installed first, configured and
up):# This assumes that boot2docker is correctly configured, and up $ boot2docker up $ docker ps # If the docker ps command issues an error, you are not ready to use the gcloud commands for Managed VM, make sure the docker command is working. Then: $ gcloud preview app setup-managed-vms
Be sure to first authenticate with:
$ gcloud auth login
This tutorial uses Maven 3.1 or above to build its Java projects, so install Maven as necessary. Be familiar with the Managed VMs Maven specific documentation located at https://cloud.google.com/appengine/docs/java/managed-vms/maven
If you are new to git, please refer to the git documentation.
Then, grab the starter code that we'll use for this tutorial, from this repo: https://github.com/GoogleCloudPlatform/appengine-java-vm-guestbook-extras.
$ git clone https://github.com/GoogleCloudPlatform/appengine-java-vm-guestbook-extras.git
$ cd stage1
This app uses as its starting point the (familiar to many) App Engine "guestbook" sample, but some extras are added that highlight the capabilities of Managed VMs. Here, we'll assume familiarity with the basic Guestbook app and plunge into the new stuff.
The 3 stages shown in this tutorial are:
| Stage | Description |
|---|---|
| stage1 | Add a captcha library using AWT to the GuestBook application |
| stage2 | Customize the Dockerfile to install a Linux native package and call it from Java, writing to the local file system |
| stage3 | Upgrade the Docker image to use Java 8 and Lambas |
All stages use Maven and Servlet 3.1 features, with Debug enabled, and are executed inside a Docker container on the local development server. The exact same Docker container will be running in production when your deploy your application.
Make sure that boot2docker is running before starting the next steps.
With Managed VMs, you can run outside the traditional App Engine instance 'sandbox'. In this section of the tutorial, we're going to use the java.awt.* package, which does not run on App Engine's sandboxed instances, to build 'captcha' support for the guestbook app. (In the next section, we'll write to the file system, which also is not supported by a sandboxed instance).
Go to the stage1 directory of the downloaded sample. Take a look at stage1/src/main/webapp/WEB-INF/appengine-web.xml. You'll see that it includes these settings:
<vm>true</vm>
<beta-settings>
    <setting name="java_quickstart" value="true"/>
</beta-settings>
<manual-scaling>
    <instances>1</instances>
</manual-scaling>
This indicates that this app module (the 'default' module, in this case) is a Managed VMs module, and indicates that one instance of this module version should be started.
Notice the java_quickstart setting: it allows you to use some advanced Servlet 3.1 annotations processing developed for the Jetty Web Server. For more details about the java_quickstartfeature, you can see this article: https://webtide.com/jetty-9-quick-start/, or refer to this [JavaOne 2014 presentation](https://oracleus.activeevents.com/2014/connect/fileDownload/session/A53E3FEF3C8321FF7542202FA4B4D791/CON5100_Moussine-Pouchkine-Java%20in%20the%20Cloud-%20The%20Good%20Parts%20(JavaOne%202014\).pdf).
While you're looking at appengine-web.xml, go ahead and change the id to your app id. (This is not necessary for running locally using the development server, but is necessary for deployment).
Before running the app, take a quick look at the stage1/src/main/java/com/google/appengine/demos/guestbook/CaptchaServlet.java servlet, which is new. It uses the java.awt.* package to generate and serve up a 'captcha' image, putting the corresponding 'captcha code' in the Session. This is also a Servlet 3.1 annotated servlet, so no need to define it in the web.xml file.
stage1/src/main/webapp/guestbook.jsp displays the captcha image, and asks the user to type in the code. stage1/src/main/java/com/google/appengine/demos/guestbook/SignGuestbookServlet.java checks the submitted code against the value in the Session, and does not record the comment if the captcha code is incorrect.
Notice that all the applications can now use the Servlet 3.1 APIs and annotations. There is an extra setting ("java_quickstart") you need to declare in stage1/src/main/webapp/WEB-INF/appengine-web.xml for this:
<beta-settings>
    <setting name="java_quickstart" value="true"/>
</beta-settings>
The Maven project is configured to enable the fast "Deploy on Save" feature that IDEs like NetBeans, Eclipse, Android Studio or Intellij support. The Deploy on Save feature will recompile the Java files in place or update the Web Content, and the Google Cloud SDK will detect the file change and trigger automatically a build of a new Docker container with the updated application, allowing very fast development cycles. This is the preferred way of working for productive developers. Some features will not be supported, like for example, when you change some appengine-web.xml or if you add or modify a Servlet 3.1 annotations, but for most changes, it is the fastest way to see them live immediately.
The trick for Deploy on Save is in the stage1/pom.xml file, regarding the outputDirectory setup.
<build>
  <!-- needed for enabling compile/reload on save in modern IDEs...-->
  <outputDirectory>target/${project.artifactId}-${project.version}/WEB-INF/classes
  </outputDirectory>
 <plugins>
 ...
First, run the gcloud:run Maven target that will compile your project and start locally the development server and create the correct Docker container to execute your application:
$ mvn gcloud:run
If this does not work, it is possible that boot2docker is not up or not correctly configured, or you did not install the Cloud SDK or it is not installed in the default location (under you home directory and the google-cloud-sdk/ directory). You can tell Maven a different location by changing the pom.xml and using the gcloud_directory parameter:
   <plugin>
    <groupId>com.google.appengine</groupId>
    <artifactId>gcloud-maven-plugin</artifactId>
    <version>1.9.17a</version>
    <configuration>
      <gcloud_directory>/YOUR/OWN/GCLOUD/INSTALLATION/DIR</gcloud_directory>
      ...
After some initialization steps (validation, build of the Docker image and execution of a Docker container that contains your application)
...
Running gcloud app run...
gcloud_directory was not set, so taking: /Users/ludo/google-cloud-sdk
Logging initialized @3281ms
Jul 14, 2014 8:19:37 AM com.google.appengine.gcloudapp.temp.AppEngineWebXmlReader readAppEngineWebXml
INFO: Successfully processed /Users/ludo/a/appengine-java-vm-guestbook-extras/stage1/target/guestbook-stage1-1.0-SNAPSHOT/WEB-INF/appengine-web.xml
Running python -S /Users/ludo/google-cloud-sdk/lib/googlecloudsdk/gcloud/gcloud.py --project=your-app-id preview app run /Users/ludo/a/appengine-java-vm-guestbook-extras/stage1/target/guestbook-stage1-1.0-SNAPSHOT
Java module found in [/Users/ludo/a/appengine-java-vm-guestbook-extras/stage1/target/guestbook-stage1-1.0-SNAPSHOT]
INFO: Looking for the Dockerfile in /Users/ludo/a/appengine-java-vm-guestbook-extras/stage1/target/guestbook-stage1-1.0-SNAPSHOT
INFO: Using Dockerfile found in /Users/ludo/a/appengine-java-vm-guestbook-extras/stage1/target/guestbook-stage1-1.0-SNAPSHOT
2014-07-14 15:19:39.066:INFO::main: Logging initialized @176ms
2014-07-14 15:19:41.471:WARN:oeja.AnnotationConfiguration:main: ServletContainerInitializers: detected. Class hierarchy: empty
INFO: No version specified. Generated version id: 20140714t151941
INFO: Skipping SDK update check.
INFO: Starting API server at: http://localhost:60946
INFO: Health checks starting for instance 0.
INFO: Starting module "default" running at: http://localhost:8080
INFO: Building image your-app-id.default.20141031t151941...
INFO: Starting admin server at: http://localhost:8000
INFO: Image your-app-id.default.20141031t151941 built, id = 2c30ea5f0bc3
INFO: Creating container...
INFO: Container 5babedab35cc22737076c8f673ba7b6d72910aa6fe7e67af49c5f4243a1c803d created.
INFO: To debug module default attach to 192.168.59.103:5005
INFO: default: "GET /_ah/start HTTP/1.1" 404 287
INFO: default: "GET /_ah/health?IsLastSuccessful=no HTTP/1.1" 200 2
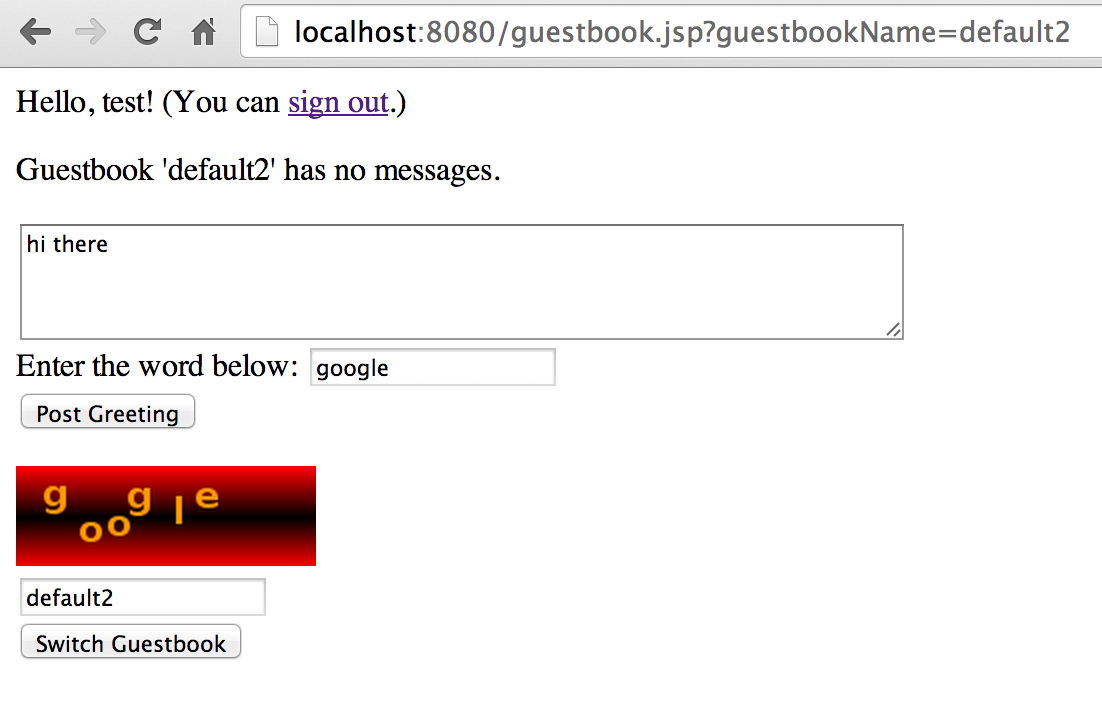
you can visit the URL that the development server is running on (likely: http://localhost:8080). You should see a figure that looks like the following. The application is the (probably all-too-familiar) guestbook app, but with a 'captcha' image and field added. You must type in the captcha word correctly for the entry to be posted.
If you want to see the Docker container running, you can use the docker ps command:
$ docker ps
CONTAINER ID        IMAGE                                        COMMAND                CREATED             STATUS              PORTS                                             NAMES
83a5c9b111da        your-app-id.default.20140714t152331:latest   "/home/vmagent/jetty   20 hours ago        Up 10 seconds       0.0.0.0:5005->5005/tcp, 0.0.0.0:49298->8080/tcp   google.appengine.your-app-id.default.20140714t152331.0.2014-07-14T152331.187386Z

# See the log of the running container:
$ docker logs 83a5c9b111da
Info: Limiting Java heap size to: 1456M
Running locally and DBG_ENABLE is set, enabling standard Java debugger agent
Listening for transport dt_socket at address: 5005
2014-07-14 18:26:32.293:INFO::main: Logging initialized @403ms
2014-07-14 18:26:32.431:INFO::main: Redirecting stderr/stdout to /var/log/app_engine/STDERR.2014_07_14.log//var/log/app_engine/STDOUT.2014_10_30.log

# See the running local Dev Application Server:
$ ps -aef | grep cloud-sdk
python -S /Users/ludo/google-cloud-sdk/lib/googlecloudsdk/gcloud/gcloud.py --project=your-app-id preview app run /Users/ludo/a/appengine-java-vm-guestbook-extras/stage1/target/guestbook-stage1-1.0-SNAPSHOT
 ...
 # sometimes, the docker container is still running when you stop the development server from Intellij IDE. You can stop this docker container using its ID:
 $ docker stop 83a5c9b111da
As you see, you need to become familiar with the Docker system in terms of running, stopping or accessing the log of a container.
Note for IDE users: If you are using NetBeans or Eclipse, you can stop the Cloud SDK run session with a click on the little RED icon that stop a process in the IDE terminal view. There is also a RED icon button in Android Studio and Intellij, but this one will not stop correctly the Cloud SDK: The docker containers will not be stopped and you need to stop them from the command line. You can instead execute the Maven command from CLI or the IDES to safely stop the running processes:
$ mvn gcloud:run_stop
Next, try deploying your application to production.
First, set the project you're using with gcloud:
$ gcloud config set project <your-project>
Make sure that you're using a Managed-VMs-enabled app, and have edited stage1/src/main/webapp/WEB-INF/appengine-web.xml to use that app id. (When you change the app id, remember to rebuild using mvn package). Then do:
$ gcloud preview app deploy target/guestbook-stage1-1.0-SNAPSHOT
This deployment is using the 'default' Dockerfile, which you can see in the <preview_google-cloud-sdk>/docker/dockerfiles directory. It contains just:
FROM google/appengine-java
ADD . /app
After deployment, go to your app: http://YOUR-APP-ID.appspot.com. The app should work the same as it did with the local development server, because it is the same Docker container that you ran locally in the development server that is deployed and executed in the Google App Engine Cloud. You'll see the captcha image. This code would not have worked with a 'regular' App Engine instance!
In Stage 2 of this application, we will to use the linux 'fortune' program to autofill in the guestbook entries with 'suggested text', in case a guest has a case of writer's block. You'll find this version of the application in the stage2 directory.
These changes involve a couple of new things.
First, we need to install the 'fortune' program on our Managed VM instances, so that we can access it. We will do this by defining a Dockerfile for the app.
Then, we will define a new class (called stage2/src/main/java/com/google/appengine/demos/guestbook/FortuneInfo.java), that will execute this program, save the results to a new file, then read the file and serve up the results.
Take a quick look at FortuneInfo.java. Both the use of ProcessBuilder, and the capability of writing temporary files to the local filesystem, would not work on 'regular' App Engine instances.
Take a look at the stage2/src/main/webapp/Dockerfile file: It looks like this:
FROM google/appengine-java
RUN apt-get update && apt-get install -y fortunes
ADD . /app
The file indicates to: start with the default java runtime docker image, and add to it an installation of the 'fortunes' program.
Build your app, via mvn package.
As described above for Stage 1, build your app and run it locally:
# Via Maven:
$ mvn gcloud:run

# Or via the gcloud Cloud SDK command line tool:
$ gcloud  preview app run target/guestbook-stage2-1.0-SNAPSHOT
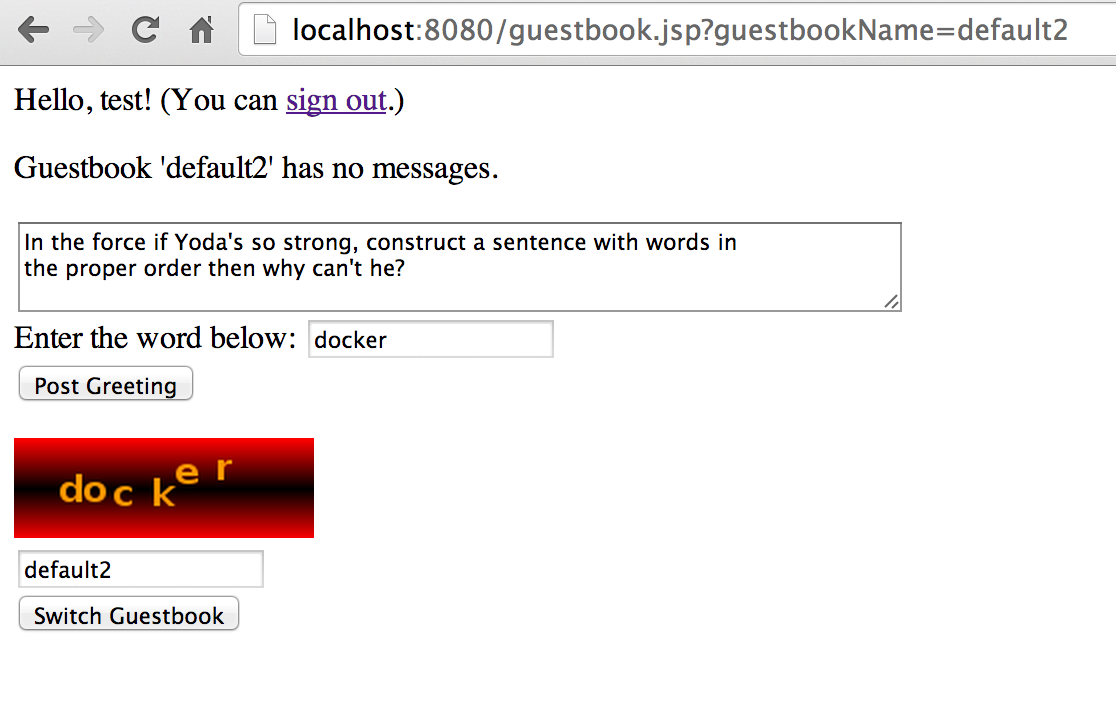
This run is compiling the Maven project, processing the Servlet 3.1 annotations, then starts the development server that is building a Docker image and running it in the context of the boot2docker installation you have on you local machine. You should now see the guestbook entry field autofilled with a randomly-selected 'fortune'.
Note: the first time you do a run, the Cloud SDK is building (and caching) the Docker image. This can take a long time, and the Beta SDK does not emit good notification yet. You'll see many lines like (sometimes for minutes or 10s of minutes if you Docker customization is accessing slow sites):
INFO: Starting admin server at: http://localhost:8000
INFO: default: "GET /_ah/health?IsLastSuccessful=no HTTP/1.1" 503
INFO: default: "GET /_ah/health?IsLastSuccessful=no HTTP/1.1" 503
Be very patient. You can see the Docker build process and the necessary apt-get commands using the docker ps command. Subsequent builds and run are much faster as Docker caches the Docker image, and only the ADD . /app Dockerfile line is executed which is very fast.
Remember you can see the log of the Docker container or see the container status using the Docker commands:
$ docker ps
# or
$ docker logs <container ID>
The Java process running inside the Docker container can be configured to be debugged. See in the stage2/src/main/webapp/WEB-INF/appengine-web.xml file the environment variable settings DBG_ENABLE and DBG_PORT (default value is 5005):
 <!-- for enabling Java debugging in the container: -->
 <env-variables>
   <env-var name="DBG_ENABLE" value="1" />
   <env-var name="DBG_PORT" value="5005" />
 </env-variables>
The Cloud SDK will emit a message telling you to attach a JPDA dt_socket Java Debugger to 192.168.59.103 on port 5005, and you can debug inside the Docker container from your preferred IDE:
...
INFO: To debug module default attach to 192.168.59.103:5005
...
Deploy your application using the same instructions as above for the Stage 1 version of the app:
# Via Maven:
$ mvn gcloud:deploy

# Or via the gcloud Cloud SDK command line tool:
$ gcloud preview app deploy target/guestbook-stage2-1.0-SNAPSHOT --set-default
The exact same Docker image that was used inside the development server has been pushed to the Google Cloud and is used in production.
As a final stage of this tutorial, we will show how you can run your app using Java 8 (not yet supported on 'regular' App Engine instances), by adding additional commands to the app's Dockerfile. You can find the code for this version of the app in the stage3 directory.
First, edit your stage3/src/main/webapp/Dockerfile file to look like the following.
FROM google/appengine-java
RUN apt-get update && apt-get install -y fortunes
# Install java8
RUN echo "deb http://ppa.launchpad.net/webupd8team/java/ubuntu precise main" | tee -a /etc/apt/sources.list
RUN echo "deb-src http://ppa.launchpad.net/webupd8team/java/ubuntu precise main" | tee -a /etc/apt/sources.list
RUN echo oracle-java8-installer shared/accepted-oracle-license-v1-1 select true | /usr/bin/debconf-set-selections
RUN apt-key adv --keyserver keyserver.ubuntu.com --recv-keys EEA14886
RUN apt-get update
RUN apt-get install -y oracle-java8-installer

ADD . /app
Then, stage3/src/main/webapp/guestbook.jsp has been modified to grab the Java version from the system properties, and print it at the top of the page.
The local testing and deployment process is the same as above, except that you need to make sure you have installed a local JDK 8 on your development machine, so that the Maven build can invoke the Java 8 compiler needed to compile your application code before it is added to the Docker image. Maven will look for the JAVA_HOME environment variable so make sure it points to the correct JDK, for example, on a Mac:
$ export JAVA_HOME=/Library/Java/JavaVirtualMachines/jdk1.8.0_40.jdk/Contents/Home
This time, when you visit your app, you should see at the top of the page an indication of the java version you're running. It should look something like the figure below.

This tutorial walked through use of Managed VMs and the new gcloud SDK for a Java app, based on an extended version of the "guestbook" app. It showed how you can test Managed VMs locally, as well as deploy using the new SDK; and showed how to "escape the sandbox" and use a non-default Dockerfile.


