Create an Outlearn Account
Viewing This on GitHub?
If you are viewing this on GitHub and want to get the full experience, check out Publishing Great Learning Content on Outlearn.
Join With GitHub
Outlearn imports your content straight from GitHub. If you are new to GitHub, check out their Getting Started guides for Mac and Windows users.
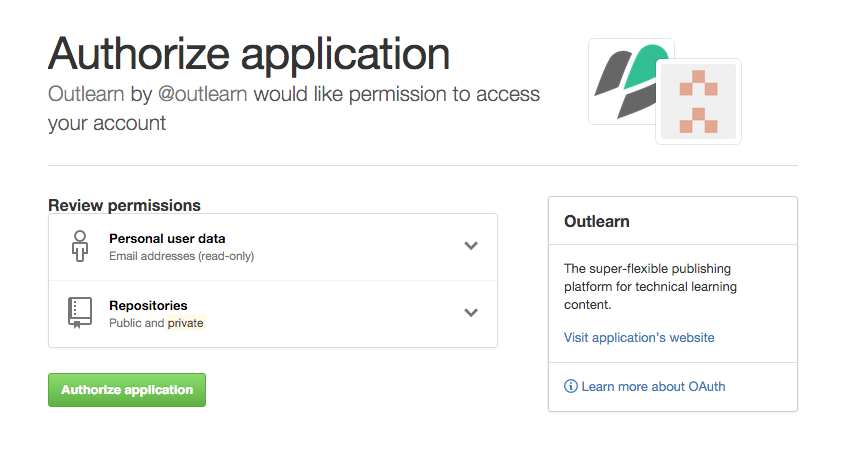
You can unleash the full power of publishing by joining Outlearn with your GitHub account. Choose "Join With GitHub" and GitHub will confirm that you want to let Outlearn publish content from your repos.
If you have already signed up, you can go to settings and link GitHub with your Outlearn account.
Duplicate and Edit the Template Repo
We know you are busy and would rather focus on writing awesome content than setting up directory structures and choosing naming conventions. Never worry, you'll be all set with our outlearn-modules repository. Your first step is to duplicate this repo. If you are just trying things out and don't mind having your repo public, you can fork outlearn-modules. In that case, you can skip the steps in the code block below.
If you want to use a private repo or want to change the repo name, create a new repo where you want to copy the contents of the template. Next, you need to perform a bare-clone and a mirror-push. The instructions below assume you have created a new repo called exampleuser/new-repository and want to use an ssh connection. You can also connect using https. To bare-clone using ssh, type these commands at the command line:
$ git clone --bare [email protected]:outlearn-content/outlearn-modules.git
# Make a bare clone of the repository

$ cd outlearn-modules.git
git push --mirror [email protected]:exampleuser/new-repository.git
# Mirror-push to the new repository

$ cd ..
$ rm -rf outlearn-modules.git
# Remove our temporary local repository
Once you have duplicated the repository, open up outlearn.json found at the root of your newly created duplicate repo. Now update the following Path metadata fields in the file:
| Field | Description |
|---|---|
| name | used for the database, must be unique for your user account or organization |
| title | visible on the website for learners |
| description | more info about your path for learners |
The relevant part of your file should now look like this:
"paths" : [
  {
    "name" : "your-new-path-name",
    "title" : "The Name You Just Chose",
    "description" : "More explanation about your the glorious purpose of your path",
    "privacy" : "public",
    "pages" : [
      {"page" : "./pages/welcome.md"},
      {"module" : "my-outlearn-module"},
      {"page" : "./pages/closing.md"}
    ]
  }
],
Publish Your Path
The best way for you to test Path creation is to see your changes in real time on Outlearn. This section will show you how to do that.
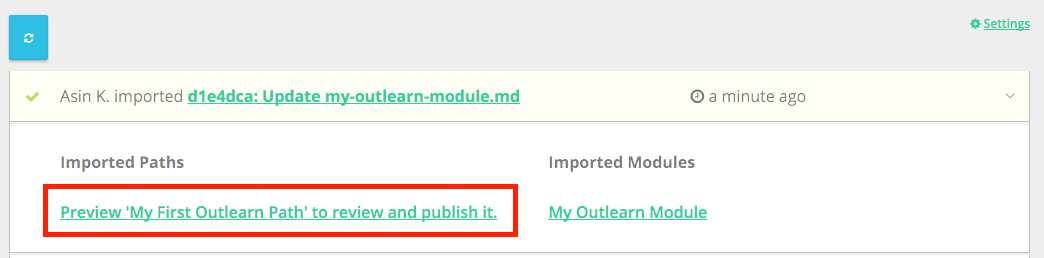
Click on the user icon in the top right corner and choose Import Content.
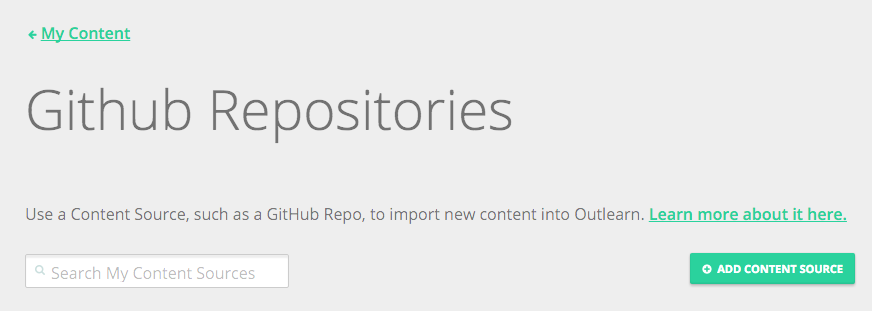
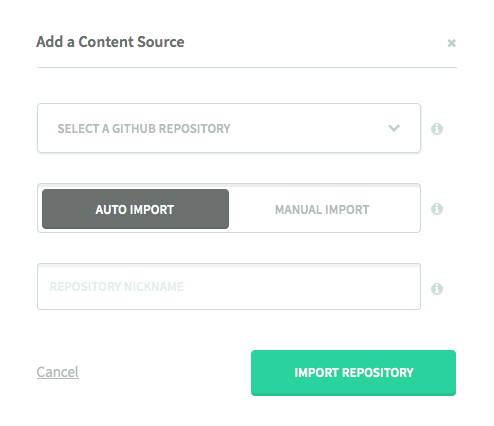
Click "Add Content Source" and choose your newly created repo. You can choose Auto Import if you want all the changes in GitHub to be automatically reflected on Outlearn. If you would rather push new changes to Outlearn manually, choose Manual Import. You can modify the default nickname if you want to and import the repository.
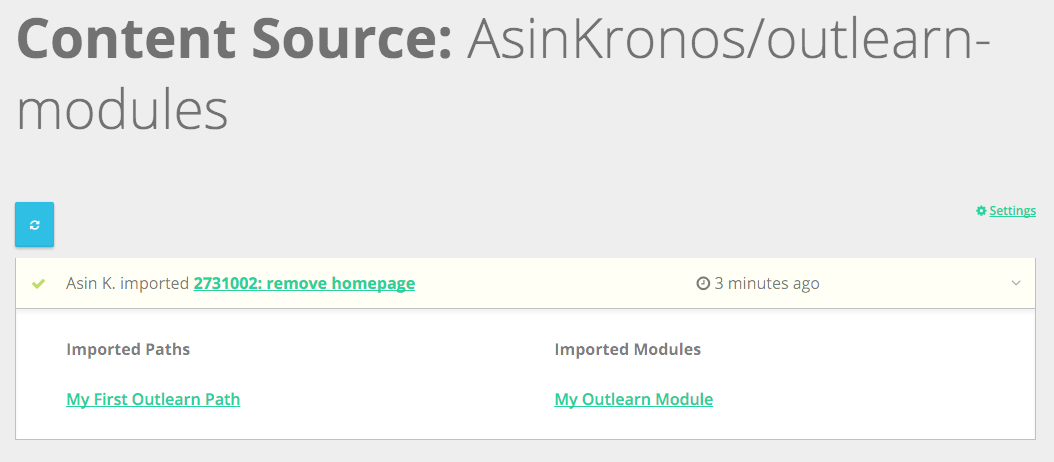
You should now see the content source on the screen. Click on the content source, then click on the green check. You will see the imported Paths and Modules. Now click on the Path and you will see your very first Outlearn Path in all its glory. Congratulations!
Say Hello!
Pages and Modules
Now that you've laid out what your Path is all about, it's time to get some content in it. Paths are made up of two basic components: Pages and Modules. The Modules are the building blocks of a Path. You might write them all yourself or you can include Modules written by others.
An ideal Module provides good stand-alone learning value, making it a good candidate to be reused in many Paths. As you create your Module, we recommend that you avoid referencing other Modules within the Module content. If you do so, you run the risk of confusing learners who might see the Module in another learning Path that does not includes the referenced Module.
To help make sense of the Modules in your Path, you can put in Guide Pages (aka "Path Pages", or just "Pages"). Pages are the glue that holds the Modules together. They let you add in more of your own personality as a curator of Modules created by others and they add context for the surrounding Modules. Pages are specific to a Path so you can talk about why you chose the Modules you did, how they fit together, what parts are super important, and how they relate to concepts your specific audience already understands. Use pages whenever a little expert context and commentary might be helpful.
Outlearn Uses Markdown
We wanted to have an authoring experience that integrates seamlessly with GitHub and is easy as well as expressive. We think Markdown strikes a great balance between those goals. You can read the official Markdown Syntax for more details. Outlearn also supports all the extensions of GitHub Flavored Markdown. If you already have your content in Markdown, importing it to Outlearn is a breeze.
Your First Content Edits
By now you are probably itching to get to publish something you actually wrote. Go ahead and edit the file welcome.md in the pages directory. You can replace everything there with your very own "Hello World" message, or something else that inspires you! The Pages are written in Markdown so feel free to try out some formatting as well.
Now go back to the Import Content section on Outlearn, click on the nickname and re-import the content with the blue double-arrow. If you set the content source for manual import, click on the green check mark and then preview the Path. If everything looks good, publish it to the world. Houston, we have a lift-off!
Note: Don't forget to push your committed changes to GitHub before re-importing to Outlearn. And if you selected the
auto importoption for this Content Source, you can just refresh the Page and you'll see change momentarily without manually re-importing.
Now you know how to get a "Hello World" Path up in less than 5 minutes. Hopefully you've seen enough of the power of Outlearn Paths to keep reading the rest of this Module and to put some real content into your Path.
Add Your Content
Organize Your Path
The meat of the Path is in the Modules. Once you have written some new Markdown or repurposed older content, this is how you make it part of your Path:
- Open the
my-outlearn-module.mdfile in themodulesdirectory. - Update the metadata at the beginning of the file, including a new name for the Module, e.g.
awesome-first-module. - Add your Markdown content to the file under the first section.
- Save your file with a new name. We recommend using the Module name also as the file name, e.g.
awesome-first-module.md. - Edit
outlearn.jsonand replace{"module" : "my-outlearn-module"}with{"module" : "awesome-first-module"}. This tells the Path how to reference the new Module. - Declare the Module in the
modulessection inoutlearn.jsonby replacing"olm" : "./modules/my-outlearn-module.md"with"olm" : "./modules/awesome-first-module.md". This tells Outlearn where the source file for the Module is.
The body of your outlearn.json will now look like this:
"paths" : [
  {
    "name" : "your-new-path-name",
    "title" : "The Name You Just Chose",
    "description" : "More explanation about your the glorious purpose of your Path",
    "privacy" : "public",
    "pages" : [
      {"page" : "./pages/welcome.md"},
      {"module" : "awesome-first-module"},
      {"page" : "./pages/closing.md"}
    ]
  }
],

"modules" : [
  {"olm" : "./modules/awesome-first-module.md"}
],
Include Images
Outlearn supports the regular Markdown syntax for including images.
Enrich Your Content
Outlearn provides a number of annotations in Markdown that act like magic dust. When you include them, we can create a more interactive and trackable experience for your content. These annotations are all HTML comments, which means they degrade gracefully when you content is rendered elsewhere (like in a GitHub README.md file).
Add Sections
The simplest way to enrich your content is to divide it into sections. Each Module can have one or more sections. A list of sections shows up on the right side of the content and serves as a navigable table of contents. Sections can also be checked off as completed in order to help learners and Path creators to keep track of progress.
You create a section by adding the following annotation:
1 2 3 | <!-- @section --> |
The platform will take the first heading after the section tag and make it the title.
Add Tasks and Open Responses
Nothing kills learner motivation like hours of reading and watching videos without a way to try it out yourself. Great teachers push the learners to put new knowledge to practice.
The easiest way to create meaningful interactions with the learners on Outlearn is to add Tasks. A task can be as simple as "Run make in your project directory" or more involved such as "Download the library and compile it in your system." To add a Task:
1 | <!-- @task, "text" : "Run the above code example on your own machine." -->
|
Another great way to engage the learners is to ask for an Open Response. For example, you can ask learners to "Fork the project repo on GitHub, add the following functionality, send a pull request to the original repo, then submit the the pull request URL." To add an Open Response:
1 | <!-- @openResponse, "text" : "Fork the repository above, fix the broken test, and submit a URL for your pull-request." -->
|
Path authors and organization admins can see which Tasks have been completed and the content of the Open Responses that have been submitted. They can then organize further activities such as code reviews.
Add Resources
There are lots of great resources out there on the web. If you want to draw more attention to an external link, you can use the following syntax:
1 | <!-- @resource, "url" : "https://nodejs.org/" -->
|
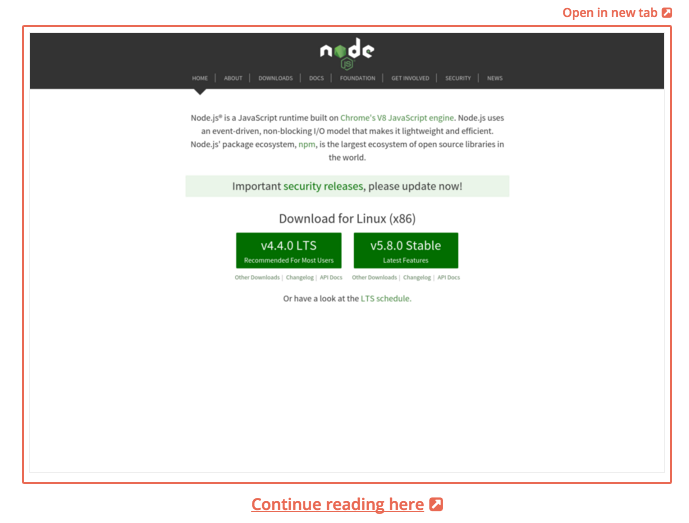
The same syntax works also for embedding content such as videos:
1 2 3 | <!-- @resource, "url": "https://vimeo.com/67325705" --> |
Add Multiple Choice Exercises
Simple multiple choice exercises include three components. The question (and any associated exposition), the answers, and an optional hint.
In OLM, we can define multiple choice questions by putting them between a @multipleChoice and an @end annotation.
1 2 3 4 5 6 7 8 9 10 11 12 | <!-- @multipleChoice --> |
Use - [ ] to start an incorrect answer, and - [X] to start a correct answer.
The markdown above the answers is treated as the question, and the markdown below the answers
is used as a 'hint' or 'explanation' that your learners can choose to reveal.
When used in an Outlearn Module, the above example appears as follows:
What is Node.js?
- A package manager for JavaScript packages
- A front-end framework for heavy-traffic web applications
- A platform for scalable network applications
Remember that Node.js is more powerful than any individual use that it can be associated with.
A couple items to finish up:
- You can delete or repurpose this
README.mdfile once you're done with it. - Feel free to use the duplicated copy of outlearn-modules as a basis for all your content, or author your own learning repositories from scratch, GitHub import is supported for all compatible repos.


