Coder Social home page Coder Social logo

org.geppetto.frontend.jupyter's Introduction

OpenWorm

Docker Image CI Docker Image Test - quick Docker Image Test Build - Intel drivers

About OpenWorm

OpenWorm aims to build the first comprehensive computational model of Caenorhabditis elegans (C. elegans), a microscopic roundworm. With only a thousand cells, it solves basic problems such as feeding, mate-finding and predator avoidance. Despite being extremely well-studied in biology, a deep, principled understanding of the biology of this organism remains elusive.

We are using a bottom-up approach, aimed at observing the worm behaviour emerge from a simulation of data derived from scientific experiments carried out over the past decade. To do so, we are incorporating the data available from the scientific community into software models. We are also forging new collaborations with universities and research institutes to collect data that fill in the gaps.

You can earn a badge with us simply by trying out this package! Click on the image below to get started. OpenWorm Docker Badge

Quickstart

We have put together a Docker container that pulls together the major components of our simulation and runs it on your machine. When you get it all running it does the following:

  1. Run our nervous system model, known as c302, on your computer.
  2. In parallel, run our 3D worm body model, known as Sibernetic, on your computer, using the output of the nervous system model.
  3. Produce graphs from the nervous system and body model that demonstrate its behavior on your computer for you to inspect.
  4. Produce a movie showing the output of the body model.

Example Output

Worm Crawling

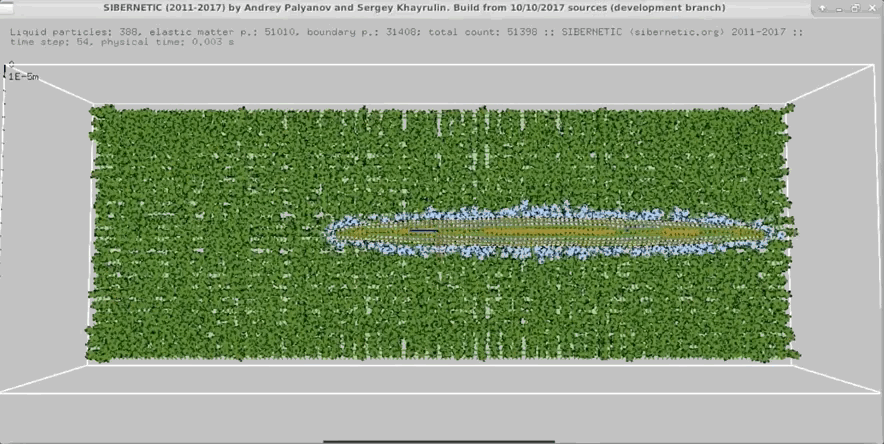
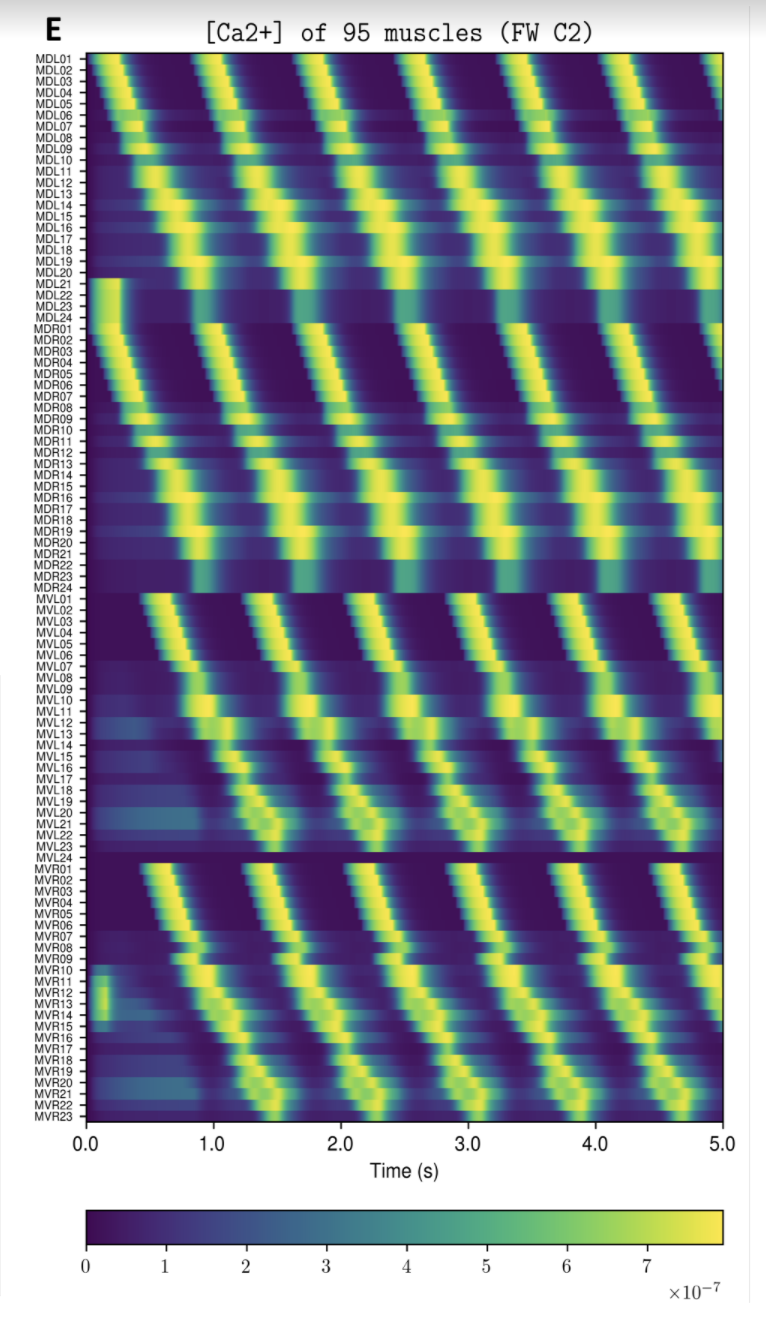
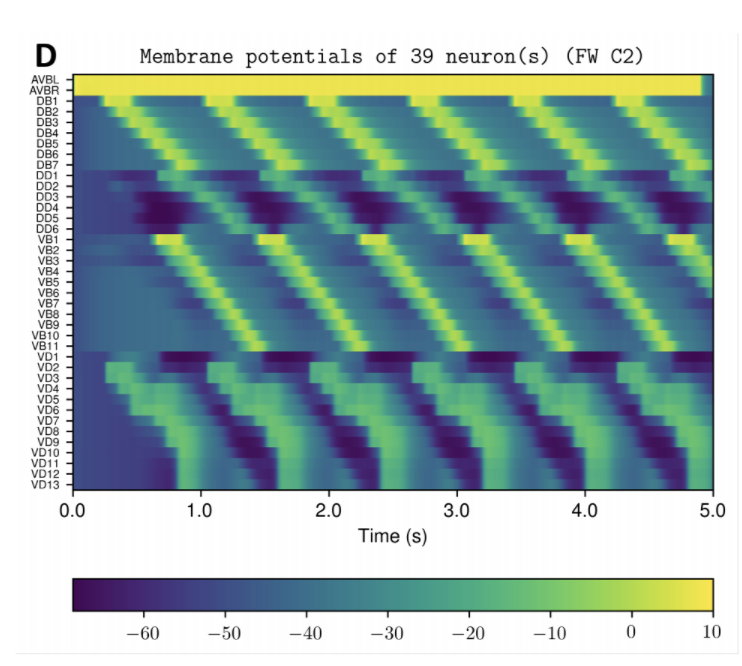
NOTE: Running the simulation for the full amount of time would produce content like the above. However, in order to run in a reasonable amount of time, the default run time for the simulation is limited. As such, you will see only a partial output, equivalent to about 5% of run time, compared to the examples above. To extend the run time, use the -d argument as described below.

Installation

Pre-requisites:

  1. You should have at least 60 GB of free space on your machine and at least 2GB of RAM
  2. You should be able to clone git repositories on your machine. Install git, or this GUI may be useful.

To Install:

  1. Install Docker on your system.
  2. If your system does not have enough free space, you can use an external hard disk. On MacOS X, the location for image storage can be specified in the Advanced Tab in Preferences. See this thread in addition for Linux instructions.

Running

  1. Ensure the Docker daemon is running in the background (on MacOS/Windows there should be an icon with the Docker whale logo showing in the menu bar/system tray).
  2. Open a terminal and run: git clone http://github.com/openworm/openworm; cd openworm
  3. Optional: Run ./build.sh (or build.cmd on Windows). If you skip this step, it will download the latest released Docker image from the OpenWorm Docker hub.
  4. Run ./run.sh (or run.cmd on Windows).
  5. About 5-10 minutes of output will display on the screen as the steps run.
  6. The simulation will end. Run stop.sh (stop.cmd on Windows) on your system to clean up the running container.
  7. Inspect the output in the output directory on your local machine.

Advanced

Arguments

  • -d [num] : Use to modify the duration of the simulation in milliseconds. Default is 15. Use 5000 to run for time to make the full movie above (i.e. 5 seconds).

Other things to try

  • Open a terminal and run ./run-shell-only.sh (or run-shell-only.cmd on Windows). This will let you log into the container before it has run master_openworm.py. From here you can inspect the internals of the various checked out code bases and installed systems and modify things. Afterwards you'll still need to run ./stop.sh to clean up.
  • If you wish to modify what gets installed, you should modify Dockerfile. If you want to modify what runs, you should modify master_openworm.py. Either way you will need to run build.sh in order to rebuild the image locally. Afterwards you can run normally.

FAQ

What is the Docker container?

The Docker container is a self-contained environment in which you can run OpenWorm simulations. It's fully set up to get you started by following the steps above. At the moment, it runs simulations and produces visualizations for you, but these visualizations must be viewed outside of the Docker container. While you do not need to know much about Docker to use OpenWorm, if you are planning on working extensively with the platform, you may benefit from understanding some basics. Docker Curriculum is an excellent tutorial for beginners that is straightforward to work through (Sections 1 - 2.5 are plenty sufficient).

Is it possible to modify the simulation without having to run build.sh?

Yes, but it is marginally more complex. The easiest way is to modify anything in the Docker container once you are inside of it - it will work just like a bash shell. If you want to modify any code in the container, you'll need to use an editor that runs in the terminal, like nano. Once you've modified something in the container, you don't need to re-build. However, if you run stop.sh once you exit, those changes will be gone.

How do I access more data than what is already output?

The simulation by default outputs only a few figures and movies to your home system (that is, outside of the Docker container). If you want to access the entire output of the simulation, you will need to copy it from the Docker container.

For example, say you want to extract the worm motion data. This is contained in the file worm_motion_log.txt, which is found in the /home/ow/sibernetic/simulations/[SPECIFIC_TIMESTAMPED_DIRECTORY]/worm_motion_log.txt. The directory [SPECIFIC_TIMESTAMPED_DIRECTORY] will have a name like C2_FW_2018_02-12_18-36-32, and its name can be found by checking the output directory. This is actually the main output directory for the simulation, and contains all output, including cell modelling and worm movement.

Once the simulation ends and you exit the container with exit, but before you run stop.sh, run the following command from the openworm-docker-master folder:

docker cp openworm:/home/ow/sibernetic/simulations/[SPECIFIC_TIMESTAMPED_DIRECTORY]/worm_motion_log.txt ./worm_motion_log.txt

This will copy the file from the Docker container, whose default name is openworm. It is crucial that you do not run stop.sh before trying to get your data out (see below)

What is the difference between exit and stop.sh?

When you are in the Docker Container openworm, and are done interacting with it, you type exit to return to your system's shell. This stops execution of anything in the container, and that container's status is now Exited. If you try to re-start the process using run-shell-only.sh, you will get an error saying that the container already exists. You can choose, at this point, to run stop.sh. Doing so will remove the container and any files associated with it, allowing you to run a new simulation. However, if you don't want to remove that container, you will instead want to re-enter it.

How do I enter a container I just exited?

If you run stop.sh you'll delete your data and reset the container for a new run. If, however, you don't want to do that, you can re-enter the Docker container like this:

docker start openworm                 # Restarts the container
docker exec -it openworm /bin/bash    # Runs bash inside the container

This tells Docker to start the container, to execute commands (exec) with an interactive, tty (-it) bash (bash) shell in the container openworm.

You'll be able to interact with the container as before.

Documentation

to find out more about OpenWorm, please see the documentation at http://docs.openworm.org or join us on Slack.

This repository also contains project-wide tracking via high-level issues and milestones.

org.geppetto.frontend.jupyter's People

Contributors

adrianq avatar ddelpiano avatar filippomc avatar jrmartin avatar tarelli avatar

Stargazers

 avatar  avatar  avatar  avatar  avatar

Watchers

 avatar  avatar  avatar  avatar  avatar  avatar  avatar  avatar  avatar  avatar  avatar  avatar  avatar  avatar  avatar  avatar

org.geppetto.frontend.jupyter's Issues

error during installation

branch feature/extensible_routes

Hi @filippometacell,
running jupyter nbextension install --py --symlink --sys-prefix jupyter_geppetto procudes the following error during the installation process:

Installing collected packages: jupyter-geppetto
  Running setup.py develop for jupyter-geppetto
Successfully installed jupyter-geppetto
Traceback (most recent call last):
  File "/Users/snakes/miniconda3/envs/nwb/bin/jupyter-nbextension", line 10, in <module>
    sys.exit(main())
  File "/Users/snakes/miniconda3/envs/nwb/lib/python3.7/site-packages/jupyter_core/application.py", line 266, in launch_instance
    return super(JupyterApp, cls).launch_instance(argv=argv, **kwargs)
  File "/Users/snakes/miniconda3/envs/nwb/lib/python3.7/site-packages/traitlets/config/application.py", line 658, in launch_instance
    app.start()
  File "/Users/snakes/miniconda3/envs/nwb/lib/python3.7/site-packages/notebook/nbextensions.py", line 988, in start
    super(NBExtensionApp, self).start()
  File "/Users/snakes/miniconda3/envs/nwb/lib/python3.7/site-packages/jupyter_core/application.py", line 255, in start
    self.subapp.start()
  File "/Users/snakes/miniconda3/envs/nwb/lib/python3.7/site-packages/notebook/nbextensions.py", line 716, in start
    self.install_extensions()
  File "/Users/snakes/miniconda3/envs/nwb/lib/python3.7/site-packages/notebook/nbextensions.py", line 677, in install_extensions
    raise ValueError("Only one nbextension allowed at a time. "
ValueError: Only one nbextension allowed at a time. Call multiple times to install multiple extensions.
Please specify one nbextension/package at a time
Enabling notebook extension jupyter-js-widgets/extension...
      - Validating: OK
Traceback (most recent call last):
  File "/Users/snakes/miniconda3/envs/nwb/bin/jupyter-serverextension", line 10, in <module>
    sys.exit(main())
  File "/Users/snakes/miniconda3/envs/nwb/lib/python3.7/site-packages/jupyter_core/application.py", line 266, in launch_instance
    return super(JupyterApp, cls).launch_instance(argv=argv, **kwargs)
  File "/Users/snakes/miniconda3/envs/nwb/lib/python3.7/site-packages/traitlets/config/application.py", line 658, in launch_instance
    app.start()
  File "/Users/snakes/miniconda3/envs/nwb/lib/python3.7/site-packages/notebook/serverextensions.py", line 294, in start
    super(ServerExtensionApp, self).start()
  File "/Users/snakes/miniconda3/envs/nwb/lib/python3.7/site-packages/jupyter_core/application.py", line 255, in start
    self.subapp.start()
  File "/Users/snakes/miniconda3/envs/nwb/lib/python3.7/site-packages/notebook/serverextensions.py", line 211, in start
    self.toggle_server_extension_python(arg)
  File "/Users/snakes/miniconda3/envs/nwb/lib/python3.7/site-packages/notebook/serverextensions.py", line 200, in toggle_server_extension_python
    m, server_exts = _get_server_extension_metadata(package)
  File "/Users/snakes/miniconda3/envs/nwb/lib/python3.7/site-packages/notebook/serverextensions.py", line 328, in _get_server_extension_metadata
    m = import_item(module)
  File "/Users/snakes/miniconda3/envs/nwb/lib/python3.7/site-packages/traitlets/utils/importstring.py", line 42, in import_item
    return __import__(parts[0])
  File "/Users/snakes/Desktop/nwb-explorer/utilities/dependencies/org.geppetto.frontend.jupyter/jupyter_geppetto/__init__.py", line 143, in <module>
    RouteManager.add_web_client(PathService.get_webapp_directory())
  File "/Users/snakes/Desktop/nwb-explorer/utilities/dependencies/org.geppetto.frontend.jupyter/jupyter_geppetto/service.py", line 12, in get_webapp_directory
    cls.webapp_directory = os.path.dirname(glob.glob('*/' + settings.geppetto_webapp_file)[0])

Add headers on REST api controller

At the moment it is not possible to add headers to a rest api.

With this new features we will be able to add response headers like that

@get('path/a/b', {'Content-type': 'application/json})
def my_handler_fn():
   ...

The spinner is hidden before the extension is fully rendered

Description

./src/index.js -- L30 --> window.parent.GEPPETTO.Manager.loadExperiment(1, [], []);

This line of code is triggering a Hide_spinner event which hides the spinner before the Geppetto extension is fully loaded which causes the screen to remain white for a second before the extension is rendered.

Steps to reproduce

Run NetPyNe-UI and watch the spinner disappear before the Appbar and Cards are rendered.

Posible solution

Comment line 30 in ./src/index.js

PathService FileNotFoundError error

[I 16:29:26.918 NotebookApp] Error on Geppetto Server extension
[E 16:29:26.918 NotebookApp] Uncaught exception GET /geppetto (::1)
HTTPServerRequest(protocol='http', host='localhost:8888', method='GET', uri='/geppetto', version='HTTP/1.1', remote_ip='::1')
Traceback (most recent call last):
File "/home/afonso/.pyenv/versions/3.7.2/envs/TestHNN/lib/python3.7/site-packages/tornado/web.py", line 1590, in _execute
result = method(self.path_args, **self.path_kwargs)
File "/home/afonso/HNN-UI/org.geppetto.frontend.jupyter/jupyter_geppetto/webapi.py", line 90, in handlerFn
value = fn(self, args, **kwargs)
File "/home/afonso/HNN-UI/org.geppetto.frontend.jupyter/jupyter_geppetto/handlers.py", line 20, in index
return open(PathService.get_webapp_resource(template)).read()
FileNotFoundError: [Errno 2] No such file or directory: './webapp/build/geppetto.vm'
[E 16:29:26.919 NotebookApp] {
"Host": "localhost:8888",
"User-Agent": "Mozilla/5.0 (X11; Linux x86_64; rv:60.0) Gecko/20100101 Firefox/60.0",
"Accept": "text/html,application/xhtml+xml,application/xml;q=0.9,
/
;q=0.8",
"Accept-Language": "en,en-US;q=0.5",
"Accept-Encoding": "gzip, deflate",
"Dnt": "1",
"Connection": "keep-alive",
"Upgrade-Insecure-Requests": "1"
}
[E 16:29:26.920 NotebookApp] 500 GET /geppetto (::1) 2.81ms referer=None

Add integration tests

As for the first implementation, the tests will cover the main apis:

  • Active path /geppetto with the main page
  • Websocket: when opened, the application will receive the user id and privileges
  • Dynamically added rest apis
  • Serve static file on contextPath

Connexion closed by reverse proxy not reconnecting

Steps to reproduce:

  1. ping host.docker.internal from a local running container (should give you something like 192.168.65.2)
  2. Run a nginx docker container as reverse proxy to a geppetto application
# dockerfile
FROM nginx:1.17-alpine
COPY default.conf /etc/nginx/conf.d
# default.conf
server {
    listen 8999;
    server_name localhost;
    
    location / {
        proxy_pass          http://192.168.65.2:8081/;

        proxy_http_version  1.1;
        proxy_set_header    Upgrade $http_upgrade;
        proxy_set_header    Connection "Upgrade";
        proxy_set_header    Host $host;
        proxy_set_header    Origin "";
        proxy_connect_timeout 30;
        proxy_send_timeout 30;
        proxy_read_timeout 30;
        send_timeout 30;
    }
}
  1. Start geppetto application and go to localhost:8999
  2. Wait 30 seconds for the ws connexion to be closed by nginx

Kernel not initialized when extension loads

Sometimes, randomly, the kernel is not yet initialized when the extension is loading, causing an error when sending the first Python commands

events.js:33 Exception in event handler for notebook_loaded.Notebook TypeError: Cannot read property 'execute' of null
    at load_extension (index.js:26)
    at window._Events.<anonymous> (index.js:40)
    at window._Events.dispatch (jquery.min.js:2)
    at window._Events.y.handle (jquery.min.js:2)
    at Object.trigger (jquery.min.js:2)
    at window._Events.<anonymous> (jquery.min.js:2)
    at Function.each (jquery.min.js:2)
    at w.fn.init.each (jquery.min.js:2)
    at w.fn.init.trigger (jquery.min.js:2)
    at w.fn.init.events.trigger (events.js:31) Arguments ["notebook_loaded.Notebook", callee: (...), Symbol(Symbol.iterator): ƒ]

Fix path discovery

The automatic path discovery doesn't work so can't use with old geppetto extensions.

Fix requirements in setup.py

Requirements in setup.py shouldn't be strict == but rely on semantic versioning, when is not otherwise required.

Strict requirements for safe deployment can safely be moved to requirements.txt

Improve Python notebook generation

If more than one Python notebook is available, at the first access is requested to select the kernel.
We want to have the Python 3 selected by default.

Implement connection scoped data

The retrieval of the runtime project should follow the same criteria of the Java backend. Every client connected receives its own id, bound to the websocket connection, so each connection can evolve the model separately.
Follow the new implementation with reconnect capabilities from openworm/org.geppetto.frontend#902.

High level design:
Geppetto backend high level design - Scoped managers and reconnect (1)

Recommend Projects

  • React photo React

    A declarative, efficient, and flexible JavaScript library for building user interfaces.

  • Vue.js photo Vue.js

    🖖 Vue.js is a progressive, incrementally-adoptable JavaScript framework for building UI on the web.

  • Typescript photo Typescript

    TypeScript is a superset of JavaScript that compiles to clean JavaScript output.

  • TensorFlow photo TensorFlow

    An Open Source Machine Learning Framework for Everyone

  • Django photo Django

    The Web framework for perfectionists with deadlines.

  • D3 photo D3

    Bring data to life with SVG, Canvas and HTML. 📊📈🎉

Recommend Topics

  • javascript

    JavaScript (JS) is a lightweight interpreted programming language with first-class functions.

  • web

    Some thing interesting about web. New door for the world.

  • server

    A server is a program made to process requests and deliver data to clients.

  • Machine learning

    Machine learning is a way of modeling and interpreting data that allows a piece of software to respond intelligently.

  • Game

    Some thing interesting about game, make everyone happy.

Recommend Org

  • Facebook photo Facebook

    We are working to build community through open source technology. NB: members must have two-factor auth.

  • Microsoft photo Microsoft

    Open source projects and samples from Microsoft.

  • Google photo Google

    Google ❤️ Open Source for everyone.

  • D3 photo D3

    Data-Driven Documents codes.