nonameplum / blog Goto Github PK
View Code? Open in Web Editor NEWMy blog as github issues
My blog as github issues


To get the best symbolication result, or event to get a proper symbolication of a crash log, the appropriate dSYM and application build is required.
The symbolicatecrash tool allows to symbolicate a crash log that doesn't exactly match the build and dSYM that you would like to use.
This script besides the symbolication, it also checks if the crash log UUID matches the build UUID.
Just run this script on a folder with your .ipa, the corresponding .dSYM, and (1+) .crash files. Will output symbolicated sym-*.crashes for you.
#!/bin/bash
#
# Fool'n'Lazy-Proof iOS .crash Symbolication
#
# Just run this script on a folder with your `.ipa`, the corresponding `.dSYM`,
# and (1+) `.crash` files. Will output symbolicated `sym-*.crash`es for you.
#
# Copyright (c) 2016 Ferran Poveda (@fbeeper)
# Provided under MIT License (MIT): http://choosealicense.com/licenses/mit/
#
# Extended by Lukasz Sliwinski to check equality of the build's UUID with the crash logs
#

function checkForRequiredFileOfType()
{
	count=`find $1 -print -quit 2> /dev/null | wc -l | awk '{print \$1}'`
	if [[ $count > 0 ]]; then
		echo "Found a $1 file"
	else
		echo "Missing a $1 file! Need *.ipa + *.dSYM + *.crash files."
		exit
	fi
}

function checkForRequiredFiles()
{
	checkForRequiredFileOfType "*.ipa"
	checkForRequiredFileOfType "*.dSYM"
	checkForRequiredFileOfType "*.crash"
}

# Define location of symbolicatecrash binary (defaults to Xcode location, but can be defined on params)
symbolicatecrash=${symbolicatecrash:-/Applications/Xcode.app/Contents/SharedFrameworks/DVTFoundation.framework/Versions/A/Resources/symbolicatecrash}

# Let's make sure you haven't forgotten any file
checkForRequiredFiles

# Extract .ipa and define where the binary is (assuming it has the same name)
ipa=`find *.ipa -print -quit`
bsdtar -xf "$ipa" -s'|[^/]*/||'
app=`find *.app -print -quit`
app="$app$/${app%.*}"

dSYM=`find *.dSYM -print -quit`
uuid=`dwarfdump -u $dSYM | perl -ne 'print $1 if /UUID: (.*) \(arm64\)/s' | cut -c 1-42 | tr -d '-' | awk '{ print tolower($0) }'`

echo ""
echo "Build UUDD: $uuid"
echo ""

# Symbolicate all .crash files
export DEVELOPER_DIR="/Applications/Xcode.app/Contents/Developer"
for i in *.crash; do

	if [[ ! $i == sym* ]]; then # Skips previous output files from this script

		build_name=`grep '{"app_name":' $i | perl -ne 'print $1 if /{"app_name":"([^"]+)","/s' | awk '{ print($0) }'`

		crashFileUuid=`grep --after-context=1000 "Binary Images:" $i | grep "$build_name arm64" | perl -ne 'print $1 if /.*<(.*)>/s' | awk '{ print($0) }'`

		if [ "$uuid" == "$crashFileUuid" ]; then
			"$symbolicatecrash" "$i" "$app" > "sym-$i"
			echo "✅ Symbolicated $i"
		else
			echo "❌ skipped $i (crash UUID [$crashFileUuid] do not match build's UUID: [$uuid]"
		fi

	fi

doneCocoaPods doesn't allow the setup of the linkage and package method separately for each dependency.
It is possible to setup the linkage method but only for the whole target like:
target :DynamicTarget do
    use_frameworks! :linkage => :dynamic

    pod 'DynamicPod' # This will be linked dynamically
end

target :StaticTarget do
    use_frameworks! :linkage => :static

    pod 'StaticPod' # This will be linked statically
end
Microsoft iOS team made a plugin to allow it:
https://github.com/microsoft/cocoapods-pod-linkage
If you don't what to use the plugin you can still make it work on your own by using the CocoaPods pre_install hook.
pre_install do |installer|
  installer.pod_targets.each do |pod|
    if pod.name == "Podname"
      def pod.build_type
        Pod::BuildType.new(:linkage => :dynamic, :packaging => :framework)
      end
    end
  end
end
All possible BuildTypes are defined here https://github.com/CocoaPods/Core/blob/master/lib/cocoapods-core/build_type.rb.
Most of the gate gearmotor has 24 V AC/DC accessories power-supply output. Useful to connect signaling devices (an external lamp) which is turned on while the gate is open. I wanted to use that information to be able to know if the gate is open or closed in my home automation system.
I could use reed switches as I do for the garage door opener. But the priority was to pack everything inside the gearmotor cover because it is on the outside. I wanted to use ESP32/8266 microcontroller, the main problem for me to solve was, how to convert 24 V AC/DC voltage to something that I can connect to GPIO pin, which in the case of ESP can be 0 - 3.3 V.
I knew that optocouplers can be useful for this, but I wasn't sure how to properly make a circuit that would be false-positive protected. Fortunately, I have found an outstanding article that explains in detail exactly what I needed. I just had to adjust a bit the elements for the 24 V instead of 120/230 V. My gate gearmotor has 24 AC Voltage but the circuit should work also for the DC case.
The secondary side of the optocoupler is galvanically separated from mains electricity (inside the optocoupler is LED diode). The diode lights up when the input voltage exceeds around 1.4 V (I used LTV-814/PC817). When the diode lights up the built-in transistor works in the active region and acts as a short circuit. When the output voltage is below 1.4 V (when the gate is closed we expect the voltage to be 0) the transistor operates in the cutoff region and acts as an open circuit.
This way we get a relay behavior that can safely connect almost any microcontroller to the output.
I specifically picked the LTV-814 bidirectional optocoupler. It has two LEDs conducting in opposite directions. It simplifies the circuit a bit because thanks to the second LED the effect on the secondary side voltage (AC) will be very similar to the use of a rectifier. The last optional thing but very useful is to add a capacitor between the Emitter and GND. It smooths out the flow which helps to protect from getting too much noise information especially when the input is switching between the 0 - 24 V.
The circuit that I picked from the mentioned article:
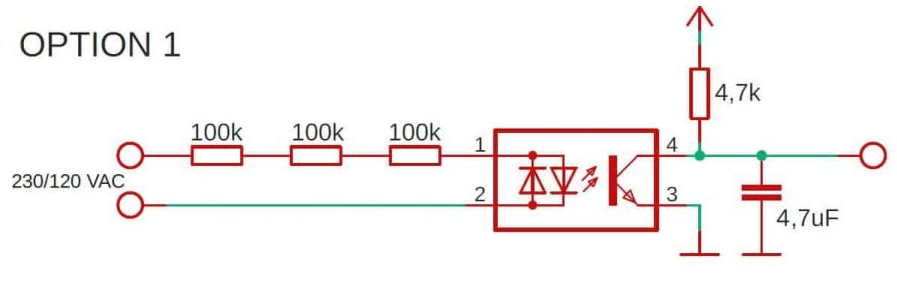
I just changed the resistors from 100k to 2k. Instead of using 1 resistor that could have 6k its a good idea to use a couple of resistors in series as mentioned in the article.
In this way, the power is distributed over several components instead of one. Secondly, and even more important is the maximum voltage that the resistor can take. We have done the detecting part of the AC/DC voltage from the gate gearmotor.
Having the voltage detector, I had to connect it between the gearmotor's terminals for signaling devices and the microcontroller's GPIO. I have the CAME BXV series SDNX gearmotor. Using the manual I just had to find where are the connectors for the signaling devices. In my case, it was very easy to access, just unscrue one scrue to take off the cover, and then already on the board ⑫ the terminals ⑱ are visible.
Because in my case the ESP8266 will be placed under the gearmotor cover I also could easily add another feature. Using the relay controller by the microcontroller I can short circuit for a short time that is connected to the command terminals ⓸. I already used those to be able open/close my gate from home, by using the wall-mounted momentary-action switch.
| Gearmotor | Board |
|---|---|
 |
 |
The whole circuit:

I placed everything inside a box and it fits nicely inside the gearmotor cover:
| Elements | Placement |
|---|---|
 |
 |
Having that done, the last piece was to program the ESP8266. I used ESPHome.
Basically, we have to react to the voltage detection that gives us information if the gate is open or closed (and also when the state is changing). In addition, we can open/close the gate by using the relay.
There is one caveat though. We do not if the gate is fully open, and we do not know if the opening ended. At least, I couldn't find in my gearmotor easy access to such information. I could add a reed switch to detect the fully opened state, but I decided that this information is not that important for me.
Knowing that I do not have precise open position feedback I implemented time-based cover opening/closing as an alternative and optional feature. The fully open state of the cover is thus always an assumed one, the current position is approximated with the time the cover has been moving in a direction.
Please see the component file to check the full component implementation. I won't describe every detail of it. Its the best to check the code itself to grasp how it works. It might be also interesting for you to check out the gate.yaml file to see how to use and set up the component.
The important bit is that you can configure a few parameters used in the gate component:
  # gate
  gate_duration: 19500ms
  gate_duration_int: "19000"

  gate_close_pin: GPIO14
  gate_close_debounce_time: 500ms

  gate_relay_pin: GPIO4
  gate_relay_active_duration: 400ms
gate_duration and gate_duration_int - configures how long it takes to fully open/close the gate. In my case, it is around 19 seconds. To parameters are required because of the ESPHome limitation to pass the integer information to the component.gate_close_pin - configures which GPIO pin will be used to detect the voltage from the gearmotor.gate_close_debounce_time - configures the debounce time that can programmatically protect from false positives while the state of the voltage detection is changing. 500ms should be a reasonable default but you can adjust as needed.gate_relay_pin - configures which GPIO pin will take care of sending a signal to the relay to switch it on and off to a short circuit that will open/close the gate.gate_relay_active_duration - configures how long the relay should short circuit to start the close/open action. Probably anything between 250 - 500ms should be fine.I have all of my IoT devices connected to the open-source home automation Home Assistant. Which allows adding many other features. I have configured push notifications to not forget to close the gate if I left it open for too long. Also, the setup is configured with HomeKit, so Hey Siri, close the gate works nicely and my kids have a lot of fun too while we talk to her to do our home automation :).
This is how it works in action. The first video presents the closing of the gate initiated from Home Assistant (time-based percentage position is changing). The second one shows received notifications about the open/close states (the gate was controlled from a remote).
| Home Assistant | Open/Close state |
|---|---|
 |
 |
Since Xcode 11 there is a possibility to configure different locales for unit tests by using Test Plans. It is fine, but a little bit cumbersome as requires the Xcode-specific configuration.
Another way of making it work is the old-school method swizzling.
It is quite simple to do and does its job with quite nice flexibility. It doesn't require any Xcode setup, works well with SPM too.
The idea could be also extended to customize not only the Locale, but also e.g. preferredlanguages.
The key point is that we can do it by exchanging the methods on NSLocale instead of Locale which still is used as a wrapper over the objective-c predecessor.
We can use method_setImplementation and @convention(block) (swift documentation) in this case, which makes it a little bit more ergonomic than defining the @objc method that would solve the purpose of the exchanged method.
extension XCTestCase {
   func setLocale(identifier: String, preferredLanguages: [String]) {
        let currentlLocale: @convention(block) (AnyObject)
            -> AnyObject = { (_: AnyObject!) -> NSLocale in
                return NSLocale(localeIdentifier: identifier)
            }

        method_setImplementation(
            class_getClassMethod(NSLocale.self, #selector(getter: NSLocale.current))!,
            imp_implementationWithBlock(currentlLocale)
        )

        let preferredLanguages: @convention(block) (AnyObject)
            -> [String] = { (_: AnyObject!) -> [String] in
                return preferredLanguages
            }

        method_setImplementation(
            class_getClassMethod(NSLocale.self, #selector(getter: NSLocale.preferredLanguages))!,
            imp_implementationWithBlock(preferredLanguages)
        )
    }
}
Having that we can easily change the Locale for each test. The only downside is that you still use singleton Locale.current, so running tests in parallel will not work reliably.
class Test: XCTestCase {
    func test_locale() {
        setLocale(identifier: "fr", preferredLanguages: ["fr", "de", "pl"])

        XCTAssertEqual(Locale.current, .init(identifier: "fr"))
        XCTAssertEqual(Locale.preferredLanguages, ["fr", "de", "pl"])
    }
}A long time ago I had a problem to solve that I needed to know the exact time that will take to animate a view by x which might be in the middle of the desired position giving into account the timing function that the animation uses.
Here it is, an objective-c category:
//  CAMediaTimingFunction+Duration.h
#import <QuartzCore/QuartzCore.h>

@interface CAMediaTimingFunction (Duration)

- (NSTimeInterval)timeNeededToMoveByY:(CGFloat)yMove totalYMove:(CGFloat)totalYMove duration:(NSTimeInterval)duration;

@end

#import "CAMediaTimingFunction+Duration.h"

@implementation CAMediaTimingFunction (Duration)

- (NSTimeInterval)timeNeededToMoveBy:(CGFloat)move totalMove:(CGFloat)totalMove duration:(NSTimeInterval)duration {
    // Using reference animation calculate needed time according to used timing function
    CGFloat normalizedMove = move/totalMove;

    // View only just for calculation
    UIView *view = [[UIView alloc] initWithFrame:CGRectMake(0, 0, 1, 1)];
    CALayer *referenceLayer = view.layer;
    referenceLayer.hidden = YES;
    referenceLayer.speed = 0.0;
    [[UIApplication sharedApplication].keyWindow addSubview:view];

    // Reference animation to calculate time
    CABasicAnimation *basicAnimation =  [CABasicAnimation animationWithKeyPath:@"frame"];
    basicAnimation.duration = 1.0;
    basicAnimation.timingFunction = self;
    basicAnimation.fromValue = [NSValue valueWithCGRect:CGRectMake(0, 0, 1, 1)];
    basicAnimation.toValue = [NSValue valueWithCGRect:CGRectMake(100, 0, 1, 1)];

    [view.layer addAnimation:basicAnimation forKey:@"evaluatorAnimation"];

    // Force to run run-loop to get the presentation layer
    [[NSRunLoop mainRunLoop] runUntilDate:[NSDate date]];

    NSUInteger n = 0;
    CGFloat a = 0.0;
    CGFloat b = 1.0;
    CGFloat tolerance = 0.005;
    CGFloat move = 0.0;
    CGFloat middle = 0.0;

    // Biselection algorithm
    while (n < 1000) {
        middle = (a + b)/2;
        referenceLayer.timeOffset = middle;
        // Refresh animation to get updated presentation layer
        [[NSRunLoop mainRunLoop] runUntilDate:[NSDate date]];
        move = referenceLayer.presentationLayer.position.x / 100;

        if ((move - tolerance) <= normalizedMove && normalizedMove <= (move + tolerance))
            break;

        n += 1;
        if (normalizedMove < move)
            b = middle;
        else
            a = middle;
    }

    [view removeFromSuperview];
    return middle * duration;
}

@endSwift documentation markup is not clear how to link to other type definition/method/... from the documentation.
It can be done using Tag element.
/// An error
/// - Tag: SomeError
enum SomeError: Error {
}

/// Description
/// - Throws: An error of type [SomeError](x-source-tag://SomeError) might be thrown
func doSomething() throws {
    throw NSError(domain: "", code: 1, userInfo: nil)
}
If you do the quick help (⌥ + click) on the method doSomething the documentation will be presented with the clickable link SomeError that will navigate to the place where the tag is defined.

SwiftUI provides LocalizedStringKey that can be used to initialize several View types, such as Text, Toggle, and others.
It works differently from UIKit in that regard, as if the localized strings leave in some other bundle than the main one from where by default SwiftUI tries to get the values, you have to pass that information to the Text constructor (not to LocalizedStringKey), in contrast to NSLocalizedString.
It is connected to the fact that SwiftUI internally handles the possibility to easily override the locale used by the view.
view.environment(\.locale, .init(identifier: "pl"))It is very handy, especially in the case of the SwiftUI Previews.
ForEach(localizations, id: \.identifier) { locale in
    Text("Hello")
        .environment(\.locale, locale)
        .previewDisplayName(Locale.current.localizedString(forIdentifier: locale.identifier))
}
The problem is when you would like to use NSLocalizedString, or you have a custom implementation for the localized strings handling. Then most probably you will lose the ability to set the locale by .environment(\.locale, locale) on the views because it won't be respected. As the environment value is available in the View context and Locale.current stays the same across the app. There is no way to get the locale set for the given view and its child views outside of the body.
To overcome that issue I came up with a solution that allows to override of the locale environment and provide a custom implementation of the localized strings.
struct LocalizedText: View {
    @Environment(\.locale) var locale
    let key: String
    let localizedString: (_ languageCode: String?, _ key: String) -> (String)

    var body: Text {
        let languageCode = locale.languageCode ?? Locale.current.languageCode
        let localizedString = localizedString(languageCode, key)

        return Text(localizedString)
    }
}
LocalizedText view is used to get the locale from the environment as it is only available from the View context.
Using localizedString closure, which gets all the information needed to resolve the localized string which is the key and languageCode (if needed the whole Locale object could be passed instead).
Example of use could look like this:
extension L18n {
    static func localizedString(_ key: String, languageCode: String) -> String {
        NSLocalizedString(
            key,
            tableName: "",
            bundle: resolveBundle(for : languageCode),
            value: "**\(key)**",
            comment: ""
        )
    }

    static func localizedText(_ key: String) -> some View {
        LocalizedText(key: key, localizedString: { languageCode, key in
            localizedString(key, languageCode: languageCode)
        })
    }
}
struct SomeView: View {
var body: some View {
L18n.localizedText("Hello")
}
}
struct SomeView_Preview: PreviewProvider {
static var previews: some View {
SomeView()
.environment(\.locale, Locale(identifier: "pl"))
}
}This way we keep the best of both worlds. Especially do not lose the ability of SwiftUI EnvironmentValues and still provide a custom implementation for the localized strings handling. We can keep *.lproj and *.strings files in a separate framework, and provide a custom implementation of the localized strings by e.g. having a complicated fallback translations business logic in case the key is missing for the asked language.
Add the section below to the file IDETextKeyBindingSet.plist that might be located at:
/Applications/Xcode.app/Contents/Frameworks/IDEKit.framework/Versions/A/Resources/IDETextKeyBindingSet.plist
depending where the Xcode app is placed and named.
<key>Custom</key>
<dict>
    <key>Join Lines</key>
    <string>moveDown:, moveToEndOfText:, moveToBeginningOfText:, deleteToBeginningOfLine:, deleteBackward:</string>
    <key>Join Lines Backward</key>
    <string>moveToEndOfText:, moveToBeginningOfText:, deleteToBeginningOfLine:, deleteBackward:</string>
</dict>
Join Lines joins the lines forward, the other one backward.
After the file is saved, Xcode needs to be restarted to load the new setup.
In Xcode settings, the keyboard shorts can be configured:

private var onViewLoadContext: UInt8 = 0

public protocol UIViewControllerOnViewLoadProtocol { }

extension UIViewController: UIViewControllerOnViewLoadProtocol { }

private class OnViewControllerViewLoadObserver<T>: NSObject {
    private var handlers: [(T) -> Void]
    var token: NSKeyValueObservation?

    init (_ handler: @escaping (T) -> Void) {
        self.handlers = [handler]
    }

    func invoke(_ value: T) {
        self.handlers.forEach { handler in
            handler(value)
        }
    }

    func add(handler: @escaping (T) -> Void) {
        self.handlers.append(handler)
    }
}

public extension UIViewControllerOnViewLoadProtocol where Self: UIViewController {
    /// Add handler when view controller's view is set by the framework
    ///
    /// - Attention: Be aware of memory leak that can be caused if any reference holded by `self` is used
    /// inside the handler callback. For that purpose use the instance passed in the handler parameter.
    ///
    /// - Parameters:
    ///     - handler: Callback that will be called when UIKit will set view controller's view.
    ///     Instance passed in the handler parameter is optional because is weakified.
    ///
    /// - Tag: addOnViewLoad
    func addOnViewLoad(handler: @escaping (Self?) -> Void) {
        let observer: OnViewControllerViewLoadObserver<Self?>
        if let existingObserver = objc_getAssociatedObject(self, &onViewLoadContext) as? OnViewControllerViewLoadObserver<Self?> {
            observer = existingObserver
            observer.add(handler: handler)
        } else {
            observer = OnViewControllerViewLoadObserver(handler)
            objc_setAssociatedObject(
                self,
                &onViewLoadContext,
                observer,
                objc_AssociationPolicy.OBJC_ASSOCIATION_RETAIN_NONATOMIC
            )

            observer.token = self.observe(\.view) { [weak observer, weak self] (_, _) in
                observer?.invoke(self)
            }
        }
    }

    /// Remove a handler added by [addOnViewLoad](x-source-tag://addOnViewLoad)
    func removeOnViewLoad() {
        objc_setAssociatedObject(
            self,
            &onViewLoadContext,
            nil,
            objc_AssociationPolicy.OBJC_ASSOCIATION_RETAIN_NONATOMIC
        )
    }
}There are two approaches that can be used to develop a custom component for ESPHome:
For better communication to distinguish components, I will call the former Simple and the latter Native.
The main difference between the two is that Native implementation provides better reusability, as you can use external_components feature to point to the local or remote (github) location in your .yaml device configuration to simply use some additional components except the build-in into ESPHome.
Additionally Native component has more advantages over the component configuration validation thanks to Python and configuration schemes.
The Simple component development is quite well described in the ESPHome documentation. In a nutshell, it just requires creating the .h + optionally .cpp file with the C++ (Arduino) component implementation and then the yaml file that registers the component so it can be used as any other ESPHome component. All that is clearly explained in the above documentation references.
In the case of the Native component development, this gets more tricky. The contribution guide sheds a bit of light on how to start but without many details. The most tricky part is how to properly write the __init__ and/orsensor.py which defines the component, validation, and C++ code generation (more details in the contribution guide). Most of the time it requires checking other component's implementations and based on that conclude what is actually needed. It's not that hard but requires a bit of Python knowledge. The C++ part is not that much different than the Simple component implementation. If you already have Simple implementation it can be copy/pasted, add namespace esphome, another inner for the component, and you are good to go.
If you would like to understand better the difference between the Simple and Native component implementation take a look at my repository. I implemented the same sensor using both approaches. You can find the Simple component implementation in custom_components/mq9 and Native in components/mq. Also, the example of how to use it is defined in mq9_test.yaml
The Native component is loaded thanks to the external_components definition in config_base.yaml.
To switch between the Native and Simple component usage uncomment the line that defines mq9_base in the mq9_test.yaml.
// MARK: Deinit observation
extension NSObject {
    func onDeinit(execute work: @escaping () -> Void) {
        let deinitCallback = Self.deinitCallback(forObject: self)
        deinitCallback.callbacks.append(work)
    }

    // MARK: Helpers
    private static let key = UnsafeMutablePointer<UInt8>.allocate(capacity: 1)

    static private func deinitCallback(forObject object: NSObject) -> DeinitCallback {
        if let deinitCallback = objc_getAssociatedObject(object, key) as? DeinitCallback {
            return deinitCallback
        } else {
            let deinitCallback = DeinitCallback()
            objc_setAssociatedObject(object, key, deinitCallback, .OBJC_ASSOCIATION_RETAIN_NONATOMIC)
            return deinitCallback
        }
    }

    // MARK: Types
    @objc fileprivate class DeinitCallback: NSObject {
        var callbacks: [() -> Void] = []

        deinit {
            callbacks.forEach({ $0() })
        }
    }
}I created a UIHostingViewController that works for me since iOS 13.0, and solves the NavigationBar visibility issues and safe area in SwiftUI.
public final class NonSafeAreaHostingController<Content: View>: UIHostingController<Content> {
    public var navigationBarHidden = true
    public var statusBarHidden = true
    public var isEmbedded = false

    override public func viewDidLoad() {
        super.viewDidLoad()
        fixSafeAreaInsets()
    }

    override public func viewWillAppear(_ animated: Bool) {
        super.viewWillAppear(animated)
        navigationController?.setNavigationBarHidden(navigationBarHidden, animated: false)
    }

    override public var prefersStatusBarHidden: Bool {
        return statusBarHidden
    }

    override public var navigationController: UINavigationController? {
        isEmbedded ? nil : super.navigationController
    }

    private func fixSafeAreaInsets() {
        guard let _class = view?.classForCoder else {
            return
        }

        let safeAreaInsets: @convention(block) (AnyObject)
            -> UIEdgeInsets = { (_: AnyObject!) -> UIEdgeInsets in
                return .zero
            }

        guard let method = class_getInstanceMethod(
            _class.self,
            #selector(getter: UIView.safeAreaInsets)
        )
        else {
            return
        }

        class_replaceMethod(
            _class,
            #selector(getter: UIView.safeAreaInsets),
            imp_implementationWithBlock(safeAreaInsets),
            method_getTypeEncoding(method)
        )

        let safeAreaLayoutGuide: @convention(block) (AnyObject)
            -> UILayoutGuide? = { (_: AnyObject!) -> UILayoutGuide? in
                return nil
            }

        guard let method2 = class_getInstanceMethod(
            _class.self,
            #selector(getter: UIView.safeAreaLayoutGuide)
        )
        else {
            return
        }

        class_replaceMethod(
            _class,
            #selector(getter: UIView.safeAreaLayoutGuide),
            imp_implementationWithBlock(safeAreaLayoutGuide),
            method_getTypeEncoding(method2)
        )
    }
}Download and unzip
Plum_Xcode_Themes.zip
Copy *.xccolortheme files to ~/Library/Developer/Xcode/UserData/FontAndColorThemes/ (create the folder if doesn't exits yet)
mkdir ./Plum_Xcode_Themes
curl --show-error --location https://github.com/nonameplum/blog/files/5965669/Plum_Xcode_Themes.zip | tar -xf - -C ./Plum_Xcode_Themes
cd ./Plum_Xcode_Themes
mkdir ~/Library/Developer/Xcode/UserData/FontAndColorThemes/
cp ./*.xccolortheme ~/Library/Developer/Xcode/UserData/FontAndColorThemes/

Sometimes it is useful to know when the view has added a subview to another view. For example, it is required before we can activate the autolayout constraints.
This can be achieved by observing the moment when the view is moved to the window, as in the case of the UIView it happens at the time when is added as a subview.
To do that we can create UIView subclass that will override method didMoveToWindow().
public final class SuperviewObserver: UIView {
    private let observer: (_ this: UIView, _ superview: UIView) -> Void

    public init(observer: @escaping (_ this: UIView, _ superview: UIView) -> Void) {
        self.observer = observer
        super.init(frame: .zero)
    }

    @available(*, unavailable)
    required init?(coder: NSCoder) {
        fatalError("init(coder:) has not been implemented")
    }

    public override func didMoveToWindow() {
        super.didMoveToWindow()
        guard let superview = superview?.superview else { return }

        observer(self, superview)
        removeFromSuperview()
    }
}
We can make this custom subclass more convenient to use, by creating an extension method:
public protocol UIViewProtocol {}
extension UIView: UIViewProtocol {}

public extension UIViewProtocol where Self: UIView {
    func onDidMoveToSubview(closure: @escaping (_ view: Self, _ superview: UIView) -> Void) {
        addSubview(
            SuperviewObserver { [unowned self] this, superview in
                closure(self, superview)
            }
        )
    }
}
UIViewProtocol protocol is added, to be able to get the exact type of the UIView.
let superview = UIView()
let view = CustomSubclass()
view.onDidMoveToSubview { this, superview in
    NSLayoutConstraint.activate([
        this.leadingAnchor.constraint(equalTo: superview.leadingAnchor) // this is type of CustomSubclass
        ...
    ])
}

superview.addSubview(view)extension Clock {
func measure<Result>(_ work: () async throws -> Result) async rethrows -> (duration: Self.Instant.Duration, result: Result) {
var result: Result!
let duration = try await self.measure {
result = try await work()
}
return (duration, result)
}
}Switch allows to declare a type inside a function body.
This ability could be handy in some situations. I found it useful to run the body of the function only once.
For example we use to run only once the body of the function updateConstraints().
In addition to that, if we use static variable in the inner struct Swift gives us thread safety for free.
I have created a simple wrapper, that allows to run an action and be sure that it will be run only once, even in the concurrect scenario.
struct Once {
    func run(action: () -> Void) {
        struct RunCheck {
            static var didRun = false
        }

        guard !RunCheck.didRun else { return }

        RunCheck.didRun = true
        action()
    }
}
Example of use:
let once = Once()

var indexes: [Int] = []
DispatchQueue.concurrentPerform(iterations: 100, execute: { index in
    once.run {
        indexes.append(index)
    }
})

print(indexes) // It will have only one elementCustom template that allows to write unit tests directly in the Xcode Playgroud with nice error/success messages:


Download and unzip
Unit Test.xctemplate.zip
Copy Unit Test.xctemplate directory to ~/Library/Developer/Xcode/Templates/File Templates/Playground/ (create the folder if doesn't exits yet)
mkdir ./Unit_Test.xctemplate
curl --show-error --location https://github.com/nonameplum/blog/files/7111526/Unit.Test.xctemplate.zip | tar -xf - -C ./Unit_Test.xctemplate
cd ./Unit_Test.xctemplate
mkdir -p ~/Library/Developer/Xcode/Templates/File\ Templates/Playground
cp -R "./Unit Test.xctemplate" ~/Library/Developer/Xcode/Templates/File\ Templates/Playground
Once you restart Xcode you should be able to see the Unit Test template for a new playgroud:

_printHierarchyI wanted to traverse the view controllers hierarchy the same way as the private method that is available on UIKit -UIViewController._printHierarchy.
You can run it from lldb:
exp -l objc -o -- [UIApplication.sharedApplication.keyWindow.rootViewController _printHierarchy]
or using a class method
exp -l objc -o -- [UIViewController _printHierarchy]
and it should return something like:
<UITabBarController 0x12c01d200>, state: appeared, view: <UILayoutContainerView 0x129e07b40>
   | <UINavigationController 0x12a808200>, state: appeared, view: <UILayoutContainerView 0x129b10880>
   |    | <App.ViewController 0x129b04620>, state: disappeared, view: (view not loaded)
   |    | <App.ViewController 0x129b049c0>, state: disappeared, view: <UIView 0x129b27620> not in the window
   |    | <App.ViewController 0x129f06550>, state: disappeared, view: <UIView 0x129f0b7c0> not in the window
   |    | <App.ViewController 0x129b24540>, state: appeared, view: <UIView 0x129b2b750>
   | <UINavigationController 0x12b80a000>, state: disappeared, view: <UILayoutContainerView 0x12d0052c0> not in the window
   |    | <App.ViewController 0x129c07220>, state: disappeared, view: (view not loaded)
   |    | <App.ViewController 0x129c075c0>, state: disappeared, view: <UIView 0x129e0c730> not in the window
   |    | <App.ViewController 0x12d204900>, state: disappeared, view: <UIView 0x129e11550> not in the window
   |    | <App.ViewController 0x12d204ca0>, state: disappeared, view: <UIView 0x129b16200> not in the window
   + <App.ViewController 0x12d2065e0>, state: appeared, view: <UIView 0x129b26a90>, presented with: <_UIPageSheetPresentationController 0x12d205aa0>
   |    + <App.ViewController 0x129b4b130>, state: appeared, view: <UIView 0x129b4b4d0>, presented with: <_UIPageSheetPresentationController 0x129b4b7f0>
   |    |    + <App.ViewController 0x129e2ada0>, state: appeared, view: <UIView 0x129e25950>, presented with: <_UIPageSheetPresentationController 0x129e27ec0>
I have found a few existing solutions that for example use the UIResponder chain to traverse the hierarchy like this one.
But the problem with UIResponder.next is that it won't traverse all of the controllers if there is a branch of more than one UIViewController stack like you might have with e.g. UITabViewController and modally presented view controllers. UIResponder.next traverses bottom-up the view hierarchy but only from the specific leaf.
I thought, that why not reverse engineer the original _printHierarchy method, to check all of the quirks of its internal implementation and understand how Apple engineers traverse the view controllers hierarchy top-down.
It turned out to be quite straightforward after using Hopper Disassembler app.
The _printHierachy core method is actually implemented in _appendDescription. On UIKit 15.0 with disassembled UIKitCore using x86_64 which is a bit more readable than ARM64.
function _appendDescription {
    stack[-200] = rcx;
    r14 = rdx;
    r12 = [rdi retain];
    rbx = [rsi retain];
    if ([rbx length] != 0x0) {
            [rbx appendString:@"\n"];
    }
    stack[-208] = rbx;
    rax = [r12 _parentViewController];
    rax = [rax retain];
    stack[-188] = r14 & 0xff;
    stack[-216] = r12;
    if (rax != 0x0) {
            [rax release];
            r15 = stack[-208];
            if (stack[-200] != 0x0) {
                    r12 = sign_extend_64(stack[-200]);
                    rbx = 0x1;
                    do {
                            [r15 appendString:@"   | "];
                            rbx = rbx + 0x1;
                    } while (rbx <= r12);
            }
            r13 = stack[-216];
            rax = -[UIViewController _descriptionForPrintingHierarchyIncludingInsets:](r13, stack[-188]);
            rax = [rax retain];
            rbx = rax;
            [r15 appendString:rax];
    }
    else {
            if ([r12 _isRootViewController] != 0x0) {
                    r15 = stack[-208];
                    if (stack[-200] != 0x0) {
                            r12 = sign_extend_64(stack[-200]);
                            rbx = 0x1;
                            do {
                                    [r15 appendString:@"   | "];
                                    rbx = rbx + 0x1;
                            } while (rbx <= r12);
                    }
                    r13 = stack[-216];
                    rax = -[UIViewController _descriptionForPrintingHierarchyIncludingInsets:](r13, stack[-188]);
                    rax = [rax retain];
                    rbx = rax;
                    [r15 appendString:rax];
            }
            else {
                    r12 = stack[-208];
                    if (stack[-200] >= 0x2) {
                            rbx = sign_extend_64(stack[-200]) - 0x1;
                            do {
                                    [r12 appendString:@"   | "];
                                    rbx = rbx - 0x1;
                            } while (rbx != 0x0);
                    }
                    [r12 appendString:@"   + "];
                    r15 = [-[UIViewController _descriptionForPrintingHierarchyIncludingInsets:](stack[-216], stack[-188]) retain];
                    rax = [stack[-216] presentingViewController];
                    rax = [rax retain];
                    stack[-248] = rax;
                    rax = [rax _presentationController];
                    rax = [rax retain];
                    stack[-240] = rax;
                    rax = [rax _descriptionForPrintingViewControllerHierarchy];
                    rax = [rax retain];
                    stack[-224] = rax;
                    rax = [NSMutableString stringWithFormat:@"%@, presented with: %@", r15, rax];
                    rax = [rax retain];
                    r13 = stack[-216];
                    [r12 appendString:rax];
                    rbx = r15;
                    [rax release];
                    [stack[-224] release];
                    [stack[-240] release];
                    [stack[-248] release];
            }
    }
    [rbx release];
    *(int128_t *)(&stack[-312] + 0x30) = intrinsic_movaps(*(int128_t *)(&stack[-312] + 0x30), 0x0);
    *(int128_t *)(&stack[-312] + 0x20) = intrinsic_movaps(*(int128_t *)(&stack[-312] + 0x20), 0x0);
    *(int128_t *)(&stack[-312] + 0x10) = intrinsic_movaps(*(int128_t *)(&stack[-312] + 0x10), 0x0);
    *(int128_t *)&stack[-312] = intrinsic_movaps(*(int128_t *)&stack[-312], 0x0);
    rax = [r13 childViewControllers];
    rax = [rax retain];
    rbx = rax;
    rcx = &stack[-184];
    rdx = &stack[-312];
    rax = [rax countByEnumeratingWithState:rdx objects:rcx count:0x10];
    if (rax != 0x0) {
            r13 = rax;
            r12 = **(&stack[-312] + 0x10);
            r15 = stack[-200] + 0x1;
            do {
                    r14 = 0x0;
                    do {
                            if (*stack[-296] != r12) {
                                    objc_enumerationMutation(rbx);
                            }
                            _appendDescription(*(stack[-304] + r14 * 0x8), stack[-208], stack[-188], r15, 0x10);
                            r14 = r14 + 0x1;
                    } while (r13 != r14);
                    rdx = &stack[-312];
                    rcx = &stack[-184];
                    rax = [rbx countByEnumeratingWithState:rdx objects:rcx count:0x10];
                    r13 = rax;
            } while (rax != 0x0);
    }
    [rbx release];
    r14 = stack[-216];
    rsi = @selector(childModalViewController);
    rax = (*_objc_msgSend)(r14, rsi);
    rax = [rax retain];
    [rax release];
    rbx = stack[-208];
    if (rax != 0x0) {
            rax = [r14 childModalViewController];
            rax = [rax retain];
            rcx = stack[-200] + 0x1;
            rsi = rbx;
            rdx = stack[-188];
            _appendDescription(rax, rsi, rdx, rcx);
            [rax release];
    }
    stack[-56] = **___stack_chk_guard;
    [rbx release];
    [r14 release];
    rax = *___stack_chk_guard;
    rax = *rax;
    if (rax != stack[-56]) {
            rax = __stack_chk_fail();
    }
    return rax;
}
There are few if statements that split the code, but they are mostly used to properly append to the print indentation, like " | " and " + ". Overall if you forget about the lines generated by the assembly code (e.g. registry assignments) and ARC (e.g. [rax retain], [r14 release]) the code is quite short and simple. Inside if statements blocks you can find the while/repeat loops that add the indentation required depending on the view hierarchy tree.
I transferred the code into Swift and this is what I got:
extension UIViewController {
    public func printHierarchy() {
        var prints: [String] = []
        self.appendDescription(output: &prints, deep: 0)

        let printString = prints.reduce("") { partialResult, elem in
            return partialResult.appending(elem)
        }

        print(printString)
    }

    private func appendDescription(output: inout [String], deep: Int) {
        if !output.isEmpty {
            output.append("\n")
        }

        if self.parent != nil {
            var i = 0
            while i < deep {
                output.append("   | ")
                i += 1
            }
            output.append(self.description)
        } else {
            if self.isRootViewController {
                var i = 1
                while i < deep {
                    output.append("   | ")
                    output.append(self.description)
                    i += 1
                }
                output.append(self.description)
            } else {
                if deep >= 2 {
                    var i = deep - 1
                    repeat {
                        output.append("   | ")
                        i -= 1
                    } while i != 0
                }
                output.append("   + ")
                output.append(self.description)
                output.append(", presented with: \(self.presentationController?.description ?? "N/A")")
            }
        }

        if !self.children.isEmpty {
            var i = 0
            while i < self.children.count {
                self.children[i].appendDescription(output: &output, deep: deep + 1)
                i += 1
            }
        }

        if let childModalVC = self.childModalViewController {
            childModalVC.appendDescription(output: &output, deep: deep + 1)
        }
    }
}

extension UIViewController {
    var isRootViewController: Bool {
        UIApplication.shared.windows.compactMap(\.rootViewController).contains(self)
    }

    var childModalViewController: UIViewController? {
        if self.presentedViewController?.presentingViewController == self {
            return self.presentedViewController
        } else {
            return nil
        }
    }
}
I intentionally left the while/repeat loops to make the comparison with disassembled method easier. I had to reimplement the isRootViewController and childModalViewController that is used in the original implementation and it is not avaiable in the public methods of UIKit API. appendDescription goes recursively trought child and child modal view controllers.
What I learned from this, is that Apple engenieers smartly do not check for the specific UIViewController subclasses to verify if there are sub view controllers like you can do with UINavigationController.viewControllers. They just check if there are child/modal view controllers, and recursively visit all of them.
The ouput of my reimplemented Swift printHierarchy looks the same beside slight differences of the UIViewControllers descriptions, as again there is custom implementation used internally like _descriptionForPrintingHierarchyIncludingInsets.
<UITabBarController: 0x12c01d200>
   | <UINavigationController: 0x12a808200>
   |    | <App.ViewController: 0x129b04620>
   |    | <App.ViewController: 0x129b049c0>
   |    | <App.ViewController: 0x129f06550>
   |    | <App.ViewController: 0x129b24540>
   | <UINavigationController: 0x12b80a000>
   |    | <App.ViewController: 0x129c07220>
   |    | <App.ViewController: 0x129c075c0>
   |    | <App.ViewController: 0x12d204900>
   |    | <App.ViewController: 0x12d204ca0>
   + <App.ViewController: 0x12d2065e0>, presented with: <_UIPageSheetPresentationController: 0x12d205aa0>
   |    + <App.ViewController: 0x129b4b130>, presented with: <_UIPageSheetPresentationController: 0x129b4b7f0>
   |    |    + <App.ViewController: 0x129e2ada0>, presented with: <_UIPageSheetPresentationController: 0x129e27ec0>
<UITabBarController 0x12c01d200>, state: appeared, view: <UILayoutContainerView 0x129e07b40>
  | <UINavigationController 0x12a808200>, state: appeared, view: <UILayoutContainerView 0x129b10880>
  |    | <App.ViewController 0x129b04620>, state: disappeared, view: (view not loaded)
  |    | <App.ViewController 0x129b049c0>, state: disappeared, view: <UIView 0x129b27620> not in the window
  |    | <App.ViewController 0x129f06550>, state: disappeared, view: <UIView 0x129f0b7c0> not in the window
  |    | <App.ViewController 0x129b24540>, state: appeared, view: <UIView 0x129b2b750>
  | <UINavigationController 0x12b80a000>, state: disappeared, view: <UILayoutContainerView 0x12d0052c0> not in the window
  |    | <App.ViewController 0x129c07220>, state: disappeared, view: (view not loaded)
  |    | <App.ViewController 0x129c075c0>, state: disappeared, view: <UIView 0x129e0c730> not in the window
  |    | <App.ViewController 0x12d204900>, state: disappeared, view: <UIView 0x129e11550> not in the window
  |    | <App.ViewController 0x12d204ca0>, state: disappeared, view: <UIView 0x129b16200> not in the window
  + <App.ViewController 0x12d2065e0>, state: appeared, view: <UIView 0x129b26a90>, presented with: <_UIPageSheetPresentationController 0x12d205aa0>
  |    + <App.ViewController 0x129b4b130>, state: appeared, view: <UIView 0x129b4b4d0>, presented with: <_UIPageSheetPresentationController 0x129b4b7f0>
  |    |    + <App.ViewController 0x129e2ada0>, state: appeared, view: <UIView 0x129e25950>, presented with: <_UIPageSheetPresentationController 0x129e27ec0>
A declarative, efficient, and flexible JavaScript library for building user interfaces.
🖖 Vue.js is a progressive, incrementally-adoptable JavaScript framework for building UI on the web.
TypeScript is a superset of JavaScript that compiles to clean JavaScript output.
An Open Source Machine Learning Framework for Everyone
The Web framework for perfectionists with deadlines.
A PHP framework for web artisans
Bring data to life with SVG, Canvas and HTML. 📊📈🎉
JavaScript (JS) is a lightweight interpreted programming language with first-class functions.
Some thing interesting about web. New door for the world.
A server is a program made to process requests and deliver data to clients.
Machine learning is a way of modeling and interpreting data that allows a piece of software to respond intelligently.
Some thing interesting about visualization, use data art
Some thing interesting about game, make everyone happy.
We are working to build community through open source technology. NB: members must have two-factor auth.
Open source projects and samples from Microsoft.
Google ❤️ Open Source for everyone.
Alibaba Open Source for everyone
Data-Driven Documents codes.
China tencent open source team.