SPL-177 - Version 1.0.1
In this workshop as a customer, you will be building a real-world scalable serverless online order-processing solution that you can port over to kick-start your business. This lab focuses on meeting the needs of the entrepreneurs and even large business owners who want to move to a serverless solution and minimize their IT operations overhead.
The end goal of the workshop is to tell the story of the evolution of an online retailer, and the decision choices and design changes he makes to adopt an enterprise-level serverless solution. The manufacturer moves through four phases of evolution:
- Phase 1 - Garage Start up - The online retailer uses static web pages (S3), and processes orders via emails, fulfilled by Amazon.
- Phase 2 - Small Business owner - As his business grows, he receives notifications about online orders via SNS & Lambda and uses those alerts to fulfil the orders
- Phase 3 - Mid-sized company - The order intake form is backed by API Gateway and the lambda backend processes the orders and payments and persists them into DynamoDB.
- Phase 4 - Large Enterprise with supply chain management & analytics - Use DynamoDB Streams + Lambda for inventory re-stocking; and use Firehose + Athena + QuickSight to predict future demand.
By the end of this lab, you will be able to:
- Create a DynamoDB table and setup autoscaling
- Create Lambda functions to perform various functionalities like Create Order, Update Inventory and integrate Amazon Kinesis Data Firehose
- Create API gateway to frontend the static website and also call the backend Lambda functions
- Setup DynamoDB trigger and the streaming Lambda function
- Create Amazon Kinesis Data Firehose delivery stream and Amazon Kinesis Analytics application
To successfully complete this lab, you should be familiar with basic navigation of the AWS Management Console and be comfortable editing scripts using a text editor.
Here are some basic details on the various AWS Services used in this Lab.
Key concepts to know:
AWS Serverless Application Model(SAM): The AWS Serverless Application Model (AWS SAM) is a model to define some of the serverless applications . An AWS CloudFormation template with serverless resources conforming to the AWS SAM model is referred to as a SAM file or template. AWS SAM is natively supported by AWS CloudFormation and defines simplified syntax for expressing serverless resources. The specification as of June 2018 covers APIs, Lambda functions and Amazon DynamoDB tables. Please refer to this link to refer to the latest information on SAM. The SAM specification and implementation are open sourced under the Apache 2.0 license and you can find more details here.
In the Lab instructions further ahead, we will share the SAM template and the commands used to package the SAM template into a cloudformation script that can be used to create Cloudformation stacked resources in AWS, for this solution.
DynamoDB autoscaling: To achieve good customer experience, avoiding throttling of capacity units becomes very critical. DynamoDB auto scaling uses the AWS Application Auto Scaling service to dynamically adjust provisioned throughput capacity on your behalf, in response to actual varying traffic patterns. This enables a table or a global secondary index to increase its provisioned read and write capacity to effectively manage sudden increases in traffic. When the workload decreases, Application Auto Scaling decreases the throughput to avoid customers from paying for unused provisioned capacity. DynamoDB Auto Scaling is designed to accommodate request rates that vary in a somewhat predictable, generally periodic fashion. If you need to accommodate very unpredictable bursts of read activity, you should use Auto Scaling in combination with DAX. Also, the AWS SDKs will detect throttled read and write requests and retry them after a suitable delay.
API Gateway: Amazon API Gateway is an AWS service that enables developers to create, publish, maintain, monitor, and secure APIs at any scale. You can create APIs that access AWS or other web services, as well as data stored in the AWS Cloud. To prevent your API from being overwhelmed by too many requests, Amazon API Gateway throttles requests to your API using the token bucket algorithm, where a token counts for a request.
AWS Glue: AWS Glue is a fully managed ETL (extract, transform, and load) service that makes it simple and cost-effective to categorize your data, clean it, enrich it, and move it reliably between various data stores. AWS Glue consists of a central metadata repository known as the AWS Glue Data Catalog, an ETL engine that automatically generates Python or Scala code, and a flexible scheduler that handles dependency resolution, job monitoring, and retries. AWS Glue is serverless, so there’s no infrastructure to set up or manage.
Other AWS services than the ones needed for this lab are disabled by IAM Policy during your access time in this lab. In addition, the capabilities of the services used in this Lab are limited to what's required by the lab and in some cases are even further limited as an intentional aspect of the lab design.
Note: Please note that with the deployment of this qwiklab, a number of IAM roles are created that will be used by various services.
This Lab is split into the following phases:
Phase 1 - Garage Startup (using S3) Phase 2 - Startup Company (using SNS, Cognito and S3) Phase 3 - Enterprise (using Lambda, DynamoDB, API Gateway and S3) Phase 4 - Analytics (using Lambda, DynamoDB, API Gateway, S3, Kinesis data Firehose, Kinensis Analytics) Phase 5 - Operational Metrics Dashboard (Optional) Phase 6 - Operationalize data integration using AWS glue and Amazon Athena (Optional)
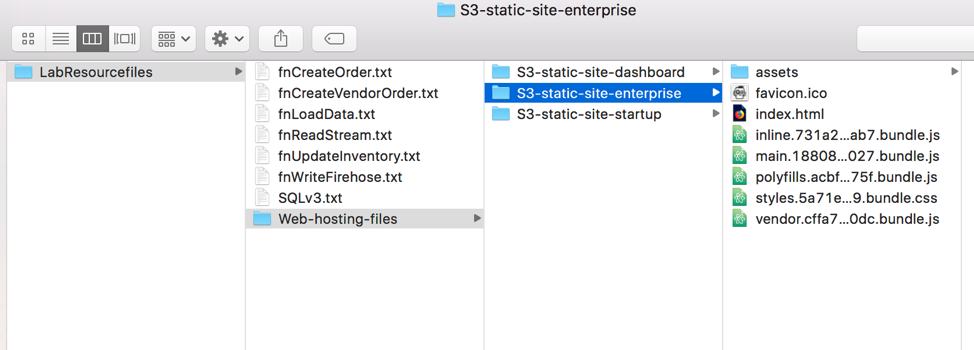
This folder consists of python functions needed for creating Lambda functions and 3 sub-folders with the files needed for hosting the static site on S3. Please review the folder content and familiarize yourself with the files.
- Task 1 - Create a static site hosted on S3
- On the AWS Services console, select S3 in the Services dropdown and create a new bucket with the name of your choice by clicking + Create bucket
Note: Make sure your bucket name is all in lower case and should be unique across S3. For example "website-startup-yourid" (appending your id helps in making the string unique)
-
After entering a unique name for the bucket name, you can click the Create button on the button left corner of the window.
-
Click your bucket.
-
Click the Permissions tab.
-
Below Public access settings, click Edit then:
- De-Select all of the boxes
- Click Save
- In the confirm box, enter
confirm - Click Confirm
-
Click the Overview tab.
-
Click on the Upload button.
-
Drag and drop all the files from within the "LabResourcefiles\web-hosting-files\S3-static-site-startup” folder you downloaded initially. The index.html file should be in the root of the bucket.
-
Hit Next to set the bucket permissions. In the section, "Manage public permissions", choose the option Grant public read access to this object(s) and complete the wizard by hitting Next with the default values and at the end click Upload to upload the files.
-
Select Properties link of the bucket you just created and open Static Website hosting to enable static web-hosting by selecting the option, Use this bucket to host a website. Update the index document to "index.html" and then hit Save button for "Static website hosting" tab.
-
Access the site by clicking on the Endpoint link under, Static website hosting. This should look something like http://YOURBUCKETNAME.s3-website-YOURREGION.amazonaws.com
You have now completed the Garage Start up phase! Stop here, and wait for instructor for the next step
- Task 1 - Grab the Cognito Id
- Task 2 - Create SNS Topic
- Task 3 - Update the website configuration files
- On the console, search for Cognito service and click on Manage Identity Pools . You should see an Identity pool listed that was created as part of the Lab setup.

-
Click on the Identity Pool name, ServerlessdaysCognitoIdentity and then click "Edit Identity pool" on the top right corner of the page. This will display all the properties of the Cognito Identity Pool.
-
Open a notepad on your local machine and copy and paste the value of the Identity pool ID that looks like YOURREGION:123b1234-f12b-1a1d-123b-12ab019652b1 in your notepad for later reference
Note: You do not need to click the "(Show ARN)" link.
- On the console, search for SNS service to open Simple Notification Service where you can create a topic for email subscription.
If you are opening SNS for the first time, you will have to click on Get started button.
- Go to Topics and hit Create New Topic . Enter a Topic name of your choice and a display name. For example: Startup-SNS
Note: Display Name cannot exceed 10 characters.
-
Now, select the topic created and click on Actions --> Subscribe to topic. In the Protocol field on the new popped up window, choose Email and enter your email address that you can access in the Endpoint field and then click Create Subscription
-
Now, copy and paste the ARN listed for the topic which should look something like "arn:aws:sns:YOUR-REGION:YOUR-ACCOUNT-NUMBER:TOPICNAME" in the notepad you had opened for later reference.
Note: You will receive an email to confirm subscription. Do not forget to "Confirm subscription" to receive emails from SNS.
-
Open the index.html file in the downloaded Lab resources folder ("/Web-hosting-files/S3-static-site-startup/").
-
Update the Cognito id and SNS ARN that you made note of in the previous two tasks.
var myCognitoIdentityPool = 'us-west-2:xxxxxx-xxxx-xxxx-xxxx-xxxxxxxxxxxxxxx';
var mySNSTopicARN = 'arn:aws:sns:us-west-2:xxxxxxxxxxxx:xxxxxxxxx';
var myAWSRegion = 'us-west-2';
- Re-upload the index.html file back into the S3 bucket using the Upload button again.
Note: Make sure you grant public access to the index.html file that was just re-uploaded to ensure you have permissions to access this file.
- Access the site by clicking on the Endpoint link under, Static website hosting in the Properties window of the S3 bucket. This should look something like http://YOURBUCKETNAME.s3-website-YOURREGION.amazonaws.com
You should see a webpage displaying Zombie Hunting Catalog*
-
On the site, click on the toggle button, "Start-up Mode?" to enable the email field by changing the value to "Yes".
-
Optionally enter the from email address and then update the quantity for the products to be purchased, followed by clicking Send Order button.
You will see a message stating THANK YOU FOR YOUR ORDER!!!!!! on the webpage.
- You should receive an email with the order details.
You have now completed the Start up Company phase! Stop here, and wait for instructor for the next step
- Task 1 - DynamoDB table creation and data load
- Task 2 - Create the Lambda function to read the data from the DynamoDB table and populate
- Task 3 - Create an API gateway endpoint for accessing the static website and submitting Create order requests
-
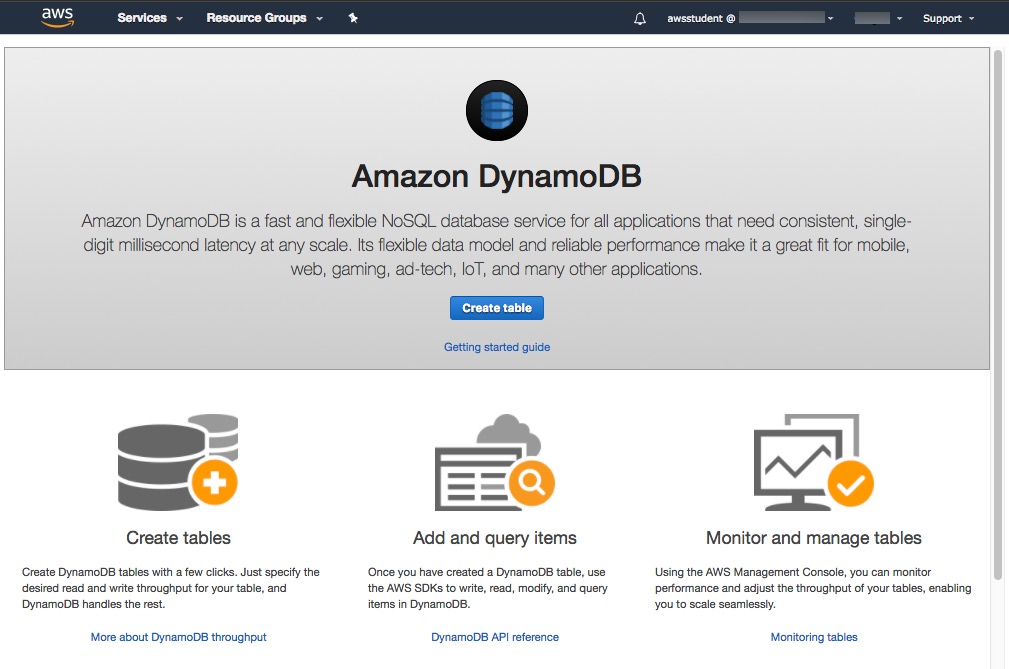
On the AWS Services console, select DynamoDB
-
We haven't created any DynamoDB tables yet. So you will see a getting-started page as shown in the screenshot below.
Figure 2 - DynamoDB
-
Once the DynamoDB view is opened, Click Create Table
-
Enter the following details to create the DynamoDB table and then scroll down and click Create
- Table Name:
UnifiedTable- Partition Key:
pk(String)- Sort Key:
sk(String)
Note: Check the checkbox "Add sort key" to enter the sort key
Once you click Create , you will see the new table created along with other views for the table like Overview, Items, Metrics, Alarms etc.
Task2 - Create Lambda functions to populate the data into the Dynamo table and write order information to the table
- You can use the below link to deploy a cloudformation template to create the Lambda function. If you choose to create the Lambda function manually, you can skip this step and execute the subsequent 4 steps.
Deploy Cloudformation Template
You should now see a "Create stack" screen. Click Create button to deploy the cloudformation stack that creates the Lambda function. Once created, you can review the Lambda function to make sure the right role is associated.
-
Please execute the next 4 steps to create the Lambda function if you chose to skip the previous step. On the AWS Services console, select Lambda service and on the home screen and then click Create a function
-
Type in the following values and click Create function to create a new Lambda function.
Lambda Function for Populate DynamoDB Table:
- Ensure "Author from Scratch" radio button is selected
- Name:
fnLoadData- Runtime: Python 3.6 (choose from dropdown)
- Role: Choose an existing role (choose from dropdown)
- Existing role -
fnLoadData(choose from dropdown)
-
Now, copy the function named, "fnLoadData" from the downloaded folder named "LabResourcefiles" and scroll down to the Function Code section of Configuration to paste the complete code.
-
Modify the timeout value to 30 seconds and then click on Save button to save the changes made.
-
You can use the below link to deploy a cloudformation template to create the Lambda function, "fnCreateOrder". If you choose to create the Lambda function manually, you can skip this step and execute the subsequent 4 steps.
Deploy Cloudformation Template
You should now see a "Create stack" screen. Click Create button to deploy the cloudformation stack that creates the Lambda function. Once created, you can review the Lambda function to make sure the right role is associated.
-
Please execute the next 4 steps to create the Lambda function if you chose to skip the previous step.
-
On the AWS Services console, select Lambda service again to create another new function for creating a new order. Type in the following values and click Create function to create a new Lambda function.
Lambda Function for CreateOrder:
- Ensure "Author from Scratch" radio button is selected
- Name:
fnCreateOrder- Runtime: Python 3.6
- Role: Choose an existing role
- Existing role -
fnCreateOrder
-
Now, copy the function named, "fnCreateOrder" from the downloaded folder named "LabResourcefiles" and scroll down to the Function Code section of Configuration to paste the complete code.
-
Modify the timeout value to 30 seconds and then click on Save button to save the changes made.
-
Now, go ahead and open the lambda function, fnLoadData and click the Test . Enter a name for the Event Name and hit Create button at the bottom of the view.
-
Click the test button again to execute the lambda function for loading the data.
-
Now that the data was successfully loaded, navigate back to the DynamoDB service and verify if the new data that was loaded is visible in the Item view for the table, UnifiedTable
Task3 - Create an API gateway endpoint for accessing the static website and submitting Create order requests
-
On the AWS Services console, select API Gateway service view by searching for API Gateway in the Services dropdown
-
If you are accessing API Gateway for the first time, click on Get Started button to create a new API. Else click + Create API and then type in the following values and hit the Create API button.
- select the radio button New API
- API Name:
Serverless Days- Description: Type in the appropriate Description (optional)
- Endpoint Type: Regional (Default value)
- You will now see different optoins for the API you just created. With the / selected, click <span style=ssb_grey">Actions menu and choose Create Resource and type the following values
- Configure as proxy resource: not checked (default)
- Resource Name*:
order- Resource Path*:
order- Enable API Gateway CORS: check the box
You will see a new /order resource created.
-
Now, with the resource (/order) selected, click <span style=ssb_grey">Actions menu again and this time choose Create Method
-
In the new field that has now appeared under OPTIONS, select the value POST and click on the little tick mark right next to the method POST to confirm
-
Select the following values for the POST method and then hit Save button, followed by OK.
- Integration Type: Lambda Function
- Use Lambda Proxy Integration: check the box
- Lambda Region: us-west-2 (choose the region where your lambda resources are deployed)
- Lambda Function:
fnCreateOrder
- Now, click <span style=ssb_grey">Actions menu and choose Deploy API and type the following values
- Deployment stage*: [New Stage]
- Stage name*:
production- Stage description:
production- Deployment description:
production
After typing in the above values, hit Deploy . Then scroll down to the bottom of the view and click Save Changes
- Now expand the production stage to view the methods in the hierarchical tree. You should see the POST method. Once you click on the POST method under /order, you will see the Invoke URL. Please make note of the invoke URL in your notepad which should look as shown in the screenshot below, for the next task (Task4).
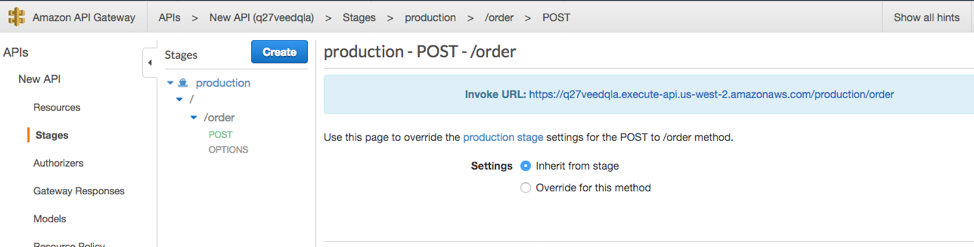
Figure 3 - APIGateway
Note: Make sure /order is at the end of the URL
- On the AWS Services console, select S3 in the Services dropdown and create a new bucket with the name of your choice by clicking + Create bucket
Note: Make sure your bucket name is all in lower case and should be unique across S3. For example "website-enterprise-yourid" (appending your id will make the name unique)
-
After entering a unique name for the bucket name, you can click the Create button on the button left corner of the window.
-
Go to the downloaded folder for the workshop and go to the "/Web-hosting-files/S3-static-enterprise/" folder
Note: While copying the folder content, make sure the index.html file is in the root of the bucket.
- Open the app-config.json file in the downloaded lab resource folder, "Web-hosting-files/S3-static-site-enterprise/assets/" and replace the API Gateway URL with the one you made note of in the very last step of the previous task, while creating the API Gateway (as shown below), to re-direct your website to APiGateway.
{
  "api_url": "https://xxxxxxxxxx.execute-api.us-west-2.amazonaws.com/production/order",
  "load_amount": "35"
}
- Now, open the S3 bucket that was just created and click on the Upload button and then drag & drop all the sub-directories and files from the S3-static-enterprise folder.
Note: If you choose the "Add files" option, you will have to create the sub-directories in the S3-static-enterprise folder manually before uploading all the files.
-
Hit Next to set the bucket permissions. In the section, "Manage public permissions", choose the option Grant public read access to this object(s) and complete the wizard by hitting Next with the default values and click on Upload to finish the wizard.
-
Select Properties link of the bucket you just created and open Static Website hosting to enable static web-hosting by selecting the option, Use this bucket to host a website. Update the index document to "index.html" and click Save .
-
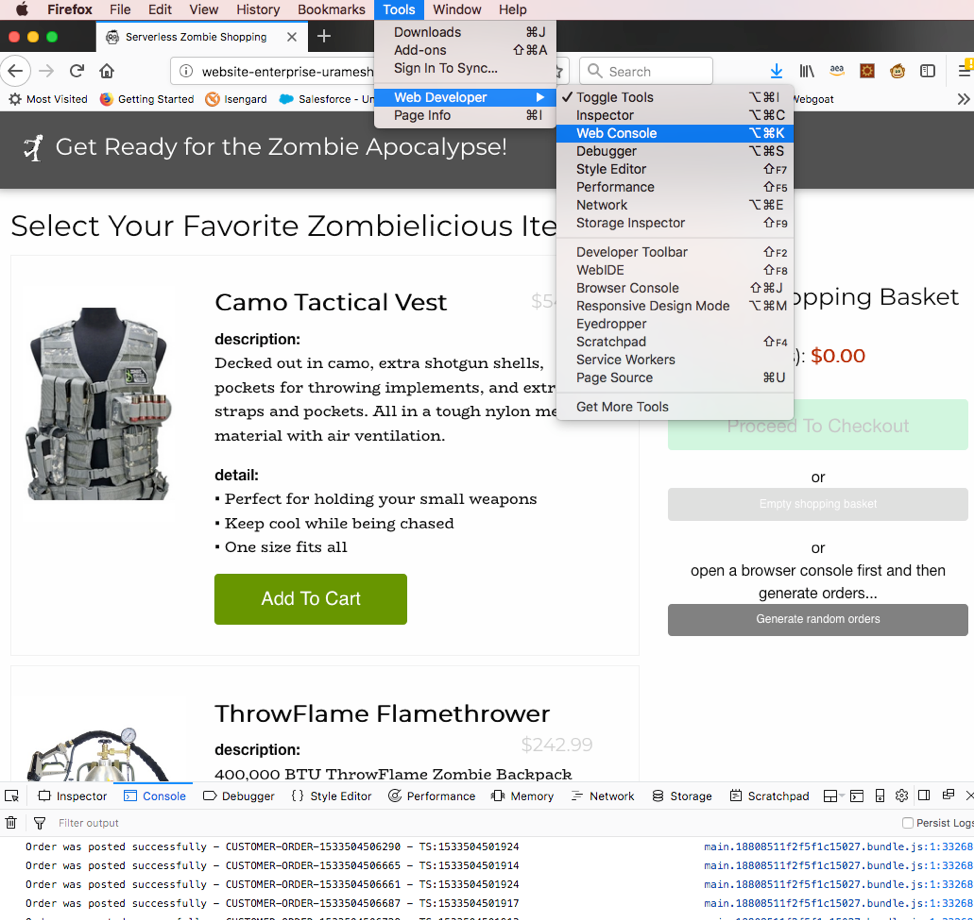
Access the site by clicking on the Endpoint link under, Static website hosting in the Properties of the S3 bucket. This should look something like http://YOURBUCKETNAME.s3-website-YOURREGION.amazonaws.com. Clicking the URL should open up the Zombie Apocalypse webpage. You can add certain products to the cart and click on Proceed To Checkout. Then choose a delivery option before placing the Purchase Order. You should get the below message once you have placed the order successfully.
Thank you for your order, it will be shipped shortly!
Note: You can also click on the "Generate random orders" button that will place a few random orders in the background. You can open the Web Developer console as shown in the below screenshot (firefox) to view the Customer orders that are created in the backend.
- You can now navigate to DynamoDB service on the console and verify if the new order(s) are created in the table, UnifiedTable under Items view.
You have now completed the Enterprise phase! Stop here, and wait for instructor for the next step
- Task 1 - Create the lambda functions to read from DynamoDB stream and write into the firehose delivery stream
- Task 2 - Create the lambda functions to read from DynamoDB stream
- Task 3 - Create DynamoDB trigger, Amazon Kinesis Data Firehose delivery Stream, and the Lambda function to write this to Kinesis data firehose
- Task 4 - Setup Kinesis Analytics and two more Lambda functions to Update Inventory and create vendor order
- You can use the below link to deploy a cloudformation template to create the Lambda function, "fnWriteFirehose". If you choose to create the Lambda function manually, you can skip this step and execute the next 4 steps.
Deploy Cloudformation Template
You should now see a "Create stack" screen. Click Create button to deploy the cloudformation stack that creates the Lambda function. Once created, you can review the Lambda function to make sure the right role is associated.
-
Please execute the next 3 steps to create the Lambda function if you chose to skip the previous step, else you can skip the subsequent 3 steps.
-
On the AWS Services console, select Lambda service again to create another new function for creating a new order. Type in the following values and click Create function to create a new Lambda function.
Lambda Function 2:
- Ensure "Author from Scratch" radio button is selected
- Name:
fnWriteFirehose- Runtime: Python 3.6 (choose value from dropdown)
- Role: Choose an existing role (default)
- Existing role -
fnWriteFirehose(choose value from dropdown)
-
Now, copy the function named, "fnWriteFirehose" from the downloaded folder named "LabResourcefiles" and scroll down to the Function Code section of Configuration to paste the complete code.
-
Modify the timeout value to 30 seconds and then click on Save button to save the changes made.
-
You can use the below link to deploy a cloudformation template to create the Lambda function, "fnCreateVendorOrder". If you choose to create the Lambda function manually, you can skip this step and execute the subsequent 4 steps.
Deploy Cloudformation Template
You should now see a "Create stack" screen. Click Create button to deploy the cloudformation stack that creates the Lambda function. Once created, you can review the Lambda function to make sure the right role is associated.
-
Please execute the next 3 steps to create the Lambda function if you chose to skip the previous step, else you can skip the next 3 steps.
-
On the AWS Services console, select Lambda service again to create another new function for creating a new order. Type in the following values and click Create function to create a new Lambda function.
Lambda Function 3:
- Ensure "Author from Scratch" radio button is selected
- Name:
fnCreateVendorOrder- Runtime: Python 3.6 (choose value from dropdown)
- Role: Choose an existing role (default)
- Existing role -
fnCreateVendorOrder(choose value from dropdown)
-
Now, copy the function named, "fnCreateVendorOrder" from the downloaded folder named "LabResourcefiles" and scroll down to the Function Code section of Configuration to paste the complete code.
-
Modify the timeout value to 30 seconds and then click on Save button to save the changes made.
- You can use the below link to deploy a cloudformation template to create the Lambda function, "fnReadStream". If you choose to create the Lambda function manually, you can skip this step and execute the subsequent 4 steps.
Deploy Cloudformation Template
You should now see a "Create stack" screen. Click Create button to deploy the cloudformation stack that creates the Lambda function. Once created, you can review the Lambda function to make sure the right role is associated.
-
Please execute the next 4 steps to create the Lambda function if you chose to skip the previous step, else you can skip the next 4 steps.
-
Go back to Lambda service home screen to create three new functions.
-
Type in the following values and click Create function to create new Lambda functions.
Lambda Function 1:
> - Ensure "Author from Scratch" radio button is selected
> - Name: ```fnReadStream```
> - Runtime: **Python 3.6** (choose value from dropdown)
> - Role: **Choose an existing role** (default)
> - Existing role - ```fnReadStream``` (choose value from dropdown)
-
Now, copy the function named, "fnReadStream" from the downloaded folder named "LabResourcefiles" and scroll down to the Function Code section of Configuration to paste the complete code.
-
Modify the timeout value to 30 seconds and then click on Save button to save the changes made.
Task3 - Create DynamoDB trigger, Amazon Kinesis Data Firehose delivery Stream, and the Lambda function to write this to Kinesis data firehose
- On the AWS Services console, select the DynamoDB service and select the table, "UnifiedTable". Now for this table, go to Triggers view. Click click <span style=ssb_blue">Create Trigger Menu and select Existing Lambda function with the following values:
- Function:
fnReadStream- Batch Size:
20- Enable Trigger - check the box
-
On the AWS Services console, select Amazon Kinesis service. This should display Amazon Kinesis Dashboard with all the Kinesis related services. Now click on Create delivery stream under Kinesis Firehose delivery streams.
-
Enter the following details while running through the delivery stream creation steps and then click Create delivery stream
- Delivery stream name:
knStream- Source: Direct PUT or other sources
- Record transformation*: Disabled
- Record format conversion*: Disabled
- Destination - Amazon S3
- S3 bucket* - Select Create new button to create a new S3 bucket with a name of your choice. For example
firehose-strm-yourid (use your id to maintain uniqueness) and retain the default region auto-selected.- Buffer Size - 5 MB (default)
- Buffer interval - 300 seconds (default)
- S3 compression* - Disabled (default)
- S3 encryption* - Disabled (default)
- Error logging* - Enabled (default)
- IAM role* - Click Create new or choose button and select the "knStream" role from the dropdown and "KinesisFirehoseS3Policy" for the Policy Name.
Continue to click Next while updating the above values until you are taken to the review screen. On this screen, review all the values entered and then hit Create delivery stream
- You should now see a new record listed, displaying the status of a new delivery stream you just created. The status changes from Creating to Active in couple of minutes. You need not wait on this and can continue with the next task.
Task4 - Setup Kinesis Analytics and two more Lambda functions to Update Inventory and create vendor order
-
On the AWS Services console, select Kinesis and on the Kinesis dashboard, under Kinesis analytics applications, click on Create analytics application . Type in a relevant name for the Application Name. For example:
EnterpriseApp -
You should see the message, Successfully created Application EnterpriseApp displayed. Under Source, click on Connect streaming data. Now, select the option, Kinesis Firehose delivery stream and choose the firehose delivery stream, knstream that you created couple of minutes back from the dropdown.
-
Retain the default option of Disabled for Record pre-processing.
-
In the next section named, Access to chosen resources, select the option Choose from IAM roles that Kinesis Analytics can assume and then select the IAM role, "KinesisAnalyticsRole" from the dropdown.
-
Now click Discover Schema. You may see an error stating, Schema discovery has failed because there is not enough data in stream knStream if there are no records in the stream, which is expected. Now that both the Lambda functions to read the DynamoDB stream and write the data into firehose are created, you can open a new browser window and follow the below steps to submit few orders to validate if the data is making it to the Kinesis data firehose delivery stream. Do not close the current browser window (Kinesis Analytics Application).
-
Navigate to the website URL that you have made note of in the Task 1 of this phase (4). If you have not made of the URL, you can open the bucket named, "website-enterprise-yourid" and then access the site by clicking on the Endpoint link under, Static website hosting in the Properties of the S3 bucket. This should look something like http://YOURBUCKETNAME.s3-website-YOURREGION.amazonaws.com. Clicking the URL should open up the Zombie Apocalypse webpage. You can add more orders by clicking on Generate Random Orders button to generate multiple orders for the Kinesis data stream.
-
Now that you have placed few orders, Amazon Kinesis data Firehose delivery stream should have received these records. So, navigate back to the other browser window you had opened, and again attempt to discover the schema by hitting the Re-discover Schema , you will see a message stating, Schema discovery successful and also display the records at the bottom of the view.
-
Now, click on Save and Continue to save the schema. Then under the section, "Real time analytics" click on Go to SQL editor button. This will prompt a message asking you if you want to Start the application. Click Yes, start application
-
From the downloaded Lab resources directory, copy the SQL from the file, "SQLv3.txt" and paste it in the SQL editor under "Real-time analytics" section and hit Save and run SQL button
CREATE OR REPLACE STREAM "UpdateInventory" (PRODUCT_TIME TIMESTAMP, PRODUCT VARCHAR(64), ORDER_QTY INTEGER);
        CREATE OR REPLACE PUMP "STREAM_PUMP" AS INSERT INTO "UpdateInventory"
        SELECT STREAM ROWTIME, "order_product", SUM("qty")
        FROM SOURCE_SQL_STREAM_001
        GROUP BY "order_product", STEP("SOURCE_SQL_STREAM_001".ROWTIME BY INTERVAL '1' MINUTE);
-
Once the application runs, you will see 3 new tabs appearing (Source data, Real-time analytics & Destination).
-
You can use the below link to deploy a cloudformation template to create the Lambda function, "fnUpdateInventory". If you choose to create the Lambda function manually, you can skip this step and execute the subsequent 4 steps.
Deploy Cloudformation Template
You should now see a "Create stack" screen. Click Create button to deploy the cloudformation stack that creates the Lambda function. Once created, you can review the Lambda function to make sure the right role is associated.
-
Please execute the next 4 steps to create the Lambda function if you chose to skip the previous step, else you can skip the next 4 steps.
-
Now, on the console, open Lambda service in a new windows to create another Lambda function.
-
Type in the following values and click Create function to create new Lambda functions.
Lambda Function 1:
- Ensure "Author from Scratch" radio button is selected
- Name:
fnUpdateInventory- Runtime: Python 3.6
- Role: Choose an existing role
- Existing role -
fnUpdateInventory
-
Now, copy the function named, "fnUpdateInventory" from the downloaded folder named "LabResourcefiles" and scroll down to the Function Code section of Configuration to paste the complete code.
-
Modify the timeout value to 1 minute and then click on Save button to save the changes made.
-
Go back to the screen where you had Kinesis Analytics application open. Select on the Destination tab and click the button, "Connect to a destination". This will open a new view under Kinesis Applications, letting to enter the details of the Destination.
- Destination*: Choose the option AWS Lambda function
- Lambda function:
fnUpdateInventory- Lambda function version*: $LATEST (default)
- Connect in-application stream name* - Choose an existing in-application stream
- In-application stream name*:
UpdateInventory- Output format: JSON
- Access to chosen resources*: Choose from IAM roles that Kinesis Analytics can assume
- IAM role*: KinesisAnalyticsRole
Note: You may have to RESELECT the IAM role to enable the Save and Continue button.
- Click on Save and Continue button to save the changes.
In the next step, we will submit few more Purchase Orders to see the Inventory getting updated.
- Navigate to the website URL that you have made note of in the Task 1 of this phase (4). If you have not made of the URL, you can open the bucket named, "website-enterprise-yourid" and then access the site by clicking on the Endpoint link under, Static website hosting in the Properties of the S3 bucket. This should look something like http://YOURBUCKETNAME.s3-website-YOURREGION.amazonaws.com. Clicking the URL should open up the Zombie Apocalypse webpage. You can add more orders by clicking on Generate Random Orders button to generate multiple orders for the Kinesis data stream. Alternatively, you can add mutiple products to the cart and choose a delivery option before placing the Purchase Order. You should get the below message once you have placed the order successfully. You can submit few more Purchase Orders to push data to the stream. Thank you for your order, it will be shipped shortly!
Note: Click on the Generate Random Orders button to generate multiple orders for the Kinesis data stream.
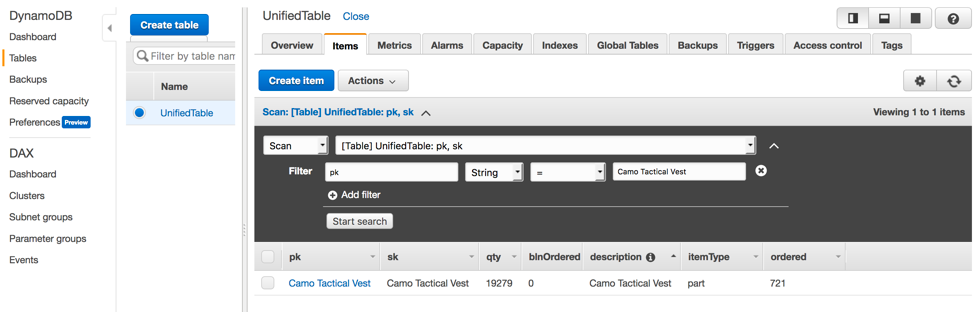
- Now navigate back to DynamoDB service and select the table, UnifiedTable. Under Items, scan for the specific products you ordered by adding a filter on pk to see the qty reduced based on the number of orders placed for the corresponding products.
You have now completed the Analytics up phase! Stop here, and wait for instructor for the next step
- Task 1 - Create GSI's for Vendor Product Order
- Task 2 - Create the S3 static site for Dashboard
-
On the AWS Services console, select DynamoDB. Choose the table, "UnifiedTable" and select the tab, "Indexes".
-
Click on Create index button and type the following values and again hit the button, Create index:
- Partition key:
itemType(S)- Sort key:
qty(N)- Index Name:
inventory
Note: Do not forget to choose the Sort key as a number
- Repeat the previous step to create another index with the following values only after the first index is created as only 1 online index can be created or deleted simultaneously per table
- Partition key:
itemType(S)- Sort key:
ordered(N)- Index Name:
orders
Note: Do not forget to choose the Sort key as a number.
-
Let us go ahead and submit a few orders to test the Vendor Product order creation. Now, before we do that, note that the logic built in the Lambda function is to place vendor product orders if the product inventory (qty) goes below 50. Let us first go ahead and update the qty for one of the products to 50.
-
Now, go back to the Items view in DynamoDB and select one of the products, Eg. Camo Tactical Vest. Update the qty value for this product to 50 and then place few more orders for this product.
-
Navigate to the website URL that you have made note of in the Task 1 of this phase (4). If you have not made of the URL, you can open the bucket named, "website-enterprise-yourid" and then access the site by clicking on the Endpoint link under, Static website hosting in the Properties of the S3 bucket. This should look something like http://YOURBUCKETNAME.s3-website-YOURREGION.amazonaws.com. Clicking the URL should open up the Zombie Apocalypse webpage. You can add more orders by clicking on Generate Random Orders button to generate multiple orders for the Kinesis data stream. Alternatively, you can add mutiple products to the cart and choose a delivery option before placing the Purchase Order. You should get the below message once you have placed the order successfully. You can submit few more Purchase Orders to push data to the stream. Thank you for your order, it will be shipped shortly!
Note: Click on the Generate Random Orders button to generate multiple orders for the Kinesis data stream.
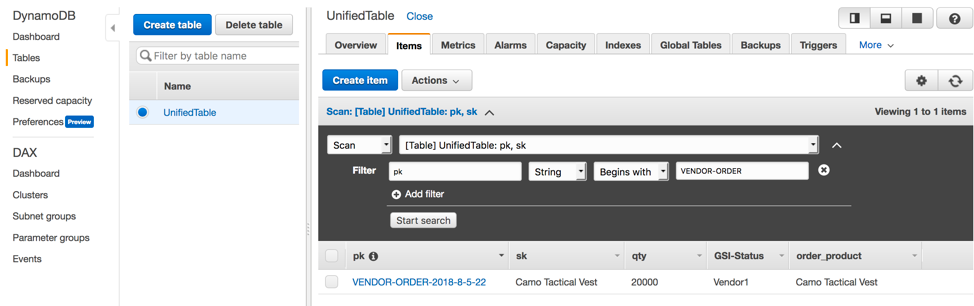
- You will now see that right after the qty value reduces to less than 50 based on the # of orders placed, a new record with pk "VENDOR-ORDER-YYYY-M-DD-HH" will be created for this product, Camo Tactical Vest with qty value of 20,000.
- Go to the downloaded Lab Resource files and update the Cognito Pool Id (captured in Phase 2-->Task 1) in the index.html file in the folder "/Web-hosting-files/S3-static-site-dashboard/index.html" as shown below:
var myCognitoIdentityPool = 'YOUR-REGION:a726703f-1d9a-4078-8b26-545bd6cf15a0';
var myAWSRegion = 'YOUR-REGION';
- On the AWS Services console, select S3 in the Services dropdown and create a new bucket with the name of your choice by clicking + Create bucket
Note: Make sure your bucket name is all in lower case and should be unique across S3. For example "website-dashboard-yourid" (appending your id will make the name unique)
-
After entering a unique name for the bucket name, you can click the Create button on the button left corner of the window.
-
Go to the downloaded folder for the workshop and go to the "/Web-hosting-files/S3-static-site-dashboard/" folder
Note: While copying the folder content, make sure the index.html file is in the root of the bucket.
-
Now, open the S3 bucket that was just created and click on the Upload button and then drag & drop all the files from the S3-static-site-dashboard folder.
-
Hit Next to set the bucket permissions. In the section, "Manage public permissions", choose the option Grant public read access to this object(s) and complete the wizard by hitting Next with the default values and click on Upload to finish the wizard.
-
Select Properties link of the bucket you just created and open Static Website hosting to enable static web-hosting by selecting the option, Use this bucket to host a website. Update the index document to "index.html" and click Save .
-
Access the site by clicking on the Endpoint link under, Static website hosting in the Properties of the S3 bucket. This should look something like http://YOURBUCKETNAME.s3-website-YOURREGION.amazonaws.com. Clicking the URL should open up the Order Dashboard webpage. This dashboard is built to display the following metrics using the two GSI's that were created in the previous task.
- Order Distribution
- Inventory Distribution
- Total Orders
-
Now go ahead and submit a few more purchase orders by clicking the Generate Random Orders button to generate few Purchase Orders on the Enterprise webpage. You can then access the site by clicking on the Endpoint link under, Static website hosting in the Properties of the S3 bucket, "website-enterprise-yourid". This should look something like http://YOURBUCKETNAME.s3-website-YOURREGION.amazonaws.com. Clicking the URL should open up the Zombie Apocalypse webpage Order Dashboard. Now, click on the Generate Random Orders button to generate few Purchase Orders.
-
Now navigate back to the Order Dashboard page, scroll down and click the Refresh if Off button to automatically update the dashboard.
Note: The dashboard is currently designed to update every 20 seconds.
You have now completed the Operational Metrics Dashboard phase! Stop here, and wait for instructor for the next step
- Task 1 - Setup AWS Glue job
- Task 2 - Query the database using Amazon Athena
-
On the AWS Services console, select AWS Glue. Click on Get Started to create Glue jobs.
-
Select Crawlers on the left tab to view or create the crawler jobs.
-
Click on Add crawler to create a new job. Now, update the following values while creating the new job:
- Crawler Name: Use an appropriate job name
- Select the option, "Specified path in my account"
- Include path: s3://YOURBUCKETNAME (click on the folder icon and choose the bucket name that you created from the list which should look like firehose-strm-yourid)
- Select the option, "Choose an existing IAM role:"
- IAM Role: GlueServiceRole
- Frequency: Run on demand
-
For the Database, click "Add database" and enter a name of your choice, followed by clicking Create button.
-
Select the crawler job listed and click on Run crawler to run the Crawler job. This creates the Athena database in the backend.
-
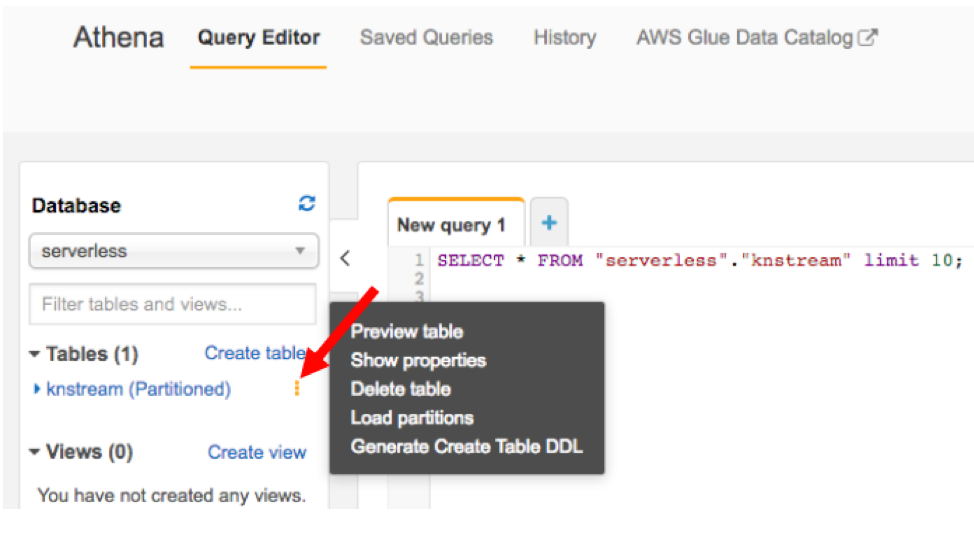
Select "Athena" on the console to view the database created. In the query editor, you will see the database you created, listing the table name, YOURBUCKETNAME(Partitioned).
-
Click on the "3 vertical dots" icon to preview the table as shown in the below screenshot.
- You can run other queries on your table to view data. Here is another query that displays the count of Purchase Orders by product names.
SELECT count(*),order_product FROM "serverless"."knstream"
GROUP BY order_product
Congratulations! You now have successfully:
- Created a DynamoDB table with autoscaling
- Created Lambda functions to perform various functionalities like Create Order, Update Inventory and integrate Amazon Kinesis Data Firehose
- Created an API gateway to frontend the static website
- Setup DynamoDB trigger and the streaming Lambda function
- Created Amazon Kinesis Data Firehose delivery stream, AWS Glue jobs and Amazon Athena queries to feed the data to other analytics applications like Quicksight
- For more information about AWS Training and Certification, see http://aws.amazon.com/training/.
- For more AWS Self-Paced Labs, see http://run.qwiklabs.com.
For feedback, suggestions, or corrections, please email us at [email protected].


