A browser extension for joining conference / class / meeting automatically
| Chrome | Firefox | Safari | Microsoft Edge | Opera | |
|---|---|---|---|---|---|
| Browser |

|

|

|

|

|
| Required Version |
v100.0 or 
|
Not Tested | Not Tested | Not Tested | Not Tested |
| Install | Add to Chrome | N/A | N/A | N/A | N/A |
| 🟠 Due to upgrading the latest manifest version, this extension isn't available for the other browsers except for Chrome. | |||||

| Features | ||
|---|---|---|
 |
1 | Create a new slot / Make a schedule for auto-join to Google Meet. |
 |
2 | Save the slot/meet schedule with Title and short description. |
 |
3 | Customize icon and color for every slot for a better look in every slot. |
 |
4 | Set date, and time for joining. |
 |
5 | Set “From Date” and “To Repeat Date” if you want to join automatically every day at a certain time. |
 |
6 | Join to scheduled meet date-wise or join continuously weekly/day basis. |
 |
7 | Automatically join from individual or multiple Google accounts at the same time. |
 |
8 | Get notified when a tab is created to join the meet automatically. |
 |
9 | Control camera and microphone on the automatically joining moment. |
 |
10 | Control joining preference e.g. [Present Now] or [Companion Mode] (If needed). |
 |
11 | Leave / End call at a specific / scheduled time. |
 |
12 | Set meeting duration and left from the meeting automatically. |
 |
13 | Leave / End call if the meeting has below a certain number of participants. |
 |
14 | Access additional features like “Auto accept participant requests” (For the meet host only). |
 |
15 | The meet host can access automatically join, and accept participant requests at the same time. |
|
16 | The meet host can also just use the ‘Accept participant requests’ feature only. |
 |
17 | Automatically retry/refresh if internet connection makes occurs on the joining moment. You can set minutes a minimum of 6 and up to 15 minutes to automatically retry/refresh. |
 |
18 | Re-join request options are available if ‘Join request is Denied’ or ‘No respond to the join request’. |
 |
19 | You can set different times for sending up to 5 messages after joining automatically. |
 |
20 | View every action log on the options page with warning, success, failure status, and more details. |
 |
21 | Turn on/off controls later on in the `Options` page view slot section. |
 |
22 | Generate Javascript code as an alternative to creating a new slot. Use this option anytime or in case creating a new slot option does not work. |
 |
23 | Get log report to the browser console to see what action was completed, when started, who joined, the meeting closed, and many other logs. |
 |
24 | Generate code option is also available for participants and meet host both. |
Click on the Add to Chrome (or your preffered browser) link from the above table. After installing the addon you can
pin it to your borwser in order to access and save preferences instantly.
Then click on the  >
>  icon from the borwser toolbar or right click on
the
icon from the borwser toolbar or right click on
the  3 dots icon that associated with > click
 options to access the options page and
other features.

|
|


|
|


|
Generate code is an option where you don't need to create a new slot to automatically join or participant requests. This is a limited feature if the main form doesn't work properly or if you don't wish to create a new slot.
To do that follow the below steps:- Go to options page. Select the Generate Code option above of the create a new slot form.

To join the call
To accept the participant requests
You can enable the Log reporting option to see the update while the generated code were executed. 
Execute code
See result
|


|
Only controls can be edit for a submitted slot. Click on a submitted slot. The edit option will be available on the left sidebar of Logs panel. |
| Preference (Light) | Preference (Dark) | ||
|---|---|---|---|
| Options Page | |||

|

|
||
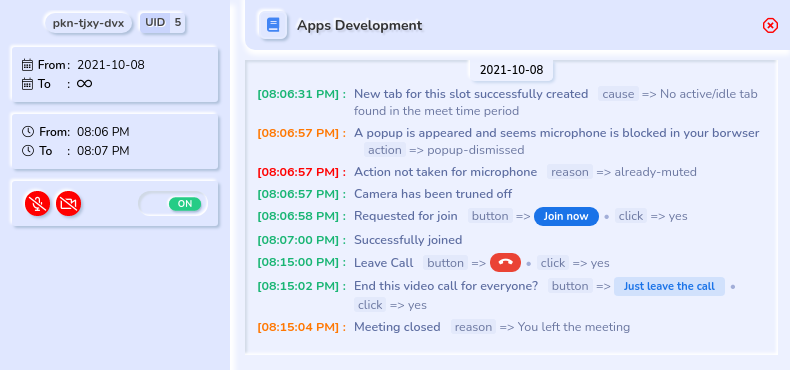
| View activy log (This option track the activites what this extension did automatically and this data stores for 2 days.) |
|||
|

|
||
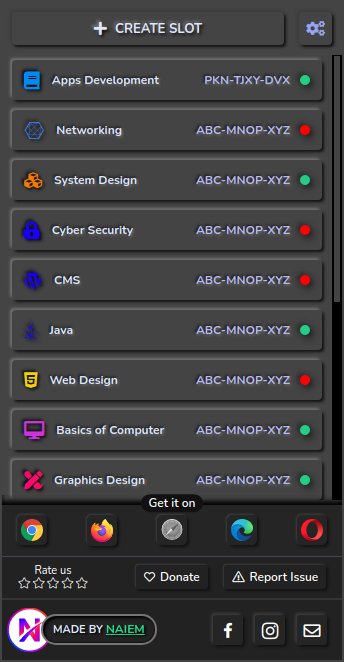
| Create a new slot | Slot List (Popup view) | ||

|

|

|
|
- Browser must be opened on for that time when automatically join will happen.
 Keep active options page if you see this indicator on the top right corner. It's required if you've upcoming scheduled meet.
- Don't update the extension while it's being executed to any Google Meet page.
- Don't make multiple slot for the same time with the same input
- Don't execute code multiple times untill the call is ended.
- To re-execute code in a same tab make the tab is reloaded completely and all popup is closed.
- Genrate Code option execution can't control to turn off/on microphone or camera, so make sure you've done your controls preference before execute the code.
- Automatically accept participant request will work only if you're joined as a host in the call.
- Keep active/ideal the window and tab. Don't minimize the Google meet tab, execution can be interrupted in that case.
This exentension doesn't collect or send any personal information, credentials or any sensetive information. So you can use this addon safely. It will store only the actions that were executed while automatically join action failed or succeeded, you can view these updates in the options page log section.
- E-mail: [email protected] (for any inquiries)
-
v1.0.1 : April 15, 2022
- Fixed camera/microphone blocked popup auto-closing issue
- Compatible with updated Google Meet
- Fixed major issues
-
v1.0.0 : February 18, 2022
- Added 2 more joining options
PresentandCompanion Mode - Automatically make a new attempts if
No one respondedorDeniedto the join request - Added
Addiational Featuressection toAccept participant requestsautomatically - Added
Generate Codeoption to use instead of creating a new slot. - UID issue solved
- Informative log panel
- Design improved
- Service worker (inactive), fixed
- Other errors and bugs fixed
- Added 2 more joining options
-
v0.0.1 : September 22, 2021
- Initial release
