![]()
Custom Resolutions, XDR/HDR Extra Brightness, Brightness Adjustment, Dummy Displays, Picture in Picture, Display Overrides - a macOS menubar app.
![]()


BetterDisplay is a truly wonderful tool! It let's you convert your displays to fully scalable screens, manage display configuration overrides, allows brightness and color control, provides XDR/HDR brightness upscaling (extra brightness beyond 100% for compatible displays with Apple Silicon Macs), full dimming to black, helps you create and manage virtual displays (dummies) for your Mac, create Picture in Picture windows of your displays and gives you a host of other features to manage your display's settings easily from the menu bar.

- Convert your internal and natively connected external displays to smoothly-scaled HiDPI displays on Apple Silicon - now even without mirroring a dummy (displays with notch, HDR, HDCP, high refresh rate fully supported)! *
- Reach the full brightness potential of your XDR or HDR display - XDR brightness upscale to 1600 nits, external HDR display brightness upscale also supported. This feature requires an Apple Silicon Mac. *
- Change the display's brightness, volume and colors via software and hardware (DDC) control via sliders and native or custom keyboard shortcuts!
- Change display inputs via DDC on supported displays.
- Create custom HiDPI resolutions for real displays manually and redefine certain system display parameters!
- Create any number of dummies (virtual screens) with varying aspect ratios.
- Enable Night Shift for your TV!
- Protect display configuration, forbid auto-switch to VRR etc. *
- Use headless Macs (servers) with any resolution and HiDPI mode for remote access.
- Create Picture in Picture window for any real or dummy displays. *
- Redirect your display's contents (real or dummy) to an other screen via streaming. *
- If you are using a big TV up close, use the bottom half of your TV as a wide screen display (off-center streaming). *
- Scale Sidecar resolutions and portrait SideCar support (via dummy full screen streaming). *
- Better quality zooming (
System Preferences»Accessibility»Zoom) or High Quality screenshots even on 1080p displays - Easily change the resolution of your real and dummy displays via a slider (or submenu) from the menubar.
- Quickly accessible refresh rate and screen rotation menu.
- Simplify creating mirrored sets. *
- Easily move around displays relative to each other using the app menu.
- Quickly designate a display to be main display.
- Associate dummies with displays for auto connect/disconnect.
- Keyboard shortcuts for basic operations.
- Advanced keyboard shortcuts support. *
- Custom dummies (resolution, orientation, naming). *
- Create a dummy optimized for a real display. *
- Export display EDID and show detailed display information (Apple Silicon).
... and more is coming! :)
Note: featues marked with an asterisk (*) require a Pro license. Some features may be available in the latest pre-release version only.
For a more detailed list and comparison with some popular alternatives, click here...
| BetterDisplay | MonitorControl | Lunar | SwitchResX | Vivid | DisplayBuddy | |
|---|---|---|---|---|---|---|
| Custom scaled resolution editing | 🆓 | 💰 | ||||
| Native smooth scaling | 💰 | |||||
| Night Shift for TVs | 🆓 | |||||
| Display name override | 🆓 | 💰 | ||||
| Native, default resolution editing | 🆓 | |||||
| Dummy display creation | 🆓 | |||||
| Dummy-display association | 🆓 | |||||
| Display mode selector menu | 🆓 | 🆓 | 💰 | |||
| Resolution slider | 🆓 | |||||
| Picture in Picture | 💰 | |||||
| Custom dummies | 💰 | |||||
| Full screen streaming | 💰 | |||||
| Stream/PIP, stretching, off-centering | 💰 | |||||
| Stream/PIP rotation, portrait Sidecar | 💰 | |||||
| Teleprompter mode (stream flipping) | 💰 | |||||
| Mirror configuration | 💰 | |||||
| DDC brightness control | 🆓 | 🆓 | ❗ | 💰 | ||
| DDC volume control | 🆓 | 🆓 | ❗ | 💰 | ||
| DDC input switching | 🆓 | 🆓 | 💰 | |||
| DDC input customization | 🆓 | |||||
| Native brightnesss and volume keys | 🆓 | 🆓 | 🆓 | |||
| Basic custom keyboard shortcuts | 🆓 | 🆓 | 🆓 | 💰 | 💰 | 💰 |
| Advanced custom keyboard shortcuts | 💰 | ❗ | 💰 | |||
| Basic native OSD support | 🆓 | 🆓 | 🆓 | 💰 | ||
| Combined native OSD support | 🆓 | 🆓 | ||||
| Software dimming (color table) | 🆓 | 🆓 | ❗ | 💰 | ||
| Software dimming (overlay) | 🆓 | 🆓 | ❗ | |||
| Combined dimming | 🆓 | 🆓 | ❗ | |||
| Dimming to black | 🆓 | 🆓 | 💰 | |||
| Color adjustments | 💰 | 💰 | ||||
| Color temperature control | 💰 | 💰 | ||||
| XDR extra brightness | 💰 | 💰 | 💰 | |||
| Third party HDR extra brightness | 💰 | 💰 | ||||
| Display config protection | 💰 | |||||
| EDID retrieval | 🆓 | 💰 | ||||
| EDID override (Intel) | 🆓 | |||||
| Custom timings on Intel | 💰 | |||||
| Command Line Integration | ⌛🆓 | 💰 | ||||
| DIY hardware integration | 💰 | |||||
| Advanced Brightness syncing | ⌛🆓 | 🆓 | 💰 | |||
| Presets | ⌛💰 | 💰 | 💰 | 💰 | ||
| Schedule based settings | ⌛💰 | 💰 | ||||
| App specific settings | ⌛💰 | 💰 | 💰 | |||
| Price | $15 | $0 | $23 | $15 | €20 | $13 |
| Trial days | 14 | - | 14 | 10 | - | - |
🆓 - Feature is completely free without limitation, even after trial
❗ - Feature is free with limitations imposed after trial (for Lunar: 100 adjustments per day)
💰 - Feature is a paid/pro feature and is not available after a trial (for apps with trial)
⌛ - Feature is planned
Please note that this comparison is only meant to give you a big picture, does not contain all secondary and derived functionalities (free or paid) for each software and might not be a fair representation in every respect as I am not an expert on the alternative apps. I am pretty sure the devs of respective alternatives would feel the comparison is skewed in some way or I did miss an important aspect or unique advantage of the competing solution. For an educated decision you might want to try all apps that offer some sort of trial. If you feel the comparison is not fair, drop me a note a the BetterDisplay Discord channel!
- Download the latest version
- Open the DMG file and move the app to Applications folder on your Mac as instructed.
- Start the app.
- Use the app menu bar item to interact with the app.
Here are some instructions on how to activate the most seeked-after features of the app.
With BetterDisplay you can fully unlock the maximum brightness of your Apple XDR display as well as your third party HDR capable display.
You don't have to do anything special to enable the display - once you start the app, you can simply use the brightness slider to increase the brightness level beyond 100% to produce up to 1600 nits on your Pro Display XDR. For other HDR displays, the app automatically sets up the maximum brightness upscaling level taking into account the reported maximum panel brightness.
Please note that the XDR/HDR upscaling feature requires an Apple Silicon Mac!
Some other steps that might be neccessary:
- If you want to use your native Apple keyboard brightness control keys, you need to set up the Accessibility Privileges. Follow the instructions under
Settings(the gear icon at the bottom of the menu) /Keyboard/Set up Accessibility Permissions - For third party HDR displays, you need to enable HDR mode to use HDR brightness upscaling. You can do so in the app menu by clicking
Enable HDR Mode. This is not required for XDR displays (these automatically switch to EDR/HDR mode). - Please note that on-screen HDR content will tone-map properly when the brightness slider is set to 100% (on third party HDR displays, or 50%-100% on XDR displays)

Some Macs have issues with custom resolutions. Apple Silicon Macs notoriously don't allow sub-4K resolution displays to have HiDPI ("Retina") resolutions even though some 1440p display would greatly benefit from having a HiDPI "Retina" mode. On other Macs the resolution options for wide displays are too constrained.
BetterDisplay solves the problem by unlocking your screens making them fully scalable natively while providing a nice HiDPI resolution slider to freely scale the desktop size. Also available is the option to create a flexible virtual "dummy" displays that support an unprecedented range of Retina resolutions. You can then utilize this dummy display as a mirror source for your display achieving any HiDPI resolution or for other purposes.
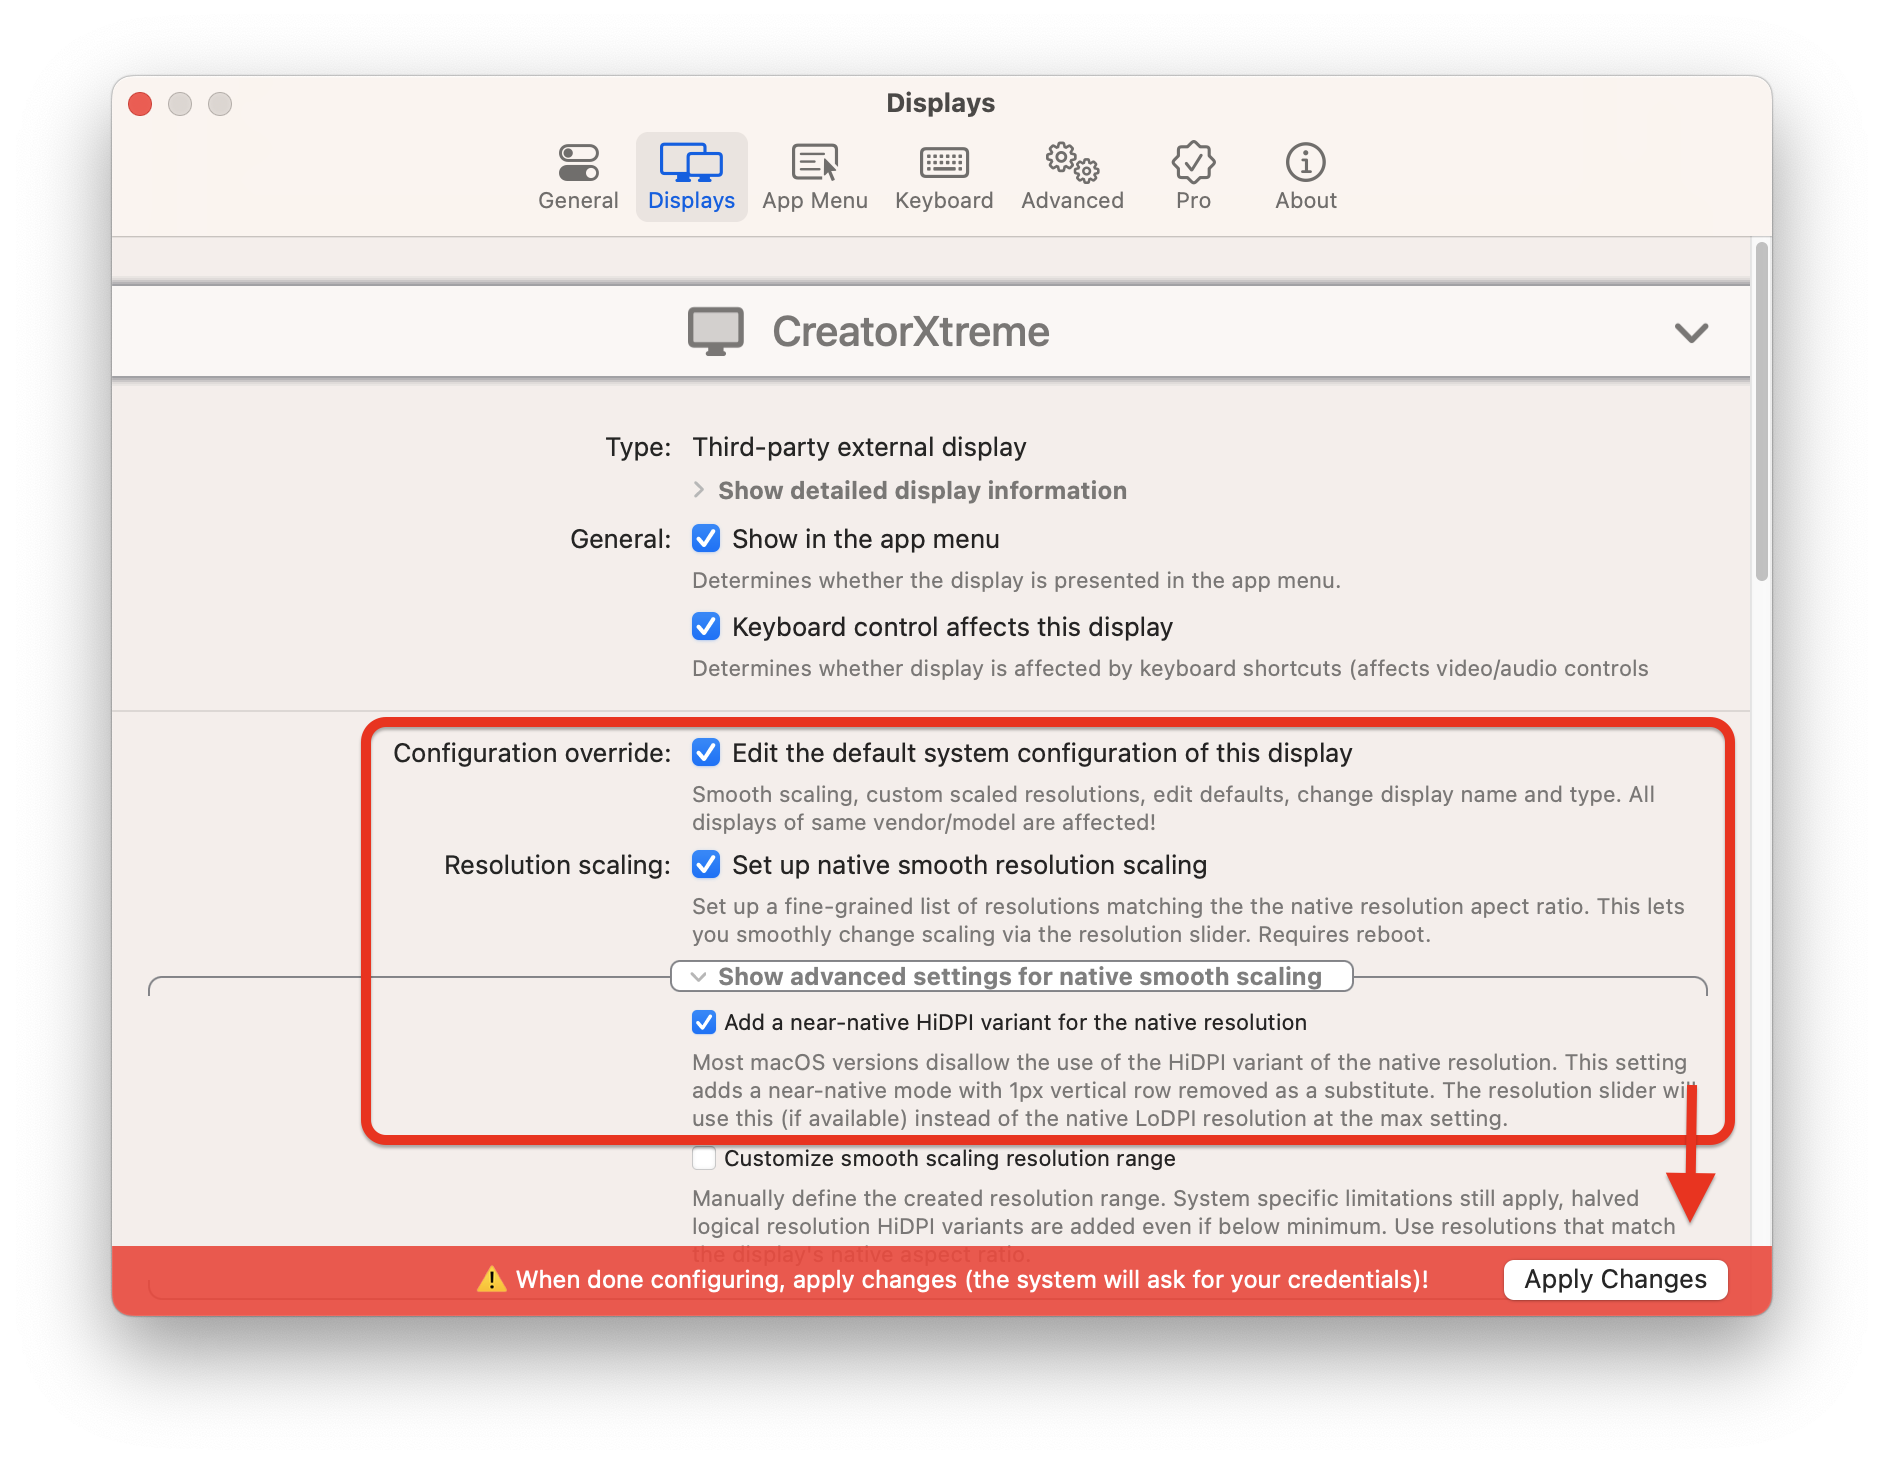
To enable the native smooth scaling feature:
- Start the app and open the app menu (locate the BetterDisplay icon in the menu bar).
- Open
Settings(the gear icon at the bottom of the menu). - Navigate to the
Displayssection, - Enable the
Edit the default system configuration of this displayfeature under the display you want to make scalable, - Enable the
Set up native smooth resolution scalingoption just below it as it appears. - You can also open
Show advanced settings for native smooth scalingand enableAdd a near-native HiDPI variant for the native resolutionas well. - If you did this for all the relevant displays, click on the
Apply Changesbutton at the bottom of the screen. - Enter your administrator level credentials and then reboot.
- After reboot, use the resolution sliders in the app menu to scale the desktop.
Notes and troubleshooting...
- The native smooth scaling option can be enabled on a per display basis, so if you want more of your displays to have this feature, don't forget to scroll down in the app
Settings>Displaystab and make the setting for each of your displays! :) - The feature is compatible with macOS Monterey 12.4+, macOS Ventura and works on natively connected (DisplayPort, HDMI) and built-in displays. The maximum allowed scaled (HiDPI) desktop size can't exceed the native display resolution. You'll also need the latest BetterDisplay version.
- The feature works if the system properly detects the
Native panel pixel resolution. If this is not correctly shown for your display underSettings>Displays, please select theEdit native panel pixel resolutionoption and enter the correct values! - The slider 100% will be the
Default resolution(on normally LoDPI display this tends to be the native resoltuion - which will mean the slider maxes out at 100%, on HiDPI display half of the native resolution - which will make the resolution slider max out at 200%). If you want to rescale the resolution slider, change theDefault resolutionto an accessible different resolution than it is set. - The maximum resolution that can be set for low PPI displays corresponds to the
Native panel pixel resolutionwhich is available only as normal resolution (not HiDPI). Converting the native resolution to HIDPI would not make sense (except for some special use cases like screenshot and accessibility zooming quality improvement) - for this or to achieve a higher-than-native-resolution scaling (for extra screen real estate) you can continue to use dummy mirroring. - The maximum horizontal pixel count is constrained on the entry-level M1 configurations to 6K (on M1 Pro/Max/Ultra to 8K) which might pose an issue to ultra-wide display users trying to go beyond a certain horizontal resolution.
An alternative (for some scenarios the only valid) approach is to create a mirrored dummy in order to use custom resolutions. This works for Sidecar and other non-native devices (like DisplayLink) and also enables scaling beyond the native resolution of the display panel on Apple Silicon (for added screen real estate). Follow these steps to do this:
- Start the app and locate the app menu (you'll see a BetterDisplay icon in the menu bar).
- In the app menu's Tools section locate the
Create New Dummyoption - Click on the
Create and Associate to...option at the bottom that matches your display. - Connect the created dummy and mirror it to the display.
It's that simple. Afterwards you should see your dummy mirrored to your display where you can use the slider to change the resolution quickly.
Please note that the dummy/virtual screen mirroring method is a workaround and have some drawbacks compared to native smooth scaling - there might be sleep issues, color issues (flickering on some setups), mouse cursor related problems on Monterey 12.5 and beyond. Whenever possible, it is advised to use the native smooth scaling method.
To help with mouse cursor related macOS bugs when a virtual screen is mirrored, you can go to System Settings > Accessibility > Display > Pointer size and slightly increase the pointer size above normal.
Notes and troubleshooting for the dummy mirroring method...
- Due to the finnicky nature of macOS display and mirror management, sometimes setting up the mirror fails or the mirror reverts to work 'the other way around' (namely instead of the dummy being mirrored to the display, the display is being mirrored to the dummy). In this case you should stop the mirroring (select
Mirror Target>Stop Mirroring) and reconfigure the mirror under the dummy in the display listMirror Target>Display Name. - Sometimes the created mirror might not be the main display (the display with the menu bar and the one where windows are located by default) or a created but invisible dummy becomes the main display which makes moving forward difficult. You can easily change any display or mirror set to be main by simply choosing
Settings>Set as mainunder the display in the app menu. - If you find that your new dummy or dummy mirror is not located where you actually want it to be relative to your other displays, you can easily move around a display using
Settings>Move Next to ...from the app menu. - You can configure both mirroring, main status, resolution and everything else in System Preferences the old fashioned way as well. If you are not using Pro, you actually need to do this. Follow the this guide on how to do this.
- If you really can't set up what you want, just hop over to the BetterDisplay Discord channel where you can lay out your problem and eventually we'll help you out! :)
You can join the discussion on the BetterDisplay Discord channel. If you have any issues or questions, don't hesitate to ask!
- The app is compatible with all Apple Silicon and Intel Macs running macOS Big Sur, Monterey or Ventura.
- XDR/HDR upscaling requires an Apple XDR display (built-in or external) or a natively connected HDR display (VESA DisplayHDR 600 or higher recommended) and an Apple Silicon Mac.
- Native Smooth resolution scaling requires macOS Ventura or Monterey 12.4 (or newer) and natively connected displays.
- Maximum Native Smooth scaling resolutions depend on GPU capabilities and the display's resolution.
- External display hardware backlight control and volume control require DDC capable, natively connected display or an Apple display. The HDMI port of Macs do not support DDC (however most USB-C to HDMI dongles do work). Some docks (especially DisplayLink ones) might not support DDC. Software brightness control is available for all displays.
- The app is compatible with headless Macs to create custom dummy resolutions for remote access.
You can support development by purchasing a BetterDisplay Pro license directly in the app. Just navigate to Settings (gear icon) > Pro and click on Buy BetterDisplay Pro. Please note that even if you don't buy the app, you can still use many of the features for free (if you are a non-business user).
Check out the license terms for the app.
For more info, see this discussion.
- I'd like to thank you for backing the open source project in the past by providing you with a coupon code so you can get a BetterDisplay Pro license for no additional cost. If you'd like to receive a code, please contact me at Discord by sending a private message or opening a separate discussion and posting a screenshot of the confirmation you received from Open Collective. I'll respond with a coupon code (some patience might be needed). Thank you!
I am thankful for each of you who contributed to the project.
Notabe contributors of the open-source project
Generous contributors, who donated $50 or more for the open-source project:
- Patrick Mast - $222
- Riten Jaiswal - $200
- Wesley - $200
- Dean Herbert - $150
- Myles Dear - $100
- Jose Tejera - $100
- Bill Southworth - $100
- Will_from_CA - $100
- MFB Technologies - $100
- Brian Conway - $60
- Ron W - $61
- Michael Charo - $50
- Jens Kielhorn - $50
- Victor - $50
- Nicholas Eidler - $50
- Jeff Nash - $50
Additional notable contributors, who donated $20 or more:
|
Derek Johnson Jerry C Jung Yeop (Steve) Kim Jason Kaz Nikola wanyeki Felix Emilio P Egido Thomas Varghese Reactual Stephen Richardson Peter Szombati NP David Verdonck Knut Holm Jan Behrmann Danilo Andrew Braithwaite Splay Display Incognito Florian Gross David Richardson Jari Hanhela |
William Edney David W Chetan Kunte Martin Clayton Nikola Milojević Wolf1701 Arthur Müller Tom Dai Jeff Lopes Jormsen Yeo Chang Long Wayne G Udome Bart Krijnen jviide Keezy SenPng Jakub Koňas docljn Adam Lounds Pablo Sichert Ville Rinne Gheorghe Aurel Pacurar Peter F. |
Thomas Brian Jedrzej Gontarczyk Chris Brooks Wang Yang Arjen Peter Cole Simon Jarvis mgiiklel Eric Alasdair Friedemann Wachsmuth Pranav Raj S Eddy George Billios Alfred Visnevsky Martin Cohen HWM Oliver Eilhard Alastair Thomson Örn Arnarson Chris Spiegl Radim Balner yipru petertriho + guest supporters |
Please don't forget to star the GitHub page and spread the word about the app. :)
- Licensing uses the third party provider Paddle as backend. This also means that the app communicates over the network with Paddle's servers to verify licensing, trial status and facilitate check-out using Paddle's SDK. Besides data required for licensing purposes by Paddle's services, no other info is transferred over the network.
- I decided not to have a marketing list (marketing opt-in) of any kind. I also do not build any usage database or collect unique (and not unique) IDs either - besides what Paddle collects and presents on its dashboard for me (to keep track of valid software licenses).
- Aside from Paddle the only other form of network communication by the app is what is required for the built-in updater to work in order to receive the update metadata and download the update binary.
