[Deprecated] IoT Edge Build and Deploy is a tool for continuous integration(build and push docker image) and continuous deployment(create Edge deployment on Azure) for Azure IoT Edge modules project.
Azure IoT Edge task is moved to Azure Pipelines in-house tasks. In-house task means you will have the task pre-installed in any Azure DevOps account, you don't need to install the extension from marketplace to use the Azure IoT Edge task.
Since it is already an in-house task, when you install the extension, it will remind you that there's already an existing task with same id. So you don't need to and is not able to install it.
Now the in-house task is version 2.0(preview), you can refer to the documentation for the usage guide. This extension will be retired once 2.0 becomes the stable version. You can give feedback on the documentation regarding issues, feature requests and suggestions, or you can ask question on stackoverflow with azure-iot-edge tag.
- For amd64 platform, please use hosted agent
Hosted Ubuntu 1604orHosted Linux Preview. For windows-amd64 platform, please use hosted agentHosted VS2017 - Your project should be a solution containing one or more Edge modules
- A deployment.template.json is under the Edge solution folder
The project is open source. You can visit Github for documentations, changelog, issues and contributions.
Please refer to this document for detailed guide. Continuous integration and continuous deployment to Azure IoT Edge
From version 1.1.0, deployment task can be defined and executed in release pipeline, which will provide convenience for us to deploy to a set of stages of environment (Dev environment/ QA test/ Production). Previously you have to set the both build and deploy task in build pipeline. You can still use the old way to set up your CI/CD pipeline, but we recommend separating the build/deploy task in build/release pipeline. It's easier to manage your environment in this way.
Here is a quick start to setup CI/CD pipeline in a recommended way, click to expand
-
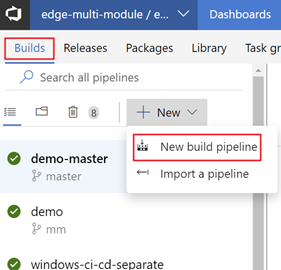
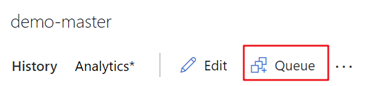
In your Azure DevOps, open the Build & Release hub and, in the Builds tab, choose + New pipeline. Or, if you already have build pipelines, choose the + New button.
-
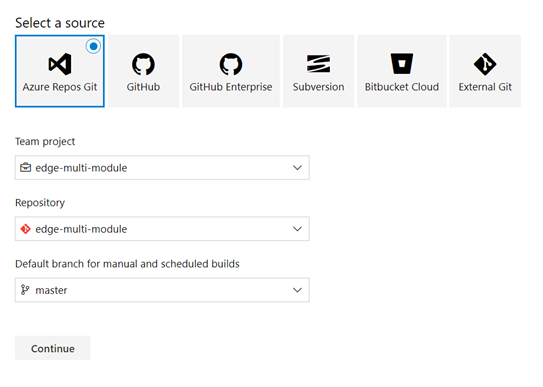
If prompted, select the Azure DevOps Git source type; then select the project, repository, and branch where your code is located. Choose Continue.
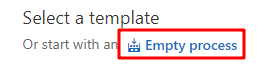
In Select a template window, choose start with an Empty process.
-
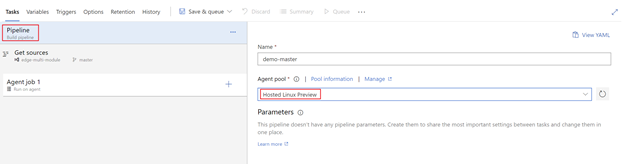
In the pipeline editor, choose the agent pool.
- If you would like to build your modules in platform amd64, choose Hosted Ubuntu 1604
- If you would like to build your modules in platform windows-amd64, choose Hosted VS2017
-
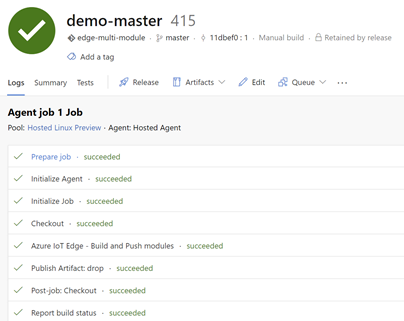
In Agent job, click "+" to add 2 tasks in the build pipeline.
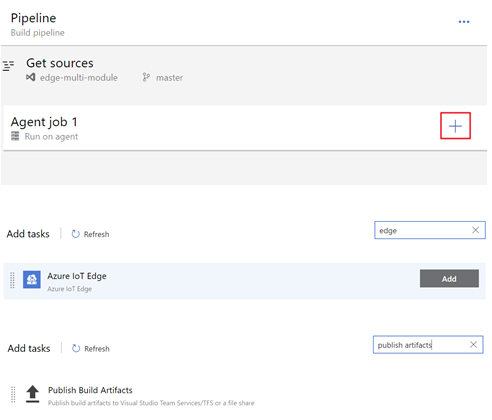
-
In the first Azure IoT Edge task, update the Display name to Module Build and Push, and in the Action dropdown list, select Build and Push. In the Module.json File textbox, add below path to it. Then choose Container Registry Type, make sure you configure and select the same registry in your code(module.json). This task will build and push all your modules in the solution and publish to the container registry you specified. If your modules will be pushed to different registries, you can have multiple Module Build and Push tasks. In some cases, the Edge solution is not under the root of the code repository. You can specify Path of Edge solution root in build definition.

-
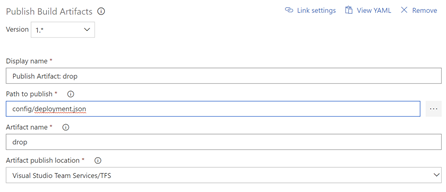
In Publish Build Artifacts task, you would specify the deployment file generated by the build task. Set the Path to publish to "config/deployment.json". If you set Path of Edge solution root in the last task, you will have to join the root path here. For example, if path of Edge solution root is "./edgesolution", then the Path to publish should be "./edgesolution/config/deployment.json".
-
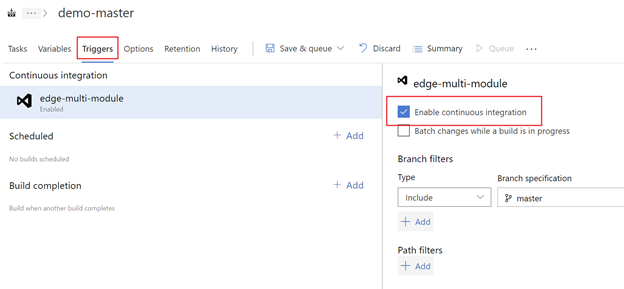
Open the Triggers tab and turn on the Continuous integration trigger. Make sure the branch containing your code is included.
Save the new build pipeline. Click the Save button.
-
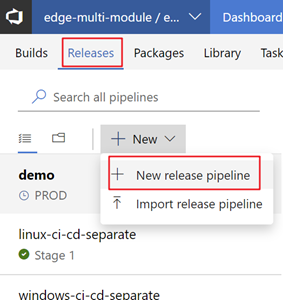
In the Releases tab, choose + New pipeline. Or, if you already have build pipelines, choose the + New button.
In Select a template window, choose start with an Empty job.

-
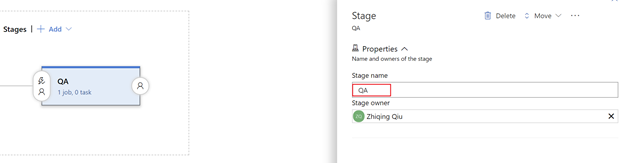
Then the release pipeline would initialize with one stage: Stage 1. For a real scenario, usually exists multiple stages. Let's rename the Stage 1 to QA and treat it as a test environment.
-
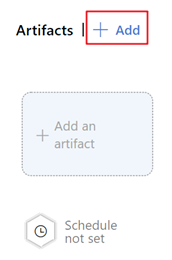
Link the release to the build artifacts. Click Add in artifacts area.
In Add an artifact page, choose Source type Build. Then select the project and the build pipeline we just created. Then Click Add.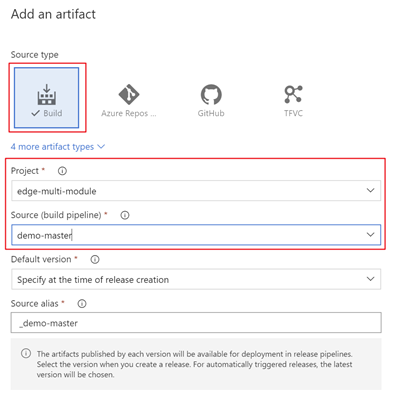
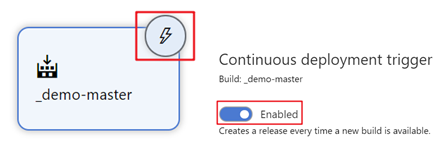
Open continuous deployment trigger,
-
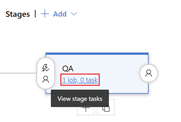
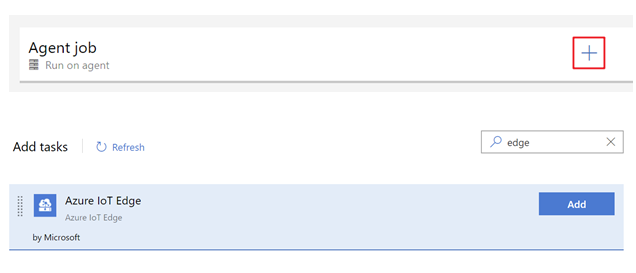
Then we edit QA stage and configure it with the task
Deployment task is platform insensitive. So, you can choose either Hosted VS2017 or Hosted Ubuntu 1604 in the Agent pool. Click "+" and add 1 task.
-
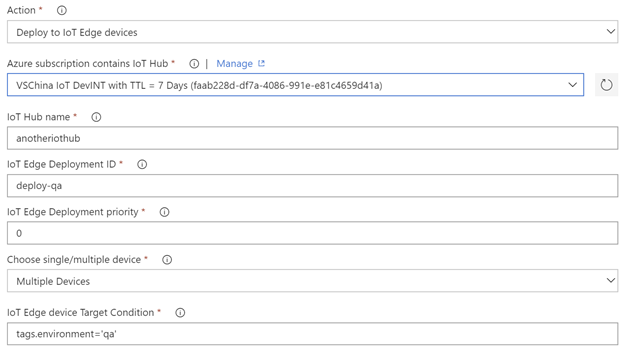
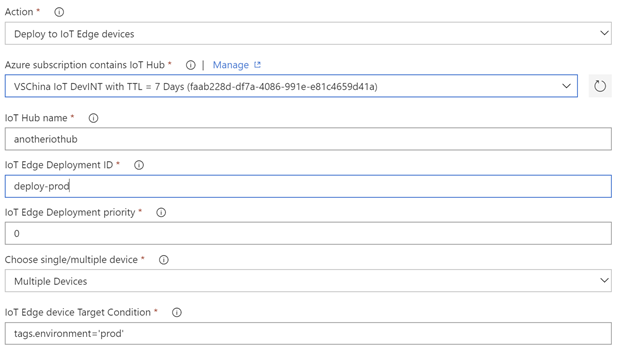
In the Azure IoT Edge task, in the Action dropdown list, select Deploy to IoT Edge device. Select your Azure subscription and input your IoT Hub name. You can specify an IoT Edge deployment ID and the deployment priority. You can also choose to deploy to single or multiple devices. If you are deploying to multiple devices, you need to specify the device target condition. The target condition is a filter to match a set of Edge devices in IoT Hub. For example, if you want to use device Tags as the condition, you need to update your corresponding devices Tags in the device twin before the deployment.
Here the stage is QA, so we deploy to devices with environment property set to "qa".
Save the new release pipeline. Click the Save button. And then click Pipeline to go back to the pipeline.
-
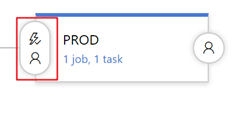
Next we add a new stage "PROD". We can simply clone the Stage QA and make some changes.
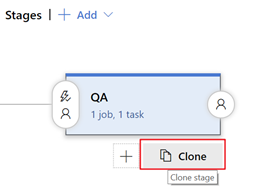
We rename cloned stage to PROD, and then edit the tasks. We deploy to devices with environment property set to "prod", and set the deployment id as "deploy-prod". Click the Save button. And then click Pipeline to go back to the pipeline.
-
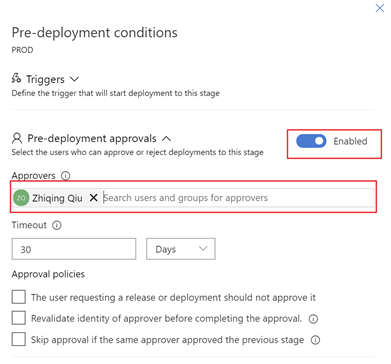
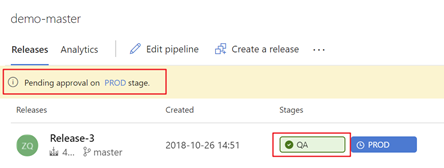
Currently, our build artifact will be triggered continuously on QA stage and then PROD stage. But most of the times we need some manual test on the QA devices and approve the new version manually to PROD environment. So we can setup an approval in PROD stage.
We set Enabled in Pre-deployment approvals. And fill in the Approvers input. Then click Save.
-
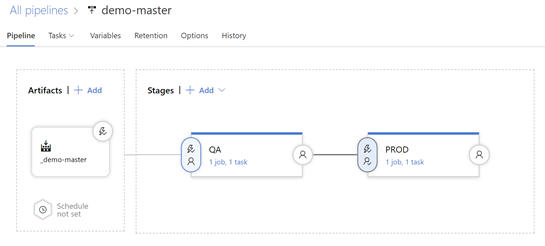
Now our release pipeline completed, and it should be looked like this.
Now let's trigger a build to make the CI/CD pipeline work. You can either push a commit to source code repository or manually trigger one.
The successful build would trigger a release to QA stage.
The successful deployment to QA stage would trigger a notification to the approver.
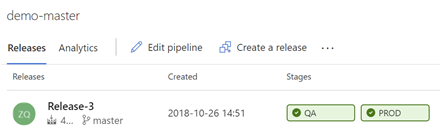
After the approver approve this change, it can be deployed to PROD.

Then we succeed!
A complete CI/CD pipeline contains at least two tasks Build and Push and Deploy to Edge device. The extension support 2 ways to setup the pipeline.
-
(Recommend) Set
Build and Pushtask in build pipeline and setDeploy to Edge devicein release pipeline.We highly recommend this way since you can easily manage different environment(dev, QA, prod) in release pipeline. Here is a Quick start to introduce how to setup.
-
Set both
Build and PushandDeploy to Edge devicein build pipeline.
In Build and Push task, you will specify a docker registry credential. It will be used when the task push docker image to the registry.
When the deployment came to Edge runtime, it will pull the docker image and start a container as a running module. For non-public docker registry, the credential needs to be provided in the deployment.json.
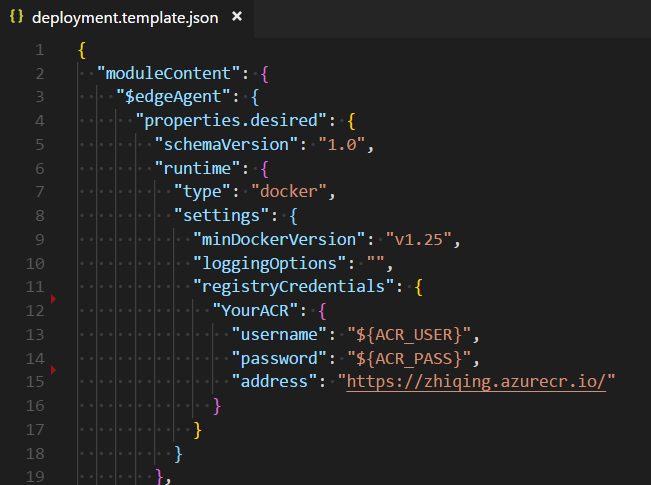
Here the username and password use place holder, and you can set variable ACR_USER and ACR_PASS in the variables in build pipeline. But most of the time, the credential here is the same as what we set in Build and Push task. So the extension provide a way to automatically fill the place holder in registryCredentials.
- Set the
registryCredentialsas above snapshot.
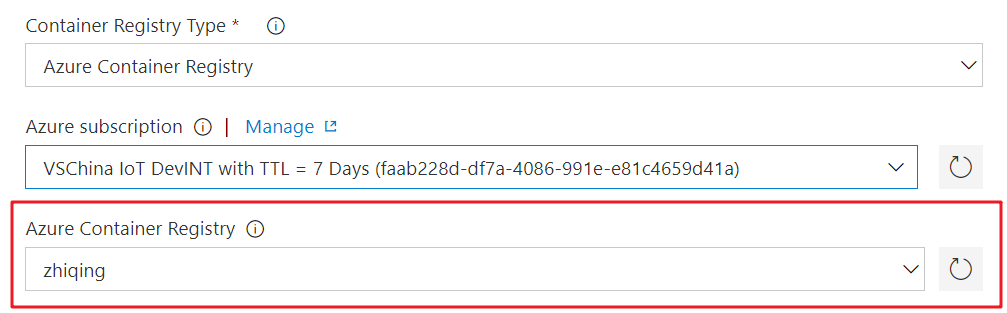
- For ACR, the address should be
acrname.azurecr.ioorhttps://acrname.azurecr.ioorhttps://acrname.azurecr.io/ - For Docker hub, the address should be
docker.ioor address containsindex.docker.io - For other registries, it should match the
Docker Registrywhen setupDocker Registry service connectionin VSTS service endpoint.
- In the build pipeline, make sure the container registry matches the registryCredential->address.
Then you can check the deployment log and see the credentials are automatically replaced.
If you need to fill the
registryCredentialswith credentials other than the ones in build pipeline, you need to put placeholder as above and setvariablewith corresponding key.
In some cases, the Edge solution is not under the root of the code repository. You can specify Path of Edge solution root in Build or Build and Push task.
Example: If your code repository is an Edge solution, then leave it to default value ./. If your solution is under subfolder 'edge', then set it to edge
Please notice that the deployment.template.json should be in the root path of solution.
For the setting in
Deploy to Edge devicetask. If this task is in Build Pipeline, thenPath of Edge solution rootsetting should be same asBuildorBuild and Pushtask. If this task is in Release Pipeline, thenPath of Edge solution rootsetting use default value./.
You can write environment variables in the json file. In the form of ${ENV} or $ENV.
Example
"tag": {
    "version": "0.0.1-${MY_BRANCH}",
    "platforms": {
        "amd64": "./Dockerfile",
        "amd64.debug": "./Dockerfile.amd64.debug",
        "arm32v7": "./Dockerfile.arm32v7",
        "windows-amd64": "./Dockerfile"
    }
}
Then you can set user-defined variables in VSTS bulld definition.
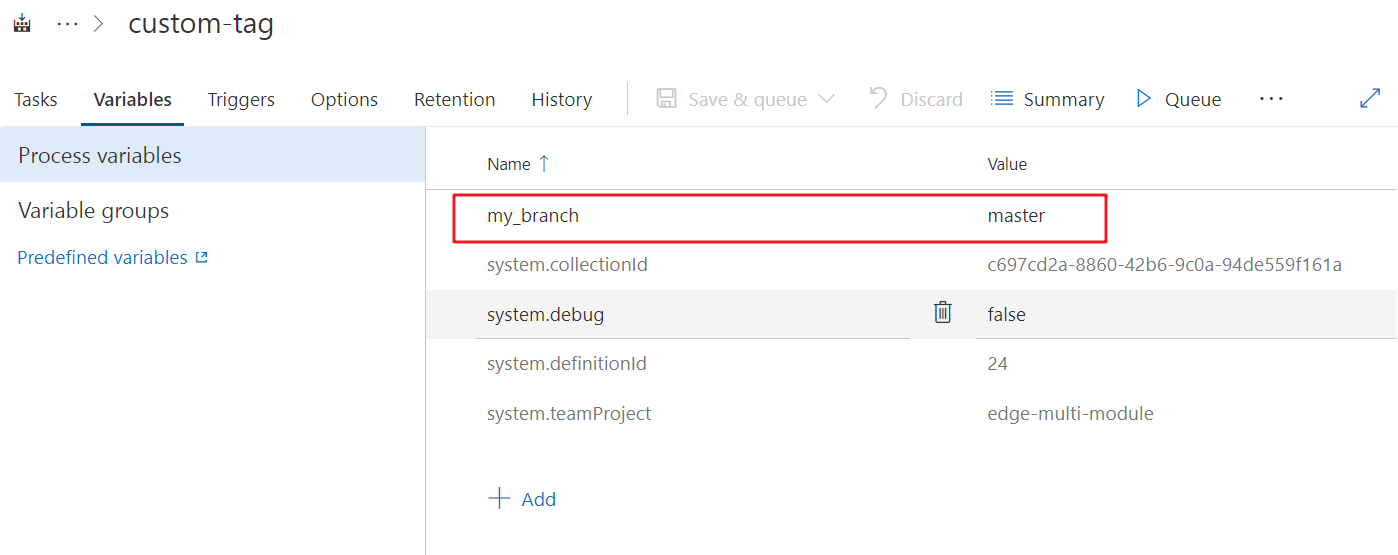
Please notice that the key of env will be automatically transformed to capitalized letter in build process. So my_branch here will actually be MY_BRANCH in build context.
And besides the user-defined environment variables, you can also use the pre-defined variables in VSTS. For example,
- BUILD_BUILDID for build number
- BUILD_DEFINITIONNAME for build definition name
- BUILD_SOURCEBRANCHNAME for source branch
- …
Here’s some reference about the predefined environment variables in VSTS:
If your edge module have dependency for NuGet package in NuGet Feed other than nuget.org, you can add your feed in build definition.
In your build definitions -> Advanced tab, there’s a setting item NuGet Feed.
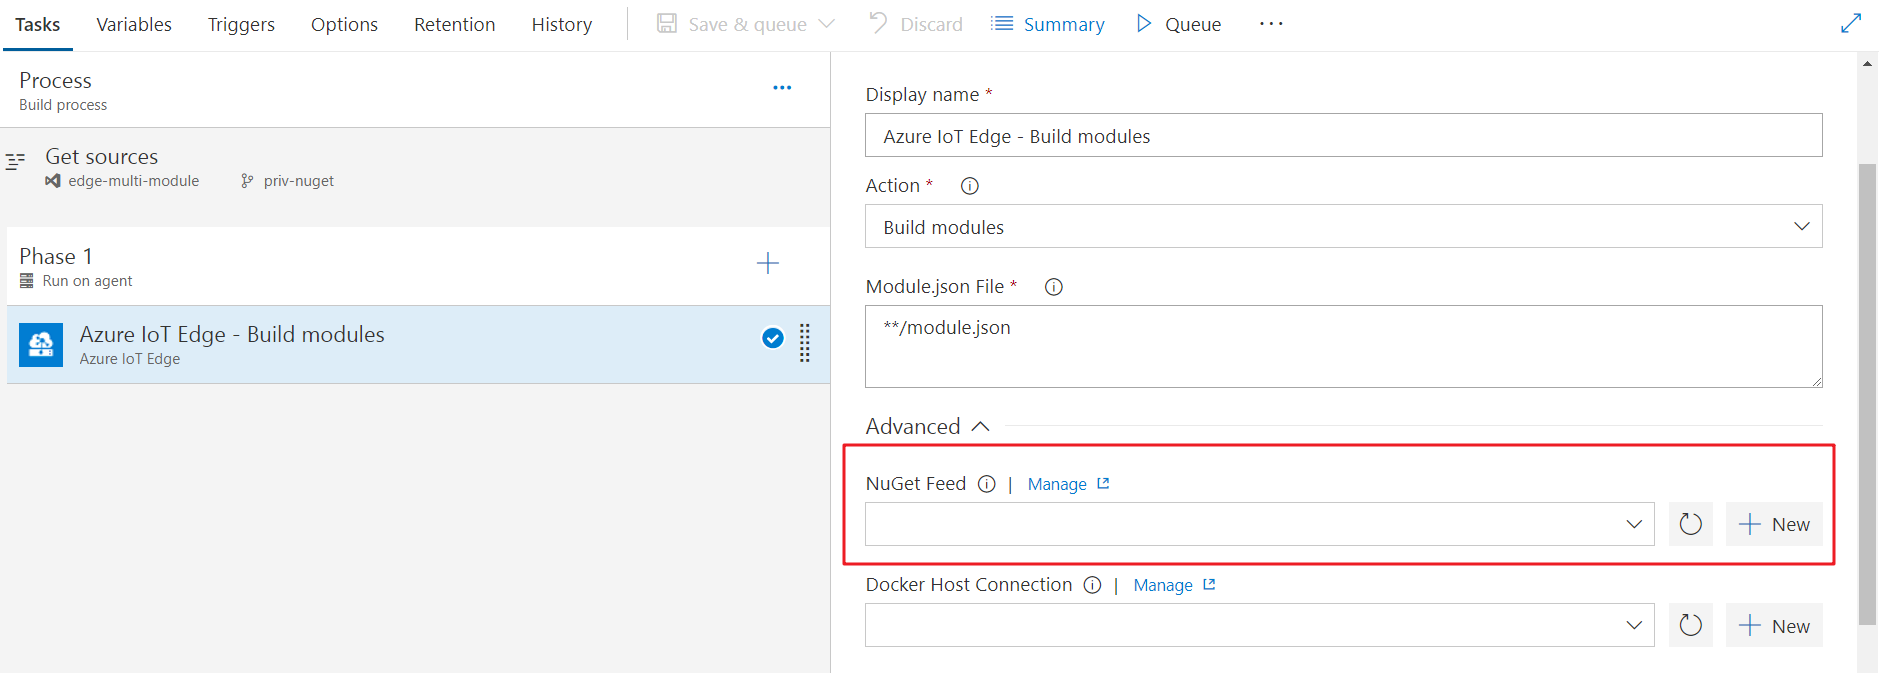
You can either choose or add one nuget endpoint. Please notice that if you use Personal Access Token in VSTS/TFS nuget package manager, your feed url should end with “/nuget/v2”, nuget v3 is not working with PAT. Related documentation

The extension leverages the python cli tool iotedgedev to build and push docker images. In the beginning of the task, the tool will be installed. The problem is probably because iotedgedev is not able to be installed. Please check:
- You chose
Hosted Linux PrevieworHosted VS2017if you use hosted agent. For self-hosted agent, make sure python and pip are installed. - You can check if
pipworks by creating aBash Scripttask with the contentpip --version.
I met error Error: a Windows version 10.0.17134-based image is incompatible with a 10.0.14393 host in build task
The reason is that the host to build docker image is 14393, while the base image specified in dockerfile is 17134. According Windows container version compatibility, the old host is not capable of building the image based on newer windows version. You can try the following solutions:
- If it is allowed, change the base image in your dockerfile to match the hosted agent windows version 14393. It will make the build work, and the image can also be used in your higher version windows server. Older containers will run the same on newer hosts with Hyper-V isolation, you can set createOptions in deployment.template.json to add docker run parameters
- Setup a private agent with 17134 windows version
When meeting issue, please follow the steps to open an issue on our Github repository
-
For the failed pipeline, try queueing a new build with
system.debugset totrue. It will provide more information for us to investigate the issue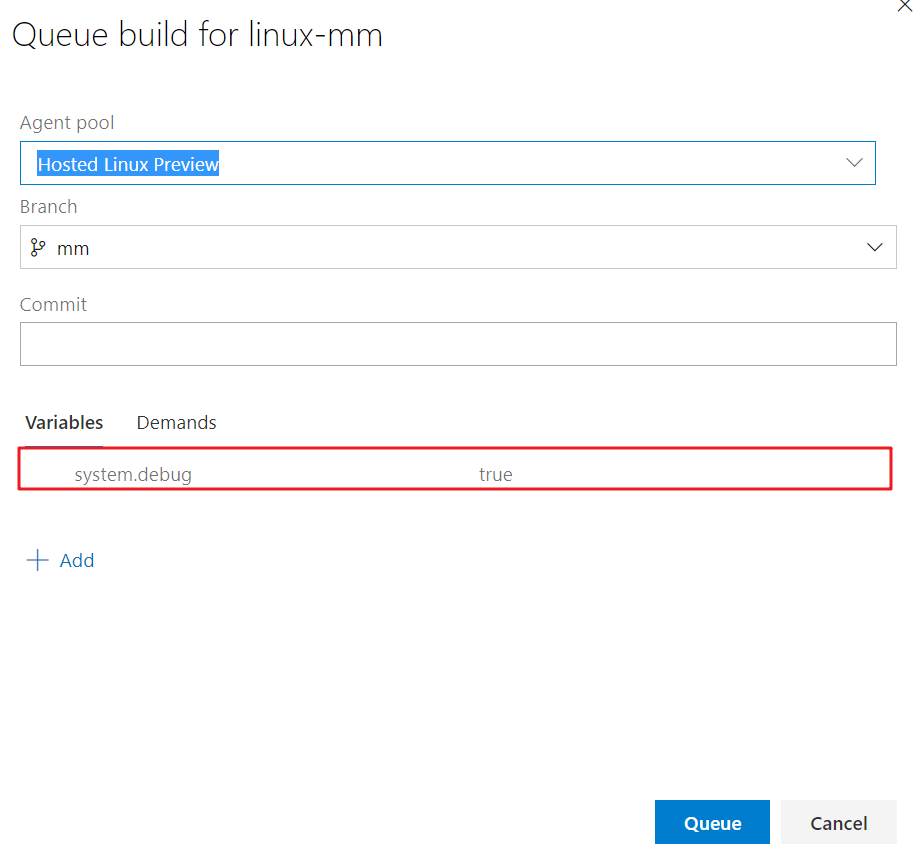
-
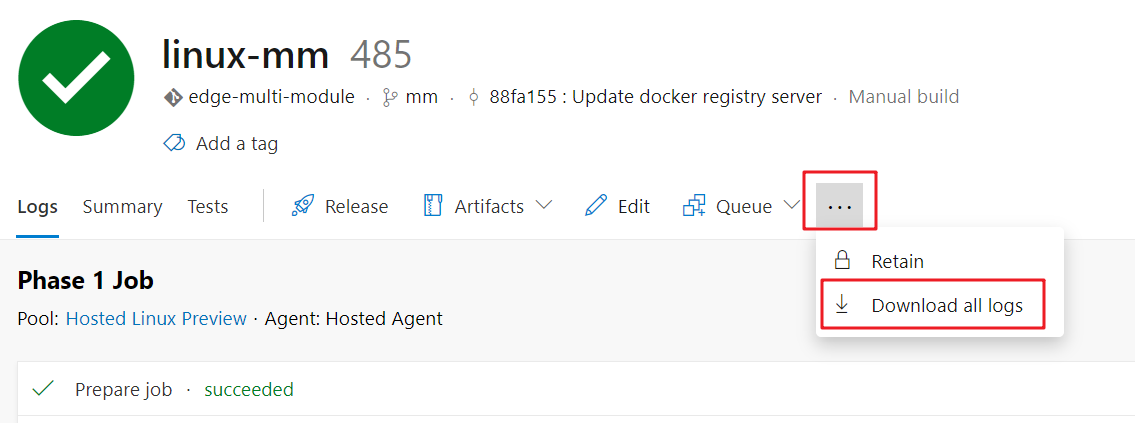
Download the logs of the build and attach it in the issue
- Fork the Github repository and clone to local
- Make the changes to the code
- In order to test privately in your personal account, make changes in
vss-extension.json.
- Change
publisherto your personal publisher id. - Change
publicflag tofalse
- Refer to Package your extension to package and publish extension to personal account and do test
- Create a PR in the repository
This project collects usage data and sends it to Microsoft to help improve our products and services. Read our privacy statement to learn more. If you don’t wish to send usage data to Microsoft, you can change your telemetry settings by setting variable DISABLE_TELEMETRY to true.
We fully welcome your feedback or suggestion for the extension, you can send Email to Azure IoT Edge Tooling team [email protected]


