
Logo Credit: @Foxlum
Flycast Dojo is a fork of Flycast, a multi-platform Sega Dreamcast, Naomi and Atomiswave emulator derived from Reicast, with a focus on netplay features and replay. We intend to keep Flycast Dojo updated with the latest downstream changes made to the parent project.
Flycast Dojo can be retrieved from GitHub, or as a part of the Fightcade matchmaking service. However you obtain it, you will always have the option to use it standalone for P2P games using Match Codes over an internet matchmaking server, through a direct IP connection, or a virtual LAN like ZeroTier or Radmin.
For quick start guides, frequently asked questions, online replays, and community links where you can find people to play against, head to the Flycast Dojo site.
General information about Flycast configuration and supported features can be found on TheArcadeStriker's flycast wiki
For general emulator help and updates on Flycast Dojo, check out the #netplay room of the Flycast Discord.
For Fightcade-specific help, be sure to read the pins and ask questions in the #flycast-emulator channel on the Fightcade Discord
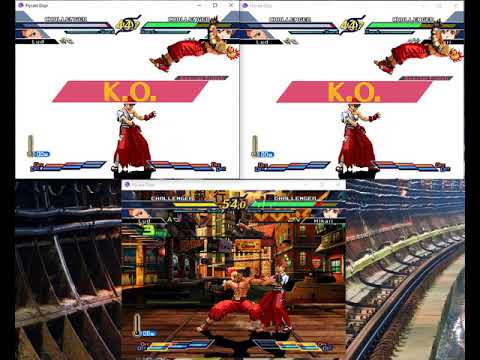
- Visual Aids
- Getting Started
- Setting Controls
- Starting a Netplay Session
- Replays
- Savestates
- MD5 Checksum Calculation & Validation
- Training Mode
- Linux Build
- Command Line
- Game-specific Guides
- Video Demos
- Roadmap

To get started with Flycast Dojo, make sure that you have the appropriate ROMs and BIOS files available in your ROM and data folders. At the time of writing, the preferred MAME romset for NAOMI & Atomiswave games is the MAME 0.226 romset.
If you are running Fightcade, you can find the ROMs folder at Fightcade\emulator\flycast\ROMS while non-Fightcade users can use the ROMS folder in the Flycast folder.
For the sake of performance, it is advised that you keep your games and the emulator on the same drive.
For the BIOS, be sure to add awbios.zip for Atomiswave games or naomi.zip for NAOMI games into your data directory in the folder you have Flycast installed. In your settings, the folder Flycast is installed in is your "Home Directory".
For more information on verifying your BIOS files, you can head to the Flycast wiki page on the topic.

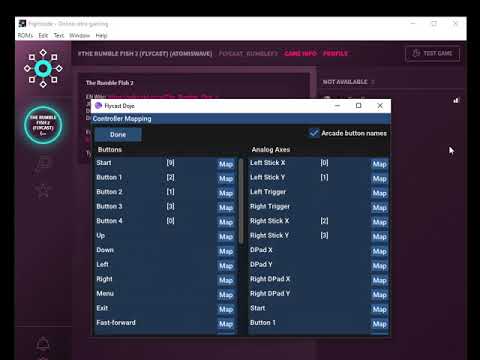
To set up your controls in Flycast, launch the emulator and head to Settings -> Controls. Set your controller of choice to Port A. From there, press Map to open the Controller Mapping menu.
Select the Arcade button names checkbox to show the arcade button mapping. Inputs recognized as buttons can be assigned on the left hand side of the screen while inputs recognized as Axes are mapped on the right hand side.
The following is a sample mapping for XInput (XBOX 360) Controllers created by pokeshark on the Official Fightcade Discord. Note that the triggers are on the right hand side of the screen, corresponding with analog axes.

You can find the Netplay settings under the Dojo section of the emulator's settings:

Match Codes are enabled by default, pointing to the default matchmaking relay. For manual operation (i.e., Command Line or External Lobbies) just disable the checkbox from Enable Internet Matchmaking, or pass dojo:EnableMatchCode=no to the command line options.

Using Match Codes, Flycast Dojo can start a P2P game session behind firewalls, so that you can play against others without the need of Radmin or Fightcade. No need to sign up for any accounts or download additional software than Flycast Dojo itself. You should be able to play any games supported by Flycast, so long as you and your opponent have the same ROM.
The methods used by this feature should work with most consumer routers, but you may run into trouble over some cloud gaming services or corporate networks. (It is confirmed to work over Paperspace though, where I did much of my testing).
You can set yourself as a host by making sure HOST is selected in the drop-down box on the left, then click on the game to begin.

This will contact the default matchmaking relay and give you a code to send to your opponent. To make code transfer easier, press the Copy Match Code button to add the code to your clipboard to paste to your opponent.

When a guest joins a session, the host can set the delay according to packet round trip time by pressing "Detect Delay". Use the slider to adjust the game to your liking, and press "Start Game" to begin your session.
Depending on the connection between you and your opponent and the tendency for network spikes, you may have to bump delay up to make your game smoother. The best course of action is to start low, and go higher until both you and your opponent have a smooth framerate.

To join a game, click on the dropdown on the left and select JOIN then select the game of your choice. It will prompt you for the match code. If you have copied the Match Code from your opponent, you can press the Paste button, otherwise, you can enter in the match code manually.
Once you are done, you can press Start Session.

If you notice disconnects at some regular interval (e.g. every 6 minutes, 10, minutes, 15 minutes), it may be possible that your router is closing the UDP route that was established by the matchmaking service by having a low UDP Timeout. This is similar to what can happen with VoIP calls on restrictive routers.
To fix this, find your router's UDP Timeout settings and set it to 90 seconds or higher.
If you are unable to find this setting, you can forward your router's port and connect manually, or use the LAN Lobby over a Virtual LAN service like ZeroTier or Radmin VPN.
For more information, check out 10 VoIP Problems: How to Fix Them Forever.
If you are hosting, you can enter your server details manually in the "Netplay" settings. Once you have specified your session details, make sure that your opponent enters your IP address and port specified.
If you are a guest, make sure that "Act As Server" is not checked and that you have entered the matching IP address and port of your opponent in the "Server" column.
To calculate delay, we would use the following formula:
Ceiling( Ping / 2 * FrameDuration (16 ms) ) = Delay #
For instance, if my opponent’s average ping is 42 ms, I would divide it by 32 ms (2 * 16 ms) and round it up to 2.
= Ceiling( 42 ms / 2*16 ms )
= Ceiling( 42 ms / 32 ms )
= Ceiling( 1.3125 )
= 2
On the Flycast main screen, you may now select your game of choice. You may also filter your list of games by typing in the text box on the top of the screen.
If you are hosting, you must start the game first, then have your opponent join afterward. If you are joining someone else's game, you must wait for them to start first. Be sure that you and your opponent have the same files before starting your session. These would include your ROM files, as well at your eeprom.net/nvmem.net files found in your data/ subdirectory.
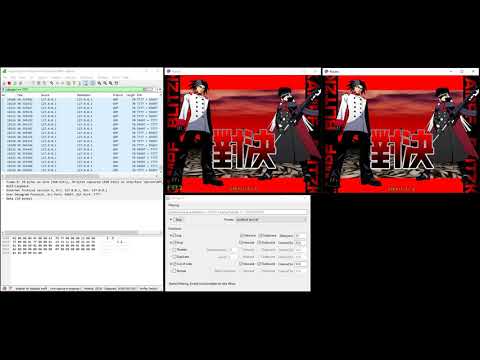
To transmit your current game session or replays, go into the Dojo settings tab and press the checkbox by Enable TCP Transmission. You can edit your target spectator IP Address and Port.

If you wish to enable transmitting when launching via the Command Line, just add -config dojo:Transmitting=yes -config dojo:SpectatorIP=<IP> -config dojo:SpectatorPort=7000 to your command.
To launch as a spectating client via the Command Line and set your listening port, add -config dojo:Receiving=yes -config dojo:ActAsServer=no to your command.
To launch as a receiving server via the Command Line and set your listening port, add -config dojo:Receiving=yes -config dojo:ActAsServer=yes -config dojo:SpectatorPort=7000 to your command.
To see a listing of your recorded replay sessions to play back, click on the "Replays" button on the Flycast main screen.
To record your netplay sessions, just check the box that says "Record All Sessions". This will create a new replay file for each netplay session you run and will be saved in the replays/ subdirectory.
To play the replay file, just click on the corresponding entry, and the replay data will played back in its corresponding game.

If you wish to share your game sessions, there is an option to transmit to any replay server or to any listening spectator with the RECEIVE option set.
There is currently an experimental public replay server available at match.dojo.ooo. The server accepts transmissions at port 7000, with an interface to search and download replays at http://match.dojo.ooo:8000/replays.
Transmitting to Replay Server

Replay Server Search Interface

Once some code cleanup and quality checks are done, the replay server will be made available in its own repository for anyone to be able to host themselves.
During a netplay match, if a custom savestate is present, you can "jump" to a starting savestate by pressing the Backspace button by default. This may be edited in the Control mapping section of the Settings.
To use custom savestates, you must first disable Ignore Netplay Savestates in the Memory Management section of your Dojo settings.

From here, you must rename your desired game savestate to be [ROM Name].state.net and replace the existing file in your data/ folder. Be sure you and your opponent have the same files when you start a session, or else you will be looking at different game states entirely.
In order for netplay to work, both you and your opponent must have the same ROM on both computers. Players using different ROM variants can lead to desyncing. Oftentimes, verifying the validity of ROMs can be a pain, leading folks to reacquire them unnecessarily in a game of guess and check. To solve this issue, MD5 checksum calculation and validation has been made available.

To access this, just right click on any ROM name, and click "Calculate MD5 Checksum". A dialog will pop up showing the MD5 checksum of the selected ROM, and a button to easily copy it to the clipboard to share with your opponent.

To verify that you have the same ROM as your opponent, just copy the MD5 checksum given to you, and click the "Paste & Verify" button. If your ROMs match, you'll see a green "Verified!" by the Close button. If the hashes do not match, it will say "Mismatch." in red.

If a flycast_roms.json file is found, it should contain a listing of MD5 checksums for approved ROMs between users. This format is intended for communities to share common ROM metadata between users to ensure that everyone has the same files.
If your ROM is found in this file, the MD5 Checksum window will say "Validation File Match". So long as you see this, you should be good to go!

With the new Training Mode, you can enable game cheats while playing offline using RetroArch's .cht file format to adjust game parameters, quickly load states, save states, record, and play back user inputs for practice on any supported Dreamcast, NAOMI, or Atomiswave game. You can enter Training mode by selecting the TRAIN option in the drop-down menu on the top left of the Flycast main menu.

To specify which player is being controlled and recorded, just press the F7 key or press the Menu button (TAB by default) and click on "Watching Player". Player 1 corresponds with Port A, while Player 2 corresponds with Port B. To set playback loop settings, hit the Menu button and click on "Playback Loop Off" (or "On").
To record inputs, hit F1, and hit it again to stop recording. To play back the input, press F4. If the Playback Loop is enabled, the input will be repeated until the Play button is hit again. If it is disabled, playback will be invoked on demand. You also have two more slots to record on F2 and F3, with playback on F5, and F6. To play a random input slot from the ones you have recorded, just hit the F10 button.
To save your current game state, hit, F8 and to quickly load it again, hit F9.
All of the Training Mode controls can be assigned to any keyboard key or gamepad input in the Controls settings.
Defaults:
- F1-F3 Record Slots
- F4-F6 Play Slots
- F7 One-Button Player Change
- F8 Quick Save
- F9 Quick Load

Flycast Dojo is currently available as a tar.gz archive containing a 64-bit x86 binary flycast.elf. It can run self-contained from the same directory, with all user configurations and relevant game metadata kept in the same place. It has been tested to run on Ubuntu 20.04, as well as Arch Linux 2021.04.01. So long as you have the dependencies installed, you should be able to run tar zxvf linux-flycast-dojo-*.tar.gz, enter the directory, and start using it immediately.
The following are the relevant dependencies:
- Ubuntu 20.04 Dependencies
libcurl3-gnutlslibzip5libminiupnpc17liblua5.3
- Arch Linux Dependencies
libcurl3-gnutlslibzipminiupnpclua53
If you still get an error after installing Lua, try creating a symbolic link to the locally installed version of liblua to the expected path:
ln -s <liblua.so location> /app/lib/liblua5.3.so.0
You may also call Flycast from the command line. All command line flags correspond with the options found in emu.cfg. Here are some example calls:
- Server (Without Match Codes)
flycast.exe -config network:GGPO=yes -config dojo:EnableMatchCode=no -config network:ActAsServer=yes -config network:server=127.0.0.1 -config network:GGPOPort=6000 -config network:GGPORemotePort=6001 -config dojo:PlayerName=Player1 ControllerTest-DJ.cdi
- Client (Without Match Codes)
/flycast.exe -config network:GGPO=yes -config dojo:EnableMatchCode=no -config network:ActAsServer=no -config network:server=127.0.0.1 -config network:GGPOPort=6001 -config network:GGPORemotePort=6000 -config dojo:PlayerName=Player2 ControllerTest-DJ.cdi
- TCP Match Transmission (Spectating)
append to server arguments
-config dojo:Transmitting=yes -config dojo:SpectatorIP=<IP> -config dojo:SpectatorPort=7000
- TCP Match Receiving
-config dojo:Receiving=yes -config dojo:SpectatorPort=7000 -config:DojoActAsServer=yes
-config dojo:TestGame=yes
- UDP Delay Netplay
- UDP Spectating
- Session Replays
- LAN Lobbies (currently being overhauled)
- TCP Spectating
- Offline Game Recording
- Offline Game Delay (Practice)
- Training Mode
- Native Linux Support
- Native Mac OS Support
- Lua Scripting (Introduced upstream)


