ESP8266 Compatible IR Blaster that accepts HTTP commands for use with services like Amazon's Alexa

The purpose of this project was to create a Wi-Fi enabled IR blaster that could be controlled with Amazon Alexa This was designed with the NodeMCU board but should be compatible with multiple ESP8266 variants
Includes a functional web portal for code capture, output monitoring, and device state tracking
Device gives real time LED feedback, can handle complex code sequences for multi-device home theater control, and full integration with Amazon Alexa via the smart home entertainment devices API and the IR Controller Alexa skill
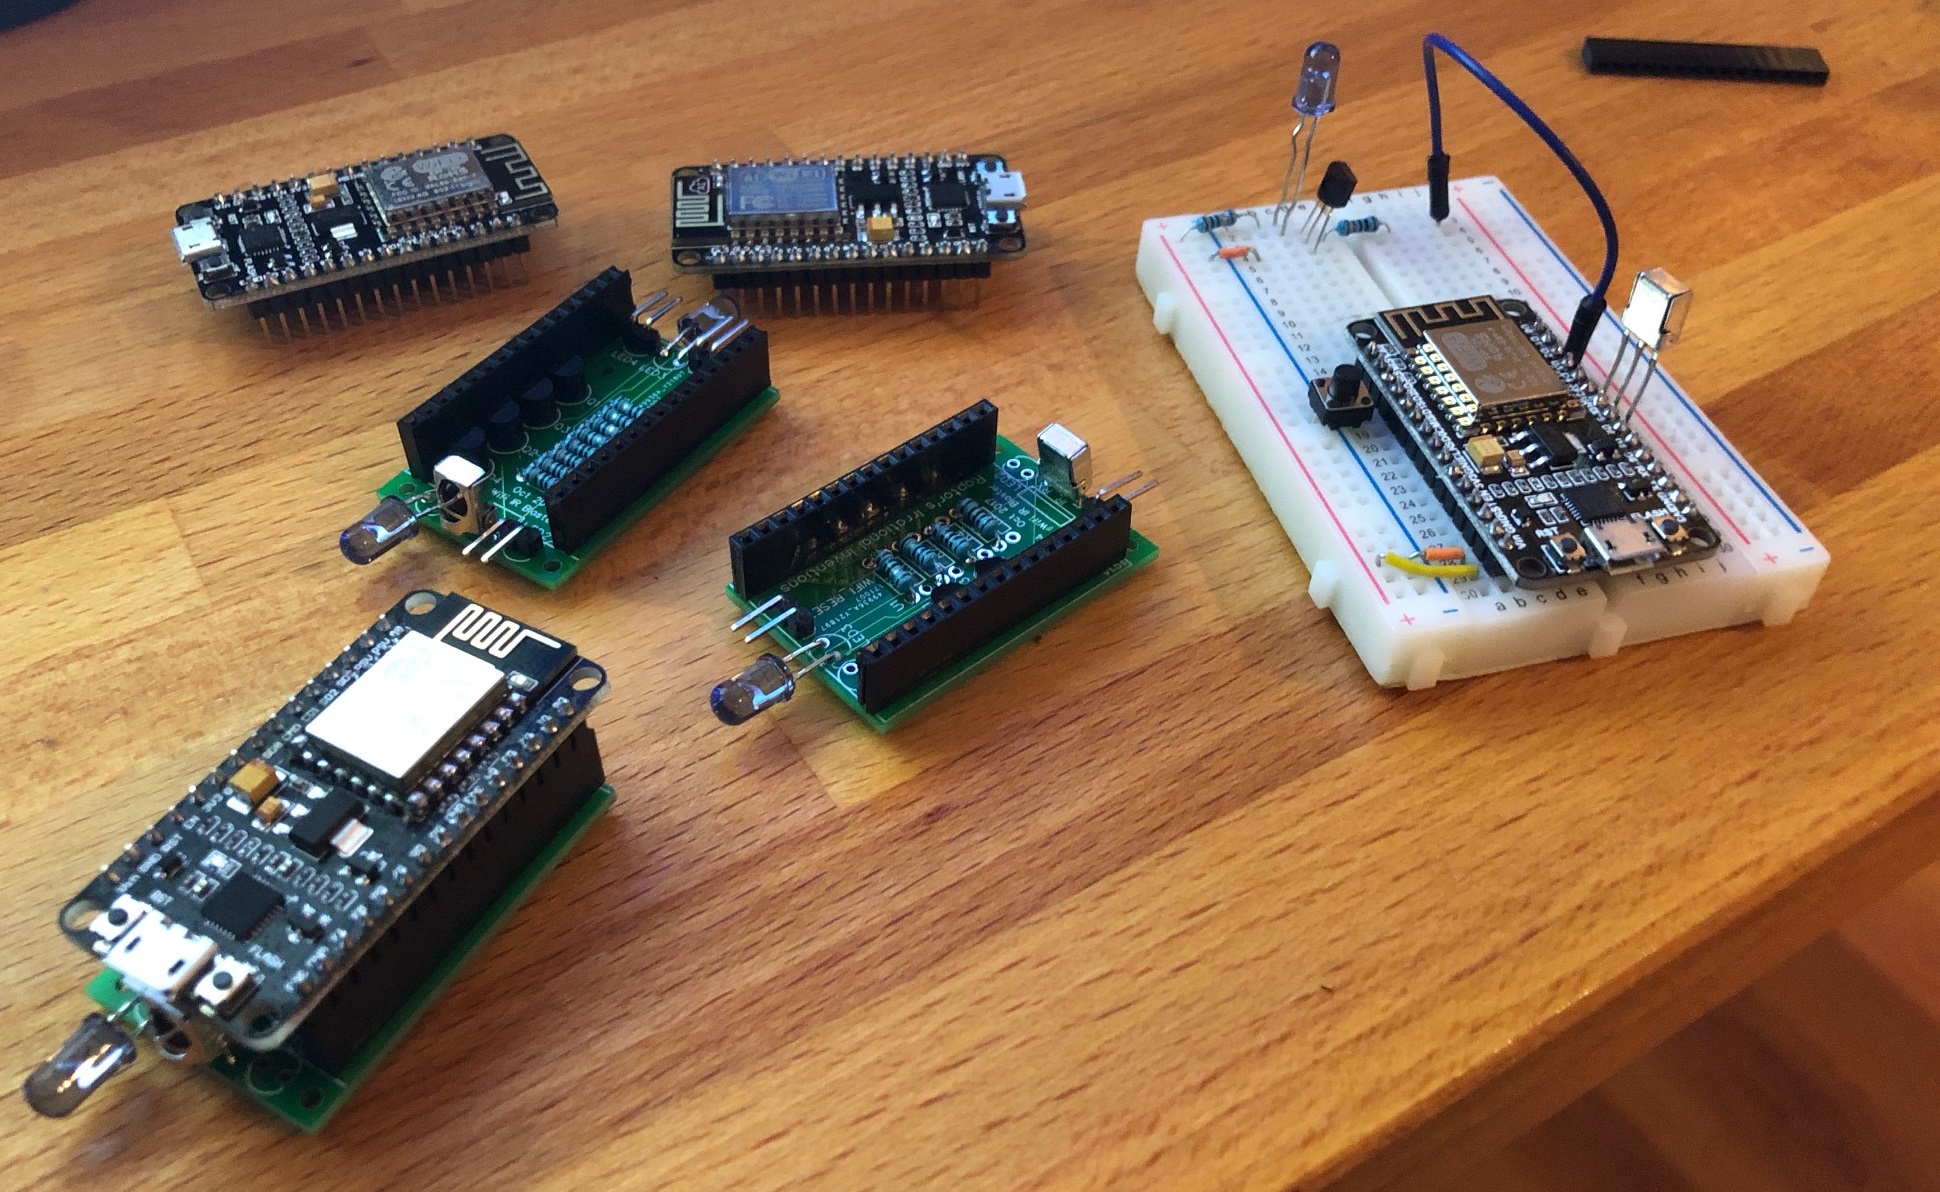


The hardware is based on the NodeMCU ESP8266 board and uses an infrared LED combined with the 2N2222 transistor for increased current and range. Values of the resistors seen in the schematic are variable and will depend on the specifications of your LED. If you're using the LED recommended below then a 1000 ohm resister to the 2N2222 transistor and a 10 ohm resistor to the LED itself are appropriate values, otherwise please use an LED resistance calculator. In total the parts come in around $10 so building a controller for each IR enabled device in your home is very feasible, and most components are cheaper in bulk
Shopping List:
These are just quick Amazon references. Parts can be purchased cheaper with longer shipping times from places like AliExpress
Install the NodeMCU drivers for your respective operating system if they are not autodetected
https://www.silabs.com/products/development-tools/software/usb-to-uart-bridge-vcp-drivers
The companion skill for the Amazon Alexa service is available here for US/CA/UK/IN/DE Alexa customers
If you use PlatformIO, you can clone the repository and run platformio run -t upload to
compile the library and upload it to a connected ESP8266-compatible board.
Otherwise, here are the building steps:
- Install Arduino IDE
- Install ESP8266 Arduino Core
- Install the following libraries from the Arduino IDE Library Manager:
ESP8266WebServerESP8266WiFiArduinoJsonTimeIRremoteESP8266as well asCryptosuiteand the developer version of [WiFiManager] which is now on the IDE (version >= 2.0) - Load the
IRController.inoblueprint from this repository - Upload blueprint to your ESP8266 (the .ino file). Monitor via serial at 115200 baud rate
After flashing, you can use the device like so:
- Device will boot into WiFi access point mode initially with SSID
IR Controller Configuration, IP address192.168.4.1. Connect to this and configure your access point settings using WiFi Manager. If your router supports mDNS/Bonjour you can now access your device on your local network via the hostname you specified (http://hostname.local:port/), otherwise via its local IP address (this IP address is displayed on the serial output) - Forward whichever port your ESP8266 web server is running on so that it can be accessed from outside your local network, this is critical since Alexa commands come from Amazon's servers, not locally
- Download the IR Controller Alexa skill and start creating your devices. Each IR command will require a URL which can be saved. Choose whichever functionality you desire. Information on creating the URLs can be found below
- Download the
IR Controllerskill from the Alexa skill store - Login with your Amazon account
- Go to https://tehpsyc.pythonanywhere.com/
- Login with the same Amazon account you used for the skill login
- Create a new device by specifying the friendlyName, endpointId, and description
- Add whichever functionality you want your device to have by scrolling through the options on the page
- Save your new device
- Run device discovery on your echo device by saying "Alexa, discover devices" or via https://alexa.amazon.com/
- Verify that your new device was discovered online or in the Alexa app and enjoy!


You may access basic device information at http://xxx.xxx.xxx.xxx:port/ (webroot)
Your last scanned code can be accessed via web at http://xxx.xxx.xxx.xxx:port/ or via serial monitoring over USB at 115200 baud. Most codes will be recognized and displayed in the format A90:SONY:12. Make a note of the code displayed in the serial output as you will need it for your maker channel URL. If your code is not recognized scroll down the JSON section of this read me.
@raptordemon has created a PCB that works great with this project. Use version 1.5 https://easyeda.com/raptordemon/ESP8266_IR_blaster-f8f224faba554bf3bb6ce0e32759fc23
For sending simple commands such as a single button press, or a repeating sequence of the same button press, use the logic below. This is unchanged from version 1. Parameters
pass- password required to execute IR command sendingcode- IR code such asA90:SONY:12address- (optional) Additional address data for NEC codes. Hex formatpulse- (optional) Repeat a signal rapidly. Default1pdelay- (optional) Delay between pulses in milliseconds. Default100repeat- (optional) Number of times to send the signal. Default1. Useful for emulating multiple button presses for functions like large volume adjustments or sleep timerrdelay- (optional) Delay between repeats in milliseconds. Default1000out- (optional) Set which IRsend present to transmit over. Default1. Choose between1-4. Corresponding output pins set in the blueprint. Useful for a single ESP8266 that needs multiple LEDs pointed in different directions to trigger different devices
Example:
http://xxx.xxx.xxx.xxx:port/msg?code=A90:SONY:12&pass=yourpass
For more complicated sequences of buttons, such a multiple button presses or sending RAW IR commands or Pronto commands, you may do an HTTP POST with a JSON object that contains an array of commands which the receiver will parse and transmit. Payload must be a JSON array of JSON objects. Password should still be specified as the URL parameter pass.
Please note that Pronto codes are often given in a hexadecimal format and need to be prefixed with 0x to indicate as such or they will be incorrectly transmitted.
Parameters
data- IR code data, may be simple HEX code such as"A90"or an array of int values when transmitting a RAW sequencetype- Type of signal transmitted. Example"SONY","RAW","Delay"or"Roomba"(and many others)length- (conditional) Bit length, example12. Parameter does not need to be specified for RAW or Roomba signalspulse- (optional) Repeat a signal rapidly. Default1pdelay- (optional) Delay between pulses in milliseconds. Default100repeat- (optional) Number of times to send the signal. Default1. Useful for emulating multiple button presses for functions like large volume adjustments or sleep timerrdelay- (optional) Delay between repeats in milliseconds. Default1000khz- (conditional) Transmission frequency in kilohertz. Default38. Only required when transmitting RAW signaladdress- (optional) Additional address data used for NEC codes. Hex formatout- (optional) Set which IRsend present to transmit over. Default1. Choose between1-4. Corresponding output pins set in the blueprint. Useful for a single ESP8266 that needs multiple LEDs pointed in different directions to trigger different devices.
3 Button Sequence Example JSON
[
    {
        "type":"nec",
        "data":"FF827D",
        "length":32,
        "repeat":3,
        "rdelay":800
    },
    {
        "type":"nec",
        "data":"FFA25D",
        "length":32,
        "repeat":3,
        "rdelay":800
    },
    {
        "type":"nec",
        "data":"FF12ED",
        "length":32,
        "rdelay": 1000
    }
]
Raw Example
[
    {
    "type":"raw",
    "data":[2450,600, 1300,600, 700,550, 1300,600, 700,550, 1300,550, 700,550, 700,600, 1300,600, 700,550, 700,550, 700,550, 700],
    "khz":38,
    "pulse":3
    }
]
Pronto Example
[
    {
    type:"pronto",
    data: [0x0000, 0x0069, 0x0007, 0x0000, 0x032a, 0x010e, 0x005a, 0x010e, 0x005a, 0x005a, 0x0168, 0x005a, 0x005a, 0x010e, 0x005a, 0x00b4, 0x005a, 0x01c2]
    }
]
To send the signal using the IFTTT Maker channel or the IR Controller smart home skill, simply take your JSON payload and remove spaces and line breaks so that entire packet is on a single line, then added it to the URL using the plain argument.
Sample URL using the same 3 button JSON sequence as above
http://xxx.xxx.xxx.xxx:port/json?pass=yourpass&plain=[{"type":"nec","data":"FF827D","length":32,"repeat":3,"rdelay":800},{"type":"nec","data":"FFA25D","length":32,"repeat":3,"rdelay":800},{"type":"nec","data":"FF12ED","length":32,"rdelay":1000}]
Due to limitations imposed by the hardware in the ESP8266, there is not enough free memory to communicate over HTTPS/SSL. To protect your devices, during the WiFiManager setup process you can specify your Amazon user_id which will act as a secret key that allows SHA256 HMAC authentication to take place. Without this time sensitive signature no codes will be sent from the device. The user_id is a unique identifier tied to your account and my developer account, not shared across any other Amazon services. This unique ID can be found at the bottom of the tehpsyc.pythonanywhere.com page. The format is amzn1.account.xxx, NOT your account email. Enabling this feature will prevent sending commands via other means but greatly increases the security of the device. By default the option bypassLocalAuth is set to true which will allow requests made to the device coming from your local network (based on your local IP address and subnet) to be processed without the HMAC authentication.
To send commands over SSL you can use an intermediate service such as Smartthings (see below), use a reverse proxy with HTTPS support (which should work with the native Alexa skill) such a nginx, or handle everything on the local network and not use the functionality with Alexa.
This article provides some details on using nginx https://jjssoftware.github.io/secure-your-esp8266/
If you are setting up your ESP8266 IR Controller to handle multiple devices, for example in a home theater setup, and the IR receivers are in different directions, you may use the out parameter to transmit codes with different LEDs which can be arranged to face different directions. Simply wire additional LEDs to a different GPIO pin on the ESP8266 in a similar fashion to the default transmitting pin and set the corresponding pin to the irsend1-4 objects created at the top of the blueprint. For example if you wired an additional LED to the GPIO0 pin and you wanted to send a signal via that LED instead of the primary, you would modify irsend2 in the blueprint to IRsend irsend2(0) corresponding to the GPIO pin. Then when sending your signal via the url simply add &out=2 and the signal will be sent via irsend2 instead of the primary irsend1.
Default mapping
- irsend1: GPIO4
- irsend2: GPIO5
- irsend3: GPIO12
- irsend4: GPIO13
- irrecv: GPIO14
- config: GPIO10
Set GPIO10 to ground to force a WiFi configuration reset, this will boot the device into WiFi host mode with an SSID of 'IR Controller Configuration' and IP of 192.168.4.1
By adding the device and state parameters to your URL or JSON object, the device will remember the last sent state of the device. This is useful since Alexa has separate on and off commands, and without knowing the device state will end up turning the TV on if an off command is issued
Example Turn On URL (if TV was already turned on, this command will do nothing):
http://xxx.xxx.xxx.xxx:port/msg?code=A90:SONY:12&pass=yourpass&device=tv&state=1
Example Turn Off URL (if TV was already turned off, this command will do nothing):
http://xxx.xxx.xxx.xxx:port/msg?code=A90:SONY:12&pass=yourpass&device=tv&state=0
For configuring URLs to work with IFTTT or the IR Controller skill, or other automation services where the HTML output of the device will never be seen by a human, add &simple=1 to the URL to simplify the data sent and speed up the response time
Example:
http://xxx.xxx.xxx.xxx:port/msg?code=A90:SONY:12&pass=yourpass&simple=1
If you are unable to use the Alexa skill for whatever reason, or you are using a competing voice control product or some other implementation, then IFTTT can also be used to execute commands using the Maker channel HTTP commands. Simply generate your URLs and save them in the Maker channel
For a great write up and instructional on how to integrate this device with Smartthings please visit http://thingsthataresmart.wiki/index.php?title=How_to_Control_your_TV_through_Alexa_and_Smartthings
Thanks to @dham102
The Roku device supports sending commands via an API to simulate remote button presses over HTTP, but only allows connections via a local IP address. This blueprint supports sending these commands and acts as a bridge between IFTTT/Alexa to control the Roku with basic commands
Roku commands require 3 parameters that can be sent as a Simple URL or part of a JSON collection. Parameters include:
data- Roku codetype- Type of signal transmitted. Must be set torokuip- Local IP address of your Roku device
Example Roku command to simulate pressing play button on a Roku with local IP 10.0.1.3
http://xxx.xxx.xxx.xxx:port/msg?pass=yourpass&type=roku&data=keypress/play&ip=10.0.1.3


