Location Trivia - Data Store Relationships
Goals
- Set up a shared data store using a singleton.
- Use a shared instance to pass information between a group of view controllers.
Review
From time to time, we may want one instance of a class (and whatever data it holds onto) to be accessed by many other objects in your program. This is very useful for organizing your application's data into one place—hence the designation in this case of "Data Store." One way to accomplish this is with a shared instance of that class. A shared instance is typically accessed by a class method which creates only one instance over the lifetime of the application. Any and all calls to that class method return the one instance already instantiated. You'll often hear this referred to as a "singleton."
The following code is used to create a singleton in Swift:
final class DataStore {
    static let sharedInstance = DataStore()
    private init() {}
}
Here we create a instance of a class called DataStore. By marking the class as final, we ensure it can't be modified or subclassed. Next, we create a constant called sharedInstance and assign it an instance of DataStore. The () following DataStore automatically calls the initializer on the following line. Setting sharedInstance as static prevents its methods from being overridden. Declaring it as a constant by using let guarantees that only this particular instance of DataStore will ever occupy sharedInstance, no matter how many times sharedInstance is called throughout the life of the application.
When an instance of a class is created with let, its variable properties can still be changed, even though the instance itself is fixed.
The initializer for the singleton is set to private to prevent other objects from creating their own instances of the DataStore class. Without this private init(), our DataStore would automatically be provided with the default public initializer. The private access control limits the scope of this method so it can only be seen (and called) from within the DataStore class.
In the scope of this lab we're going to call this class LocationsDataStore meaning we need to write out our data store as follows:
class LocationsDataStore {
    static let sharedInstance = LocationsDataStore()
    private init() {}
}
Great! That's a singleton. But it's not very useful on its own. Since we want our data store to hold Location objects, let's add an Array property to our LocationsDataStore class.
var locations: [Location] = []Remember that even though the sharedInstance we created can't be changed or swapped out for another instance, the values of the properties on it can still be modified.
Now that we have our data store class set up, we can access it from any view controller by calling the LocationsDataStore class and its sharedInstance property.
let singleton = LocationsDataStore.sharedInstanceThis lab already has these steps set up for you. Take a moment to look over the data store's files to see how they're laid out, then solve the lab by connecting a new view controller to the data store.
Instructions
-
The previously-used
LocationandTriviumdata models have been provided for you. Set up theLocationsDataStoreclass to be a singleton class using the code provided above. It should have one property, anArraycalledLocations. From thesharedInstanceinitializer, populate theLocationsarray with the starting data by using thegenerateStartingLocationsDatamethod provided at the end of this readme. -
Create a storyboard named
Main.storyboard. Add a table view controller embedded in a navigation controller which is the initial view controller. This first table view controller should be connected to a class calledLocationsTableViewController.
- In
viewDidLoad, set thetableViewproperty's accessibility label & accessibility identifier to"Locations Table"(this cannot be done in Interface Builder). - Give the table view controller a
LocationsDataStoreproperty calledstoreand use thesharedInstancemethod to instantiate it. - In storyboard, set the table view's prototype cell type to "right detail". Have the table view use the
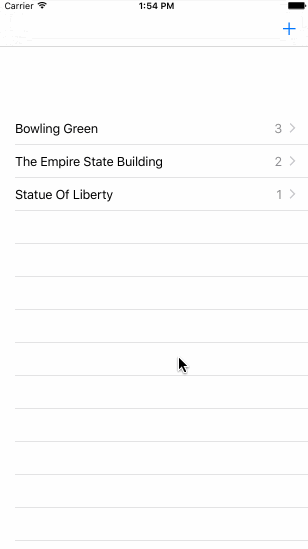
textLabelto show the name of the locations, and thedetailTextLabelto display the number of trivia it has associated with it.
- Add a second table view controller named
TriviaTableViewControlleraccessed by a show segue from a table view cell in theLocationsTableViewController. InviewDidLoad, set thetableView's accessibility label & accessibility identifier to"Trivia Table".
- Give the view controller a
Locationproperty calledlocation, which should be set with the relevantLocationobject inLocationsTableViewController'sprepareForSeguemethod. - Use the
locationproperty'striviaarray to load the table view. Each cell should display theTriviumobject's "content" in thetextLabel, and the number of "likes" in thedetailTextLabel.
- Create a new view controller named
AddLocationViewControllerthat will be presented modally from the locations table view controller.
- Add three text fields for the name, latitude, and longitude. Set their accessibility labels & accessibility identifiers to
"nameField","latitudeField, and"longitudeField"respectively. - Add two buttons, one to "cancel" adding a location, and one to "save" a new location with the information entered in the text fields. Set their accessibility labels & identifiers to
"cancelButton"and"saveButton"respectively. - When the "cancel" button is tapped, dismiss the view controller.
- When the "submit" button is tapped, use the information in the text fields to create new a instance of
Locationand add it the the data store'slocationsarray. Then dismiss the view controller.
- To access this new view controller, add a bar button item to the navigation bar in the location table view's storyboard canvas. Set the style to "add" so it shows a
+sign. In theLocationsTableViewController'sviewDidLoadmethod, set this new button's accessibility label & identifier to"addButton". You can access it as a property viaself.navigationItem.rightBarButtonItemand set the string properties from there.
- Create a modal segue between this add button and the
AddLocationViewController. Now that you have two segues, you'll need to detect which segue has been activated in theprepareForSegue:method — only one of the destination view controllers has aLocationproperty that can be set.
-
Use the iOS Simulator to test your add-location view controller. You may notice that the new location doesn't appear in the locations table view, even though the data has been added. How can you get the table view to reload itself?
-
Create another view controller named
AddTriviaViewControllerto be presented modally from the the trivia table view controller. It will need one text field, a cancel button, and a save button. Set their accessibility labels & accessibility identifiers to"Trivium Text Field","Cancel Button", and"Save Button"respectively.
- When the cancel button is tapped, dismiss the view controller.
- When the submit button is tapped, add use the text field to create a new
Triviumobject with zero likes. Add the this new trivium to the relevantLocationobject that was passed to theTriviaTableViewController. Then dismiss the view controller.
- To access this last view controller, add a bar button to the navigation bar in the trivia table view's storyboard canvas. Set the style to "add" so it shows a
+sign. In theTriviaTableViewController'sviewDidLoadmethod, set this new button's accessibility label & identifier to"Add Trivia Button". You can access this it as a property viaself.navigationItem.rightBarButtonItemand set the string properties from there.
- Create a modal segue between the add button and the
AddTriviaViewController.
- Use the iOS Simulator to test your add-trivia view controller. Does the new trivium show up in the
TriviaTableViewController?
Starting Data
func generateStartingLocationsData() {

    let empireState = Location(name: "The Empire State Building", latitude: 40.7484, longitude: -73.9857)
    let trivium1A = Trivium(content: "1,454 Feet Tall", likes: 4)
    let trivium1B = Trivium(content: "Cost $24,718,000 to build", likes: 2)
    empireState.trivia.append(contentsOf:[trivium1A, trivium1B])

    let bowlingGreen = Location(name: "Bowling Green", latitude: 41.3739, longitude: -83.6508)
    let trivium2A = Trivium(content: "NYC's oldest park", likes: 8)
    let trivium2B = Trivium(content: "Made a park in 1733", likes: 2)
    let trivium2C = Trivium(content: "Charging Bull was created in 1989", likes: 0)
    bowlingGreen.trivia.append(contentsOf:[trivium2A, trivium2B, trivium2C])

    let ladyLiberty = Location(name: "Statue Of Liberty", latitude: 40.6892, longitude: -74.0444)
    let trivium3A = Trivium(content: "Gift from France", likes: 6)
    ladyLiberty.trivia.append(trivium3A)

    self.locations.append(contentsOf:[bowlingGreen, empireState, ladyLiberty])
}
Advanced
Add functionality to get the users actual location. Beware that significant changes to CLLocation were made with iOS 8, so resources older than September 2014 might be incorrect.
End Result
Your final product should function like this: