- Explain what Handlebars is
- Connect Handlebars to the previously built application
- Write a helper for formatting comments as Markdown
You've probably noticed by now that the application that we've been working on doesn't offer much in the way of a view. We've used a minimal interface because we've been focusing on building the server, but there comes a time in every application's life when it needs a fresh coat of paint.
We're going to use the Handlebars templating library to build our application interface. (You might have already seen the .handlebars files in the views/ directory.)
But what does a templating library do? And how does it work? We'll walk you through building a new view step-by-step.
First, let's take a look at app/views/layouts/main.handlebars. It should look like this:
<!DOCTYPE html>
<html>
<head>
    <meta charset="utf-8">
    <title>Blog</title>
</head>
<body>
    {{body}}
</body>
</html>
This looks basically like standard HTML, with the exception of that {{body}}} thing. What is that?
Well, that's a Handlebars placeholder. It's where our content will go. Handlebars uses {{ }} to wrap parts of a view. (We could use {{{ }}} if we were absolutely certain that the internal part wouldn't execute any code that could be harmful for our servers or our users — use triple-curly-braces sparingly.)
To understand how we use these placeholders, we need to go back to app/index.js. Notice the section that reads
app.engine('handlebars', handlebars({
  defaultLayout: 'main',
  layoutsDir: path.join(__dirname, '/views/layouts')
}));
app.set('views', path.join(__dirname, '/views'));
app.set('view engine', 'handlebars');
This is where we tell the server to use Handlebars for rendering. The first line sets up the view engine. We use Handlebars' own rendering engine, telling it to use main.handlebars as the defaultLayout and also telling it where to find other layouts. We then register this view engine with our application using app.engine().
Next, we tell our application where to find other views — easy enough, they're in the views/ directory.
Finally, we set 'handlebars' as the application's view engine. (This actually just tells the app to use the engine that we set up just a few lines above.)
Okay, let's fire up the application. (If you haven't already created a learnco_blog database in Postgres, do that now: createdb learnco_blog.)
npm startIf everything goes according to plan, you'll see something like

Now let's check out our application! Go to http://localhost:3000 in your favorite browser.
You should be redirected to http://localhost:3000/login without fanfare. But unless we've created a user on the back end, this doesn't do us much good. We want to make it possible to sign up, but there's no signup.handlebars template.
Hm. Well, I guess we should just call it a day.

Wait!

We're engineers! We can write our own signup.handlebars template!
Let's create a file at app/views/signup.handlebars. To start, it'll look a lot like app/views/login.handlebars:
{{#if message}}
<div class="error">
  <span style="color: red">{{message}}</span>
</div>
{{/if}}
<form action="/user" method="post">
  <div>
      <label>Username:</label>
      <input type="text" name="username" />
  </div>
  <div>
      <label>Password:</label>
      <input type="password" name="password" />
  </div>
  <div>
    <label>Confirm password:</label>
    <input type="password" name="confirm-password" />
  </div>
  <button type="submit">Sign up</button>
</form>
Notice that we keep the {{#if message}} block (more on that in a sec), but we change the form's action to "/signup", add a confirm-password <input> and change <button>'s text to "Sign up".
So what's up with that {{#if message}} thing? In Handlebars terminology, this is called a helper. You can probably guess what it does: if its argument returns false, undefined, null, "", 0, or [], it will not render anything between {{#if arg}} and {{/if}}; otherwise, it will render what's between those tags.
Top tip: Note that the if helper in Handlebars will not render its block if its argument is an empty array ([]). This is different from JavaScript's normal rules for truthiness — [] is truthy — but handy in the case of rendering a collection only if it has content.
You'll notice that we open this block with {{#if message}} and close it with {{/if}}. In Handlebars, block helpers (like the built-in helpers if and each) open with a # and close with a /.
Single-line helpers and variables don't need a # and they also don't need to close — that's why we can just call {{message}} inside the block.
Now that we've written our template and understand a bit more about how it works, we have to make it viewable.
If we open up app/index.js, we can see how we rendered (hint hint) login.handlebars.
app.get('/login', (req, res) => {
  res.render('login', { message: req.flash('error') });
});
We simply call res.render() with the name of the template (without the .handelbars extension) and with an object of key-value pairs that will get passed as local variables to the template (this is where the message in {{message}} comes from).
Let's do similarly for /signup:
app.get('/signup', (req, res) => {
res.render('signup', { message: req.flash('error') });
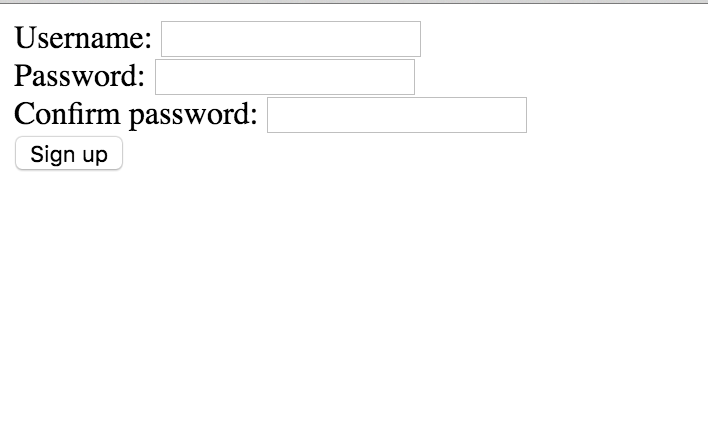
});Now in the browser if we navigate to http://localhost:3000/signup, we should see our form!
We can edit the form, but creating a user this way won't work quite yet because we still need to tell POST /user what to do with the confirm-password field — that's straightforward enough.
Find app.post('/user', ...) in app/index.js and make it resemble the following:
In app/index.js, add the following:
app.post('/user', (req, res) => {
const { body } = req;
if (!body.username || !body.password || !body['confirm-password']) {
req.flash('error', 'All fields are required!');
return res.redirect('/signup');
}
if (body.password !== body['confirm-password']) {
req.flash('error', 'Password did not match confirmation!');
return res.redirect('/signup');
}
delete body['confirm-password'];
User
.forge(req.body)
.save()
.then((usr) => {
res.send({id: usr.id});
})
.catch((error) => {
console.error(error);
return res.sendStatus(500);
});
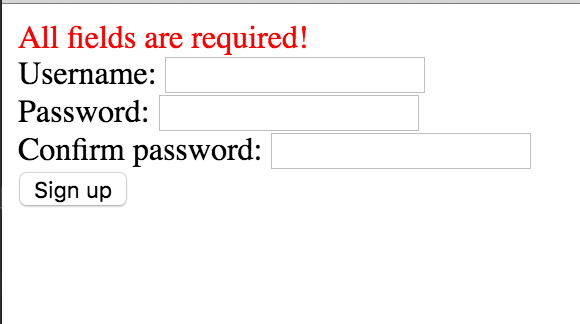
});We're going to go a step at a time. First, we make sure that the form is even filled out. Go ahead and submit an empty form. You should see
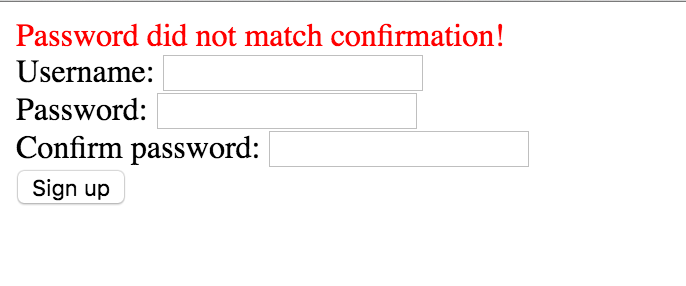
Then we make sure that the passwords that the user has supplied are equal to each other. If they aren't, we redirect with an error. Let's try it. Fill out the form, but enter unequal passwords. You should see
But if everything goes well, you should be shown a page with { id: [your user's integer id] } — good work!
Now that you have a basic understanding of how Handlebars templates work, we encourage you to flex some of those developer muscles. Can you write a template for rendering comments from scratch? Can you redirect to that page after successfully signing up?
Have fun!
View An App with a View (Intro To Handlebars) on Learn.co and start learning to code for free.


