- Transform a list of values into a list of components
- Use the
keyprop correctly with the list of components
We'll keep building our portfolio site and add the ability to display a list of projects based on an array of project data.
Here is an image of what we want once we are finished:

...and here is a tree view of our component parent-child structure:
└── App
    ├── NavBar
    ├── Home
    ├── About
    |   └── Links
    └── ProjectList
        |   ProjectItem
        |   ProjectItem
└── ProjectItemIt's recommended that you run npm start and work on this in the browser
before running tests — try to get your app to match the demo! Once you've
built out the components below, run npm test to see if your code passes the
tests.
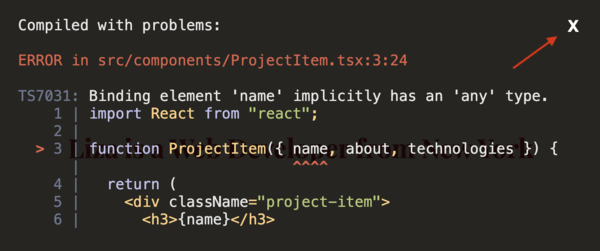
There will be some TypeScript errors upon running the starter code. That's okay, you will fix those as you go through the lab. To remove those errors from the screen so you can observe your work before you fix them, click the white "X" in the top right corner.
Note: If this feels challenging as you go through the lab, that is okay! React is a challenging framework. Don't be afraid to look back at previous lessons to remind yourself how something was done.
In the NavBar component, there is an array with three strings representing
each link on the page. For each of those strings, create an <a> tag that looks
like this:
<a href="#home">home</a>Make sure each <a> element also gets a unique key prop.
In the ProjectList component, a prop of projects is being passed down from
the App component with an array of objects.
Investigate what the props look like by looking at the console.log() in the
browser console. Use that shape to create a Props interface to type the
props with.
For each object in the array, render one ProjectItem component with the
correct props. Use the id of the project for the key prop.
Hint: If you need a refresher on how we use interfaces to type props, look back at the Props Basics lesson. If you need a refresher on interfaces in general, look back at the TypeScript lessons, or venture over to the TypeScript documentation on them. The data in this lab has a more complex structure than given in examples we've seen before, but note that interfaces can type complex structures with nested data:
Click to see an example
Given the shape:
{
  id: 1,
  name: "Biscuit",
  breed: "Maltese",
  stats: {
      fur: "white",
      weight: 10,
      vaccinated: true
  },
  owners: [
      {
          name: "Momo",
          phone: "555-555-5551"
      },
      {
          name: "Gabriel",
          phone: "555-555-5552"
      }
  ]
}
We could create an interface by typing each property individually, following the given shape:
interface Pet {
  id: number;
  name: string;
  breed: string;
  stats: {
    fur: string;
    weight: number;
    vaccinated: true;
  };
  owners: {
    name: string;
    phone: string;
  }[];
}
The ProjectItem component should the props name about and technologies
passed down from ProjectList.
Create a Props interface to type the props appropriately. You should have
already typed these individual properties in the ProjectList interface - so if
you forgot what types name, about, and technologies are, look back at the
interface and consider which properties you're passing onto ProjectItem.
For each element in the array of technologies, create a <span> tag that
displays the name of the technology.


