laughing-pic-zhu / blog Goto Github PK
View Code? Open in Web Editor NEW朱建的个人博客
朱建的个人博客


随着前端交互复杂度的提升,各类框架如angular,react,vue等也层出不穷,这些框架一个比较重要的技术点就是数据绑定。数据的监听有较多的实现方案,本文将粗略的描述一番,并对其中一个兼容性较好的深入分析。
#实现方案简介
目前对象的监听可行的方案:
ES5现代浏览器基本都支持了,OK,本文将介绍目前支持度最好的object.defineproperty 的Setters 和 Getters方式
它属于es5规范,有两种定义属性:
数据属性的例子
obj.key='static';
//等效于
Object.defineProperty(obj, "key", {
  enumerable: true,
  configurable: true,
  writable: true,
  value: "static"
});
访问器属性例子
var obj = {
    temperature:'test'
};
var temperature='';
Object.defineProperty(obj, 'temperature', {
    get: function() {
        return temperature+'-----after';
    },
    set: function(value) {
        temperature = value;
    }
})
obj.temperature='Test';
//Test-----after
console.log(obj.temperature);
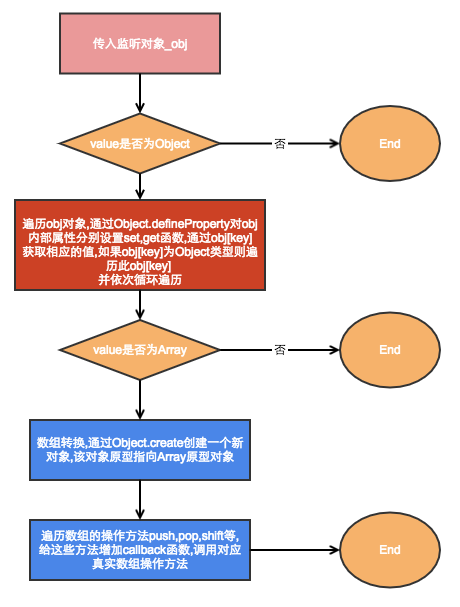
比较复杂的是数组的封装,结构如下:
新建一个对象newProto,继承Array的原型,并在newProto上面封装push,pop等数组操作方法,再将传入的array对象的原型设置为newProto。

##路径的定位
在获取数据变化的同时,定位该变化数据在原始根对象的位置,以数组表示如:
如[ 'a', 'dd', 'ddd' ] 表示对象obj.a.dd.ddd的属性改变
实现:每个遍历对象属性都通过path.slice(0)的方式复制入参数组path,生成新数组tpath,给tpath数组push对应的对象属性key,最后在执行set的回调函数时候将tpath当参数传入
watch.js
  /**
   *
   * @param obj 需要监听的对象或数组
   * @param callback 当对应属性变化的时候触发的回调函数
   * @constructor
   */
  function Watch(obj, callback) {
      this.callback = callback;
      //监听_obj对象 判断是否为对象,如果是数组,则对数组对应的原型进行封装
      //path代表相应属性在原始对象的位置,以数组表示. 如[ 'a', 'dd', 'ddd' ] 表示对象obj.a.dd.ddd的属性改变
      this.observe = function (_obj, path) {
          var type=Object.prototype.toString.call(_obj);
          if (type== '[object Object]'||type== '[object Array]') {
              this.observeObj(_obj, path);
              if (type == '[object Array]') {
                  this.cloneArray(_obj, path);
              }
          }
      };

      //遍历对象obj,设置set,get属性,set属性能触发callback函数,并将val的值改为newVal
      //遍历结束后再次调用observe函数 判断val是否为对象,如果是则在对val进行遍历设置set,get
      this.observeObj = function (obj, path) {
          var t = this;
          Object.keys(obj).forEach(function (prop) {
              var val = obj[prop];
              var tpath = path.slice(0);
              tpath.push(prop);
              Object.defineProperty(obj, prop, {
                  get: function () {
                      return val;
                  },
                  set: function (newVal) {
                      t.callback(tpath, newVal, val);
                      val = newVal;
                  }
              });
              t.observe(val, tpath);
          });
      };

      //通过对特定数组的原型中间放一个newProto原型,该原型继承于Array的原型,但是对push,pop等数组操作属性进行封装
      this.cloneArray = function (a_array, path) {
          var ORP = ['push', 'pop', 'shift', 'unshift', 'splice', 'sort', 'reverse'];
          var arrayProto = Array.prototype;
          var newProto = Object.create(arrayProto);
          var t = this;
          ORP.forEach(function (prop) {
              Object.defineProperty(newProto, prop, {
                  value: function (newVal) {
                      path.push(prop);
                      t.callback(path, newVal);
                      arrayProto[prop].apply(a_array, arguments);
                  },
                  enumerable: false,
                  configurable: true,
                  writable: true
              });
          });
          a_array.__proto__ = newProto;
      };

      //开始监听obj对象,初始path为[]
      this.observe(obj, []);
  }
index.html
    <body>
    <ul>
        <li>
            <a href="javascript:void(0)" onClick="dataOne()">
                将obj b属性改变
            </a>
        </li>
        <li>
            <a href="javascript:void(0)" onClick="dataTwo()">
                将obj a属性的dd属性的ddd属性改变
            </a>
        </li>
        <li>
            <a href="javascript:void(0)" onClick="dataThree()">
                将obj a属性的g属性数组第一个值的a属性改变
            </a>
        </li>
        <li>
            <a href="javascript:void(0)" onClick="dataFour()">
                将obj a属性的g属性数组push新的值
            </a>
        </li>
    </ul>

    <div id="path">
    </div>
    <div id="old-val">
    </div>
    <div id="new-val">
    </div>
    </body>
    <script src="../src/watch.js"></script>
    <script>
        var obj = {
            a: {e: 4, f: 5, g: [{a: 1, b: 2}, [3, 4]], dd: {ddd: 1}},
            b: 2,
            c: 3
        };

        new Watch(obj, call);
        function call(path, newVal, oldVal) {
            document.getElementById('path').innerHTML='路径:'+path;
            document.getElementById('old-val').innerHTML='新的值:'+newVal;
            document.getElementById('new-val').innerHTML='老的值:'+oldVal;
        }

        function dataOne() {
            obj.b = Math.floor(Math.random()*10);
        }

        function dataTwo() {
            obj.a.dd.ddd = Math.floor(Math.random()*10);
        }

        function dataThree() {
            obj.a.g[0].a=Math.floor(Math.random()*10);
        }

        function dataFour() {
            obj.a.g.push(Math.floor(Math.random()*10));
        }
    </script>

#代码地址
完整代码地址
具体流程的复杂度基于监听对象的深度,所以下图只对父对象做流程分析
本文有什么不完善的地方,或者流程图有待改进的地方,敬请斧正。
babel是javaScript编译器,主要用于将ECMAScript2015+版本的代码转化为具有兼容性的较低版本,从而让代码适用于各种环境。
它的早期代码从acorn项目中fork出来,后续提供了acorn不具备的一整套的代码解析,转换,生成的功能。
现在的babel有着抽象的工程实现很难直接啃源码。笔者打算通过一系列早期功能点的实现来慢慢揭开其内部机制。babel代码转换第一步是将源码转化成AST(Abstract Syntax Tree)。
本文将借助babel/acorn初期的源码,详细讲解其生成AST的工程细节。
阅读本文前,希望您对AST的概念如Statement,Expression有一些了解。ESTree 规范文档传送门
先举个代码转为ast的例子:
/*
  测试whileStatement
*/
while(b !== 0){
  if (a > b){
   a = a - b;
  }else{
   b = b - a;
  }
}
console.log(a)
转化后的ast结构

上图的整个树的生成都是由一次次词法,语法解析中递归出来的。
  ...
  while (tokType !== _eof) {
        const statement = parseStatement();
        if (first) {
            first = false;
            if (isUseStrict(statement)) {
                setStrict(true);
            }
        }
        node.body.push(statement);
    }
 ...
部分Statement, Experssion内部也有自己的递归逻辑:
以逗号分隔的递归如var a,b,c。
参数内部以逗号分隔的行参递归,大括号内部的以分号分割的statement递归,如function a(b,c,d){e;f;g;}。
大括号内部的以分号分割的statement递归,直到到遇到大括号结束符,如{e;f;g}。
以else关键字的递归,如if(a){}else if(b){}else{}。
以 case以及default关键字的递归,如switch(a){case a:xxx;caseb :xxx; default: xxx;}。
都是大括号内部的以分号分割的statement递归,大括号结束符,如
for(;;){e;f;g;}
for (var a in b){e;f;g}
while(a){e;f;g}
do{e;f;g;}while(a)
try{e;f;g}catch(a){e;f;g}finally{e;f;g;}以逗号分隔分割的递归,直到遇到大括号结束符。如{a,b,c,}
以逗号分隔分割的递归,直到遇到中括号结束符。如[a,b,c,]
和FunctionDeclaration一样,参数内部以逗号分隔的行参递归,大括号内部的以分号分割的statement递归,如var a=function (b,c,d){e;f;g;}。
单个通用的递归函数的实现的功能如下
注释分两种:
/* */,或者 / ** */的多行注释以及//的单行注释。
空格分为' ' \t \n \r \f
function skipSpace() {
    while (tokenPos < inputLen) {
        const ch = input.charAt(tokenPos);
        if (ch === '/') {
            if (input.charAt(tokenPos + 1) === '/') {
                tokenPos += 2;
                while (tokenPos < inputLen && !newline.test(input.charAt(tokenPos))) {
                    tokenPos++;
                }
            } else if (input.charAt(tokenPos + 1) === '*') {
                const i = input.indexOf('*/', tokenPos + 2);
                if (i < 0) {
                    raise(tokenPos - 2, 'Unterminated comment');
                }
                tokenPos = i + 2;
            } else {
                ++tokenPos;
            }
        } else if (ch === '\n' || ch === '\t' || ch === " " || ch === "\r" || ch === "\f") {
            ++tokenPos;
        } else {
            break;
        }
    }
}具体token有非常多,但是按类型分的话,可以分为以下6种:
function readToken() {
    lastStart = tokStart;
    lastEnd = tokEnd;
    tokStart = tokenPos;
    const ch = input.charAt(tokenPos);
    if (tokenPos >= inputLen) {
        return finishToken(_eof);
    }
    if (ch === '\'' || ch === '"') {
        readString(ch);
    } else if (indentifierReg.test(ch)) {
        readWord();
    } else if (digest.test(ch)) {
        readNumber();
    } else if (puncChars.test(ch)) {
        tokenPos++;
        finishToken(puncTypes[ch]);
    } else if (operatorChar.test(ch)) {
        readOperator(ch)
    }
}除了BlockStatement,其他statement是以;或者换行符结束。
每种statement都由自己不同的解析方式以及名称。一个statement可能含有0个或者多个expression。
如while类型的statement解析函数如下
function parseWhile() {
    const node = startNode();
    next();
    node.test = parseParenExpression();
    node.body = parseBlock();
    return finishNode(node, 'WhileStatement');
}
解析后的简单的json类型为
{
      "type": "WhileStatement",
      "test": {
        "type": "AssignmentExpression",
        "operator": "=",
        "left": {
          "type": "Identifier",
          "name": "a"
        },
        "right": {
          "type": "Identifier",
          "name": "b"
        }
      },
      "body": {
        "type": "BlockStatement",
        "body": []
      }
    }
这个模块个人认为是最核心的模块,对不同表达式进行解析。
最基本的表达式如:Identifier,Literal,FunctionExpression,ObjectExpression,ArrayExpression,NewExpression。
建立在基本表达式之上的如:a.b的MemberExpression,a()的CallExpression。
++a,a--之类的UpdateExpression。
!a,!!a之类的UnaryExpression。
a||b,a&&b的LogicalExpression,a-b之类的BinaryExpression。
a=b之类的AssignmentExpression。
a?b:c之类的ConditionalExpression。
上面这些复杂类型的解析执行顺序如下:

举个复杂的例子:
var a=!b++?c+1:d.e(f,g);解析之后的json格式如下
{
      "type": "VariableDeclaration",
      "declarations": [
        {
          "type": "VariableDeclarator",
          "id": {
            "type": "Identifier",
            "name": "a"
          },
          "init": {
            "type": "ConditionalExpression",
            "test": {
              "type": "UnaryExpression",
              "operator": "!",
              "prefix": true,
              "argument": {
                "type": "UpdateExpression",
                "operator": "++",
                "prefix": false,
                "argument": {
                  "type": "Identifier",
                  "name": "b"
                }
              }
            },
            "consequent": {
              "type": "BinaryExpression",
              "left": {
                "type": "Identifier",
                "name": "c"
              },
              "operator": "+",
              "right": {
                "type": "Literal",
                "value": 1,
                "raw": "1"
              }
            },
            "alternate": {
              "type": "CallExpression",
              "callee": {
                "type": "MemberExpression",
                "object": {
                  "type": "Identifier",
                  "name": "d"
                },
                "property": {
                  "type": "Identifier",
                  "name": "e"
                },
                "computed": false
              },
              "arguments": [
                {
                  "type": "Identifier",
                  "name": "f"
                },
                {
                  "type": "Identifier",
                  "name": "g"
                }
              ]
            }
          }
        }
      ],
      "kind": "var"
}本人的简易版babel实现simple-babel
实现了AST之后,后续也可以拓展很多有趣的功能如代码转换,代码风格检测,代码自动格式化,代码压缩。目前我还不是太明白,以后可以尝试实现一下。
(完)
随着前端应用日趋复杂,如今如angular,vue的mvvm框架,基于virtual dom的react等前端库基本成为了各个公司的首选。而以当初最流行的头号大哥backbone为代表的mvc库基本退出了历史舞台。
在现如今人人都说mvvm/react多好,backbone多差的时代。笔者看别人文章,看的时候总是感觉好像有点道理,看完之后如耳边风一般左耳朵进,右耳朵出。
so,痛定思痛之后,笔者定了个小目标,实现了份简易版的backbone库。以设计,实现的角度来对比其它类型库的差异。
ok,废话不多说,上正菜。
MVC即将前端应用抽象为Model,View,Control三大模块。View为用户视图,通过浏览器事件接受用户输入。Model为数据模型,他可以随时和后端同步数据。Control则是具体实现View派发的事件,计算并改变Model的数据。
UI可以被抽象为模版+数据,随着用户不断的触发浏览器提供的各种事件,交互不断的进行,Control接受了View指令改变着Model的数据,而View则随着Model的改变做出响应,最终展现在用户面前。

本篇文章的思路来自于backbone,并屏弃了耦合的后端操作。早期MVC并没有对Control做严格的划分,也许是数据的改变计算并不那么复杂,所以Control功能在View的事件内完成了,也就是说View模块里面耦合了Control的功能。
但近几年flux的action,store的出现,View调用action,具体数据变化计算则在store内部实现,也算是把Control功能从View内部抽象出来了吧。
为对象提供对事件的处理和回调,内部实现了观察者(订阅者)模式,如view订阅了model的变化,model变化之后则通知view。
on函数通过event名,在object上绑定callback函数,将回调函数存储在数组里。
off函数移除在object上绑定的callback函数
trigger函数通过event名,找到object对应的数组,并触发所有数组内回调函数。
其所有方法应该支持类似on(name,callback),on('name1 name2 name3',callback), on({name1:callback1,name2:callback2})
这时候则可以抽象内部公用方法。通过递归的方式,on({name1:callback1,name2:callback2})类型的和on('name1 name2 name3',callback)类型,最终转化为最基本的on(name,callback)类型。核心代码如下:
this.eventsApi = function (iteratee, name, callback, context) {
    let event;
    if (name && typeof name === 'object') {
      Object.keys(name).forEach(key=> {
        event = this.eventsApi(key, name[key], context);
      })
    } else if (SEPARATE.test(name)) {
      var keys = name.split(SEPARATE);
      keys.forEach(key=> {
        event = iteratee.call(this,key, name[key], context);
      });
    } else {
      event = iteratee.call(this,name, callback, context);
    }
    return event;
};
_ensureElement,确保View有一层dom包裹,如果this.el这个dom不存在,则通过id,className,tagName创建一个dom并赋值于this.el。
listenTo,将model与view实例关联起来,并收集关联model,存储于listenTo数组内,内部实现则是调用model的on函数
stopListening,view销毁前调用,通过listenTo数组找到关联model,并取消view与这些model之间的观察者关系。
$,将dom的查找定位在 this.$el下
delegateEvents,事件委托,以{'click #toggle-all': 'choose'}为例,为在this.el子节点的id等于toggle-all的dom注册click事件choose函数。核心代码如下:
 delegateEvents: function (events) {
     var $el = this.$el;
     Object.keys(events).forEach(item=> {
       var arr = item.split(' ');
       if (arr.length === 2) {
         var event = arr[0];
         var dom = arr[1];
         $el.on(event + '.delegateEvents' + this.$id, dom, this[events[item]].bind(this));
       }
     })
 },
undelegateEvents,注销掉通过delegateEvents注册的dom事件
Model在backbone里被抽象为object类型的Model和array类型的Collection
监听数据的变化,对model的修改,删除之后调用对应的trigger函数,通知订阅了model变化的view。
set函数,改变model数据,并触发change事件
 set: function (obj) {
     this._changing = true;
     this.changed = obj;
     this._previousAttributes = Object.assign({}, this.attributes);
     this.attributes = Object.assign({}, this.attributes, obj);
     const keys = [];
     Object.keys(obj).forEach(key=> {
       keys.push(key);
       this.trigger('change:' + key, this);
     }, this);

     if (keys.length > 0) {
       this.trigger('change', this);
     }
     this._changing = false;
  },
destroy函数触发destroy事件
 destroy: function () {
    this.stopListening();
    this.trigger('destroy', this);
 },
提供数组类型models的push,unshift,pop,shift,remove,reset等功能。push,unshift实际调用add函数,pop,shift实际调用remove函数。
add函数支持任意索引插入指定数组,触发add事件。核心的代码如下:
 export const splice = (array, insert, at)=> {
   at = Math.max(0, Math.min(array.length, at));
   let len = insert.length;
   let tail = [];
   for (let i = at; i < array.length; i++) {
     tail.push(array[i]);
   }
   for (let i = 0; i < tail.length; i++) {
     array[i + at + len] = tail[i];
   }
   for (let i = 0; i < len; i++) {
     array[i + at] = insert[i];
   }
   return array;
 };
remove函数支持删除指定model,触发update事件。
_addReference,调用add方法新增model时,通过观察者模式增加该model与collection之间的关联,model的变化通知collection。核心代码如下:
 _addReference: function (model) {
 model.on('all',this._onModelEvent,this);
 }
_removeReference,调用remove,reset移除model时,取消该model与collection关联。核心代码如下:
  _removeReference: function(model) {
    if (this === model.collection) delete model.collection;
    model.off('all', this._onModelEvent, this);
  }
生产环境下需要在保留原生View,Model类的功能情况下做一些业务拓展,这时候需要用到类的继承。
虽然es6支持extend继承,但这边我还是手写了一份。思路则是返回一个构造函数,该函数的原型为新的实例对象props,而props的原型对象则是父函数的原型(有点拗口,自己看代码理解)。
核心代码如下:
export const extend = function (props) {
  var parent = this;
  var child = function () {
    parent.apply(this, arguments);
  };
  child.prototype = Object.assign(Object.create(parent.prototype), props, { constructor: child });
  return child;
};

整篇文章基本是围绕着如下2点
好了,文章草草写到这了,多谢各位看官,以上也是纯个人观点,有问题欢迎各位web前端mvc设计指教。
在web开发中,webpack的hot module replacement(HMR)功能是可以向运行状态的应用程序定向的注入并更新已经改变的modules。它的出现可以避免像LiveReload那样,任意文件的改变而刷新整个页面。
这个特性可以极大的提升开发拥有运行状态,以及资源文件普遍过多的前端应用型网站的效率。完整介绍可以看官网文档
本文是先从使用者的角度去介绍这个功能,然后从设计者的角度去分析并拆分需要实现的功能和实现的一些细节。
对于使用者来说,体验到这个功能需要以下的配置。
webpack.config.js:
const path = require('path');
const HtmlWebpackPlugin = require('html-webpack-plugin');
const webpack = require('webpack');

module.exports = {
    entry: {
        app: './src/index.js'
    },
    devServer: {
        contentBase: './dist',
        hot: true,
    },
    plugins: [
        new webpack.HotModuleReplacementPlugin(),
        new HtmlWebpackPlugin()
    ],
    output: {
        filename: '[name].bundle.js',
        path: path.resolve(__dirname, 'dist')
    }
};
代码: index.js 依赖print.js,使用module.hot.accept接受print.js的更新:
import './print';

if (module.hot) {
    module.hot.accept('./print', function () {
        console.log('i am updated');
    })
}
改变print.js代码:
console.log('print2')
console.log('i am change');
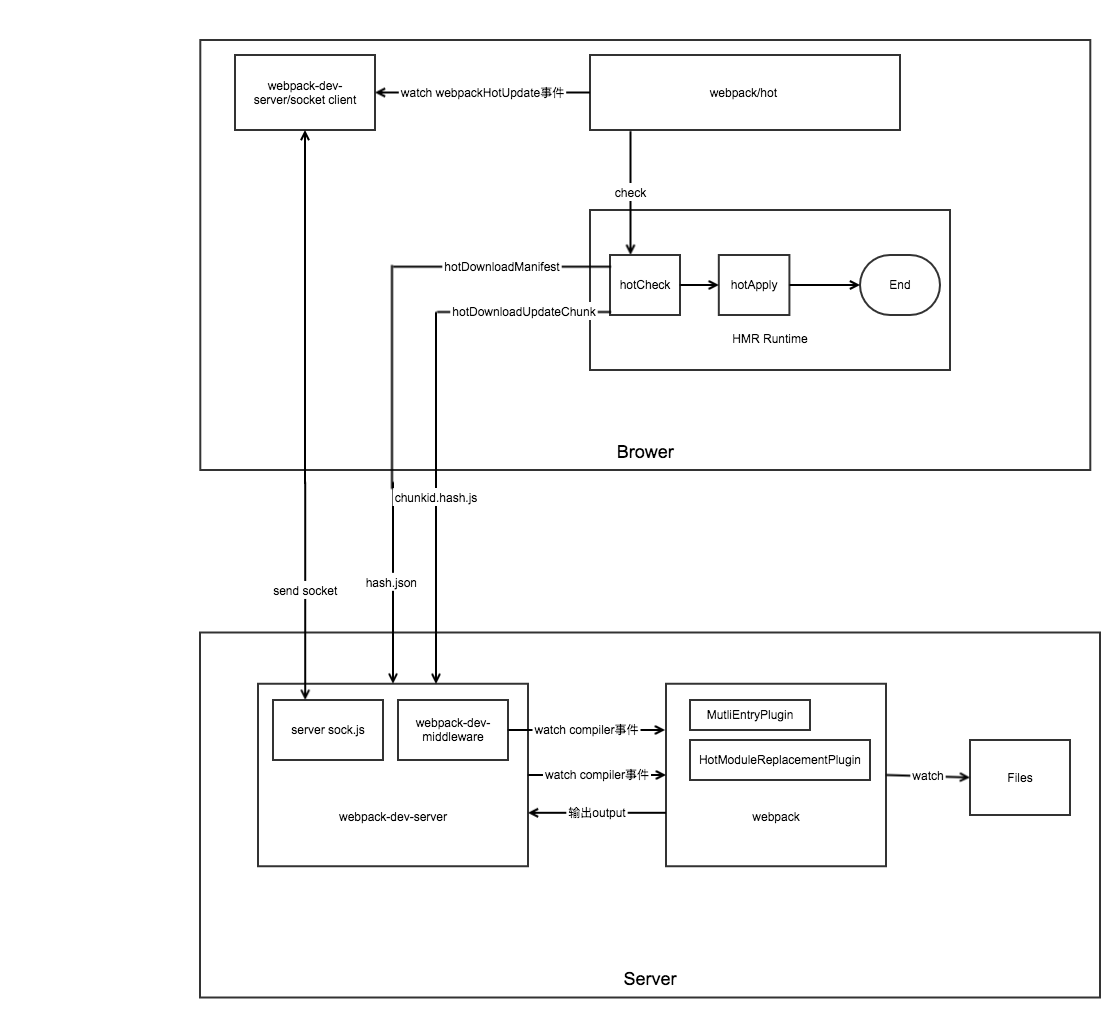
此时服务端向浏览器发送socket信息,浏览器收到消息后,开始下载以hash为名字的下载的json,jsonp文件,如下图:

浏览器会下载对应的hot-update.js,并注入运行时的应用中:
webpackHotUpdate(0,{

/***/ 30:
/***/ (function(module, exports) {

console.log('print2')
console.log('i am change');


/***/ })

})
0 代表着所属的chunkid,30代表着所属的moduleid。
替换完之后,执行module.hot.accept的回调函数,如下图:

简单来讲,开启了hmr功能之后,处于accepted状态的module的改动将会以jsonp的形式定向的注入到应用程序中。
一张图来表示HMR的整体流程:
当翻开bundle.js的时候,你会发现Runtime代码多了许多以下的代码:
/******/ 	function hotDownloadUpdateChunk(chunkId) {
/******/			...
/******/ 	}
/******/	function hotDownloadManifest(requestTimeout) {
/******/			...
/******/ 	}
/******
/******/ 	function hotSetStatus(newStatus) {
/******/			...
/******/ 	}
/******/
打包的时候,明明只引用了4个文件,但是整个打包文件却有30个modules之多:

/* 30 */
/***/ (function(module, exports) {

console.log('print3')
console.log('i am change');


/***/ })
到现在你可能会有以下几个疑问:
以上问题,可以从三个不同的角度去解决。server,webpack,brower。
entry:{app:'./src/index.js'}
,转换为
entry:{app:['/Users/zhujian/Documents/workspace/webpack/webpack-demos-master/node_modules/[email protected]@webpack-dev-server/client/index.js?http://localhost:8082'],'webpack/hot/dev-server','./src/index.js'}
构建业务代码时,附带上socketjs,hot代码。
Server.js
if (this.hot) this.sockWrite([conn], 'hot');
浏览器
hot: function hot() {
    _hot = true;
    log.info('[WDS] Hot Module Replacement enabled.');
  }
监听编译器的生命周期模块。
  compiler.plugin('compile', invalidPlugin);
  compiler.plugin('invalid', invalidPlugin);
  compiler.plugin('done', (stats) => {
    this._sendStats(this.sockets, stats.toJson(clientStats));
    this._stats = stats;
  });
	context.compiler.plugin("done", share.compilerDone);
	context.compiler.plugin("invalid", share.compilerInvalid);
	context.compiler.plugin("watch-run", share.compilerInvalid);
	context.compiler.plugin("run", share.compilerInvalid);
MainTemplate增加module-obj,module-require事件
module-obj事件负责生成以下代码
/******/ 		var module = installedModules[moduleId] = {
/******/ 			i: moduleId,
/******/ 			l: false,
/******/ 			exports: {},
/******/ 			hot: hotCreateModule(moduleId),
/******/ 			parents: (hotCurrentParentsTemp = hotCurrentParents, hotCurrentParents = [], hotCurrentParentsTemp),
/******/ 			children: []
/******/ 		};
/******/
module-require事件负责生成以下代码
/******/ modules[moduleId].call(module.exports, module, module.exports, hotCreateRequire(moduleId));
新增Watching类支持watch模式,并结合watchpack监听文件变化。
class Watching {
	....
}
新增updateHash实现
updateHash(hash) {
   	this.updateHashWithSource(hash);
   	this.updateHashWithMeta(hash);
   	super.updateHash(hash);
   }
新增updateHash实现
	updateHash(hash) {
		hash.update(`${this.id} `);
		hash.update(this.ids ? this.ids.join(",") : "");
		hash.update(`${this.name || ""} `);
		this._modules.forEach(m => m.updateHash(hash));
	}
增加createHash方法,默认调用md5计算compilation hash。调用依赖树module,chunk的updateHash方法。
createHash() {
	....
}
如:
if(module.hot){}
编译后
if(true){}
entry:{app:['/Users/zhujian/Documents/workspace/webpack/webpack-demos-master/node_modules/[email protected]@webpack-dev-server/client/index.js?http://localhost:8082'],'webpack/hot/dev-server','./src/index.js'}
打包后
/* 5 */
/***/ (function(module, exports, __webpack_require__) {

// webpack-dev-server/client/index.js
__webpack_require__(6);
//webpack/hot/dev-server
__webpack_require__(26);
// .src/index.js
module.exports = __webpack_require__(28);

/***/ })
compilation.plugin("record", function(compilation, records) {
				if(records.hash === this.hash) return;
				records.hash = compilation.hash;
				records.moduleHashs = {};
				this.modules.forEach(module => {
					const identifier = module.identifier();
					const hash = require("crypto").createHash("md5");
					module.updateHash(hash);
					records.moduleHashs[identifier] = hash.digest("hex");
				});
				records.chunkHashs = {};
				this.chunks.forEach(chunk => {
					records.chunkHashs[chunk.id] = chunk.hash;
				});
				records.chunkModuleIds = {};
				this.chunks.forEach(chunk => {
					records.chunkModuleIds[chunk.id] = chunk.mapModules(m => m.id);
				});
			});
compilation.plugin("additional-chunk-assets", function() {
				....
				this.assets[filename] = source;
			});
module.hot.check(true).then(function(updatedModules) {
	....
})
本人的简易版webpack实现simple-webpack
(完)
mvvm模式即model-view-viewmodel模式简称,单项/双向数据绑定的实现,让前端开发者们从繁杂的dom事件中解脱出来,很方便的处理数据和ui之间的联动。
本文将从vue的双向数据绑定入手,剖析mvvm库设计的核心代码与思路。
MVVM目前划分为observer,compile,directive,watcher四个模块
通过es5规范中的object.defineProperty方式实现对数据的监听
实现思路:
递归遍历data,将data下面所有属性都加上set,get方法,以实现对所有属性的拦截.
注意:对象可能含有数组属性,数组的内置有push,pop,splice等方法改变内部数据.
此时做法是改变数组的原型链,在原型链中增加一层自定义的push,pop,splice方法做拦截,这些方法里面加上我们自己的回调函数,然后在调用原生的push,pop,splice等方法.
具体可以看我上一篇文章[js对象监听实现][1]
observer.js代码
export function Observer(obj) {
    this.$observe = function(_obj) {
        var type = Object.prototype.toString.call(_obj);
        if (type == '[object Object]') {
            this.$observeObj(_obj);
        } else if (type == '[object Array]') {
            this.$cloneArray(_obj);
        }
    };

    this.$observeObj = function(obj) {
        var t = this;
        Object.keys(obj).forEach(function(prop) {
            var val = obj[prop];
            defineProperty(obj, prop, val);
            if (prop != '__observe__') {
                t.$observe(val);
            }
        });
    };

    this.$cloneArray = function(a_array) {
        var ORP = ['push', 'pop', 'shift', 'unshift', 'splice', 'sort', 'reverse'];
        var arrayProto = Array.prototype;
        var newProto = Object.create(arrayProto);
        ORP.forEach(function(prop) {
            Object.defineProperty(newProto, prop, {
                value: function(newVal) {
                    var dep = a_array.__observe__;
                    var re=arrayProto[prop].apply(a_array, arguments);
                    dep.notify();
                    return re;
                },
                enumerable: false,
                configurable: true,
                writable: true
            });
        });
        a_array.__proto__ = newProto;
    };

    this.$observe(obj, []);
}

var addObserve = function(val) {
    if (!val || typeof val != 'object') {
        return;
    }
    var dep = new Dep();
    if (isArray(val)) {
        val.__observe__ = dep;
        return dep;
    }

}

export function defineProperty(obj, prop, val) {
    if (prop == '__observe__') {
        return;
    }
    val = val || obj[prop];
    var dep = new Dep();

    obj.__observe__ = dep;
    var childDep = addObserve(val);

    Object.defineProperty(obj, prop, {
        get: function() {
            var target = Dep.target;
            if (target) {
                dep.addSub(target);
                if (childDep) {
                    childDep.addSub(target);
                }
            }
            return val;
        },
        set: function(newVal) {
            if(newVal!=val){
                val = newVal;
                dep.notify();
            }
        }
    });
}
实现思路:
1.将模版template上的dom遍历一遍,将其存入文档碎片frag
2.遍历frag,通过attributes获取节点的属性信息,在通过正则表达式过滤属性信息,进而拿到元素节点和文档节点的指令信息
 var complieTemplate = function (nodes, model) {
      if ((nodes.nodeType == 1 || nodes.nodeType == 11) && !isScript(nodes)) {
        paserNode(model, nodes);
        if (nodes.hasChildNodes()) {
          nodes.childNodes.forEach(node=> {
            complieTemplate(node, model);
          })
        }
      }
    };

    var paserNode = function (model, node) {
  var attributes = node.attributes || [];
  var direct_array = [];
  var scope = {
    parentNode: node.parentNode,
    nextNode: node.nextElementSibling,
    el: node,
    model: model,
    direct_array: direct_array
  };

  attributes = toArray(attributes);
  var textContent = node.textContent;
  var attrs = [];
  var vfor;

  attributes.forEach(attr => {
    var name = attr.name;
    if (isDirective(name)) {
      if (name == 'v-for') {
        vfor = attr;
      } else {
        attrs.push(attr);
      }
      removeAttribute(node, name);
    }
  });

  //bug  nodeType=3
  var textValue = stringParse(textContent);
  if (textValue) {
    attrs.push({
      name: 'v-text',
      value: textValue
    });
    node.textContent = '';
  }

  if (vfor) {
    scope.attrs = attrs;
    attrs = [vfor];
  }

  attrs.forEach(function (attr) {
    var name = attr.name;
    var val = attr.value;
    var directiveType = 'v' + /v-(\w+)/.exec(name)[1];
    var Directive = directives[directiveType];
    if (Directive) {
      direct_array.push(new Directive(val, scope));
    }
  });
};

var isDirective = function (attr) {
  return /v-(\w+)/.test(attr)
};

var isScript = function isScript(el) {
  return el.tagName === 'SCRIPT' && (
      !el.hasAttribute('type') ||
      el.getAttribute('type') === 'text/javascript'
    )
}
如简单的vtext指令的update函数如下:
vt.update = function (textContent) {
    this.el.textContent = textContent;
};

watcher的功能是让directive和observer模块关联起来。
初始化的时候做两件事:
由于在defineProperty函数中定义的dep变量在setter和getter函数里有引用,使dep变量处于闭包状态没有释放,此时在getter方法中通过判断Depend.target的存在,来获取订阅者watcher,通过发布者dep储存起来。
数据的每个属性都有一个唯一的的dep变量,记录着所有订阅者watcher的信息,一旦属性有变化,调用setter函数的时候触发dep.notify(),通知所有已订阅的watcher,进而执行所有与该属性关联的刷新函数,最后更新指定的ui。
watcher 初始化部分代码:
Depend.target = this;
this.value = this.getValue();
Depend.target = null;
observer.js 属性定义代码:
export function defineProperty(obj, prop, val) {
if (prop == 'observe') {
return;
}
val = val || obj[prop];
var dep = new Dep();
    obj.__observe__ = dep;
    var childDep = addObserve(val);

    Object.defineProperty(obj, prop, {
        get: function() {
            var target = Dep.target;
            if (target) {
                dep.addSub(target);
                if (childDep) {
                    childDep.addSub(target);
                }
            }
            return val;
        },
        set: function(newVal) {
            if(newVal!=val){
                val = newVal;
                dep.notify();
            }
        }
    });
}
简单的流程图如下:


本文基本对mvvm库的需求整理,拆分,以及对拆分模块的逐一实现来达到整体双向绑定功能的实现,当然目前市场上的mvvm库功能绝不止于此,本文只是略举个人认为的核心代码。
如果思路和实现上的问题,也请各位斧正,谢谢阅读!
在前端单页面应用里面,路由是比较重要的部分,现有的路由系统从简易的director.js到backbone,react等内置路由,功能一步步增强。那么这些系统原理是什么呢,本文将分析并实现一份简易的路由,以阐述其工作原理。
以hash做示范,其运行机制如下:
router.js
function Router() {
        this.cache = {};
        //将url/callback 以key/value形式储存在cache内
        this.on = function (key, value) {
            var cache = this.cache;
            cache[key] = value;
        };
        //匹配hash对应的回调函数,并触发
        this.trigger = function (hash) {
            var cache = this.cache;
            for (var r in cache) {
                var reg = this.initRegexps(r);
                if (reg.test(hash)) {
                    var callback = cache[r] || function () {
                        };
                    var params = this.getParams(reg, hash);
                    callback.apply(this, params);
                }
            }

        };
        //初始化 添加监听浏览器hashchange 以及dom loaded函数
        this.init = function () {
            window.addEventListener('hashchange', function () {
                var hash = location.hash.slice(1);
                router.trigger(hash);
            });
            window.addEventListener('load', function () {
                var hash = location.hash.slice(1) || 'default';
                router.trigger(hash);
            })
        };
        /**
         *将cache内的key 做正则处理,并返回
         * 第一个正则 匹配诸如/,.+-?$#{}[]] 关键字  并在关键字前面加转译字符\
         * 第二个正则 匹配() 标示()内部内容可有可无
         * 第三个正则 匹配: 在/后面可以由接受任意字符,直到遇到下一个/
         * 第四个正则 匹配* 在*后面可以由接受任意字符
         */
        this.initRegexps = function (route) {
            route = route.replace(/[/,.+\-?$#{}\[\]]/g, '\\$&')
                .replace(/\((.*?)\)/g, '(?:$1)?')
                .replace(/(\/\w?:\w+)+/g, '\/([^/]+)')
                .replace(/\*\w*/g, '([^?]*?)');

            return new RegExp('^' + route + '$');
        };

        //将匹配的正则返回,为回调函数提供参数
        this.getParams = function (reg, hash) {
            return reg.exec(hash).slice(1);
        }
    }
index.html
    <style>
        .test {
            width: 200px;
            height: 200px;
            color:white;
        }
    </style>

    <div>
        <a href="#/aaaa/bcd">hash=aaaa/bcd 匹配/aaaa/:id</a>
    </div>
    <div>
        <a href="#/bbbb">hash=bbbb 匹配/bbbb(/:name)</a>
    </div>
    <div>
        <a href="#/bbbb/ddd">hash=bbbb/ddd 匹配/bbbb(/:name)</a>
    </div>
    <div>
        <a href="#/cccc/s/d">hash=cccc/s/d 匹配cccc/*</a>
    </div>
    <div class="test">
    </div>

    <script>
            var router = new Router();
            var test = $('.test');
            router.on('/', function () {
                test.css('background-color', 'green').css('color','white').html('我是绿色');
            })
            router.on('/aaaa/:id', function (id) {
                console.log(id);
                test.css('background-color', 'red').css('color','white').html('我是红色');
            })
            router.on('/bbbb(/:name)', function (name) {
                console.log(name);
                test.css('background-color', 'yellow').css('color','red').html('我是黄色');
            })
            router.on('/cccc/*', function (x) {
                console.log(x);
                test.css('background-color', 'black').css('color','white').html('我是黑色');
            })
            router.init();
    </script>
简易的前端路由实现
##效果图


虽然本文实现比较简单,但很多框架的内部路由也是基于这种机制,只不过有基于对自身的特性做了一些优化。
本文有什么不完善的地方,或者流程图有待改进的地方,敬请斧正。
插件plugin,webpack重要的组成部分。它以事件流的方式让用户可以直接接触到webpack的整个编译过程。plugin在编译的关键地方触发对应的事件,极大的增强了webpack的扩展性。它的出现让webpack从一个面向过程的打包工具,变成了一套完整的打包生态系统。
既然说到了事件流,那么就得介绍Tapable了,Tapable是webpack里面的一个小型库,它允许你自定义一个事件,并在触发后访问到触发者的上下文。当然他也支持异步触发,多个事件同步,异步触发。本次实现用的是较早的v0.1.9版,具体文档可查看tapable v0.19文档
在webpack内使用,如SingleEntryPlugin中
compiler.plugin("make",function(compilation,callback){
   compilation.addEntry(this.context, new SingleEntryDependency({request: this.entry}), this.name, callback);
})
在compiler内部触发。
 this.applyPluginsParallel('make',compilation, err => {
 	/* do something */
 })
解析入口文件时,通过EntryOptionPlugin解析entry类型并实例化SingleEntryPlugin, SingleEntryPlugin在调用compilation的addEntry函数开启编译。这种观察者模式的设计,解耦了compiler, compilation,并使它们提供的功能更加纯粹,进而增加扩展性。
纵观整个打包过程,可以流程划分为四块。
接入plugin后,webpack对parse,resolve,build,writeSource等功能的大规模重构。
目前拆分模块为

通过exprima将源码解析为AST树,并拆分statements,以及expression直至Identifier基础模块。
 case 'CallExpression':
    		//do something
        	this.applyPluginsBailResult('call ' + calleeName, expression);
    		//do something
            break;
 case 'MemberExpression':
            //do something
            this.applyPluginsBailResult('expression ' + memberName, expression);
            //do something
            break;
 case 'Identifier':
            //do something
            this.applyPluginsBailResult('expression ' + idenName, expression);
           	//do something
            break;
 this.plugin('evaluate Literal', (expr) => {})
 this.plugin('evaluate ArrayExpression', (expr) => {})
 this.plugin('evaluate CallExpression', (expr) => {})
 ...
如需要解析require("a"),require.ensure(["b"],function(){})的时候,注册plugin去订阅"call require",以及"call require.ensure",再在回调函数调用evaluateExpression解析expression。
封装在enhanced-resolve库,提供异步解析文件路径,以及可配置的filestream能力。在webpack用于缓存文件流以及以下三种类型模块的路径解析。
用法如
ResolverFactory.createResolver(Object.assign({
            fileSystem: compiler.inputFileSystem,
            resolveToContext: true
        }, options.resolve));
具体配置可去查看github文档
子类有NormalModuleFactory,ContextModuleFactory。常用的NormalModuleFactory功能如下
这里主要是使用async库的parallel函数并行的解析loaders和module的路径,并整合运行结果。
async.parallel([
                (callback) => {
                    this.requestResolverArray( context, loader, resolver, callback)
                },
                (callback) => {
                    resolver.normal.resolve({}, context, req, function (err, result) {
                        callback(null, result)
                    });
                },
            ], (err, result) => {
             	   let loaders = result[0];
                const resource = result[1];
                //do something
            })
async模块是一整套异步编程的解决方案。async官方文档
一个编译好的module对象包含modules依赖ModuleDependency和blocks依赖RequireEnsureDependenciesBlock,loaders,源码_source,其数据结构如下:
{
  chunks: [],
  id: null,
  parser:
   Tapable {
     _plugins:
      { 'evaluate Literal': [Array],
        'evaluate ArrayExpression': [Array],
        'evaluate CallExpression': [Array],
        'call require': [Array],
        'call require:commonjs:item': [Array],
        'call require.ensure': [Array] },
     options: {},
     scope: { declarations: [] },
     state: { current: [Circular], module: [Circular] },
     _currentPluginApply: undefined },
  fileDependencies:
   [ '/Users/zhujian/Documents/workspace/webpack/simple-webpack/example/a.js' ],
  dependencies:
   [ ModuleDependency {
       request: './module!d',
       range: [Array],
       class: [Function: ModuleDependency],
       type: 'cms require' },
     ModuleDependency {
       request: './assets/test',
       range: [Array],
       class: [Function: ModuleDependency],
       type: 'cms require' } ],
  blocks:
   [ RequireEnsureDependenciesBlock {
       blocks: [],
       dependencies: [Array],
       requires: [Array],
       chunkName: '',
       beforeRange: [Array],
       afterRange: [Array] } ],
  loaders: [],
  request: '/Users/zhujian/Documents/workspace/webpack/simple-webpack/example/a.js',
  fileName: 'a.js',
  requires: [ [ 0, 7 ], [ 23, 30 ] ],
  context: '/Users/zhujian/Documents/workspace/webpack/simple-webpack/example',
  built: true,
  _source:
   RawSource {
     _result:
      { source: 'require(\'./module!d\');\nrequire(\'./assets/test\');\nrequire.ensure([\'./e\',\'./b\'], function () {\n    console.log(1)\n    console.log(1)\n    console.log(1)\n    console.log(1)\n    require(\'./m\');\n    require(\'./e\');\n});\n' },
     _source: 'require(\'./module!d\');\nrequire(\'./assets/test\');\nrequire.ensure([\'./e\',\'./b\'], function () {\n    console.log(1)\n    console.log(1)\n    console.log(1)\n    console.log(1)\n    require(\'./m\');\n    require(\'./e\');\n});\n'
 			}
     }
一个典型的含有切割文件的多入口entry的assets对象数据结构如下:
assets:
   { '0.bundle.js':
      Chunk {
        name: '',
        parents: [Array],
        modules: [Array],
        id: 0,
        source: [Object] },
     'main.bundle.js':
      Chunk {
        name: 'main',
        parents: [],
        modules: [Array],
        id: 1,
        entry: true,
        chunks: [Array],
        blocks: true,
        source: [Object] },
     'multiple.bundle.js':
      Chunk {
        name: 'multiple',
        parents: [],
        modules: [Array],
        id: 2,
        entry: true,
        chunks: [Array],
        source: [Object] }
  }
考虑到多入口entry的可能,make调用的是并行异步事件
this.applyPluginsParallel('make', compilation, err => {
	//do something
	compilation.seal(err=>{})
	//do something
}
本人的简易版webpack实现simple-webpack
相信大家都有设计过业务/开源代码,很多情况是越往后写,越难维护。一次次的定制化的需求,将原有的设计改的支离破碎。这个时候可以试试借鉴webpak的**,充分思考并抽象出稳定的基础模块,划分生命周期,将模块之间的业务逻辑,特殊需求交由插件去解决。
完。
setTimeout(function(){
    var a=100;
    console.log(a);
    setTimeout(function () {
        var b=200;
        console.log(b)
        setTimeout(function () {
            var c=300;
            console.log(c)
        }, 1000);
    }, 1000);
},1000);
 new Promise(function (resolve, reject) {
    setTimeout(function () {
        var a=100;
        resolve(a);
    }, 1000);
}).then(function (res) {
    console.log(res);
    return new Promise(function (resolve, reject) {
        setTimeout(function () {
            var b=200;
            resolve(b);
        }, 1000);
    })
}).then(function (res) {
    console.log(res);
    return new Promise(function (resolve, reject) {
        setTimeout(function () {
            var c=300
            resolve(c);
        }, 1000);
    })
}).then(function (res) {
        console.log(res);
    }
    )
            /*
            我们要满足状态只能三种状态:PENDING,FULFILLED,REJECTED三种状态,且状态只能由PENDING=>FULFILLED,或者PENDING=>REJECTED
            */
            var PENDING = 0;
            var FULFILLED = 1;
            var REJECTED = 2;
            /*
            value状态为执行成功事件的入参,deferreds保存着状态改变之后的需要处理的函数以及promise子节点,构造函数里面应该包含这三个属性的初始化
             */
            function Promise(callback) {
                this.status = PENDING;
                this.value = null;
                this.defferd = [];
                setTimeout(callback.bind(this, this.resolve.bind(this), this.reject.bind(this)), 0);
            }

            Promise.prototype = {
                constructor: Promise,
                //触发改变promise状态到FULFILLED
                resolve: function (result) {
                    this.status = FULFILLED;
                    this.value = result;
                    this.done();
                },
                //触发改变promise状态到REJECTED
                reject: function (error) {
                    this.status = REJECTED;
                    this.value = error;
                },
                //处理defferd
                handle: function (fn) {
                    if (!fn) {
                        return;
                    }
                    var value = this.value;
                    var t = this.status;
                    var p;
                    if (t == PENDING) {
                         this.defferd.push(fn);
                    } else {
                        if (t == FULFILLED && typeof fn.onfulfiled == 'function') {
                            p = fn.onfulfiled(value);
                        }
                        if (t == REJECTED && typeof fn.onrejected == 'function') {
                            p = fn.onrejected(value);
                        }
                    var promise = fn.promise;
                    if (promise) {
                        if (p && p.constructor == Promise) {
                            p.defferd = promise.defferd;
                        } else {
                            p = this;
                            p.defferd = promise.defferd;
                            this.done();
                        }
                    }
                    }
                },
                //触发promise defferd里面需要执行的函数
                done: function () {
                    var status = this.status;
                    if (status == PENDING) {
                        return;
                    }
                    var defferd = this.defferd;
                    for (var i = 0; i < defferd.length; i++) {
                        this.handle(defferd[i]);
                    }
                },
                /*储存then函数里面的事件
                返回promise对象
                defferd函数当前promise对象里面
                */
                then: function (success, fail) {
                   var o = {
                        onfulfiled: success,
                        onrejected: fail
                    };
                    var status = this.status;
                    o.promise = new this.constructor(function () {

                    });
                    if (status == PENDING) {
                        this.defferd.push(o);
                    } else if (status == FULFILLED || status == REJECTED) {
                        this.handle(o);
                    }
                    return o.promise;
                }
            };

自动化打包工具webpack,相信很多人和我一样尝试着研究下它,但是繁杂的功能以及高度抽象的代码实在是很难理解,所以笔者只能通过github的webpack的第一次提交进行分析,实现,并将实现的一些心得分享一下。
对于node端来讲,有commonjs来规范模块的标识,定义,引用。而浏览器端由于缺乏原生对象支持就需要通过自我实现来模拟commonjs规范。
webpack是通过一个IIFE立即调用函数表达式去实现这个规范的。简要的去注释,去除内部运行的代码,其格式如下:
(function(module){})([function(){},function(){}]);
简单点说就是各个模块代码以数组的形式传递给运行函数,在进行存储。详细分析可以参考简要分析webpack打包后代码
所以实现以上的功能需求点如下:
本功能和node的require类似,故有参考node require源码
文件分析,将文件为两种类型
[ '/Users/zhujian/Documents/workspace/webpack/simple-webpack/node_modules',
  '/Users/zhujian/Documents/workspace/webpack/node_modules',
  '/Users/zhujian/Documents/workspace/node_modules',
  '/Users/zhujian/Documents/node_modules',
  '/Users/zhujian/node_modules',
  '/Users/node_modules',
  '/node_modules' ]
文件定位
{extensions:['js','jsx','jpg']}
比如
const b = require('./b');
解析后
....
"init": {
        "type": "CallExpression",
        "callee": {
            "type": "Identifier",
            "name": "require",
            "range": [
                10,
                17
            ]
        },
        "arguments": [
            {
                "type": "Literal",
                "value": "./b",
                "raw": "'./b'",
                "range": [
                    18,
                    23
                ]
            }
        ],
        "range": [
            10,
            24
        ]
    },
 ....
我们要做的就是提取value "./b",以及该字符串在文件所处的位置range。
主要是从入口文件开始,将所有依赖的js,以及其内容,分配的id组成一个可操作的扁平化的对象和存储着name与id对应的map对象。
实现手法上也是递归resolve函数,获取到各个文件的依赖,文件,id的信息,最后得到depTree对象
举个例子:
{ modules:
   { '/Users/zhujian/Documents/workspace/webpack/simple-webpack/example/a.js':
      { filename: '/Users/zhujian/Documents/workspace/webpack/simple-webpack/example/a.js',
        id: 0,
        requires: [Array],
        rangeRequires: [Array],
        source: 'const b = require(\'./b\');\nconst c = require(\'c\');\nconst {e, f, g} = require(\'./m\');\n\n
      },
     '/Users/zhujian/Documents/workspace/webpack/simple-webpack/example/b.js':
      { filename: '/Users/zhujian/Documents/workspace/webpack/simple-webpack/example/b.js',
        id: 1,
        requires: [],
        rangeRequires: [],
        source: 'const b = \'b\';\n\nmodule.exports = b;\n'
      },
     '/Users/zhujian/Documents/workspace/webpack/simple-webpack/example/node_modules/c.js':
      { filename: '/Users/zhujian/Documents/workspace/webpack/simple-webpack/example/node_modules/c.js',
        id: 2,
        requires: [],
        rangeRequires: [],
        source: 'const c = \'c\';\n\nmodule.exports = c;\n'
      },
     '/Users/zhujian/Documents/workspace/webpack/simple-webpack/example/m.js':
      { filename: '/Users/zhujian/Documents/workspace/webpack/simple-webpack/example/m.js',
        id: 3,
        requires: [],
        rangeRequires: [],
        source: '// const core = require(\'./core\');\nconst a = 1;\n\n
      },
  nextModuleId: 4,
  mapNameToId:
   { '/Users/zhujian/Documents/workspace/webpack/simple-webpack/example/a.js': 0,
     '/Users/zhujian/Documents/workspace/webpack/simple-webpack/example/b.js': 1,
     '/Users/zhujian/Documents/workspace/webpack/simple-webpack/example/node_modules/c.js': 2,
     '/Users/zhujian/Documents/workspace/webpack/simple-webpack/example/m.js': 3
 	}
 }
写入主函数,替换入口的执行函数。这块会用到之前的path和id关系的map对象,通过路口文件的绝对路径,找出入口文件的mainId,并进行替换。
写入参数数组。遍历文件树,将文件节点的source内容替换掉
大致如下:
require('module') 替换为__webpack_require__(0)
官方实现
 	const result = [source];
    replaces.forEach(replace => {
        const {from, value, end} = replace;
        const source = result.shift();
        result.unshift(source.substr(0, from), value, source.substr(end))
    });
本人的简易版webpack实现simple-webpack
(完)
code-splitting是webpack最引人瞩目的特性之一,此特性将代码分离到不同的bundle文件中。详细介绍官网code-split,这次实现则在笔者上次文件打包之上做开发。
官网上有三种方式实现
1本质则是多个入口的chunk,2则在以common.js为入口文件,将多入口的chunk切分为按切割文件,通过jsonp加载。在这里笔者则介绍最为复杂的3的实现,
对于webpack 的切割文件的引入本质就是jsonp,动态引入一个约定好格式的js,并运行。
__webpack_require__.e = function requireEnsure(chunkId) {
....
	var head = document.getElementsByTagName('head')[0];
	var script = document.createElement('script');
	script.src = __webpack_require__.p + "" + chunkId + ".bundle.js";
	head.appendChild(script);
....
}
切割文件去除注释如下:
webpackJsonp([1],[function(){},function(){}])
而在入口文件的webpackJsonpCallback函数内,则是将切割的文件包含的modules依次放入存储在modules内
function webpackJsonpCallback(chunkIds, moreModules){
....
for(moduleId in moreModules) {
 			if(Object.prototype.hasOwnProperty.call(moreModules, moduleId)) {
 				modules[moduleId] = moreModules[moduleId];
 			}
 		}
}
....
所以实现以上功能需求如下:
所以实现以上功能需求如下:
例子
require('d');

function a() {
    require.ensure(['./a'], function () {
        require('c');
    });
}

require.ensure(['./b'], function () {
    require('./m');
});

require('./e');
实现思路:
数据结构如下:
{
    filename: '/Users/zhujian/Documents/workspace/webpack/simple-webpack/example/main.js',
    id: 0,
    requires: [{
            name: 'd',
            range: [8, 11],
            id: 1
        }],
    rangeRequires: [[0, 7]],
    asyncs: [{
            requires: [{
                    name: './a',
                    id: 2
                }, {
                    name: 'c',
                    range: [88, 91],
                    id: 3
                }],
            asyncs: [],
            rangeRequires: [80, 87],
            ensureRequires: [34, 58]
        },
        {
            requires: [{
                    name: './b',
                    id: 4
                }, {
                    name: './m',
                    range: [156, 161],
                    id: 5
                }],
            asyncs: [],
            rangeRequires: [148, 155],
            ensureRequires: [106, 130]
        }],
}
由于各个依赖文件的源码都包含在modlues内,所以chunks包含的是具体各个切割文件所包需module的moduleId。
实现思路:
数据结构如下
{ '0':
   { id: 0,
     modules: { '0': 'include', '1': 'include', '2': 'include' } },
  '1':
   { id: 1,
     modules:
      { '1': 'in-parent',
        '3': 'include',
        '4': 'include',
        '5': 'include',
        '6': 'include' },
     parentId: 0 },
  '2':
   { id: 2,
     modules: { '5': 'include', '6': 'include' },
     parentId: 0
 	}
}
实现思路:

本人的简易版webpack实现simple-webpack
(完)
在webpack特性里面,它可以支持将非javaScript文件打包,但前面写到webpack的模块化打包只能应用于含有特定规范的JavaScript文件。本次介绍的loader则是用来解决这类问题的。本文章loader的实现基于code-splitting
举个例子:
webpack.config.js中的配置loader
	module: {
            rules: [
                {
                    test: /\.js$/,
                    loader: "test-loader!test-loader2"
                }
            ]
        }
业务代码中的内联loader
require('d!c');
分析:
我们需要将这些loader解析成可运行的函数,并在parse模块解析语法树之前运行掉这些loader函数
所以我们需要:
实现思路:
最终require内的字符串如下
/Users/zhujian/Documents/workspace/webpack/simple-webpack/example/node_modules/d.js!
/Users/zhujian/Documents/workspace/webpack/simple-webpack/example/node_modules/test-loader/index.js!
/Users/zhujian/Documents/workspace/webpack/simple-webpack/example/node_modules/test-loader2/index.js!
/Users/zhujian/Documents/workspace/webpack/simple-webpack/example/node_modules/c.js
实现思路:
loader递归逻辑如下:
	nextLoader.apply(null, content);
	function nextLoader() {
        const args = Array.prototype.slice.apply(arguments);
        if (loaderFunctions.length > 0) {
            const loaderFunction = loaderFunctions.pop();
            let async = false;
            const context = {
                fileName,
                options,
                debug: options.debug,
                async: function () {
                    async = true;
                    return nextLoader;
                },
                callback: function () {
                    async = true;
                    nextLoader.apply(null, arguments)
                }
            };
            const resVal = loaderFunction.apply(context, args);
            if (!async) {
                nextLoader(resVal);
            }
        } else {
            callback(null, args[0])
        }
    }
将以上3个loader,test-loader,test-loader2,异步loader d.js,打包c.js
test-loader
module.exports = function(content) {
    return content+"\nexports.answer = 42;\n"
}
test-loader2
module.exports = function(content) {
    return content+"\nexports.test2 = test2;\n"
}
异步loader d.js
module.exports = function (content) {
    const d = 'd';
    this.async();
    const b = content + "\nexports.d = 2000;\n";
    setTimeout(this.callback.bind(this, b), 2000);
}
c.js
const c = 'c';

module.exports = c;
最终打包出来的c.js的代码如下
....
/* 1 */
/***/(function(module, exports,__webpack_require__) {
const c = 'c';

module.exports = c;

exports.test2 = test2;

exports.answer = 42;

exports.d = 2000;

/***/}
....
本人的简易版webpack实现simple-webpack
(完)
goc前端分工越来越细,一个前端应用划分为通用的工具类,通用的组件库,业务组件库,以及业务代码。在下游写业务代码,写组件库的时候是不清楚上游的依赖函数的入参,出参。口头问问或者去翻一翻源码,需要沟通成本。typescript集成的静态类型可以解决这种情况。
TypeScript=Type+Script 是微软开发一款开源的编程语言。
官方的定义TypeScript is a typed superset of JavaScript that compiles to plain JavaScript官方文档.翻译下就是TypeScript是一个编译到纯JS的有类型定义的JS超集。
const x: number = '123';
//error

function foo(flagA: boolean, flagB: string):string {
    return ''
}

var y=1;
const z:string=y;
//error类型命名的一种表现形式。其中?:代表可选属性。
interface NameObject {
 name: string;
 nickName?:string;
}

function printLabel(label: NameObject) {
  console.log(label.name);
}
方便接口之间的复用,比如模糊搜索的接口参数可以继承antd select的接口
interface Names extends NameObject {
    num: number;
}类似C#和java,他也可以强制一个类去实现类型规范
interface ClockInterface {
    currentTime: Date;
    setTime(d: Date);
}

class Clock implements ClockInterface {
    currentTime: Date;
    setTime(d: Date) {
        this.currentTime = d;
    }
    constructor(h: number, m: number) { }
}
和java类似,更好的重用组件。
确保返回值的类型与传入参数的类型是相同。
function identity<T>(arg: T): T {
    return arg;
}确保类所有的属性使用相同的类型
class Queue<T> {
  private data: T[] = [];
  push = (item: T) => this.data.push(item);
  pop = (): T | undefined => this.data.shift();
}

// 简单的使用
const queue = new Queue<string>();
queue.push('1');enum Color {
Red=3,
Green,
Blue
}基于以上特性可以知道使用时的优势
需要对已有的上游依赖库进行typescript申明。以goc的goc-request库为例:需要在文件夹下新建xxx.d.ts的申明文件,对对外提供的函数进行ts申明,并在根目录的package.json文件下补充对应的文件地址。如"types": "types/index.d.ts"。
通用配置可以直接查询官方文档
ts自带了tsc编译器,可以将其编译成直接执行的js代码。使用webpack+babel体系的话,需要@babel/preset-typescript插件。 使用gulp的话gulp-typescript转化。我们使用的是antd-tools工具,它内部封装了gulp并使用了gulp-typescript去编译。
一个变量可能有多种类型的时候,需要强制转换类型。
type fetchValue = string | string[] | number | number[];

function show(value: fetchValue) {
    (value as number[]).forEach(v => {
        console.log(v)
    })
}

show([1,2])//webpack.config.js
const FilterWarningsPlugin = require('webpack-filter-warnings-plugin');
plugins: [
new ForkTsCheckerWebpackPlugin({
eslint: true
}),
],(完)
经过webpack打包压缩之后的javascript, css文件和原有构建之前的文件相差比较大,对于开发者而言比较难在客户端上调试定位问题。为了解决这类问题,webpack引入了source maps。
source maps是一个存储了打包前所有代码的行,列信息的mapping文件,其核心的mapping属性以;,以及VLQ编码的字母记录着转换前的代码的位置。
本文重点不在sourcemap的算法实现。而是重点介绍的是基于github source-map之上,在webpack中的工程实现。
SourceNode是该库生成mapping文件的核心。所以先介绍SourceNode。
它提供了一种抽象方法将含有行,列关系的多个代码片以插入或者连接的形式组合成含有这些代码的行,列信息的对象。
举个例子:
一个A.js 文件内容如下:
var a = 1;

console.log(a);
调用SourceNode方法
const SourceNode = require("source-map").SourceNode;

var node = new SourceNode(null, null, null, [
    new SourceNode(1, 0, 'webpack:///./example/a.js', "var a = 1;\n"),
    '\n',
    new SourceNode(3, 0, 'webpack:///./example/a.js', 'console.log(a);"')
]);

node.setSourceContent('index.js', 'var a = 1;\n\nconsole.log(a);')
const t = node.toStringWithSourceMap({file: "index.js"})
const map = t.map.toJSON();
map.sourceRoot = '/';
console.log(JSON.stringify(map))
生成的mapping数据结构如下:
{
"version":3,
"sources":["webpack:///./example/a.js"],
"names":[],
"mappings":"AAAA;;AAEA",
"file":"index.js",
"sourcesContent":["var a = 1;\n\nconsole.log(a);"],
"sourceRoot":"/"
}
在chrome下的调试模式效果如下:

了解了SourceNode之后,往下接可以讲在webpack内的实现了。
首先得抽象一个模块originalSource,它负责记录源代码的行,列信息,并通过这些信息结合源代码生成出mapping对象。
将源码以\n形式分割组合成数组,在通过数组索引来确定行信息。
以上图A.js为例,表示3行信息的代码如下:
 new SourceNode(1, 0, 'webpack:///./example/a.js', "var a = 1;\n") //第1行
 \n //第2行
 new SourceNode(3, 0, 'webpack:///./example/a.js', 'console.log(a);"')//第3行
将行信息的代码块以(;,{,})进行分割组成数组后在通过每次分割的字符串长度来确定列信息。
源码
var a = 1;var b=2;{a=b}
生成soucemap代码
 new SourceNode(1, 0, 'webpack:///./example/a.js', "var a = 1;") //第0列
 new SourceNode(1, 10, 'webpack:///./example/a.js', "var b=2;{") //第10列
 new SourceNode(1, 19, 'webpack:///./example/a.js', "a=b}") //第19列
光标下标可以在第10列上的效果如下:

故基于行,列信息生产mapping对象的核心代码如下:
node(options) {
        const value = this._value;
        const name = this._name;
        const lines = value.split('\n');
        const len = lines.length;
        const columns = options.columns;
        const node = new SourceNode(null, null, null, lines.map((line, idx) => {
            let i = 0;
            const content = idx !== len - 1 ? line + '\n' : line;
            if (/^\s*$/.test(content)) return content;
            if (columns === false) {
                return new SourceNode(idx + 1, 0, name, content);
            }
            return new SourceNode(null, null, null, _splitCode(content).map(item => {
                const result= new SourceNode(idx + 1, i, name, item);
                i = i + item.length;
                return result
            }))
        }));

        node.setSourceContent(name, value);
        return node;
    }
上图A.js的在originalSource下的数据结构如下
SourceNode {
  children: [
	  SourceNode {
       children: [
		  {
		    "children": [
		      "var a = 1;\n"
		    ],
		    "sourceContents": {},
		    "line": 1,
		    "column": 0,
		    "source": "/Users/zhujian/Documents/workspace/webpack/simple-webpack/example/a.js",
		    "name": null,
		    "$$$isSourceNode$$$": true
		  }
		],
       sourceContents: {},
       line: null,
       column: null,
       source: null,
       name: null,
       '$$$isSourceNode$$$': true
      },
     '\n',
     SourceNode {
       children: [
		  {
		    "children": [
		      "console.log(a);\n"
		    ],
		    "sourceContents": {},
		    "line": 3,
		    "column": 0,
		    "source": "/Users/zhujian/Documents/workspace/webpack/simple-webpack/example/a.js",
		    "name": null,
		    "$$$isSourceNode$$$": true
		  }
		],
       sourceContents: {},
       line: null,
       column: null,
       source: null,
       name: null,
       '$$$isSourceNode$$$': true } ],
  sourceContents:
   { '/Users/zhujian/Documents/workspace/webpack/simple-webpack/example/a.js': 'var a = 1;\n\nconsole.log(a);\n' },
  line: null,
  column: null,
  source: null,
  name: null,
  '$$$isSourceNode$$$': true }
webpack其他的source实例如cachedSource,prefixSource,concatSource,replaceSource除去一些本生特性之外,底层都是调用originalSource实现。
另外webpack在不展示columns的情况下,优先使用source-map-list,这块实现是参考mozilla的github source-map实现,并结合自身情况,去优化生成sourcemap的性能。如大规模的字符串split使用递归indexOf和substr去替代。
proto.sourceAndMap = function(options) {
		options = options || {};
		if(options.columns === false) {
			//console.log(this.listMap(options).debugInfo());
			return this.listMap(options).toStringWithSourceMap({
				file: "x"
			});
		}
		const temp=this.node(options)
		var res = this.node(options).toStringWithSourceMap({
			file: "x"
		});
		return {
			source: res.code,
			map: res.map.toJSON()
		};
	};
对这块有兴趣的可以到webpack-sources去深入探索
webpack通过SourceMapDevToolPlugin,EvalSourceMapDevToolPlugin,EvalDevToolModulePlugin这三个插件以及devtool对外输出sourcemap。devtool本质也是indexOf截取不同的关键字而实例化不同的plugin类
if(options.devtool && (options.devtool.indexOf("sourcemap") >= 0 || options.devtool.indexOf("source-map") >= 0)) {
			...
			comment = legacy && modern ? "\n/*\n//@ source" + "MappingURL=[url]\n//# source" + "MappingURL=[url]\n*/" :
				legacy ? "\n/*\n//@ source" + "MappingURL=[url]\n*/" :
				modern ? "\n//# source" + "MappingURL=[url]" :
				null;
			let Plugin = evalWrapped ? EvalSourceMapDevToolPlugin : SourceMapDevToolPlugin;
			compiler.apply(new Plugin({
				filename: inline ? null : options.output.sourceMapFilename,
				moduleFilenameTemplate: options.output.devtoolModuleFilenameTemplate,
				fallbackModuleFilenameTemplate: options.output.devtoolFallbackModuleFilenameTemplate,
				append: hidden ? false : comment,
				module: moduleMaps ? true : cheap ? false : true,
				columns: cheap ? false : true,
				lineToLine: options.output.devtoolLineToLine,
				noSources: noSources,
			}));
			} else if(options.devtool && options.devtool.indexOf("eval") >= 0) {
			...
			compiler.apply(new EvalDevToolModulePlugin(comment, options.output.devtoolModuleFilenameTemplate));
		}
对于这几个插件,实现思路如下
含有sourcemap信息的插件需要取source以及对应sourcemap(EvalDevToolModulePlugin不含sourcemap信息除外),eval模式每个module源码用eval包裹源码。
文件名生成。如需要将真实路径/Users/zhujian/Documents/workspace/webpack/webpack-demos-master/src/index.js转变为goc:///./src/index.js

文件底部信息WEBPACK FOOTER生成。展示信息有原始文件名,moduleId,chunkId。
整个webpack的打包流程完毕compilation的after-optimize-chunk-asset阶段的source作为原始源码。拼凑bundle文件底部map信息,修改map文件文件名。以devtool为source-map为例生成文件如下
bundle文件
(function(module, exports) {
var a = 1;
console.log(a);
 })
 ]);
//# sourceMappingURL=main.output.js.map
map文件
{
"version":3,
"sources":["goc:///webpack/bootstrap 0ee5c00ca3b31f99a2e0?","goc:///./src/index.js?"],
"names":[],
"mappings":";AAAA;AACA;;AAEA;AACA;;AAEA;AACA;AACA;AACA;AACA;AACA;AACA;AACA;AACA;AACA;;AAEA;AACA;;AAEA;AACA;;AAEA;AACA;AACA;;;AAGA;AACA;;AAEA;AACA;;AAEA;AACA;AACA;AACA;AACA;AACA;AACA;AACA,aAAK;AACL;AACA;;AAEA;AACA;AACA;AACA,mCAA2B,0BAA0B,EAAE;AACvD,yCAAiC,eAAe;AAChD;AACA;AACA;;AAEA;AACA,8DAAsD,+DAA+D;;AAErH;AACA;;AAEA;AACA;;;;;;;AC7DA;;AAEA",
"file":"main.output.js",
"sourcesContent":[" \t// The module cache\n \tvar installedModules = {};\n\n \t// The require function\n \tfunction __webpack_require__(moduleId) {\n\n \t\t// Check if module is in cache\n \t\tif(installedModules[moduleId]) {\n \t\t\treturn installedModules[moduleId].exports;\n \t\t}\n \t\t// Create a new module (and put it into the cache)\n \t\tvar module = installedModules[moduleId] = {\n \t\t\ti: moduleId,\n \t\t\tl: false,\n \t\t\texports: {}\n \t\t};\n\n \t\t// Execute the module function\n \t\tmodules[moduleId].call(module.exports, module, module.exports, __webpack_require__);\n\n \t\t// Flag the module as loaded\n \t\tmodule.l = true;\n\n \t\t// Return the exports of the module\n \t\treturn module.exports;\n \t}\n\n\n \t// expose the modules object (__webpack_modules__)\n \t__webpack_require__.m = modules;\n\n \t// expose the module cache\n \t__webpack_require__.c = installedModules;\n\n \t// define getter function for harmony exports\n \t__webpack_require__.d = function(exports, name, getter) {\n \t\tif(!__webpack_require__.o(exports, name)) {\n \t\t\tObject.defineProperty(exports, name, {\n \t\t\t\tconfigurable: false,\n \t\t\t\tenumerable: true,\n \t\t\t\tget: getter\n \t\t\t});\n \t\t}\n \t};\n\n \t// getDefaultExport function for compatibility with non-harmony modules\n \t__webpack_require__.n = function(module) {\n \t\tvar getter = module && module.__esModule ?\n \t\t\tfunction getDefault() { return module['default']; } :\n \t\t\tfunction getModuleExports() { return module; };\n \t\t__webpack_require__.d(getter, 'a', getter);\n \t\treturn getter;\n \t};\n\n \t// Object.prototype.hasOwnProperty.call\n \t__webpack_require__.o = function(object, property) { return Object.prototype.hasOwnProperty.call(object, property); };\n\n \t// __webpack_public_path__\n \t__webpack_require__.p = \"/dist/\";\n\n \t// Load entry module and return exports\n \treturn __webpack_require__(__webpack_require__.s = 0);\n\n\n\n// WEBPACK FOOTER //\n// webpack/bootstrap 0ee5c00ca3b31f99a2e0","var a = 1;\n\nconsole.log(a);\n\n\n\n//////////////////\n// WEBPACK FOOTER\n// ./src/index.js\n// module id = 0\n// module chunks = 0"],
"sourceRoot":""
}
每个module构建完成,moduleTemplate的module阶段的source作为原始源码,以module id做为文件名,将得到的sourcemap以base64形式存储在sourceMappingURL内,并紧跟在module源码后面。bundle文件如下
eval("var a = 1;\n\nconsole.log(a);" +
    "\n//# sourceURL=[module]\n//# sourceMappingURL=data:application/json;charset=utf-8;base64,eyJ2ZXJzaW9uIjozLCJzb3VyY2VzIjpbImdvYzovLy8uL3NyYy9pbmRleC5qcz8iXSwibmFtZXMiOltdLCJtYXBwaW5ncyI6IkFBQUE7O0FBRUEiLCJmaWxlIjoiMC5qcyIsInNvdXJjZXNDb250ZW50IjpbInZhciBhID0gMTtcblxuY29uc29sZS5sb2coYSk7XG5cblxuXG4vLy8vLy8vLy8vLy8vLy8vLy9cbi8vIFdFQlBBQ0sgRk9PVEVSXG4vLyAuL3NyYy9pbmRleC5qc1xuLy8gbW9kdWxlIGlkID0gMFxuLy8gbW9kdWxlIGNodW5rcyA9IDAiXSwic291cmNlUm9vdCI6IiJ9" +
    "\n//# sourceURL=webpack-internal:///0\n");
不包含sourcemap信息,每个module构建完成,moduleTemplate的module。用eval包裹,并拼凑底部信息,sourceURL信息。
bundle文件如下:
eval("var a = 1;\n\nconsole.log(a);" +
    "\n\n\n//////////////////\n// WEBPACK FOOTER\n// ./src/index.js\n// module id = 0\n// module chunks = 0\n" +
    "\n//# sourceURL=goc:///./src/index.js?"
);
本人的简易版webpack实现simple-webpack
(完)
在前端单页面应用里面,路由是比较重要的部分,笔者的上一篇博文[简单的路由][1]介绍了简单的路由内部机制,本文则将分析react-router的内部机制。
react-router为react提供路由管理,为基于jsx格式的app系统提供了方便的切换页面功能。
它在前端提供给了2种方式,通过hashchange或者浏览器原生的history api进行地址更新,上一篇介绍了hash的方式,本文则以history api的形式切入分析。
react-router本生为react组建,内部组建如Router,Route,IndexRoute, Redirect,Link等。
以下是摘自react-router example的路由配置
<Router history={withExampleBasename(browserHistory, __dirname)}>
在初始化过程中他会以children形式读入Router生命周期内,在被转化为数组,此时它内部的结构如下
![图片描述][3]

react-router依赖history^2.0模块生成的history对象,然后在Router生命周期componentWillMount中加入对应的封装如basename,query
useQueries.js 对history对象内的方法进行封装
function listen(listener) {
  return history.listen(function (location) {
    listener(addQuery(location))
  })
}

// Override all write methods with query-aware versions.
function push(location) {
  history.push(appendQuery(location, location.query))
}
useBasename.js 对history对象内的方法进行封装
   function listen(listener) {
      return history.listen(function (location) {
        listener(addBasename(location))
      })
    }

    // Override all write methods with basename-aware versions.
    function push(location) {
      history.push(prependBasename(location))
    }
Router.js 对history对象增加setRouteLeaveHook钩子函数以及isActive函数
最终生成router对象 以this.router = router存在Router组建内部,this.history 已过时([issues][4]),不建议使用
###初始化监听事件
this._unlisten = transitionManager.listen(function (error, state) {
  if (error) {
    _this.handleError(error);
  } else {
    _this.setState(state, _this.props.onUpdate);
  }
});


function listen(listener) {
changeListeners.push(listener);
if (location) {
  listener(location);
} else {
  var _location = getCurrentLocation();
  allKeys = [_location.key];
  updateLocation(_location);
}
此时整体初始化完毕
<Link to="about" activeStyle={ACTIVE}>/</Link>
以一次Link点击为例
放上一个本人总结的一个简单流转过程图

对简洁的流程图熟悉之后,则可深入了解内部机制的细节如下图

虽然源码繁琐复杂,但是内部的核心仍是围绕着下面3块动作做一系列的封装.

本文有什么不完善的地方,或者流程图有待改进的地方,敬请斧正。
A declarative, efficient, and flexible JavaScript library for building user interfaces.
🖖 Vue.js is a progressive, incrementally-adoptable JavaScript framework for building UI on the web.
TypeScript is a superset of JavaScript that compiles to clean JavaScript output.
An Open Source Machine Learning Framework for Everyone
The Web framework for perfectionists with deadlines.
A PHP framework for web artisans
Bring data to life with SVG, Canvas and HTML. 📊📈🎉
JavaScript (JS) is a lightweight interpreted programming language with first-class functions.
Some thing interesting about web. New door for the world.
A server is a program made to process requests and deliver data to clients.
Machine learning is a way of modeling and interpreting data that allows a piece of software to respond intelligently.
Some thing interesting about visualization, use data art
Some thing interesting about game, make everyone happy.
We are working to build community through open source technology. NB: members must have two-factor auth.
Open source projects and samples from Microsoft.
Google ❤️ Open Source for everyone.
Alibaba Open Source for everyone
Data-Driven Documents codes.
China tencent open source team.