


FlyBrainLab is an interactive computing platform for studying the function of executable circuits constructed from fruit fly brain data. FlyBrainLab is designed with three main capabilities in mind: (i) 3D exploration and visualization of fruit fly brain data, (ii) creation of executable circuits directly from the explored and visualized fly brain data, and (iii) interactive exploration of the functional logic of the devised executable circuits.
FlyBrainLab provides an environment where computational researchers can present configurable, executable neural circuits, and experimental scientists can interactively explore circuit structure and function ultimately leading to biological validation.
More details about FlyBrainLab can be found in the following publication:
- Aurel A. Lazar, Tingkai Liu, Mehmet K. Turkcan, and Yiyin Zhou, FlyBrainLab: Accelerating the Discovery of the Functional Logic of the Fruit Fly Brain in the Connectomic/Synaptomic Era, bioRxiv, June 2020.
This repository serves as the entry point for FlyBrainLab, where documentation and installation scripts can be found.
- 1.1 Installing Only User-side Components
- 1.2 Full Installation
- 1.3 Docker Image
- 1.4 Amazon Machine Image
- 2.1 Launching FlyBrainLab
- 2.2 FlyBrainLab User Interface
- 2.3 Configuring Backend Servers
- 2.4 Getting Started Tutorials
FlyBrainLab consists of backend components and user-side components. There are a few options for installation.
- Installing only User-side Components: provides instructions for installing a copy of all FlyBrainLab user-side components that, by default, connect to backend servers hosted by the Fruit Fly Brain Observatory Team. If you only need to visualize and explore the biological data, this will be the fastest way to install. However, the public backend servers do not provide capabilities for executing neural circuits on GPUs using Neurokernel. It may also be helpful to visit BrainMapsViz where you can directly interact with the NeuroNLP web application without any installation.
- Full Installation: provides instructions for installing both the user-side and backend components on the same machine. By default, FlyBrainLab will connect to the backend servers locally hosted.
- Docker Image: We maintain this Docker image with a full FlyBrainLab installation. If you are set up with Docker with GPU support, this will be the easiest way to try FlyBrainLab that runs locally.
- Amazon Machine Image: We also maintain AMI
ami-07b76a65526478567that has the FlyBrainLab fully installed. It is helpful in case you do not have a machine with NVIDIA GPU handy, but still want to try out the full installation.
- Supported OS (64-bit): Linux, Windows and macOS.
- Minimum 2GB disk space.
- conda: See its Installation Instructions.
Additional requirement for macOS:
- Xcode Command Line Tools: use the following command to install:
xcode-select --installIf you encounter error:
Can’t install the software because it is not currently available from the Software Update server.
you can download the installer directly at https://developer.apple.com/download/more/ (Apple ID Login required), and select the latest stable version. If you encounter further error, you can try installing Xcode and then the Command Line Tools again.
Download the installation script for your OS to an empty folder where you want your FlyBrainLab installation to reside,
- Linux:
fbl_installer_ubuntu.sh - Windows:
fbl_installer.cmd - macOS:
fbl_installer_mac.sh
In terminal or command line, go to the folder and execute the following commands line by line (you can change flybrainlab to a different name of your choice for the environment name):
conda create -n flybrainlab python=3.7 -c conda-forge -y # make sure install python from conda-forge otherwise it may lead to an error later
conda activate flybrainlab
Note that the last line above can raise an error. If you do not see "(flybrainlab)" appear at the start of the current line in your terminal, execute the following line:
source activate flybrainlabFinally, execute this line:
sh fbl_installer_ubuntu.shconda create -n flybrainlab python=3.7 -c conda-forge -y
activate flybrainlab
conda install nodejs scipy pandas cookiecutter git yarn -c conda-forge -y
conda install graphviz pygraphviz -c alubbock -y
fbl_installer.cmdconda create -n flybrainlab python=3.7 -c conda-forge -y
conda activate flybrainlabNote that the last line above can raise an error. If you do not see "(flybrainlab)" appear at the start of the current line in your terminal, execute the following line:
source activate flybrainlabFinally, execute this line:
sh fbl_installer_mac.shAfter the script finishes, go to Launching FlyBrainLab from User-side Only Installation.
If you want to use the latest development code instead of the release, you can build FlyBrainLab using the following command line code:
# create anaconda environment called flybrainlab with appropriate packages installed
conda create -n flybrainlab python=3.7 nodejs scipy pandas cookiecutter git yarn -c conda-forge -y
# activate the flybrainlab environment just created
# if you have conda<4.4, you may need to use `source activate flybrainlab` instead
conda activate flybrainlab
# Install additional package into the environment
pip install jupyter "jupyterlab>=2.2.8,<3.0"
pip install txaio twisted autobahn crochet service_identity autobahn-sync matplotlib h5py seaborn fastcluster networkx msgpack msgpack-numpy
# If on Windows, execute the following:
pip install pypiwin32

# Create a preferred installation directory and go into that directory, For example:
# mkdir ~/MyFBL
# cd ~/MyFBL

# Clone packages into your preferred directory (~/MyFBL) in the example above
git clone https://github.com/FlyBrainLab/Neuroballad.git
git clone https://github.com/FlyBrainLab/FBLClient.git
git clone https://github.com/FlyBrainLab/NeuroMynerva.git

# Install all relevant packages
cd ./Neuroballad
python setup.py develop
cd ../FBLClient
python setup.py develop
cd ../NeuroMynerva
jlpm
jlpm run build

# Execute this if you are a user
jupyter labextension install .
jupyter lab build
jupyter lab

# Execute this if you are a developer
jupyter labextension link .
jupyter lab --watch
You may be prompted. On Windows, you will only need to write "activate neuromynerva" instead of "source activate neuromynerva".
After the script finishes, go to Launching FlyBrainLab from User-side Only Installation.
- Supported OS (64-bit): Ubuntu 16.04 or later.
- CUDA enabled GPU and CUDA Toolkit.
- Minimum 30GB disk space, preferrably on SSD (including 3 default databases).
- A machine with at least 32GB of memory is recommended. Otherwise reduce the size of
DATABASE_MEMORYandDATABASE_DISKCACHEin the steps below. - The following ubuntu packages:
wget default-jre curl build-essential tar apt-transport-https tmux. - conda: See its Installation Instructions.
Download the installation script fbl_full_installation_ubuntu.sh.
Uncomment the following code in the script if you have not installed all required Ubuntu packages (requires sudo privilege):
#echo "Installing prerequisites"
#sudo apt update
#sudo apt install -y wget default-jre curl build-essential tar apt-transport-https tmux
Then edit the following lines:
# existing directories
CUDA_ROOT=/usr/local/cuda # root directory where you installed cuda

# To be installed
BASE=$HOME # base directory where the folders will be installed
FFBO_ENV=ffbo # conda environment for main fbl
NLP_ENV=ffbo_legacy # additional conda environment for NLP
FFBO_DIR=$BASE/ffbo # directory to store local repositories
ORIENTDB_ROOT=$BASE/orientdb # root directory where you want to install OrientDB
FFBO_PORT=8081 # main port number of the FFBO processor, make sure to use an uncommon port that will not be used by other program
ORIENTDB_BINARY_PORT=2424 # Binary port of OrientDB, please change this if you are on running this on a multi-user machine to avoid running OrientDB on a wrong port
ORIENTDB_HTTP_PORT=2480 # HTTP port of OrientDB, please change this if you are on running this on a multi-user machine to avoid running OrientDB on a wrong port
DATABASE_MEMORY=8G # maximum amount of memory you want to assign to the database for java heap in GB
DATABASE_DISKCACHE=10240 # amount of memory assigned to caching disk in MB
Then run the script in bash:
bash fbl_full_installation_ubuntu.shIf installation fails, and you want to reinstall, please remove the previous (perhaps partial) installation.
To cleanly remove the FlyBrainLab full installation:
rm -rf $FFBO_DIR
rm -rf $ORIENTDB_ROOT
rm -rf ~/.ffbo
conda env remove -n $FFBO_ENV
conda env remove -n $NLP_ENV
where the environment variables should match the ones during installation.
Also remove the following 3 lines in your ~/.bashrc:
export ORIENTDB_ROOT_PASSWORD=root
export ORIENTDB_OPTS_MEMORY='-Xms1G -Xmx8G' # increase or decrease Xmx to fit the memory size of your machine
export ORIENTDB_SETTINGS=-Dstorage.diskCache.bufferSize=10240 # the amount of memory in MB used for disk cache. This plus Xmx above must be smaller than the total size of memory on your machine.
If installation complete without error, please log out and log in again (or source .bashrc). Then go to Launching FlyBrainLab from Full Installation.
- Supported OS: Linux, Windows (via Windows Subsystem for Linux 2 using Microsoft Windows Insider Program Build version 20145 or higher).
- CUDA enabled GPU (NVIDIA driver must be installed. For WSL2, get NVIDIA driver here. See also here for enabling CUDA on WSL2).
- Docker CE 19.03 or higher.
- NVIDIA Container Toolkit.
- Minimum 30GB disk space, preferrably on SSD (including 3 default databases).
- A machine with at least 32GB of memory is recommended.
Pull the FlyBrainLab Docker Image:
docker pull fruitflybrain/fbl:g
For usage, see Launching FlyBrainLab from FlyBrainLab Docker Image.
We provide an Amazon Machine Image (AMI) that has the FlyBrainLab Docker Image built in and meets all its requirements. The AMI ID is ami-07b76a65526478567 in us-east-1 region. It must be launched using a GPU instance (a Tesla GPU is recommended).
You can launch a GPU instance directly using the following link:
Once an instance is launched, first update the docker image by
docker pull fruitflybrain/fbl:latestThen it can be used the same way as the Docker Image installation.
For usage, see Launching FlyBrainLab from FlyBrainLab Docker Image.
Note that all default databases are stored in ~/databases.
conda activate flybrainlab
jupyter lab
Default port is 8888. Go to browser with url: localhost:8888, and refer to FlyBrainLab User Interface. Note that if you are using an environment with a different name than flybrainlab, you will need to change the first line above accordingly.
$FFBO_DIR/bin/start.shwhere $FFBO_DIR is the directory you configured to install FlyBrainLab in.
Default port is 8888. Go to browser with url: localhost:8888, and refer to FlyBrainLab User Interface.
A set of NeuroArch databases should have been downloaded during the installation process. For more information, see the Dataset Version Tracker.
Assuming all GPUs will be available to the docker container, run
docker run --name fbl --gpus all -p 9999:8888 -it fruitflybrain/fbl:latestYou will be prompted to download datasets. Select to install the databases you needed. For more information, see the Dataset Version Tracker.
(TIP): If you would like to keep the databases after the docker container is removed, bind an empty directory on your machine when launching the container:
docker run --name fbl --gpus all -p 9999:8888 -v /path/to/directory:/home/ffbo/orientdb/databases -it fruitflybrain/fbl:latestGo to browser with url: localhost:9999. Note that the default jupyter notebook port in the Docker container is 8888 and is mapped to 9999 on host machine. Then refer to FlyBrainLab User Interface.
For advanced usage of the Docker image, please refer to the FlyBrainLab Docker Image Page.
Once FlyBrainLab is launched, you will find in the browser a typical JupyterLab interface, with an additional selection of FlyBrainLab buttons, as shown here:

Click on the Create FBL Workspace button and choose a dataset to work with. By default, you will find the Hemibrain, the FlyCircuit and the L1EM Larva datasets.
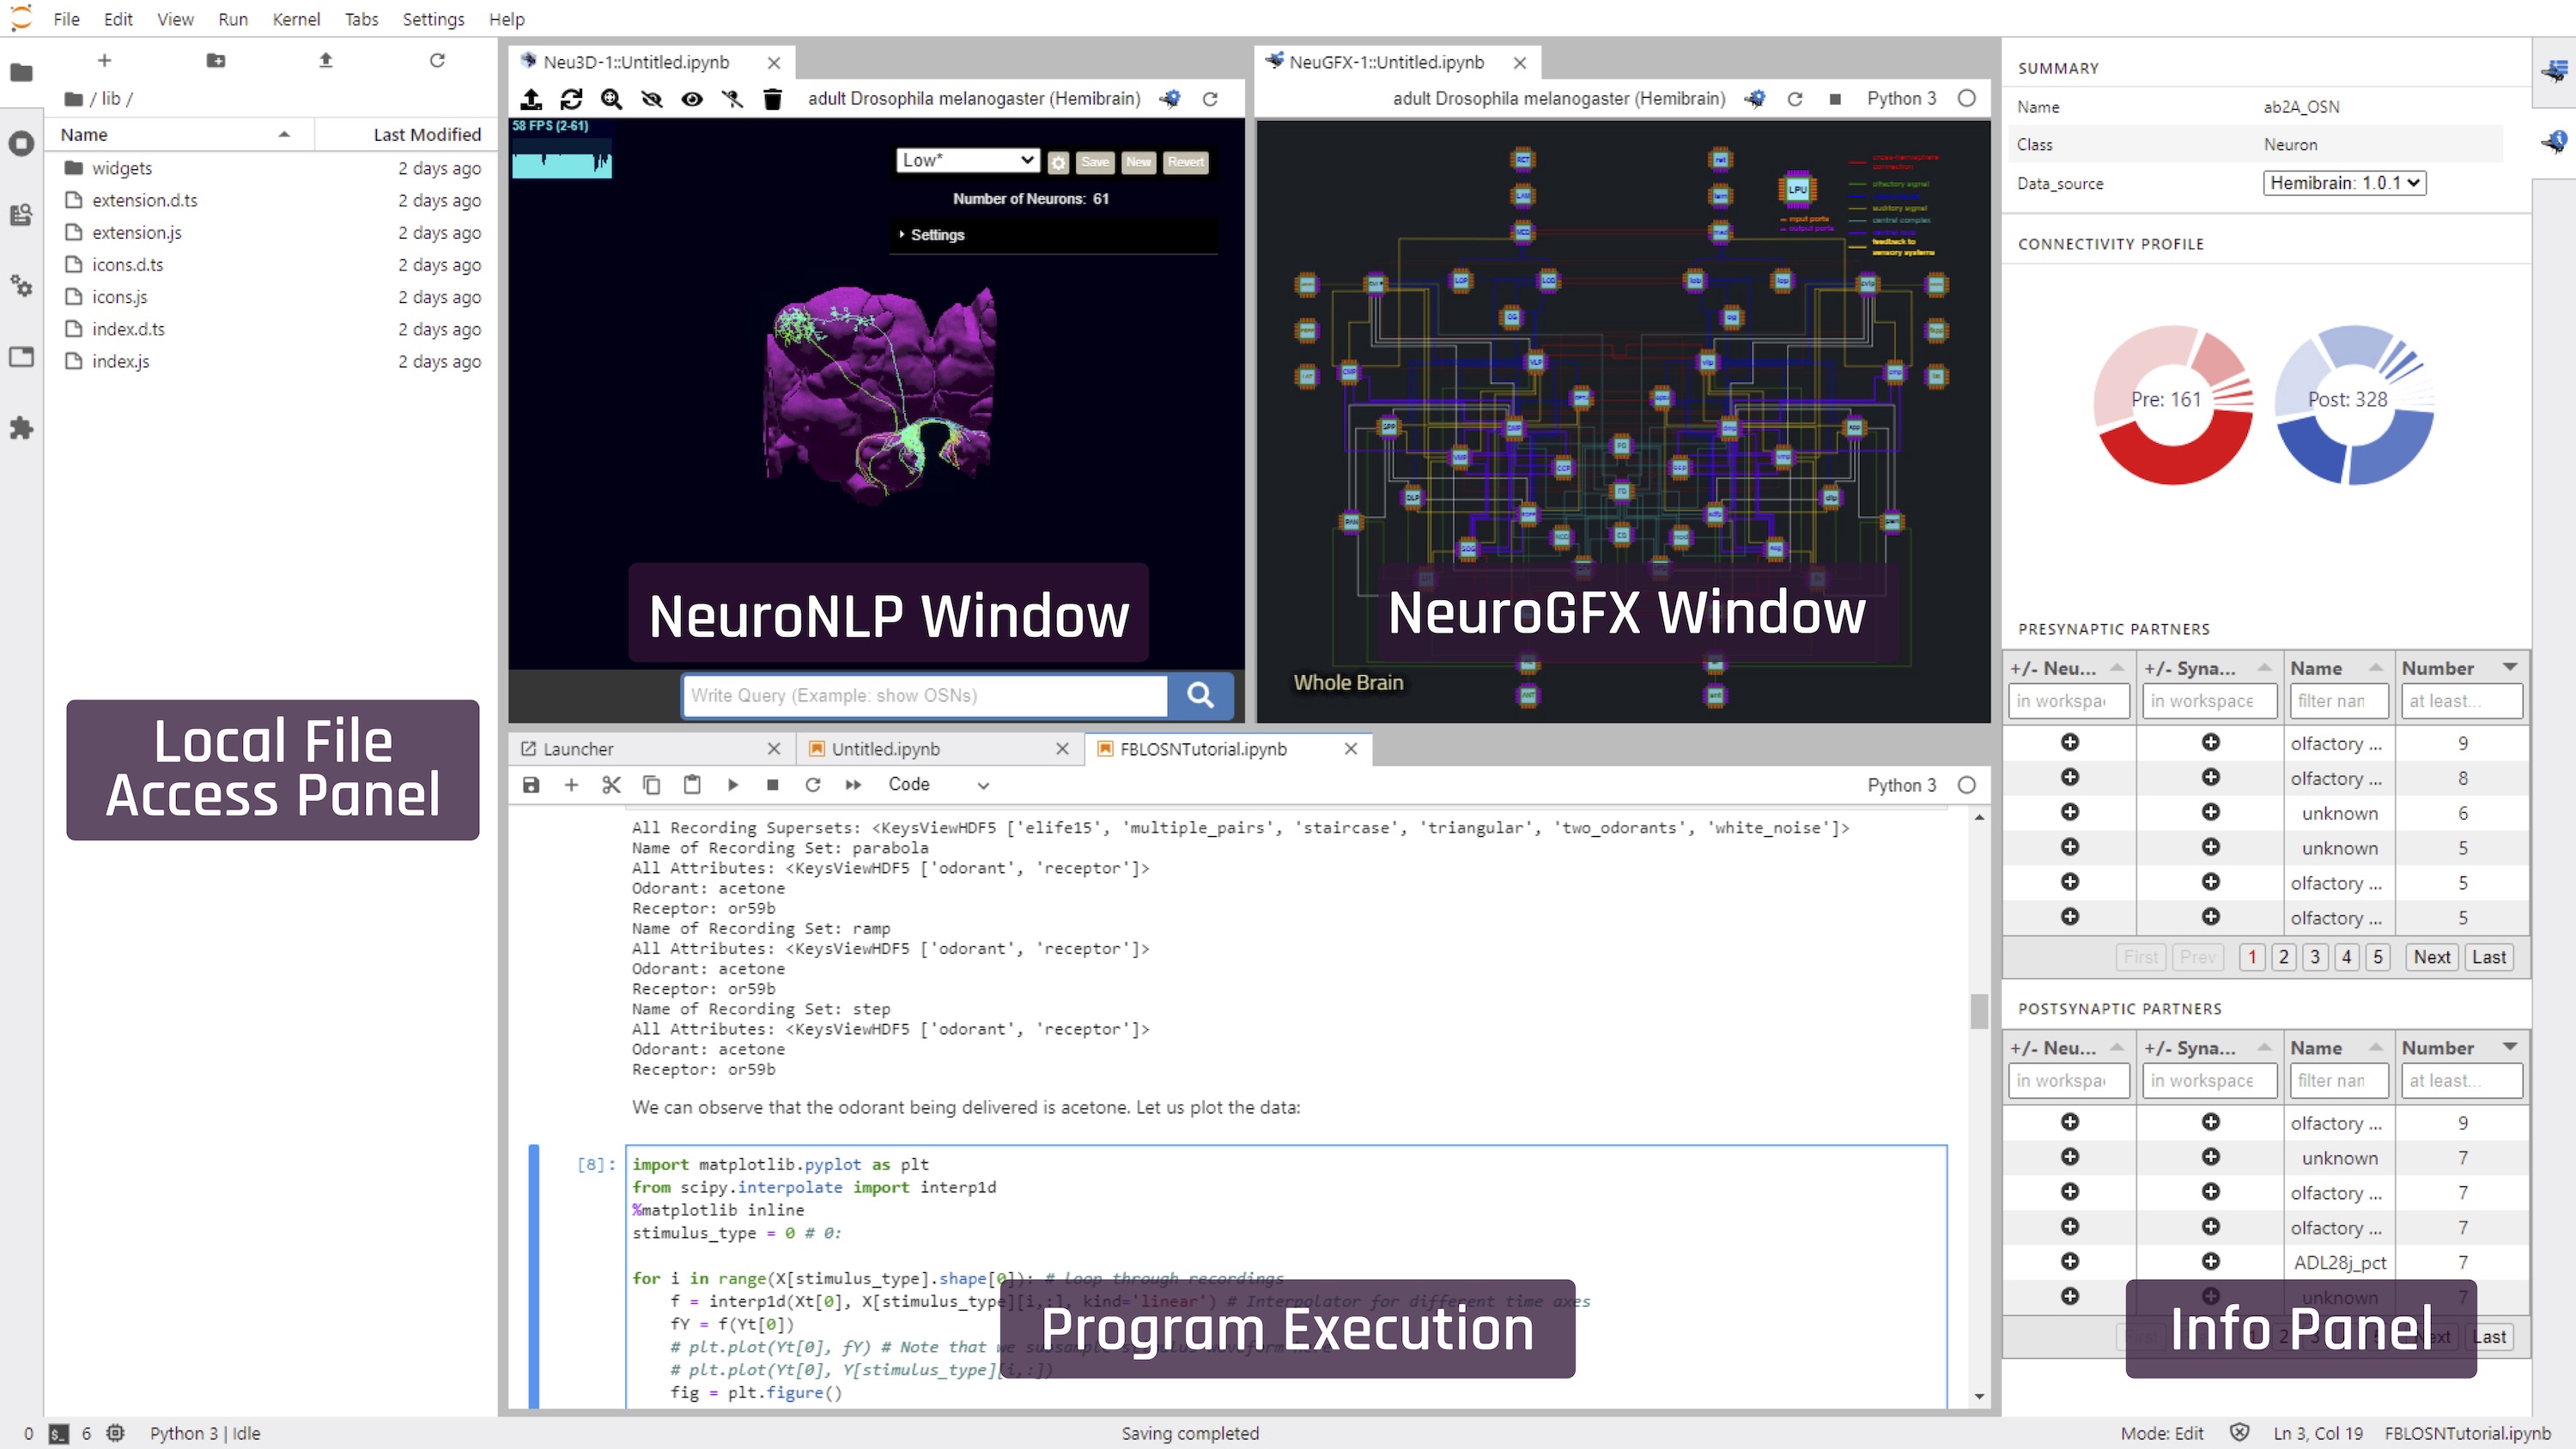
This will open the main FlyBrainLab user interface, as shown in the following figure (positions of the windows can be arbitrarily rearranged):
If you encounter a popup window showing error, you may need to check if the configuration of servers is correct. See Configuring Backend Servers.
In order for a opened notebook to interact with the NeuroNLP and NeuroGFX windows, please select the kernel correspoding to the kernal used by the NeuroNLP window (e.g. Untitled.ipynb in the following figure).

Please read https://github.com/FlyBrainLab/FlyBrainLab/wiki/Installation for instructions on adding/changing servers.
Several tutorials are available in the form of notebooks. They are available in the Tutorials repository.
Please see the wiki page for Troubleshooting.
You can also report bugs and get help in this Issue Tracker.
To cite FlyBrainLab:
@article {Lazar2020.06.23.168161,
	author = {Lazar, Aurel A. and Liu, Tingkai and Turkcan, Mehmet Kerem and Zhou, Yiyin},
	title = {FlyBrainLab: Accelerating the Discovery of the Functional Logic of the Drosophila Brain in the Connectomic/Synaptomic Era},
	year = {2020},
	doi = {10.1101/2020.06.23.168161},
	publisher = {Cold Spring Harbor Laboratory},
	journal = {bioRxiv}
}
Coming Soon!


