
        point(20,20 );                      // Draw a point at (20,20).
        line(200,30, 250,50 );              // Draw a line between two points.
        rect( 50,50, 80,60 );               // Rectangle with CORNER at (50,50).
        ellipse( 200,100, 90,90 );          // Circle with CENTER at (200,100);
+ Semicolon __;__ must end each statement.
<img src= "http://suffolk.li/img/h.png" WIDTH=120 ALIGN=RIGHT >
        // Draw a red house, with roof.
        fill( 255, 0, 0 );                  // Red house
        rect( 50,50, 100,50 );
        triangle( 50,50, 150,50, 100,20 );  // Roof
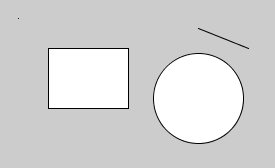
+ Use library methods to draw different shapes and colors.
<img src= "http://suffolk.li/img/shapes.png" ALIGN=RIGHT VSPACE=100 >
        // DRAW:  shapes and colors
        text( "Some lines and shapes", 10,10 );

        // Points & lines.
        point(20,20 );
        line(100,20, 200,20 );
        line(200,30, 250,50 );

        // Rectangles
        rect( 50,50, 80,60 );
        fill( 255,0,0 );                // Red
        rect( 80,80, 60,90 );


        // Ellipses
        stroke( 0,0,255 );              // Blue border
        fill( 255,255,0 );              // Yellow fill
        ellipse( 200,100, 90,90 );
        fill( 0,255,0 );                // Green
        ellipse( 250,150, 90,60 );

        // Lines between centers.
        stroke( 255,0,255 );
        line(50,50, 80,80 );
        line(200,100, 250,150 );
##### Add your own shapes to this code: [shapes.pde](http://raw.githubusercontent.com/61cst112/tutorial/master/shapes.pde)


+ Each __BLOCK__ of statements should be indented and surrounded by *curly-braces*: <img src= "http://suffolk.li/img/sunny.png" WIDTH=200 ALIGN=RIGHT VSPACE=150 >
        //// SETUP:  Define screen size, set modes.
        {
                    size( 600, 400 );
                    rectMode( CORNER );
                    ellipseMode( CENTER );
        }

        //// DRAW:  sky and sun
        {
                    background( 150, 255, 255 );     // Cyan sky
                    fill( 255, 255, 0 );
                    ellipse( width/2, 50, 30,30 );   // Yellow sun
        }


        //// MESSAGES:  title & author
        {
                    fill(0);
                    text( "Project #0:  Sunny day",   10, width/3 );
                    text( "Joe Bloggs, CST 112",   10, height-10 );
        }
+ Variables must be declared. (Use only the __```float```__ type for now.) <img src="http://suffolk.li/img/magenta.png" ALIGN=RIGHT VSPACE=50 >
        float x=200, y=300;     // Starting position of creature.
        float sunX=50, sunY=50; // Starting position for the sun.

        //// ZOOG:  draw a creature at (x,y)
        {
                    fill( 255,0,255 );               // Magenta creature
                    rect( x,y, 50,80 );              // Body
                    ellipse( x+25,y-20, 40,40 );     // Head
        }
## For dynamic sketches,
  1. put setup code in a ```setup( )``` method _(called once)_, and
  2. code to draw each frame in a ```draw( )``` method _(called repeatedly)_:
//// Example of a dynamic sketch. //// Creature follows the mouse, while the sun moves across the sky. //// Joe Bloggs, CST112
float x,y; // Position of creature and sun. float sunX, sunY;
//// SETUP: Define screen size, set modes. //// void setup() { size( 300, 200 ); sunX= width/2; // Reset the sun position. sunY= 50; }
<img src="http://suffolk.li/img/project0.png" ALIGN=RIGHT WIDTH=240 VSPACE=200 >
//// DRAW: sky, sun, house plus creature. //// void draw() { //// SCENE: { background( 150, 255, 255 ); // Cyan sky fill( 255, 255, 0 ); ellipse( sunX, sunY, 30,30 ); // Yellow sun // Draw a red house, with roof. fill( 255, 0, 0 ); // Red house rect( 50,50, 100,50 ); triangle( 50,50, 150,50, 100,20 ); // Roof }
//// ACTION:  Follow the mouse.
{
        sunX=  sunX + 1;
        if (sunX > width) sunX=  0;
        x=  mouseX;                         // Move the creature.
        y=  mouseY;
}

//// SHOW:    Draw blue creature.
{
        fill( 0,0,200 );
        rect( x, y, 50, 80 );               // Body
        ellipse( x+25, y-20, 40,40 );       // Head
        fill( 255 );
        ellipse( x+15,y-25, 12,12 );        // Eyes
        ellipse( x+35,y-25, 12,12 );
}

 // MESSAGES:  title & author
 {
        fill(0);
        text(  "Project #0:  Hero follows mouse.",   10, 10 );
        text(  "Joe Bloggs, CST 112",   10, height-10 );
}
}
[http://raw.githubusercontent.com/61cst112/tutorial/master/project0.pde](http://raw.githubusercontent.com/61cst112/tutorial/master/project0.pde)


## Modularize:
* Organize your code using bite-sized pieces (blocks).
        //// DRAW:  Next frame.
        void draw()
        {
                    scene();
                    action();
                    show();
                    messages();
        }
#### _Examine this code, then make your own modifications and run it!_
  [http://raw.githubusercontent.com/61cst112/tutorial/master/modular0.pde](http://raw.githubusercontent.com/61cst112/tutorial/master/modular0.pde)

