
If you just want to get up and running here are the steps:
- Install Quasar CLI globbaly with NPM
npm i -g @quasar/cli@latest - To build (I recommend
yarnasnpmsometimes has issues with local packages):It should build and run.yarn dev
If you get an issue with vue-template-compiler not found, this is because you used npm and it can't find it, even though it is injected into the build via quasar. Please install yarn, delete your node_modules folder and try again.
Electron is a framework that allows you to build cross platform desktop apps with javascript, HTML and CSS.
If you can build a website, you can build a desktop app. Electron is a framework for creating native applications with web technologies like Javascript, HTML and CSS. It takes care of the hard parts so you can focus on the core of your application.
With Electron, you get two processes: the main process and the renderer process. You can think of the main process as your backend code and the renderer process as your front-end code.
Quasar Framework is an up and coming MIT licensed open-source framework powered by Vue.
With Quasar, you can build:
- SPAs (Single Page App)
- SSR (Server-side Rendered App) (+ optional PWA client takeover)
- PWAs (Progressive Web App)
- Mobile Apps (Android, iOS, …) through Apache Cordova
- Multi-platform Desktop Apps (using Electron)
It is basically an all-in-one solution for web developers with a rich supply of components derived from innovative ideas and concepts that take away the pain (also known as The Quasar Method to Quasarians) of managing a project with eslint, webpack, babel, etc., so you can get on with developing your app (web, desktop or mobile).
A file explorer is a graphical user interface (GUI) that allows the User to visualize and traverse the file system of an operating system.
Why not?
Sarcasm aside, let me say just a few things. I work with Vue (Vue Homepage) on a day-to-day basis and use Quasar Framework. We made this decision collaboratively back in September 2017. It was a gamble to use Vue and even more so for Quasar. Since then, as of this writing, Vue (118k) has more stars on Github than React (116k) or Angular (42.2k) (Github Search) and Quasar (7.7k) (Quasar Github page) is growing rapidly in popularity with it's all-in-one solution. So far, we feel our gamble has paid off in spades (In Spades Definition) as we gear up to release 5.0 of our product (Intelliview Technologies Homepage) after converting from Angular.
Ok, back to why a tutorial? Our product provides an intelligent camera that creates alert videos that Users can export to their computers, as well as archive videos. With that video, we have a custom SVG that runs as an overlay on top of the video so the User can see the analytics. Because the SVG is custom, we needed to write an offline viewer for these exported videos that can also play the associated SVG as an overlay. Thus, we used Electron and Quasar to develop a custom desktop application that fits our needs. So, yes, I am not that experienced with Electron, but I did learn things along the way, that, in this tutorial I will share with you.
This is not a full-on tutorial with step-by-step instructions. The source code for the project is freely available and you are welcomed to download or fork the project and extend it out further.
What I will be discussing is design decisions, code decisions, electron security and highlight various coding issues and tasks that I had to overcome in order to create this project. You might already be an experienced coder familiar with everything that I have to say, or you just might learn something you didn't know about. Either way, it's basically a history of events that allowed this project to be done.
The end goal is to have a file explorer that can traverse a User's file system. I want it to work with both Linux and Windows since we are making a desktop app. However, since I am mainly a Linux developer (C++ and Web), I need to get a copy of Windows to work with. Microsoft has a VM (Virtual Machine) with Windows 10 pre-installed that you can download and has a 90-day limit. That will work perfect! I can use VirtualBox to import the VM and install all my tools and work concurrently in Linux and Windows. If Apple would do a VM for Mac, I'd certainly be making sure it works for that as well.
One thing I need to keep in mind is that with Linux, the file system is under one hierarchy. All files and folders are under root. Windows is different in that each hard drive is basically a root of the files and folders that the hard drive contains. This will present a challenge as I'll need to get the hard drives being used by Windows and then treat each like a root.
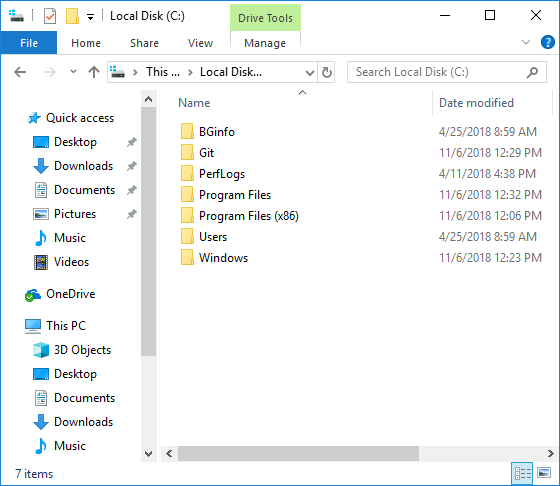
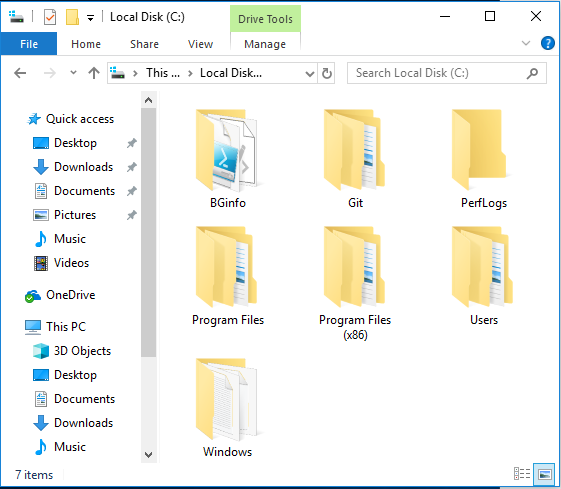
Let's take a look at Windows Explorer:
Let's take a look at Ubuntu Files:
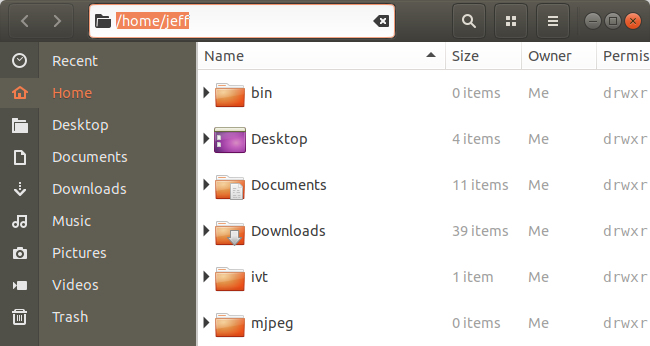
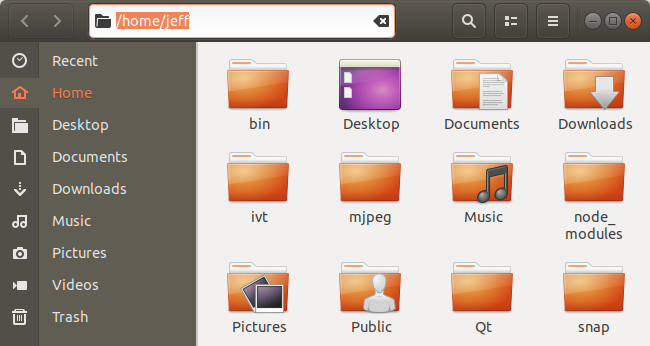
Both file explorers offer a grid and list mode. They also have an (optional) address bar at the top. There is navigation of various sorts on the left side. Then there is the content area in the middle that shows both files and folders.
I want to keep a similar look-and-feel so that the User will already be familiar with Using my file explorer from the first time they start it.
Here are the things I'll do:
-
Have a read-only address bar that shows the current path. I'll call this the breadcrumb bar. For each part of the path, the User will be able to click on it in order to make back-traversal easy.
-
Show shortcuts on the left side. This will show links to a number of pre-defined paths. Both Windows and Linux share this concept. Like, the home, documents, and downloads folder. I don't want to hard-code this, so I'll have to research if there is a way of getting them via Electron.
-
Under the shortcuts I want to show a traversal-tree that expands each folder to show additional folders. I'll be able to use the Quasar QTree component for this. It provides for lazy loading of each tree node, so this will be perfect as I want to load data on-demand to keep things running quickly.
-
In the main content area I want to show the contents of a folder. The contents may contain other folders as well as files. I want to display the file name and I want to display an icon that represents the file mime type for the most commonly used files. In the content area, I also want the User to be able to switch between grid and list views. And, finally, if the User double-clicks on a folder in the content area, the UI will navigate to the selected folder.
-
In the content area, if additional files are added, removed, modified, while viewing, then they'll automatically be updated. There is a great package called Chokidar that I can use to watch files and give me notifications.
-
Finally, if a file is an image, instead of a generic icon, I want to show a thumbnail of the actual image.
Here are things I won't do:
-
Double-clicking a file won't open it. Although this would be nice, this is not one of my goals at this time.
-
The User will be unable to create, delete or modify files. This will be a read-only app only to provide proof-of-concept abilities only.
-
The User will be unable to get information (properties) about a selected file.
In general, the User won't be able to do much except traverse the file system.
These items are likely something I'd do when if I expand out this project with additional functionality.
As I found out, Electron comes with security concerns, depending on how much power you give it. We want to make sure we limit Electron while still having the power we require. For this aspect, we'll make sure when we set up Electron, that we use the following:
    webPreferences: {
      webSecurity: true
    }
This is actually the default setting for this option. But, I did want to highlight it here.
When false, it will disable the same-origin policy (usually using testing websites by people), and set allowRunningInsecureContent to true if this options has not been set by user. Default is true.
You can read up on more options here.
This presents an additional challenge as you can no longer use the file:// protocol from within the renderer process. In this case, I want to be able to show thumbnails of files that are image-based. So, I'll have to feed them from the main process to the renderer process via a web server instance, like express.
Quasar makes it really easy to get started. But, first you have to have it installed globally. You can do that by typing npm install -g quasar-cli. Once installed globally, you can access it as it's now on your path.
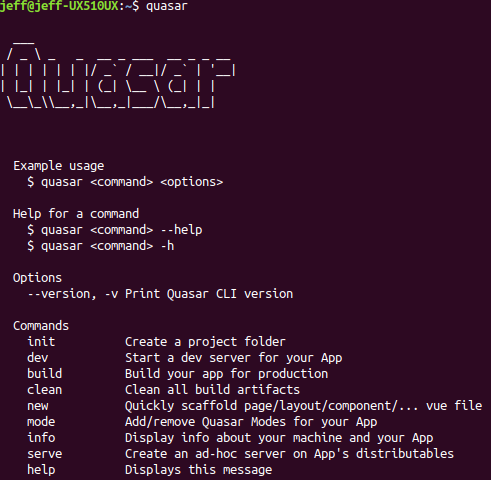
To begin a project, from the command-line:
quasar init my-project-name
This will create a new folder, based on your current folder, and start the scaffolding process. But, first, you will be asked several questions about your project:

To start the web application, you can now type quasar dev or your can build a production-ready web site using quasar build.
At this point, we have not told Quasar to add Electron. So, we type:
quasar dev -m electron -t mat
Quasar will detect that Eletron needs to be installed, does that, then continues on with the development build.
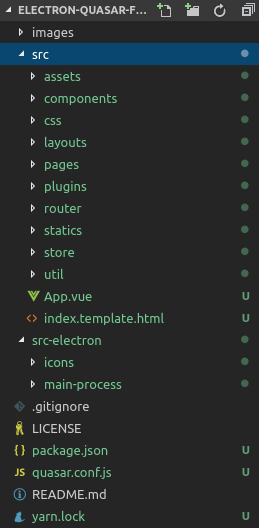
The folder system that Quasar creates is logical and easy to understand:
A very nice feature of Quasar is layouts. This is basically a controller for a page layout and you create pages and components that will be loaded into your layout. For most of my work, I use just one layout, but you can have more than one that does different takes based on your needs.
We will want to have Quasar create the page for use using quasar new <something> command:
$ quasar new
  Description
    Quickly scaffold a page/layout/component/store module.

  Usage
    $ quasar new [p|page] <page_file_name>
    $ quasar new [l|layout] <layout_file_name>
    $ quasar new [c|component] <component_file_name>
    $ quasar new plugin <plugin_name>
    $ quasar new [s|store] <store_module_name>

    # Examples:

    # Create src/pages/MyNewPage.vue:
    $ quasar new p MyNewPage

    # Create src/pages/MyNewPage.vue and src/pages/OtherPage.vue:
    $ quasar new p MyNewPage OtherPage

    # Create src/layouts/shop/Checkout.vue
    $ quasar new layout shop/Checkout.vue

  Options
    --help, -h     Displays this message
This is what we will be creating:
- A main Layout: created automatically for you by Quasar when you init the project.
- A contents page using this Quasar command:
quasar new p contents - And, then, our components: breadcrumbs, shortcuts, folderTree, gridItem and gridItemImage. These can be created all at once with this Quasar command:
quasar new p breadcrumbs, shortcuts, folderTree, gridItem, gridItemImage
Just in case there is any confusion, my gridItem component will contain an image and text and will be displayed on the contents area for both grid and list modes of the file explorer. The gridItemImage component will be a child of the gridItem component and be responsible for image display. This could be a generic icon of sorts, based on mime-type, or if an image file, then the actual image. It will also be responsible for centering images that may be smaller than the display area.
The first thing I do is update a few things in my scripts section in package.json. I add the following to make builds more convenient:
  "lint-fix": "eslint --ext .js,.vue src --fix",
  "dev": "quasar dev -m electron -t mat",
  "build-linux": "quasar build -m electron linux -t mat -b builder",
  "build-win32": "quasar build -m electron win32 -t mat -b builder",
The first one with the lint-fix command is because I am lazy. When I forget to do something that that eslint complains about, I issue yarn lint-fix (or npm run lint-fix) and if the issue can be fixed, it goes away.
The dev command is for concurrent development while running. Changes to you code cause an HMR (Hot Module Reload).
Finally, the last two commands build-linux and build-win32 are to build the production ready applications. build-linux should be called on a Linux system and build-win32 should be called on a Windows system. (Note: For windows we will actually be building a 64-bit application. Electron uses "win32" to denote a Windows system, not it's "arch" type.)
Finally, I add the following in the generated eslintrc.js file:
'brace-style': [2, 'stroustrup', { 'allowSingleLine': false }],
Only because this is the style I like to use.
One of the first things I want to do is get a list of files and folders from the local file system. I wrote a utility function to do this because I wasn't sure if I wanted to do this in Eletron's main process or renderer process. In the end, I went with the renderer process out of convenience.
This utility function walkFolders is a Javascript Generator function.
Generator functions provide a powerful alternative [to custom iterators]: they allow you to define an iterative algorithm by writing a single function whose execution is not continuous. Generator functions are written using the function* syntax. When called initially, generator functions do not execute any of their code, instead returning a type of iterator called a Generator. When a value is consumed by calling the generator's next method, the Generator function executes until it encounters the yield keyword.
const path = require('path')
const fs = require('fs')

/**
 * Generator function that lists all files in a folder recursively
 * in a synchronous fashion
 *
 * @param {String} folder - folder to start with
 * @param {Number} recurseLevel - number of times to recurse folders
 * @returns {IterableIterator<String>}
 */
function *walkFolders (folder, recurseLevel = 0) {
  try {
    const files = fs.readdirSync(folder)

    for (const file of files) {
      try {
        const pathToFile = path.join(folder, file)
        const stat = fs.statSync(pathToFile)
        const isDirectory = stat.isDirectory()
        if (isDirectory && recurseLevel > 0) {
          yield * walkFolders(pathToFile, recurseLevel - 1)
        }
        else {
          yield {
            rootDir: folder,
            fileName: file,
            isDir: isDirectory,
            stat: stat
          }
        }
      }
      catch (err) {
        yield {
          rootDir: folder,
          fileName: file,
          error: err
        }
      }
    }
  }
  catch (err) {
    yield {
      rootDir: folder,
      error: err
    }
  }
}

export default walkFolders
Now that we have a function that will give us what we want, we can call like this:
    getFolders: function (absolutePath) {
      let folders = []
      // check incoming arg
      if (!absolutePath || typeof absolutePath !== 'string') {
        return folders
      }
      for (const fileInfo of walkFolders(absolutePath, false)) {
        // all files and folders
        if ('error' in fileInfo) {
          console.error(`Error: ${fileInfo.rootDir} - ${fileInfo.error}`)
          continue
        }
        // we only want folders
        if (!fileInfo.isDir) {
          continue
        }
        const node = this.createNode(fileInfo)
        folders.push(node)
      }
      return folders
    },
and
    getFolderContents: function (folder) {
      let contents = []
      // check incoming arg
      if (!folder || typeof folder !== 'string') {
        return contents
      }
      for (const fileInfo of walkFolders(folder, false)) {
        // all files and folders
        if ('error' in fileInfo) {
          console.error(`Error: ${fileInfo.rootDir} - ${fileInfo.error}`)
          continue
        }
        const node = this.createNode(fileInfo)
        contents.push(node)
      }
      return contents
    },
The first function is responsible for getting the data and filtering it for folders only. The second function gets all content (files and folders). These could have been combined into one function taking a parameter to decide if you wanted all returned or just folders, but depending on the skill-level of the reader, I didn't want to add too much confusion.
Initially when I wrote this code, I would just console.log() the output. I didn't have a createNode function yet.
In my folderTree component, I want to use the Quasar QTree component. The tree takes an array of objects. Each object contains a label (folder or file name), a nodeKey (absolute path to the file or folder), expandable (I'll set to true for a folder), lazy (if children of this node will be lazy loaded -- on demand), children (an empty array where lazy-loaded sub-folders will get loaded, each with their own node), and data (my own addition carrying additional meta data for that node).
    createNode: function (fileInfo) {
      let nodeKey = fileInfo.rootDir
      if (nodeKey.charAt(nodeKey.length - 1) !== path.sep) {
        nodeKey += path.sep
      }
      if (fileInfo.fileName === path.sep) {
        fileInfo.fileName = nodeKey
      }
      else {
        nodeKey += fileInfo.fileName
      }
      // get file mime type
      const mimeType = mime.lookup(nodeKey)
      // create object
      return {
        label: fileInfo.fileName,
        nodeKey: nodeKey,
        expandable: fileInfo.isDir,
        tickable: true,
        lazy: true,
        children: [],
        data: {
          rootDir: fileInfo.rootDir,
          isDir: fileInfo.isDir,
          mimeType: mimeType,
          stat: fileInfo.stat
        }
      }
    },
You may have noticed that I am using path.sep which contains the path separator based on the current operating system. This is very important when making cross-platform software. To get access to this, you will need to const path = require('path') in the script area of your code.
When developing this project, I realized that with Linux, all the files and folders are under the root system. Even mounted drives are under root. This is very convenient. However, under Windows you get drives. I needed a way of determining which drives were in use by the operating system.
I did try a couple of packages, that worked, but then when I went to compile my project for Linux, it was broken. The packages themselves were restricted to Windows builds and I needed a way of saying it was optional. I tried the npm route of optionalPackages in the package.json but it did not work for me at all. Really, I could not be bothered trying to figure that out, so I decided to roll my own. I would only ever call it if the application was being run under Windows anyway.
Thus, my getWindowsDrives function was created:
const exec = require('child_process').exec
const fs = require('fs')
const path = require('path')

function getWindowsDrives (callback) {
  if (!callback) {
    throw new Error('getWindowsDrives called with no callback')
  }
  if (process.platform !== 'win32') {
    throw new Error('getWindowsDrives called but process.plaform !== \'win32\'')
  }
  let drives = []
  exec('wmic LOGICALDISK LIST BRIEF', (error, stdout) => {
    if (error) {
      callback(error, drives)
      return
    }
    // get the drives
    let parts = stdout.split('\n')
    if (parts.length) {
      // first part is titles; get rid of it
      parts.splice(0, 1)
      for (let index = 0; index < parts.length; ++index) {
        let drive = parts[index].slice(0, 2)
        if (drive.length && drive[drive.length - 1] === ':') {
          try {
            // if stat fails, it'll throw an exception
            fs.statSync(drive + path.sep)
            drives.push(drive)
          }
          catch (e) {
          }
        }
      }
      callback(null, drives)
    }
  })
}

export default getWindowsDrives
And happily, it allows for me to build for Linux and Windows with no problems.
And calling it, works like this:
    if (process.platform === 'win32') {
      getWindowsDrives((error, drives) => {
        if (!error) {
          this.drives = drives
          // work through the drives backwards
          for (let index = this.drives.length - 1; index >= 0; --index) {
            try {
              const stat = fs.statSync(this.drives[index] + path.sep)
              let fileInfo = {}
              fileInfo.rootDir = this.drives[index]
              fileInfo.fileName = path.sep
              fileInfo.isDir = stat.isDirectory()
              fileInfo.stat = stat
              let node = this.createNode(fileInfo)
              this.rootDir.unshift(node)
            }
            catch (error) {
              // remove from (bad/phantom) drive list
              this.drives.splice(index, 1)
              console.error(error)
            }
          }
        }
      })
    }
    else {
      // set and get root folder's folders
      this.setSelectedFolder(this.drive + path.sep)
      this.rootDir.push(...this.getFolders(this.selectedFolder))
    }
Note: process.platform is available while in code written for Electron (as it comes from Node) without having to require/import it.
The process.platform property returns a string identifying the operating system platform on which the Node.js process is running.
For possible values, click here.
This was not something I expected. The way the QTree works is based off of User interaction. You click on a tree node and can drill down to different child nodes and so on. I wanted to tell QTree to open a node that wasn't even loaded yet. For instance, when a User clicks on one of the shortcuts. It really has no way of knowing a-child-of-child-of-a-child-node that doesn't exist.
In order to do this, you would have to write some funky code. Basically, starting at the root node level and working your way to the desired child node. So, almost recursively, but you'd have to wait until QTree called it's lazy load function on any nodes that had children that weren't yet loaded.
To do this will take some creative thinking, but I did come up with a solution right away using a combination of the Vue nextTick function and Vue's global event bus messaging.
Note: Don't be confused by articles for creating a global event bus in Vue. These are old articles. The latest Vue supports this directly.
In my folderTree component, I want to access the global event bus to send messages to itself. So, when the component has the message available, I want the expandTree function to be called.
  mounted: function () {
    this.$root.$on('expand-tree', this.expandTree)
  },

  beforeDestroy: function () {
    this.$root.$off('expand-tree', this.expandTree)
  },
Whenever you use the global event bus, make sure you turn it off when the component that it's it is unloaded. It can have unintended consequences if your component is reloaded multiple times.
The HTML for my QTree looks like this:
    <q-tree
      ref="folders"
      :nodes="rootDir"
      label-key="label"
      node-key="nodeKey"
      accordion
      default-expand-all
      :selected.sync="selected"
      @lazy-load="lazyLoad"
    />
and the method to recursively expand the tree looks like this:
    expandTree: function (absolutePath) {
      // get parts for the path
      let parts = absolutePath.split(path.sep)
      let path2 = ''
      let lastNodeKey

      // iterate through the path parts.
      // This code will get the node. If the node is not found,
      // it forces lazy-load by programmatically expanding
      // the parent node.
      for (let index = 0; index < parts.length; ++index) {
        if (parts[index].length === 0) {
          continue
        }
        if (index === 0) {
          path2 += parts[index] + path.sep
        }
        else {
          if (path2[path2.length - 1] !== path.sep) {
            path2 += path.sep
          }
          path2 += parts[index]
        }
        if (index > -1) {
          if ('folders' in this.$refs) {
            const key = this.$refs.folders.getNodeByKey(path2)
            // if we get key, then this folder has already been loaded
            if (key) {
              lastNodeKey = key
            }
            // handle folder not expanded
            if (!this.$refs.folders.isExpanded(lastNodeKey.nodeKey)) {
              this.$refs.folders.setExpanded(lastNodeKey.nodeKey, true)
              if (path2 === absolutePath) {
                this.selected = absolutePath
              }
              else {
                this.$nextTick(() => {
                  this.$root.$emit('expand-tree', absolutePath)
                })
              }
            }
          }
        }
      }
    }
You will notice that if you give an HTML component a ref="name" you will be able to directly access that component using this.$refs['name'] or this.$refs.name. It just so happens that QTree has some functions that are accessible. getNodeByKey returns the node with the specified key, isExpanded will return true if the node is expanded, and setExpanded will call the lazy load function and expand the node once the data has been received. I will note right now that setExpanded is an "undocumented" function and I had to find by actually looking in the code for QTree, but I would be unable to have this sort of functionality without it.
The trick in the code above is to get each node, working down towards the node I want. If a node is not expanded, then call the setExpanded button. If we are at the node we want, then we're done, otherwise emit the expand-tree in the this->$nextTick function. This allows the lazy load to occur before the next iteration of node traversal occurs.
I wouldn't say this is good behavior. As programmers, we should not use "undocumented" functions. However, as programmers, we have all written something that was used other than the way intended. When you do something like this (using any 3rd-party code), you should write up an issue (or two) so the author can make adjustments. Better yet, if you have the time, create a PR (Pull Request) with the functionality you need.
Remember, above, in Security Concerns we did this:
    webPreferences: {
      webSecurity: true
    }
At one point, I was using the file:// protocol to access images on the file system so they could be displayed instead of a generic icon. Well, the file:// protocol is no longer available in the renderer process. The best way now, would be the same way as if you were using a web page and a web server.
In electron-main.js I have the following code (at the top):
import { app, BrowserWindow, ipcMain } from 'electron'
const nativeImage = require('electron').nativeImage
const path = require('path')
const http = require('http')
const express = require('express')
const expressApp = express()
const cors = require('cors')
const router = express.Router()
let fileFolder
and at the bottom:
ipcMain.on('folder', (event, folder) => {
  fileFolder = folder
})

expressApp.use(cors())

router.get('/file/:name', function (req, res) {
  let filename = fileFolder + path.sep + req.params.name
  console.log('Serving file:', filename)
  res.sendFile(filename)
})

expressApp.use('/', router)

http.createServer(expressApp).listen(8000)
Here, you will see I create a web server (express) to feed the image files to the renderer process. Also notice the ipcMain.on code. Each time the User changes to a different folder in the renderer process, I send an IPC (Inter-Process Communications) message to the main process. Then, when a file is requested from the renderer process, it's all put together in the router.get function.
The code that calls this is in the gridItemImage component in the getImage function. The fragment looks like this:
  else if (type === 'image') {
    return 'http://localhost:8000/file/' + this.node.label
  }
Now, if you really wanted to be secure, you could have all kinds of things going on here. 1) You could pick a random port number to use and the renderer process could request it from the main process to use in it's HTTP GET calls, 2) You could generate a unique key (or guid), that the renderer process could request it from the main process to use in it's HTTP GET calls.
For instance:
return 'http://localhost:8000/file/' + this.guid + '/' + this.node.label
And the router function would possibly look like this:
router.get('/file/:guid/:name', function (req, res) {
  if (req.params.guid === myGuid) {
    let filename = fileFolder + path.sep + req.params.name
    console.log('Serving file:', filename)
    res.sendFile(filename)
  }
  else {
    res.status(401).json({
      status: 401,
      message: 'UNAUTHORIZED'
    })
  }
})
Any time a User has selected a folder and new files appear or some are deleted, I wanted them to show up immediately. There is an excellent package called Chokidar that can do this for you. This package is used by quality applications like Visual Studio Code (my preferred editor).
Each time the selected folder changes, we call this function:
    folderWatcherHandler: function (newFolder, oldFolder) {
      if (oldFolder && this.watcher) {
        this.watcher.close()
      }
      if (newFolder) {
        // let backend know to statically serve files from this folder
        ipcRenderer.send('folder', newFolder)

        this.watcher = chokidar.watch(newFolder, {
          depth: 0,
          ignorePermissionErrors: true
        })
        if (this.watcher) {
          this.watcher.on('ready', () => { // initial scan done
            // watch for additions
            this.watcher.on('raw', (event, path, details) => {
              this.$root.$emit('rescan-current-folder')
            })
          })
          this.watcher.on('error', (error) => { // initial scan done
            console.error(error)
          })
        }
      }
    }
I make sure to remove any "watch" on an existing folder and create a new "watch" on the new folder. Whenever something changes, I emit the message "rescan-current-folder", which is eventually picked up by this function:
    rescanCurrentFolder: function () {
      this.clearAllContentItems()
      this.contents.push(...this.getFolderContents(this.selectedFolder))
    },
This has been an overview of Building an Electron File Explorer with Quasar (and Vue). It is my hope you have learned some things that you might not have already known and helped you learn a bit about Quasar (to truly appreciate Quasar, download or fork the project).


