
pi@raspberrypi:~ $ sudo apt-get update
pi@raspberrypi:~ $ sudo apt-get upgrade
pi@raspberrypi:~ $ sudo apt-get install raspberrypi-kernel-headers
pi@raspberrypi:~ $ echo "deb http://deb.debian.org/debian/ unstable main" | sudo tee --append /etc/apt/sources.list.d/unstable.list
pi@raspberrypi:~ $ sudo apt-get install dirmngr
pi@raspberrypi:~ $ sudo apt-key adv --keyserver   keyserver.ubuntu.com --recv-keys 8B48AD6246925553
pi@raspberrypi:~ $ printf 'Package: *\nPin: release a=unstable\nPin-Priority: 150\n' | sudo tee --append /etc/apt/preferences.d/limit-unstable
pi@raspberrypi:~ $ sudo apt-get update
pi@raspberrypi:~ $ sudo apt-get install wireguard
pi@raspberrypi:~ $ sudo reboot
Raspberry Pi 1, Zero, ZeroW requires manual compiling.
Enable ipv4 forwarding then reboot to make changes active:
pi@raspberrypi:~ $ sudo perl -pi -e 's/#{1,}?net.ipv4.ip_forward ?= ?(0|1)/net.ipv4.ip_forward = 1/g' /etc/sysctl.conf
pi@raspberrypi:~ $ sudo reboot
To check if it has been enabled:
pi@raspberrypi:~ $ sysctl net.ipv4.ip_forward
net.ipv4.ip_forward = 1
If you get net.ipv4.ip_forward = 0, please manually edit sudo nano /etc/sysctl.conf and add net.ipv4.ip_forward = 1.
We cover two way of setting up Wireguard and clients:
- manually: that's what we do in this document
- semi automatic mode via WireGuard User Management Script
pi@raspberrypi:~ $ mkdir wgkeys
pi@raspberrypi:~ $ cd wgkeys
pi@raspberrypi:~/wgkeys $ wg genkey > server_private.key
Warning: writing to world accessible file.
Consider setting the umask to 077 and trying again.

pi@raspberrypi:~/wgkeys $ wg pubkey > server_public.key < server_private.key
pi@raspberrypi:~/wgkeys $ wg genkey > client1_private.key
Warning: writing to world accessible file.
Consider setting the umask to 077 and trying again.
pi@raspberrypi:~/wgkeys $ wg pubkey > client1_public.key < client1_private.key
pi@raspberrypi:~/wgkeys $ ls
client1_private.key client1_public.key server_private.key server_public.key
Use cat command to view content of the file. You need this in the next step.
pi@raspberrypi:~/wgkeys $ cat server_public.key
Aj2HHAutB2U0O56jJBdkZ/xgb9pnmUPJ0IeiuACLLmI=pi@raspberrypi:~/wgkeys $ sudo nano /etc/wireguard/wg0.conf
[Interface]
Address = 192.168.99.1/24
ListenPort = 51820
PrivateKey = <server_private.key>
PostUp = iptables -A FORWARD -i %i -j ACCEPT; iptables -A FORWARD -o %i -j ACCEPT; iptables -t nat -A POSTROUTING -o eth0 -j MASQUERADE
PostDown = iptables -D FORWARD -i %i -j ACCEPT; iptables -D FORWARD -o %i -j ACCEPT; iptables -t nat -D POSTROUTING -o eth0 -j MASQUERADE
[Peer]
#Client1
PublicKey = <client1_public.key>
AllowedIPs = 192.168.99.2/32Start Wireguard with wg-quick command.
pi@raspberrypi:~/wgkeys $ sudo wg-quick up wg0
[#] ip link add wg0 type wireguard
[#] wg setconf wg0 /dev/fd/63
[#] ip address add 192.168.99.1/24 dev wg0
[#] ip link set mtu 1420 dev wg0
[#] ip link set wg0 up
Use sudo wg command to check if it is working:
pi@raspberrypi:~/wgkeys $ sudo wg
interface: wg0
public key: Aj2HHAutB2U0O56jJBdkZ/xgb9pnmUPJ0IeiuACLLmI=
private key: (hidden)
listening port: 51820

peer: ht4+w8Tk28hFQCpXWnL4ftGAu/IwtMvD2yEZ+1hp7zA=
allowed ips: 192.168.99.2/32
You can launch automatically at startup:
pi@raspberrypi:~/wgkeys $ sudo systemctl enable wg-quick@wg0
Created symlink /etc/systemd/system/multi-user.target.wants/[email protected] → /lib/systemd/system/[email protected].You will need to install wireguard on clients as well. Wireguard does not have separate apps for server and client, just differences in the configuration file.
On Debian based distros (Ubuntu, Debian etc.) you just run sudo apt-get install wireguard.
For installing on other systems, please visit Wireguard website.
We generated credentials for one user above.
Example configuration on client:
adrian@MacBook-Pro:/Volumes$ sudo mkdir /etc/wireguard/
adrian@MacBook-Pro:/Volumes$ sudo nano /etc/wireguard/wg0.conf
[Interface]
Address = 192.168.99.2/24
PrivateKey = <client1_private.key>

[Peer]
Endpoint = your.publicdns.com:51820
PublicKey = <server_public.key>
AllowedIPs = 192.168.99.1/32, 192.168.1.0/24
192.168.1.0/24 is my remote LAN subnet, if you add here your own network, you can access remote LAN devices from the client.
adrian@MacBook-Pro:/Volumes$ sudo wg-quick up wg0
Warning: '/private/etc/wireguard/wg0.conf' is world accessible


[#] wireguard-go utun
INFO: (utun3) 2018/12/19 00:14:21 Starting wireguard-go version 0.0.20181018

[+] Interface for wg0 is utun3
[#] wg setconf utun3 /dev/fd/63
[#] ifconfig utun3 inet 192.168.99.2/24 192.168.99.2 alias
[#] ifconfig utun3 mtu 1416
[#] ifconfig utun3 up
[#] route -q -n add -inet 192.168.99.1/32 -interface utun3
[+] Backgrounding route monitor
Check if Wireguard is working:
adrian@MacBook-Pro:/Volumes$ sudo wg
interface: utun3
public key: ht4+w8Tk28hFQCpXWnL4ftGAu/IwtMvD2yEZ+1hp7zA=
private key: (hidden)
listening port: 53694

peer: Aj2HHAutB2U0O56jJBdkZ/xgb9pnmUPJ0IeiuACLLmI=
endpoint: your.publicdns.com:51820
allowed ips: 192.168.99.1/32

adrian@MacBook-Pro:/Volumes$ ping 192.168.99.1

PING 192.168.99.1 (192.168.99.1): 56 data bytes
64 bytes from 192.168.99.1: icmp_seq=0 ttl=64 time=13.447 ms
^C
--- 192.168.99.1 ping statistics ---

3 packets transmitted, 3 packets received, 0.0% packet loss
round-trip min/avg/max/stddev = 4.565/8.495/13.447/3.697 ms
Mobile clients (iOS, Android)
Generate key pairs:
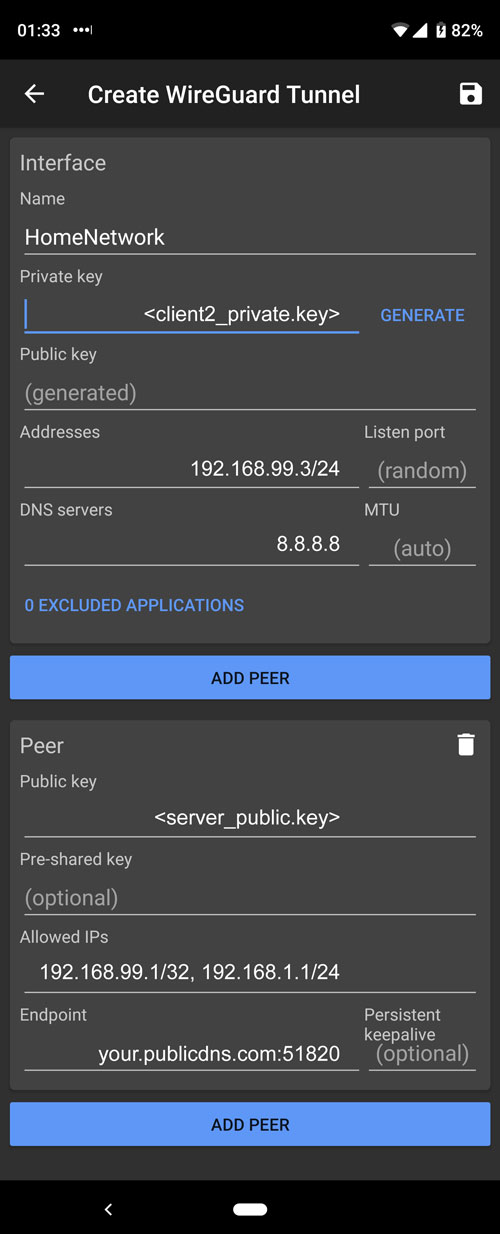
pi@raspberrypi:~/wgkeys $ wg genkey > client2_private.key
Warning: writing to world accessible file.
Consider setting the umask to 077 and trying again.

pi@raspberrypi:~/wgkeys $ wg pubkey > client2_public.key < client2_private.key
To the bottom of your config add:
pi@raspberrypi:~/wgkeys $ sudo nano /etc/wireguard/wg0.conf
[Peer]
#Client2
PublicKey = <client2_public.key>
AllowedIPs = 192.168.99.2/32

pi@raspberrypi:~/wgkeys $ sudo wg-quick down wg0
pi@raspberrypi:~/wgkeys $ sudo wg-quick up wg0
iOS configuration
Download and install official Wireguard app: Wireguard beta is available in the App Store.
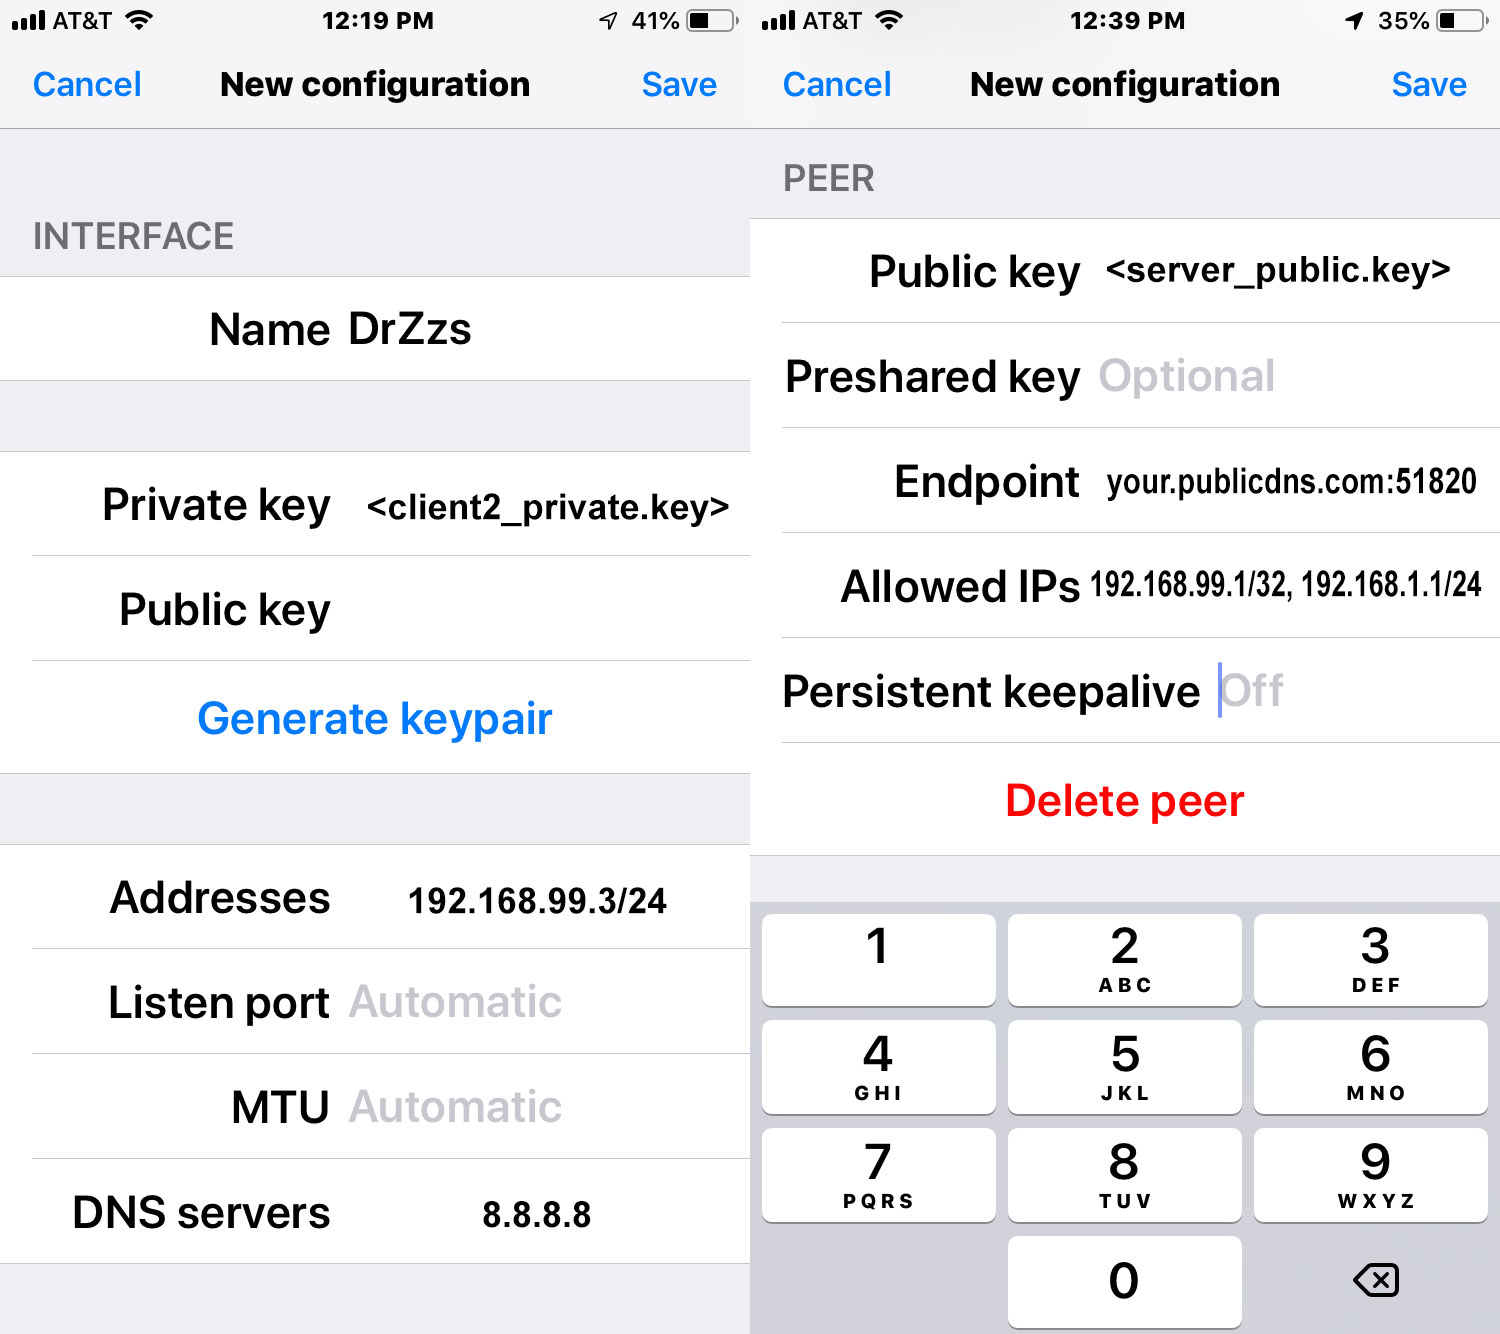
Android configuration
Additional INFO:
If you put 0.0.0.0/0 in AllowedIPs on clients, all traffic will be redirected trough this interface.
Q&A:
Q: No network problems if the lans are in the same dhcp range?
A: You can't have same dhcp range on both sides. There are workarounds, but it is not trivial to set up.
Q: Do you need port forward?
A: Yes, you need to forward one port, type: UDP. In example we used port 51820.
Q: Can you make a VM with Wireguard instead of a Raspberry Pi?
A: Of course you can, there is no restriction, the configuration is the same. Virtual machine, physical machine, doesn’t matter.
Resources:
WireGuard website: https://www.wireguard.com
WireGuard presentation https://www.wireguard.com/talks/eindhoven2018-slides.pdf
Actual version of this guide is available at: https://github.com/adrianmihalko/raspberrypiwireguard/
TODO:
- Port forwarding on router UDP 51820
- Double WARN users for using the right key at the right place


