jiyeqian.github.io's People
Stargazers


Watchers


jiyeqian.github.io's Issues
libs
unistd.h/getopt.h ── 處理命令行參數
getopt()/getopt_long()
while ( ( c = getopt ( argc, argv, "t:" ) ) != -1 ) {
        switch c {
        case 't':
            getstops ( optarg );
            break;
        case '?': default:
            usage ( );
        }
}用法:http://www.ibm.com/developerworks/cn/aix/library/au-unix-getopt.html
內存池:
dlmalloc、talloc、apr、ptmalloc、nedmalloc、hoard
Simple Memory Pool in C
C/C++
準則
| 64位系統(字節) | 32位系統(字節) | |
|---|---|---|
| char | 1 | 1 |
| short | 2 | 2 |
| int | 4 | 4 |
| long | 8 (Unix) / 4 (Windows) | 4 |
| long long | 8 | 8 |
| float | 4 | 4 |
| double | 8 | 8 |
| long double | 16 | 12 |
| size_t | 8 | 4 |
| 指針 | 8 | 4 |
| 結構體對齊 | 8 | 4 |
結構體對齊示例
結構體定義:
//by www.datahf.net zhangyu
typedef struct T {
    char c; //本身长度1字节
    __int64 d;  //本身长度8字节
    int e;  //本身长度4字节
    short f;  //本身长度2字节
    char g;  //本身长度1字节
    short h;  //本身长度2字节
};
對齊方式(注意e、f和g的對齊方式):

調整和恢復結構體對齊的指令:
#pragma pack ( n )
// some code
#pragma pack (  )
編碼風格
本文讨论了几种在使用动态内存分配时可以避免的陷阱。要避免内存相关的问题,良好的实践是:
- 始终结合使用 memset 和 malloc,或始终使用 calloc。
- 每当向指针写入值时,都要确保对可用字节数和所写入的字节数进行交叉核对。
- 在对指针赋值前,要确保没有内存位置会变为孤立的。
- 每当释放结构化的元素(而该元素又包含指向动态分配的内存位置的指针)时,都应首先遍历子内存位置并从那里开始释放,然后再遍历回父节点。
- 始终正确处理返回动态分配的内存引用的函数返回值。
- 每个 malloc 都要有一个对应的 free。
- 确保您不是在访问空指针。
技巧算法
當i < 0時,factor = −1, 當 i > 0時 factor = 1(關鍵:明確參與位運算變量的字長)
short i = −199;
short mask = 0x8000;
int factor = ( ( i & mask ) >> 14 ) + 1;
由於確定0x8000字長有問題,如下方式不可行:
factor = ( ( i & 0x8000 ) >> 14 ) + 1;判斷兩個數異號(判断最高的符号位)
( a & b ) ^ 0x80000000 == TRUE // a和b为int型參考文獻
關於結構體對齊方式:
http://zhangyu.blog.51cto.com/197148/673792
http://www.cppblog.com/range/archive/2011/07/15/151094.html
內存分配:
http://www.cnblogs.com/JCSU/articles/1051579.html
編程風格:
http://google-styleguide.googlecode.com/svn/trunk/cppguide.xml
Regular Expression
基本語法
限定符
| 限定符 | 涵義 |
|---|---|
| ? | 重复0次或1次 |
| * | 不少於0次重複 |
| + | 不少於1次重複 |
| {n} | n次重複 |
| {n, } | 至少n次重複 |
| {n, m} | n至m次重複 |
元字符
| 符號 | 涵義 |
|---|---|
| . | 換行符之外的任意字符 |
| \w | 字母、數字、下劃線、漢字 |
| \W | 除\w之外 |
| \d | 數字 |
| \D | 除\d之外 |
| \s | 任意空白符 |
| \S | 除\s之外 |
| ^ | 字符串開始 |
| $ | 字符串結束 |
貪婪匹配(匹配最長串)與惰性匹配(匹配最短串)
| 貪婪匹配 | 惰性匹配 |
|---|---|
| * | *? |
| + | +? |
| ? | ?? |
| {n, } | {n, }? |
| {n, m} | {n, m}? |
高級功能
(?m)
(?=)
(?<=)
(?!)
(?<!)
示例
基本示例
| 目的 | 正則表達式 |
|---|---|
| 除x以外的任意字符 | [^x] |
| 除aeiou外的任意字符 | [^aeiou] |
| 1900~20xx | (19|20)\b{2} |
兩個以上 |
( ){2,} |
高級示例
匹配形如<h2></h2>的html標籤對
<[hH]([1-6])>.*?</[hH]\1>
Perl 風格的正則表達式
grep 風格的正則表達式
Vim的正則表達式
量词
| Vim | Perl | 意义 |
|---|---|---|
| * | * | 0个或多个(匹配优先) |
| + | + | 1个或多个(匹配优先) |
| ? 或 = | ? | 0个或1个(匹配优先),?不能在 ? 命令(逆向查找)中使用 |
| {n,m} | {n,m} | n个到m个(匹配优先) |
| {n,} | {n,} | 最少n个(匹配优先) |
| {,m} | {,m} | 最多m个(匹配优先) |
| {n} | {n} | 恰好n个 |
| {-n,m} | {n,m}? | n个到m个(忽略优先) |
| {-} | *? | 0个或多个(忽略优先) |
| {-1,} | +? | 1个或多个(忽略优先) |
| {-,1} | ?? | 0个或1个(忽略优先) |
环视和固化分组
| Vim | Perl | 意义 | 示例 |
|---|---|---|---|
| @= | (?= | 顺序环视 | 查找后面 是 cat的字符small:/small(cat)@= |
| @! | (?! | 顺序否定环视 | 查找后面 不是 cat的字符small:/small(cat)@! |
| @<= | (?<= | 逆序环视 | 查找前面 是 small的cat:/(small)@<=cat |
| @<! | (?<! | 逆序否定环视 | 查找前面 不是 small的cat:/(small)@<!cat |
| @> | (?> | 固化分组 | |
| %(atom) | (?: | 非捕获型括号 |
參考文獻
DSP
- 使用指針解引用與使用amem4等指令取值有何區別?
- amem4、amem4_const、mem4指令有何區別?
Makefile
預覽
target ... : prerequisites ...
    command
... - target 目標文件,可以是Object File,也可以是執行文件,還可以是一個標簽(Label);
- prerequisites 依賴文件,要生成那個 target 所需要的文件或是目標;
- command make 需要執行的命令(任意的 Shell 命令),定義用何種方式通過依賴文件生成目標文件。
依賴關系的實質上就是說明了目標文件是由哪些文件生成的。在定義好依賴關系後,後續的那一行定義了如何生成目標文件的操作系統命令, 一定要以一個 Tab 鍵作為開頭 。make 並不管命令是怎麽工作的,它只管執行所定義的命令。 make 會比較 targets 文件和 prerequisites 文件的修改日期, 如果 prerequisites 文件的日期要比 targets 文件的日期要新,或者 target 不存在,make 就會執行後續定義的命令 。
edit: main.o kbd.o command.o display.o \
    insert.o search.o files.o utils.o
    cc -o edit main.o kbd.o command.o display.o \
        insert.o search.o files.o utils.o
main.o: main.c defs.h
    cc -c main.c
kbd.o: kbd.c defs.h command.h
    cc -c kbd.c
command.o: command.c defs.h command.h
    cc -c command.c
display.o: display.c defs.h buffer.h
    cc -c display.c
insert.o: insert.c defs.h buffer.h
    cc -c insert.c
search.o: search.c defs.h buffer.h
    cc -c search.c
files.o: files.c defs.h buffer.h command.h
    cc -c files.c
utils.o: utils.c defs.h
    cc -c utils.c
clean:
    rm edit main.o kbd.o command.o display.o \
        insert.o search.o files.o utils.o
上例中,clean 不是一個文件,是一個動作名字,類似 C 語言 中的 lable,冒號後什麽也沒有,make 不會去找文件的依賴性,就不會自動執行其後所定義的命令。要執行其後的命令,就要在 make 命令後明顯得指出這個 lable 的名字。可以利用這樣的方法在一個 makefile 中定義不用的編譯或是和編譯無關的命令,比如程序的打包、程序的備份等等。
Makefile 中可使用變量
objects = main.o kbd.o command.o display.o \
    insert.o search.o files.o utils.o
edit: $(objects)
    cc -o edit $(objects)
        ......
clean:
    rm edit $(objects)
自動推導
只要 make 看到一个.o文件,.c文件就會自動加在依赖关系中。如果 make 找到一个 whatever.o,那么 whatever.c就会是 whatever.o 的依赖文件,并且 cc -c whatever.c 也会被推导出来。
objects = main.o kbd.o command.o display.o \
          insert.o search.o files.o utils.o
edit : $(objects)
    cc -o edit $(objects)
main.o : defs.h
kbd.o : defs.h command.h
command.o : defs.h command.h
display.o : defs.h buffer.h
insert.o : defs.h buffer.h
search.o : defs.h buffer.h
files.o : defs.h buffer.h command.h
utils.o : defs.h
.PHONY : clean
clean :
    -rm edit $(objects)
.PHONY 意思表示 clean 是一个“伪目标”,而在 rm 命令前面加了一个小减号的意思就是:也许某些文件出现问题,但不要管,继续做后面的事。
概述
Makefile 裏主要包含了五個東西:
- 顯式規則:顯式規則說明了如何生成一個或多個目標文件。這是由 Makefile 的書寫者明顯指出要生成的文件、文件的依賴文件、生成的命令。
- 隱晦規則:由於 make 有自動推導,所以隱晦的規則可以讓我們比較粗糙地簡略地書寫 Makefile,這是由 make 所支持的。
- 變量的定義:在 Makefile 中我們要定義一系列的變量,當 Makefile 被執行時,其中的變量都會被擴展到相應的引用位置上。
- 文件指示:其包括了三個部分,一個是在一個 Makefile 中引用另一個 Makefile,另一個是指根據某些情況指定 Makefile 中的有效部分,就像 C 語言 中的預編譯#if 一樣,還有就是定義一個多行的命令。
- 註釋:Makefile 中只有行註釋,其註釋是用“#”字符,如果你要在你的 Makefile 中使用“#”字符,可以用反斜框進行轉義。
在 Makefile 中的命令必須要以 Tab 鍵開始。
如果要指定特定的 Makefile,你可以使用 make 的-f參數,如:
$ make -f Make.LinuxMakefile 中第一條規則中的目標為最終目標,如果第一條規則中的目標有多個,第一個目為最終目標。
通配符
make 支持三各通配符:*、?和...。
objects := $(wildcard *.o)
clean:
    rm -f *.o
文件搜索
Makefile 文件中的特殊变量VPATH指定源文件搜索的路徑,如果没有指明这个变量,make 只会在当前的目录中去找寻依赖文件和目标文件。
VPATH = src:../headers另一個設置文件搜索路徑的方法是使用 make 的vpath關鍵字(全小寫),這不是變量,是一個 make 關鍵字,這和上面VPATH 變量類似,但更靈活。它可以指定不同的文件在不同的搜索目錄中。使用方法有三種:
- vpath 為符合模式的文件指定搜索目錄;
- vpath 清除符合模式的文件的搜索目錄;
- vpath 清除所有已被設置好了的文件搜索目錄。
vapth 使用方法中的需要包含%字符,以匹配零或若幹字符,指定了要搜索的文件集,而則指定了的文件集的搜索的目錄。例如:
vpath %.h ../headers該語句表示要求如果某文件在當前目錄沒有找到,在../headers目錄搜索以.h結尾的文件。
vpath %.c foo:bar
vpath % blish 上面的語句則表示.c結尾的文件,先在foo目錄,然後是bar目錄,最後才是blish目錄。
偽目標
正像前面例子中的clean一樣,並不生成clean這個文件。偽目標並不是一個文件,只是一個標簽。偽目標不能和文件重名,為了避免和文件重名,可用特殊的標記.PHONY顯示指明偽目標,不管是否有這個文件,這個目標就是偽目標。
.PHONY : clean但是,可為偽目標指定依賴文件。偽目標可以作為默認目標,只要將其放在第一個。如果 Makefile 需要生成若幹個可執行文件,但只簡敲一個 make ,並且所有的目標文件都寫在一個 Makefile 中,可使用偽目標特性:
all : prog1 prog2 prog3
.PHONY : all
prog1 : prog1.o utils.o
    cc -o prog1 prog1.o utils.o
prog2 : prog2.o
    cc -o prog2 prog2.o
prog3 : prog3.o sort.o utils.o
    cc -o prog3 prog3.o sort.o utils.o
偽目標同樣也可成為依賴:
.PHONY: cleanall cleanobj cleandiff
cleanall : cleanobj cleandiff
    rm program
cleanobj :
    rm *.o
cleandiff :
    rm *.diff
多目標
Makefile 的規則中的目標可以不止一個:
bigoutput littleoutput : text.g
    generate text.g -$(subst output,,$@) > $@
靜態模式
<targets ...>: <target-pattern>: <prereq-patterns ...>
    <commands>
...targets定義了一系列目標文件,可以有通配符,是目標的一個集合;target-parrtern是指明了 targets 的模式,也就是的目標集模式;prereq-parrterns是目標的依賴模式,它對 target-parrtern 形成的模式再進行一次依賴目標的定義。
例如:
objects = foo.o bar.oall: $(objects)
$(objects): %.o: %.c
    $(CC) -c $(CFLAGS) $< -o $@
等價于:
foo.o : foo.c
    $(CC) -c $(CFLAGS) foo.c -o foo.o
bar.o : bar.c
$(CC) -c $(CFLAGS) bar.c -o bar.o利用filter過濾滿足規則的目標文件:
files = foo.elc bar.o lose.o
$(filter %.o,$(files)): %.o: %.c
    $(CC) -c $(CFLAGS) $< -o $@
$(filter %.elc,$(files)): %.elc: %.el
    emacs -f batch-byte-compile $<
自動生成依賴
書寫命令
make 會把其要執行的命令行輸出到屏幕上,當用@在命令前,命令將不被顯示:
@echo 正在編譯 XXX 模塊......當 make 執行時,會輸出:
正在編譯 XXX 模塊......但不會輸出命令。
如果沒有@,make 將輸出:
echo 正在編譯 XXX 模塊......
正在編譯 XXX 模塊......
make 参数-s或--slient则全面禁止命令显示。
如果要讓上一條命令的結果應用在下一條命令時,應用分號分隔這兩條命令。
#示例一:
exec:
    cd /home/hchen
pwd#示例二:
exec:
cd /home/hchen; pwd當執行make exec時,第一個例子中的 cd 沒有作用,pwd 會打印出當前的 Makefile 目錄,而第二個例子中 cd 就起作用了,pwd 會打印出/home/hchen。
可以在 Makefile 的命令行前加一個減號-(在 Tab 鍵之後),標記為不管命令出不出錯都認為是成功的。如:
clean:
    -rm -f *.o
还有一个全局的办法是,给 make 加上-i或是--ignore-errors参数。
命令包
如果 Makefile 中出現一些相同命令序列,可以為這些相同的命令序列定義一個變量。定義這種命令序列的語法以define開始,以endef結束,如:
define run-yacc
    yacc $(firstword $^)
    mv y.tab.c $@
endef
使用該命令:
foo.c : foo.y
$(run-yacc)在使用中,命令包run-yacc中的$^就是foo.y,$@就是foo.c。
變量賦值
賦值的幾種方式:
=:=?=+=
變量在聲明時需要給予初值,而在使用時需要給在變量名前加上$符號,但最好用小括 號()或是大括號{}把變量給包括起來。如果要使用$,要用$$表示,例如:
objects = program.o foo.o utils.o
program : $(objects)
    cc -o program $(objects)
$(objects) : defs.h在定義變量時,可以使用其它變量來構造變量的值,使用=(左側是變量,右側是變量的值),右側變量的值可以定義在文件的任何一處, 不一定非要是已定義好的值(可以使用後面定義的值) 。
foo = $(bar)
bar = $(ugh)
ugh = Huh?
all:
echo $(foo)使用:=操作符,前面的變量不能使用後面的定義的變量, 只能使用前面已定義好的變量 。
FOO ?= bar操作符?=表示如果 FOO 沒有被定義過,變量 FOO 的值就是bar,如果 FOO 先前被定義過,那麽這條語將什麽也不做。
變量值替換
$(var:a=b)或是${var:a=b},把變量var中所有以a字串結尾的a替換成b字串(結尾的意思是空格或是結束符)。例如:
foo := a.o b.o c.o
bar := $(foo:.o=.c)
另外一種變量替換的技術是以靜態模式,如:
foo := a.o b.o c.o
bar := $(foo:%.o=%.c) 這依賴於被替換字串中的有相同的模式,模式中必須包含一個%字符,這個例子同樣讓$(bar)的值為a.c b.c c.c。
可把變量的值再當成變量,例如:
x=y
y=z
a := $($(x))
環境變量
P33
參考文獻
陳皓:《跟我一起寫Makefile》
Data Structure
樹狀數組
給定數組A,若數組C滿足C[i] = A[i - 2^k + 1] + ... + A[i](k為i的二進制中末尾連續0的個數,i = 1, 2, 3, ...),則稱C為樹狀數組。
詳見:http://dongxicheng.org/structure/binary_indexed_tree/

- 若i為奇數,則C[i] = A[i];
- 若i = 2^k,則C[i] = A[1] + A[2] + ... + A[i] (A的前i項之和)
計算k
unsigned get_number_of_rear_0 ( const unsigned t )
{
    unsigned square_of_2 = t & ( t ^ ( t - 1 ) ); // 0bxxxx1000 ==> 0b1000
    unsigned k = 0;
    while ( square_of_2 != 1 ) {
        square_of_2 >>=  1;
        k++;
    }
    return k;
}
C的遞推計算法則
C[1] = C[0b0001] = A[1]
C[2] = C[0b0010] = A[2] + C[0b0001] = A[2] + C[1]
C[3] = C[0b0011] = A[3]
C[4] = C[0b0100] = A[4] + C[0b0011] + C[0b0010] = A[4] + C[3] + C[2]
C[5] = C[0b0101] = A[5]
C[6] = C[0b0110] = A[6] + C[0b0101] = A[6] + C[5]
C[7] = C[0b0111] = A[7]
C[8] = C[0b1000] = A[8] + C[0b0111] + C[0b0110] + C[0b0100] = A[8] + C[7] + C[6] + C[4]
C[9] = C[0b1001] = A[9]
C[10] = C[0b1010] = A[10] + C[0b1001] = A[10] + C[9]
C[11] = C[0b1011] = A[11]
C[12] = C[0b1100] = A[12] + C[0b1011] + C[0b1010] = A[12] + C[11] + C[10]
...
C[8] =
A[0b1000] +
C[0b0100] +
C[0b0110] +
C[0b0111] +
...
C[10] =
A[0b1010] +
C[0b1001]
...
C[12] =
A[0b1100] +
C[0b1010] +
C[0b1011]
...
C[24] =
A[0b11000] +
C[0b10100] +
C[0b10110] +
C[0b10111]
...
C[32] =
A[0b100000] +
C[0b010000] +
C[0b011000] +
C[0b011100] +
C[0b011110] +
C[0b011111]
// C[N] = {0, 0, 0, ...}
for ( int i = 1; i < N + 1; ++i ) {
    C[i - 1] += A[i - 1]; // The (i)th is the (i-1)th in the array.
    if ( i & 0x1 == 0 ) {
        int k = get_number_of_rear_0 ( i );
        int c_index = 0;
        c_index += i - ( 1 << k );
        while ( k-- ) {
            c_index += 1 << k;
            C[i - 1] += C[c_index - 1];
        }
    }
}
for ( int i = 1; i < N + 1; ++i ) {
unsigned c_index = i;
unsigned index_bias = i & ( i ^ ( i - 1 ) );
C[c_index - 1] += A[c_index - 1];
c_index -= index_bias;
while ( index_bias >>= 1 ) {
c_index += index_bias;
C[c_index - 1] += A[c_index - 1]; // The (i)th is the (i-1)th in the array.
}
}計算A的前n項之和sum_A[n - 1]
A的前n項之和是n的二進制中1的個數的C項之和,計算規律如下:
sum_A[4] =
C[0b0100]
...
sum_A[5] =
C[0b0101] +
C[0b0100]
..
sum_A[6] =
C[0b0110] +
C[0b0100]
..
sum_A[7] =
C[0b0111] +
C[0b0110] +
C[0b0100]
...
sum_A[10] =
C[0b1010] +
C[0b1000]
// sum_A[n] = 0
unsigned flag = 1;
unsigned bn = n;
while ( bn ) {
    if ( bn & flag ) {
        sum_A[n - 1] += C[bn - 1];
        bn -= flag;
    }
    flag <<= 1;
}
unsigned bn = n;
while ( bn ) {
sum_A[n] += C[bn];
bn -= bn & ( bn ^ ( bn - 1 ) );
}當A的第m個元素更新時更新C
- 偶數點的更新不會影響到奇數點,奇數點的更新會影響偶素點;
- C的第2^k個元素是C的子樹的根節點,更新的過程為:子樹 --> 子樹的根節點 --> 子樹的根節點 --> ... --> C的根節點;
C更新的節點p為 m <= p <= 2^k <= N,且p的二進制形如:
0bxxxxxxx1
0bxxxxxx10
0bxxxxx100
0bxxxx1000
0bxxx10000
A[m - 1] += delta;
unsigned p = m;
while ( p < N + 1 ) {
    C[p - 1] += delta;
    p += p & ( p ^ ( p - 1 ) );  // get_number_of_rear_0
}
Algorithm
已知一个凸多边形,需要再内部画两条线,将多边形面积三等分。
利用凸多邊形的積分圖,一次掃描即可!
Qt
打開文件,讀入文件名:
QString fileName = QFileDialog::getOpenFileName(this, tr("Open File"), QString(),
                                                    tr("Images (*.jpg *.jpeg);;C++ Files (*.cpp *.h)"));
顯示圖片之一:
QGraphicsScene* scene = new QGraphicsScene();
QGraphicsView* view = new QGraphicsView(scene);
QGraphicsPixmapItem* item = new QGraphicsPixmapItem(QPixmap::fromImage(image));
scene->addItem(item);
view->show();
顯示圖片之二:
QString filename = "X:/my_image";
QImage image(filename);
ui->label->setPixmap(QPixmap::fromImage(image));
顯示圖片之三:
QPixmap image = new QPixmap("blah.jpg");
QLabel imageLabel = new QLabel();
imageLabel.setPixmap(image);class QGLCanvas : public QGLWidget
{
public:
QGLCanvas(QWidget* parent = NULL);
void setImage(const QImage& image);
protected:
void paintEvent(QPaintEvent*);
private:
QImage img;
};
QGLCanvas::QGLCanvas(QWidget* parent)
: QGLWidget(parent)
{
}
void QGLCanvas::setImage(const QImage& image)
{
img = image;
}
void QGLCanvas::paintEvent(QPaintEvent*)
{
QPainter p(this);
//Set the painter to use a smooth scaling algorithm.
p.SetRenderHint(QPainter::SmoothPixmapTransform, 1);
p.drawImage(this->rect(), img);
}Qt界面设计QSS
// http://hi.baidu.com/lujizhen/item/4ff16909318171123a53eeb9
int main(int  argc,char  *argv[])
{
    QApplication  a(argc,argv);
    MainWidget   w;
   QFile  qss(":/new/prefix1/style.qss");
    qss.open(QFile::ReadOnly);
    a.setStyleSheet(qss.readAll());
    qss.close();
     w.show();
     returna.exec();
}
Qt显示中文
// http://hi.baidu.com/lujizhen/item/abd3eb4881bafae81e19bc8a
#include <QtGui/QApplication>
#include "mainwindow.h"
#include <QTextCodec>

int main(int argc, char *argv[])
{
    QApplication a(argc, argv);
    QTextCodec *utg8 = QTextCodec::codecForName("utf-8");
    QTextCodec::setCodecForTr(utg8 );
    QTextCodec::setCodecForLocale(utg8 );
    QTextCodec::setCodecForCStrings(utg8 );
    QFont font("wenquanyi",12,QFont::Bold); //使用wenquanyi字体
    MainWindow w;
    w.setFont(font);
    w.show();

    return a.exec();
}
Debugger
GDB
啟動調試
調試的代碼在編譯時需要-g指令(Generate debug information.),例如:
clang -Wall -g test.c -o test進入調試模式:
gdb testddd testcgdb test基本概念
斷點通知GDB在程序中的特定位置暫停執行監視點通知GDB當特定內存位置值發生變化時暫停執行捕獲點通知GDB當特定事件發生時暫停執行
常用命令
| 命令 | 功能 |
|---|---|
| h 命令 | 查看 命令 的使用說明 |
| r 參數列表 | 運行程序 |
| b num | 在第 num 行設置斷點 |
| b 函數名 | |
| b filename:num | |
| b +offset | |
| b -offset | |
| b *address | |
| cl | 清除GDB將要執行的下一處的斷點 |
| cl num | 清除 num 行的斷點 |
| cl 函數名 | |
| i b | 查看斷點/監視點/捕獲點列表 |
| d num1 num2 ... | 刪除斷點列表中第 num1 num2 ... 號斷點/監視點/捕獲點 |
| d | 刪除所有斷點 |
| dis num1 num2 ... | 禁用斷點列表中第 num1 num2 ... 號斷點/監視點/捕獲點 |
| en num1 num2 ... | 啟用斷點列表中第 num1 num2 ... 號斷點/監視點/捕獲點 |
| en once num1 num2 ... | 啟用一次斷點列表中第 num1 num2 ... 號斷點/監視點/捕獲點,類似tb |
| n | 單步調試執行下一語句(stepping over,不會進入函數) |
| ni | 單步調試執行下一指令(stepping over,不會進入函數) |
| s | 單步調試執行下一語句(stepping into,會進入函數) |
| si | 單步調試執行下一指令(stepping over,不會進入函數) |
| n num | 執行 num 次n,等價于n + num 次 enter |
| s num | |
| c | 恢復執行直到斷點或結束 |
| fin | 恢復執行直到恰好當前棧幀完成為止(通常用於不進一步在函數中暫停的情況下完成當前函數執行) |
| u | 不進一步在循環中暫停(斷點除外)完成循環執行 |
| u num | |
| u 函數名 | |
| tb num | 設置臨時斷點 |
| p 變量 | 查看 變量 的值(鼠標指針放在該 變量 上亦可顯示其值) |
| p/x 變量 | 以16進制查看…… |
| p/c 變量 | 以character查看…… |
| p/s 變量 | 以string查看…… |
| p/f 變量 | 以floating-point查看…… |
| pt 變量或類型 | 查看 變量或類型 的類型定義 |
| wa 變量 | 監視 變量 的值(當 變量 值發生變化時GDB暫停并顯示其值) |
| wa 監視條件 | 例如:wa (a > 10) |
| i wat | 查看被監視的變量 |
| disp 變量 | 每次暫停(斷點、next或step)時都輸出 變量 的值 |
| dis disp num | 臨時禁止顯示 num 號變量,num可通過 i di 查看 |
| en disp num | |
| undi num | 刪除 num 號變量 |
| set 賦值表達式 | 調試時臨時給變量賦值 |
| set $變量 = 變量 | 將調試程序中的變量賦值給調試環境的臨時變量(convenience value) |
| f | 查看調用棧的幀 |
| f num | 查看 num 號幀(當前正執行的函數編號為0,父幀為1……) |
| i f | |
| cond num 條件 | 當滿足 條件 時, num 號斷點才生效 |
| cond num | 刪除條件 |
| b num if 條件 | 設置行 num 為條(有效的C條件語句,可使用已鏈接的函數)件斷點 |
| def 宏名 | 創建宏(具體見下文) |
| sho user | 查看已經創建的宏 |


i b 命令之斷點信息說明
| 類別 | 意義 |
|---|---|
| Num | |
| Type | 指出該斷點是斷點、監視點還是捕獲點 |
| Disp | 下次GDB暫停后該斷點會發生的動作(keep:不改變斷點「默認值」;del:刪除「tb創建的斷點」;dis:禁用「en once 創建的斷點」) |
| Enb | |
| Address | |
| What | 斷點所在的行號和文件名 |
進階功能
斷點命令列表
當執行到 num 號斷點時,執行一系列的命令commands……
comm num
...
commands
...
end
利用define創建命令宏
定義示例:
(gdb) define print_and_go
Type commands for definition of "print_and_go".
End with a line saying just "end".
> print $arg0, $arg1
> continue
> end
使用示例:
(gdb) commands 1
Type commands for when breakpoint 1 is hit, one per line.
End with a line saying just "end".
> silent
> print_and_go "fibonacci() was passed %d \n" n
> end
利用call指令在調試過程中臨時插入代碼
原代碼如下:
for ( int i = 1; i < argc; i++ ) {
    insert ( &root, atoi ( argv[i] ) );
}
在調試過程中,可以通過在insert函數末尾設置斷點(假設斷點號為2),然後定義命令列表:
(gdb) commands 1
Type commands for when breakpoint 1 is hit, one per line.
End with a line saying just "end".
> printf "******************"
> call printtree ( root )
> end
使代碼按如下方式執行:
for ( int i = 1; i < argc; i++ ) {
    insert ( &root, atoi ( argv[i] ) );
    printtree ( root );
}
查看動態數組的值
#include <stdio.h>
#include <stdlib.h>

int main ( int argc, char const *argv[] )
{
    int *x = (int*) calloc ( 25, sizeof ( int ) );
    x[12] = 12;
    free ( x );
    return 0;
}
若要查看x[12]在賦值以後的值,可以先在free行設置斷點,然後:
(gdb) p *x@13
$1 = {0 <repeats 12 times>, 12}
Current language:  auto; currently minimal
參考文獻

DDD
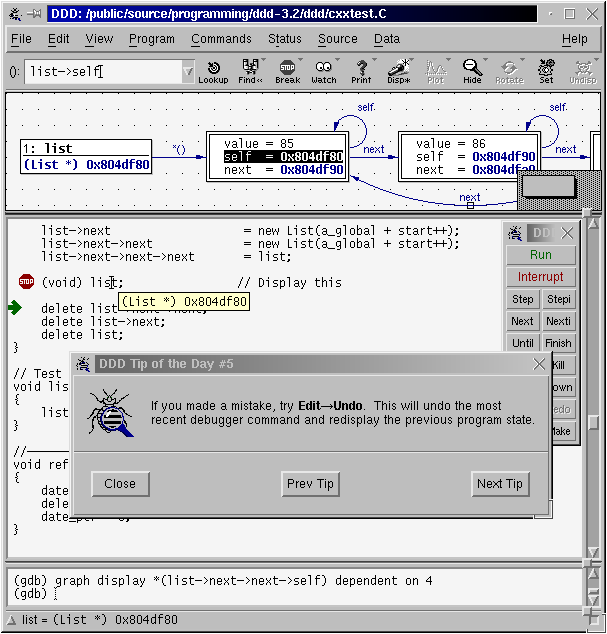
GDB中的命令在DDD命令有效!
CGDB
基本介紹
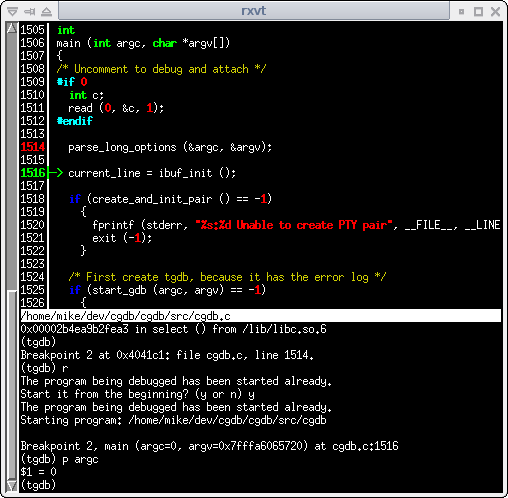
CGDB界面包括代碼窗口(source window)、GDB窗口(GDB window)和狀態條(status bar)。界面根據所激活的窗口不同而分別對應不同的工作模式:CGDB mode、GDB mode和TTY mode。
快捷鍵
基本快捷鍵
| 鍵 | 功能 |
|---|---|
| quit(或control + d) | 從GDB mode退出CGDB |
| :quit | 從CGDB mode退出CGDB |
| esc | 切換到CGDB mode |
| i | 切換到GDB mode |
CGDB mode(source window)快捷鍵
| 鍵 | 功能 |
|---|---|
| o | 通過file window打開源文件 |
| q | 退出file window |
| :num | 跳轉到num行 |
| h/j/k/k/l/gg/G | 移動光標(同vim) |
| space | 設置或取消斷點breakpoint |
| t | 設置臨時斷點 |
| / | 前向查找 |
| ? | 后向查找 |
| n/N | 順或逆向查找 |
| - | 窗口減少一行 |
| = | 窗口增加一行 |
| _ | 窗口減少25%(or, shrink tty window 1 line, if visible) |
| + | 窗口增加25% (or, grow tty window 1 line, if visible) |
| T | 打開或關閉輸入數據到調試程序的窗口 |
| : gdb命令 | 與gdb中執行一樣 |
| fn + F5 | run |
| fn + F6 | continue |
| fn + F7 | finish |
| fn + F8 | next |
| fn + F10 | step |
Affinic Debugger GUI

參考資料
CMake
查看编译选项:
cmake .. -LAH设置编译选项:
cmake .. -DXXXCommandlinefu
find
示例
查找權限為755的文件
$ find . -perm 755查找大於10M的文件
$ find . -size +10000000csize表示文件大小,+表示大于某个数,-表示小于某个数;c表示单位是字节,可将c换成k,M,G。
找出非*.xml文件
find . \! -iname "*.xml"找出比car.c新且用戶名為jiye的文件
$ find . -type f \( -newer car.c -user jiye \) -print找出比car.c新且用戶名為jiye的文件
$ find . -type f \( -newer car.c -or -user jiye \) -print刪除空文件夾
$ find . -type d -empty -delete查找并修改文件權限
$ find . -type f -exec chmod 644 {} \;{} ; 别忘了写,其中{}代表用find查找到的结果中的每一个查找项。
尋找5個最大的文件
$ find . -type f -exec ls -lha {} \; | sort -n -r | head -5查找5分钟内被访问过的文件
$ find . -amin -5访问过用amin,修改过用mmin,文件状态改变过用cmin;精确到天的用atime,mtime,ctime;在5分钟之内的用-5,在5分钟以上的用+5。
尋找修改時間大於10分鐘的刪除
$ find . -type f -mtime +10m -exec rm -f {} \;查找特定文件文中的特定字段
$ find . -name "*.[ch]" -exec grep -i -H "search pharse" {} \;
$ find . -iname '*.conf' | xargs grep "searh string" -sl
i 忽略大小寫
查找_.c及_.cpp文件
$ find . -iregex ".*\.c\(pp\)*"此命令会和“全路径”进行匹配,也就是说前面要加.*,因为输出结果中会有“./”符号。
參考文獻
http://www.commandlinefu.com
http://roclinux.cn/?p=18
grep
簡介
如果模板搜索成功,则返回0;如果搜索不成功,则返回1;如果搜索的文件不存在,则返回2。
主要參數
| 參數 | 涵義 |
|---|---|
| -c | 只输出匹配行的计数 |
| -I | 不区分大小写(只适用于单字符) |
| -h | 查询多文件时不显示文件名 |
| -l | 查询多文件时只输出包含匹配字符的文件名 |
| -n | 显示匹配行及行号 |
| -s | 不显示不存在或无匹配文本的错误信息 |
| -v | 显示不包含匹配文本的所有行 |
示例
列出filename文件中的所有ip
$ grep -E '([0-9]{1,3})\.([0-9]{1,3})\.([0-9]{1,3})\.([0-9]{1,3})' -o filename查詢當前文件夾中所有文件以static開始的行
$ egrep "^static" *egrep = grep -E
查找形如abc_def_ghi的字符串,并顯示所在的行號
$ egrep "\b[a-z]+_[a-z]+_[a-z]+\b" -n *移除filename中的空行另存為newfilename
$ grep . filename > newfilename參考文獻
Computer Vision Basic
圖像的直方圖反向投影(back project of the histogram)
所謂反向投影就是首先計算某一特征的直方圖模型,然後使用模型去尋找圖像中存在的該特征。用像素對應直方圖的值代替該像素的灰度值,就是直方圖反向投影。使用統計學的語言,反向投影中儲存的數值代表了測試圖像中該像素屬於被檢測區域的概率 。定義不同含義的直方圖模型可得不同的反向投影圖。
void calcBackProject(const Mat* images, int nimages, const int* channels, InputArray hist, OutputArray backProject, const float** ranges, double scale=1, bool uniform=true )  // C++
void calcBackProject(const Mat* images, int nimages, const int* channels, const SparseMat& hist, OutputArray backProject, const float** ranges, double scale=1, bool uniform=true )  // C++
void cvCalcBackProject(IplImage** image, CvArr* backProject, const CvHistogram* hist)  // C
The functions calcBackProject calculate the back project of the histogram. That is, similarly to calcHist , at each location (x, y) the function collects the values from the selected channels in the input images and finds the corresponding histogram bin. But instead of incrementing it, the function reads the bin value, scales it by scale , and stores in backProject(x,y) . In terms of statistics, the function computes probability of each element value in respect with the empirical probability distribution represented by the histogram.
CamShift跟蹤算法採用了直方圖反向投影(probImage/prob_image):
RotatedRect CamShift(InputArray probImage, Rect& window, TermCriteria criteria)
int cvCamShift(const CvArr* prob_image, CvRect window, CvTermCriteria criteria, CvConnectedComp* comp, CvBox2D* box=NULL )示例可見samples/cpp/camshiftdemo.cpp。
參考資料
http://www.opencv.org.cn/opencvdoc/2.3.2/html/doc/tutorials/imgproc/histograms/back_projection/back_projection.html
http://www.cnblogs.com/xrwang/archive/2010/02/04/HowToUseHistogram.html
http://blog.csdn.net/yang_xian521/article/details/6915608
Vim Basics
基本操作
移動
翻頁
| 鍵 | 功能 |
|---|---|
| control + e/y | 滾一行 |
| control + d/u | 滾半屏 |
| control + f/b | 滾一屏 |
| zt、z | 當前位置放在屏幕頂端 |
| zz | 當前位置放在屏幕** |
| zb、z- | 當前位置放在屏幕底端 |
查看
| 鍵 | 功能 |
|---|---|
| :reg | 查看寄存器內容 |
| :ls | 列出緩衝 |
| :version | 查看版本及配置文件信息 |
| :scriptnames | 查看配置文件 |
| :marks | 查看標記 |
| :jumps | 列出跳轉列表(control + ]的) |
| control + g | 顯示當前位置信息 |
| shift + k | 查看當前詞語的man手冊 |
| :set 變量 ? | 查看 變量 值 |
文檔修訂
| 鍵 | 功能 |
|---|---|
| i | 進入Insert模式(光標位於當前字符前) |
| I | 将光标置于当前行第一个非空白字符处并進入Insert模式 |
| a | 進入Insert模式(光標位於當前字符后) |
| A | 当光标置于当前行尾并進入Insert模式 |
| o | 當前行下新開一行 |
| O | 當前行上新開一行 |
| J | 將下一行連接到本行(Joint) |
| ~ | 改变当前光标下字符的大小写,并将光标移至下一字符 |
| y 移動的位置 | 複製直到該位置的所有字符 |
| y4w | |
| y4e | |
| yiw | 複製光標所在位置的單詞(不包含空白字符) |
| yaw | 複製光標所在位置的單詞(含空白字符) |
| y$ | 複製至行尾 |
| yy 或 Y | 複製當前行 |
| y/ 字符 | 複製至首次出現 字符 的位(/表示查找) |
| " a yy | 將本行文字複製到 a 緩衝區( a 可為26個英文字母中的一個,如果是小寫的話,原先的內容會被清掉,如果是大寫的話是append的作用,會把內容附加到原先內容之後) |
| " a p | 將 a 緩衝區的內容貼上 |
| 5" a yy | 複製5行內容至 a 緩衝區. |
| 5" A yy | 再複製5行附在 a 內容之後(現在 a 中有10行內容) |
| "fyas | 把一个句子复制到名为f的寄存器中 |
| "l3Y | 把3个整行的内容放到寄存器l中 |
| "wdaw | 删除了一个word并把它保存在寄存器w中 |
| p | 當前位置之后粘貼(只要是在緩衝區的內容都可以使用p來貼上,d、c、s、x、y 等指令改變或刪除的內容都是放在 registers 中的) |
| P | 當前位置之前粘貼 |
| "*y | 複製到共享剪貼板 |
| "*p | |
| "+p | 複製到系統剪貼板 |
| c 移動的位置 | 插入并修改直到該位置的所有字符 |
| c4w | |
| c4e | |
| ciw | |
| caw | |
| cl 或 s | 修改一个字符(注意與r的區別) |
| c$ 或 C | 修改至行尾 |
| cc 或 S | 修改一整行 |
| c/ 字符 | 修改至首次出現 字符 的位(/表示查找) |
| d 移動的位置 | 刪除直到該位置的所有字符 |
| d4w | |
| d4e | |
| diw | |
| daw | |
| dd | 刪除一行 |
| x 或 dl | 删除当前光标下的字符 |
| X 或 dh | 删除当前光标左边的字符 |
| d$ 或 D | 刪除至行尾 |
| dG | 刪除至文末 |
| dgg | 刪除至文首 |
| d/ 字符 | 刪除至首次出現 字符 的位(/表示查找) |
| r x | 用字符 x 替換當前字符 |
| Shift + > | 整行向右移一個 shiftwidth(預設是 8 個字元) |
| Shift + < | 整行向左移一個 shiftwidth(預設是 8 個字元) |
| :ce(nter) | 本行文字置中 |
| :ri(ght) | 本行文字靠右 |
| :le(ft) | 本行文字靠左 |
| gp | 重排命令(詳見:h gp) |
| R | 進入替換模式 |
| U | 在游標沒離開本行之前, 回復所有編輯動作 |
| u | undo |
| control + r | redo |
| . | 重複上一步的修改 |
| ZZ | 保存并退出 |
標記
| 鍵 | 功能 |
|---|---|
| m a | 設置 a(可設置a-z標記) |
| m A | 大寫標記 A ,可以在文件之間跳轉 |
| ` a | 跳到 a |
| :marks | 查看標記列表 |
| ` | 特殊標記:进行此次跳转之前的起跳点 |
| " | 特殊標記:上次编辑该文件时光标最后停留的位置 |
| [ | 特殊標記:最后一次修改的起始位置 |
| ] | 特殊標記:最后一次修改的结束位置 |
命令行操作
| 鍵 | 功能 |
|---|---|
| control + b | 光標移到命令行首 |
| control + e | 光標移到命令行尾 |
| control + r control + w | 複製當前單詞到命令行 |
| control + w | 刪除光標前的單詞 |
| control + u | 刪除光標前的所有字符 |
| option + ← | 左移一個單詞(Mac中) |
| option + → | 右移一個單詞(Mac中) |
| tab | 向右自動補齊 |
| control + p | 向左自動補齊 |
| :history | 查看歷史命令 |
| :help | 查看幫助 |
| q: | 打開命令行窗口 |
快速編輯(插入模式的編輯功能)
| 鍵 | 功能 |
|---|---|
| option + ← | 左移一個單詞(Mac中) |
| option + → | 右移一個單詞(Mac中) |
| control + w | 刪除光標前的單詞 |
| control + u | 刪除光標前的該行內容 |
| control + p/n | 自動補齊 |
| control + x control + f | 補齊文件名 |
| control + x control + l | 補齊整行 |
| control + x control + d | 補齊宏定義 |
| control + x control + i | 補齊當前文件和被當前文件include的文件 |
| control + x control + k | 補齊來自一個字典的word |
| control + x control + t | 補齊一个thesaurus的word |
| control + x control + ] | 補齊tags |
| control + x control + v | 補齊Vim命令 |
| control + a | 插入上一次insert模式輸入內容 |
| control + @ | 插入上一次insert模式輸入內容,并退出insert模式 |
| control + y | 插入上一行中同樣位置的內容(Mac沒用起) |
| control + e | 插入下一行中同樣位置的內容 |
| :iabbrev(或:iab) jyq Jiye Qian | 將Jiye Qian縮寫為j,當鍵入jyq后空格會自動補全(可用縮寫功能修正錯誤:teh --> the) |
| :abbreviate | 列出當前定義的縮寫 |
| :unabbreviate jyq | 刪除縮寫 |
| :abclear | 清除所有縮寫 |
| control + o | 在Insert模式下執行一次Normal命令 |
split
| 鍵 | 功能 |
|---|---|
| control + w o | 关闭当前窗口外的所有窗口 |
參考文獻
Compile misc
| 編譯指令 | *.c | *.cpp |
|---|---|---|
| gcc | C | C++ |
| g++ | C++ | C++ |
生成静态库
$ gcc -c func.c -o func.o
$ ar rcs libfunc.a func.o
$ gcc main.c -o main -static -L. -lfunc
$ ./main
生成动态库
$ gcc -fPIC -c func.c -o func.o
$ gcc -shared -o libfunc.so.1.0.0 func.o
$ ln -s libfunc.so.1.0.0 libfunc.so
$ gcc main.c -o main -L. -lfunc
$ export LD_LIBRARY_PATH=$(pwd)
$ ./main
Tips
gcc命令不能自动和C++程序使用的库联接,所以通常用g++来完成链接
gcc hw.cpp -lstdc++
nm命令:列出目标文件或2进制文件的所有符号。
ldd命令:列出为了使程序正常运行所需要的所有共享库。
/etc/ld.so.conf文件:除了标准目录(/lib和/usr/lib)之外,链接器和加载器搜索共享库时要检查的其他目录,和这个文件相关的一个命令是:ldconfig 。
參考文獻
http://www.cnblogs.com/werookies/archive/2012/04/06/2434049.html
OpenCV Data Structure
https://gist.github.com/jiyeqian/5270741#file-opencv_data_structure-c
https://gist.github.com/jiyeqian/5270741#file-opencv_data_structure-cpp
C中的IplImage結構體(types_c.h)
關鍵參數說明
| 參數 | 含義 |
|---|---|
| int depth | 每個通道的每個像素佔用的字節數(見前文定義),IPL_DEPTH_8U 表示每個像素在每個通道佔用8位(1字節) |
| int dataOrder | 圖像數據的存儲方式:0表示圖像數據按bgrbgr...的像素交錯排列方式,1表示bbb...ggg...rrr...的面排列方式(類似YUV422sp與YUV422p的區別) |
| int origin | 圖像數據原點的位置:0表示原點位於左上角,1表示位於左下角(若要倒轉顯示圖像,可以將該參數設為1) |
| int widthStep | 每行圖像佔用的字節,按4n方式補齊(若彩色圖像寬度為225,則widthStep=225_3+1=4_169,每行補1個字節) |
| char *imageDataOrigin |

一個簡單的OpenCV讀和顯示圖片的C程序
#include <stdio.h>
#include <highgui.h>

int main ( int argc, char const *argv[] )
{
    if ( argc != 2 ) {
        printf ( "Usage: display_image ImageToLoadAndDisplay\n" );
        return -1;
    }

    IplImage *image = cvLoadImage ( argv[1], CV_LOAD_IMAGE_COLOR );
    if ( !image->imageData ) {
        printf ( "Could not open or find the image\n" );
        return -1;
    }

    cvNamedWindow ( "Display window", CV_WINDOW_AUTOSIZE );
    cvShowImage ( "Display window", image );
    cvWaitKey ( 0 );

    return 0;
}
IplImage 與 CvMat 互轉:
// 函數原型
// 注意:轉換只設計數據頭,不拷貝數據,轉換前後共用數據區;
// Returns matrix header for arbitrary array.
CvMat* cvGetMat(const CvArr* arr, CvMat* header, int* coi=NULL, int allowND=0) // IplImage --> CvMat
// Returns image header for arbitrary array.
IplImage* cvGetImage(const CvArr* arr, IplImage* image_header) // CvMat --> IplImage
使用示例
// IplImage *img; CvMat mat;
cvGetMat ( img, &mat, NULL, 0 );
注意事項:
mat.step = img->widthStep;- 若img為IPL_DEPTH_32S或IPL_DEPTH_32F或IPL_DEPTH_65F,每個通道像素佔用4/8個字節,不需補齊即為4n方式對齊
- 當img為IPL_DEPTH_32S時,mat的讀取指針為
mat.data.i,每次加1,移動4個字節
C++中的Mat類(core.hpp)
常用成員(Mat操作示例)
| 成員 | 功能 | 示例 |
|---|---|---|
| operator IplImage() const; | 類型轉換操作符,相當於聲明類型強制轉換函數(只轉換數據頭,不拷貝數據) | IplImage img_ipl = img_mat; // img_mat為Mat類型 |
| operator CvMat() const; | Ditto | |
| operator CvMatND() const; | Ditto | |
| Mat(const IplImage* img, bool copyData=false); | 基於IplImage的構造函數,copyData=0表示不拷貝數據 | Mat img_mat(&img_ipl, 0) |
| bool isContinuous() const; | 是否存在類似IplImage的4n填充 | |
| uchar* data; | 指向圖像數據的指針 |
一個簡單的OpenCV讀和顯示圖片的cpp程序
#include <opencv2/highgui/highgui.hpp>
#include <iostream>

using namespace cv;
using namespace std;

int main( int argc, char** argv )
{
    if( argc != 2)
    {
     cout <<" Usage: display_image ImageToLoadAndDisplay" << endl;
     return -1;
    }

    Mat image;
    image = imread(argv[1], CV_LOAD_IMAGE_COLOR);   // Read the file

    if(! image.data )                              // Check for invalid input
    {
        cout <<  "Could not open or find the image" << std::endl ;
        return -1;
    }

    namedWindow( "Display window", CV_WINDOW_AUTOSIZE );// Create a window for display.
    imshow( "Display window", image );                   // Show our image inside it.

    waitKey(0);                                          // Wait for a keystroke in the window
    return 0;
}訪問圖像的像素值有多種方法,高效訪問圖像像素值的方法如下:
Mat& ScanImageAndReduceC(Mat& I, const uchar* const table)
{
    // accept only char type matrices
    CV_Assert(I.depth() != sizeof(uchar));

    int channels = I.channels();

    int nRows = I.rows;
    int nCols = I.cols * channels;

    if (I.isContinuous())
    {
        nCols *= nRows;
        nRows = 1;
    }

    int i,j;
    uchar* p;
    for( i = 0; i < nRows; ++i)
    {
        p = I.ptr<uchar>(i);
        for ( j = 0; j < nCols; ++j)
        {
            p[j] = table[p[j]];
        }
    }
    return I;
}
更多Mat的操作:
http://docs.opencv.org/doc/tutorials/core/mat_the_basic_image_container/mat_the_basic_image_container.html#matthebasicimagecontainer
http://blog.csdn.net/yang_xian521/article/details/7107786
http://blog.csdn.net/yang_xian521/article/details/7161335
Apocalypse
Report: 基於狀態感知的視頻**目標分析(李波)
- 背景重建比較好的方法:Hou、GMM
- 根據不同的變化方式將背景分為:靜止的牆體、抖動的樹枝、往來的車輛。
- 像素級的低級特徵容易變化,如何利用高級特徵提高魯棒性
- 如何定義顯著顏色:必須是背景的非顯著顏色
- 追蹤:首先得(魯棒)識別出對象
- 國際上先進的視頻分析公司:以色列IOimage http://www.dvtel.com/products-solutions/ioimage/
思考:
不僅要識別對象本身,還要追蹤對象的變遷過程(發生形變,或者鳳吹動服飾等),咬死!
QT Basics
Graphics View Framework
View/Scene/Item
QGraphicsViewprovides the view widget, which visualizes the contents of a scene.QGraphicsSceneprovides the Graphics View scene.QGraphicsItemis the base class for graphical items in a scene.
QGraphicsAnchorLayout *l = new QGraphicsAnchorLayout;
QGraphicsWidget *w = new QGraphicsWidget(0, Qt::Window);
w->setLayout(l);

QGraphicsScene scene;
scene.addItem(w);
QGraphicsView view(&scene);
Coordinates

There are three effective coordinate systems in play in Graphics View: Item coordinates, scene coordinates, and view coordinates. When rendering, Graphics View's scene coordinates correspond to QPainter's logical coordinates, and view coordinates are the same as device coordinates.
Item CoordinatesItems live in their own local coordinate system. Their coordinates are usually centered around its center point (0, 0), and this is also the center for all transformations. At item's position is the coordinate of the item's center point in its parent's coordinate system; sometimes referred to as parent coordinates. The scene is in this sense regarded as all parent-less items' "parent". Top level items' position are in scene coordinates.Scene CoordinatesThe scene represents the base coordinate system for all its items. The scene coordinate system describes the position of each top-level item, and also forms the basis for all scene events delivered to the scene from the view. Each item on the scene has a scene position and bounding rectangle (QGraphicsItem::scenePos(), QGraphicsItem::sceneBoundingRect()), in addition to its local item pos and bounding rectangle. The scene position describes the item's position in scene coordinates, and its scene bounding rect forms the basis for how QGraphicsScene determines what areas of the scene have changed.View coordinatesare the coordinates of the widget. What's special about this coordinate system is that it is relative to thewidget, orviewport, and unaffected by the observed scene. The top left corner of QGraphicsView's viewport is always (0, 0), and the bottom right corner is always (viewport width, viewport height). All mouse events and drag and drop events are originally received as view coordinates, and you need to map these coordinates to the scene in order to interact with items.
Recommend Projects
-
 React
React
A declarative, efficient, and flexible JavaScript library for building user interfaces.
-
Vue.js
🖖 Vue.js is a progressive, incrementally-adoptable JavaScript framework for building UI on the web.
-
 Typescript
TypeScript is a superset of JavaScript that compiles to clean JavaScript output.
-
TensorFlow
An Open Source Machine Learning Framework for Everyone
-
Django
The Web framework for perfectionists with deadlines.
-
 Laravel
A PHP framework for web artisans
-
D3
Bring data to life with SVG, Canvas and HTML. 📊📈🎉
-
Recommend Topics
-
javascript
JavaScript (JS) is a lightweight interpreted programming language with first-class functions.
-
web
Some thing interesting about web. New door for the world.
-
server
A server is a program made to process requests and deliver data to clients.
-
Machine learning
Machine learning is a way of modeling and interpreting data that allows a piece of software to respond intelligently.
-
Visualization
Some thing interesting about visualization, use data art
-
Game
Some thing interesting about game, make everyone happy.
Recommend Org
-
Facebook
We are working to build community through open source technology. NB: members must have two-factor auth.
-
Microsoft
Open source projects and samples from Microsoft.
-
Google
Google ❤️ Open Source for everyone.
-
Alibaba
Alibaba Open Source for everyone
-
D3
Data-Driven Documents codes.
-
Tencent
China tencent open source team.