Coder Social home page Coder Social logo

invoke-ai / invokeai Goto Github PK

View Code? Open in Web Editor NEW
21.3K 195.0 2.2K 285.44 MB

InvokeAI is a leading creative engine for Stable Diffusion models, empowering professionals, artists, and enthusiasts to generate and create visual media using the latest AI-driven technologies. The solution offers an industry leading WebUI, supports terminal use through a CLI, and serves as the foundation for multiple commercial products.

Home Page: https://invoke-ai.github.io/InvokeAI/

License: Apache License 2.0

Shell 0.32% Python 43.00% HTML 0.01% JavaScript 0.06% Dockerfile 0.09% TypeScript 56.27% Nix 0.06% CSS 0.06% Makefile 0.06% Jupyter Notebook 0.07%
ai-art artificial-intelligence generative-art image-generation img2img inpainting latent-diffusion linux macos outpainting

invokeai's Introduction

project hero

Invoke - Professional Creative AI Tools for Visual Media

To learn more about Invoke, or implement our Business solutions, visit invoke.com

discord badge

latest release badge github stars badge github forks badge

CI checks on main badge latest commit to main badge

github open issues badge github open prs badge translation status badge

InvokeAI is a leading creative engine built to empower professionals and enthusiasts alike. Generate and create stunning visual media using the latest AI-driven technologies. InvokeAI offers an industry leading Web Interface, interactive Command Line Interface, and also serves as the foundation for multiple commercial products.

Quick links: [How to Install] [Discord Server] [Documentation and Tutorials] [Bug Reports] [Discussion, Ideas & Q&A] [Contributing]

Highlighted Features - Canvas and Workflows

Table of Contents

Table of Contents ๐Ÿ“

Getting Started

  1. ๐Ÿ Quick Start
  2. ๐Ÿ–ฅ๏ธ Hardware Requirements

More About Invoke

  1. ๐ŸŒŸ Features
  2. ๐Ÿ“ฃ Latest Changes
  3. ๐Ÿ› ๏ธ Troubleshooting

Supporting the Project

  1. ๐Ÿค Contributing
  2. ๐Ÿ‘ฅ Contributors
  3. ๐Ÿ’• Support

Quick Start

For full installation and upgrade instructions, please see: InvokeAI Installation Overview

If upgrading from version 2.3, please read Migrating a 2.3 root directory to 3.0 first.

Automatic Installer (suggested for 1st time users)

  1. Go to the bottom of the Latest Release Page

  2. Download the .zip file for your OS (Windows/macOS/Linux).

  3. Unzip the file.

  4. Windows: double-click on the install.bat script. macOS: Open a Terminal window, drag the file install.sh from Finder into the Terminal, and press return. Linux: run install.sh.

  5. You'll be asked to confirm the location of the folder in which to install InvokeAI and its image generation model files. Pick a location with at least 15 GB of free memory. More if you plan on installing lots of models.

  6. Wait while the installer does its thing. After installing the software, the installer will launch a script that lets you configure InvokeAI and select a set of starting image generation models.

  7. Find the folder that InvokeAI was installed into (it is not the same as the unpacked zip file directory!) The default location of this folder (if you didn't change it in step 5) is ~/invokeai on Linux/Mac systems, and C:\Users\YourName\invokeai on Windows. This directory will contain launcher scripts named invoke.sh and invoke.bat.

  8. On Windows systems, double-click on the invoke.bat file. On macOS, open a Terminal window, drag invoke.sh from the folder into the Terminal, and press return. On Linux, run invoke.sh

  9. Press 2 to open the "browser-based UI", press enter/return, wait a minute or two for Stable Diffusion to start up, then open your browser and go to http://localhost:9090.

  10. Type banana sushi in the box on the top left and click Invoke

Command-Line Installation (for developers and users familiar with Terminals)

You must have Python 3.10 through 3.11 installed on your machine. Earlier or later versions are not supported. Node.js also needs to be installed along with pnpm (can be installed with the command npm install -g pnpm if needed)

  1. Open a command-line window on your machine. The PowerShell is recommended for Windows.

  2. Create a directory to install InvokeAI into. You'll need at least 15 GB of free space:

    mkdir invokeai
    
  3. Create a virtual environment named .venv inside this directory and activate it:

    cd invokeai
    python -m venv .venv --prompt InvokeAI
    
  4. Activate the virtual environment (do it every time you run InvokeAI)

    For Linux/Mac users:

    source .venv/bin/activate

    For Windows users:

    .venv\Scripts\activate
  5. Install the InvokeAI module and its dependencies. Choose the command suited for your platform & GPU.

    For Windows/Linux with an NVIDIA GPU:

    pip install "InvokeAI[xformers]" --use-pep517 --extra-index-url https://download.pytorch.org/whl/cu121
    

    For Linux with an AMD GPU:

    pip install InvokeAI --use-pep517 --extra-index-url https://download.pytorch.org/whl/rocm5.6

    For non-GPU systems:

    pip install InvokeAI --use-pep517 --extra-index-url https://download.pytorch.org/whl/cpu
    

    For Macintoshes, either Intel or M1/M2/M3:

    pip install InvokeAI --use-pep517
  6. Configure InvokeAI and install a starting set of image generation models (you only need to do this once):

    invokeai-configure --root .
    

    Don't miss the dot at the end!

  7. Launch the web server (do it every time you run InvokeAI):

    invokeai-web
    
  8. Point your browser to http://localhost:9090 to bring up the web interface.

  9. Type banana sushi in the box on the top left and click Invoke.

Be sure to activate the virtual environment each time before re-launching InvokeAI, using source .venv/bin/activate or .venv\Scripts\activate.

Detailed Installation Instructions

This fork is supported across Linux, Windows and Macintosh. Linux users can use either an Nvidia-based card (with CUDA support) or an AMD card (using the ROCm driver). For full installation and upgrade instructions, please see: InvokeAI Installation Overview

Migrating a v2.3 InvokeAI root directory

The InvokeAI root directory is where the InvokeAI startup file, installed models, and generated images are stored. It is ordinarily named invokeai and located in your home directory. The contents and layout of this directory has changed between versions 2.3 and 3.0 and cannot be used directly.

We currently recommend that you use the installer to create a new root directory named differently from the 2.3 one, e.g. invokeai-3 and then use a migration script to copy your 2.3 models into the new location. However, if you choose, you can upgrade this directory in place. This section gives both recipes.

Creating a new root directory and migrating old models

This is the safer recipe because it leaves your old root directory in place to fall back on.

  1. Follow the instructions above to create and install InvokeAI in a directory that has a different name from the 2.3 invokeai directory. In this example, we will use "invokeai-3"

  2. When you are prompted to select models to install, select a minimal set of models, such as stable-diffusion-v1.5 only.

  3. After installation is complete launch invokeai.sh (Linux/Mac) or invokeai.bat and select option 8 "Open the developers console". This will take you to the command line.

  4. Issue the command invokeai-migrate3 --from /path/to/v2.3-root --to /path/to/invokeai-3-root. Provide the correct --from and --to paths for your v2.3 and v3.0 root directories respectively.

This will copy and convert your old models from 2.3 format to 3.0 format and create a new models directory in the 3.0 directory. The old models directory (which contains the models selected at install time) will be renamed models.orig and can be deleted once you have confirmed that the migration was successful.

If you wish, you can pass the 2.3 root directory to both --from and --to in order to update in place. Warning: this directory will no longer be usable with InvokeAI 2.3.

Migrating in place

For the adventurous, you may do an in-place upgrade from 2.3 to 3.0 without touching the command line. *This recipe does not work on Windows platforms due to a bug in the Windows version of the 2.3 upgrade script. See the next section for a Windows recipe.

For Mac and Linux Users:
  1. Launch the InvokeAI launcher script in your current v2.3 root directory.

  2. Select option [9] "Update InvokeAI" to bring up the updater dialog.

  3. Select option [1] to upgrade to the latest release.

  4. Once the upgrade is finished you will be returned to the launcher menu. Select option [6] "Re-run the configure script to fix a broken install or to complete a major upgrade".

This will run the configure script against the v2.3 directory and update it to the 3.0 format. The following files will be replaced:

  • The invokeai.init file, replaced by invokeai.yaml
  • The models directory
  • The configs/models.yaml model index

The original versions of these files will be saved with the suffix ".orig" appended to the end. Once you have confirmed that the upgrade worked, you can safely remove these files. Alternatively you can restore a working v2.3 directory by removing the new files and restoring the ".orig" files' original names.

For Windows Users:

Windows Users can upgrade with the

  1. Enter the 2.3 root directory you wish to upgrade
  2. Launch invoke.sh or invoke.bat
  3. Select the "Developer's console" option [8]
  4. Type the following commands
pip install "invokeai @ https://github.com/invoke-ai/InvokeAI/archive/refs/tags/v3.0.0" --use-pep517 --upgrade
invokeai-configure --root .

(Replace v3.0.0 with the current release number if this document is out of date).

The first command will install and upgrade new software to run InvokeAI. The second will prepare the 2.3 directory for use with 3.0. You may now launch the WebUI in the usual way, by selecting option [1] from the launcher script

Migrating Images

The migration script will migrate your invokeai settings and models, including textual inversion models, LoRAs and merges that you may have installed previously. However it does not migrate the generated images stored in your 2.3-format outputs directory. To do this, you need to run an additional step:

  1. From a working InvokeAI 3.0 root directory, start the launcher and enter menu option [8] to open the "developer's console".

  2. At the developer's console command line, type the command:

invokeai-import-images
  1. This will lead you through the process of confirming the desired source and destination for the imported images. The images will appear in the gallery board of your choice, and contain the original prompt, model name, and other parameters used to generate the image.

(Many kudos to techjedi for contributing this script.)

Hardware Requirements

InvokeAI is supported across Linux, Windows and macOS. Linux users can use either an Nvidia-based card (with CUDA support) or an AMD card (using the ROCm driver).

System

You will need one of the following:

  • An NVIDIA-based graphics card with 4 GB or more VRAM memory. 6-8 GB of VRAM is highly recommended for rendering using the Stable Diffusion XL models
  • An Apple computer with an M1 chip.
  • An AMD-based graphics card with 4GB or more VRAM memory (Linux only), 6-8 GB for XL rendering.

We do not recommend the GTX 1650 or 1660 series video cards. They are unable to run in half-precision mode and do not have sufficient VRAM to render 512x512 images.

Memory - At least 12 GB Main Memory RAM.

Disk - At least 12 GB of free disk space for the machine learning model, Python, and all its dependencies.

Features

Feature documentation can be reviewed by navigating to the InvokeAI Documentation page

Web Server & UI

InvokeAI offers a locally hosted Web Server & React Frontend, with an industry leading user experience. The Web-based UI allows for simple and intuitive workflows, and is responsive for use on mobile devices and tablets accessing the web server.

Unified Canvas

The Unified Canvas is a fully integrated canvas implementation with support for all core generation capabilities, in/outpainting, brush tools, and more. This creative tool unlocks the capability for artists to create with AI as a creative collaborator, and can be used to augment AI-generated imagery, sketches, photography, renders, and more.

Workflows & Nodes

InvokeAI offers a fully featured workflow management solution, enabling users to combine the power of nodes based workflows with the easy of a UI. This allows for customizable generation pipelines to be developed and shared by users looking to create specific workflows to support their production use-cases.

Board & Gallery Management

Invoke AI provides an organized gallery system for easily storing, accessing, and remixing your content in the Invoke workspace. Images can be dragged/dropped onto any Image-base UI element in the application, and rich metadata within the Image allows for easy recall of key prompts or settings used in your workflow.

Other features

  • Support for both ckpt and diffusers models
  • SD 2.0, 2.1, XL support
  • Upscaling Tools
  • Embedding Manager & Support
  • Model Manager & Support
  • Workflow creation & management
  • Node-Based Architecture

Latest Changes

For our latest changes, view our Release Notes and the CHANGELOG.

Troubleshooting / FAQ

Please check out our FAQ to get solutions for common installation problems and other issues. For more help, please join our Discord

Contributing

Anyone who wishes to contribute to this project, whether documentation, features, bug fixes, code cleanup, testing, or code reviews, is very much encouraged to do so.

Get started with contributing by reading our Contribution documentation, joining the #dev-chat or the GitHub discussion board.

If you are unfamiliar with how to contribute to GitHub projects, we have a new contributor checklist you can follow to get started contributing: New Contributor Checklist.

We hope you enjoy using our software as much as we enjoy creating it, and we hope that some of those of you who are reading this will elect to become part of our community.

Welcome to InvokeAI!

Contributors

This fork is a combined effort of various people from across the world. Check out the list of all these amazing people. We thank them for their time, hard work and effort.

Support

For support, please use this repository's GitHub Issues tracking service, or join the Discord.

Original portions of the software are Copyright (c) 2023 by respective contributors.

invokeai's People

Contributors

bakkot avatar blessedcoolant avatar brandonrising avatar chainchompa avatar cmdr2 avatar damian0815 avatar dunkeroni avatar ebr avatar gregghelt2 avatar harvester62 avatar hipsterusername avatar jpphoto avatar junglebadger avatar keturn avatar kyle0654 avatar lstein avatar malrama avatar maryhipp avatar mauwii avatar mickr777 avatar millu avatar oceanswave avatar pbaylies avatar psychedelicious avatar rohinish404 avatar ryanjdick avatar skunkworxdark avatar stalker7779 avatar stefantobler avatar weblate avatar

Stargazers

 avatar  avatar  avatar  avatar  avatar  avatar  avatar  avatar  avatar  avatar  avatar  avatar  avatar  avatar  avatar  avatar  avatar  avatar  avatar  avatar  avatar  avatar  avatar  avatar  avatar  avatar  avatar  avatar  avatar  avatar  avatar  avatar  avatar  avatar  avatar  avatar  avatar  avatar  avatar  avatar  avatar  avatar  avatar  avatar  avatar  avatar  avatar  avatar  avatar  avatar  avatar  avatar  avatar  avatar  avatar  avatar  avatar  avatar  avatar  avatar  avatar  avatar  avatar  avatar  avatar  avatar  avatar  avatar  avatar  avatar  avatar  avatar  avatar  avatar  avatar  avatar  avatar  avatar  avatar  avatar  avatar  avatar  avatar  avatar  avatar  avatar  avatar  avatar  avatar  avatar  avatar  avatar  avatar  avatar  avatar  avatar  avatar  avatar  avatar  avatar

Watchers

 avatar  avatar  avatar  avatar  avatar  avatar  avatar  avatar  avatar  avatar  avatar  avatar  avatar  avatar  avatar  avatar  avatar  avatar  avatar  avatar  avatar  avatar  avatar  avatar  avatar  avatar  avatar  avatar  avatar  avatar  avatar  avatar  avatar  avatar  avatar  avatar  avatar  avatar  avatar  avatar  avatar  avatar  avatar  avatar  avatar  avatar  avatar  avatar  avatar  avatar  avatar  avatar  avatar  avatar  avatar  avatar  avatar  avatar  avatar  avatar  avatar  avatar  avatar  avatar  avatar  avatar  avatar  avatar  avatar  avatar  avatar  avatar  avatar  avatar  avatar  avatar  avatar  avatar  avatar  avatar  avatar  avatar  avatar  avatar  avatar  avatar  avatar  avatar  avatar  avatar  avatar  avatar  avatar  avatar  avatar  avatar  avatar  avatar  avatar  avatar

invokeai's Issues

img2img confusion

Hi, me again with another low/no code brain. The instructions for img2img aren't clear. There was no file with int-images in the stable diffusion file so I assume I had to create it myself. Still couldn't make it work, so I assumed maybe the dimestions of the initial image had to be 512x512. So I cut it down to those dimetions. But I am still not understanding something here.

Please help! I keep getting these errors.
2022-08-24 15_07_46-Anaconda Prompt (Anaconda3) - python  scripts_dream py
2022-08-24 15_07_35-Anaconda Prompt (Anaconda3) - python  scripts_dream py
2022-08-24 15_07_18-Anaconda Prompt (Anaconda3) - python  scripts_dream py

CUDA out of memory

still trying to use this version of SD and when i had type:
python scripts\dream.py
i got an error:
RuntimeError: CUDA out of memory. Tried to allocate 20.00 MiB (GPU 0; 4.00 GiB total capacity; 3.46 GiB already allocated; 0 bytes free; 3.52 GiB reserved in total by PyTorch) If reserved memory is >> allocated memory try setting max_split_size_mb to avoid fragmentation. See documentation for Memory Management and PYTORCH_CUDA_ALLOC_CONF

is there the way to use optimization for low cards or this version of SD is not about it?

Receiving the following error

My knowledge of coding is nil. But I can follow instructions. It should be working as far as I can tell. Please help!

Thanks in advance!
2022-08-20 17_09_31-Anaconda Prompt (Miniconda)

Generated images are pure green

It runs without any error, but it generates images where all pixels are the same shade of green (#007B00).

In the basujindal repo, changing the default precision from "autocast" to "full" in the file optimized_txt2img.py fixes this problem. So I tried to do the same for this repo in the file scripts/orig_scripts/txt2img.py but it didn't make a difference.

Whenever I run dream.py with --full_precision it runs out of memory. I have 6 GB of VRAM.

Its overwriting my images

I dont remember it happening, how to prevent it ? i just run a prompt

dream chuck norris!!! clay! close detailed sculpted head of chuck norris , style: claymation puppet kids clay , by guldies -n 4

and my images kept being overwritten to the same 4 filenames
--- ok i deleted dream log and its not doing that so all is fine for now
but i think it has something to do that i used grid setting...

another bug - it kicked me out of model for not closing quotation

--
OK it started overwriting my images again, i think it gets confused when i use -n 4 after awhile and keeps outpitting to the same filenames as before, there must be some extra checks in the code to prevent that IMO

Integrate textual inversion to allow for personalized t2i results

The textual-inversion paper and the accompanying textual-inversion repository describes the approach of being able to train a new model and introduce a new vocabulary to the fixed model to provide the ability to generate images of a new, provided subject.

The provided source works with the release version of SD, as confirmed by myself and others, and it would be great if the capabilities found in this repository could be combined with this one.

Windows - It breaks after 'dream'

I followed the Windows installation guide and up until executing the 'dream' command all was fine. I also moved the contents of the 'scripts' folder to the main folder as suggested.

There's a small mistake in the guide, the pre-release weight folder should be named "text2img-large" instead of "text2img.large", since it keeps raising an exception 'no such file or directory' if I name it "text2img.large".

Anyway, after invoking "dream.py -l" for the first time, the initialization is successful. After inputting a simple prompt, however, I get this:

  • Initialization done! Awaiting your command (-h for help, q to quit)...
    dream> an astronaut riding a horse
    Traceback (most recent call last):
    File "C:\Users\xxx\stable-diffusion\dream.py", line 276, in
    main()
    File "C:\Users\xxx\stable-diffusion\dream.py", line 67, in main
    main_loop(t2i,cmd_parser,log)
    File "C:\Users\xxx\stable-diffusion\dream.py", line 114, in main_loop
    results = t2i.txt2img(**vars(opt))
    File "C:\Users\xxx\stable-diffusion\ldm\simplet2i.py", line 154, in txt2img
    model = self.load_model() # will instantiate the model or return it from cache
    File "C:\Users\xxx\stable-diffusion\ldm\simplet2i.py", line 375, in load_model
    config = OmegaConf.load(self.config)
    File "C:\Users\xxx\Conda\envs\ldm\lib\site-packages\omegaconf\omegaconf.py", line 183, in load
    with io.open(os.path.abspath(file_), "r", encoding="utf-8") as f:
    FileNotFoundError: [Errno 2] No such file or directory: 'C:\Users\xxx\configs\latent-diffusion\txt2img-1p4B-eval.yaml'

I tried creating the folder (and the .yaml file) myself. I get this error now:

  • Initialization done! Awaiting your command (-h for help, q to quit)...
    dream> an astronaut riding a horse
    Loading model from models/ldm/text2img-large/model.ckpt
    Traceback (most recent call last):
    File "C:\Users\xxx\stable-diffusion\dream.py", line 276, in
    main()
    File "C:\Users\xxx\stable-diffusion\dream.py", line 67, in main
    main_loop(t2i,cmd_parser,log)
    File "C:\Users\xxx\stable-diffusion\dream.py", line 114, in main_loop
    results = t2i.txt2img(**vars(opt))
    File "C:\Users\xxx\stable-diffusion\ldm\simplet2i.py", line 154, in txt2img
    model = self.load_model() # will instantiate the model or return it from cache
    File "C:\Users\xxx\stable-diffusion\ldm\simplet2i.py", line 377, in load_model
    model = self._load_model_from_config(config,self.weights)
    File "C:\Users\xxx\stable-diffusion\ldm\simplet2i.py", line 396, in _load_model_from_config
    pl_sd = torch.load(ckpt, map_location="cpu")
    File "C:\Users\xxx\Conda\envs\ldm\lib\site-packages\torch\serialization.py", line 699, in load
    with _open_file_like(f, 'rb') as opened_file:
    File "C:\Users\xxx\Conda\envs\ldm\lib\site-packages\torch\serialization.py", line 231, in _open_file_like
    return _open_file(name_or_buffer, mode)
    File "C:\Users\xxx\Conda\envs\ldm\lib\site-packages\torch\serialization.py", line 212, in init
    super(_open_file, self).init(open(name, mode))
    FileNotFoundError: [Errno 2] No such file or directory: 'models/ldm/text2img-large/model.ckpt'

even though such folder (and file) exists.

Bulk generation of variations of your favorite image

This video shows smooth variations of the initial prompt and seed:
https://twitter.com/karpathy/status/1559343616270557184

Source code of this feature is available here:
https://gist.github.com/karpathy/00103b0037c5aaea32fe1da1af553355

Personally I would love to use this feature this way:

dream "an elephant walking on another planet" -S 385838583 -n 1000 -variations

This command will use image from initial seed and then start to change it slightly.
As a result of this command 1000 image files will be created. Then I could scroll through them and enjoy variations of my initially provided image (I provided "image" by specifying -S seed argument)

Without this feature I am forced to manually change prompt in a slow and hacky way by adding random numbers to the prompt and then change them - this makes a new variant of the image that is slightly different from original. But it takes forever to do it manually.
I hope this feature could automate this process.

Hacky way:

dream "an elephant walking on 532 another planet 761" -S 385838583 -n 1
dream "an elephant walking on 531 another planet 762" -S 385838583 -n 1
dream "an elephant walking on 4531 another planet 762" -S 385838583 -n 1

Improvement to generator of new filenames

I was regenerating images using the same seed but slightly different prompts and I have these image files:

000002.706865549.png
000003.706865549.png
000005.706865549.png

Then I deleted file 000003.706865549.png (script is still running) and newly generated file was not named 000006.706865549.png as I would expect but as 000003.706865549.png. It is a problem because it makes browsing files in historical order (sorted by file name) impossible.

It would be great if newly generated files would be named as "already_assigned_max_number + 1"

One way to implement it is to create "counter.txt" file inside "img-samples" folder. Inside it will be a number.
It will start with 1 and with new image it will be incremented by 1. With this approach it's guaranteed that next image file will always have a correct "max" number' name.

Error while trying to generate from dream.py

Hey, followed your Windows guide but got stuck at this step and error.
I've tried using both dream.py -l and dream.py to refer to pre- and post-release models that I found.

(base) C:\Users\andrige>cd stable-diffusion

(base) C:\Users\andrige\stable-diffusion>conda activate ldm

(ldm) C:\Users\andrige\stable-diffusion>python scripts\preload_models.py
preloading bert tokenizer...
...success
preloading Kornia requirements...
...success

(ldm) C:\Users\andrige\stable-diffusion>python scripts\dream.py
* Initializing, be patient...


* Initialization done! Awaiting your command (-h for help, q to quit)...
dream> ashley judd riding a camel -n2 -s150
Loading model from models/ldm/stable-diffusion-v1/model.ckpt
Global Step: 440000
Traceback (most recent call last):
  File "scripts\dream.py", line 278, in <module>
    main()
  File "scripts\dream.py", line 69, in main
    main_loop(t2i,cmd_parser,log)
  File "scripts\dream.py", line 116, in main_loop
    results = t2i.txt2img(**vars(opt))
  File "c:\users\andrige\stable-diffusion\ldm\simplet2i.py", line 154, in txt2img
    model = self.load_model()  # will instantiate the model or return it from cache
  File "c:\users\andrige\stable-diffusion\ldm\simplet2i.py", line 379, in load_model
    model = self._load_model_from_config(config,self.weights)
  File "c:\users\andrige\stable-diffusion\ldm\simplet2i.py", line 402, in _load_model_from_config
    model = instantiate_from_config(config.model)
  File "c:\users\andrige\stable-diffusion\ldm\util.py", line 83, in instantiate_from_config
    return get_obj_from_str(config["target"])(**config.get("params", dict()))
  File "c:\users\andrige\stable-diffusion\ldm\util.py", line 91, in get_obj_from_str
    return getattr(importlib.import_module(module, package=None), cls)
  File "G:\ai\Miniconda3\envs\ldm\lib\importlib\__init__.py", line 127, in import_module
    return _bootstrap._gcd_import(name[level:], package, level)
  File "<frozen importlib._bootstrap>", line 1014, in _gcd_import
  File "<frozen importlib._bootstrap>", line 991, in _find_and_load
  File "<frozen importlib._bootstrap>", line 975, in _find_and_load_unlocked
  File "<frozen importlib._bootstrap>", line 671, in _load_unlocked
  File "<frozen importlib._bootstrap_external>", line 783, in exec_module
  File "<frozen importlib._bootstrap>", line 219, in _call_with_frames_removed
  File "c:\users\andrige\stable-diffusion\ldm\models\diffusion\ddpm.py", line 25, in <module>
    from ldm.models.autoencoder import VQModelInterface, IdentityFirstStage, AutoencoderKL
  File "c:\users\andrige\stable-diffusion\ldm\models\autoencoder.py", line 6, in <module>
    from taming.modules.vqvae.quantize import VectorQuantizer2 as VectorQuantizer
ModuleNotFoundError: No module named 'taming'

Conda info for current version etc.

(ldm) C:\Users\andrige\stable-diffusion>conda info

     active environment : ldm
    active env location : G:\ai\Miniconda3\envs\ldm
            shell level : 2
       user config file : C:\Users\andrige\.condarc
 populated config files : C:\Users\andrige\.condarc
          conda version : 4.13.0
    conda-build version : not installed
         python version : 3.9.12.final.0
       virtual packages : __cuda=11.7=0
                          __win=0=0
                          __archspec=1=x86_64
       base environment : G:\ai\Miniconda3  (writable)
      conda av data dir : G:\ai\Miniconda3\etc\conda
  conda av metadata url : None
           channel URLs : https://repo.anaconda.com/pkgs/main/win-64
                          https://repo.anaconda.com/pkgs/main/noarch
                          https://repo.anaconda.com/pkgs/r/win-64
                          https://repo.anaconda.com/pkgs/r/noarch
                          https://repo.anaconda.com/pkgs/msys2/win-64
                          https://repo.anaconda.com/pkgs/msys2/noarch
          package cache : G:\ai\Miniconda3\pkgs
                          C:\Users\andrige\.conda\pkgs
                          C:\Users\andrige\AppData\Local\conda\conda\pkgs
       envs directories : G:\ai\Miniconda3\envs
                          C:\Users\andrige\.conda\envs
                          C:\Users\andrige\AppData\Local\conda\conda\envs
               platform : win-64
             user-agent : conda/4.13.0 requests/2.28.1 CPython/3.9.12 Windows/10 Windows/10.0.19044
          administrator : False
             netrc file : None
           offline mode : False

Paths to the model.ckpt's I have downloaded are:
C:\Users\Andrige\stable-diffusion\models\ldm\text2img-large\model.ckpt - from your guide
C:\Users\Andrige\stable-diffusion\models\ldm\stable-diffusion-v1\model.ckpt - from the other guide in this Reddit post

No module named 'ldm.models.diffusion.ksampler'

How to fix it? (Windows)

  • Initializing, be patient...
    Traceback (most recent call last):
    File "scripts\dream.py", line 376, in
    main()
    File "scripts\dream.py", line 42, in main
    from ldm.simplet2i import T2I
    File ".\ldm\simplet2i.py", line 68, in
    from ldm.models.diffusion.ksampler import KSampler
    ModuleNotFoundError: No module named 'ldm.models.diffusion.ksampler'

RuntimeError: Error(s) in loading state_dict for LatentDiffusion:

(ldm) PS E:\anaconda3\envs> python scripts\dream.py -l

"ashley judd riding a camel"

  • Initializing, be patient...

Loading model from models/ldm/text2img-large/model.ckpt
Global Step: 470000
LatentDiffusion: Running in eps-prediction mode
DiffusionWrapper has 872.30 M params.
making attention of type 'vanilla' with 512 in_channels
Working with z of shape (1, 4, 32, 32) = 4096 dimensions.
making attention of type 'vanilla' with 512 in_channels
Traceback (most recent call last):
File "scripts\dream.py", line 376, in
main()
File "scripts\dream.py", line 80, in main
t2i.load_model()
File "e:\anaconda3\envs\ldm\simplet2i.py", line 433, in load_model
model = self._load_model_from_config(config,self.weights)
File "e:\anaconda3\envs\ldm\simplet2i.py", line 460, in _load_model_from_config
m, u = model.load_state_dict(sd, strict=False)
File "E:\Anaconda3\envs\ldm\lib\site-packages\torch\nn\modules\module.py", line 1497, in load_state_dict
raise RuntimeError('Error(s) in loading state_dict for {}:\n\t{}'.format(
RuntimeError: Error(s) in loading state_dict for LatentDiffusion:
size mismatch for model.diffusion_model.input_blocks.1.1.transformer_blocks.0.attn2.to_k.weight: copying a param with shape torch.Size([320, 768]) from checkpoint, the shape in current model is torch.Size([320, 1280]).
size mismatch for model.diffusion_model.input_blocks.1.1.transformer_blocks.0.attn2.to_v.weight: copying a param with shape torch.Size([320, 768]) from checkpoint, the shape in current model is torch.Size([320, 1280]).
size mismatch for model.diffusion_model.input_blocks.2.1.transformer_blocks.0.attn2.to_k.weight: copying a param with shape torch.Size([320, 768]) from checkpoint, the shape in current model is torch.Size([320, 1280]).
size mismatch for model.diffusion_model.input_blocks.2.1.transformer_blocks.0.attn2.to_v.weight: copying a param with shape torch.Size([320, 768]) from checkpoint, the shape in current model is torch.Size([320, 1280]).
size mismatch for model.diffusion_model.input_blocks.4.1.transformer_blocks.0.attn2.to_k.weight: copying a param with shape torch.Size([640, 768]) from checkpoint, the shape in current model is torch.Size([640, 1280]).
size mismatch for model.diffusion_model.input_blocks.4.1.transformer_blocks.0.attn2.to_v.weight: copying a param with shape torch.Size([640, 768]) from checkpoint, the shape in current model is torch.Size([640, 1280]).
size mismatch for model.diffusion_model.input_blocks.5.1.transformer_blocks.0.attn2.to_k.weight: copying a param with shape torch.Size([640, 768]) from checkpoint, the shape in current model is torch.Size([640, 1280]).
size mismatch for model.diffusion_model.input_blocks.5.1.transformer_blocks.0.attn2.to_v.weight: copying a param with shape torch.Size([640, 768]) from checkpoint, the shape in current model is torch.Size([640, 1280]).
size mismatch for model.diffusion_model.input_blocks.7.1.transformer_blocks.0.attn2.to_k.weight: copying a param with shape torch.Size([1280, 768]) from checkpoint, the shape in current model is torch.Size([1280, 1280]).
size mismatch for model.diffusion_model.input_blocks.7.1.transformer_blocks.0.attn2.to_v.weight: copying a param with shape torch.Size([1280, 768]) from checkpoint, the shape in current model is torch.Size([1280, 1280]).
size mismatch for model.diffusion_model.input_blocks.8.1.transformer_blocks.0.attn2.to_k.weight: copying a param with shape torch.Size([1280, 768]) from checkpoint, the shape in current model is torch.Size([1280, 1280]).
size mismatch for model.diffusion_model.input_blocks.8.1.transformer_blocks.0.attn2.to_v.weight: copying a param with shape torch.Size([1280, 768]) from checkpoint, the shape in current model is torch.Size([1280, 1280]).
size mismatch for model.diffusion_model.middle_block.1.transformer_blocks.0.attn2.to_k.weight: copying a param with shape torch.Size([1280, 768]) from checkpoint, the shape in current model is torch.Size([1280, 1280]).
size mismatch for model.diffusion_model.middle_block.1.transformer_blocks.0.attn2.to_v.weight: copying a param with shape torch.Size([1280, 768]) from checkpoint, the shape in current model is torch.Size([1280, 1280]).
size mismatch for model.diffusion_model.output_blocks.3.1.transformer_blocks.0.attn2.to_k.weight: copying a param with shape torch.Size([1280, 768]) from checkpoint, the shape in current model is torch.Size([1280, 1280]).
size mismatch for model.diffusion_model.output_blocks.3.1.transformer_blocks.0.attn2.to_v.weight: copying a param with shape torch.Size([1280, 768]) from checkpoint, the shape in current model is torch.Size([1280, 1280]).
size mismatch for model.diffusion_model.output_blocks.4.1.transformer_blocks.0.attn2.to_k.weight: copying a param with shape torch.Size([1280, 768]) from checkpoint, the shape in current model is torch.Size([1280, 1280]).
size mismatch for model.diffusion_model.output_blocks.4.1.transformer_blocks.0.attn2.to_v.weight: copying a param with shape torch.Size([1280, 768]) from checkpoint, the shape in current model is torch.Size([1280, 1280]).
size mismatch for model.diffusion_model.output_blocks.5.1.transformer_blocks.0.attn2.to_k.weight: copying a param with shape torch.Size([1280, 768]) from checkpoint, the shape in current model is torch.Size([1280, 1280]).
size mismatch for model.diffusion_model.output_blocks.5.1.transformer_blocks.0.attn2.to_v.weight: copying a param with shape torch.Size([1280, 768]) from checkpoint, the shape in current model is torch.Size([1280, 1280]).
size mismatch for model.diffusion_model.output_blocks.6.1.transformer_blocks.0.attn2.to_k.weight: copying a param with shape torch.Size([640, 768]) from checkpoint, the shape in current model is torch.Size([640, 1280]).
size mismatch for model.diffusion_model.output_blocks.6.1.transformer_blocks.0.attn2.to_v.weight: copying a param with shape torch.Size([640, 768]) from checkpoint, the shape in current model is torch.Size([640, 1280]).
size mismatch for model.diffusion_model.output_blocks.7.1.transformer_blocks.0.attn2.to_k.weight: copying a param with shape torch.Size([640, 768]) from checkpoint, the shape in current model is torch.Size([640, 1280]).
size mismatch for model.diffusion_model.output_blocks.7.1.transformer_blocks.0.attn2.to_v.weight: copying a param with shape torch.Size([640, 768]) from checkpoint, the shape in current model is torch.Size([640, 1280]).
size mismatch for model.diffusion_model.output_blocks.8.1.transformer_blocks.0.attn2.to_k.weight: copying a param with shape torch.Size([640, 768]) from checkpoint, the shape in current model is torch.Size([640, 1280]).
size mismatch for model.diffusion_model.output_blocks.8.1.transformer_blocks.0.attn2.to_v.weight: copying a param with shape torch.Size([640, 768]) from checkpoint, the shape in current model is torch.Size([640, 1280]).
size mismatch for model.diffusion_model.output_blocks.9.1.transformer_blocks.0.attn2.to_k.weight: copying a param with shape torch.Size([320, 768]) from checkpoint, the shape in current model is torch.Size([320, 1280]).
size mismatch for model.diffusion_model.output_blocks.9.1.transformer_blocks.0.attn2.to_v.weight: copying a param with shape torch.Size([320, 768]) from checkpoint, the shape in current model is torch.Size([320, 1280]).
size mismatch for model.diffusion_model.output_blocks.10.1.transformer_blocks.0.attn2.to_k.weight: copying a param with shape torch.Size([320, 768]) from checkpoint, the shape in current model is torch.Size([320, 1280]).
size mismatch for model.diffusion_model.output_blocks.10.1.transformer_blocks.0.attn2.to_v.weight: copying a param with shape torch.Size([320, 768]) from checkpoint, the shape in current model is torch.Size([320, 1280]).
size mismatch for model.diffusion_model.output_blocks.11.1.transformer_blocks.0.attn2.to_k.weight: copying a param with shape torch.Size([320, 768]) from checkpoint, the shape in current model is torch.Size([320, 1280]).
size mismatch for model.diffusion_model.output_blocks.11.1.transformer_blocks.0.attn2.to_v.weight: copying a param with shape torch.Size([320, 768]) from checkpoint, the shape in current model is torch.Size([320, 1280]).
ashley judd riding a camel
(ldm) PS E:\anaconda3\envs>

os.path.append('.') is causing error on linux

(ldm2) bernard@DESKTOP-4M9DSE4:~/stable-diffusion-cli$ python3 scripts/dream.py
posix
* Initializing, be patient...

Traceback (most recent call last):
  File "scripts/dream.py", line 279, in <module>
    main()
  File "scripts/dream.py", line 39, in main
    os.path.append('.')
AttributeError: module 'posixpath' has no attribute 'append'

Commenting line 37 fix this issue. If this is a fix for windown then perhaps it should only be applied on windows system an not linux.

API: how to use parameters?

Sorry if a dumb question, but could you provide extended example of API usage?
e.g. I'd like to generate 10 variations of img2img with escalating weight paramaeter (from 0.2 to 0.8)

Feature Request: Specify a file of prompt requests.

Hi, loving the script. It's really nice to run just like the discord did.

It would be really nice if we could hand the script a text file and it would run the prompts out of that text file. I'd be okay with it bombing as normal when there were issues like oom, or whatnot. That would be par for the course. A simple file that perhaps supported comments with lines that began // (or some such) would be fantastic. I'm picturing something like this:

dream>-inputFile "c:\stable-diffusion\inputfile.txt"

----inputFile.txt----
// sample prompt file
"a unicorn in manhatten" -n4 -H512 -W640 -S1234
"a fantastic futuristic landscape, trending on artstation" -n4 -H512 -W512 -S5678
// and now for the bulk generation
"this prompt will generate quite a few images by greg rutkowski, 8k, trending on artstation" -n1000 -H512 -W640

Allow loading of different weight files

It would be great if I could specify weight file during script launch, like so:

python scripts/dream.py --model=sd13
python scripts/dream.py --model=sd14
python scripts/dream.py --model=sd12
python scripts/dream.py --model=sd11
python scripts/dream.py --model=sd13_leaked

This command should go to folder \models\ldm\stable-diffusion-v1\ and find a file with exact name passed in argument list + add ".ckpt" extension to it to load a model.

The reason for this request is that all these models produce slightly different images for the same Seed and prompt and the latest version is not the best one for all prompts.

Slow Generation Latest Update

With the latest update adding weights, image generation speed on my machine went from around 12 seconds to 4.5 minutes. Basic prompts ("a cute puppy"), no special parameters added. After updating through git pull, was there some extra step needed? I hope I am not missing something obvious.

Templates in arguments

Format of proposed template:
{start_value, end_value, increment}

Usage example:

"red elephant on a bike" -C{2,10,0.5} -f{0.5,1.0,0.02} -n 100 -S 2828484928

It will result in these 100 prompts:

"red elephant on a bike" -C 2 -f 0.5 -n 1 -S 2828484928
"red elephant on a bike" -C 2.5 -f 0.52 -n 1 -S 2828484928

and so on.

I noticed that when you change -C parameter newly generated image is a slight variation of original image so by automatically generating bunch of images with different -C value (for txt2img) or different -f value (for img2img) variations of the same Seed image can be generated.

AttributeError

after typing python scripts\dream.py -l

i'm getting this error:

Traceback (most recent call last):
File "scripts\dream.py", line 277, in
main()
File "scripts\dream.py", line 37, in main
os.path.append('.')
AttributeError: module 'ntpath' has no attribute 'append'

Dream prompt input processing doesn't accept single quotes

Hi,

While running the dream.py script with a file containing the input prompts, I saw that having a ' will skip the prompt.
The error is "No closing quotation"

I'm unsure if this is normal, or unintended.

Anyways, thanks for the script, it's great! I'd love to see a replica of the bot, so it could be self-hosted and run on my own server, allowing my friends to use it

The image comes out in green

Hello, good, I've been trying to get Stable Diffusion to work but I'm doing something wrong, the images come out green.

Example:

000006 2470758828

I have an NVIDIA GTX 1660 SUPER, could it be the graphics problem?

Thanks greetings

Windows probably doesn't need standalone Python

I don't think that

Install Python version 3.8.5 from here: https://www.python.org/downloads/windows/

is necessary. I simply installed (SPECIFICALLY, and man was that hard to figure out) Miniconda3-py38_4.9.2-Windows-x86_64 to get Python 3.8.5, and then followed the rest of the instructions. I do have Py 3.10 installed (from python.org), but after launching "Anaconda Prompt (miniconda3)", I can do

(ldm) C:\Users\xxxxxxxxxx\Source\stable-diffusion>python
Python 3.8.5 (default, Sep  3 2020, 21:29:08) [MSC v.1916 64 bit (AMD64)] :: Anaconda, Inc. on win32
Type "help", "copyright", "credits" or "license" for more information.

so Miniconda alone is providing 1) a version of Python and 2) the correct version.

The warning from Miniconda about there being an existing "default" Python 3.8 could be quite confusing for users not experienced with Python (particularly on Windows).

After running python scripts\dream.py -l I get this error:

  • Initializing, be patient...

Traceback (most recent call last):
File "scripts\dream.py", line 276, in
main()
File "scripts\dream.py", line 37, in main
from pytorch_lightning import logging
File "C:\Users\louis\anaconda3\envs\ldm\lib\site-packages\pytorch_lightning_init_.py", line 20, in
from pytorch_lightning import metrics # noqa: E402
File "C:\Users\louis\anaconda3\envs\ldm\lib\site-packages\pytorch_lightning\metrics_init_.py", line 15, in
from pytorch_lightning.metrics.classification import ( # noqa: F401
File "C:\Users\louis\anaconda3\envs\ldm\lib\site-packages\pytorch_lightning\metrics\classification_init_.py", line 14, in
from pytorch_lightning.metrics.classification.accuracy import Accuracy # noqa: F401
File "C:\Users\louis\anaconda3\envs\ldm\lib\site-packages\pytorch_lightning\metrics\classification\accuracy.py", line 18, in
from pytorch_lightning.metrics.utils import deprecated_metrics, void
File "C:\Users\louis\anaconda3\envs\ldm\lib\site-packages\pytorch_lightning\metrics\utils.py", line 22, in
from torchmetrics.utilities.data import get_num_classes as _get_num_classes
ImportError: cannot import name 'get_num_classes' from 'torchmetrics.utilities.data' (C:\Users\louis\anaconda3\envs\ldm\lib\site-packages\torchmetrics\utilities\data.py)

latest environment.yaml does not result in functional env

I just tried to run the solution on a new wsl2 "vm" with a fresh miniconda install using the provided environment.yaml and upon running python script/dream.py I get the usual load model but after that everything stop without any error...

(sdbm) bernard@DESKTOP-4M9DSE4:~/stable-diffusion-bm$ python scripts/dream.py --sampler klms
* Initializing, be patient...

Loading model from models/ldm/stable-diffusion-v1/model.ckpt
Global Step: 470000
LatentDiffusion: Running in eps-prediction mode
DiffusionWrapper has 859.52 M params.
making attention of type 'vanilla' with 512 in_channels
Working with z of shape (1, 4, 32, 32) = 4096 dimensions.
making attention of type 'vanilla' with 512 in_channels
Using half precision math. Call with --full_precision to use slower but more accurate full precision.
(sdbm) bernard@DESKTOP-4M9DSE4:~/stable-diffusion-bm$

Yes, I renamed the env from ldm to sdbm because I have too many repos I play with and they all use the same "ldm" name and this does not work well with conflicting requirements fort each... so I renamed the env in the environment.yaml file to make them per "repo".

If I then load my previous conda env with the original build from a fews days ago environment.yaml all is fine... Not sure what is missing but something is causing things to not work with the current yaml.

When it work under my previous ldm2 env I get e line about setting up the sampler that does not get shown with the latest commit:

(ldm2) bernard@DESKTOP-4M9DSE4:~/stable-diffusion-bm$ python scripts/dream.py --sampler klms
* Initializing, be patient...

Loading model from models/ldm/stable-diffusion-v1/model.ckpt
Global Step: 470000
LatentDiffusion: Running in eps-prediction mode
DiffusionWrapper has 859.52 M params.
making attention of type 'vanilla' with 512 in_channels
Working with z of shape (1, 4, 32, 32) = 4096 dimensions.
making attention of type 'vanilla' with 512 in_channels
Using half precision math. Call with --full_precision to use slower but more accurate full precision.
setting sampler to klms

* Initialization done! Awaiting your command (-h for help, 'q' to quit, 'cd' to change output dir, 'pwd' to print output dir)...
dream>

Low quality results

my test prompt was car -W 256 -H 256 -n 2 -s 50 -S 10 but the results I get are horrible quality, whats wrong here?

00000
00001

LICENSE change?

IANAL, so don't take my advice ๐Ÿ˜, but LICENSE changed completely in upstream's 69ae4b3

Dream process gets Killed unexpectedly

Screenshot 2022-08-23 at 23 53 58

Sorry for dumb question
Im on linux and when I run the python3 ./scripts/dream.py I get event "Killed"
Also trying to change my env to ldm gives me these errors which I have tried to install the packages oone by one but nothing so far.....I tried to run conda upgrade --all but still cant get the packages to install. Please Kindily assist me in any way

Screenshot 2022-08-23 at 23 55 55

Yaku

using k_euler_ancestral

i've found that if editing this line in txt2img.py

samples_ddim = K.sampling.sample_lms(model_wrap_cfg, x, sigmas, extra_args=extra_args, disable=not accelerator.is_main_process)

to this

samples_ddim = K.sampling.sample_euler_ancestral(model_wrap_cfg, x, sigmas, extra_args=extra_args, disable=not accelerator.is_main_process)

it actually works

it appears to work in another iteration i'm using, but i do not believe that it would carry over to dream.py since it does not appear to utilize the txt2img script anymore.

utilizing k_euler_ancestral would be extremely vital for many users since it has a faster sampling rate and is more accurate at lower steps!

simplet2i crashes if invalid file path is specified

Hi there, great repo! It's been my go-to so far!

If I put an invalid file path in as the -I argument, simplet2i crashes which causes the dream script to also die. The output looks like this:

Traceback (most recent call last):
  File "scripts\dream.py", line 376, in <module>
    main()
  File "scripts\dream.py", line 86, in main
    main_loop(t2i,cmd_parser,log,infile)
  File "scripts\dream.py", line 164, in main_loop
    results = t2i.img2img(**vars(opt))
  File "d:\stablediffusion\sdbot\ldm\simplet2i.py", line 312, in img2img
    assert os.path.isfile(init_img)
AssertionError

Also, not sure if this is a bug, but when I specify a strength (-f) of 1.0, it seems to fail. .99 works just fine, though.

ModuleNotFoundError

Traceback (most recent call last):
File "scripts/dream.py", line 277, in
main()
File "scripts/dream.py", line 39, in main
from ldm.simplet2i import T2I
ModuleNotFoundError: No module named 'ldm.simplet2i'

I get this error on run and ive followed the proper instructions, im not sure what to do here.

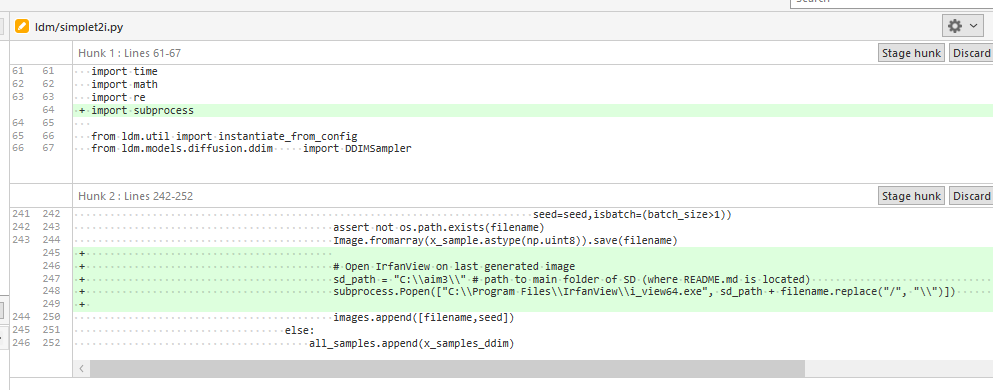
Show preview of last generated image

What this code does?
As soon as new image is generated - it will be automatically opened in Irfan image viewer.
It's a nice way to preview images as they are generated.

Setup:

  1. Download IrfanViewer https://www.irfanview.com/
  2. Modify simplet2i.py code as shown below

image

# Open IrfanView on last generated image
sd_path = "C:\\aim3\\" # path to main folder of SD (where README.md is located)                                        
subprocess.Popen(["C:\\Program Files\\IrfanView\\i_view64.exe", sd_path + filename.replace("/", "\\")])                

Use seed and prompt in image filenames

Great, the names of the prompt and seed at the end, pretty much like on discord would work the best i think to go back and modify the image later keeping same seed
On windows i had to pip some thigns myself cause entire yaml didn get trhough everything in it but its prettu straightforward installation, just opencv must be current one

Originally posted by @1blackbar in #1 (comment)

Subfolders with prompt name for easier categorization

Currently all images are stored inside "img-samples" folder. It does not matter if user types 200 different prompts.
It can be a problem because it will be difficult to quickly inspect images related to specific prompt.

Instead I propose to create subfolders with names exactly as prompt text.
For example, inside img-samples folder there will be folders:

  • portrait of mona lisa in rembrand style
  • portrait of mona lisa in mone style
  • expressive portrait of mona lisa in mone style

and so on.

This naming convention already is used in this branch of SD: https://github.com/basujindal/stable-diffusion

Folder name could consist only of alphanumeric characters. Inside a folder could be created a file "prompt.txt" and inside it will be an original full prompt with all command line arguments.

img2img generates 512x512 image although 568x568px were specified

Here's a prompt:

"photo dogs playing with cats happy family" -W 576 -H 576 -n 1 -S 2152503213 --init_img=./init-images/00036.png --strength=0.6 -C 10 -s 100

It's worth mentioning that provided init_img has dimensions of 512x512px but I thought that if I specified explicit -W and -H after the prompt then image should be created with 576x576px

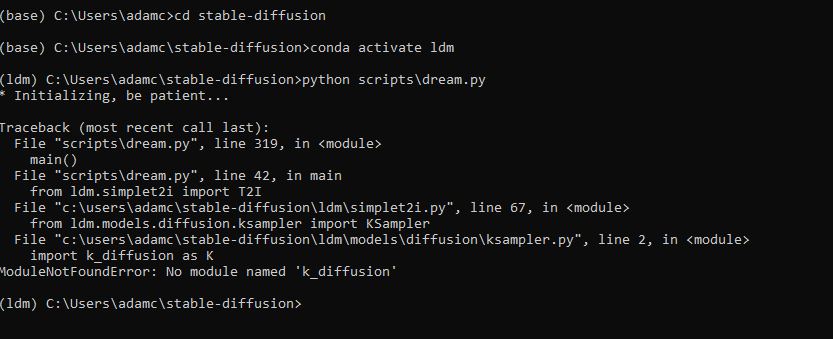
No Module named k_diffusion

With the new weights released I thought I could slot it into the stable diffusion V1 folder and start generating images. But i'm getting the following error
2022-08-23 03_04_06-Anaconda Prompt (Miniconda)

Recommend Projects

  • React photo React

    A declarative, efficient, and flexible JavaScript library for building user interfaces.

  • Vue.js photo Vue.js

    ๐Ÿ–– Vue.js is a progressive, incrementally-adoptable JavaScript framework for building UI on the web.

  • Typescript photo Typescript

    TypeScript is a superset of JavaScript that compiles to clean JavaScript output.

  • TensorFlow photo TensorFlow

    An Open Source Machine Learning Framework for Everyone

  • Django photo Django

    The Web framework for perfectionists with deadlines.

  • D3 photo D3

    Bring data to life with SVG, Canvas and HTML. ๐Ÿ“Š๐Ÿ“ˆ๐ŸŽ‰

Recommend Topics

  • javascript

    JavaScript (JS) is a lightweight interpreted programming language with first-class functions.

  • web

    Some thing interesting about web. New door for the world.

  • server

    A server is a program made to process requests and deliver data to clients.

  • Machine learning

    Machine learning is a way of modeling and interpreting data that allows a piece of software to respond intelligently.

  • Game

    Some thing interesting about game, make everyone happy.

Recommend Org

  • Facebook photo Facebook

    We are working to build community through open source technology. NB: members must have two-factor auth.

  • Microsoft photo Microsoft

    Open source projects and samples from Microsoft.

  • Google photo Google

    Google โค๏ธ Open Source for everyone.

  • D3 photo D3

    Data-Driven Documents codes.