本项目使用在线绘图工具web sequencediagrams完成,目标是图形化OpenStack的所有操作流程,通过操作序列图能快速学习Openstack的工作原理,理清各个组件的关系,运维人员也能根据操作序列图进行更精确的故障定位和排查.
注意,该操作序列图基于L版OpenStack源码,未来版本的操作可能会有变化,请以最新版的源码为准,该项目提供的序列图仅供参考。
OpenStack是一个IaaS层的云计算平台开源实现,其对标产品为AWS。最开始OpenStack只有两个组件,分别为提供计算服务的Nova以及提供对象存储服务的Swift,其中Nova不仅提供计算服务,还包含了网络服务、块存储服务、镜像服务以及裸机管理服务。之后随着项目的不断发展,从Nova中根据功能拆分为多个独立的项目,如nova-volume拆分为Cinder项目提供块存储服务,nova-image拆分为Glance项目,提供镜像存储服务,nova-network则是neutron的前身,裸机管理也从Nova中分离出来为Ironic项目。最开始容器服务也是由Nova提供支持的,作为Nova的driver之一来实现,而后迁移到Heat,到现在已经独立为一个单独的项目Magnum,后来Magnum的愿景调整为主要提供容器编排服务,单纯的容器服务则由Zun项目接管。最开始OpenStack并没有认证功能,从E版开始才加入认证服务Keystone。
目前OpenStack核心组件如下:
- Keystone:认证服务。
- Glance:镜像服务。
- Nova:计算服务。
- Cinder:块存储服务。
- Neutorn:网络服务。
- Swift:对象存储服务。
E版之后,在这些核心服务之上,又不断涌现新的服务,如面板服务Horizon、编排服务Heat、数据库服务Trove、文件共享服务Manila、大数据服务Sahara以及前面提到的Magnum等,这些服务几乎都依赖于以上的核心服务。比如Sahara大数据服务会先调用Heat模板服务,Heat又会调用Nova创建虚拟机,调用Glance获取镜像,调用Cinder创建数据卷,调用Neutron创建网络等。
截至现在(2016年11月27日),OpenStack已经走过了6年半的岁月,最新发布的版本为第14个版本,代号为Newton,Ocata版已经处在快速开发中。
OpenStack服务越来越多、越来越复杂,覆盖的技术生态越来越庞大,宛如一个庞然大物,刚接触如此庞大的分布式系统,都或多或少感觉有点如"盲人摸象"的感觉。不过不必先过于绝望,好在OpenStack项目具有非常良好的设计,虽然OpenStack项目众多,组件繁杂,但几乎所有的服务骨架脉络基本是一样的,熟悉了其中一个项目的架构,深入读了其中一个项目源码,再去看其它项目可谓轻车熟路。
本文档会以Nova项目为例,一步一步剖析源码结构,阅读完之后,你再去看Cinder项目,发现非常轻松。
要阅读源代码首先需要安装科学的代码阅读工具,图形界面使用pycharm没有问题,不过通常在虚拟机中是没有图形界面的,首选vim,需要简单的配置使其支持代码跳转和代码搜索,可以参考GitHub - int32bit/dotfiles: A set of vim, zsh, git, and tmux configuration files.。如图:

OpenStack所有项目都是基于Python开发,都是标准的Python项目,通过setuptools工具管理项目,负责Python包的安装和分发。想知道一个项目有哪些服务组成,入口函数(main函数)在哪里,最直接的方式就是查看项目根目录下的setup.cfg文件,其中console_scripts就是所有服务组件的入口,比如nova的setup.cfg的console_scripts如下:
[entry_points]
...
console_scripts =
    nova-all = nova.cmd.all:main
    nova-api = nova.cmd.api:main
    nova-api-metadata = nova.cmd.api_metadata:main
    nova-api-os-compute = nova.cmd.api_os_compute:main
    nova-cells = nova.cmd.cells:main
    nova-cert = nova.cmd.cert:main
    nova-compute = nova.cmd.compute:main
    nova-conductor = nova.cmd.conductor:main
    nova-console = nova.cmd.console:main
    nova-consoleauth = nova.cmd.consoleauth:main
    nova-dhcpbridge = nova.cmd.dhcpbridge:main
    nova-idmapshift = nova.cmd.idmapshift:main
    nova-manage = nova.cmd.manage:main
    nova-network = nova.cmd.network:main
    nova-novncproxy = nova.cmd.novncproxy:main
    nova-rootwrap = oslo_rootwrap.cmd:main
    nova-rootwrap-daemon = oslo_rootwrap.cmd:daemon
    nova-scheduler = nova.cmd.scheduler:main
    nova-serialproxy = nova.cmd.serialproxy:main
    nova-spicehtml5proxy = nova.cmd.spicehtml5proxy:main
    nova-xvpvncproxy = nova.cmd.xvpvncproxy:main
...
由此可知nova项目安装后会包含21个可执行程序,其中nova-compute服务的入口函数为nova/cmd/compute.py(. -> /)模块的main函数:
def main():
    config.parse_args(sys.argv)
    logging.setup(CONF, 'nova')
    utils.monkey_patch()
    objects.register_all()

    gmr.TextGuruMeditation.setup_autorun(version)

    if not CONF.conductor.use_local:
        block_db_access()
        objects_base.NovaObject.indirection_api = \
            conductor_rpcapi.ConductorAPI()
    else:
        LOG.warning(_LW('Conductor local mode is deprecated and will '
                        'be removed in a subsequent release'))

    server = service.Service.create(binary='nova-compute',

由于OpenStack使用python语言开发,而python是动态类型语言,参数类型不容易从代码中看出,因此必须部署一个allinone的OpenStack开发测试环境,建议使用RDO部署:[Packstack quickstart](https://www.rdoproject.org/install/quickstart/),当然乐于折腾使用Devstack也是没有问题的。

要想深入研究源码,最有效的方式就是一步一步跟踪代码执行,因此会使用debug工具是关键技能之一。python的debug工具有很多,为了简便起见,pdb工具就够了。使用方法也非常简单,只要在你想设置断点的地方,嵌入以下代码:
import pdb; pdb.set_trace()
然后在命令行(不能通过systemd执行)直接运行服务即可。假如想跟踪nova创建虚拟机的过程,首先在`nova/api/openstack/compute/servers.py`模块的`create`方法打上断点,如下:

```python
@wsgi.response(202)
    @extensions.expected_errors((400, 403, 409, 413))
    @validation.schema(schema_server_create_v20, '2.0', '2.0')
    @validation.schema(schema_server_create, '2.1', '2.18')
    @validation.schema(schema_server_create_v219, '2.19')
    def create(self, req, body):
        """Creates a new server for a given user."""

        import pdb; pdb.set_trace() # 设置断点
        context = req.environ['nova.context']
        server_dict = body['server']
        password = self._get_server_admin_password(server_dict)
        name = common.normalize_name(server_dict['name'])

        if api_version_request.is_supported(req, min_version='2.19'):
            if 'description' in server_dict:
                # This is allowed to be None
                description = server_dict['description']
            else:
                # No default description
                description = None
        else:
            description = name
        ...
然后注意需要通过命令行直接运行,而不是通过systemd启动:
su -c 'nova-api' nova
此时调用创建虚拟机API,nova-api进程就会马上弹出pdb shell,此时你可以通过s或者n命令一步一步执行了。
阅读源码的首要问题就是就要对代码的结构了然于胸,需要强调的是,OpenStack项目的目录结构并不是根据组件严格划分,而是根据功能划分,以Nova为例,compute目录并不是一定在nova-compute节点上运行,而主要是和compute相关(虚拟机操作相关)的功能实现,同样的,scheduler目录代码并不全在scheduler服务节点运行,但主要是和调度相关的代码。不过目录结构并不是完全没有规律,它遵循一定的套路。
通常一个服务的目录都会包含api.py、rpcapi.py、manager.py,这个三个是最重要的模块。
api.py: 通常是供其它组件调用的封装库。换句话说,该模块通常并不会由本模块调用。比如compute目录的api.py,通常由nova-api服务的controller调用。- rpcapi.py:这个是RPC请求的封装,或者说是RPC封装的client端,该模块封装了RPC请求调用。
- manager.py: 这个才是真正服务的功能实现,也是RPC的服务端,即处理RPC请求的入口,实现的方法通常和rpcapi实现的方法一一对应。
比如对一个虚拟机执行关机操作:
API节点
nova-api接收用户请求 -> nova-api调用compute/api.py -> compute/api调用compute/rpcapi.py -> rpcapi.py向目标计算节点发起stop_instance()RPC请求

计算节点
收到stop_instance()请求 -> 调用compute/manager.py的callback方法stop_instance() -> 调用libvirt关机虚拟机
前面提到OpenStack项目的目录结构是按照功能划分的,而不是服务组件,因此并不是所有的目录都能有对应的组件。仍以Nova为例:
- cmd:这是服务的启动脚本,即所有服务的main函数。看服务怎么初始化,就从这里开始。
- db: 封装数据库访问,目前支持的driver为sqlalchemy。
- conf:Nova的配置项声明都在这里。
- locale: 本地化处理。
- image: 封装Glance调用接口。
- network: 封装网络服务接口,根据配置不同,可能调用nova-network或者neutron。
- volume: 封装数据卷访问接口,通常是Cinder的client封装。
- virt: 这是所有支持的hypervisor驱动,主流的如libvirt、xen等。
- objects: 对象模型,封装了所有实体对象的CURD操作,相对以前直接调用db的model更安全,并且支持版本控制。
- policies: policy校验实现。
- tests: 单元测试和功能测试代码。
以上同样适用于其它服务,比如Cinder等。
另外需要了解的是,所有的API入口都是从xxx-api开始的,RESTFul API是OpenStack服务的唯一入口,也就是说,阅读源码就从api开始。而api组件也是根据实体划分的,不同的实体对应不同的controller,比如servers、flavors、keypairs等,controller的index方法对应list操作、show方法对应get操作、create创建、delete删除、update更新等。
根据进程阅读源码并不是什么好的实践,因为光理解服务如何初始化、如何通信、如何发送心跳等就不容易,各种高级封装太复杂了。我认为比较好的阅读源码方式是追踪一个任务的执行过程,比如看启动虚拟机的整个流程,因此接下来本文将以创建一台虚拟机为例,一步步分析其过程。
这里以创建虚拟机过程为例,根据前面的总体套路,一步步跟踪其执行过程。需要注意的是,Nova支持同时创建多台虚拟机,因此在调度时需要选择多个宿主机。
入口为nova/api/openstack/compute/servers.py的create方法,该方法检查了一堆参数以及policy后,调用compute_api的create方法。
def create(self, req, body):
    """Creates a new server for a given user."""

    context = req.environ['nova.context']
    server_dict = body['server']
    password = self._get_server_admin_password(server_dict)
    name = common.normalize_name(server_dict['name'])

    ...

    flavor_id = self._flavor_id_from_req_data(body)
    try:
        inst_type = flavors.get_flavor_by_flavor_id(
                flavor_id, ctxt=context, read_deleted="no")

        (instances, resv_id) = self.compute_api.create(context,
                        inst_type,
                        image_uuid,
                        display_name=name,
                        display_description=description,
                        availability_zone=availability_zone,
                        forced_host=host, forced_node=node,
                        metadata=server_dict.get('metadata', {}),
                        admin_password=password,
                        requested_networks=requested_networks,
                        check_server_group_quota=True,
                        **create_kwargs)
    except (exception.QuotaError,
            exception.PortLimitExceeded) as error:
        raise exc.HTTPForbidden(
explanation=error.format_message())这里的compute_api即前面说的nova/compute/api.py模块,找到该模块的create方法,该方法会创建数据库记录、检查参数等,然后调用compute_task_api的build_instances方法:
self.compute_task_api.schedule_and_build_instances(
    context,
    build_requests=build_requests,
    request_spec=request_specs,
    image=boot_meta,
    admin_password=admin_password,
    injected_files=injected_files,
    requested_networks=requested_networks,
block_device_mapping=block_device_mapping)compute_task_api即conductor的api.py。conductor的api并没有执行什么操作,直接调用了conductor_compute_rpcapi的build_instances方法:
def schedule_and_build_instances(self, context, build_requests,
                                 request_spec, image,
                                 admin_password, injected_files,
                                 requested_networks, block_device_mapping):
    self.conductor_compute_rpcapi.schedule_and_build_instances(
        context, build_requests, request_spec, image,
        admin_password, injected_files, requested_networks,
        block_device_mapping)
该方法即时conductor RPC调用api,即nova/conductor/rpcapi.py模块,该方法除了一堆的版本检查,剩下的就是对RPC调用的封装,代码只有两行:
cctxt = self.client.prepare(version=version)
cctxt.cast(context, 'build_instances', **kw)
其中cast表示异步调用,build_instances是远程调用的方法,kw是传递的参数。参数是字典类型,没有复杂对象结构,因此不需要特别的序列化操作。
截至到现在,虽然目录由api->compute->conductor,但仍在nova-api进程中运行,直到cast方法执行,该方法由于是异步调用,因此nova-api任务完成,此时会响应用户请求,虚拟机状态为building。
由于是向nova-conductor发起的RPC调用,而前面说了接收端肯定是manager.py,因此进程跳到nova-conductor服务,入口为nova/conductor/manager.py的build_instances方法,该方法首先调用了_schedule_instances方法,该方法调用了scheduler_client的select_destinations方法:
def _schedule_instances(self, context, request_spec, filter_properties):
    scheduler_utils.setup_instance_group(context, request_spec,
                                         filter_properties)
    # TODO(sbauza): Hydrate here the object until we modify the
    # scheduler.utils methods to directly use the RequestSpec object
    spec_obj = objects.RequestSpec.from_primitives(
        context, request_spec, filter_properties)
    hosts = self.scheduler_client.select_destinations(context, spec_obj)
return hostsscheduler_client和compute_api以及compute_task_api都是一样对服务的client调用,不过scheduler没有api.py,而是有个单独的client目录,实现在client目录的__init__.py,这里仅仅是调用query.py下的SchedulerQueryClient的select_destinations实现,然后又很直接的调用了scheduler_rpcapi的select_destinations方法,终于又到了RPC调用环节。
def select_destinations(self, context, spec_obj):
    """Returns destinations(s) best suited for this request_spec and
    filter_properties.

    The result should be a list of dicts with 'host', 'nodename' and
    'limits' as keys.
    """
    return self.scheduler_rpcapi.select_destinations(context, spec_obj)
毫无疑问,RPC封装同样是在scheduler的rpcapi中实现。该方法RPC调用代码如下:
return cctxt.call(ctxt, 'select_destinations', **msg_args)
注意这里调用的call方法,即同步RPC调用,此时nova-conductor并不会退出,而是堵塞等待直到nova-scheduler返回。因此当前状态为nova-conductor为blocked状态,等待nova-scheduler返回,nova-scheduler接管任务。
同理找到scheduler的manager.py模块的select_destinations方法,该方法会调用driver方法,这里的driver其实就是调度算法实现,通常用的比较多的就是filter_scheduler的,对应filter_scheduler.py模块,该模块首先通过host_manager拿到所有的计算节点信息,然后通过filters过滤掉不满足条件的计算节点,剩下的节点通过weigh方法计算权值,最后选择权值高的作为候选计算节点返回。最后nova-scheduler返回调度结果的hosts集合,任务结束,返回到nova-conductor服务。
回到scheduler/manager.py的build_instances方法,nova-conductor等待nova-scheduler返回后,拿到调度的计算节点列表。因为可能同时启动多个虚拟机,因此循环调用了compute_rpcapi的build_and_run_instance方法。
for (instance, host) in six.moves.zip(instances, hosts):
    instance.availability_zone = (
        availability_zones.get_host_availability_zone(context,
                                                      host['host']))
    try:
        # NOTE(danms): This saves the az change above, refreshes our
        # instance, and tells us if it has been deleted underneath us
        instance.save()
    except (exception.InstanceNotFound,
            exception.InstanceInfoCacheNotFound):
        LOG.debug('Instance deleted during build', instance=instance)
        continue
    ...
    self.compute_rpcapi.build_and_run_instance(context,
            instance=instance, host=host['host'], image=image,
            request_spec=request_spec,
            filter_properties=local_filter_props,
            admin_password=admin_password,
            injected_files=injected_files,
            requested_networks=requested_networks,
            security_groups=security_groups,
            block_device_mapping=bdms, node=host['nodename'],
limits=host['limits'])看到xxxrpc立即想到对应的代码位置,位于compute/rpcapi模块,该方法向nova-compute发起RPC请求:
cctxt.cast(ctxt, 'build_and_run_instance', ...)
由于是cast调用,因此发起的是异步RPC,因此nova-conductor任务结束,紧接着终于轮到nova-compute登场了。
到了nova-compute服务,入口为compute/manager.py,找到build_and_run_instance方法,该方法调用了driver的spawn方法,这里的driver就是各种hypervisor的实现,所有实现的driver都在virt目录下,入口为driver.py,比如libvirt driver实现对应为virt/libvirt/driver.py,找到spawn方法,该方法拉取镜像创建根磁盘、生成xml文件、define domain,启动domain等。最后虚拟机完成创建。nova-compute服务结束。
以上是创建虚拟机的各个服务的交互过程以及调用关系,需要注意的是,所有的数据库操作,比如instance.save()以及update操作,如果配置use_local为false,则会向nova-conductor发起RPC调用,由nova-conductor代理完成数据库更新,而不是由nova-compute直接访问数据库,这里的RPC调用过程在以上的分析中省略了。
- boot
- start
- stop
- reboot
- rebuild
- resize
- list
- delete
- reset-state
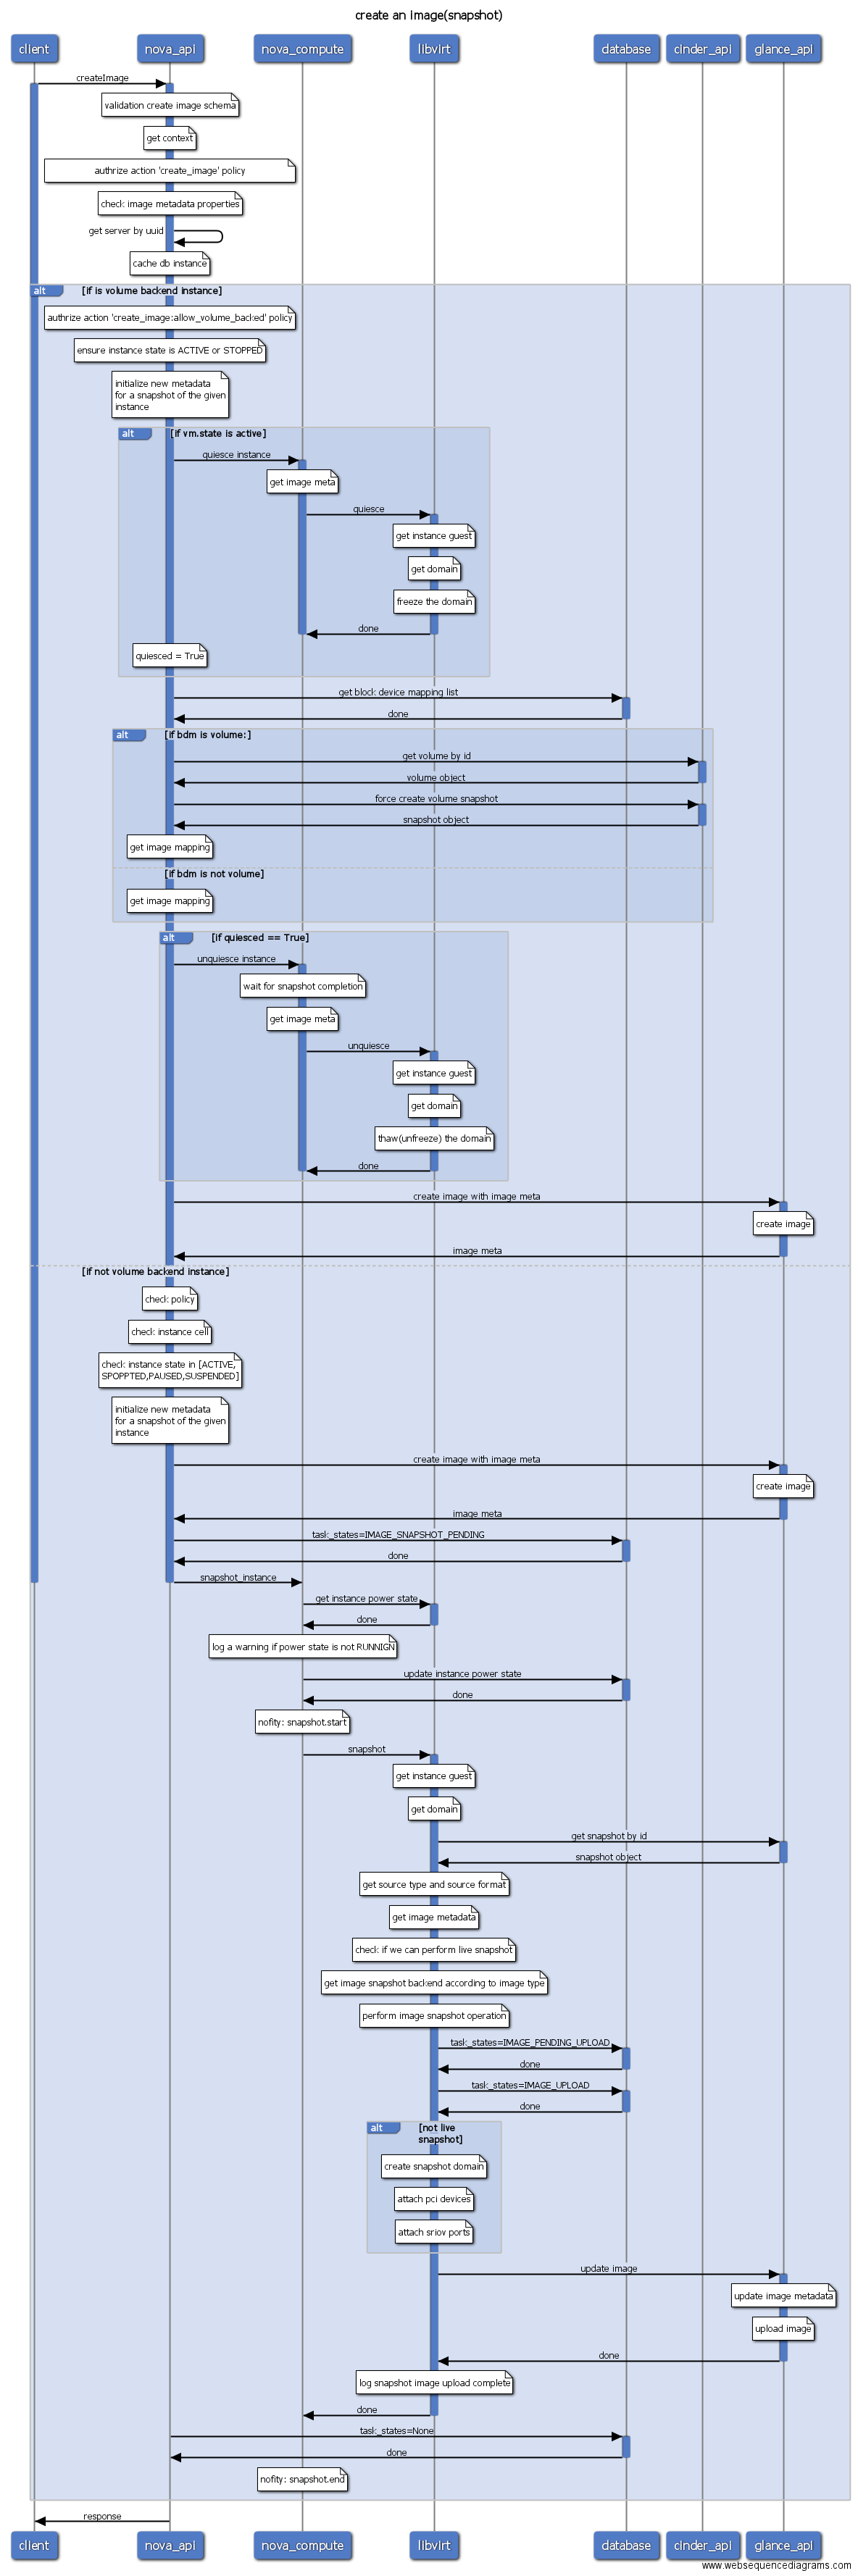
- create-image(快照)
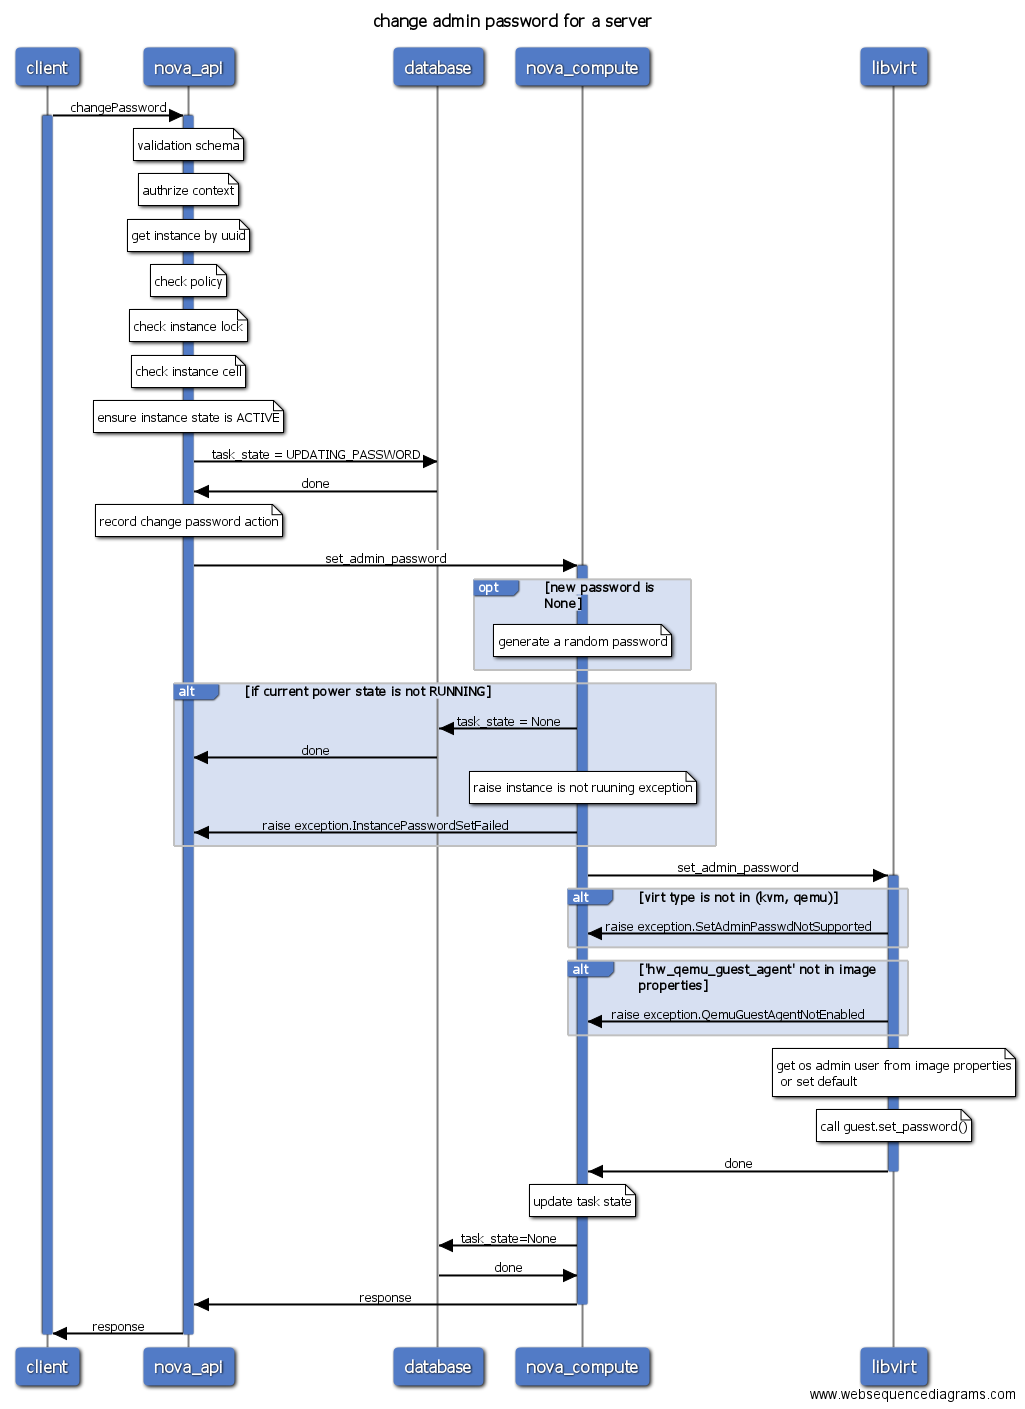
- set-password
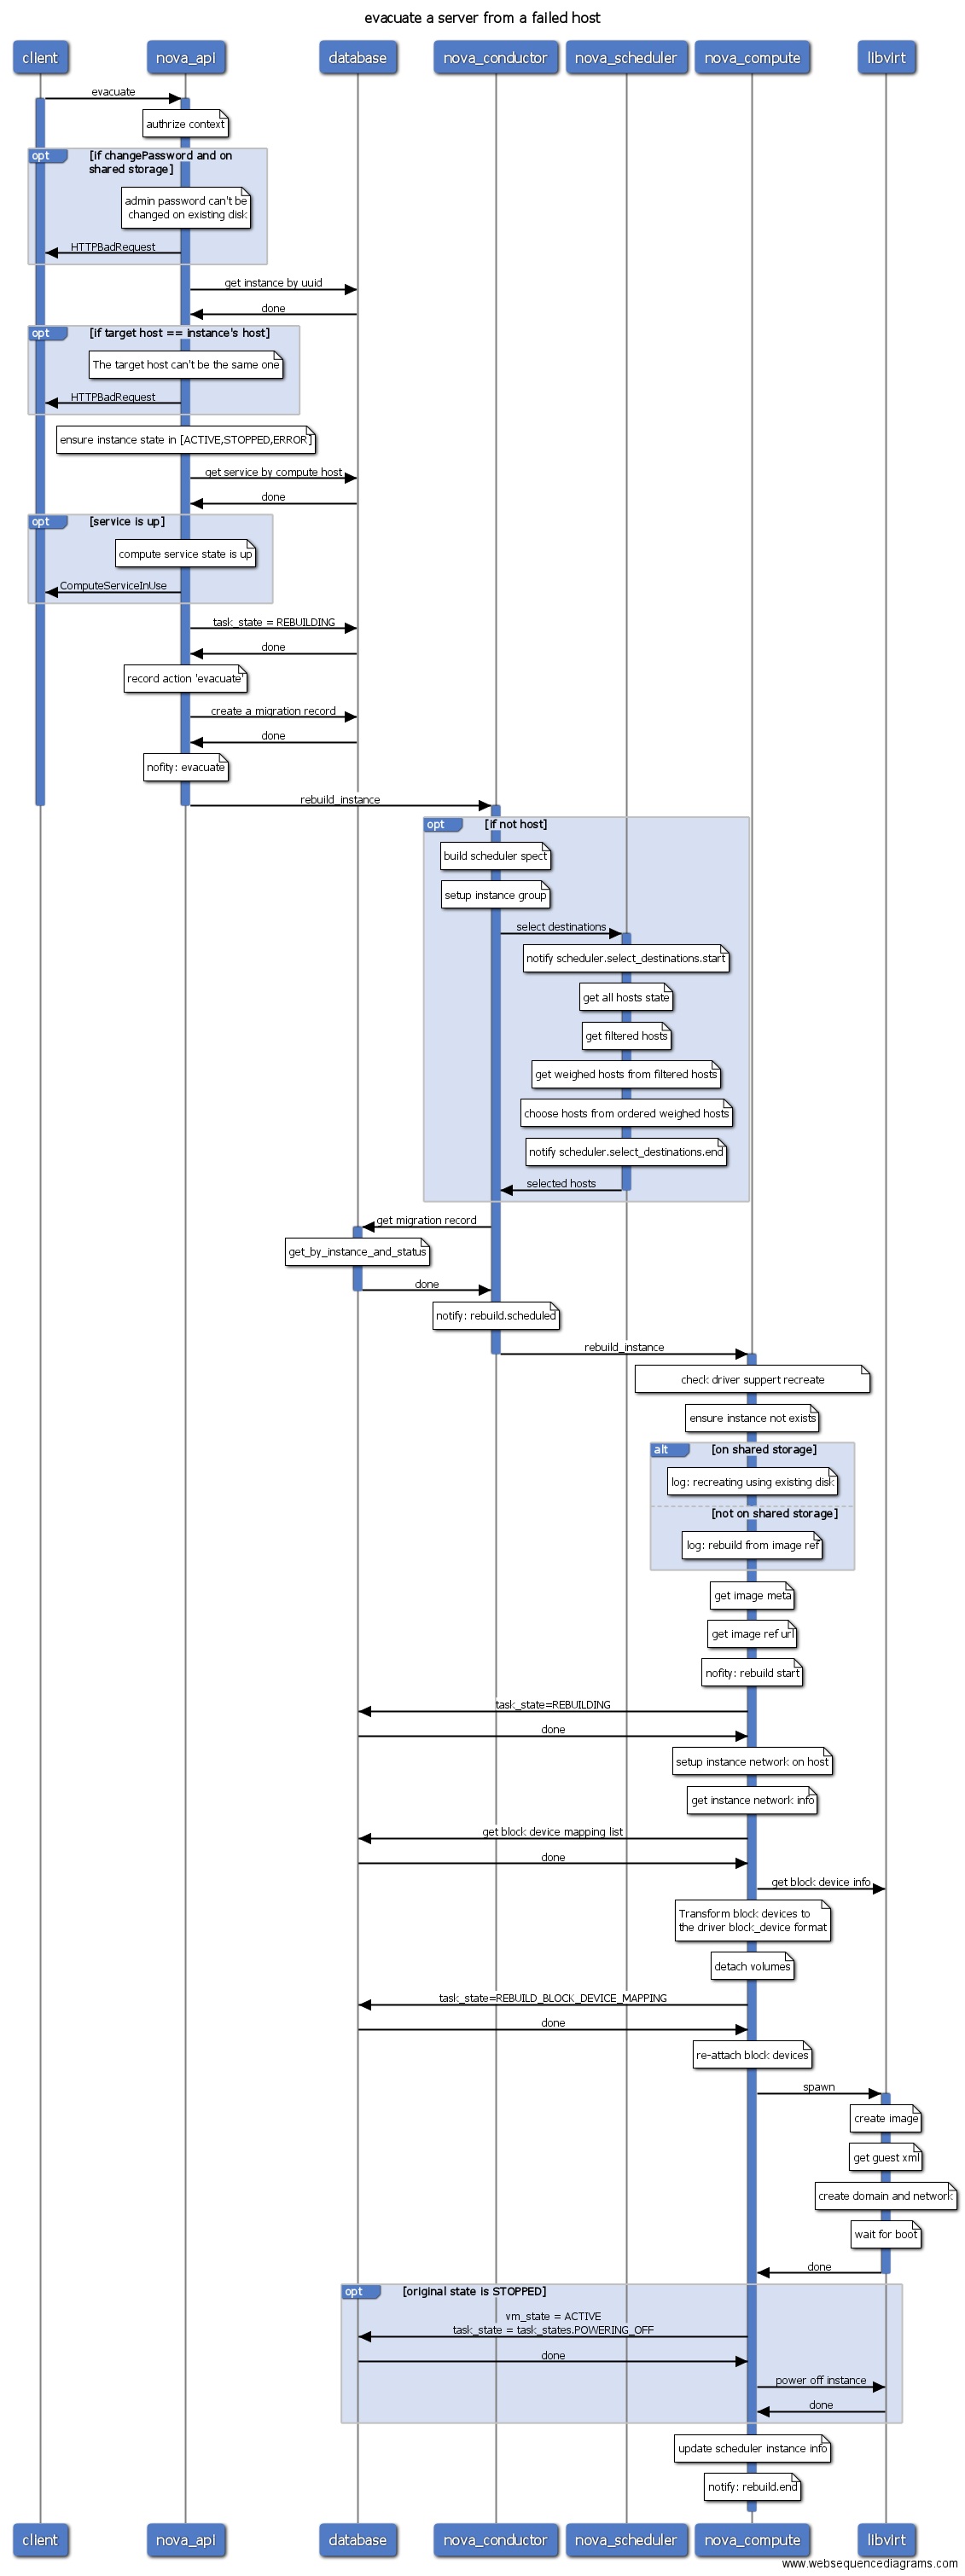
- evacuate(疏散迁移)
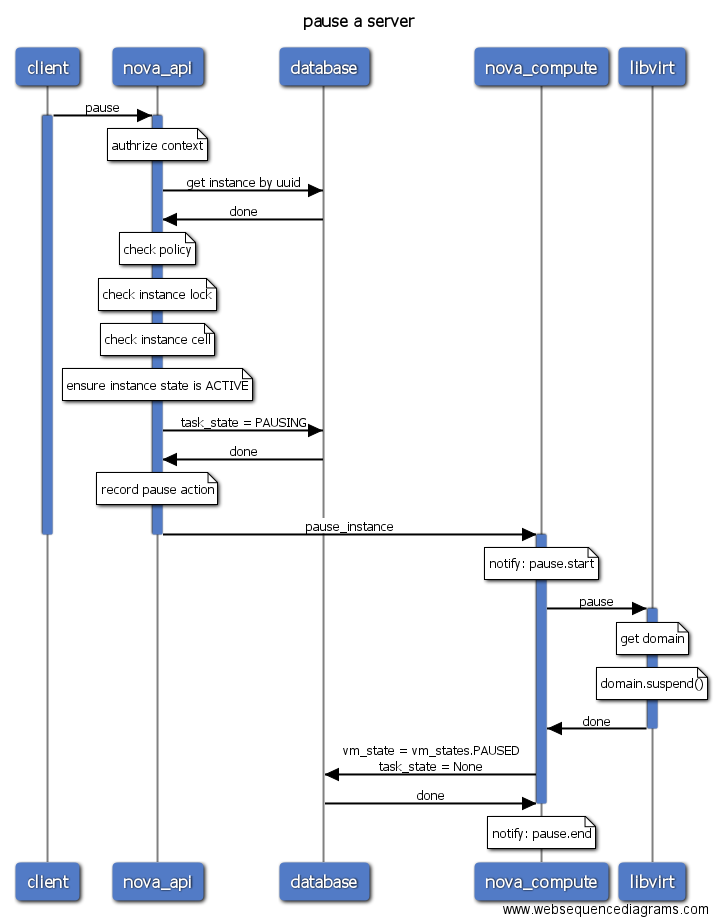
- pause
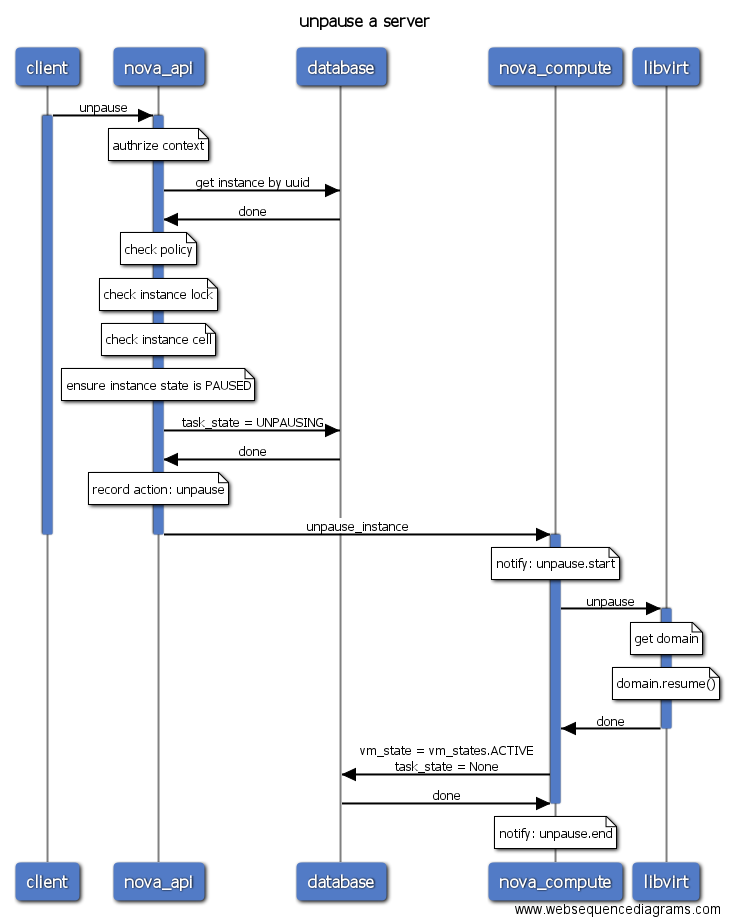
- unpause
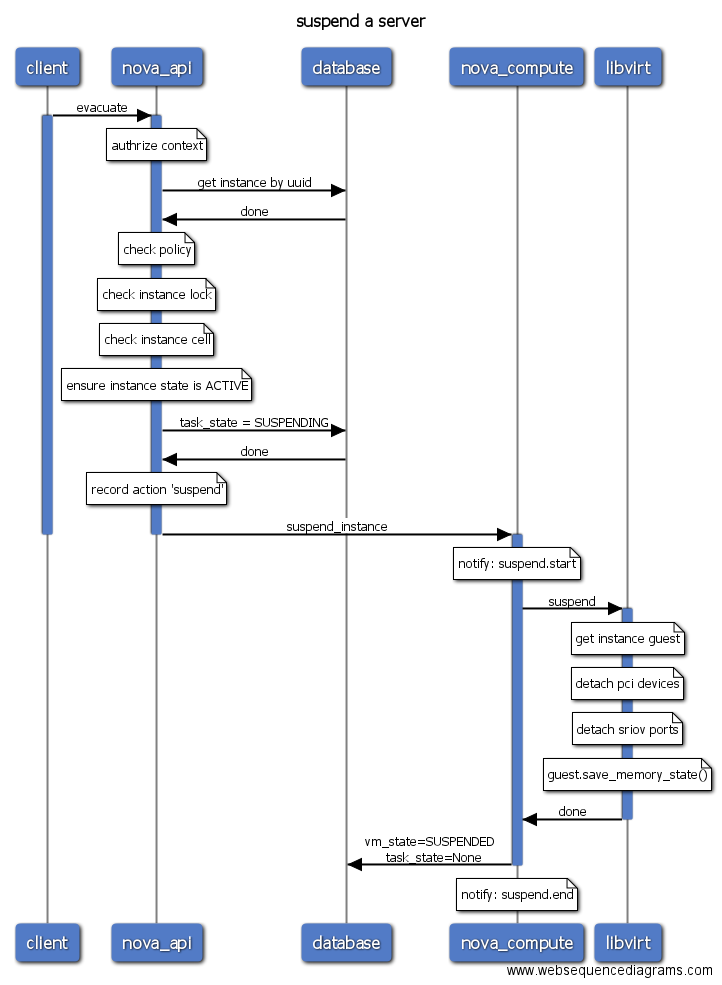
- suspend
- resume
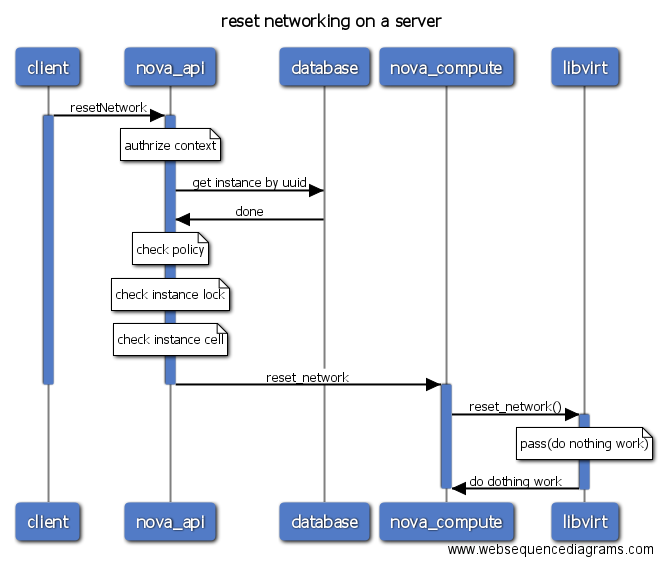
- reset-network
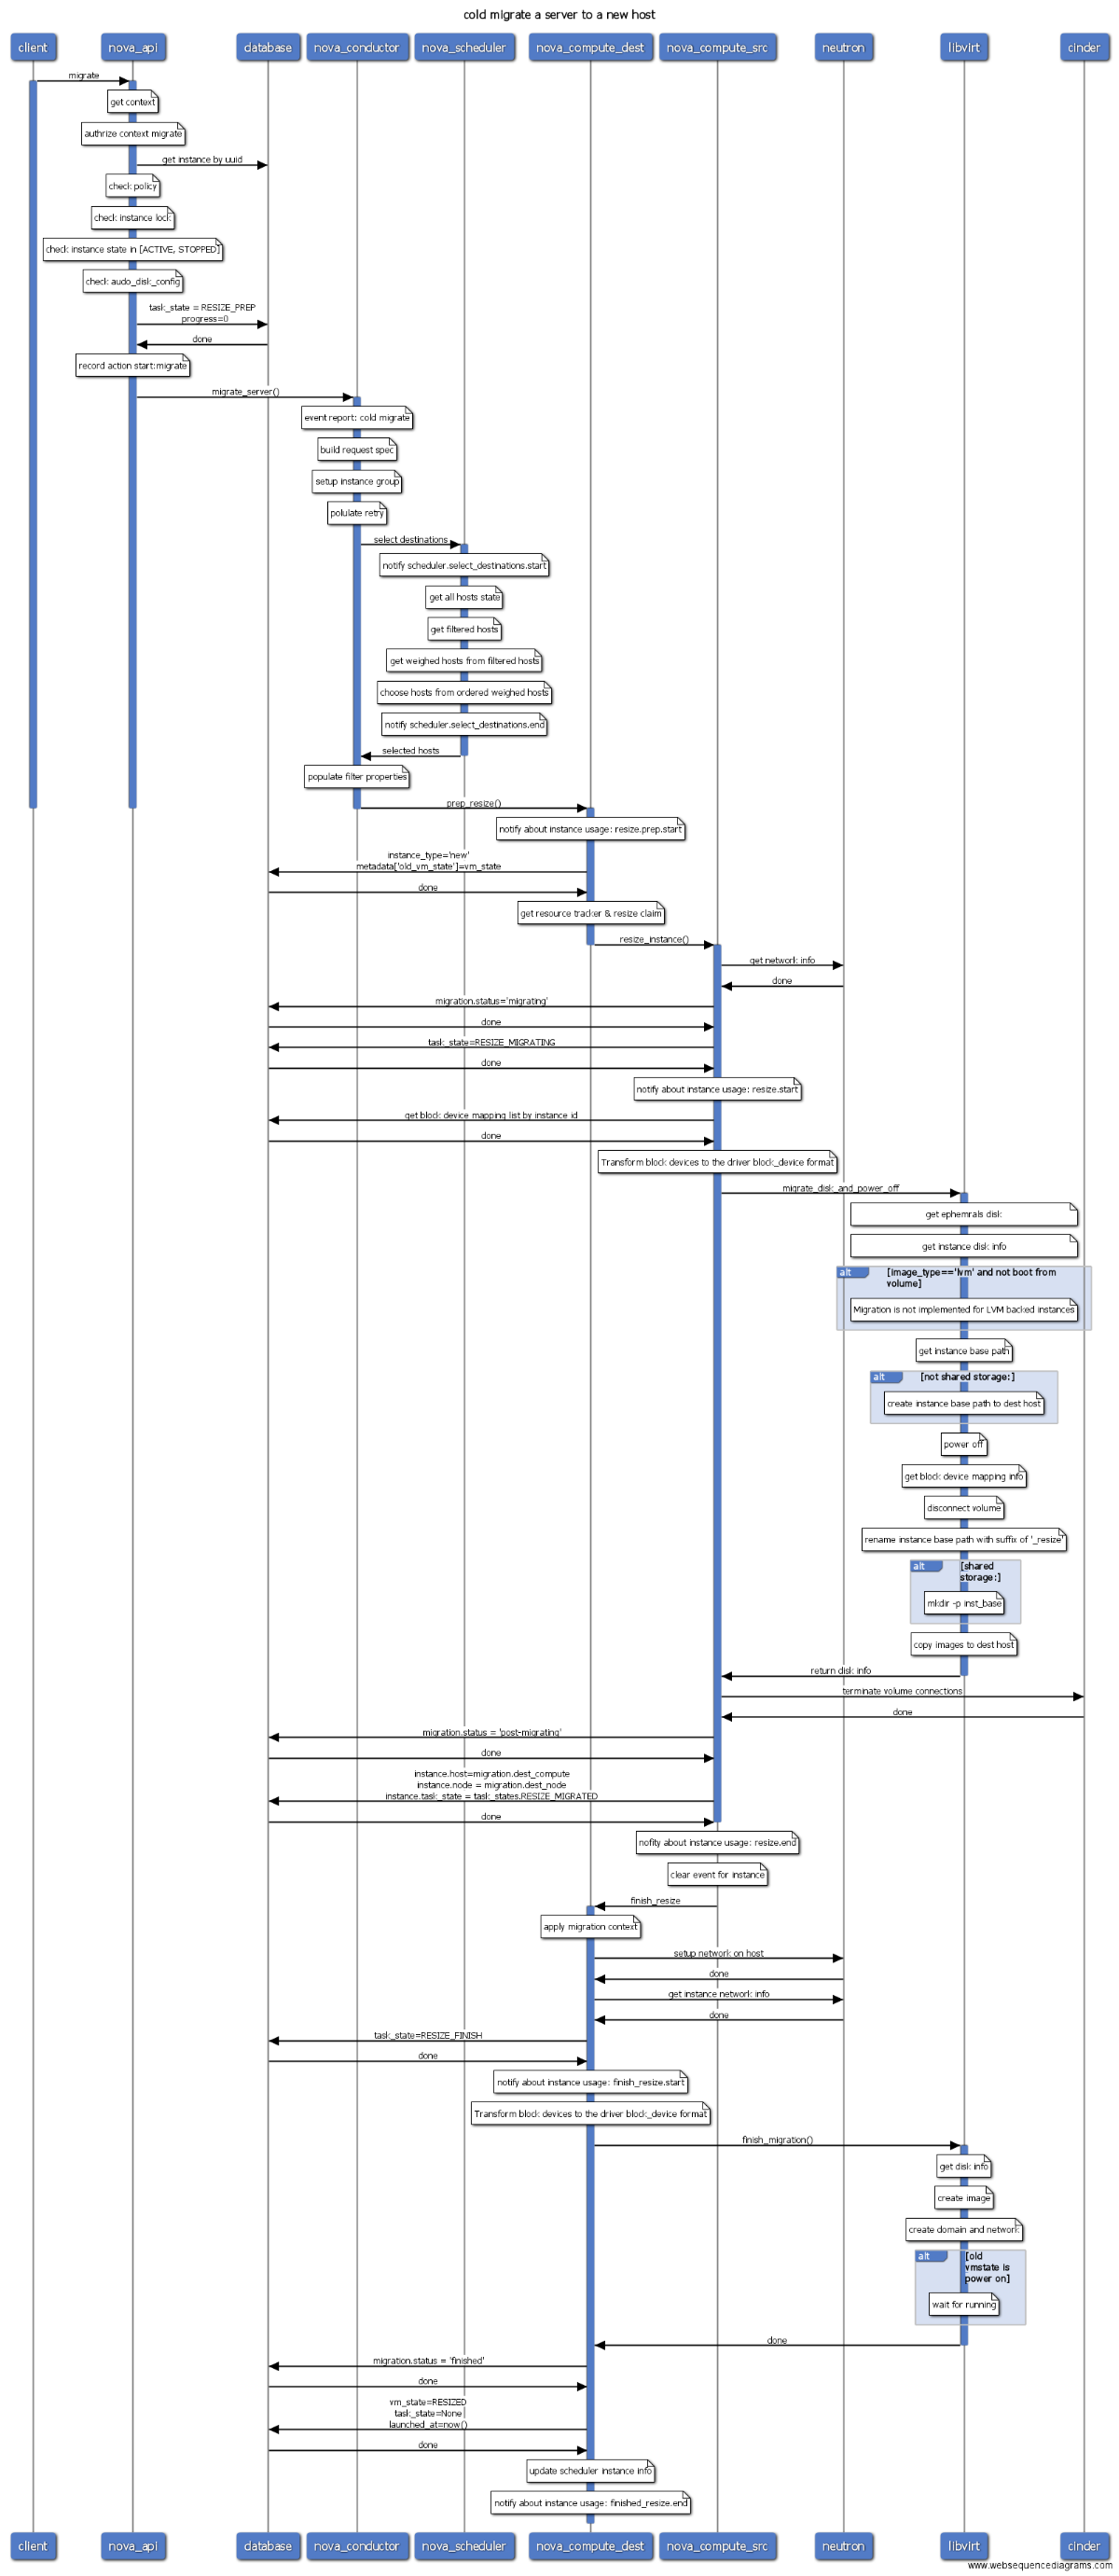
- migrate(冷迁移)
- live-migrate(在线迁移)
- Shelve
- Shelve-offload
- Unshelve
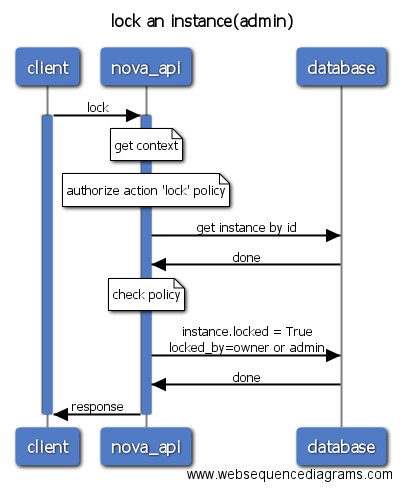
- lock
- unlock
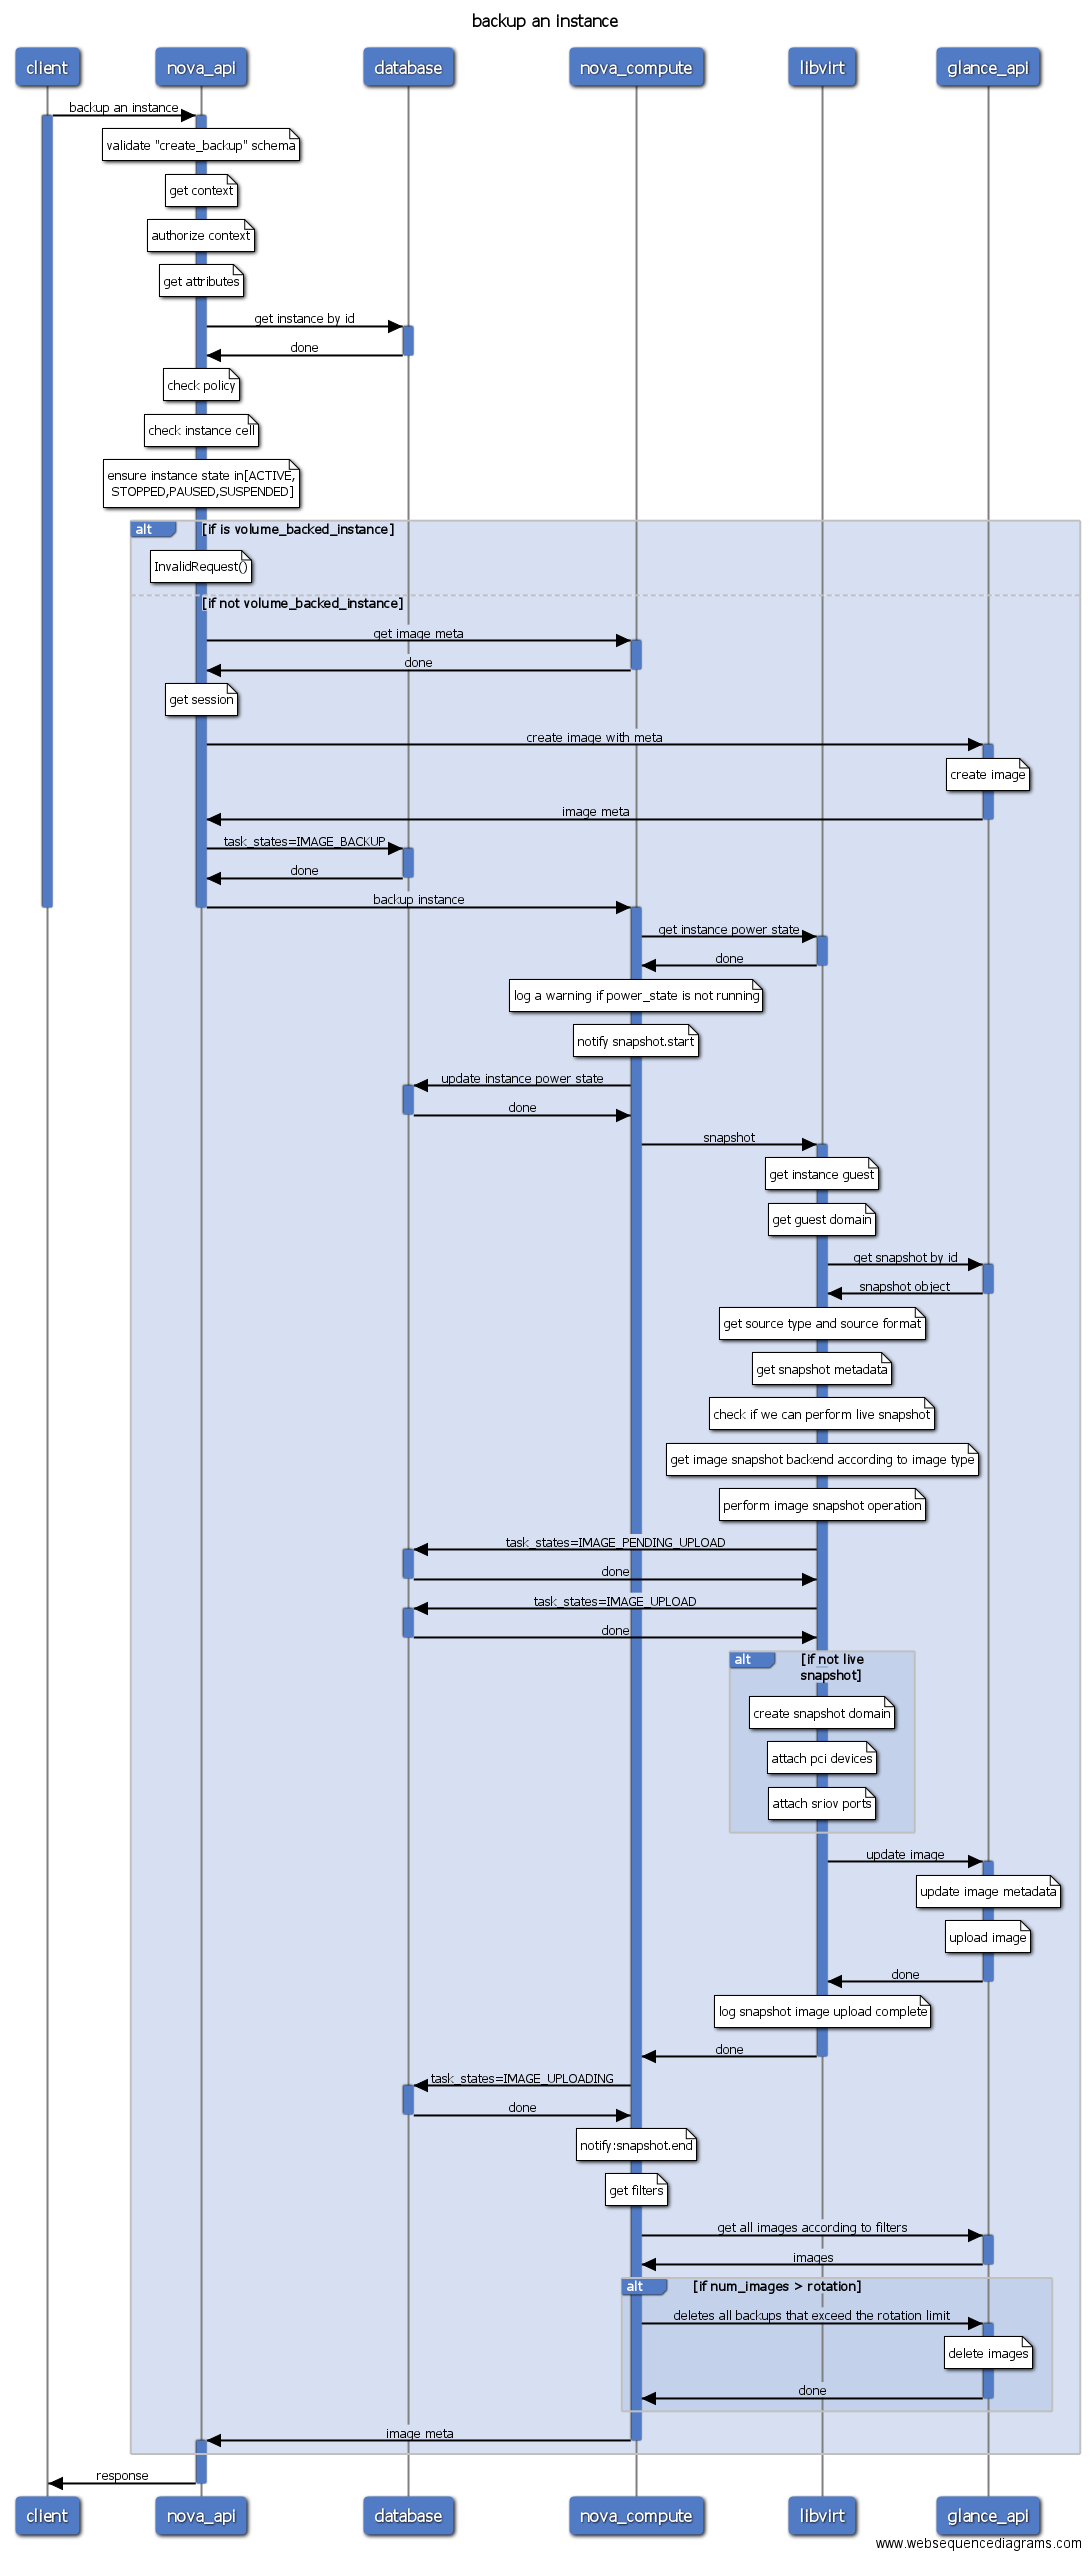
- backup
- Refresh Network
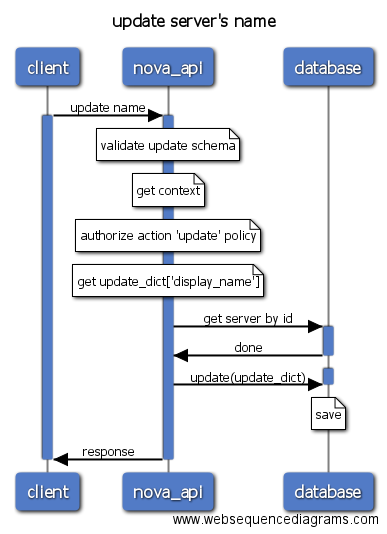
- rename/update
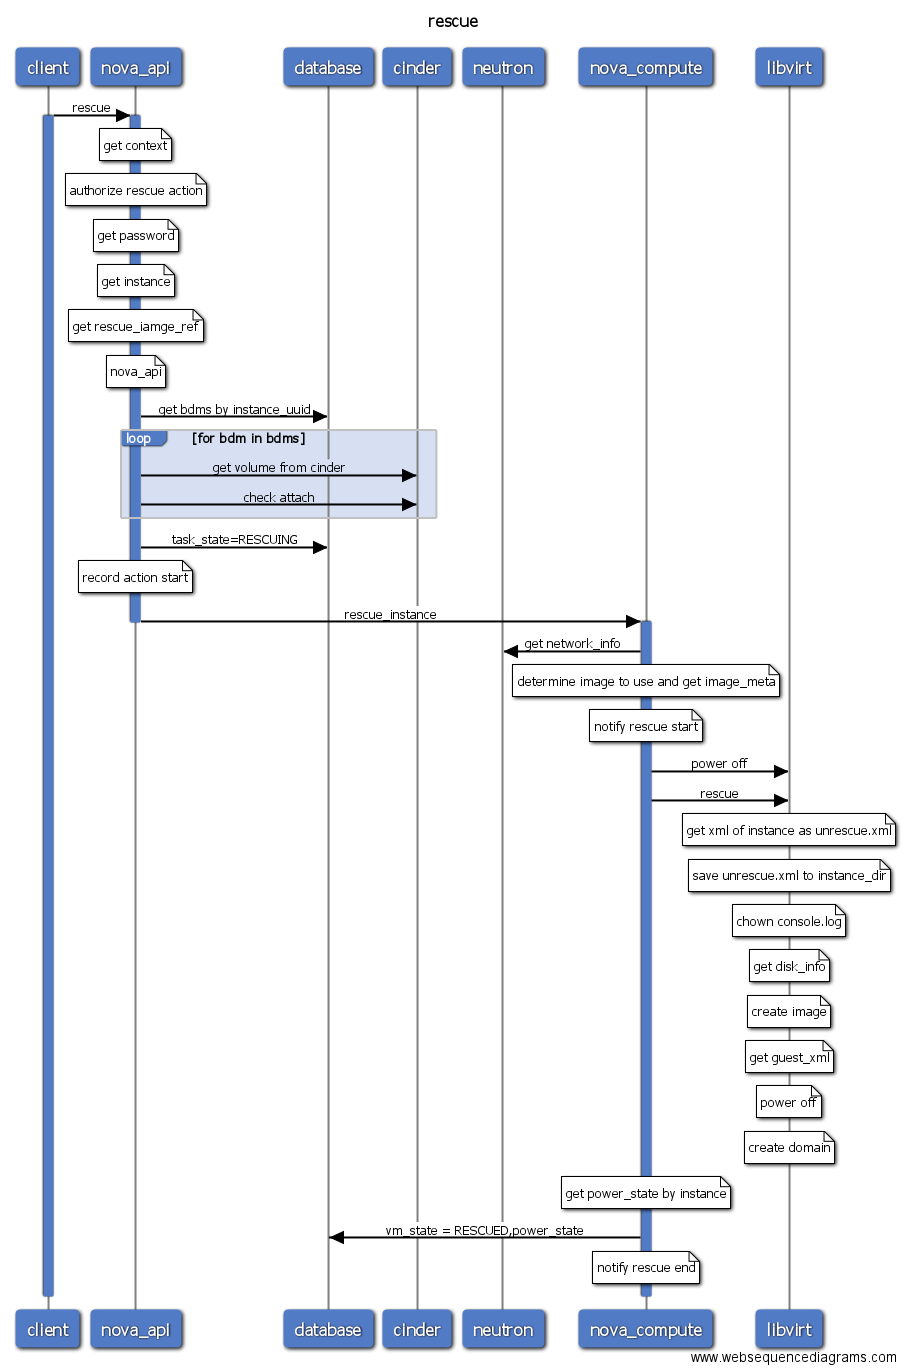
- rescue
- unrescue
- volume-attach
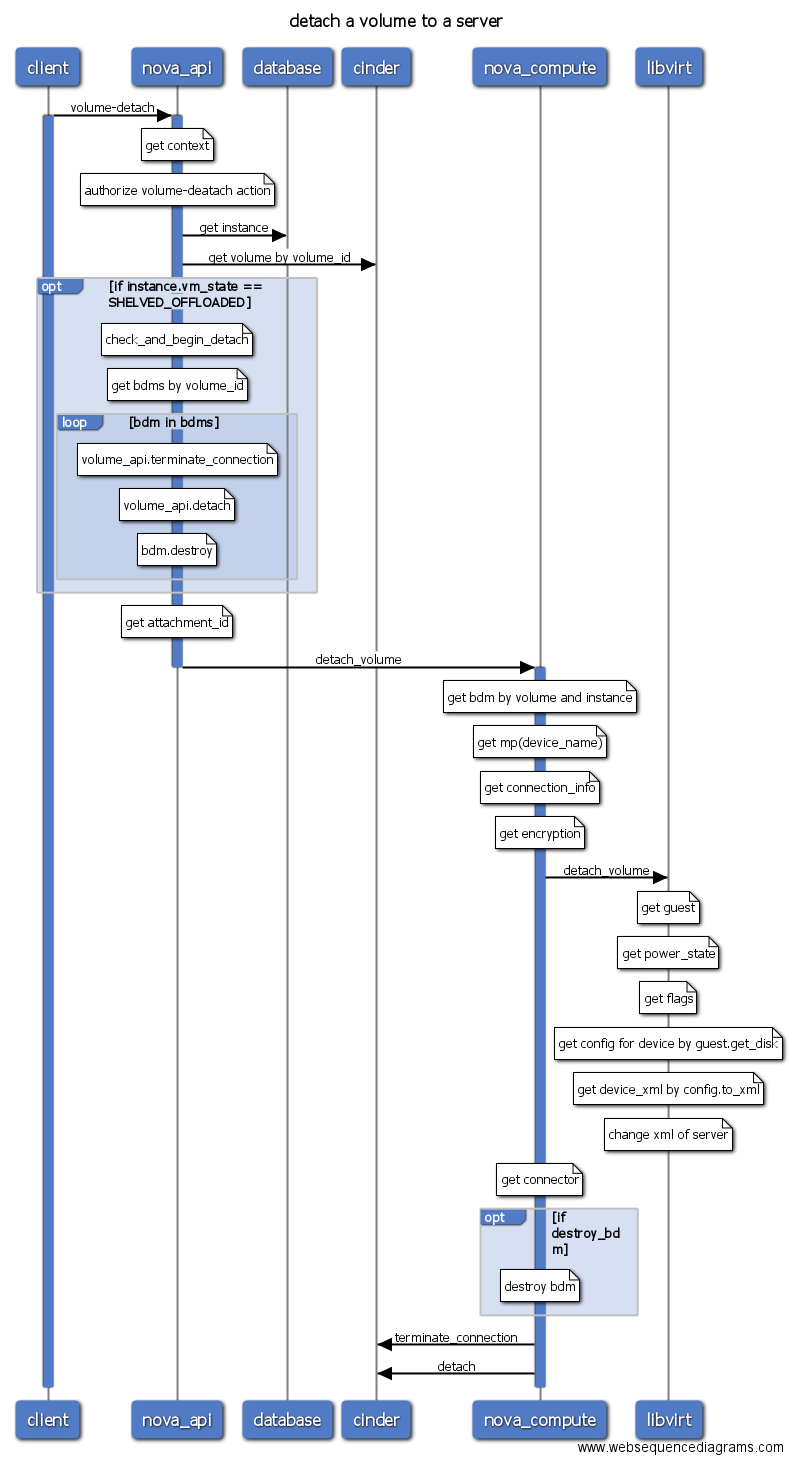
- volume-detach
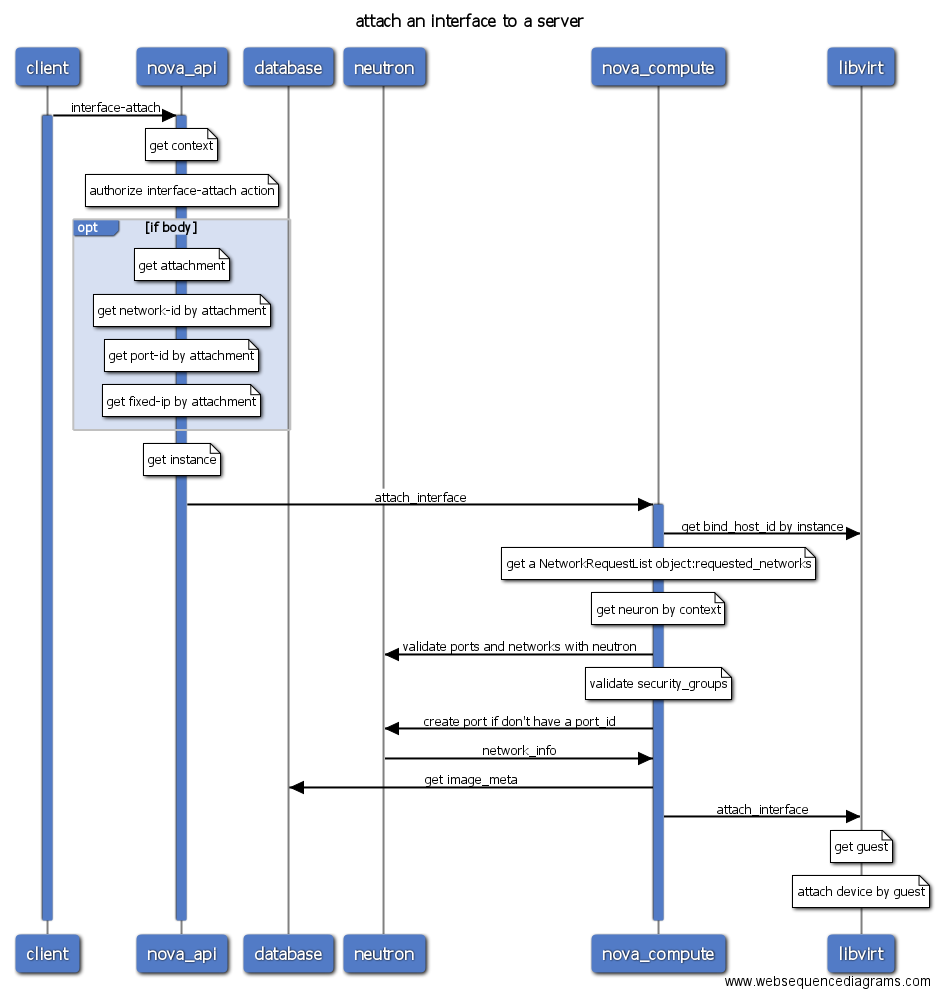
- interface-attach
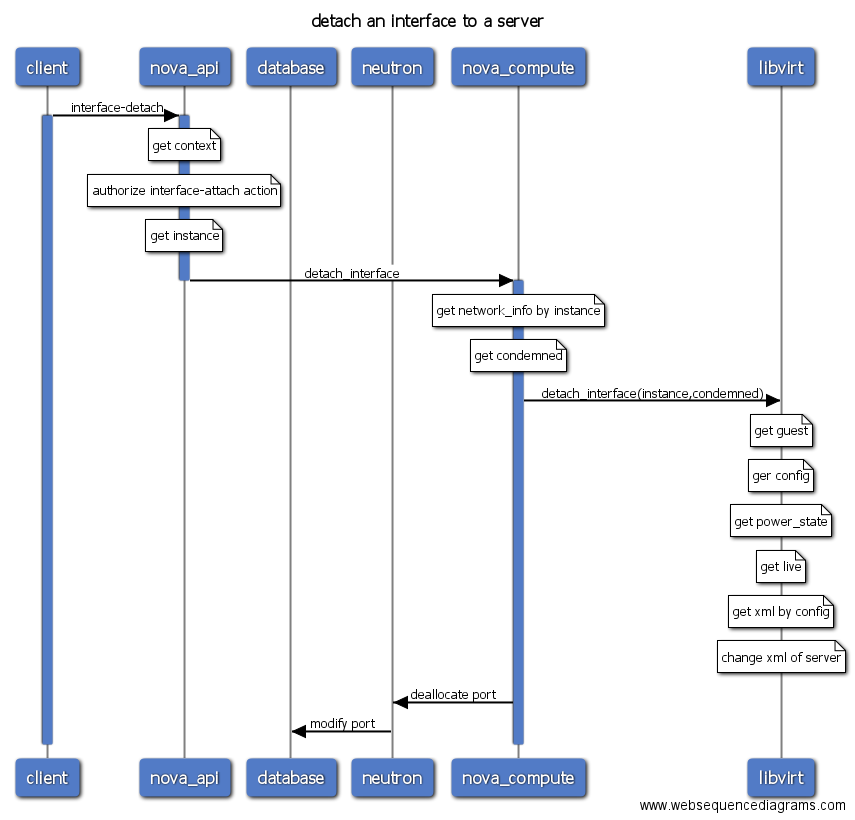
- interface-detach
-
Cinder
-
Neutron
-
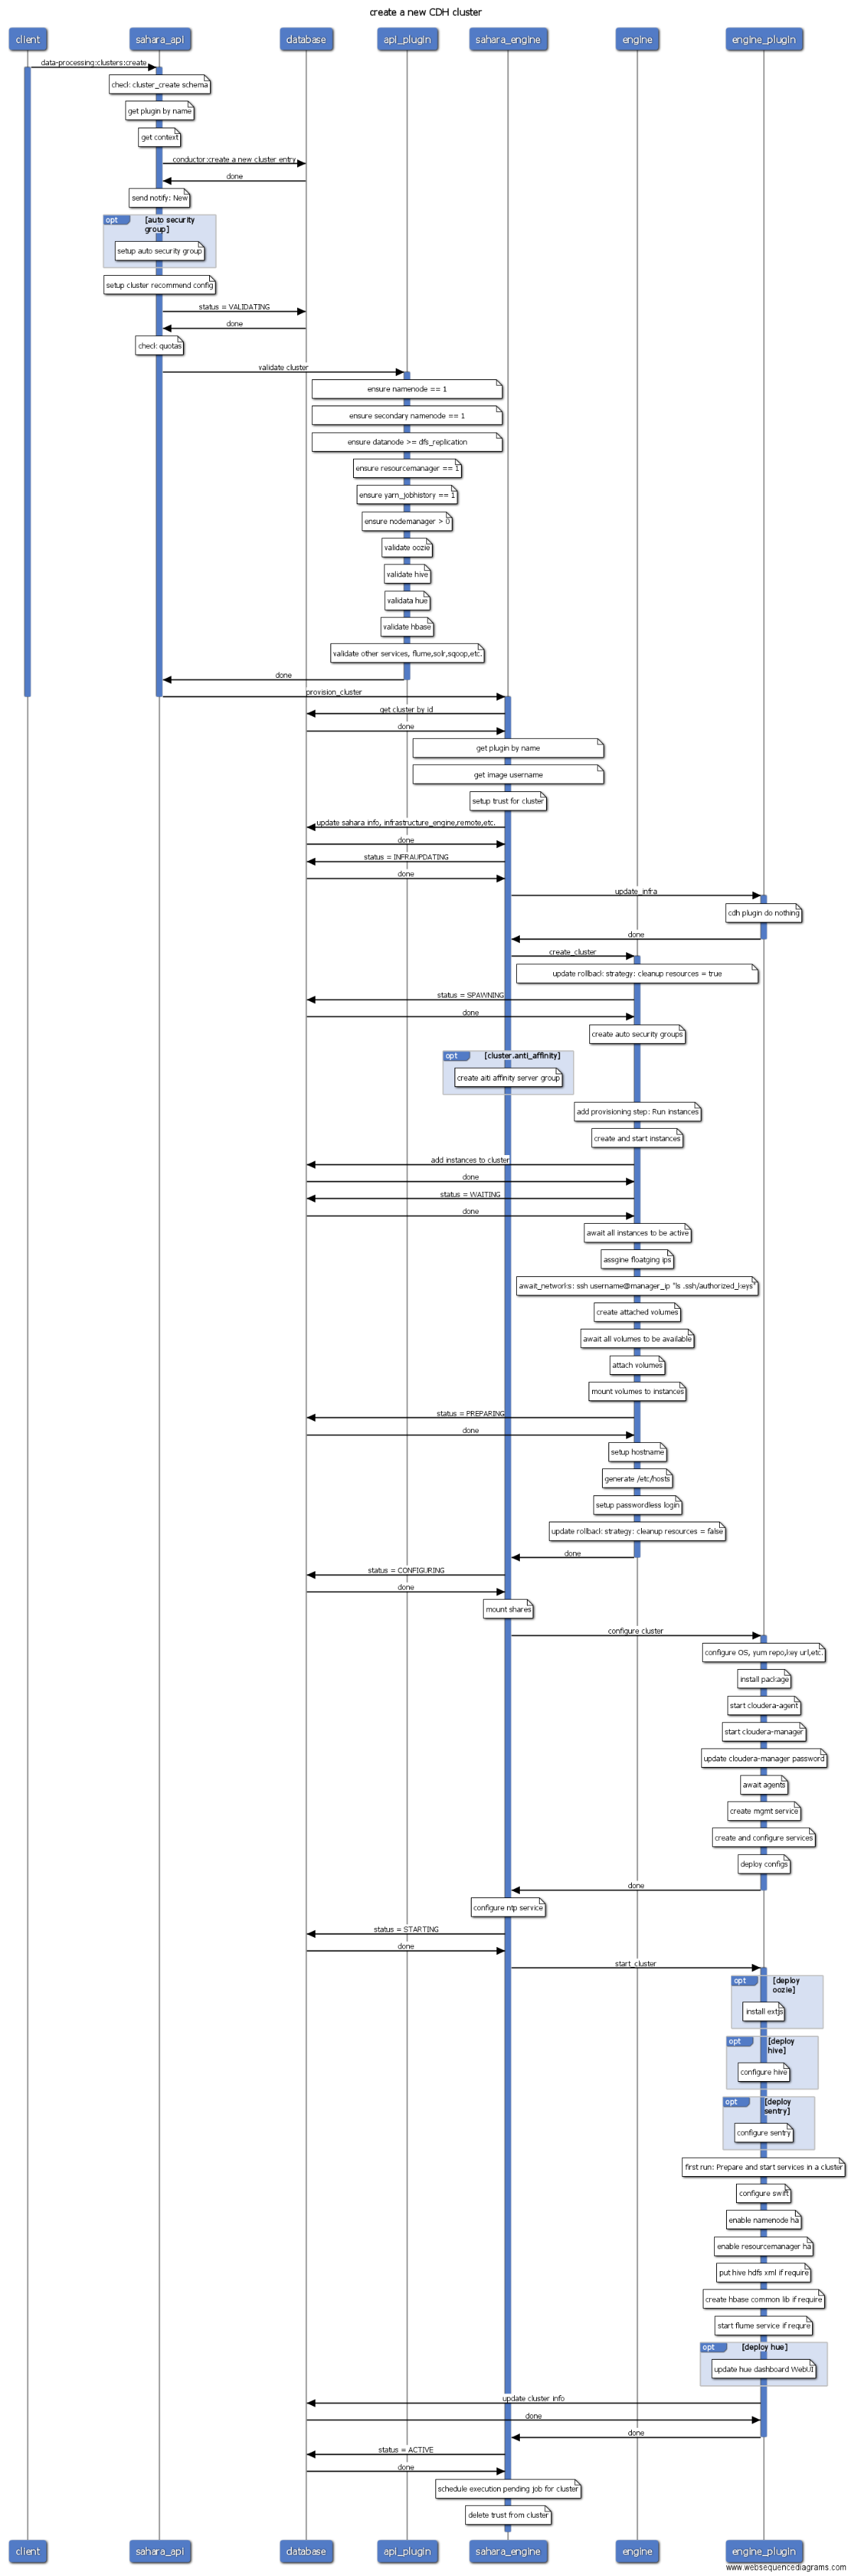
Sahara
- Magnum
- ...
生成最新图片需要连接外网并且依赖于Make工具,请确保所依赖的包已经安装。
直接执行make即可扫描所有的源码并自动生成操作序列图.
make
生成的图片默认会保存在./output路径下.
执行以下命令可清理所有的图片:
make clean
注意:
- 图中蓝色线表示当前进程是active的,因此可以很容易看出是RPC同步调用还是异步调用的。
- Nova conductor配置use_local为false,访问数据库需要通过RPC调用conductor,但图中为了方便表示数据库操作,省略了RPC调用conductor访问数据库的过程。Nova已经使用objects模型封装了数据库操作,代码位于
nova/objects目录。

从操作序列图看,虚拟机的创建主要分为三步:第一步是nova api对用户创建虚拟机的参数进行检查,如果参数没有问题,nova api会在数据库中创建相应的表项用来记录用户的请求,然后给nova-conductor发起一个异步RPC调用,conductor会对调度时的filters spect进行初始化,并向nova-scheduler发起RPC同步调用,nova-scheduler收到nova conductor发来的请求之后筛选能够满足虚拟机资源需求的hypervisor,并按照一定的策略选取其中的一台hypervisor,返回给nova-conductor,conductor然后给候选的计算节点nova compute发起一个run_instance的RPC调用。 Nova compute收到run_instance的请求之后,会为虚拟机的运行分配各种资源,如:ip地址、磁盘、网络等。分配完各种资源之后,nova会调用libvirt创建根磁盘、xml文件等,并启动虚拟机。到此,虚拟机的创建基本上就结束了,等虚拟机启动完成,用户就可以登录和控制虚拟机了。
Nova中reboot操作可以分成两种:soft reboot和hard reboot。Soft reboot通过发送acpid或者guest agent信号给虚拟机,虚拟机接收到信号号主动执行重启操作。虚拟机必须支持appid或者运行qemu guest agent才能执行soft reboot。若soft reboot失败或者超时(默认120秒),则会进入hard reboot。hard reboot将执行强制重启(相当于强制切电源),虚拟机重启的序列图如下:

从上图可以看出,soft reboot和hard reboot最主要的差别是libvirt所执行的操作不同,soft reboot关机时执行shutdown操作,而hard reboot执行destroy操作,可能导致正在运行的虚拟机异常关机导致数据丢失。

从上图中看出,修改管理员密码是通过libvirt调用qemu guest agent执行的,因此虚拟机必须安装了qemu-guest-agent服务并且处于运行状态。
注意L版修改管理员密码只支持使用kvm/qemu hypervisor。
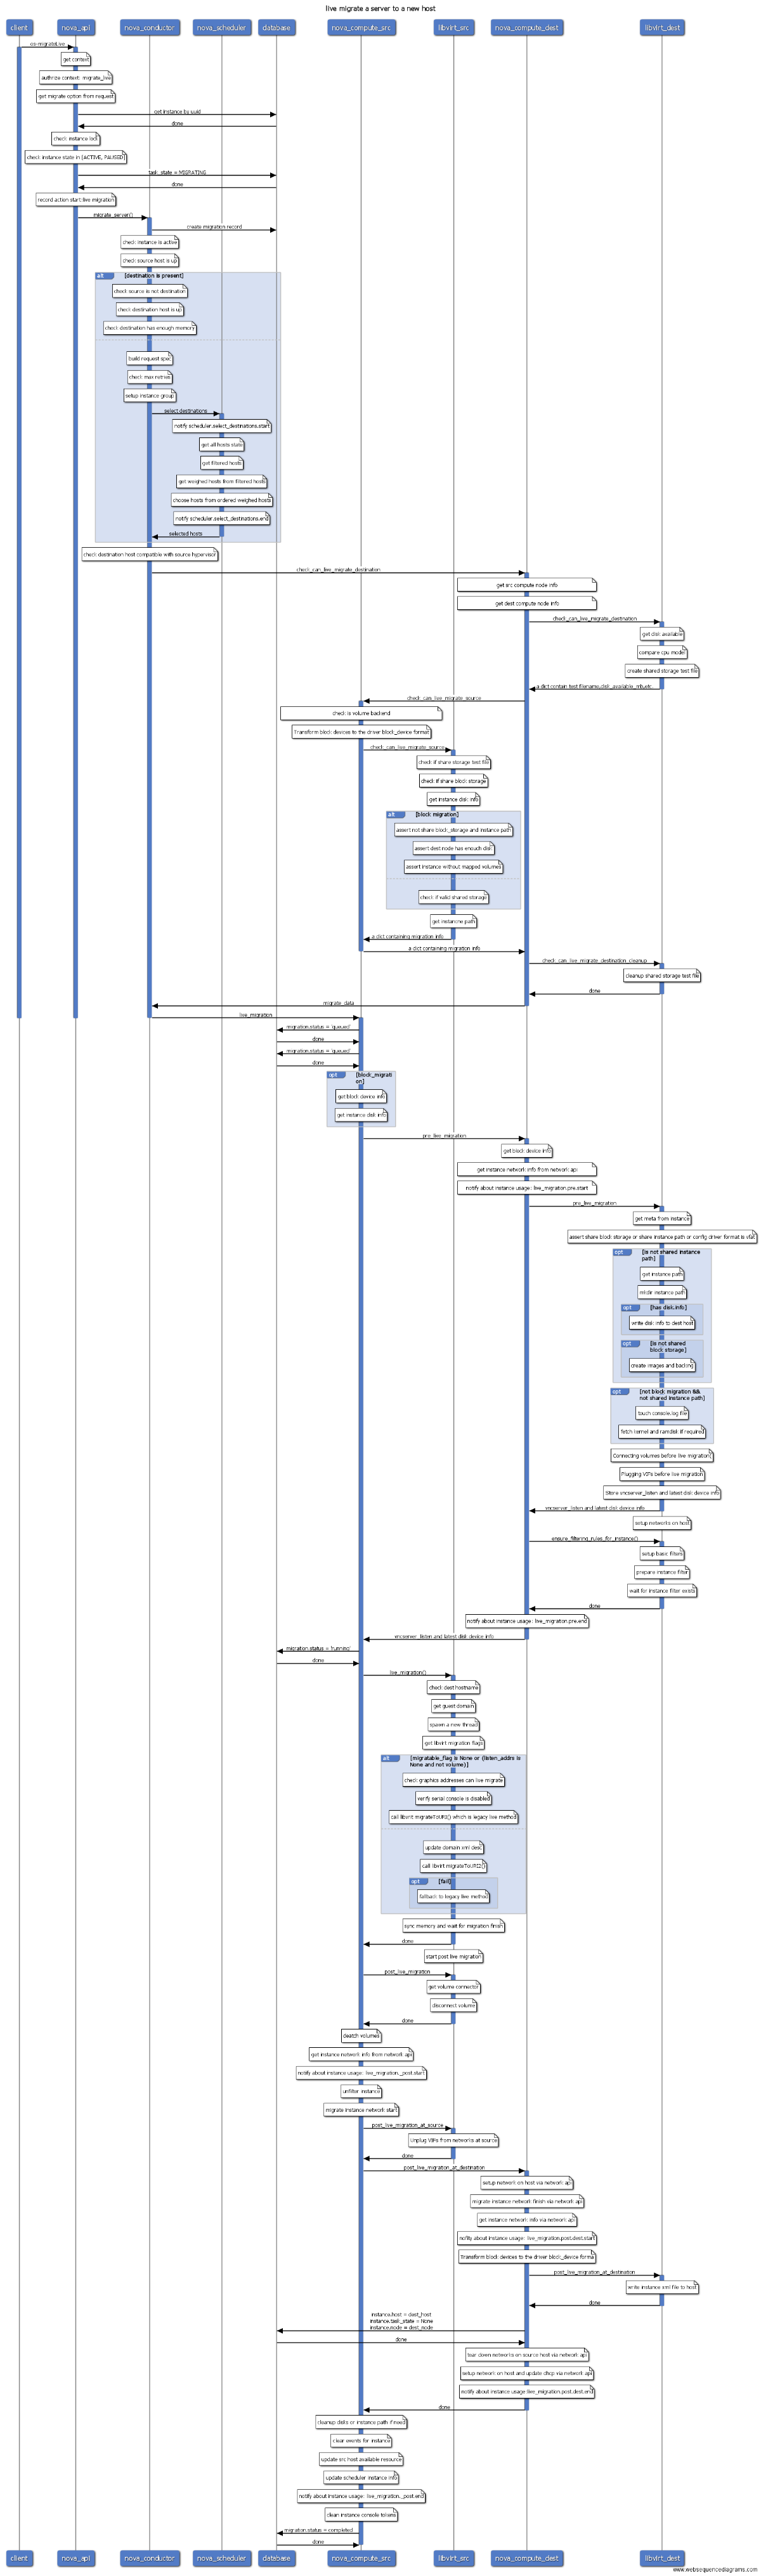
Live migrate是在不停止虚拟机的情况下,将虚拟机从一台宿主机上迁移到另外一台宿主机。在线迁移操作序列图如下:

在线迁移相对复杂,不过从图中看还是比较清晰的。如果不使用共享存储,传输虚拟机磁盘会花很长一段时间,导致虚拟机迁移很慢,因此建议使用统一共享分布式存储做OpenStack存储后端。 在线迁移会不断的增量同步内存状态信息,直到收敛到很小的变化时,虚拟机会freeze一段时间,即处于downtime状态,完成最后的状态同步。迁移完成后,原来的虚拟机会自动删除。
所有的图形均使用工具生成,并且是可编程的。你只需要阅读源代码并使用Websequence Diagrams Tool语法编写代码,语法请参考官方文档。以pause操作为例,对应源码为:
title pause a server

participant client
participant nova_api

client->nova_api: pause
activate client
activate nova_api

# nova/api/openstack/compute/pause_server.py _pause()
note over nova_api: authrize context
nova_api->database: get instance by uuid
database->nova_api: done

# nova/compute/api.py pause()
note over nova_api: check policy
note over nova_api: check instance lock
note over nova_api: check instance cell
note over nova_api: ensure instance state is ACTIVE
nova_api->database: task_state = PAUSING
database->nova_api: done

note over nova_api: record pause action
# nova/compute/rpcapi.py pause_instance()
nova_api->nova_compute: pause_instance
deactivate nova_api
deactivate client
activate nova_compute

# nova/compute/manager.py pause_instance()
note over nova_compute: notify: pause.start
nova_compute->libvirt: pause
activate libvirt

# nova/virt/libvirt/driver.py pause()
note over libvirt: get domain
note over libvirt: domain.suspend()
libvirt->nova_compute: done
deactivate libvirt
# nova/compute/manager.py pause_instance()
nova_compute->database: vm_state = vm_states.PAUSED\ntask_state = None
database->nova_compute: done
note over nova_compute: notify: pause.end
deactivate nova_compute
新增了源码后,只需要重新执行make命令即可生成新的图片。
以下这些开发者参与了该项目:
- AndiaQ: 喜爱研究OpenStack的萌妹纸,她的博客:
https://andiaq.github.io。 - int32bit: 从2013年开始折腾OpenStack H版本,研究生期间曾在英特尔实习研究nova、ironic项目, 毕业后在UnitedStack负责cinder、nova开发和运维,现供职于云极星创,主要研究nova和容器相关技术。nova、cinder以及oslo的代码贡献者。
- ljjjustin: OpenStack专家, 更多资料查看他的博客
- boot: 创建虚拟机。
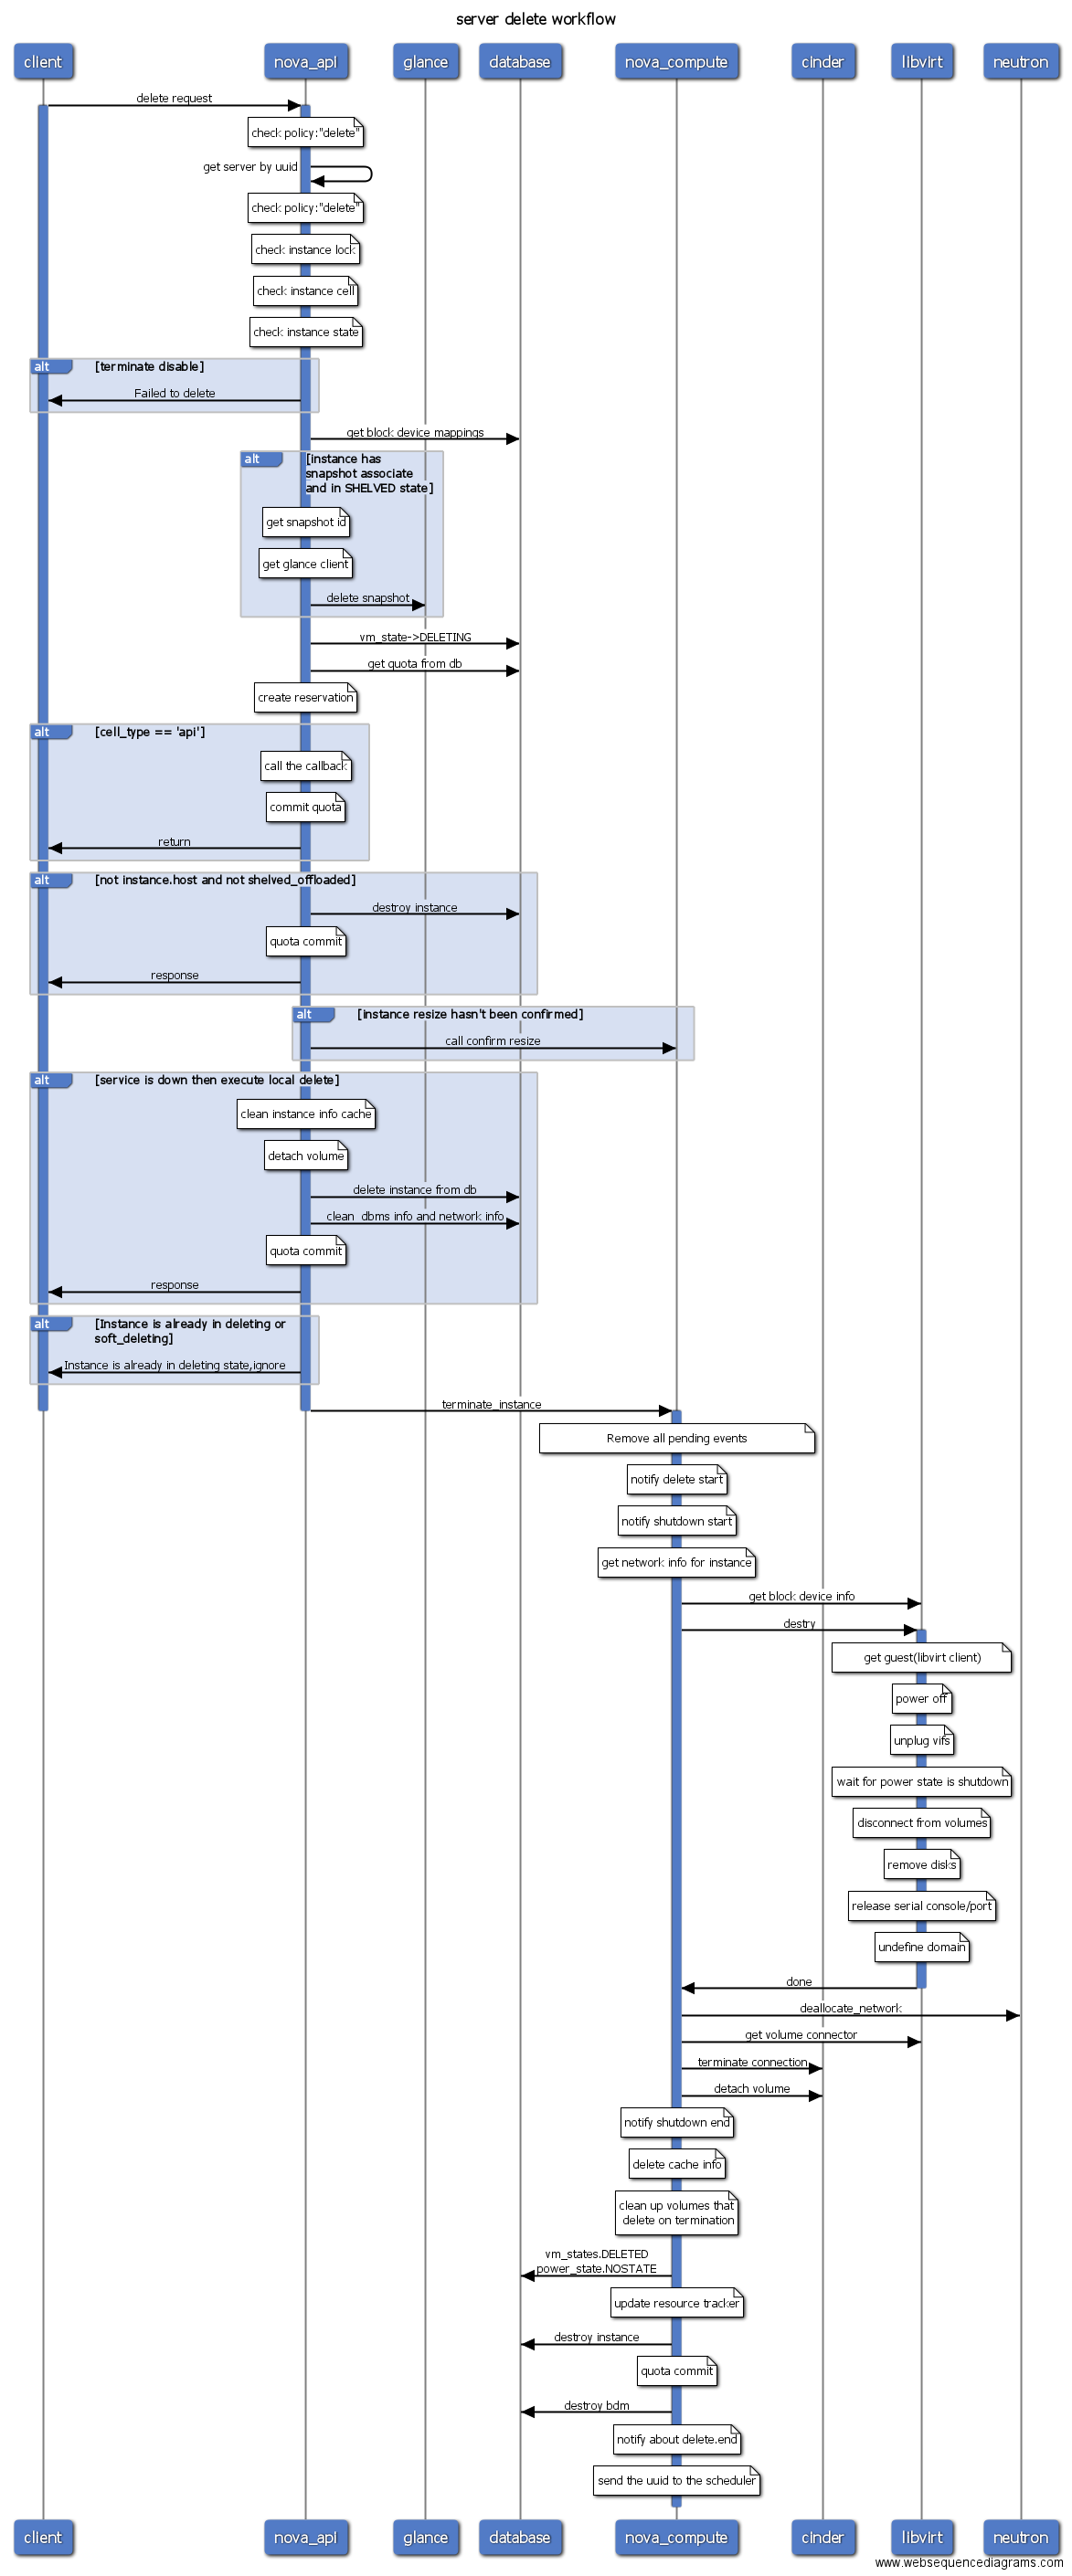
- delete: 删除虚拟机。
- force-delete: 无视虚拟机当前状态,强制删除虚拟机。即使开启了软删除功能,该操作也会立即清理虚拟机资源。
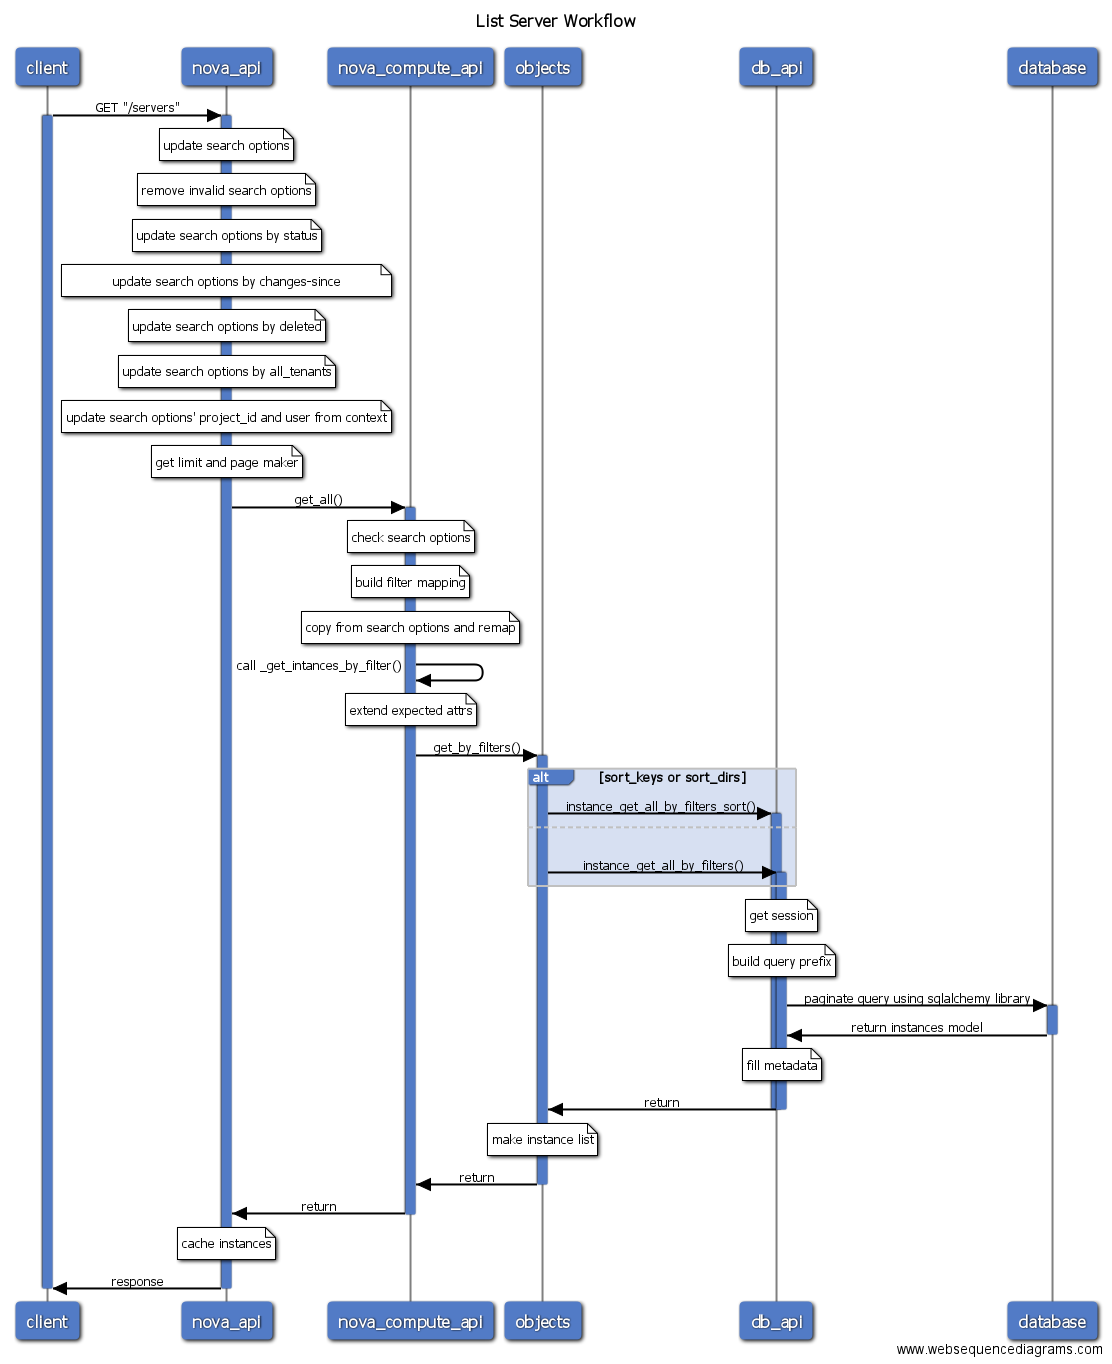
- list: 显示虚拟机列表。
- show: 查看指定虚拟机的详细信息。
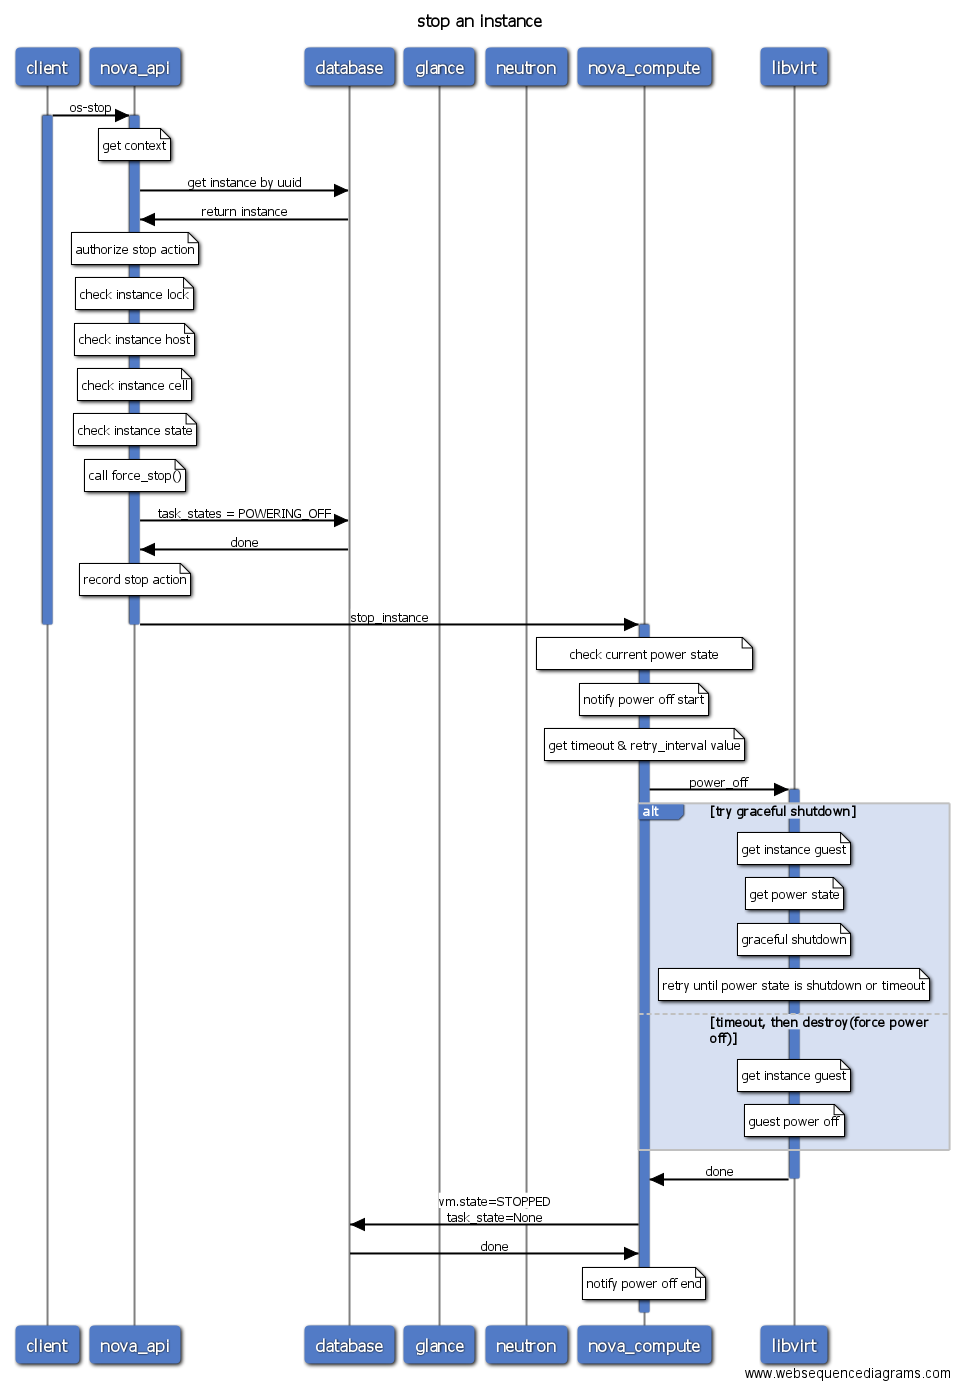
- stop: 关机虚拟机。
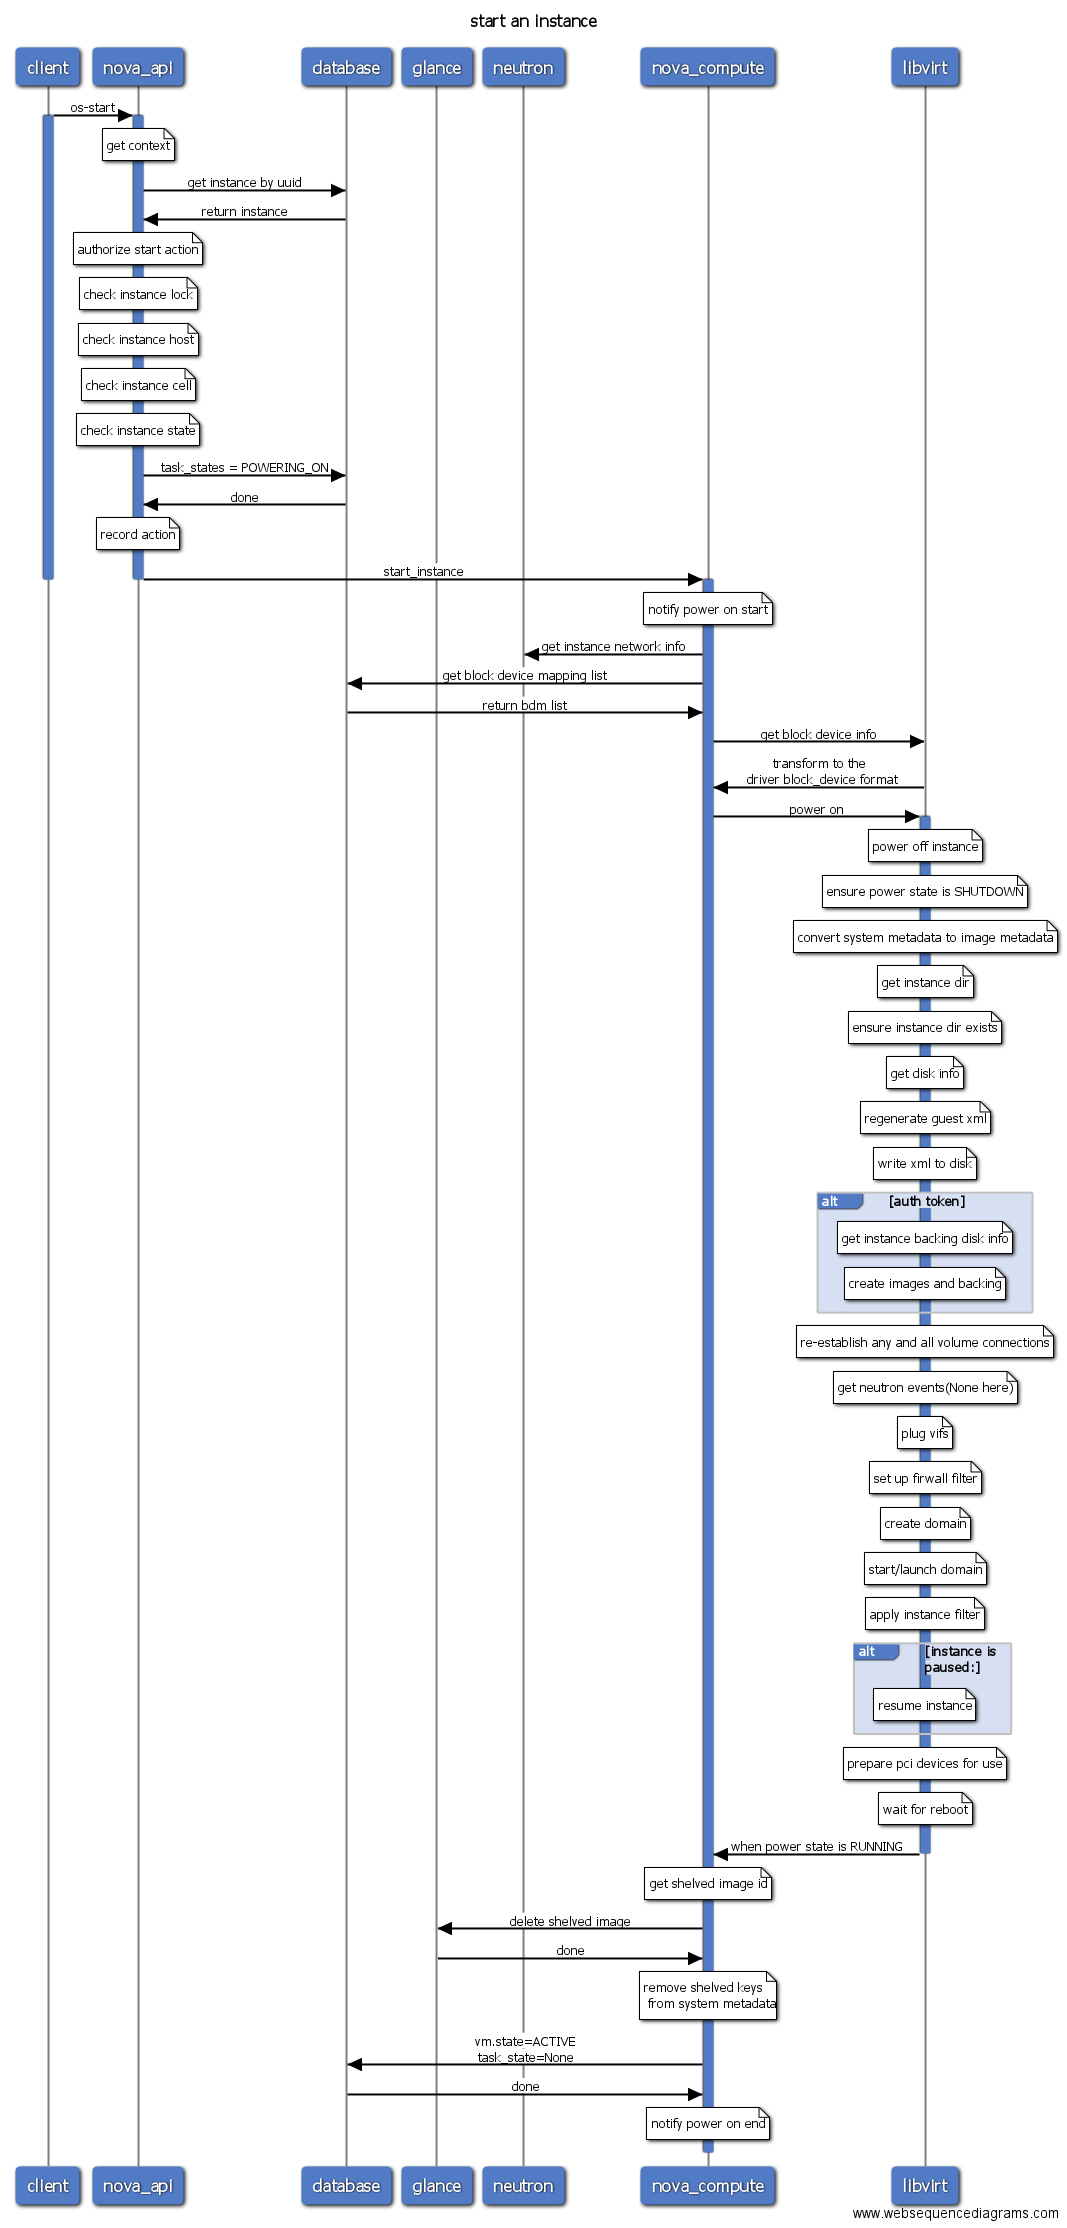
- start: 开机虚拟机。
- reboot: 重启虚拟机。默认先尝试软重启,当软重启尝试120后失败,将执行强制重启。
- migrate: 冷迁移虚拟机,迁移过程中虚拟机将关机。
- live-migrate: 在线迁移虚拟机,虚拟机不会关机。
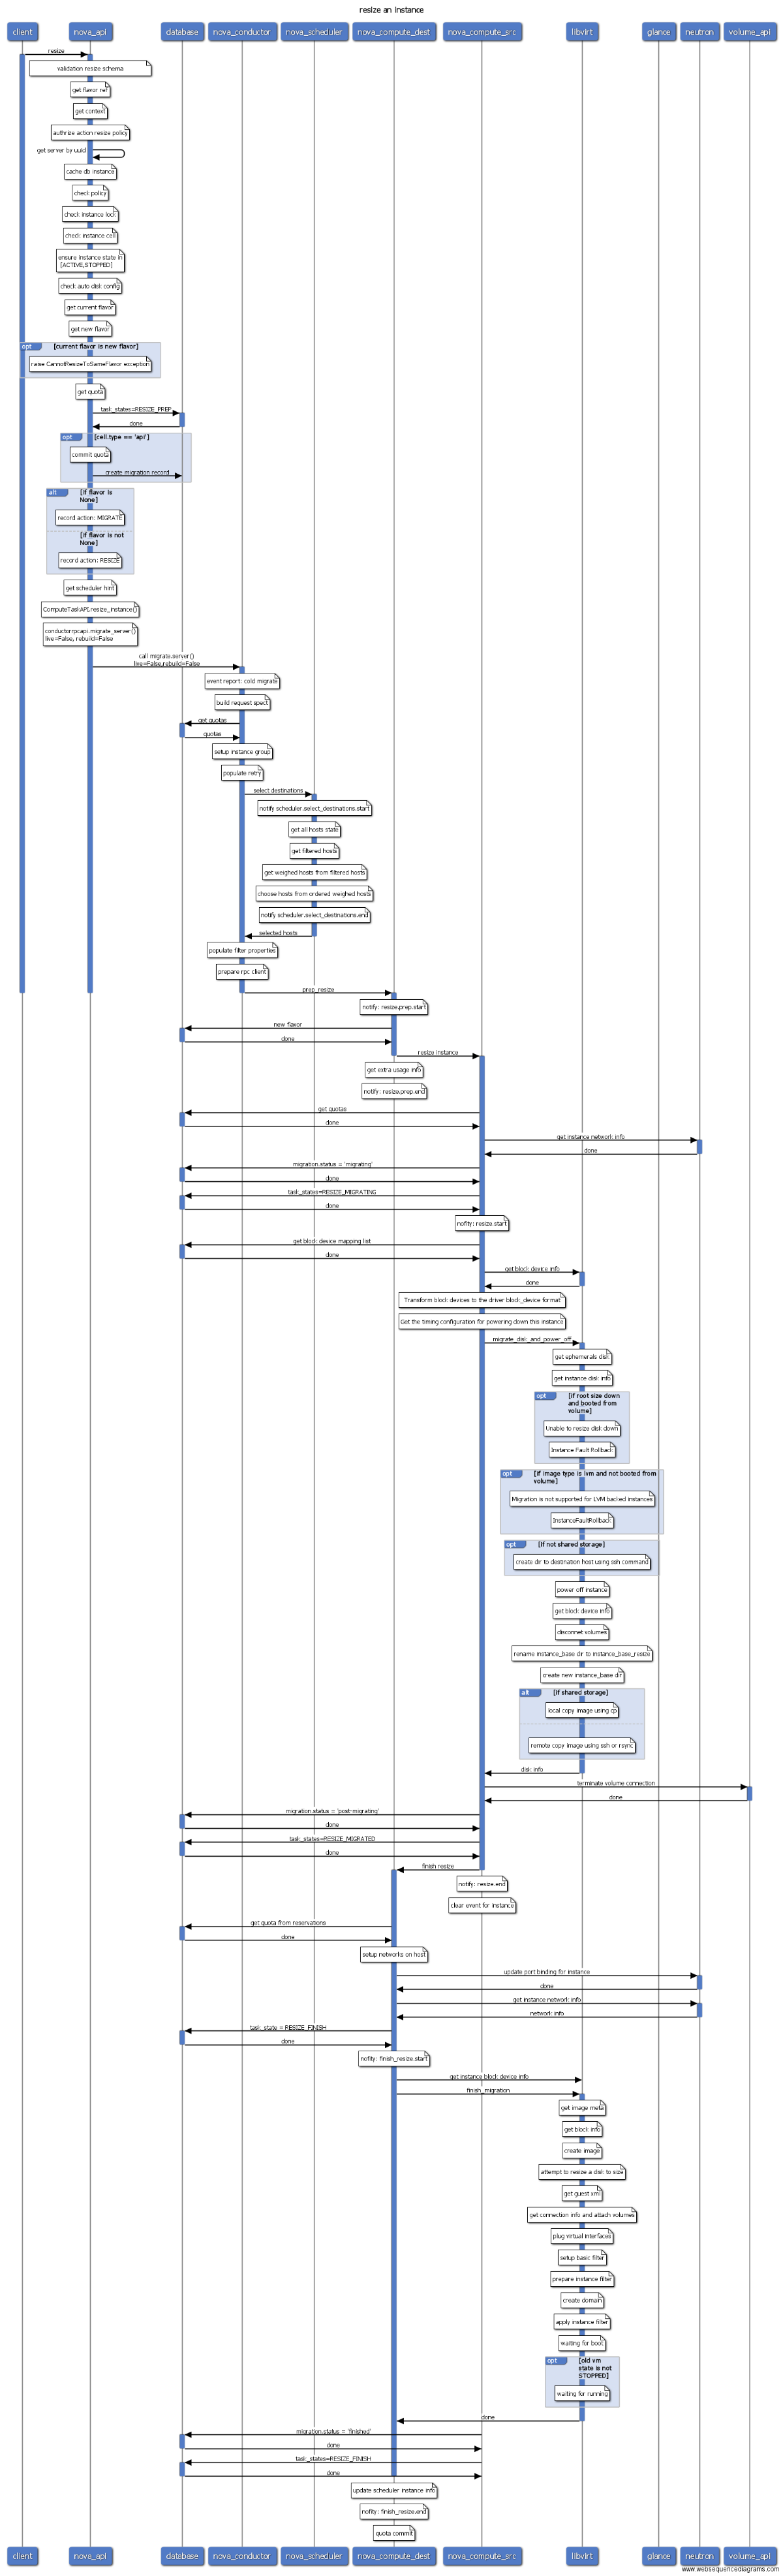
- resize: 修改虚拟机配置,即使用新的flavor重建虚拟机。
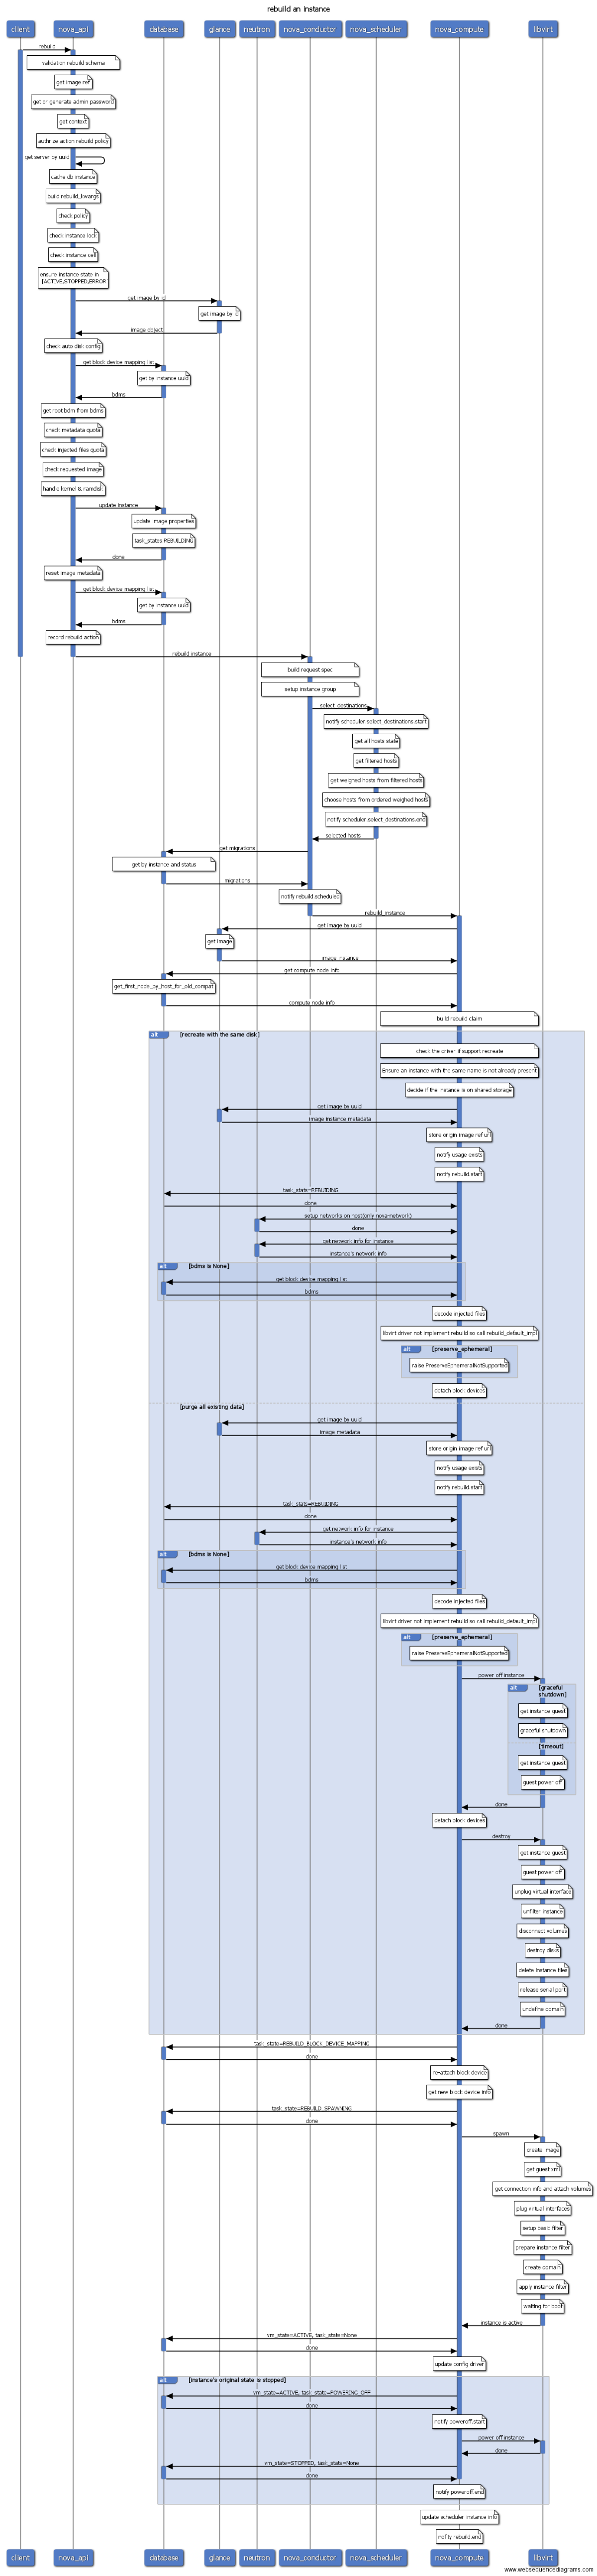
- rebuild: 重建虚拟机,指定新的image,如果指定快照,则相当于虚拟机状态回滚。
- evacuate: 疏散迁移,只有当compute服务down时执行,能够迁移虚拟机到其它正常计算节点中。
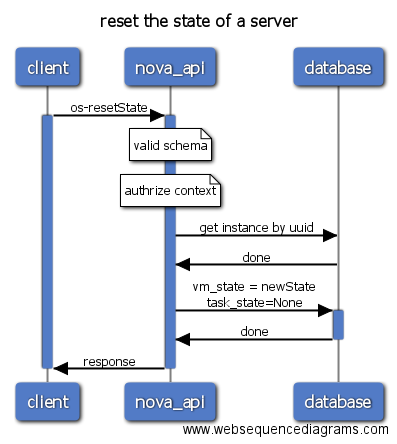
- reset-state: 手动重置虚拟机状态为error或者active。
- create-image: 创建虚拟机快照。
- backup: 定期创建虚拟机快照。
- volume-attach: 挂载volume卷。
- volume-detach: 卸载volume卷。
- lock/unlock: 锁定虚拟机,锁定后的虚拟机普通用户不能执行删除、关机等操作。
- set-password: 修改管理员密码,虚拟机需要运行qemu guest agent服务。
- pause/unpause: 暂停运行的虚拟机,如果底层的虚拟化使用的是libvirt,那么libvirt会在将虚拟机的信息保存到内存中,KVM/QEMU进程仍然在运行,只是暂停执行虚拟机的指令。
- suspend/resume: 挂起虚拟机,将虚拟机内存中的信息保存到磁盘上,虚拟机对于的KVM/QEMU进程会终止掉,该操作对应于libvirt中的save操作。resume从挂起的虚拟机恢复。
- reset-network: 重置虚拟机网络,在使用libvirt时,该操作不执行任何实际的动作,因此功能尚未实现。
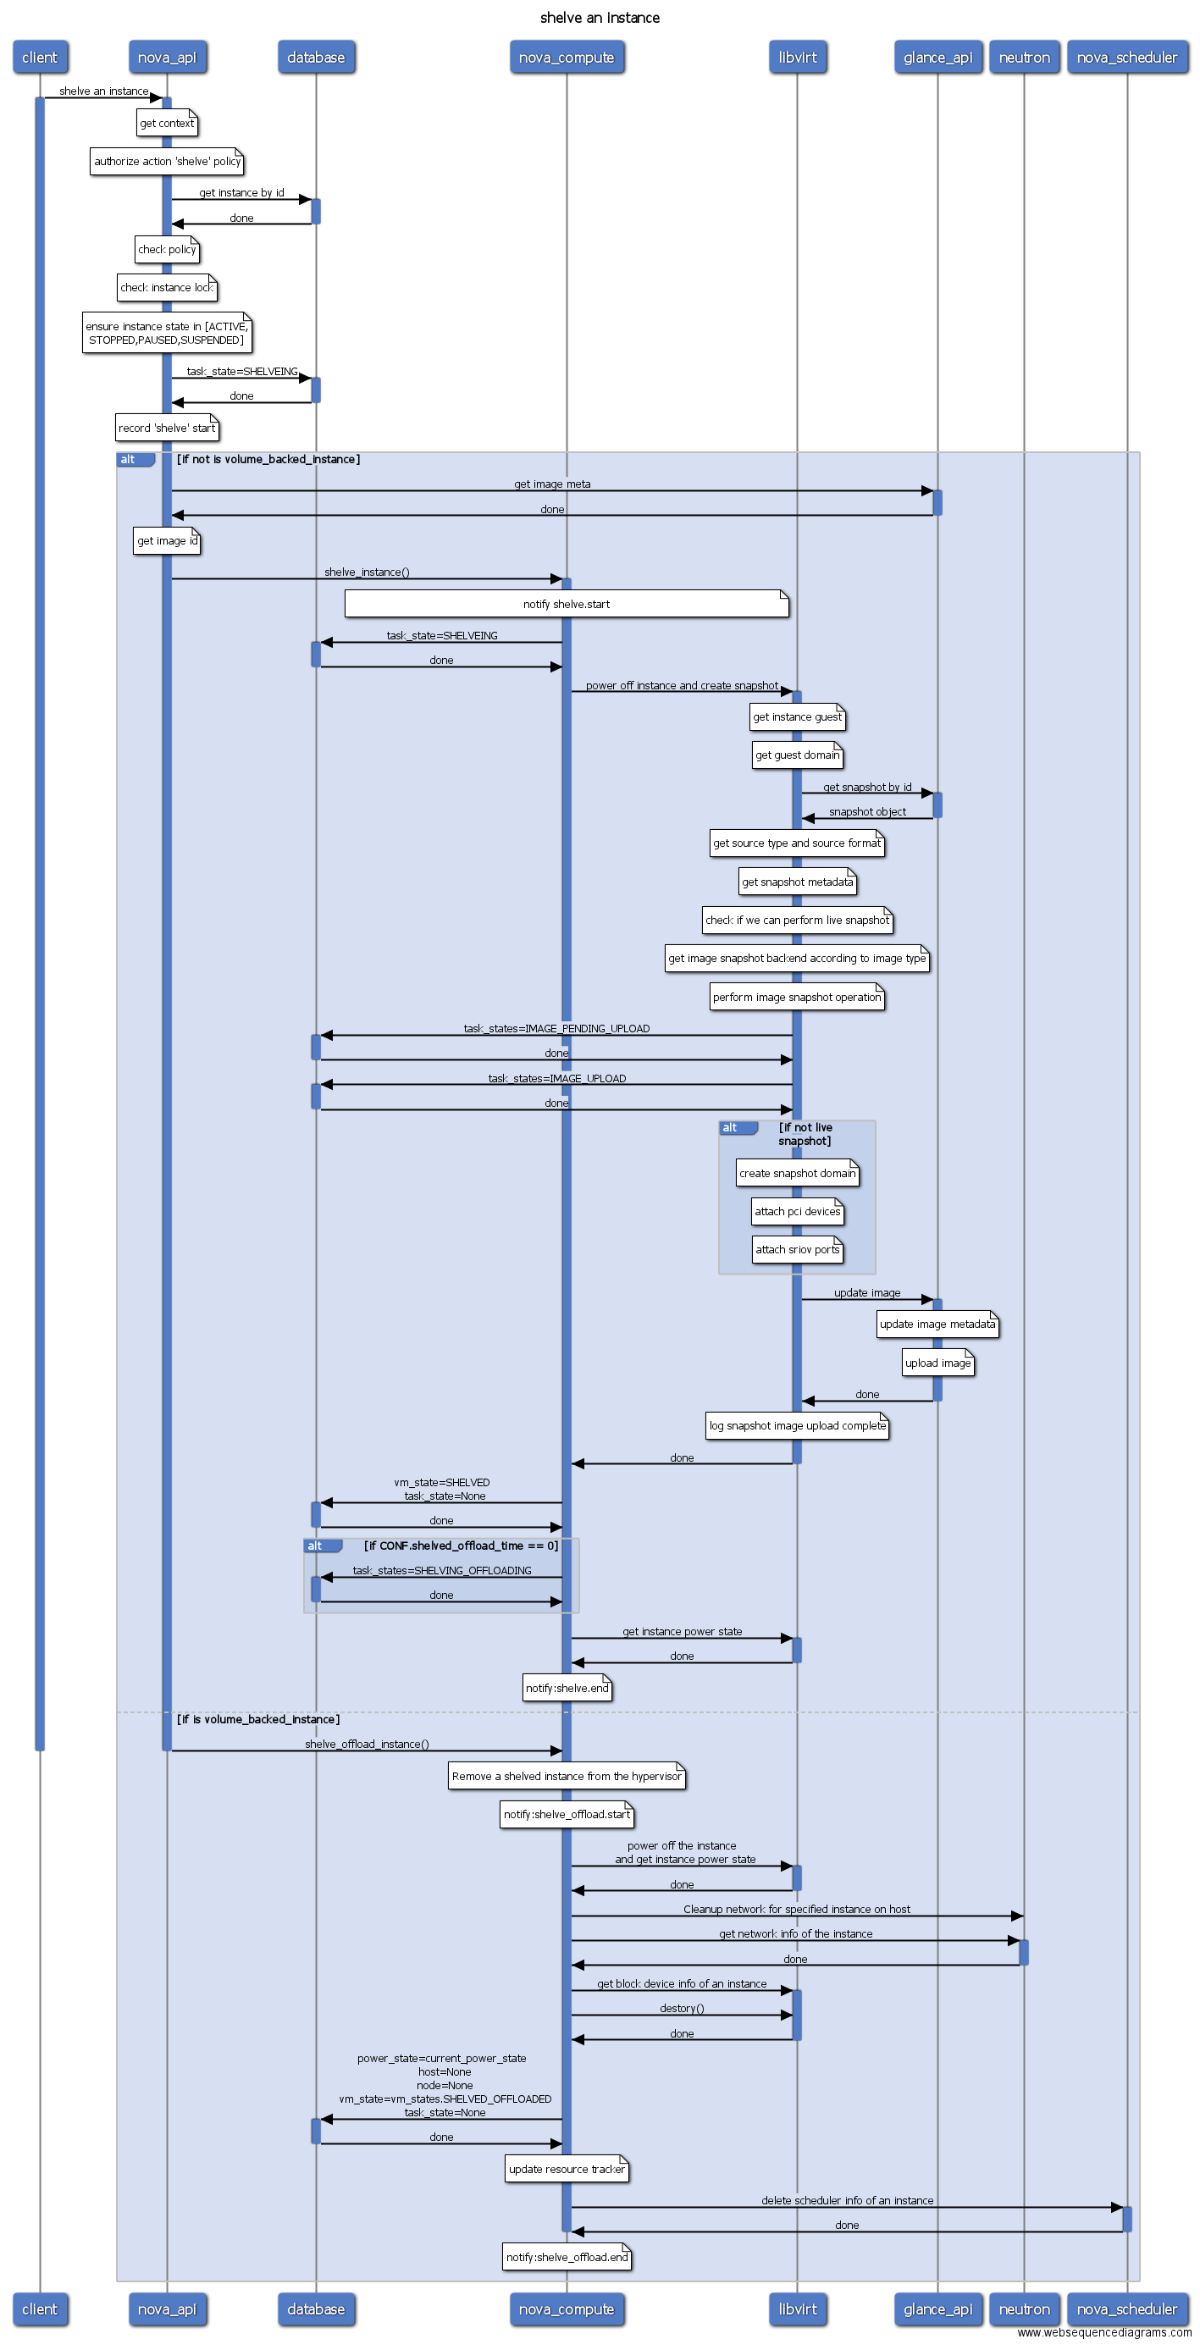
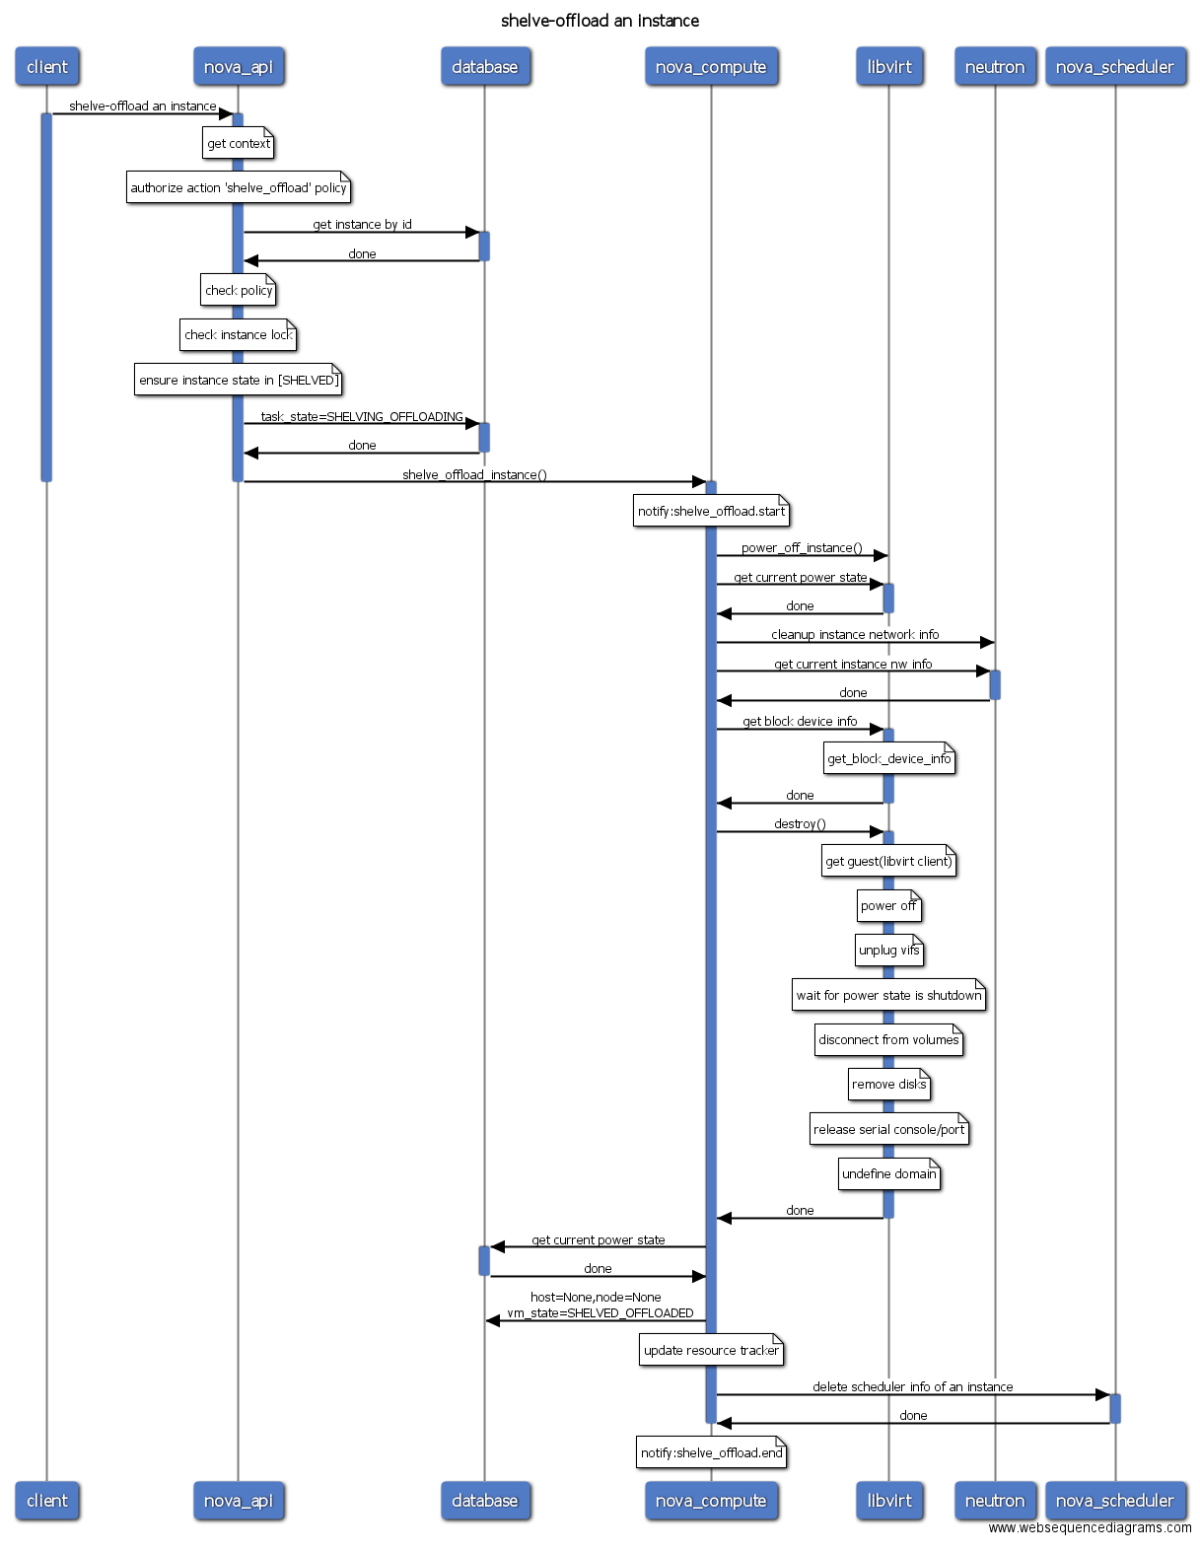
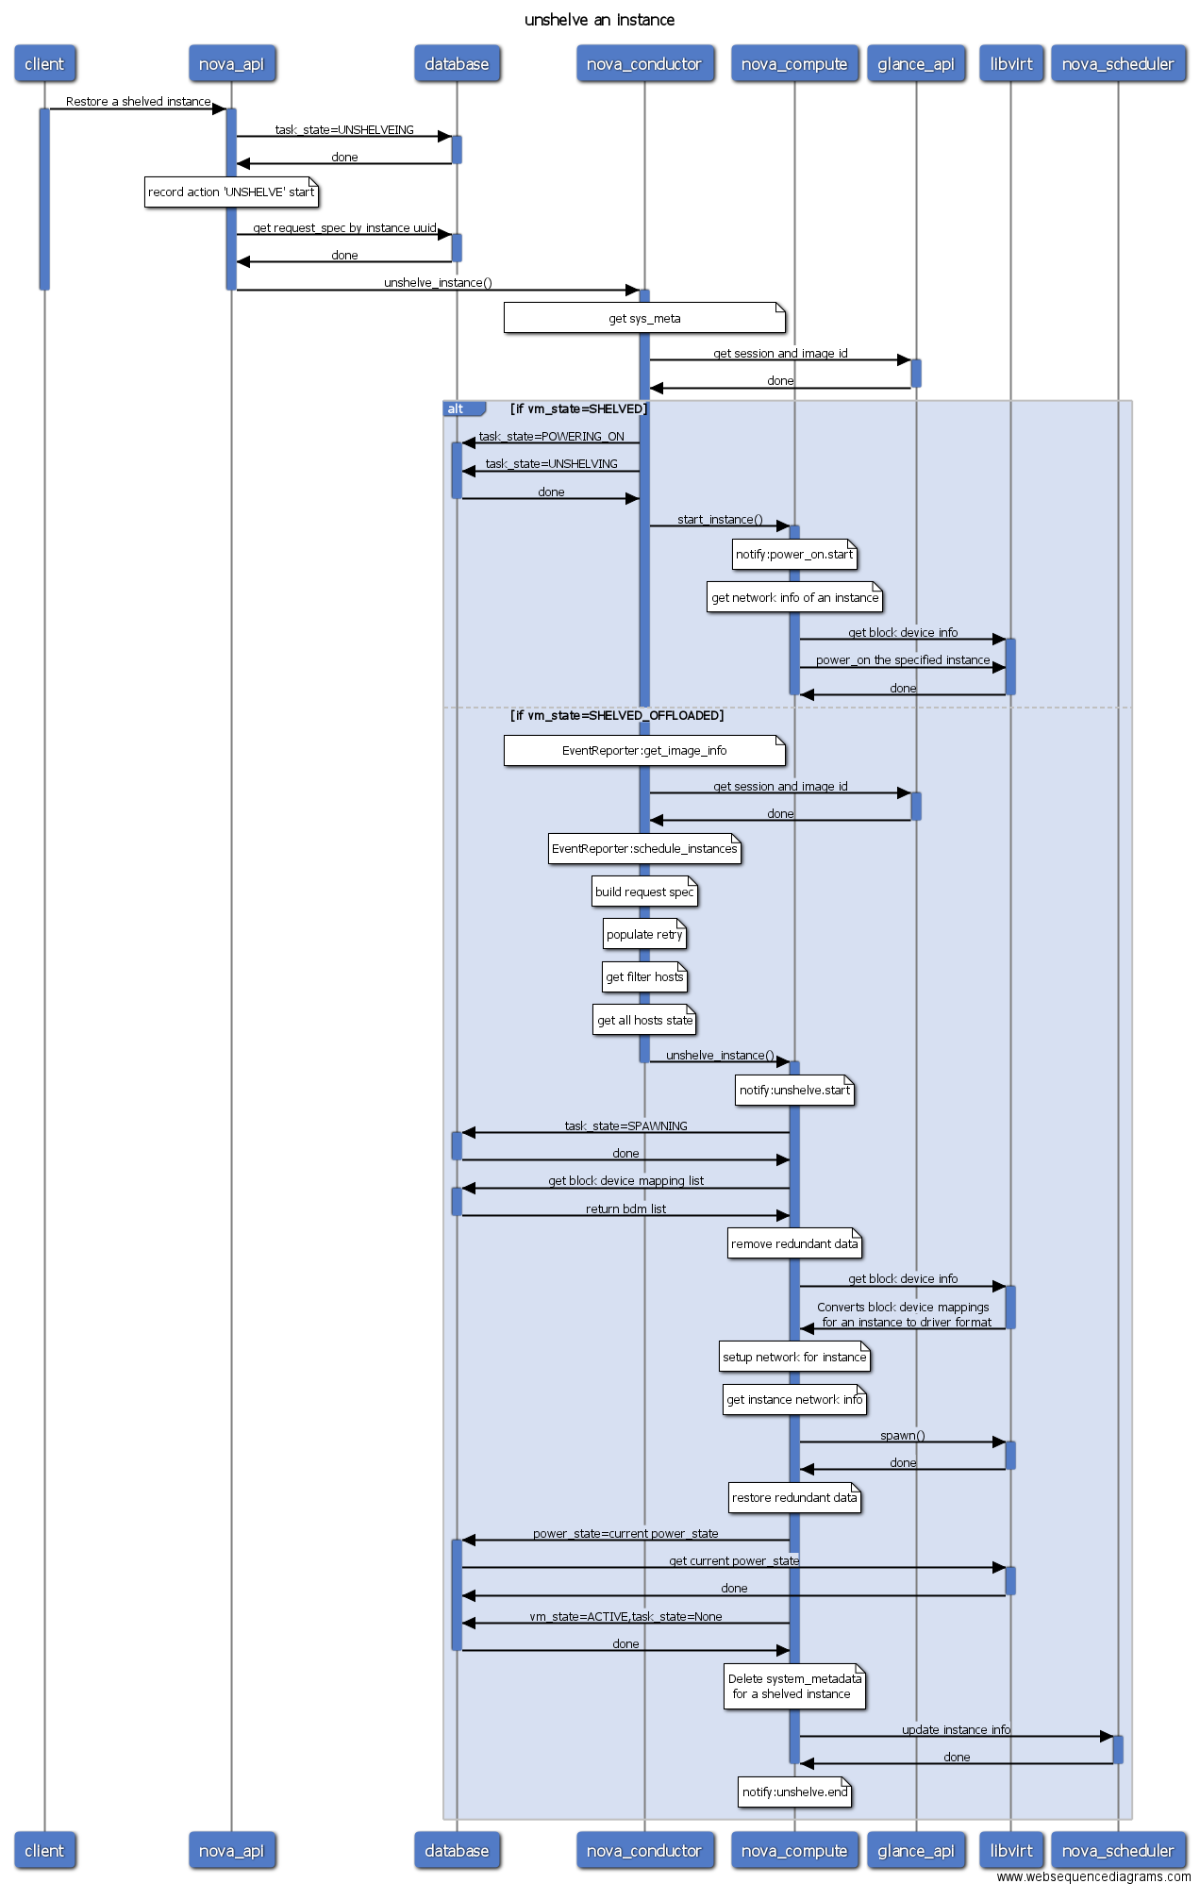
- shelve/unshelve: 虚拟机关机后仍占用资源,如果虚拟机长期不使用,可以执行shelve操作,该操作先创建虚拟机快照,然后删除虚拟机,恢复时从快照中重建虚拟机。
- rename: 重命名虚拟机, 后期版本将被update操作替代。
- update: 修改虚拟机名称、description信息等。
- rescue/unrescue: 虚拟机进入拯救模式。原理是创建一台新的虚拟机,并把需要rescue的虚拟机的根磁盘作为第二块硬盘挂载到新创建的虚拟机。当原虚拟机根磁盘破坏不能启动时该操作非常有用。
- interface-attach/interface-dettach: 绑定/解绑网卡。
- trigger-crash-dump: 使虚拟机触发crash dump错误,测试使用。
- resize-confirm: 确认resize操作,此时原来的虚拟机将被删除, 可以配置为自动确认。
- resize-revert: 撤销resize操作,新创建的虚拟机删除,并使用原来的虚拟机。
- console-log: 查看虚拟机日志。
- get-vnc-console: 获取虚拟机vnc地址, 通常使用novnc协议。
- restore: 恢复虚拟机。如果配置了软删除功能,当虚拟机被删除时,不会立即删除,而仅仅标识下,此时能够使用restore操作恢复删除的虚拟机。
- instance-action-list: 查看虚拟机的操作日志。
- instance-action:查看某个虚拟机操作的详细信息,如操作用户、操作时间等。
MIT
欢迎有兴趣的读者补充更多的操作序列图或者参与讨论。
- 如果你有任何问题,请直接创建issure。
- 如果你要贡献代码,请直接PR。
- dotfiles: vim、tmux、zsh、iterm配置,阅读OpenStack源码必备,vim支持标签列表、函数跳转、代码搜索、智能补全功能。
- openstack-cheat-sheet: 汇集所有OpenStack相关的资料。
- int32bit's blog: int32bit的博客,主要专注于OpenStack、Docker、Ceph相关。
--by int32bit(OpenStack Contributor).


