Component developed by using the amazing development template [blueprint][blueprint].
This custom component for Home Assistant is an upgrade of my first component "simple thermostat" with addition of trully awesome features.
For my personnal usage, I needed to add a couple of features and also to update the behavior that I implemented in my previous component "Simple thremostat". This new component "Awesome thermosts" now manage the awesome use cases :
- Explicitely define the temperature for presets mode in config file.
- Unset the preset mode when the temperature is manually defined on a thermostat.
- Turn off/on a thermostat when a door or windows is opened/closed.
- Set a temperature when an activity is detected in a room, and another one after no activity has been detected for a defined time.
- Install HACS. That way you get updates automatically.
- Add this Github repository as custom repository in HACS settings.
- search and install "Awesome Thermostat" in HACS and click
install. - Modify your
configuration.yamlas explain below. - Restart Home Assistant.
- Using the tool of choice open the directory (folder) for your HA configuration (where you find
configuration.yaml). - If you do not have a
custom_componentsdirectory (folder) there, you need to create it. - In the
custom_componentsdirectory (folder) create a new folder calledawesome_thermostat. - Download all the files from the
custom_components/awesome_thermostat/directory (folder) in this repository. - Place the files you downloaded in the new directory (folder) you created.
- Modify your
configuration.yamlas explain below - Restart Home Assistant
- This implementstion can override or superseed the core generic thermostat
In the following examples we are assuming that you know how to configure a generic thermostat (if not please have a look at : https://www.home-assistant.io/integrations/generic_thermostat/ ) and we will just highlight the differences in the configuration to apply.
The minimal configuration for a generic thermostat is the following :
climate:
  - platform: generic_thermostat
    name: Study
    heater: switch.study_heater
    target_sensor: sensor.study_temperature
If you want to switch to an awesome thermostat, your new configuration will be :
climate:
  - platform: awesome_thermostat
    name: Study
    heater: switch.study_heater
    target_sensor: sensor.study_temperature
Congrats ! You just migrate to an awesome thermostat behaving exactly like the generic one !
Ok, let's start the real fun. Concerning the preset modes, you first have to know that, as defined in the core development documentation (https://developers.home-assistant.io/docs/core/entity/climate/), the preset mode handled are the following :
- ECO : Device is running an energy-saving mode
- AWAY : Device is in away mode
- BOOST : Device turn all valve full up
- COMFORT : Device is in comfort mode
- HOME : Device is in home mode
- SLEEP : Device is prepared for sleep
- ACTIVITY : Device is reacting to activity (e.g. movement sensors)
As it was implemented in generic thermostat, I extended the management of the temperatures for each mode by configuration with te following keys : eco_temp, away_temp, boost_temp, comfort_temp, home_temp, sleep_temp An exception was made for activity as for this specific mode we need to set 2 temperatures. Just remember that setting activity_temp won't work. So imagine that you want to set temperature for each of the classic preset mode, your new configuration file will be :
climate:
  - platform: awesome_thermostat
    name: Study
    heater: switch.study_heater
    target_sensor: sensor.study_temperature
    eco_temp: 18.5
    away_temp: 16
    boost_temp: 23
    comfort_temp: 21.5
    sleep_temp: 20
In this example you can see that I didn't set activity_temp BECAUSE IT DOESN'T WORK for this preset mode. Also I didn't set home_temp because I don't need it. The result of this configuration is that I created a thermostat on which I can choose the following modes : Eco, Away, Boost, Comfort, Sleep and None.
'None' is always added in the list of modes, as it is a way to not use the presets modes but a manual temperature instead. !!! IMPORTANT !!! The contrary of the previous sentence is also true : IF A PRESET MODE IS SET, IT WILL BE CHANGE TO NONE IF YOU MANUALLY CHANGE THE TEMPERATURE.
Good question ! The use case is the following : every morning I open the windows of the rooms to renew the air and of course the thermostat have to be stopped. And when I close the windows, the thermostat must be turned on. As I have sensor on all of my doors and windows, I decided to use them to automatize this action. The only thing that we need to declare is the windows sensor, with the config key window_sensor :
climate:
  - platform: awesome_thermostat
    name: Study
    heater: switch.study_heater
    target_sensor: sensor.study_temperature
    eco_temp: 18.5
    away_temp: 16
    boost_temp: 23
    comfort_temp: 21.5
    sleep_temp: 20
    window_sensor: binary_sensor.study_windows
And that's it ! your thermostat will turn off when the windows is open and be turned back on when it's closed. Note 1 : this implementation is based on 'normal' door/windows behavior, that'smean it considers it's closed when the state is 'off' and open when the state is 'on' Note 2 : If you want to use several door/windows sensors to automatize your thermostat, just create a group with the regular behavior (https://www.home-assistant.io/integrations/binary_sensor.group/).
We will now see how to configure the new Activity mode. For this mode I freely inspired myself from a blueprint shared by @ChrisInUK (https://community.home-assistant.io/t/motion-controlled-room-eco-heating/291322) and I gratefully thank him for his job. What we need:
- a motion sensor. The key in configurationfile is "motion_sensor".
- a target "motion" mode. We will used the same temperature than this mode when an activity is detected. The key in configurationfile is "motion_mode".
- a target "no motion" mode. We will used the same temperature than this mode when no activity is detected. The key in configurationfile is "no_motion_mode".
- a "motion delay" duration defining how many time we leave the temperature like in "motion" mode after the last motion is detected. The key in configurationfile is "motion_delay".
So imagine we want to have the following behavior :
- we have room with a thermostat set in activity mode, the "motion" mode chosen is comfort (21.5C), the "no motion" mode chosen is Eco (18.5 C) and the motion delay is 5 min.
- the room is empty for a while (no activity detected), the temperature of this room is 18.5 C
- somebody enters into the room, an activity is detected the temperature is set to 21.5 C
- the person leaves the room, after 5 min the temperature is set back to 18.5 C
The configuration we have to set is the following :
climate:
  - platform: awesome_thermostat
    name: Study
    heater: switch.study_heater
    target_sensor: sensor.study_temperature
    eco_temp: 18.5
    away_temp: 16
    boost_temp: 23
    comfort_temp: 21.5
    sleep_temp: 20
    motion_sensor: input_boolean.study_motion_sensor
    motion_mode: comfort
    no_motion_mode: eco
    motion_delay:
      minutes: 5
Be aware that as for the others preset modes, Activity will only be proposed if it's correctly configure. In other words, the 4 configurayion keys have to be set if you want to see Activity in home assistant Interface
In order to enjoy the full power of awesome thermostat, I invite you to use it with https://github.com/nielsfaber/scheduler-component Indeed, the scheduler component porpose a management of the climate base on the preset modes. This feature has limited interest with the generic thermostat but it becomes highly powerfull with Awesome thermostat :
Starting here, I assume you have installed Awesome Thermostat and Scheduler Component.
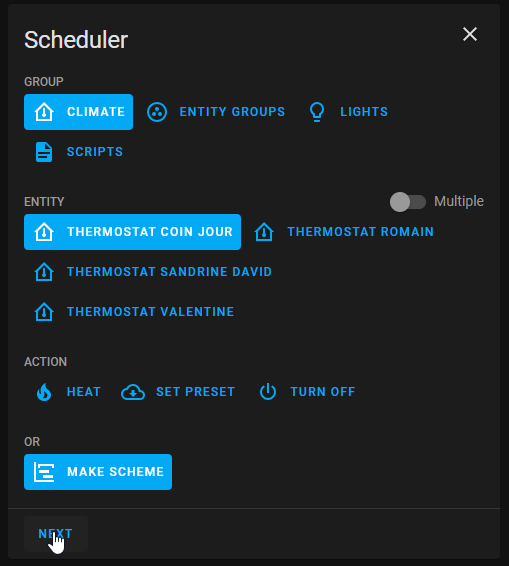
In Scheduler, add a schedule :

Choose "climate" group, choose one (or multiple) entity/ies, select "MAKE SCHEME" and click next : (it is possible to choose "SET PRESET", but I prefer to use "MAKE SCHEME")
Set your mode scheme and save :

In this example I set ECO mode during the night and the day when nobody's at home BOOST in the morning and COMFORT in the evening.
I hope this example helps you, don't hesitate to give me your feedbacks !
If you want to contribute to this please read the Contribution guidelines
