This is a Node.js version of MariaDB service broker for Cloud Foundry, which can be deployed as a Helm Chart inside of IBM Cloud Private (Kubernetes) or as a Node.js application in Cloud Foundry or anywhere Node.js framework works as long as it can communicate with a MariaDB deployment.
The included mariadb-broker Helm Chart makes it easy to deploy both the MariaDB broker and the Community Version of the MariaDB Chart.
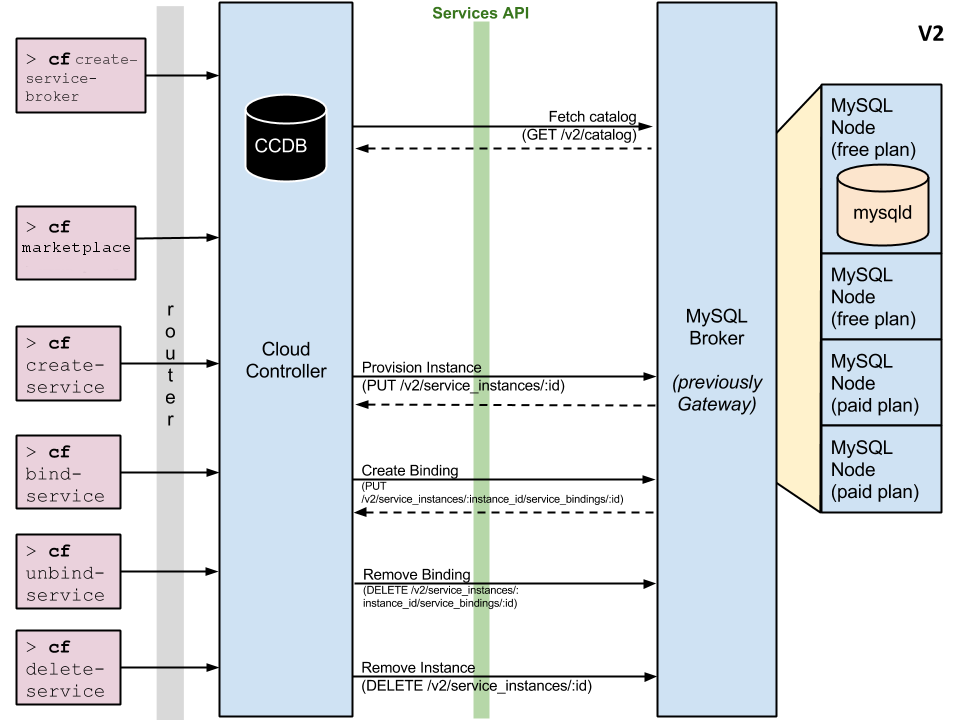
The specification complies with the Service Broker API v2. Some other official documents of Cloud Foundry - Managing Service Brokers & Access Control - were also be referenced.
- Architecture
- Local Environment Test
- Deploy to IBM Cloud Private
- Cloud Foundry Integration
- Conclusion
The broker can be deployed to any place where both sides - Cloud Foundry and MariaDB Server - can be reached. Here is a sample
In this section we are going to test the broker's API locally. Here is what we need:
- Node.js and NPM
- Go to https://nodejs.org/en/download/ and download proper release for your OS.
- A local MariaDB server.
- Go to https://mariadb.com/products/get-started and download and install the proper release for your OS.
- Make sure you create a password for the root user.
- Here is a great article for doing that.
I also prefer to use MySQL Workbench for GUI management but it is optional.
$ git clone https://github.com/fabiogomezdiaz/mariadb-broker
$ cd mariadb-brokerOpen env.sh and enter the password (if any) for the root user in your MariaDB deployment. Then run the following to populate the environment variables:
$ source env.shRemeber to install node.js and npm first. Then, install the dependencies:
$ npm installThen, run the Application:
$ npm startYou should be able access the broker with test/test as credentials. Basic Authentication was used to make the code simple.
Let's test the /v2/catalog API:
$ curl -X GET http://test:test@localhost:8080/v2/catalogThe above should return something like the following:
{
  "services": [
    {
      "name": "mariadb",
      "id": "937ac27d-707f-4d88-a3f4-0b975b0bade4",
      "description": "MariaDB service for application development and testing",
      "bindable": true,
      "tags": [
        "mysql",
        "relational"
      ],
      "max_db_per_node": 250,
      "metadata": {
        "displayName": "MariaDB",
        "imageUrl": "https://raw.githubusercontent.com/docker-library/docs/74e3b3d4d60389208732dbd2c95145868111d959/mariadb/logo.png",
        "longDescription": "Provisioning a service instance creates a MariaDB database. Binding applications to the instance creates unique credentials for each application to access the database",
        "providerDisplayName": "MariaDB Community Edition",
        "documentationUrl": "https://mariadb.com/kb/en/library/documentation/",
        "supportUrl": "https://mariadb.com/kb/en/library/community/"
      },
      "plans": [
        {
          "name": "15mb",
          "id": "0472145e-6492-4860-9952-42fa69529872",
          "description": "Shared MariaDB Server, 15mb persistent disk, 40 max concurrent connections",
          "max_storage_mb": 15,
          "metadata": {
            "cost": 0,
            "bullets": [
              {
                "content": "Shared MariaDB server"
              },
              {
                "content": "15 MB storage"
              },
              {
                "content": "40 concurrent connections"
              }
            ]
          }
        }
      ]
    }
  ]
}
$ curl -X PUT http://test:test@localhost:8080/v2/service_instances/myinstanceWhere myinstance is the id of the service instance to be created.
If successful, you will get the following response:
{}Check your MariaDB server, now you should have a MySQL schema called myinstance.
Now let's bind myinstance and get its credentials:
$ curl -X PUT http://test:test@localhost:8080/v2/service_instances/myinstance/service_bindings/mybindingidWhere:
mybindingidis the id of the binding to be created.myinstanceis the id of the service instance for which a binding will be created.
If successful, you will get the following response:
{
    "credentials": {
        "uri": "mysql://0fd7c4b7475c3cbd:d235440f6be97030@localhost:3306/myinstance",
        "username": "0fd7c4b7475c3cbd",
        "password": "d235440f6be97030",
        "host": "localhost",
        "port": "3306",
        "database": "myinstance"
    }
}
Where:
usernameis the database username created for the service instance.passwordis the database password created for the service instance.hostis the MariaDB hostname.portis the MariaDB port.databaseis the MariaDB database created for theusernameand the service instance.
$ mysql -u${username} -p${password} -D myinstanceWhere:
${username}is the username value returned in the Binding response${password}is the password value returned in the Binding responsemyinstanceis the name of the database that was created for the above user
If successful, you will get the MariaDB prompt similar to this:
Welcome to the MariaDB monitor.  Commands end with ; or \g.
Your MariaDB connection id is 35
Server version: 10.3.7-MariaDB Homebrew

Copyright (c) 2000, 2018, Oracle, MariaDB Corporation Ab and others.

Type 'help;' or '\h' for help. Type '\c' to clear the current input statement.

MariaDB [myinstance]>$ curl -X DELETE http://test:test@localhost:8080/v2/service_instances/myinstanceIf successful, you will receive the following response, which means that the myinstance schema is gone:
{}If you try to connect to the MariaDB server with the credentials, you should get an error similar to the one below as expected:
ERROR 1045 (28000): Access denied for user '0fd7c4b7475c3cbd'@'localhost' (using password: YES)$ curl -X DELETE http://test:test@localhost:8080/v2/service_instances/myinstanceIf successful, you will receive the following response:
{}To make deployment of the broker and MariaDB easier, we provided the mariadb-broker Helm chart, which deploys both the Node.js broker and the MariaDB community chart, which is included as a dependency chart here.
Use the following command to install the Helm Chart
$ helm install --name mariadb-broker chart/mariadb-broker --set mariadb.service.nodeIP=${PROXY_NODE_IP} --tlsWhere ${PROXY_NODE_IP} is the IP of any of the proxy/worker nodes. This is the IP address that will be returned as the MariaDB host after creating a service instance and a binding, which means that it should be accessible from outside the cluster.
The chart also creates a root password for MariaDB deployment, as shown in values.yaml.
Once fully deployed and ready, the broker will register itself to ICP by virtue of the broker.yaml file, which leverages the Kubernetes Open Service Broker implementation.
Also, since the broker is secured with Basic Authentication, we need to specify a secret that holds the username and password so that ICP can authenticate itself with the broker. Such secret is provided in the broker_auth_secret.yaml file.
To confirm that the broker is fully registered and shows up in ICP, run the following command:
$ kubectl get clusterservicebrokers
NAME                            AGE
mariadb-broker-default-broker   7m
If you wait a couple minutes, the MariaDB Service Class become visible. To retrieve the MariaDB Service Class, run the following command:
$ kubectl get clusterserviceclasses
NAME                                   AGE
937ac27d-707f-4d88-a3f4-0b975b0bade4   27m
The above shows the Service Class id for MariaDB service. Just to confirm that the id indeed belongs to MariaDB Service Class, you can run the following command, which gets the Service Class's externalName:
$ kubectl get clusterserviceclasses 937ac27d-707f-4d88-a3f4-0b975b0bade4 -o=jsonpath='{.spec.externalName}'
mariadb
To retrieve Service Plan (15mb in this case) for the above Service Class, you can run the following command:
kubectl get clusterserviceplans
NAME                                   AGE
0472145e-6492-4860-9952-42fa69529872   31m
To confirm that the above Service Plan id belongs to the 15MB plan, you can run the following command:
$ kubectl get clusterserviceplans 0472145e-6492-4860-9952-42fa69529872 -o=jsonpath='{.spec.externalName}'
15mbOpen a browser window and enter this URL to view the Service Broker on ICP's Web Dashboard:
https://${MASTER_NODE_IP}:8443/console/manage/clusterservicebrokers/mariadb-broker-default-brokerWhere ${MASTER_NODE_IP} is the IP address of your cluster's master node.
Here is what a registered broker would looks like on ICP's Web Dashboard:

Notice under the ClusterServiceBroker details section the description and details of the broker. On the right you will see the mariadb ClusterServiceClass, which is the only service provided by this broker. Lastly, in the bottom you will see the 15mb ClusterServicePlan, which is the only plan offered by the mariadb service.
Let's test the /v2/catalog API:
$ curl -X GET http://test:test@${PROXY_NODE_IP}:31333/v2/catalogWhere ${PROXY_NODE_IP} is the Proxy node IP used in helm install command we showed earlier and 31333 is the NodePort is the external port name, as defined in the chart values.yaml
The above should return something like the following:
{
  "services": [
    {
      "name": "mariadb",
      "id": "937ac27d-707f-4d88-a3f4-0b975b0bade4",
      "description": "MariaDB service for application development and testing",
      "bindable": true,
      "tags": [
        "mysql",
        "relational"
      ],
      "max_db_per_node": 250,
      "metadata": {
        "displayName": "MariaDB",
        "imageUrl": "https://raw.githubusercontent.com/docker-library/docs/74e3b3d4d60389208732dbd2c95145868111d959/mariadb/logo.png",
        "longDescription": "Provisioning a service instance creates a MariaDB database. Binding applications to the instance creates unique credentials for each application to access the database",
        "providerDisplayName": "MariaDB Community Edition",
        "documentationUrl": "https://mariadb.com/kb/en/library/documentation/",
        "supportUrl": "https://mariadb.com/kb/en/library/community/"
      },
      "plans": [
        {
          "name": "15mb",
          "id": "0472145e-6492-4860-9952-42fa69529872",
          "description": "Shared MariaDB Server, 15mb persistent disk, 40 max concurrent connections",
          "max_storage_mb": 15,
          "metadata": {
            "cost": 0,
            "bullets": [
              {
                "content": "Shared MariaDB server"
              },
              {
                "content": "15 MB storage"
              },
              {
                "content": "40 concurrent connections"
              }
            ]
          }
        }
      ]
    }
  ]
}
If you get the above output, then CONGRATULATIONS. You have successfully deployed and registered the MariaDB service broker on ICP. To test the rest of the API, just follow the instructions in Testing the Broker API and make sure to use ${PROXY_NODE_IP} as the host and 31338 as the port in the CURL commands.
Since the broker deployed in ICP adheres to the Open Service Broker API, this means that it can be registered with an instance of Cloud Foundry (CF) and be able to create Service Instances and bind them to applications like any CF service. To demonstrate this functionality, we are going to do the following:
- Register the MariaDB Broker in ICP with a CF deployment
- Deploy a sample CF Web Application that consumes a MariaDB database
- Create a MariaDB Service Instance from CF using the MariaDB broker in ICP
- Bind the MariaDB Service Instance to the CF Web Application and Restart it
- Test that CF Web Application is consuming MariaDB Service Instance
To register the ICP MariaDB Broker with CF, run the following command:
$ cf create-service-broker ${BROKER_NAME} ${BROKER_USER} ${BROKER_PASSWORD} http://${BROKER_HOST}:${BROKER_PORT}Where:
${BROKER_NAME}is the name you will provide the broker. In this case, usemariadb-broker.${BROKER_USER}is the broker username. In this case, usetest.${BROKER_PASSWORD}is the broker password. In this case, usetest.${BROKER_HOST}is the broker host. In this case, use thePROXY_NODE_IPthat was used in thehelm installcommand.${BROKER_PORT}is the broker port. In this case, use31333
i.e. a full command will look like this and produce the following output:
$ cf create-service-broker mariadb-broker test test http://PROXY_NODE_IP:31333
Creating service broker mariadb-broker as admin...
OK
To enable service access for the mariadb-broker's mariadb service in all CF orgs, run the following command, which produces the following output:
$ cf enable-service-access mariadb
Enabling access to all plans of service mariadb for all orgs as admin...
OK
Now every space in every org should be able to create mariadb service instances and bind them to existing or new applications.
To verify that the mariadb service and it's 15mb plan shows up in the CF marketplace, run the following commands, which produce the following output:
# List all services available in the CF marketplace
$ cf marketplace
Getting services from marketplace in org [email protected] / space fabio as admin...
OK

service   plans   description
mariadb   15mb    MariaDB service for application development and testing

TIP:  Use 'cf marketplace -s SERVICE' to view descriptions of individual plans of a given service.

# List all the plans available in the mariadb service
$ cf marketplace -s mariadb
Getting service plan information for service mariadb as admin...
OK

service plan   description                                                                  free or paid
15mb Shared MariaDB Server, 15mb persistent disk, 40 max concurrent connections freeNow let's deploy a CF application that will consume a MariaDB service instance. In this case, we are going to deploy this application, as follows:
# Clone the repository
$ git clone https://github.com/ibm-cloud-architecture/compose-mysql-helloworld-nodejs.git

# CD to repository directory
$ cd compose-mysql-helloworld-nodejs

# Deploy the application
$ cf push --no-start
The above instructions will deploy the application to CF but won't start it. Before we can start it, we need to provision a mariadb service instance, bind it to the application, and then restage the application.
To create a service instance of mariadb and it's 15mb plan, run the following command, which produces the following output:
$ cf create-service mariadb 15mb mariadb-instance
Creating service instance mariadb-instance in org [email protected] / space fabio as admin...
OK
Where:
mariadbis the service name.15mbis the service plan.mariadb-instanceis the name of the new service instance.
To bind the newly created service instance to the CF application, use the following command, which produces the following output:
$ cf bind-service nodejs-mariadb mariadb-instance
Binding service mariadb-instance to app nodejs-mariadb in org [email protected] / space fabio as admin...
OK
TIP: Use 'cf restage nodejs-mariadb' to ensure your env variable changes take effect
Once you start the application, it will have access to consume the mariadb-instance service instance.
Start the CF application with the following command:
$ cf start nodejs-mariadbIf the application doesn't start successfully, it's probably because the service instance was not properly bound.
Optional: If you want to verify that the application indeed has the service instance credentials bound as enviroment variables, you can run the following command, which produces the following output:
# SSH into the application
$ cf ssh nodejs-mariadb

# Print the service instance credentials from environment variable
$ echo $VCAP_SERVICES | jq .
{
  "mariadb": [
    {
      "tags": [
        "mysql",
        "relational"
      ],
      "name": "mariadb-instance",
      "plan": "15mb",
      "provider": null,
      "label": "mariadb",
      "volume_mounts": [],
      "syslog_drain_url": null,
      "credentials": {
        "database": "0f59d919-dabf-4545-9204-1b2248ba04e9",
        "port": "31338",
        "host": "${PROXY_NODE_IP}",
        "password": "892d949678ebe86b",
        "username": "e2ca181848784c28",
        "uri": "mysql://e2ca181848784c28:892d949678ebe86b@${PROXY_NODE_IP}:31338/0f59d919-dabf-4545-9204-1b2248ba04e9"
      }
    }
  ]
}
Above you will see an array of a single mariadb instance, where you can see it's name, plan, and credentials. Notice that ${PROXY_NODE_IP} would be the IP of the ICP Proxy Node used in the helm install command.
To access the application, open a browser tab and enter the application route. If you don't know how to get application route, run the following command:
$ cf routes
Getting routes for org [email protected] / space fabio as admin ...

space   host             domain                        port   path   type   apps             service
fabio   nodejs-mariadb   mybluemix.some-domain.local                        nodejs-mariadb
Notice the values under the host and domain columns. The application url/route takes the form of http(s)://${host}.${domain}. In this case, it would be http://nodejs-mariadb.mybluemix.some-domain.local. Keep in mind that the domain value will likely be different for your CF deployment.
In any case, a successful deployment will look something similar as the following web page:

All this application does is put a 2-field row in a MariaDB table when you press the Add button and display the rows under the Database output section. In this screenshot you can see 2 existing rows. If I were to restart the application, whatever rows I put in the MariaDB table will still persist.
Feel free to enter multiple rows, then restart the application with the following command and check whether the rows persist:
$ cf restart nodejs-mariadbCONGRATULATIONS! You have successfully deployed a Cloud Foundry app that consumes a MariaDB service instance deployed via the Open Service Broker hosted in a IBM Cloud Private cluster.
First, you have to unbind the mariadb-instance service instance from the nodejs-mariadb app:
$ cf us nodejs-mariadb mariadb-instanceNow delete the CF application:
$ cf delete -f nodejs-mariadbNow delete the service instance:
$ cf ds -f mariadb-instanceNow delete the CF application route:
$ cf delete-route -f ${YOUR_DOMAIN} --hostname nodejs-mariadbNow delete the broker:
$ cf delete-service-broker -f mariadb-brokerOnce you cleaned up on the CF side, all you need to do on the ICP side is delete the broker's helm chart:
$ helm delete mariadb-broker --purge --tlsIn this guide we have successfully integrated 2 development platforms (Cloud Foundry and IBM Cloud Private) via the Open Service Broker. Sounds simple but here is a list that summarizes what we did and all its moving pieces:
- Deployed broker app and a MariaDB instance locally and tested the Open Service Broker API.
- Deployed the broker helm chart and the MariaDB community Chart in ICP.
- Registed the ICP MariaDB broker in a Cloud Foundry deployment.
- Created a MariaDB service instance from Cloud Foundry through the ICP broker.
- Deployed the CF sample web app and bound the MariaDB service instance to it.
- Successfully tested that the CF web app can consume the MariaDB service instance in ICP.
This comes to show how flexible the 2 platforms are and how you can use the best of both worlds to build great applications. On the CF side you can leverage the simplicity of it's routing and deployment commands, and on the ICP side you can leverage it's robust set of tools (i.e. Helm) to deploy highly complex applications/infrastructure. Finally, with the Open Service Broker you can bridge the gap between the 2 platforms and have them communicate with each other.
If you are interested to see the implementation of this broker, feel free to check the server broker, which contains all the code. Also, the chart/mariadb-broker contains the implementation of the broker helm chart.


