Welcome to the course!
During the course, you'll practice common continuous integration actions. The course isn't intended to be a click-through wizard-style experience, instead you'll do what developers do during their daily work the way they do it. I'll explain the theory as you reach relevant steps.
What are we going to do?
As we progress, we will incrementally build a memo with a common CI steps sequence, which is a great way to memorize it. In other words, we will make the list of actions which developers take doing CI doing CI. You can always see current list using the GitHub's ability to render Markdown.
We'll also use some simple test suite to mimic actual CI process.
To complete the course you will need Node.js and a Git client installed. You can use whatever Git client you prefer, but I will provide reference solutions for command line only.
Make sure, you have a command line client. Click here for more details.
If you don't have a command line client yet, you can find the installation instructions here.
By the way, I will use such collapsible sections like this to provide extra information during the course.
About solutions
Even though the best way to complete this course is doing everything by your own hands, you potentially might find yourself in trouble.
If you feel, you don't understand what to do and cannot continue, you can refer to solution branch included in your starting repository. Please, don't merge solution into master during the course. You can use the branch to figure out what you need to do, or to compare your code with the reference implementation using all the capabilities Git provides. If you feel completely lost, you can replace your master branch commits with solution commits entirely and then reset your working directory to whatever step of the course you desire.
Use it only if you really need to.
Commit your current work before doing this.
git add .
git commit -m "Backing up my work"
The following commands
- rename master as master-backup;
- rename solution as master;
- check out the new master and overwrite the working directory;
- create branch "solution" from "master" (being "solution" in past) just is in case if need "solution" in future.
git branch -m master master-backup
git branch -m solution master
git checkout master -f
git branch solution
After performing these actions, you can use git log master to figure out what commit you need.
Then you can reset your working directory to it using
git reset --hard <the SHA you need>
If you are happy with the result, eventually you might want to push the remote. Don't forget to update the remote branch accordingly when you push.
git push --force origin master
Please, note that we use git push --force. You will rarely ever want to force push to a remote's master, but here we have very specific scenario with only one collaborator who knows what he is doing.
What is Continuous Integration, really?
Continuous integration, or CI, is a technical practice when each member of a team integrates their code at least once a day so that the resulting code at least builds without errors.
There are various interpretations of the term.
One point of disagreement is the frequency of integration. Some argue that integrating just once a day is not enough to actually integrate continuously. A counterexample is when everybody gets fresh code once in the morning and integrates once in the evening. Though the argument stands, it's mostly considered that "once a day" definition is practical enough, it's concrete and is good for teams of different sizes.
Another point is that C++ in not the only language used in development for a long time, and just building without errors is a very weak validation requirement. Some set of tests (e.g. unit tests run on a local computer) should be required to pass. Currently, community seems to gravitate towards such requirement, and in the future "build + units tests" will likely be the mainstream, if not already.
Continuous integration is different from continuous deployment or continuous delivery (CD) in that we are not required to have a release candidate after each integration cycle.
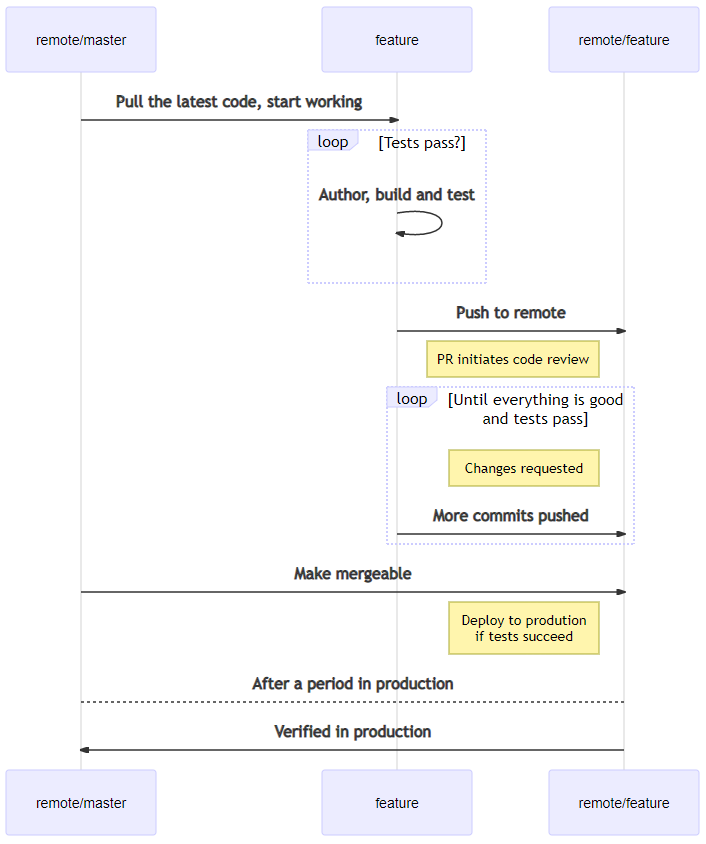
This is the list of CI steps we will use during the course
- Pull in the latest code. Create a branch from
master. Start working.
- Create commits on your new branch. Build and test locally. Pass? Go to the next step. Fail? Fix errors or tests and try again.
- Push to your remote repository or remote branch.
- Open a pull request. Discuss the changes, add more commits as discussion continues. Make tests pass on the feature branch.
- Merge/rebase commits from master. Make tests pass on the merge result.
- Deploy from the feature branch to production.
- If everything is good in production for some period of time, merge changes to master.
Before you begin
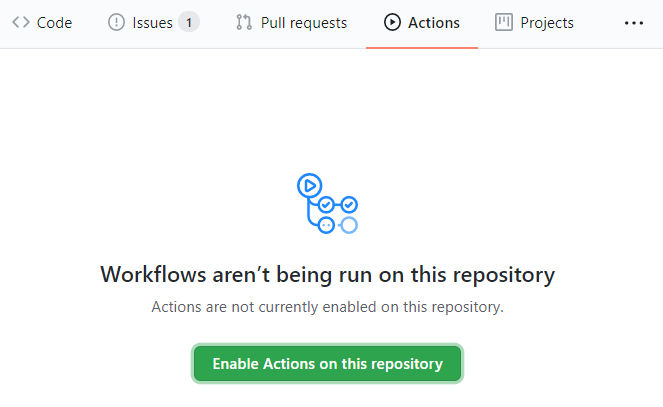
Make sure that GitHub actions are enabled for the course repository. If actions are not enabled, please enable them clicking the button in middle of the screen under the Actions GitHub UI tab. If they are not enabled, automatic tests will not run in pull requests, and you will not be able to complete the course.
Starting working
Let's start composing our CI steps list. You would commonly start this step with pulling the latest code from the remote repository, but we don't have a local repository set up yet, so we clone it instead.
⌨️ Activity: Pull in the latest code, create a branch from master, start working
- Clone the course repository from
https://github.com/hussainmuzzamil/continuous-integration-team-scenarios.
- Run
npm install in the course repository's directory; we need it to install Jest which we use to run tests.
- Create a branch and name it
feature-steps. Check out the branch.
- Add the tests code to
ci.test.js between the comments asking to do so.
  it('1. pull latest code', () => {
    expect(/.*pull.*/ig.test(fileContents)).toBe(true);
  });

  it('2. add commits', () => {
    expect(/.*commit.*/ig.test(fileContents)).toBe(true);
  });

  it('3. push to the remote branch with the same name', () => {
    expect(/.*push.*/ig.test(fileContents)).toBe(true);
  });

  it('4. open a pull request and continue working', () => {
    expect(/.*pull\s+request.*/ig.test(fileContents)).toBe(true);
  });
- Add the text with the first 4 steps to "ci.md" file.
1. Pull in the latest code. Create a branch from `master`. Start working.
2. Create commits on your new branch. Build and test locally.
  Pass? Go to the next step. Fail? Fix errors or tests and try again.
3. Push to your remote repository or remote branch.
4. Open a pull request. Discuss the changes, add more commits
  as discussion continues. Make tests pass on the feature branch.
Show the commands...
# Clone the course repository
git clone https://github.com/hussainmuzzamil/continuous-integration-team-scenarios
cd continuous-integration-team-scenarios

# Run npm install in the course repository's directory; we need it to install Jest which we use to run tests.
npm install

# Create a branch and name it feature-steps. Check out the branch.
git checkout -b feature-steps

# Edit ci.test.js as described above
# Edit ci.md as described above
Create commits on your new branch, build and test locally
We are going to set up tests to run on commit and then commit the code.
Scenarios when tests are triggered automatically
Generally, the less time it takes to run a test suite, the more often you can afford to run it. Common arrangement might look like this.
- Fast unit tests - on build, in CI pipeline
- Slow unit tests, fast component and integration tests - on commit, in CI pipeline
- Slow component and integration tests - in CI pipeline
- Security, capacity and other lengthy or expensive tests - in CI/CD pipelines, but only on certain build modes/stages/pipelines, e.g., when preparing a release candidate or when launched manually.
I suggest first running tests manually using npm test command. After, let's add a git hook to run our tests on commit. There is a catch, Git hooks are not considered a part of repository and thus cannot be cloned from GitHub with the rest of the course materials. To install the hook, you'll need to run install_hook.sh or copy file repo/hooks/pre-commit into your local .git/hooks/ directory.
When you commit, you'll see test running and checking if certain keywords are present in the list.
⌨️ Activity
- Run tests manually executing
npm test command in your course repository folder. Make sure test run.
- Install the pre-commit hook executing
install_hook.sh.
- Commit changes to local repository.
- Make sure the tests run before the commit.
Show the commands...
# Install the pre-commit hook executing install_hook.sh.

# Commit changes to local repository. Use "Add first CI steps" as the commit message.
git add ci.md ci.test.js
git commit -m "Add first CI steps"

# Make sure the tests run before the commit.
Push to your remote repository or remote branch
After doing work locally, developers usually make their work publicly available so that it could be eventually merged into a shared codebase. Using GitHub, it's either done publishing the work to a personal fork or a branch.
- When using forks, a developer forks a remote shared repository creating a personal remote copy of it also known as fork. After, he clones the personal repo to work with it locally. When work is done and the commits are created, he pushes them to his fork where they are available to others and can be merged into the shared repository. This approach commonly used when contributing to open source projects on GitHub.
- Another approach is to use single remote and to consider only shared remote's
master branch "protected". In this scenario individual developers push their work into the remote's branches so that it could be reviewed and, if everything is good, merged to the remote's master.
In this specific course, we will use the branch-based workflow as it's currently supported by the GitHub Labs engine.
Let's now publish our work.
⌨️ Activity
- Please, check that GitHub actions are enabled as this is the last chance to enable them.
- Push the changes to the remote branch with the same name as our working branch.
Show the commands...
git push --set-upstream origin feature-steps

