


This project started with myself learning and investigating the applications of Generative Adversarial Networks. Having gone through countless Medium or other various blog posts, and GitHub repos that either 1) just don't bloody work or 2) show results are not reproducible to the effect described by the authors, I have decided to create a one stop shop for YOU, my fellow GAN-enthusiast to quickly get started with code that not only works but is succinct and have clear logical flow. So I hope you use this repo well and accelerate your learning in this space.
Generative Adversarial Networks, or GAN, is a class of machine learning systems where two neural networks contest with each other. Generally, a model called the Generator is trained on real images which then generate new images that look at least superficially authentic to human observers while another model called the Discriminator distinguishes images produced by the Generator from real images. In this project, I aim to build various types of GAN models with publicly available datasets for image generation, conditional image generation and unpaired image translation problems. For more on GAN, please visit: Ian Goodfellow's GAN paper.
All GAN implementations will be done using Keras with Tensorflow backend. This documentation aims to help beginners to get started with hands-on GAN implementation with hints and tips on how to improve performance with various GAN architectures.
Hope you are now excited to start building GAN on your machine. To get started, please ensure you have the below packages installed.
- Keras==2.3.1
- Scikit-Image==0.15.0
- Scikit-Learn==0.21.3
- PIL==6.2.0
- Tensorflow-gpu==2.1.0
- Numpy==1.18.2
This projects is divided into 3 parts. With the foundational level GANs, namely DCGAN and LSGAN codes, I will be running through the below listed steps.
- Download the 100k Celebrities Images Dataset
- Run resize images to scale down image size to [32 x 32] (default) or [64 x 64]
- Load images into session
- Build the GAN
- Train the GAN
- Export a result .gif file
Next, I will explore extensions of the foundational GANs with variants such as CGAN, InfoGAN and CycleGAN. CGAN, ACGAN and InfoGAN will be used to tackle problems such as conditional image generation using publicly available datasets such as CelebFaces Attributes (CelebA) Dataset, MNIST and Fashion MNIST. With CycleGAN, I will explore unpaired image translation with the Monet2Photo Dataset.
Click to expand
DCGAN is also known as Deep Convolutional Generative Adversarial Network, where two models are trained simultaneously by an adversarial process. A generator learns to create images that look real, while a discriminator learns to tell the real and fake images apart. During training, the generator progressively becomes better at creating images that look real, while the discriminator becomes better at telling them apart. The process reaches equilibrium when the discriminator can no longer distinguish real images from fakes, i.e. accuracy maintains at 50%.
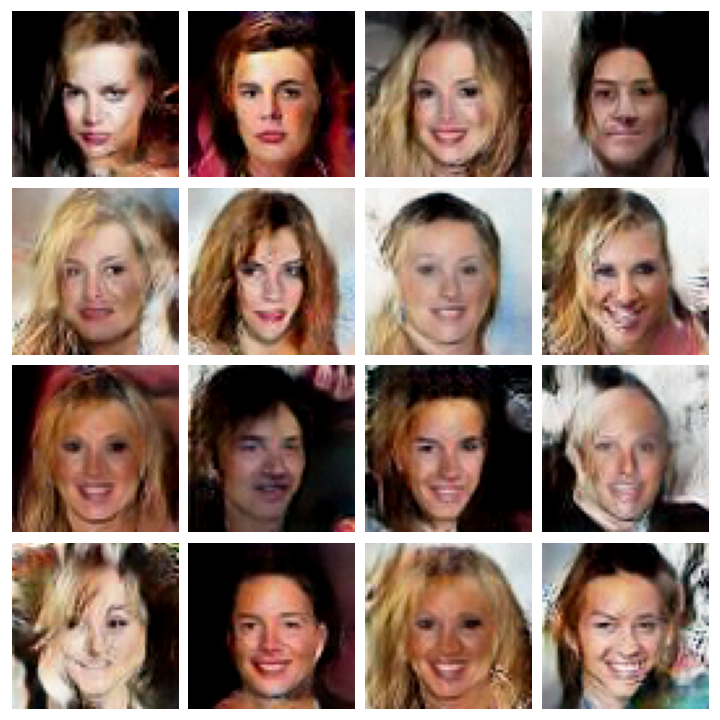
Aim: Our goal here is to demonstrate ability to generate realistic looking human faces with DCGAN.
Results from DCGAN training with below listed configurations.
| Results | Configuration |
|---|---|
 |
|
Below is a summary of what I have done in the DCGAN code file main.py.
- Resized celebrity images to 64x64x3
- Load images into session and normalised RGB intensities
- Created the discriminator and generator models
- Stacked the two models into GAN
- Train the GAN by repeating the following
(Optional) First pre-train our discriminator to understand what it is looking for(removed in 29/04/2020 update)- Create 32D noise vectors and feed into the generator to create n number of fake images
- Select n number of real images and concatenate with the fake images from generator
- Train the discriminator with this batch of images
Then freeze the weights on the discriminator(removed in 29/04/2020 update)- Create a new set of 32D noise vectors and again feed into the generator to create n number of fake images
- Force all labels to be 0 (for "fake images")
- Train the GAN with this batch of images
Training DCGAN successfully is difficult as we are trying to train two models that compete with each other at the same time, and optimisation can oscillate between solutions so much that the generator can collapse. Below are some tips on how to train a DCGAN succesfully.
- Increase length of input noise vectors - Start with 32 and try 128 and 256
- Decrease batch size - Start with 64 and try 32, 16 and 8. Smaller batch size generally leads to rapid learning but a volatile learning process with higher variance in the classification accuracy. Whereas larger batch sizes slow down the learning process but the final stages result in a convergence to a more stable model exemplified by lower variance in classification accuracy.
- Add pre-training of discriminator
- Training longer does not necessarily lead to better results - So don't set the epoch parameter too high
- The discriminator model needs to be really good at distinguishing the fake from real images but it cannot overpower the generator, therefore both of these models should be as good as possible through maximising the depth of the network that can be supported by your machine
You can also try to configure the below settings.
- GAN network architecture
- Values of dropout, LeakyReLU alpha, BatchNormalization momentum
- Change activation of generator to 'sigmoid'
- Change optimiser from RMSProp to Adam
- Change optimisation metric
- Try various kinds of noise sampling, e.g. uniform sampling
- Hard labelling
- Separate batches of real and fake images when training discriminator
One of the key limitations of DCGAN is that it occupies a lot of memory during training and typically only works well with small, thumbnail sized images.
I also tried to manually change each of the 32 values in the input vector independently to observe the impact on the generated images. This can be considered as a somewhat conditional image generation process through the manipulation of the input vector. However, as we can see from the below result it is not clear what exactly these values actually code for.

Click to expand
LSGAN is also known as Least Squares Generative Adversarial Network. This architecture was developed and described by Mao et al., 2016 in the paper Least Squares Generative Adversarial Networks, where the author described LSGAN as "...able to generate higher quality images than regular GANs ... LSGANs perform more stable during the learning process."
LSGAN is heuristically identical with DCGAN with below changes in code:
- 'linear' for activation in the discriminator
- 'tanh' for activation in the generator
- 'mse' for loss metric rather than binary corssentropy
Aim: Our goal here is to demonstrate that LSGAN can generate higher quality images than DCGAN and performs more stabily during the training process.
Results from LSGAN training with below listed configurations.
| Results | Configuration |
|---|---|
 |
|
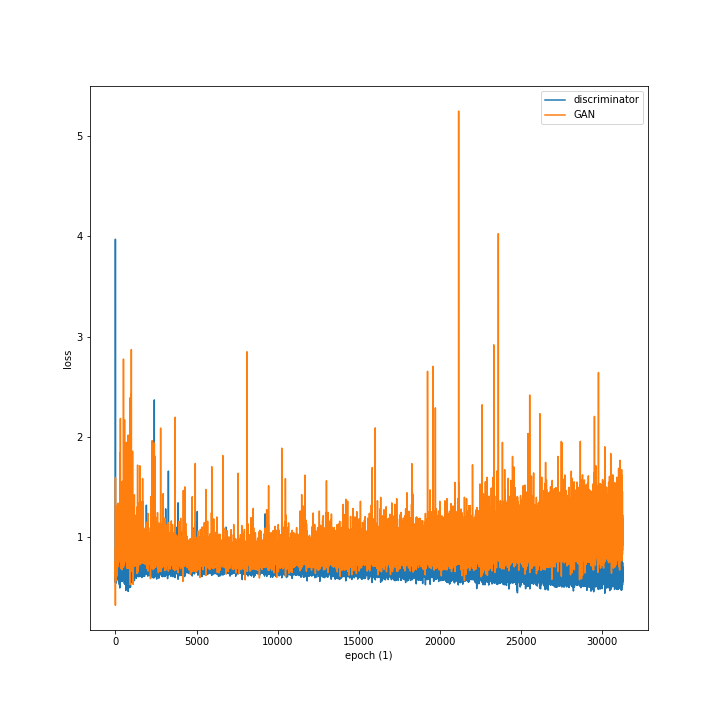
As stated above, the authors of the LSGAN paper claimed that LSGAN is "...able to generate higher quality images than regular GANs ... LSGANs perform more stable during the learning process." Therefore I decided to compare the loss over time during training and the image quality at epoch 30 (LSGAN was only trained for 30 epochs) and I think based on the results below, it is fair to say that the statements hold true.
Please note that the loss over time plots are not at the same scale!
| LSGAN | DCGAN | |
|---|---|---|
| Image quality at Epoch 30 | |
 |
| Loss over Time |  |
 |
Below is a summary of what I have done in our LSGAN code file main.py.
- Resized celebrity images to 64x64x3
- Load images into session and normalised RGB intensities
- Created the discriminator and generator models
- Stacked the two models into LSGAN
- Train the LSGAN (process as per DCGAN, see above)
You can also try to configure the below settings.
- GAN network architecture
- Values of dropout, LeakyReLU alpha, BatchNormalization momentum
- Change optimiser from RMSProp to Adam
- Try various kinds of noise sampling, e.g. uniform sampling
- Soft labelling
- Separate batches of real and fake images when training discriminator
Click to expand
InfoGAN is an information-theoretic extention to the Generative Adversarial Network. This architecture was developed and described by Chen et al., 2016 in the paper InfoGAN: Interpretable Representation Learning by Information Maximizing Generative Adversarial Nets, where the author described InfoGAN as "... a generative adversarial network that also maximizes the mutual information between a small subset of the latent variables and the observation."
In a well-trained vanilla GAN, the generator model randomly generate images that cannot be distinguished by the discriminator from the rest of the learning set. There is no control over what type of images would be generated. With InfoGAN, this becomes possible through manipulation of the input vector for the generator.
So how do we control the output in InfoGAN?
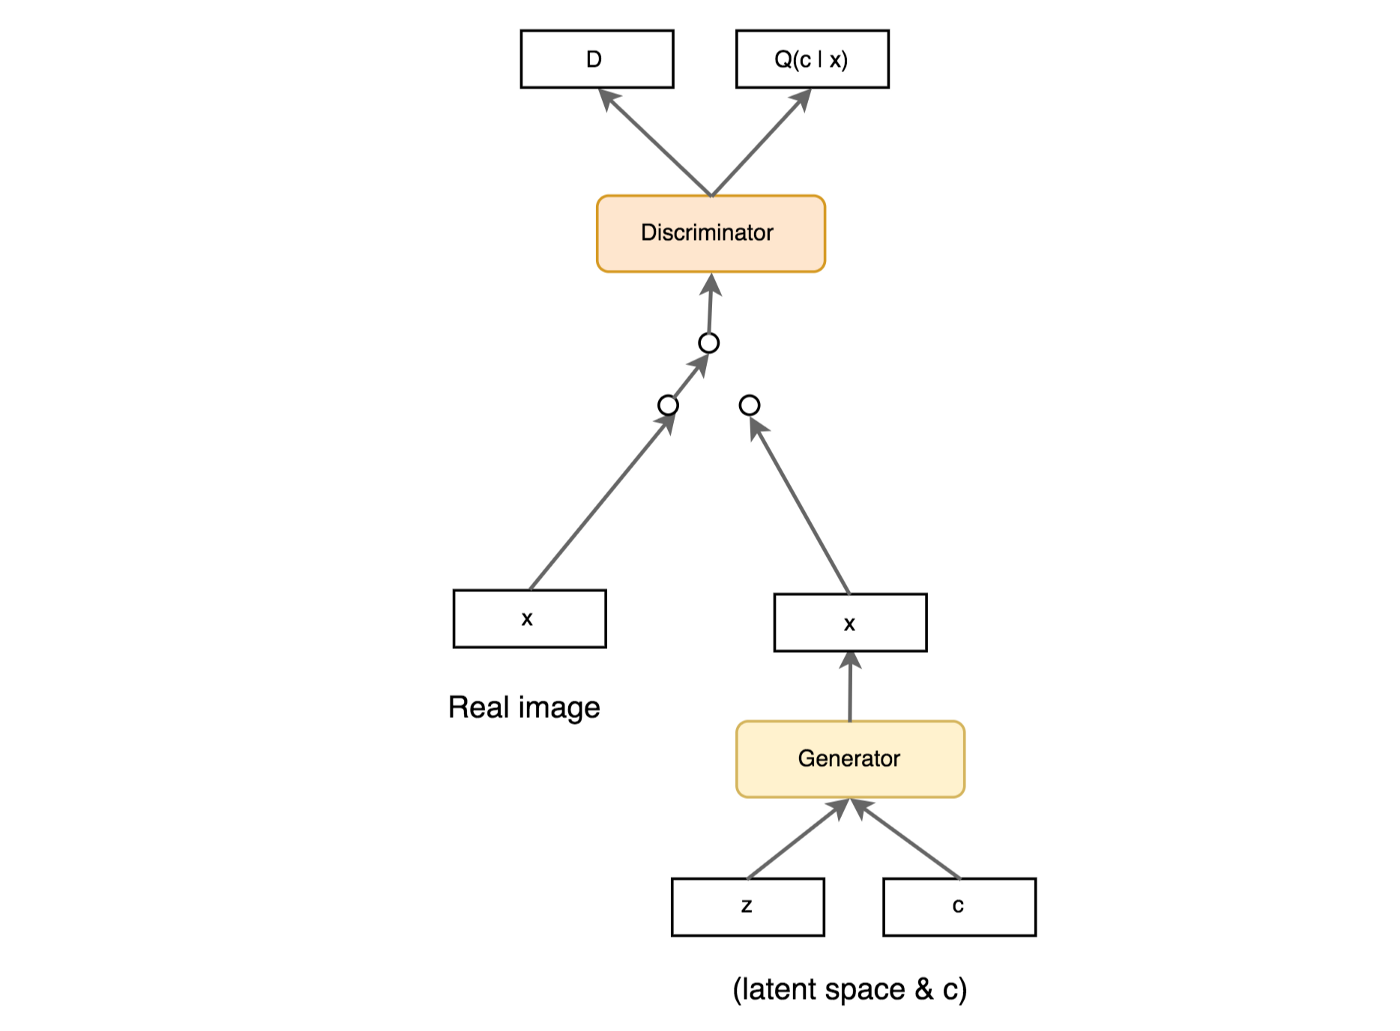
The above diagram outlines the structure of the network in InfoGAN. We can see that InfoGAN is an extention of DCGAN with new components such as the latent codes c (also known as control vector/variables) and the auxiliary distribution Q(c|X) output which comes from a modified discriminator model. Here the discriminator box denotes a single network of shared weights for
- A discriminator model that validates the input images
- An auxiliary model that predicts the control variables
At each step of training, we would first train the discriminator to learn to separate real and fake images. Then we freeze the weights on the discriminator and train the generator to produce fake images, given a set of control variables. The discriminator will then tell us how bad the fake images were and we update the weights in the generator to improve the quality of fake images.
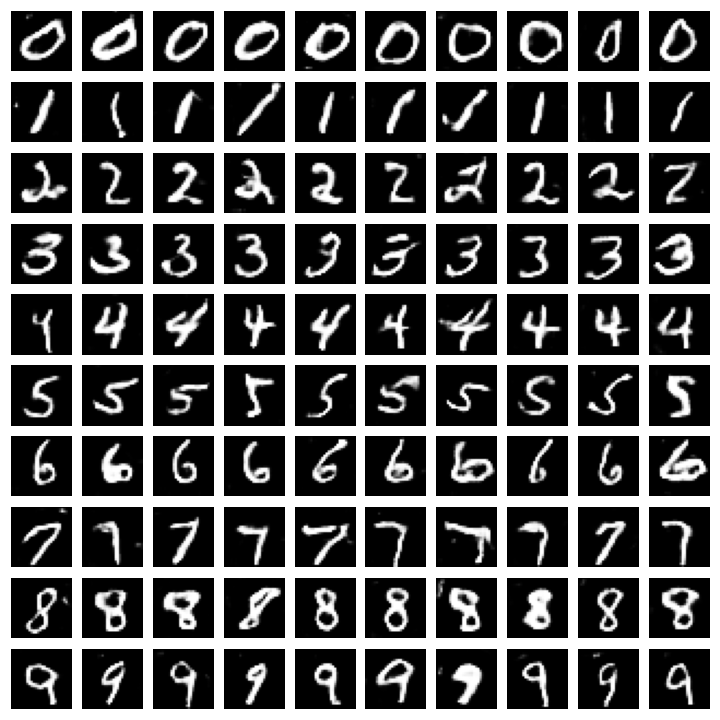
Aim: Our goal here is to demonstrate ability to control generated outputs through the InfoGAN architecture.
Results from InfoGAN training with below listed configurations. Please note that each row of images denotes one configuration of the control vector.
| Results | Configuration |
|---|---|
 |
|
| Results | Configuration |
 |
|
Below is a summary of what I have done in our InfoGAN code file main.py.
- Load MNIST dataset (default shape 28 x 28 x 1)
- Normalised intensities into range 0 to 1
- Created the discriminator, auxiliary and generator models
- Stacked the three models into InfoGAN
- Train the GAN by repeating the following
- Create and stack 100D noise vectors and 10D one-hot encoding vectors (representing random value between 0 and 9)
- Feed the stacked vectors (variable: gen_input) into the generator to create n number of fake images
- Train the discriminator with this batch of fake images
- Randomly select n number of real images
- Train the discriminator with this batch of real images
- Then freeze the weights on the discriminator
- Using the same gen_input variable and force all labels to be 1 (for "real images")
- Train the GAN with this batch of images
Click to expand
ACGAN or Auxiliary Classifier GAN is similar to the InfoGAN where the generator takes a control vector to produce image of a particular desired type. This architecture was developed and described by Odena et al., 2016 in the paper Conditional Image Synthesis With Auxiliary Classifier GANs, where the author described ACGAN as "... a variant of GANs employing label conditioning..." for "...synthesizing high resolution photorealistic images..."
Aim: Our goal here is to demonstrate ability to control generated outputs through the ACGAN architecture.
Results from ACGAN training with below listed configurations. Please note that each row of images denotes one configuration of the control vector.
| Results | Configuration |
|---|---|
 |
|
| Results | Configuration |
 |
|
Click to expand
CGAN or Conditional GAN is just like the InfoGAN or ACGAN where the generator takes upon a control vector to produce image of a particular desired type. This architecture was developed and described by Mirza and Osindero, 2014 in the paper Conditional Generative Adversarial Nets, where the author described CGAN as "... conditional version of generative adversarial nets, which can be constructed by simply feeding the data, y, we wish to condition on to both the generator and discriminator."
So how do we control the output in CGAN?
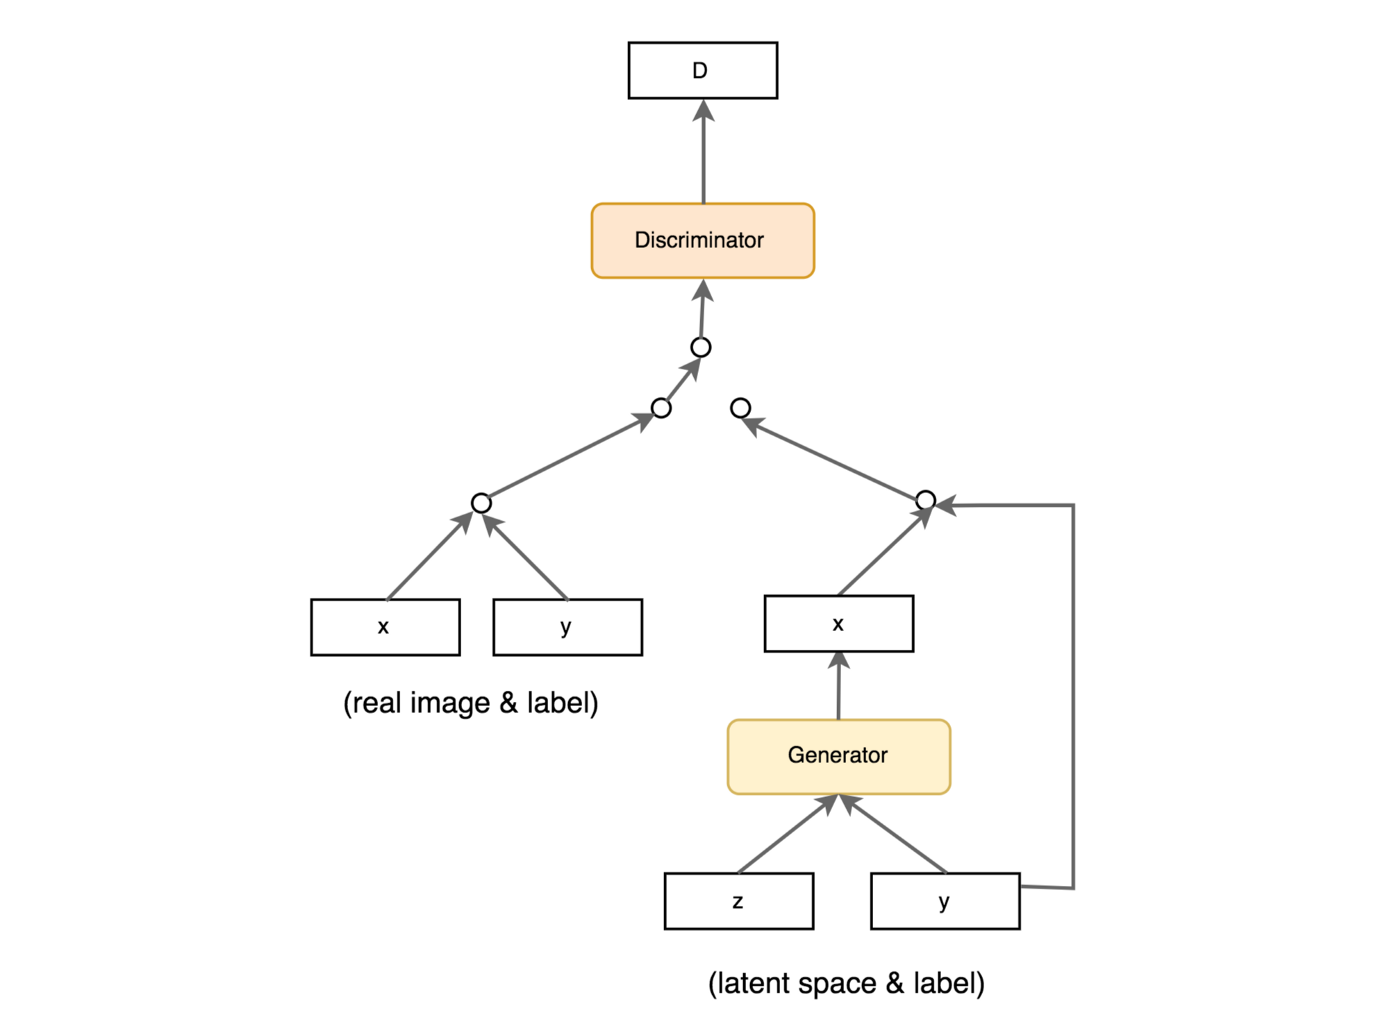
The above diagram outlines the structure of the network in CGAN. We can see that CGAN is similar to InfoGAN in that it is an extention of DCGAN with new components such as the control vector y which is fed into both the generator and the discriminator.
At each step of training, we would first train the discriminator to learn to separate real and fake images. Then we freeze the weights on the discriminator and train the generator to produce fake images, given a set of control variables. The same set of control variables and the images are then both feed into the discriminator which will then tell us how bad the fake images were and we update the weights in the generator to improve the quality of fake images.
Aim: Our goal here is to demonstrate ability to control generated outputs through the CGAN architecture.
Results from CGAN training with below listed configurations. Please note that each row of images denotes one configuration of the control vector.
| Results | Configuration |
|---|---|
 |
|
 |
|
 |
|
Below is a summary of what I have done in our CGAN code in 2 parts.
Part One - MNIST & Fashion MNIST main.py.
- Load MNIST dataset (default shape 28 x 28 x 1)
- Normalised intensities into range 0 to 1
- Created the discriminator and generator models
- Stacked the two models into CGAN
- Train the GAN by repeating the following
- Create and stack 256D noise vectors and 10D one-hot encoding vectors (representing random value between 0 and 9)
- Feed the stacked vectors into the generator to create n number of fake images
- Train the discriminator with this batch of fake images and the same 10D one-hot encoding vectors from before
- Randomly select n number of real images and their corresponding 10D one-hot encoding vectors
- Train the discriminator with this batch of real images and their 10D vectors
- Then freeze the weights on the discriminator
- Using the same noise vector, the 10D one-hot encoding vectors and force all labels to be 1 (for "real images")
- Train the GAN with this batch of images and 10D one-hot encoding vectors
Part Two - CelebA main.py.
- Load CelebA dataset (resized to shape 64 x 64 x 3)
- Normalised intensities into range 0 to 1
- Created the discriminator and generator models
- Stacked the two models into CGAN
- Train the GAN by repeating the following
- Create and stack 32D noise vectors and 5D one-hot encoding vectors, representing the features black hair, blonde hair, eyeglasses, male and smiling (e.g. a smiling dark-haired man without glasses will have a vector representation of [1, 0, 0, 1, 1])
- Feed the stacked vectors into the generator to create n number of fake images
- Train the discriminator with this batch of fake images and the same 5D one-hot encoding vectors from before
- Randomly select n number of real images and their corresponding 5D one-hot encoding vectors
- Train the discriminator with this batch of real images and their 5D vectors
- Using the same noise vector, the 5D one-hot encoding vectors and force all labels to be 1 (for "real images")
- Train the GAN with this batch of images and 5D one-hot encoding vectors
Let's take a closer look at the generated results.
As we can observe below, the model has successfully learnt the embedding of the features in the input vector which in turn has enabled us to generate images with desired features at will. In this model, we learnt from five features in the CelebA dataset, these are black hair, blonde hair, eyeglasses, man and smiling.
An interesting note here is that during development, the original code for training the generator employed the usual method of randomly sample both the noise and the input vector (see MNIST training) which resulted in the trained generator producing poorly located and coloured pixels. The reason for this in part is due to the fact that it is not possible to have both black and blonde hair (or at least very unlikely). This means the CGAN model could not really learn anything meaningful from some randomly sampled vectors. As a result, the code was later modified to randomly sample from the CelebA dataset instead which led to an increase in performance of the generator.

Click to expand
CycleGAN is a GAN implementation that enables unpaired image translation. Traditionally, image translation requires large volume of paired examples. The CycleGAN architecture was developed and described by Zhu et al, 2017 in the paper Unpaired Image-to-Image Translation using Cycle-Consistent Adversarial Networks, in which the author described CycleGAN as a process of "... learning to translate an image from a source domain X to a target domain Y in the absence of paired examples."
Aim: Our goal here is to demonstrate ability to perform image translation with the CycleGAN architecture.
Results from CycleGAN training with below listed configurations.
| Results | Configuration |
|---|---|
 |
|
I welcome anyone to contribute to this project so if you are interested, feel free to add your code. Alternatively, if you are not a programmer but would still like to contribute to this project, please click on the request feature button at the top of the page and provide your valuable feedback.
- Incompatibility with Tensorflow V2 or later versions
- Training may take a very long time if you do not have a GPU available
- If you have previously installed tensorflow-gpu with pip, tensorflow may be unable to detect your GPU. To overcome this issue, first uninstall tensorflow-gpu, then reinstall with conda.


