![]()
In case you never heard of beacons or iBeacons before, beacons are little devices that send a signal in a certain interval through Bluetooth LE. iBeacon is the specification that emits specific events and values which we can listen, interpret and react to.
On a mobile device we can might interpret this data as sending a notification when you are near a beacon. This can be used for museums as providing additional information for exhibitions, a whole tour guide or even playing audio files when you are in a certain room of a building. Another use case is in retail to show different specific information about products where you are in their vicinity - let's say in a shoe shop you get the information for a specific shoe on your device when you're passing by. In this scenario, we might even get more specific, like have the option to buy the shoe on the spot or be directed to where is available in different sizes and colors.
React Native is a new way of developing native applications for iOS with JavaScript. It differs from other solutions like Cordova in the regard that Cordova embeds a complete web view wherein our browser environment lies. With React Native on the other hand, we get the default iOS JavaScript engine (JavaScriptCore) but instead of fiddling around with DOM elements, we get access to native elements.
We can use the same concepts we know from our React web apps and apply them to mobile development with React Native. There are still a few differences which means we shouldn't go around and just copy-and-paste React components from the web in our mobile React Native projects. The biggest difference is that instead of having <div />, <span /> and <img /> elements we have <View />, <Text /> and <Image /> components. How we style our application is also different to what we might be familiar with: Instead of writing CSS, styles are written as JavaScript objects and then inserted as inline styles into our components. React Native uses the Flexbox model for styling components.
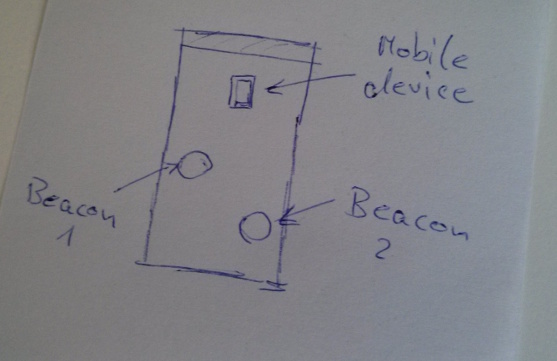
Let's combine these two technologies. We at Geniux created react-native-ibeacon while we were prototyping an app. As the name suggests, it lets us use iBeacons in our React Native apps. Since the react-native-ibeacon already contains a small example where it displays all beacons in the area in a simple list, let's create an app that shows the signal of our beacons as distance relative to our device.
Before we get into developing our application, there are certain things we need:
- A Mac with Xcode 6.3 or higher installed
- io.js is the most important prequisite when using React Native and needs to be installed on our machine. Grab the latest io.js version from https://iojs.org/.
For more information on getting started with React Native, take a look at their official documentation.
Next up, we need to install the React Native command line application which includes a nifty project creator for mobile apps. To install open a terminal and type npm install -g react-native-cli.
Using the React Native command line tools we just installed we can easily create a new project using react-native init ReactNativeBeaconExample. This will create a folder called ReactNativeBeaconExample where our project resides. In there, we'll find an Xcode project, the usual package.json file - we might already be familiar with when working with Node.js applications - that handles our dependencies amongst other things. The index.ios.js file is our main entry point for JavaScript code.
To integrate iBeacons into this setup, follow these steps:
- Open the command-line and enter
npm install react-native-ibeacon --save - Open the Xcode project. Drag
RNBeacon.xcodeprojfrom thenode_modules/react-native-ibeaconfolder into your XCode project. - Click on the your project in XCode, goto
Build PhasesthenLink Binary With Librariesand addlibRNBeacon.aandCoreLocation.framework.
So what actually happened here? In step one, we are adding react-native-ibeacon as a dependency in our package.json file. The library is now under the dependencies section in that file. Afterwards, we link the native component of react-native-ibeacon with our project. That works in two steps: First, we need to add the react-native-ibeacons Xcode project to our application. Put it in the same place where all the other Xcode projects are. Technically, you could drop RNBeacon.xcodeproj anywhere inside our project, it doesn't matter if it's in the root folder or in one of the sub-folders. Then, we need to link the resulting library with our application. After we dropped RNBeacon.xcodeproj in our project, the first suggestion will be libRNBeacon.a. This is not the only library we need to link though: We need to link against CoreLocation.framework to enable iBeacon support in the first place.
For a more visual representation of how linking libraries work, take a look the section inside the React Native documentation.
Open index.ios.js in your favorite IDE or text editor and remove all views except for the root view inside the main component. Do the same for the styles. After which, our code should look like this:
/**
 * React Native iBeacon App
 */
'use strict';

var React = require('react-native');
var {
  AppRegistry,
  StyleSheet,
  Text,
  View,
} = React;

var ReactNativeBeaconExample = React.createClass({
  render: function() {
    return (
      <View style={styles.container} />
    );
  }
});

var styles = StyleSheet.create({
  container: {
    flex: 1,
    justifyContent: 'center',
    alignItems: 'center',
    backgroundColor: '#F5FCFF',
  },
});

AppRegistry.registerComponent('ReactNativeBeaconExample', () => ReactNativeBeaconExample);
After the destructuring assignment code segment, we are now importing react-native-ibeacon and assign it to a variable.
var Beacons = require('react-native-ibeacon');Before we can actually listen to beacon events, we need to request permission. This will open a prompt in the app where the user can decide if they want to grant us that permission.
Beacons.requestWhenInUseAuthorization();There are two types of beacon permission. Using beacons when the app is open and currently in use or scanning for beacons while the app is used and while it's in the background. The latter drains more battery power than usual. If we choose background functionality, we need to make sure to actually do something in the background such as displaying notifications when we are near a beacon. Otherwise there is a high chance, Apple will reject the final app. For information on how to enable background mode, take a look at that section in the react-native-ibeacon documentation.
Unfortunately we can't just scan for all beacons, we have to specify which beacons we want to scan for. In its simplest form, we need an identifier and the UUID of one or multiple beacons. Even though it's called UUID, the uniqueness of a beacon is defined through the combination of its UUID, its major and minor version. The same UUID can be used by multiple beacons. When we define multiple regions, we need to make sure that the identifier aren't re-used. The way we define a region is just by having a plain JavaScript object with the properties we need:
var region = {
  identifier: 'Estimotes',
  uuid: 'B9407F30-F5F8-466E-AFF9-25556B57FE6D'
};
When we would define the major and minor version, it would be similar to this code snippet:
var region = {
  identifier: 'Estimotes',
  uuid: 'B9407F30-F5F8-466E-AFF9-25556B57FE6D',
  major: 12345
  minor: 111
};
The next thing we need to is to range for beacons. Ranging is the process of checking continously for beacons. Each beacon sends a signal every second unless specified differently by the beacon or beacon vendors. The data we can retreive includes information about the uuid, major and minor version of the beacon, the signal strength called rssi, the proximity as a fuzzy value - being either immediate, near, far or unknown - and accuracy that is defined as one sigma accuracy in meters and shouldn't be confused with an actual distance between the device and the beacon itself.
Beacons.startRangingBeaconsInRegion(region);Now that we have permission to use iBeacons and react-native-ibeacon knows what beacons to search for, let's scan for beacons in the vicinity. As our first step, we need to use something that's called DeviceEventEmitter.
var {
  AppRegistry,
  StyleSheet,
  DeviceEventEmitter,
  Text,
  View,
} = React;
DeviceEventEmitter allows us to listen for events that have been triggered on the native side of things and work with the result on the JavaScript side of things.
DeviceEventEmitter.addListener(
  'beaconsDidRange',
  (data) => {
    console.log(data);
  }
);
For now, we are just logging the data of the beacon.
{
  region: { /* ... */ },
  beacons: [ /* ... */ ]
}
Inside the region property, we see the identifier and the uuid of that region. The beacons property is an array which contains objects that contain data about beacons.
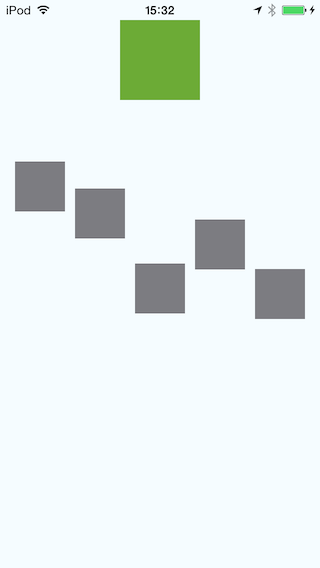
Now that we have our beacon signals and we know that we actually get the data we want, let's use this to display our beacons on the screen. At the top of the screen we want to display a representation of our mobile device. A green rectangle will do for now.
var ReactNativeBeaconExample = React.createClass({
  render: function() {
    return (
      <View style={styles.container}>
        <View style={styles.device} />
      </View>
    );
  }
});

var styles = StyleSheet.create({
  container: {
    flex: 1,
    justifyContent: 'center',
    alignItems: 'center',
    backgroundColor: '#F5FCFF',
  },
  device: {
    width: 80,
    height: 80,
    backgroundColor: '#6cab36'
  },
});
The next thing is to add a beacon container in where the beacons will be displayed. We'll display beacons as rectangles as well, but instead of being green they should be gray.
var ReactNativeBeaconExample = React.createClass({
  render: function() {
    return (
      <View style={styles.container}>
        <View style={styles.device} />
        <View style={styles.beaconContainer}>
          <View style={styles.beacon} />
        </View>
      </View>
    );
  }
});

var styles = StyleSheet.create({
  container: {
    flex: 1,
    justifyContent: 'center',
    alignItems: 'center',
    backgroundColor: '#F5FCFF',
    paddingTop: 20,
  },
  device: {
    width: 80,
    height: 80,
    backgroundColor: '#6cab36'
  },
  beaconContainer: {
    flex: 1,
    flexDirection: 'row',
    marginTop: 10,
  },
  beacon: {
    width: 50,
    height: 50,
    marginLeft: 5,
    marginRight: 5,
    marginTop: 200,
    backgroundColor: '#7c7c81'
  }
});
Our container gets a flex: 1, so it can take as much space as it needs and we want to leave some padding between the container and the device rectangle, so that the beacon rectangles won't appear glued to the device rectangle.
For the beacons to be displayed side-by-side, we need to add flexDirection: 'row'. Adding some padding
![]()
With the layout set up, we just need to wire up the beacon scanning logic with the beacon rectangles. The first thing is to move the beaconsDidRange event into the component:
var ReactNativeBeaconExample = React.createClass({
  getInitialState: function() {
    return {
      beacons: []
    };
  },
  componentDidMount: function() {
    DeviceEventEmitter.addListener(
      'beaconsDidRange',
      (data) => {
        this.setState({
          beacons: data.beacons.filter(item => item.rssi < 0).map(item => item.rssi)
        });
      }
    );
  },
  render: function() {
    return (
      <View style={styles.container}>
        <View style={styles.device} />
        <View style={styles.beaconContainer}>
          <View style={styles.beacon} />
        </View>
      </View>
    );
  }
});
What's most important for us in this example is the signal strength which is a number between 0 and -100. When the value is 0, it means that there isn't any precise data available. Generally, it's a good idea to disregard beacons that have 0 as their signal strength or unknown as its proximity as it's simply too unreliable.
Ideally we want the signal strength of all our beacons in an array, something like [-85, -60, -50]. To be able to use that in our component, we are setting the component's internal state. When we get a beaconsDidRange event, we want to update the state with a fresh array of signal strengths. To achieve that we are filtering the initial beacon array and then only taking the signal strength by using the rssi property. In this case we are using the arrow syntax to keep the this context and to be more concise in our filter and map methods.
Now we need to update the render function to use the component's state in order to draw the amount and position of the beacon rectangles:
render: function() {
  var beacons = this.state.beacons.map(function(strength, index) {
    var beaconPosition = {
      marginTop: Math.pow(strength, 3) / (Math.pow(-100, 3) / 250)
    };

    return <View key={index} style={[styles.beacon, beaconPosition]} />
  }, this);

  return (
    <View style={styles.container}>
      <View style={styles.device} />
      <View style={styles.beaconContainer}>
        {beacons}
      </View>
    </View>
  );
}
When the signal is at 0, the beacon would be super-close to our device, if it's -100 it would be really far away. In real-life scenarios, we probably get a signal of -57 or -60 if a beacon is really close and usually -85 if a beacon is far away. This depends on the beacon's configuration of its signal frequency and its transmitter power.
Our small example could definitely improved on the visual side of things, but for the moment its simplicity is enough for our purposes. One important thing to remember is that beacons only work on the real device and not in the simulator. The example code is available at https://github.com/geniuxconsulting/blog-react-native-ibeacon.
Using beacons proved to be a lot of trial-and-error at first. Here are a few things that helped us when we worked with Beacons:
- Place the beacons at around head height
- Since beacons send a signal every second, you might want to filter getting the same or even similar signals received in a short period of time
- The beacon signal can vary a lot. You may get the proximity
near,unknownthe next time andfarafter that. Something simple like a moving average algorithm may already do wonders, but might not work for all use cases.