iot-facerecognition is a project that is created to bring real-time face recognition ability to iot/embedded devices such as Raspberry Pi that are not normally able to recognize faces due to low computing power. The logic behind of it is to offload the work required of image recognition to a capable back-end solution in a simple way. WebSocket is used for communication for versatility. Encryption is force enabled to secure the connection. Currently only MJPEG streaming is supported.
Even though the project's name is 'iot-facerecognition', with the latest version it also allows object recognition. It uses dlib's examplary ResNet network (http://dlib.net/dnn_imagenet_ex.cpp.html) to recognize objects.
iot-facerecognition consists of two parts: server and client. Server, or the backend, is responsible for parsing the data that the connected clients send concurrently. It uses the ResNet network defined in dlib's examplary Deep Face Recognition (http://dlib.net/dnn_face_recognition_ex.cpp.html) to perform face detection and recognition. Face recognition is done for each client in parallel. It should handle multiple amount of clients as long as the hardware allows. The server is written in C++.
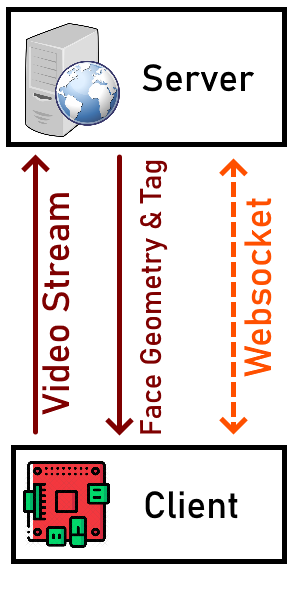
The client captures images with the connected camera and streams it to the server, continuously. After the server resolves the faces and/or objects contained in a certain video frame it sends back JSON formatted text regarding the faces (geometry and tag) and the objects (label and prediction rate) to the client and according to the client's configuration, the client shows rectangle around faces along with their tags as well as a textbox for the found objects.
There are two types of client implementations available. One of them is written in C++ and requires Qt Framework, while the other one is written in Python. The qt client is newer and is better supported, it also works faster and tested to work even on Raspberry Pi 0 W. The Python based client uses OpenCV while the C++ based one uses OpenMAX if possible (if not possible, Qt Multimedia backend).
The server is written in C++ and it uses Qt Framework. Qt 5.15.2 and C++17 compliant compiler is needed. MSVC and GCC/MinGW should be both fine. However, I only tested the dlib's CUDA support with MSVC.
CMake must be used to generate build files out of CMakeLists.txt.
The server depends on dlib (https://github.com/davisking/dlib) library. The cmake file is configured in such a way that dlib gets automatically downloaded. Normally, this behavior should not cause any issue but you should check dlib's cmake configuration before starting to build. For example, if you want the dlib to use CUDA, you should install CUDA Toolkit and CuDNN. I will not get into details of how to set up dlib here but there are a lot of documentation on the internet about the subject.
Note that dlib works the best when its compiled in release mode. To debug, you can try Release with Debug Information mode. Be aware that image recognition will be extremely slow in debug mode. Only x86_64 is supported and tested. To further accelerate image recognition, CUDA support must be enabled in dlib's configuration.
It is also possible to accelerate dlib's processing by installing OpenBLAS and LAPACK libraries. Installing them provides a good amount of boost when CUDA is not used. You can also try installing Intel's Math Kernel Library. dlib will detect it and use it.
The server uses libjpeg-turbo, to accelerate JPEG decoding. It is possible to use the application without it, however, then the JPEG decoding will be so much slower. It is strongly recommended to install libjpeg-turbo before building the server.
It is advised to build the project yourself. However, time to time I build both the server and the client myself and create a release. You can find them in the Releases section.
The prebuilt binaries don't generally support CUDA. This means that image recognition is going to be slow if you use precompiled binaries.
There is no install procedure for now. Just extract the archive and launch the server there.
A Qt-based client is available now. It is written in C++ and it uses Qt Framework 5.15.2. Qt 5.15.2 and C++17 compliant compiler is needed. MSVC and GCC/MinGW should be both fine. GCC/MinGW is tested to work properly. The advantage of Qt client is that if the target platform is Raspberry Pi, it will use hardware acceleration through OpenMAX.
QMake must be used to generate build files out of iot-facerecognition-client-qt.pro file.
During configuration, the project file will automatically detect the platform it is being built and make required adjustments. Currently, special care is taken only for Raspberry Pi. If the target platform is Raspberry Pi, it will use OpenMaxIL-cpp (https://github.com/dridri/OpenMaxIL-cpp) library. This means that you will need OpenMaxIL-cpp libraries installed on the system (or sysroot, if cross-compiling more info about that later).
OpenMaxIL-cpp, is a wrapper library to provide C++ way of interacting with OpenMax. OpenMax (https://en.wikipedia.org/wiki/OpenMAX) provides hardware acceleration for both rendering the camera frames and encoding. This enables the client to run on even Raspberry Pi 0 W without major performance impact. I managed to get constant 15 FPS during testing with Raspberry Pi 0.
On platforms other than Raspberry Pi, the client uses libjpeg-turbo, to accelerate JPEG encoding. It is possible to use the application without it, however, then the JPEG encoding will be so much slower. It is strongly recommended to install libjpeg-turbo before building the server if the target platform is not Raspberry Pi. The project file will try to detect libjpeg-turbo through pkgconfig, and if it fails it will manually look for C:\libjpeg-turbo64\lib\turbojpeg.lib. You can edit the project file to make it able to find libjpeg-turbo if it can't find it automatically. If the target is Raspberry Pi, libjpeg-turbo is not needed as OpenMAX will be used for hardware accelerated JPEG encoding.
Building Qt on actual Raspberry Pi takes quite some time, so I'd recommend cross compiling it. I will not cover how to cross compile Qt and the client here. There are some guides available on the internet such as https://github.com/UvinduW/Cross-Compiling-Qt-for-Raspberry-Pi-4 (it is for RPi 4, you need to make adjustments for RPi 0), and https://wiki.qt.io/RaspberryPi2EGLFS (this one is not very up-to-date).
One thing that you should note though, you should find a specific toolchain that supports C++17. The toolchain that is provided by the Raspberry Pi Foundation is very old and it can not compile Qt 5.15.2. There are other toolchains such as Linaro or vanilla GCC to compile for ARMv7, you can use them if you intend to use the client on Raspberry Pi >= 3. The problem is that Raspberry Pi 0 W has ARMv6 architecture which is quite old so that it is not supported with prebuilt upstream toolchains by default, even if you set the march parameter with something like -march=armv6, it will NOT work and you will get Illegal Instruction error. So, you need to compile the toolchain yourself or find an appropriate pre-built one.
I have found two toolchains that support ARMv6. One of them is https://github.com/abhiTronix/raspberry-pi-cross-compilers#supported-arm-devices, and the other is https://github.com/Pro/raspi-toolchain. The first one is up-to-date but is also quite problematic because the author did not make required adjustments for it to work properly. There is also a specific guide to build Qt with it (https://github.com/abhiTronix/raspberry-pi-cross-compilers/blob/master/QT_build_instructions.md), but beware that it might not work out of the box. I have noticed the author about its problems but he ignored them and behaved in a toxic manner. The second/other one is not very recent and requires to be extracted in a specific place. Both toolchains should work but because of their problems I can not recommend either of them. The best idea would be building the toolchain yourself as mentioned.
If you go with the cross-compile route, make sure that Qt is configured properly. For example, it must support EGLFS, and OpenSSL (make sure that openssl and libssl-dev is installed before on the system / sysroot), and some other things for touch input (libinput) etc. Check the configure output log carefully otherwise you may need to recompile. Even when cross-compiling, building Qt takes a lot of time.
You can find the precompiled binaries in the Releases section. Currently, only Windows (x64) and Raspberry Pi OS Lite (ARMv6) are available.
There is no install procedure for now. Just extract the archive and launch it there.
Python client is available on PyPI : https://pypi.org/project/iot-facerecognition-client
You may install through PyPI as such:
pip install iot-facerecognition-client
Alternatively, you can apply standard Python application installation routines. opencv-python, websocket-client and screeninfo packages are needed for installation. Please note that on Raspberry PI >= 3, the latest OpenCV-python seems to be broken so you may need to download a specific version that is older than the current one.
I did not test it on Raspberry Pi 0, but I think that it would not work properly. You can use Qt-based client which is designed to work on it. The Python client works fine on Raspberry Pi 3 but it consumes too much CPU cycles due to how OpenCV works. Maybe, disabling the GUI can make it work faster.
First of all, because of encryption, OpenSSL >= 1.1 (runtimes) must be available on the machine. It is not possible to disable encryption.
The server needs to be configured before usage. To configure the server, open the config.ini file that comes with the server and modify lines according to these: In future, I may make the config.ini auto-generated from CMake options.
GUIEnable(boolean) -> You can disable or enable the GUI using this entry. Disabling GUI reserves system resources to be allocated for more clients. Default istrue.
CertificateTestMode(boolean) -> If set tofalse, an exception is thrown when SSL error occurs. Default isfalse.Key(string) -> Specifies the location of private key file (*.key). A sample key file is provided but should not be used in production. Default points to the sample key file.Certificate(string) -> Specifies the location of public certificate file (*.cert, *.crt). Certificate hostname must match with the listening ip address / hostname. A sample certificate file is provided but should not be used in production. Default points to the sample cert file.QSsl::KeyAlgorithm(enum) -> Set it according to the information available in https://doc.qt.io/qt-5/qssl.html#KeyAlgorithm-enum. Default is 1 (RSA Algorithm).QSsl::EncodingFormat(enum) -> Set it according to the information available in https://doc.qt.io/qt-5/qssl.html#EncodingFormat-enum. Default is 0 (PEM Format).
LogEnable(boolean) -> Enables or disables logging to file. Default istrue.Location(string) -> Points to the file location in which the logs are stored. Default islog.txt.
DLIB-
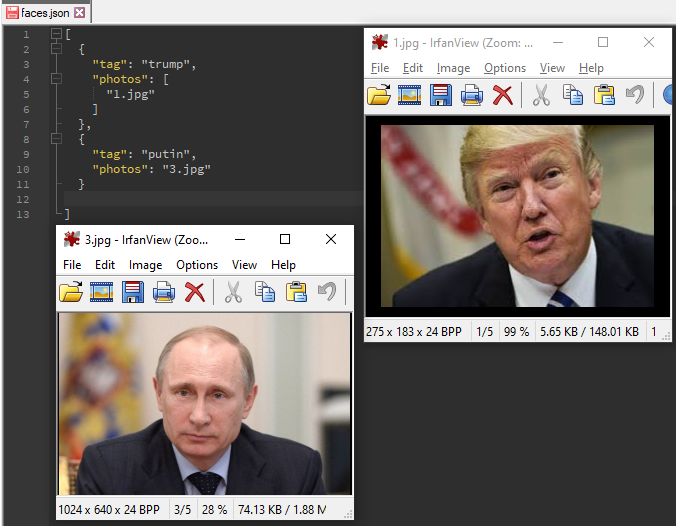
ReferenceFile(string) -> Specifies the file containing reference face data for face recognition. iot-facerecognition-server will try to find faces that are specified in this file in the input stream. Default isfaces.json. This file must be in JSON format. See below for example:[ { "tag": "trump", "photos": [ "trump.jpg", "trump2.jpg" ] }, { "tag": "obama", "photos": "obama.jpg" } ] -
FaceLandmarkModelFile(string) -> Specifies the face landmark model file for face recognition. Can be gathered from https://github.com/davisking/dlib-models. Default isshape_predictor_5_face_landmarks.dat. -
FaceRecognitionModelFile(string) -> Specifies the face recognition model file for face recognition. Can be gathered from https://github.com/davisking/dlib-models. Default isdlib_face_recognition_resnet_model_v1.dat. -
Threshold(double) -> Threshold for face matching. Should probably not be changed. Default is0.6. -
FaceDetailSize(uint) -> dlib internal. Should probably not be changed. Default is150. -
FacePadding(double) -> dlib internal. Should probably not be changed. Default is0.25. -
ImageNetClassifierFile(string) -> Specifies the ImageNet classifier model file for object classification/recognition. Can be gathered from https://github.com/davisking/dlib-models. Default isresnet34_1000_imagenet_classifier.dnn. -
NumberOfCrops(uint) -> Specifies how many crops should be made from an image frame to run the ImageNet classifier model on. Increasing it causes a major performance impact. Default is16.
-
ConnectionServerName(string) -> Name of the server. Default isiot-facerecognition-server.Port(int) -> Specifies the port of the Websocket to listen on. This port should not be used by other applications. Default is50000.
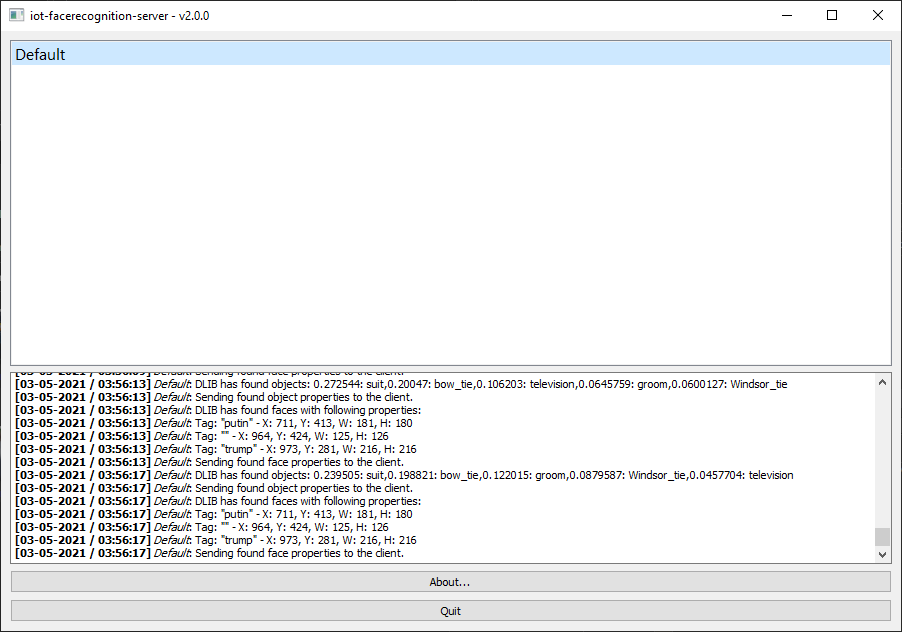
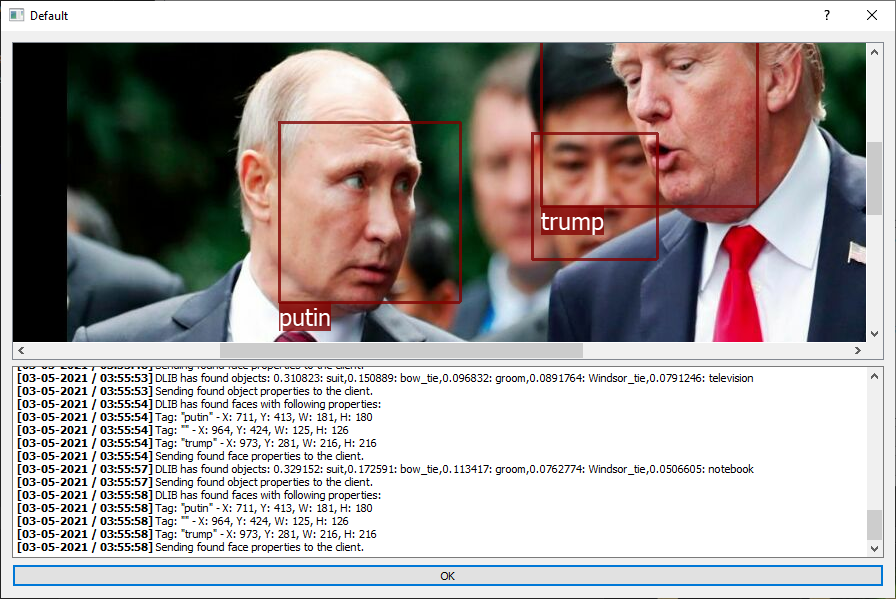
After configuring the server, you can directly run it. If GUI is enabled, a simple user interface will be shown along with console. In the gui you can see the clients that are connected. Double clicking a client will open a dialog in which the input stream is shown and faces are marked with a rectangle and label (label text is the tag associated with that face) as well as a textbox to indicate found objects.
When a known or unknown face is found, iot-facerecognition-server will send the data to the client as a string through WebSocket. If an unknown face is found the face tag will be empty string. The format of this data is simply JSON, so you can develop your own client and parse the results easily.
Sample face recognition result:
[
  {
    "tag": "trump",
    "x": 10,
    "y": 200,
    "width": 128,
    "height": 128
  },
  {
    "tag": "",
    "x": 35,
    "y": 50,
    "width": 64,
    "height": 86
  }
]
Sample object recognition result:
[
  {
    "label": "King penguin",
    "prediction": 0.15
  },
  {
    "label": "Chihuahua",
    "prediction": 0.0005
  }
]
In addition to the config file, the server additionally holds a Settings struct for each client (a simple settings system). This allows clients to tell the server their needs. For example, a client can disable object recognition by sending a special command to the server. This topic is described below in the Protocol section.
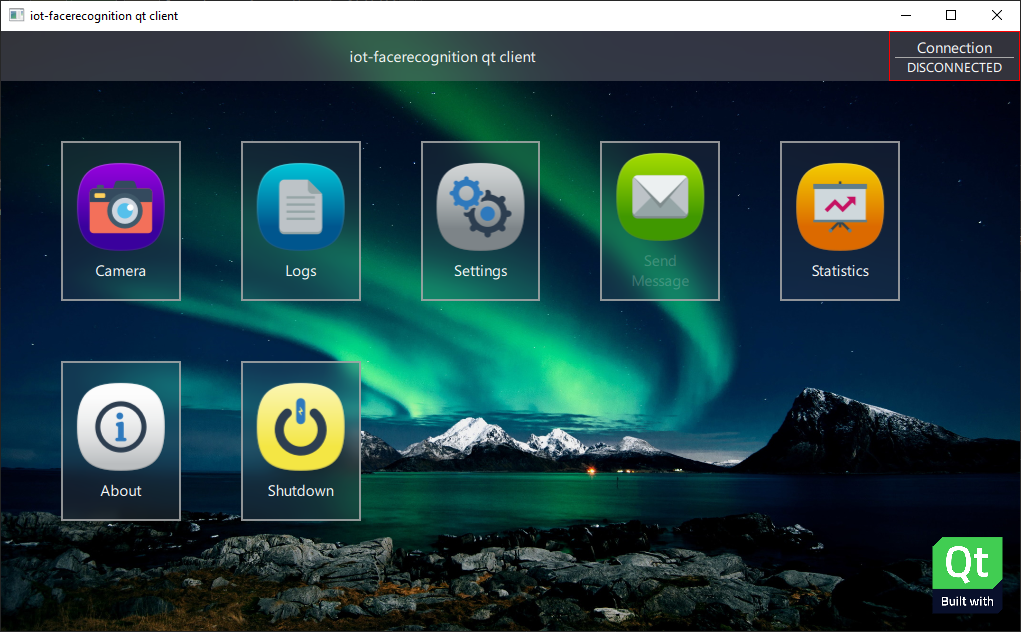
The Qt client comes with a modern and fluid UI made with Qt QML (see screenshots). However, it also does not provide an API unlike the Python client so it is rather an end product (for now).
The Qt client is optimized to run on Raspberry Pi. It is tested on Raspberry Pi 0 W, and it works fine.
Note that due to Qt's EGLFS implementation, the UI is not DPI aware on Raspberry Pi.
Unlike Python client, which uses OpenCV to do various resource intensive tasks such as jpeg encoding, and retrieval of camera frames; the Qt client uses OpenMAX to hardware accelerate those tasks.
To use the Qt client, you must have a touch display and a camera connected to Raspberry Pi. However, it also works on other platforms such as Windows and Linux, though in that case Qt Multimedia Backend will be used instead of OpenMAX. The client uses libjpeg-turbo (when available) to hardware accelerate jpeg encoding on platforms other than Raspberry Pi OS.
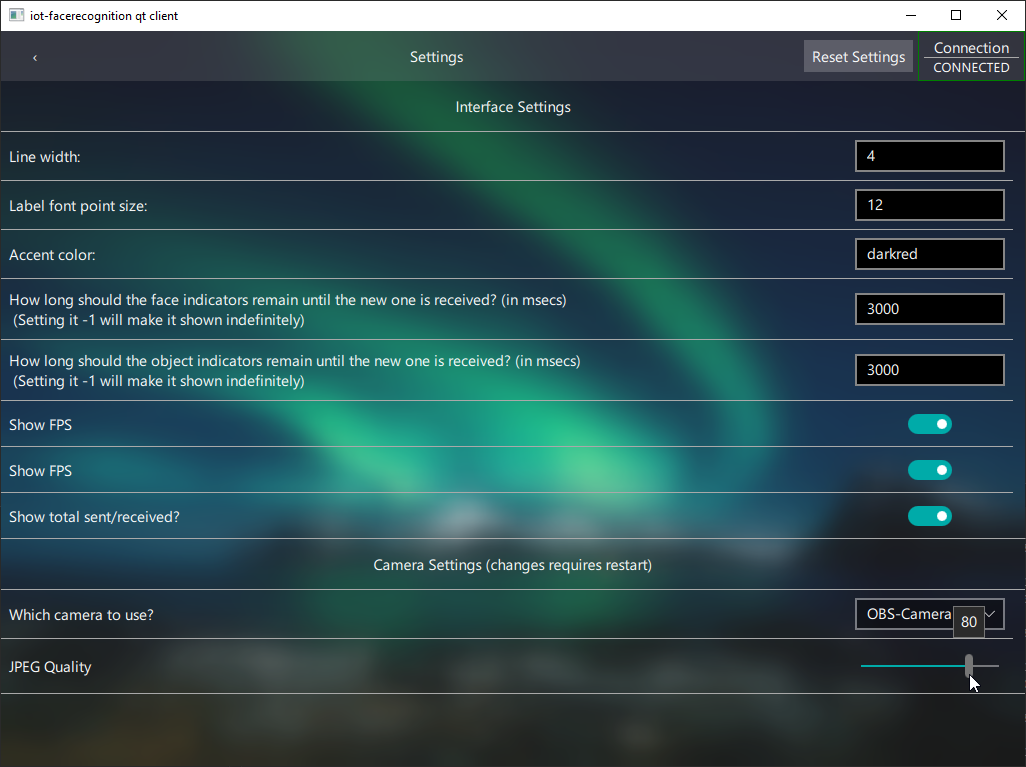
Since it has a fully-featured GUI, you can make all the changes to settings through the UI. For now, this is the only option as there is no config.ini like there is for the server.
The UI consists of several views, the details are explained below.
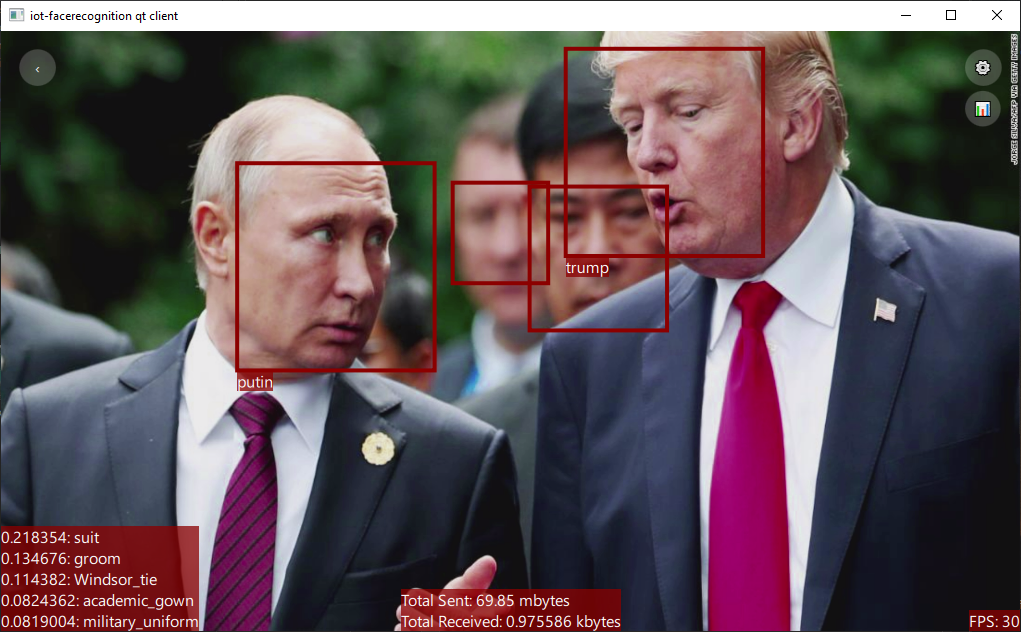
This view is the main view of the client and it acts as a viewfinder of the camera (live preview). When the server finds face/object, they are shown on real-time here. The information is drawn as an overlay to the viewfinder. You can access the settings, statistics by clicking the buttons that are placed on right, and you can go back by pressing the back button placed on the left. The total internet usage, and FPS textboxes can be disabled through the camera settings. The camera works only when this view is activated.
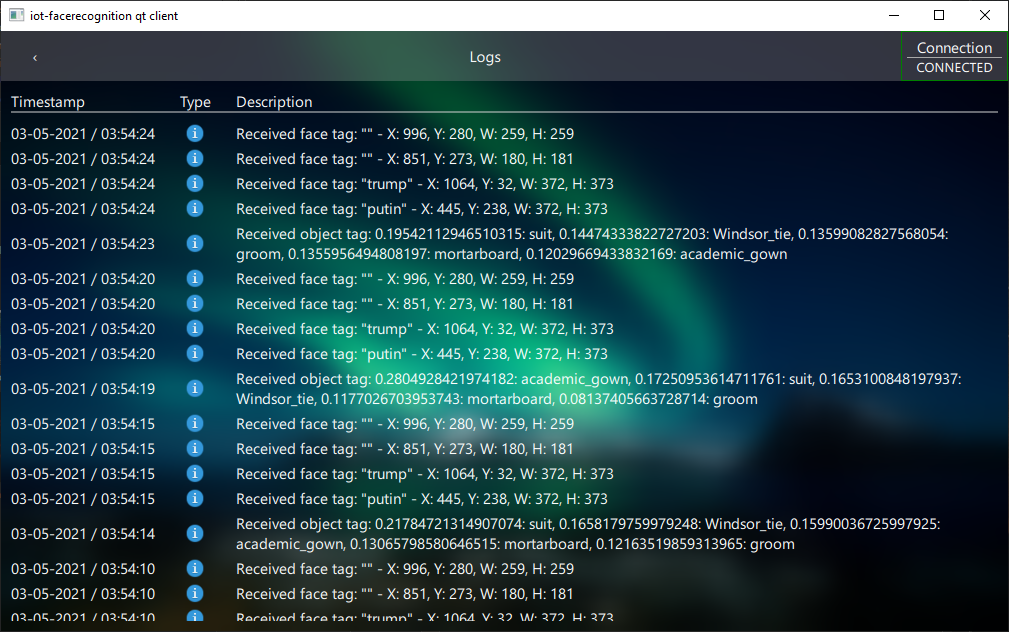
Similar to Server's logging feature, the Qt client also has logging support. It also has classification for logs (information, warning, error). Various events such as connection, disconnection, face/object found, exceptions are logged and timestamped (so that you can see the exact time when a detection occurred later)
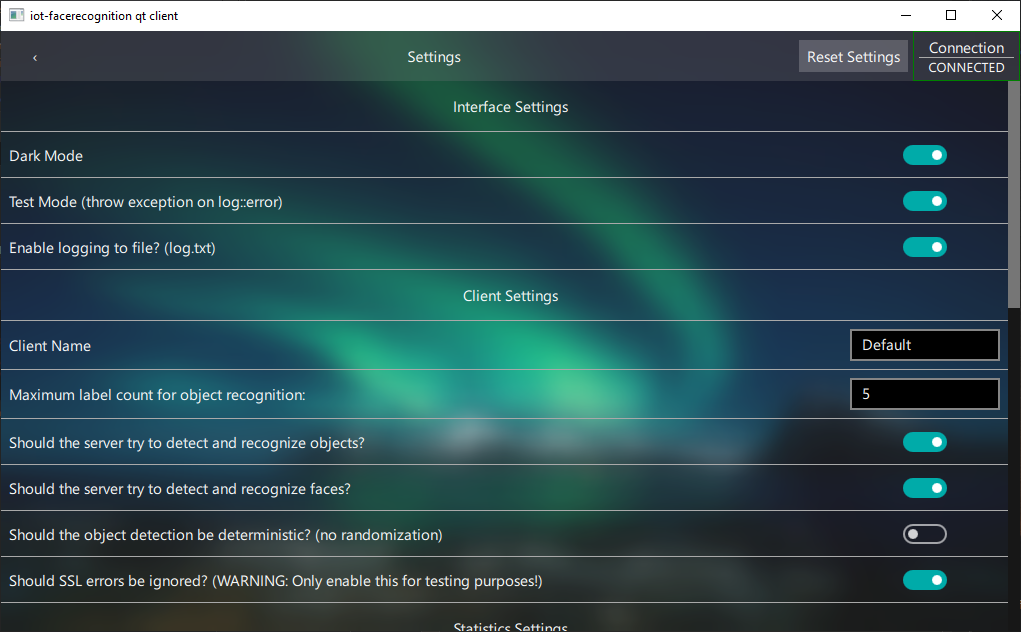
The settings are self-explanatory so they are not described here. In short, you can find all settings in this view (Camera, Interface, Statistics, ...). Clicking the Reset Settings button will revert all changes made to the settings. The location of the settings can be determined with this guide: https://doc.qt.io/qt-5/qsettings.html#locations-where-application-settings-are-stored
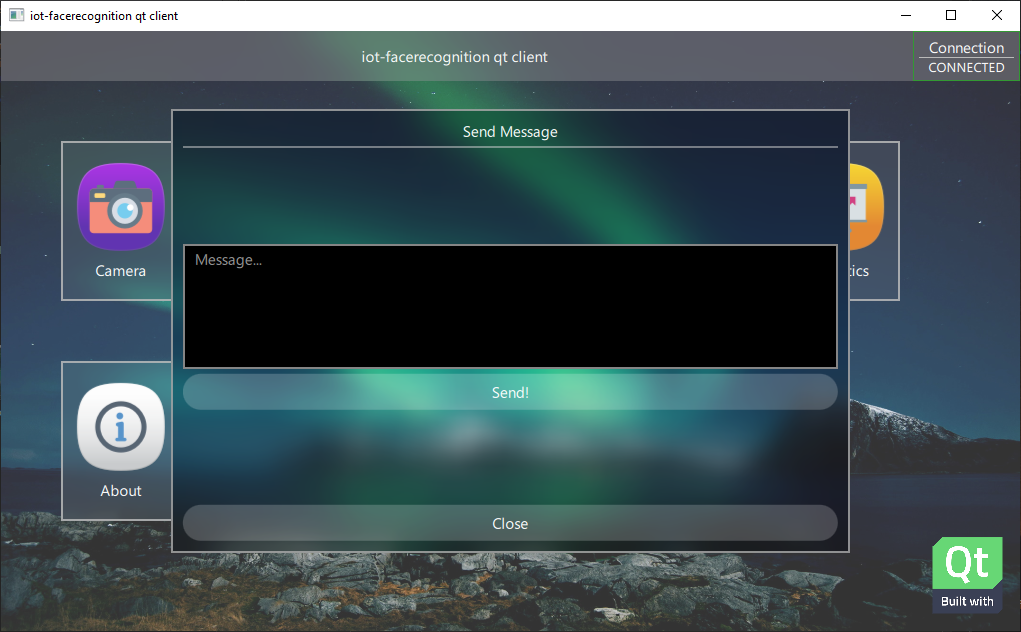
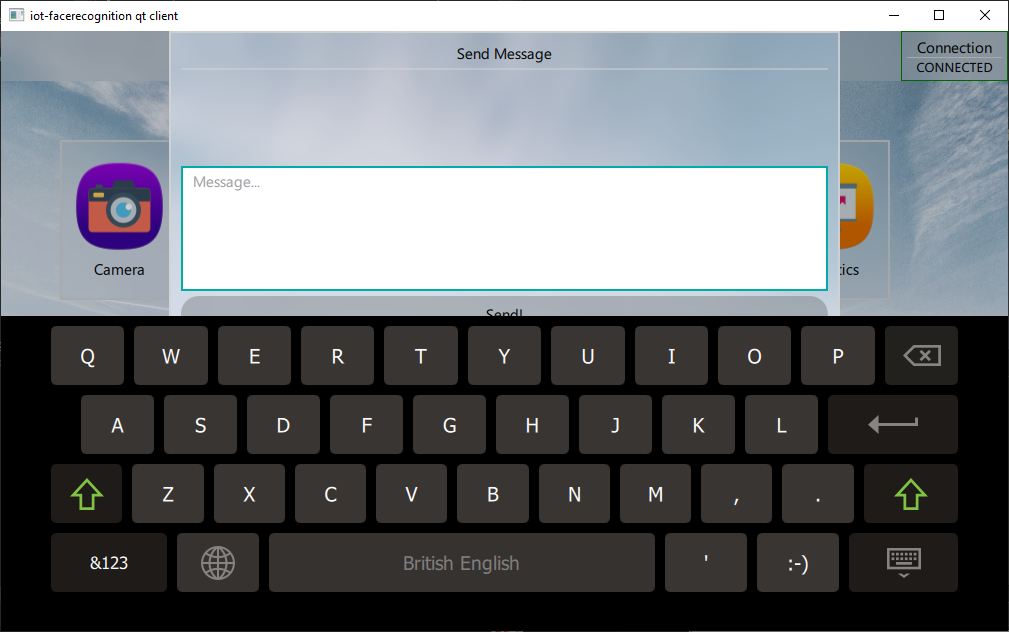
This is not a view but a popup. It allows to send a message to the server. It is only enabled when there is an established connection.
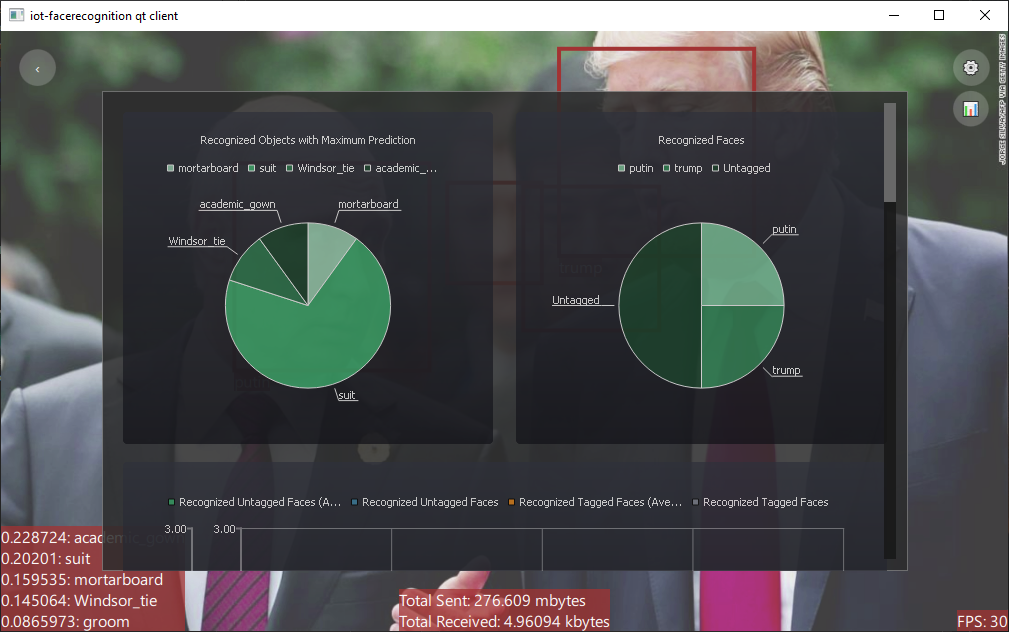
The Qt client records most of the activities and shows them on this view as charts. The list is given below. Note that the Raspberry Pi 0 apparently does not have enough computing power to make use of the statistics.
- Recognized objects with Maximum prediction -> Pie Chart
- Recognized Faces -> Pie Chart, Line Chart
- Maximum Object Prediction Rate -> Line Chart
- Internet Usage (Cumulative) -> Line Chart
- Internet Usage -> Line Chart
- FPS -> Line Chart
First of all, if allowselfsign parameter (described below) is False you need to make sure that the certificate that the server is configured with is installed as a trusted certificate on the system that the client runs otherwise you will get SSL errors.
Python client does not fully support object recognition (there is no callback function for object recognition). I intend to update it later though.
The python client does not support the settings system yet. There are also other things that need to be changed in the python client. I have been busy making the Qt-based client but I will try to update the Python client when I have enough free time.
In the iot-facerecognition-client.py file there is a class named FaceRecognition. This class handles all the things regarding communication with the server and it calls a callback function when a known face is found in the capture stream thus the Python client can be used by an external software. It also has a basic GUI that it shows the found faces and the objects on a Window that is overlayed to the camera images. The external software should create an instance of this class with the following parameters:
clientname(string) -> Name of the client. Server will use this name to list and identify the clients.ipaddress(string) -> IP address of the server.port(string) -> port number that is being listened by the server.capturewidth, captureheight(int) -> Capture resolution.callbackfunc( function( str ) ) -> This function will be called when a known face is found. A string argument containing the tag will be passed to the function.targetwidth, targetheight(int) -> Target width & height. Captured frame will be resized to this size before sending it to the server. Can be something like capture resolution / 2. Should be configured according to the bandwidth available. If is 0, resize will not occur.lessbandwidth(boolean) -> Sets if frame is to be encoded as JPEG or WEBP format. WEBP format consumes less bandwidth but takes more time to encode. Consider this tradeoff and set it according to your system. False means JPEG will be used, True means WEBP will be used. Default is False. Note that the server no longer supports WEBP decoding, so this paramater will be removed with an update.guienabled(boolean) -> Enables or disables the GUI. Disabling the GUI will make it virtually a blackbox which only invokes the callback function whenever faces are detected. When gui is enabled, camera stream will always be shown fullscreen. Default is False.enablewstrace(boolean) -> Enables or disables websocket tracing. Enabling it will make it log every websocket related activity to the console. Default is False.allowselfsign(boolean) -> Allows certificate to be self signed. Default is True.
Example usage:
from iot_facerecognition_client import FaceRecognition

def callback(tag):
	print("Found Face: " + tag)

if __name__ == "__main__":
  facerecognition = FaceRecognition(parameters mentioned above, callbackfunc = callback)
  facerecognition.connect()
  facerecognition.start()
Alternatively, python client can be used as a standalone application (with console command 'iot-facerecognition-client'). Although it will not invoke the callback function, it will show a window to show detected faces and objects that are overlayed to camera images. In this mode, the client can be started by specifying arguments. Example usage:
iot-facerecognition-client clientname ipaddr port capwidth capheight
As mentioned before, the server has a simple settings system. In order to make settings adjustments, the client must send special command to the server. In addition to settings, there are some other special commands too. Note that the Server does not save settings of Clients, so a client must set (synchronize) the settings every time it connects to a server (more details on that can be found below).
How the server know what the client wants it to do? This is achieved by providing a common (synchronized) data structure to both the Client and the Server. When a command arrives, it is simply parsed and fed to a switch statement. Think of it like speaking a common language.
The container of the so-called special commands is just a JSON formatted string like the recognition results, and the payload is the command itself. In fact, the recognition results are also sent this way as well as any other thing that is sent as text/string.
The Protocol defines how the Server and the Client communicate with each other.
The commands can be found in Client.h (Server), and it should be the same for all client implementations and the server:
enum class Command : unsigned int
{
    SETTING_NAME = 1,
    MESSAGE = 2,
    MESSAGE_TAG_FACE = 3,
    MESSAGE_TAG_OBJECT = 4,
    SETTING_OBJDETECTIONENABLED = 5,
    SETTING_LABELCOUNT = 6,
    SETTING_DETERMINISTICOBJECTDETECTION = 7,
    SETTING_FACERECOGNITIONENABLED = 8,
    INIT_REQUEST = 9
};
An example command (the command that contains facial recognition results):
{
  "command": 3,
  "context": [
    {
      "tag": "trump",
      "x": 10,
      "y": 200,
      "width": 128,
      "height": 128
    }
  ]
}SETTING_NAME:string-> This command makes the client to change it's name. The context is simply a string. Has no effect when sent from the Server to the Client.MESSAGE:string-> This command allows basic communication between the client and the server. Currently, the server does not send a message to the client but I plan to implement it somehow. The context is string.MESSAGE_TAG_FACE:JSON array-> This command gets sent from the Server to the Client when a face is recognized. The context is explained above. Has no effect when sent from the Client to the Server.MESSAGE_TAG_OBJECT:JSON array-> This command gets sent from the Server to the Client when an onject is recognized. The context is explained above. Has no effect when sent from the Client to the Server.SETTING_OBJDETECTIONENABLED:bool-> Client sends this command to the server to enable/disable object recognition. Default setting on the Server respective to the Client istrue. It should have no effect when sent from the Server to the Client.SETTING_LABELCOUNT:unsigned int-> Client sends this command to the server to adjust the label count for object detection. In other words, it is used to set how many objects should be detected per frame by the server. Default is5. It should have no effect when sent from the Server to the Client.SETTING_DETERMINISTICOBJECTDETECTION:bool-> This settings makes the object recognition deterministic / non-deterministic. Normally, the server uses features like random flip, random crop. While non-deterministic approach increases the ability of detecting objects, it can also cause the detected objects to change continuously even when the input image is the same. Default isfalse(non-deterministic). It should have no effect when sent from the Server to the Client.SETTING_FACERECOGNITIONENABLED:bool-> Client sends this command to the server to enable/disable facial recognition. Default setting on the Server respective to the Client istrue. It should have no effect when sent from the Server to the Client.INIT_REQUEST:void-> Server sends this command to the client upon connection is established successfully. This command was added to not let Client to send settings during inappropriate times. The Qt-based client implementation synchronizes the settings with the Server every time it connects to a server after it receives this command since the Server does not have capability of remembering the settings for each client. This command has no context.

iot-facerecognition server and client implementations are all licensed under AGPLv3. It can not be used for any commercial purposes. If you need another licensing solution, please contact with me.
- Qt Framework is used under LGPLv3.
- Qt Module -- Qt WebSockets is used under LGPLv3.
- dlib is used under Boost Software License.
- libjpeg-turbo is used under The Modified (3-clause) BSD License.
- Qt Framework Base is used under LGPLv3.
- Qt Module -- QtQuick Virtual Keyboard is used under GPLv3.
- Qt Module -- QtCharts is used under GPLv3.
- Qt Module -- Qt WebSockets is used under LGPLv3.
- Qt Module -- Qt Quick Controls 2 is used under LGPLv3.
- OpenMaxIL-cpp library (https://github.com//dridri/OpenMaxIL-cpp) is used under MIT license.
- SampleYUVRenderer (https://github.com//MasterAler/SampleYUVRenderer) is used under MIT license.
- Qt Docs -- Scene Graph - OpenGL Under QML is used under BSD license.
- yuv2rgb library is used under BSD-3-Clause License.
- libjpeg-turbo is used under The Modified (3-clause) BSD License.
- Assets -- background images are used under Pexels License.
- Assets -- icons are used under Creative Commons (Attribution 3.0 unported) License.


