fanfanjun / dailylog Goto Github PK
View Code? Open in Web Editor NEW记录开发所遇到的点点滴滴
记录开发所遇到的点点滴滴


什么是类组件
在 React 中,类组件就是基于ES6语法,通过继承 React.component 得到的组件,下面就是一个典型的类组件
class Demo extends React.Component {
  // 初始化类组件的 state
  state = {
    text: ""
  };
  // 编写生命周期方法 didMount
  componentDidMount() {
    // 省略业务逻辑
  }
  // 编写自定义的实例方法
  changeText = (newText) => {
    // 更新 state
    this.setState({
      text: newText
    });
  };
  // 编写生命周期方法 render
  render() {
    return (
      <div className="demoClass">
        <p>{this.state.text}</p>
        <button onClick={this.changeText}>点我修改</button>
      </div>
    );
  }
}
什么是函数组件
函数组件也称无状态组件,顾名思义就是以函数形态存在的 React 组件。如下就是典型的函数组件
function DemoFunction(props) {
  const { text } = props
  return (
    <div className="demoFunction">
      <p>{`function 组件所接收到的来自外界的文本内容是:[${text}]`}</p>
    </div>
  );
}
那么很多人会问到在 React 中类组件和函数组件的差异,就表象来说可以说很多条
- 类组件有生命周期,函数组件没有
- 类组件需要继承 Class,函数组件不需要
- 类组件可以获取实例化的 this,并且基于 this 做各种操作,函数组件不行
- 类组件内部可以定义并维护 state, 函数组件都称为无状态了,那肯定不行。
看上去类组件的功能包含了方方面面,大而全,大而全一定好吗?肯定不尽其然,大家也能知道类组件的内部逻辑容易和组件黏在一起,难以拆分和复用;大而全代表学习成本高,容易写出垃圾代码。
函数组件相比较类组件,优点是更轻量与灵活,便于逻辑的拆分复用。
那么难道 React 内部就是基于此大力推广 Hooks 和函数组件吗?肯定有这些方面的因素,但最重要的一点,我引用一下 React 团队核心成员和 Redux 作者 Dan 的一篇文章,函数式组件与类组件有何不同?
一句话概括:函数式组件捕获了渲染时所使用的值,这是两类组件最大的不同。
怎么理解这句话呢? 我们都知道,React 框架有一个经典的公式是 UI = f(data),React框架做的本质工作就是吃入数据,吐出UI,把声明式的代码转换为命令式的 DOM 操作,把数据层面的描述映射到用户可见的 UI 变化中去。这也就是说React的数据应该紧紧的和渲染绑定在一起,但是问题的关键就在于类组件是做不到这一点的。
我们采用 Dan 文章中的例子
class ProfilePage extends React.Component {
  showMessage = () => {
    alert('Followed ' + this.props.user);
  };
  handleClick = () => {
    setTimeout(this.showMessage, 3000);
  };
  render() {
    return <button onClick={this.handleClick}>Follow</button>;
  }
}
这个组件返回的是一个按钮,点击之后延迟三秒,页面弹出 ‘Followed XXX‘的文案。 看上去好像是没有什么问题,但是在sandBox例子中,如果你在dan用户下点击 follow按钮,并且在三秒内把用户切换到 Sophie, 最终弹出的提示框会变成 ‘Followed Sophie’,这明显很不合理。
这个现象有点奇怪,user 是通过 props 下发的,props不可改变,那么造成数据改变的原因就一定是 this 指向改变了。 真正的原因也确实如此,虽然props不可改变,但是this是可变的,this.props 的每次调用都会去获取最新的 this 值,这也是React保证数据实时性的重要手段。
那么就很清晰了,当showMessage最终执行时,此时的 this 绑定的是 Sophie 对应的上下文,所以输出为 ‘Followed Sophie’;
如果我们把上面的类组件改造成函数组件
function ProfilePage(props) {
  const showMessage = () => {
    alert('Followed ' + props.user);
  };
  const handleClick = () => {
    setTimeout(showMessage, 3000);
  };
  return (
    <button onClick={handleClick}>Follow</button>
  );
}
最终的输出值明显为 ‘Followed Dan’,props 会在函数执行的瞬间就被捕获,而 props 本身又是不可变值,所以我们可以确保从当前开始读取到的 props 都是最初捕获到的。当父组件传入新的 props 尝试重新渲染函数时,本质是基于新的 props 入参重新调用了一次函数,并不会影响上一次调用。这就是 Dan 所说的函数式组件捕获了渲染所使用的值,并且我们还能进一步意识到:函数组件真正将数据和渲染紧紧的绑定到一起了。
这里有个小Tips,很多人认为在函数组件中延迟输出的 state 是调用时的 state,而不是最新的 state 是一个Bug,恰恰相反,这是一个函数式组件的特性,是真正践行了React设计理念的正确方式。
Hooks也给出了获取最新的props和state的方法,就是 useRef,详细用法我不再赘叙,大家有兴趣可以自己去查阅。那么显而易见的是,函数组件更符合 React 团队的设计理念,并且代码易于拆分和复用,用脚投票都知道 React 团队为什么要推出 Hooks 来扩展函数组件的功能,并且倡导大家使用函数组件了。
参考文章: Dan Abramov 函数式组件与类组件有何不同
1. 脱离文档流 不再保留原来的位置 形成高度塌陷
2. 具有行内块的特性(行内元素、块级元素)
3. 一行内显示并且元素顶部对齐
4. 父级元素装不下这些浮动盒子 多出的盒子另起一行对齐
flex-direction: x 轴(row)  y 轴(column)
justify-content:控制子元素位置
1. space-between 先两边贴边 再平分剩余空间
2. center 在主轴居中对齐 (x 轴水平居中)
flex-wrap : wrap 换行  nowrap 不换行

侧轴
align-items: center  挤在一起居中(垂直居中) 单行有效

align-content : 多行有效(换行多行)
position: left right bottom top
定位 = 定位模式 + 边偏移
1、相对于最近的一层父级定位元素;没有一个祖先元素设置定位,那么参照物是body层
2、脱离文档流 不占有原有位置
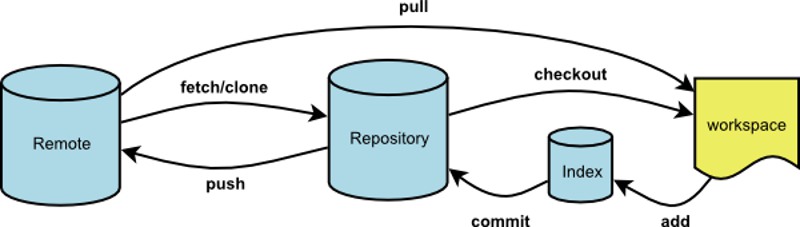
查看所有远程主机名
$ git remote
查看远程主机地址
$ git remote -v
查看主机相关信息
$ git remote show <主机名>
克隆远程主机下的分支
$ git clone -b <主机地址> <分支名>
取回远程主机某个分支的更新
$ git pull <主机名> <分支名>
将本地分支的更新,推送到远程主机
$ git push <主机名> <分支名>
在本地分支上合并远程分支
$ git merge <主机名>/<分支名>
删除本地分支: git branch -d branch
删除远程分支:git push origin --delete branch
git cherry-pick commitID

代码开发的时候,有时需要把某分支(比如develop分支)的某一次提交合并到另一分支(比如master分支),这就需要用到git cherry-pick命令。

首先,切换到develop分支,敲 git log 命令,查找需要合并的commit记录,比如commitID:7fcb3defff;

然后,切换到master分支,使用 git cherry-pick 7fcb3defff  命令,就把该条commit记录合并到了master分支,这只是在本地合并到了master分支;

最后,git push 提交到master远程,至此,就把develop分支的这条commit所涉及的更改合并到了master分支。
git reset --hard head
git branch -a  --查看所有分支
git branch -r  --查看远程分支
git branch --查看本地分支

git checkout + 分支branch
git checkout -b branchName origin/branchName
git log --author="提交人"
git show commitid
git diff 文件名
git stash save <message>
git checkout <feture_branch> //切换刚才功能开发的分支
git stash list //查看暂存区的所有暂存修改记录
git stash pop //取出最近一次暂存并删除记录列表中对应记录
git stash apply stash@{X} //取出相应的暂存
git stash drop stash@{X} //将记录列表中取出的对应暂存记录删除
创建branchName并切到此分支

git checkout -b 本地分支名  origin/远程分支名

git push -u origin 本地分支名
git reset HEAD@{1}
比如我的提交历史如下,我现在想删除commit_B,但是不影响commit_B之后的提交历史

commit_C

commit_B

commit_A

操作方法如下:

假如要删除备注为add c.txt commit为0fb295fe0e0276f0c81df61c4fd853b7a000bb5c的这次提交

首先找到commit_B提交之前的一次提交的commit_A

执行如下命令

1 git rebase -i  commit_A

2 将commit_B这一行前面的pick改为drop,然后按照提示保存退出

至此已经删除了指定的commit,可以使用git log查看下

3 git push origin HEAD –force

然后推送到远程仓库
此时 commit_B 就被干掉了,没有影响后面的提交
git clone -b branchName(分支名) http://username:[email protected]/package1/myProject.git
git merge --no-ff branch
Commit 1c3268d4b69dc6ca9dd89e92b513f5edb194978c is a merge but no -m option was given
解决如下:
git revert -m 1 <commit-hash>
git commit -m "Reverting the last commit."
git push
当你使用 git revert 撤销一个 merge commit 时,如果除了 commit 号而不加任何其他参数,git 将会提示错误:

$ git revert 83281a8e9aa1ede58d51a6dd78d5414dd9bc8548 //本人实际git信息,这里对应git演进图中的 g
error: Commit g is a merge but no -m option was given.
fatal: revert failed

在你合并两个分支并试图撤销时,Git 并不知道你到底需要保留哪一个分支上所做的修改。从 Git 的角度来看,master 分支和 dev 在地位上是完全平等的,只是在 workflow 中,master 被人为约定成了「主分支」。

于是 Git 需要你通过 m 或 mainline 参数来指定「主线」。merge commit 的 parents 一定是在两个不同的线索上,因此可以通过 parent 来表示「主线」。m 参数的值可以是 1 或者 2,对应着 parent 在 merge commit 信息中的顺序。

以上面那张图为例,我们查看 commit g 的内容:

$ git show 83281a8e9aa1ede58d51a6dd78d5414dd9bc8548 //本人实际git信息,这里对应git演进图中的 g

commit 83281a8e9aa1ede58d51a6dd78d5414dd9bc8548

Merge: 312a518 fa87415 //312a518和fa87415 可以在git log中找到对应的提交信息(只是commit一长串字符的头部分)

......

那么,$ git revert -m 1 g 将会保留 master 分支上的修改,撤销 dev 分支上的修改。//(1就是1,表示312a518对应的父来源,2表示fa87415对应的父来源)撤销成功之后,Git 将会生成一个新的 Commit
git log --oneline
git log --oneline -3
git log --oneline --author='iYeacle' --oneline
git log --oneline --before='2019-2-18'
git log --oneline --after='1 week'
git log --oneline --after='2021-05-31' --author="[email protected]"
git config --global user.name "mistdon"
git config --global user.email "[email protected]"
长期存储密码
git config --global credential.helper store
全局提交账号名
git config --global credential.username licai
git clone -b dev_jk http://10.1.1.11/service/tmall-service.git
git clone https://gitlab.com/Dongshen/Today.git
cd Today
touch README.md
git add README.md
git commit -m "add README"
git push -u origin master
cd existing_folder
git init
若存在绑定先输入 git remote rm origin
git remote add origin https://gitlab.com/Dongshen/Today.git
git add .
git commit -m "Initial commit"
git push -u origin master
git remote set-url origin https://[email protected]/FanFanJUN/VUESTU.git
<BatchImportForNew
                    columns={mapKeyValueCol(
                      keyMapForWin(defaultValue.pricingMannerCode)
                    ).map((item) => ({ ...item, align: "center" }))}
                    keyMap={keyMapForWin(defaultValue.pricingMannerCode)}
                    tableKey=""
                    beforeimport={this.beforeimport}
                    downParams={{

                    }}
                    fileName={imfileName}
                    downLoadUrl={

                    }
                    downMethod="post"
                    callback={this.importCallBackForNew}
                    defaultValue={defaultValue}
                  />
<Upload
                showUploadList={false}
                style={{ width: "100%" }}
                fileList={this.state.fileList}
                beforeUpload={this.beforeUpload}
                onChange={this.getUploadFile}
              >
                <Button
                  style={{ marginLeft: 5 }}
                  key="chooseFile"
                  loading={loading}
                  type="primary"
                >
                  <Icon type="upload" />选择文件
                </Button>
              </Upload>
// 前端解析
    getUploadFile = (e) => {
        const { keyMap, tableKey } = this.props;
        const fileName = e.file.name;
        // 导入文件类型
        if(!fileName.includes('xls')) {
            return;
        }
        //拿到所导入文件的名字
        let fileList = [...e.fileList];
        fileList = fileList.slice(-1);
        this.setState({ fileList, loading: true });
        //定义reader,存放文件读取方法
        const reader = new FileReader()
        const _that = this;
        if (e.file.status !== 'uploading') {
            reader.onload = (function (theFile) {
                return function (e) {
                    let binary = '';
                    var wb;
                    var outData;
                    const bytes = new Uint8Array(e.target.result);
                    const length = bytes.byteLength;
                    for (let i = 0; i < length; i++) {
                        binary += String.fromCharCode(bytes[i]);
                    }
                    wb = XLSX.read(binary, {
                        type: 'binary'
                    });
                    outData = XLSX.utils.sheet_to_json(wb.Sheets[wb.SheetNames[0]]);
                    // 处理outData
                    if (!isEmptyArray(outData)) {
                        const newImportList = outData.map((item) => {
                            return dealimportObj(item, keyMap);
                        });
                        newImportList.forEach((item, index) => {
                            // 前端自定义行号
                            item[tableKey] = (Array(4).join(0) + (index+1)).slice(-4) + '0';
                            item.whetherNew = true;
                        })
                        _that.setState({ data: newImportList, loading: false });
                    }
                };
            })(fileList[0].originFileObj);
        }
        //启动函数
        reader.readAsArrayBuffer(fileList[0].originFileObj);
        //onload在文件被读取时自动触发
    }
export const dealimportObj =(obj, keyMap)=>{
    if(!obj) return;
    const a =  Object.keys(obj).reduce((newData, key) => {
        let newKey = keyMap[key] || key
        newData[newKey] = obj[key]
        return newData
        }, {});
    return a;
}
1、 HOMEBREW_CORE_GIT_REMOTE=https://mirrors.ustc.edu.cn/homebrew-core.git

2、 /bin/bash -c  "$(curl -fsSL https://cdn.jsdelivr.net/gh/ineo6/homebrew-install/install.sh)"


 3、 echo 'eval "$(/opt/homebrew/bin/brew shellenv)"' >> /Users/licai/.zprofile
    eval "$(/opt/homebrew/bin/brew shellenv)"
import pako from 'pako';

export const addCalibration = (params) => {
    const sendData = dealDataToGzip(params);
    return httpUtils.postJsonForGzip(WinBidApproveBaseUrl + "/calibrationHeadInfo/insert", sendData)
};

export function dealDataToGzip(params) {
    let secparams = encodeURIComponent(JSON.stringify(params));
    const compressBeginLen = secparams.length;
    if (compressBeginLen > 1000) {
        //对 JSON 字符串进行压缩
        // pako.gzip(params) 默认返回一个 Uint8Array 对象,如果此时使用 Ajax 进行请求,参数会以数组的形式进行发送
        // 为了解决该问题,添加 {to: "string"} 参数,返回一个二进制的字符串
        secparams = {sendGzipData: pako.gzip(secparams), isGzip: true};
    } else {
        secparams = {sendGzipData: params, isGzip: false};
    }
    return secparams;
}

axios 实例请求
postJsonForGzip(url,data={}){
        return new Promise((resolve,reject) => {
            instance({
                method: 'post',
                data: data.sendGzipData,
                headers: data.isGzip ?{...getHeader(), 'Content-Encoding': 'gzip'} : getHeader(),
                url,
                params:Date.parse(new Date()),
            }).then(res => {
                resolve(res)
            }).catch(err =>{
                message.error(err.messageCode)
                reject(err)
            })
        })
    },
 /**
     * 解析数据
     *
     */

    public xxx( HttpServletRequest request) {
        //从request中获取参数对象,支持gzip压缩格式
       GzipUtil.getObjFromRequest(request, CalibrationHeadInfoBo.class);
    }


package com.ecmp.srm.wa.util;

import com.ecmp.log.util.LogUtil;
import com.ecmp.util.JsonUtils;
import org.apache.commons.compress.utils.IOUtils;

import javax.servlet.http.HttpServletRequest;
import java.io.ByteArrayInputStream;
import java.io.ByteArrayOutputStream;
import java.io.IOException;
import java.net.URLDecoder;
import java.util.List;
import java.util.Objects;
import java.util.zip.GZIPInputStream;

/**
 * 对请求中压缩的参数进行解压
 * @author lifei
 * @Date 2021/6/24 15:32
 */
public class GzipUtil {

    //Spring方法参数不能包含@RequestBody,否则无法获取到参数
    public static <T> T getObjFromRequest(HttpServletRequest request,Class<T> clazz){
        try {
            String params = getStringFromRequest(request);
            if (Objects.nonNull(params) && params.trim().length() > 0) {
                //因为前台对参数进行了 url 编码,在此进行解码
                params = params.replaceAll("%(?![0-9a-fA-F]{2})", "%25").replaceAll("\\+", "%2B");
                params = URLDecoder.decode(params, "utf-8");
                //将解码后的参数转换为 json 对象
                return JsonUtils.fromJson(params,clazz);
            }
        } catch (IOException e) {
            e.printStackTrace();
            LogUtil.error("压缩参数解析错误",e);
        }
        return null;
    }

    //Spring方法参数不能包含@RequestBody,否则无法获取到参数
    public static <T> List<T> getListFromRequest(HttpServletRequest request, Class<T> clazz){
        try {
            String params = getStringFromRequest(request);
            if (Objects.nonNull(params) && params.trim().length() > 0) {
                //因为前台对参数进行了 url 编码,在此进行解码
                params = params.replaceAll("%(?![0-9a-fA-F]{2})", "%25").replaceAll("\\+", "%2B");
                params = URLDecoder.decode(params, "utf-8");
                //将解码后的参数转换为 json 对象
                return JsonUtils.fromJson2List(params,clazz);
            }
        } catch (IOException e) {
            e.printStackTrace();
        }
        return null;
    }

    private static String getStringFromRequest(HttpServletRequest request) throws IOException {
        //将输入流中的请求实体转换为byte数组,进行gzip解压
        byte[] bytes = IOUtils.toByteArray(request.getInputStream());
        //获取 Content-Encoding 请求头
        String contentEncoding = request.getHeader("Content-Encoding");
        if (contentEncoding != null && contentEncoding.equals("gzip")) {
            //对 bytes 数组进行解压
            return uncompress(bytes);
        } else {
            return new String(bytes);
        }
    }

    private static String uncompress(byte[] bytes) throws IOException {
        if (Objects.isNull(bytes) || bytes.length == 0) {
            return null;
        }
        ByteArrayOutputStream byteArrayOutputStream = null;
        ByteArrayInputStream byteArrayInputStream = null;
        GZIPInputStream gzipInputStream = null;
        try {
            byteArrayInputStream = new ByteArrayInputStream(bytes);
            gzipInputStream = new GZIPInputStream(byteArrayInputStream);
            //使用org.apache.commons.io.IOUtils 简化流的操作
            byteArrayOutputStream = new ByteArrayOutputStream();
            IOUtils.copy(gzipInputStream, byteArrayOutputStream);
            return byteArrayOutputStream.toString("utf-8");
        } catch (IOException e) {
            throw e;
        } finally {
            //释放流资源
            IOUtils.closeQuietly(gzipInputStream);
            IOUtils.closeQuietly(byteArrayInputStream);
            IOUtils.closeQuietly(byteArrayOutputStream);
        }
    }
}
HTML程式碼:

<a
	onClick={this.fullScreen}
	style={{ margin: "0 6px 0 6px"}}
>全屏</a>

js程式碼:
state = {
    isFullScreen: false
    }

fullScreen = () => {
console.log('fullscreen:',this.state.isFullScreen);
    if (!this.state.isFullScreen) {
      this.requestFullScreen();
    } else {
      this.exitFullscreen();
    }
};

//進入全屏requestFullScreen = () => {
 console.log('requestFullScreen')
var de = document.documentElement;
if (de.requestFullscreen) {
	de.requestFullscreen();
} else if (de.mozRequestFullScreen) {
	de.mozRequestFullScreen();
} else if (de.webkitRequestFullScreen) {
	de.webkitRequestFullScreen();
}
};

//退出全屏
exitFullscreen = () => {
console.log('exitFullscreen')
var de = document;
if (de.exitFullscreen) {
	de.exitFullscreen();
} else if (de.mozCancelFullScreen) {
 de.mozCancelFullScreen();
} else if (de.webkitCancelFullScreen) {
	de.webkitCancelFullScreen();
}
};

//監聽fullscreenchange事件
watchFullScreen = () => {
const _self = this;
document.addEventListener(
	"fullscreenchange",
	function() {
  	_self.setState({
    isFullScreen: document.fullscreen
  });
},
false
);

document.addEventListener(
"mozfullscreenchange",
function() {
  _self.setState({
    isFullScreen: document.mozFullScreen
  });
},
false
);

document.addEventListener(
"webkitfullscreenchange",
function() {
  _self.setState({
    isFullScreen: document.webkitIsFullScreen
  });
},
false
);
};
function launchFullscreen(element) {
  if (element.requestFullscreen) {
    element.requestFullscreen()
  } else if (element.mozRequestFullScreen) {
    element.mozRequestFullScreen()
  } else if (element.msRequestFullscreen) {
    element.msRequestFullscreen()
  } else if (element.webkitRequestFullscreen) {
    element.webkitRequestFullScreen()
  }
}

launchFullscreen(document.documentElement) // 整个页面进入全屏
launchFullscreen(document.getElementById("id")) //某个元素进入全屏
function exitFullscreen() {
  if (document.exitFullscreen) {
    document.exitFullscreen()
  } else if (document.msExitFullscreen) {
    document.msExitFullscreen()
  } else if (document.mozCancelFullScreen) {
    document.mozCancelFullScreen()
  } else if (document.webkitExitFullscreen) {
    document.webkitExitFullscreen()
  }
}
exitFullscreen()
document.addEventListener("fullscreenchange", function (e) {
  if (document.fullscreenElement) {
    console.log('进入全屏')
  } else {
    console.log('退出全屏')
  }
})
A declarative, efficient, and flexible JavaScript library for building user interfaces.
🖖 Vue.js is a progressive, incrementally-adoptable JavaScript framework for building UI on the web.
TypeScript is a superset of JavaScript that compiles to clean JavaScript output.
An Open Source Machine Learning Framework for Everyone
The Web framework for perfectionists with deadlines.
A PHP framework for web artisans
Bring data to life with SVG, Canvas and HTML. 📊📈🎉
JavaScript (JS) is a lightweight interpreted programming language with first-class functions.
Some thing interesting about web. New door for the world.
A server is a program made to process requests and deliver data to clients.
Machine learning is a way of modeling and interpreting data that allows a piece of software to respond intelligently.
Some thing interesting about visualization, use data art
Some thing interesting about game, make everyone happy.
We are working to build community through open source technology. NB: members must have two-factor auth.
Open source projects and samples from Microsoft.
Google ❤️ Open Source for everyone.
Alibaba Open Source for everyone
Data-Driven Documents codes.
China tencent open source team.