- chop_recorder.tox - Download v0.2.30
- color_curves.tox - Download v2.3.4
- comper.tox - Download v2.0.6
- hexler.tox - Download v0.1.5
- optimeister.tox - Download v0.6.53
- masker.tox - Download v0.4.4
- playback.tox - Download v0.2.38
- step_n_repeat.tox - Download v1.0.2
- timecode.tox - Download v0.1.5
Chop Recorder allows you to record multi-channel CHOPs in real time, to disk, and play them back later. It's perfect for LiDAR and MIDI data, providing a seamless way to capture and replay complex channel data within TouchDesigner.
- Real-time recording of multi-channel CHOPs
- Disk-based storage for efficient memory usage
- Playback functionality for recorded data
- Ideal for LiDAR, MIDI, and other multi-channel data sources
Active: Enable/disable the recorderRecord: Start/stop recordingRec Progress: Shows the recording progressLength (sec): Set the recording durationRec Folder: Specify the folder for saving recordingsRec Filename: Set the filename for the recordingOpen Rec Folder: Open the folder containing recordings
Active: Enable/disable playbackFile: Select the file to playPlay: Start/stop playbackPlay Progress: Shows the playback progressOne-shot or Loop: Toggle between single playback or looping
- Connect your input CHOP to the
INinput of the Chop Recorder. - Set the
Rec FolderandRec Filenameparameters. - Set the desired
Lengthfor your recording. - Toggle
Recordto start recording. TheRec Progresswill show the progress. - Once recorded, you can play back the file by setting the
Fileparameter and togglingPlay. - Use
One-shot or Loopto control playback behavior.
ColorCurves graphically adjusts per-channel color levels of a TOP using a plotted curve, similar to many image and video editing applications. Credit goes to Vasily for authoring the original version of this component, to which I built onto.
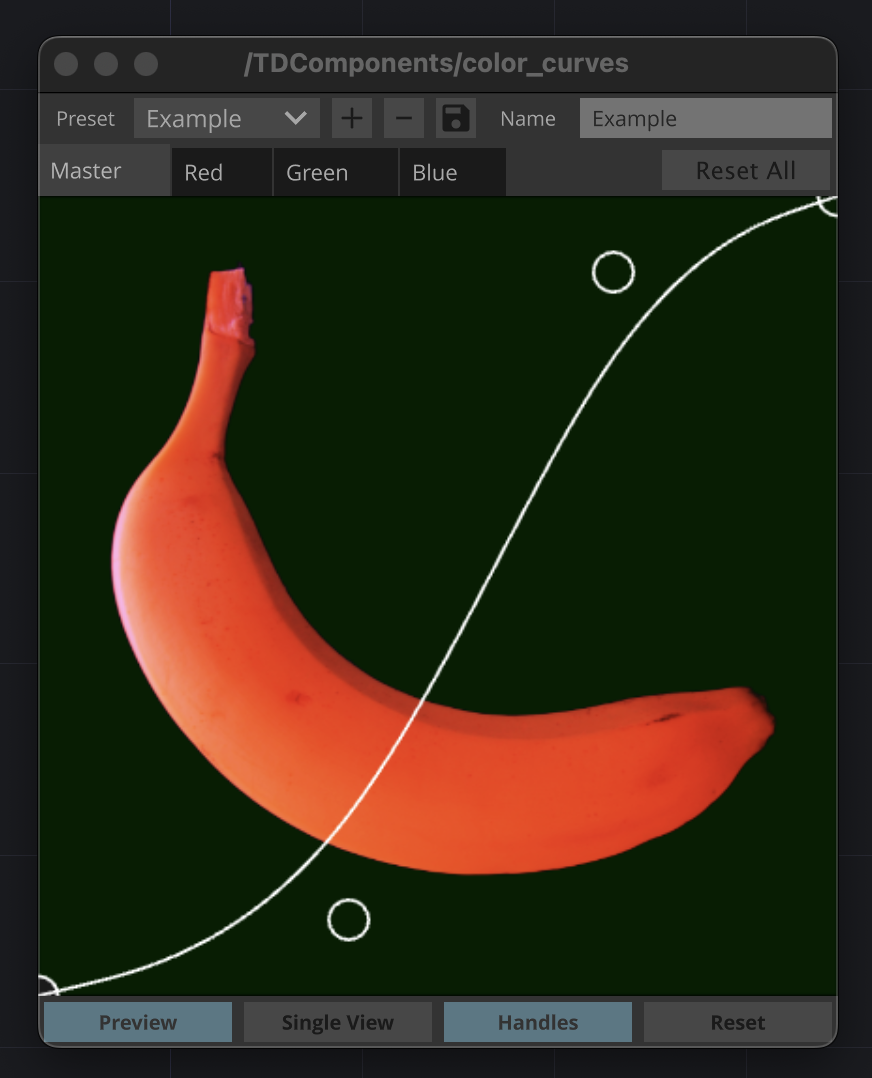
Any TOP can be fed into the component's input. Default is the TD Banana.
The component's output consists of the graded TOP.
Master (all channels), Red, Green and Blue channels can be edited individually by selecting them from the top tab menu. All settings can be reset for all 4 channel editors by pulsing the Reset All button.
Click anywhere in the curve editor (the square with the thin white diagonal line crossing through it) to add a point at that location. Click and drag to move the point into your desired position. If you click and drag on an existing point, that point will be moved.
Right click on any point to remove it.
Default interpolation between points is Linear. You can select between Step, Linear, Ease and Hermite for various curve styles. If Hermite is selected, the Hermite Tension par slider allows you to further tune your curve.
In addition to interpolation, your curve can be smoothed out by increasing the Smooth par slider. By default it is set to 0.0 (no interpolation). This can be used in combination with any interpolation mode.
By default a Preview of your TOP is shown. If you toggle the Preview button, it will switch to a Levels display of your current channel, which shows the total amount of values (y axis) in your adjusted TOP, drawn from dark to bright values (x-axis).
By default a single view of the edited image is shown. To compare against the original, toggle the Single View button to the Split View mode, which draws a vertical bar in the curve editor that slides from left to right. The original TOP image is on the left, and the edited TOP is on the right.
The circle handles and curve line call additional draw functions via Render TOPs. To reduce compute in your project, these can be hidden via the Handles toggle button.
Finally, the Reset button will reset the current channel being edited.
Comper is a texel-based composite GLSL component with position, rotation, scale, and alpha matte options for each layer. It allows for flexible and efficient compositing of multiple layers in TouchDesigner.
- Texel-based compositing using GLSL
- Per-layer control of position, rotation, and scale
- Alpha matte options for each layer
- Efficient GPU-based processing
Resolution: Set the output resolution (width/height)BG Colour: Set the background color (RGBA)Fractional Translate: Enable/disable fractional translationPivot: Set the pivot point for transformations
TOP: Select the input TOP for each layerLevel: Adjust the opacity of each layerTranslate: Set the X and Y translation for each layerRotate: Set the rotation for each layerScale: Set the X and Y scale for each layerMatte Buffer: Set the matte buffer color (RGBA) for each layer
- Set the desired output
Resolution. - Add input TOPs to the
TOPparameters for each layer you want to composite. - Adjust the
Level,Translate,Rotate, andScaleparameters for each layer as needed. - Fine-tune the composition using the
Matte Bufferand other advanced parameters.
Hexler is a utility component that converts RGB color values to hexadecimal color codes and vice versa. This tool is perfect for designers and developers who need to work with different color formats in TouchDesigner.
- Convert RGB to Hex
- Convert Hex to RGB
- Easy-to-use interface
Hex: Enter or display the hexadecimal color codeRGB: Set or display the RGB color values (0-1 range)
-
To convert from RGB to Hex:
- Set the
RGBvalues using the parameter sliders. - The corresponding
Hexvalue will be automatically updated.
- Set the
-
To convert from Hex to RGB:
- Enter the hexadecimal color code in the
Hexparameter. - The corresponding
RGBvalues will be automatically updated.
- Enter the hexadecimal color code in the
Optimeister cooks common CHOP outputs only when their data changes. This considerably improves performance of complex networks with many downstream CHOPs following ones that typically always cook. Supported CHOPs include: Delay, Filter, Lag, Logic, Timer, Trigger, Speed, and Slope.
It accepts channel inputs via custom parameters or a single wire in, which can be multi-channel, allows for renaming of outputs, and the full customization of parameters bound to the CHOP operation specified (Delay/Filter/Lag/etc.).
Reinit- Reinitializes the component, a sort of reset button.Selectively Uncook Operation- Bypass the main operation node (usually Filter or Lag CHOP) while it is not actively tweening data. Can greatly improve performance in environments with many instances of Optimeister. Note that this may not always function as intended, and should be disabled if any oddities with output data are observed.Version- Current version of the component, which can be compared with this repo to confirm the latest version.Help- Opens this webpage in a browser for the very section you're reading right now... help! #metaGitHub- Opens the main GitHub repo for downloading any updates to Optimeister.
Use Wired Input- Used to disable the use of the wired input instead of the Input parameters (Input0, Input1, etc.). Will automatically set itself when a wired input is connected, and vice-versa will disable itself when disconnected.Num Inputs- The total number of input channels. Can be set manually when Use Wired Input is disabled. Otherwise, it is set to Read Only and automatically updated to the number of input channels detected when wired input is used.Input * Value- Each input channel as a parameter. Can be referenced withop('Optimeister').par.Input0, etc. Set to Read Only when Use Wired Input is enabled to prevent data stream doubling. Supports expression and bind modes that reference external sources. Note that expression and bind modes will be disabled (reset to constant mode) when a wired input is detected.
Use Input Channel Names- When enabled all Output Channels will default to the input channel names if using wired inputs. If using custom parameters on the Input page, they will be Input0, Input1, Input2, etc. When disabled, the Output Channel Names parameters will become editable (instead of Read Only) and override the existing output values when changed. If this parameter is toggled, any edits made are retained in Python storage, so any custom channel names are not immediately lost.Output Channel *- The name of each output channel as a parameter, editable or Read Only depending on whether the Use Input Channel Names parameter is enabled or not.
Operation Type- The type of CHOP that input data runs through; the intermediary of Optimeister. Supported Operators include: Delay, Filter, Lag, Logic, Timer, Trigger, Speed, and Slope. All parameters of the selected Operation Type are automatically added below this parameter and bound to the intermediary CHOP. This allows for easy external adjustments of settings without diving into the Optimeister base component (useful, for example, if Optimeister operates in a clone setup within a project.)
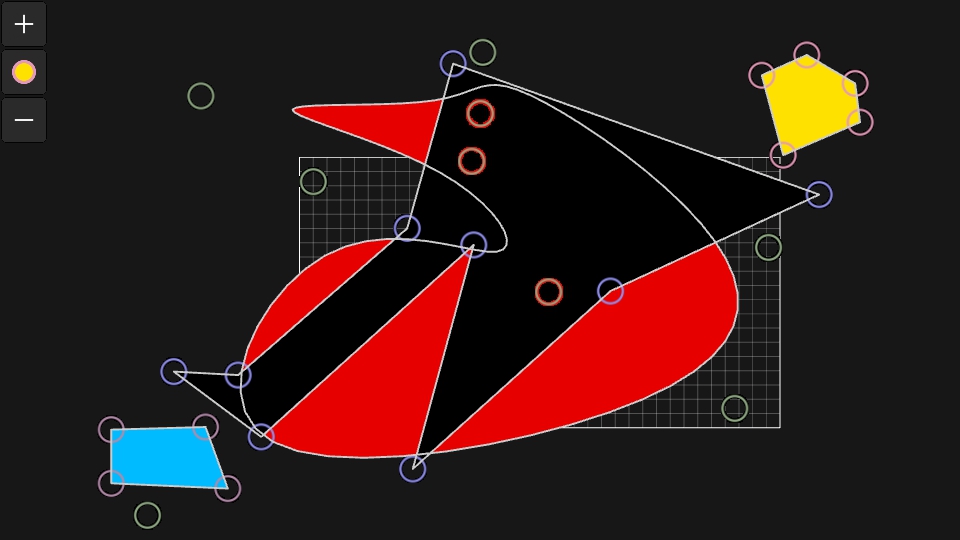
Masker is a powerful UI-based mask creation tool for TouchDesigner, allowing you to create and manipulate complex masks with an intuitive interface.
- Multiple mask layers with individual controls
- Real-time mask rendering and editing
- Customizable UI and output settings
- Support for curved and inverted masks
- Color and opacity controls for each mask
- Active Mask: Select the current mask to edit
- Mask Name: Name your masks for easy identification
- Add/Remove Mask: Create or delete mask layers
- Mask Color: Set the color of the current mask
- Mask Opacity: Adjust the transparency of the mask
- Invert Mask: Invert the selected mask
- Curve Mask: Enable curved edges for the mask
- Delete Mask Points: Remove all points from the current mask
- Render UI: Toggle the visibility of the UI
- UI Zoom/Pan: Adjust the view of the mask editing area
- Edit Point Size: Change the size of control points
- Show Artboard/Grid: Display helpful visual guides
- Render Output: Enable/disable mask rendering
- Resolution: Set the output resolution of the mask
- Zoom: Adjust the scale of the output
- Use the "Add Mask" button to create a new mask layer.
- Select a mask from the "Active Mask" dropdown to edit it.
- Click in the UI area to add points and shape your mask.
- Adjust the mask's color, opacity, and other properties as needed.
- Use the "Curve Mask" option for smooth, curved edges.
- The final mask output can be accessed through the "Output Render Pass TOP".
This powerful and flexible masking tool allows for creative and precise mask creation directly within TouchDesigner, suitable for a wide range of visual effects and compositing tasks.
Playback plays, scrubs, loops and fades movies in/out in a simple geometryCOMP setup.
Active- Fades the movie material alpha on/off.Video File- The video file that is played back.One-shot or Loop- Plays the video file once or loops it forever. Can be switched during playback for advanced workflows.Crossfade (Sec)- Sets the duration of the crossfade between loops or when switching videos.Reload- Reloads the current video file.Play- Plays/pauses the video playback.Scrub- Scrubs the video file from start to finish. 0.0 is the first frame of the file, 1.0 is the last frame. Can be scrubbed at anytime. Setting to 0.0 is the equivalent of cueing the video.Progress- The current frame of the video being displayed (normalized fraction, same asScrub).Size- The width and height of the rectangleSOP in which the video is displayed. This can be pixel values, or fractional values, depending on your scene setup and scale.
- Set the
Video Fileparameter to the path of your video file. - Adjust the
Sizeparameter to fit your scene. - Toggle
Activeto fade the video in/out. - Use
Playto start/pause playback, orScrubto manually control the playback position. - Set
One-shot or Loopbased on your playback needs. - Adjust
Crossfade (Sec)for smooth transitions between loops or video changes.
Step N Repeat is a GLSL-based component that creates a brick or grid pattern of a texture (like a logo) on top of a different background texture. It offers various sizing and layout options for flexible design possibilities.
- Create brick or grid patterns
- Customizable sizing and layout
- GLSL-based for efficient processing
- Combine foreground and background textures
Number of Tiles: Set the number of tiles in X and Y directionsTile Scale: Adjust the scale of individual tilesPattern Mode: Choose between "grid" and "brick" patternsPremultiply Alpha: Toggle alpha premultiplication
- Connect your logo texture to the
in_logoinput. - Connect your background texture to the
in_bginput. - Adjust the
Number of Tilesin X and Y to set the grid density. - Use
Tile Scaleto resize the individual tiles. - Select the desired
Pattern Mode(grid or brick). - Toggle
Premultiply Alphabased on your compositing needs.
The component will output a TOP with the repeated pattern of your logo over the background texture.
Timecode renders a TOP output of timecode (HH:MM:SS:FF) using 2D texture slicing instead of the Text TOP. This generally cooks about twice as fast as an equivalent Text TOP. It can be configured with a custom font, generate timecode from an internal timer setup, or receive a single row/column table DAT input.
Use Timeline- Use the timeline for timecode generation instead of the internal timer.Use Internal Timer- Enables/disables the internal Timer CHOP. Will auto-disable on a timer cycle if an external input is connected to the Timecode COMP input.Init- Initializes the internal Timer CHOP.Start- Starts the internal Timer CHOP.Play- Plays/pauses the internal Timer CHOP.Cue- Cues the internal Timer CHOP.Length (s)- Updates the length of the internal Timer CHOP, in


