- 简述: OpenCV 全称 Open Computer Vision (开放计算机视觉库)
- 可用于Andriod、Windows、Linux等平台
- 语言C++\JAVA\Python
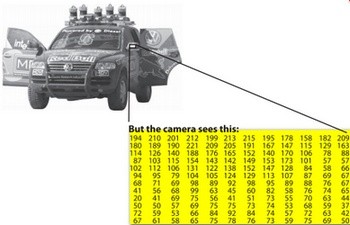
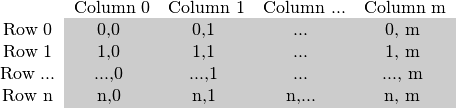
- 核心**:矩阵变换结合线性代数的矩阵变换,对图片以像素化处理
- 概念理清:
- 通道:BGR(3通道),一个点可以由多个通道的数值表示,构成列
   Mat input,thresoutput;
       contourVec contoursFound,contoursFiltered;
       vector<Marker> markersOut;
       input= imread(argv[1], 0); // Read the file
       if(input.empty()) // Check for invalid input
       {
           std::cout << "Could not open or find the img" << std::endl;
           return -1;
} threshold(input,thresoutput,100,255,0); // do threshold ,set max_gray_scale as 100 void findContoursAndFilter(Mat& thresedImg,contourVec& contoursOut,int ContourRetriMethod,int ContourApproxChoice,Point offset,size_t minSize,size_t maxSize){
vector<vector<cv::Point>> contoursFound;
findContours(thresedImg,contoursFound,ContourRetriMethod,ContourApproxChoice,offset);
// Find the contours
for(int i = 0 ;i<contoursFound.size();i++){ //filter out unnecessary contours
if(contoursFound[i].size()>minSize&&contoursFound[i].size()<maxSize){
contoursOut.push_back(contoursFound[i]);
}
}
} void findMarkers(const contourVec& contours,vector<Marker>& finalMarkers) {
vector<Point2f> approxCurve;
vector<Marker> possibleMarkers;
float minLengthBetweenPoints = 10;
float minLengthOfSide = 1e10;
vector<pair<int,int>> closeMarkerIndexPair;
for(int i = 0 ; i<contours.size();i++){ //近似轮廓到多边形
approxPolyDP(contours[i],approxCurve,contours[i].size()*0.05,true);
if((!isContourConvex(approxCurve))||(approxCurve.size()!=4)){//如果不是四边形或不具有凸性,就不是一个合法的标记
continue;
}
//筛去边长过短的四边形
for(int j = 0 ; j<4;j++){
Point2f x = approxCurve[j]-approxCurve[(j+1)%4];
minLengthOfSide =std::min(minLengthOfSide,x.dot(x));
}
if(minLengthOfSide<minLengthBetweenPoints*minLengthBetweenPoints){
continue;
}
//基本筛选完毕,添加进入marker,并修正四个顶点要逆时针排列
Marker marker =Marker(Point2f(approxCurve[0].x,approxCurve[0].y),Point2f(approxCurve[1].x,approxCurve[1].y),Point2f(approxCurve[2].x,approxCurve[2].y),Point2f(approxCurve[3].x,approxCurve[3].y));
marker.FixantiClockWise();
possibleMarkers.push_back(marker);
}
//筛选角点距离相近的四边形:筛去周长更短的四边形marker
for(int i = 0 ; i<possibleMarkers.size();i++){
for(int j = i+1 ;j<possibleMarkers.size();j++){
float avg_distSquared = 0;
for(int k = 0 ;k<4;k++){
Point2f p = possibleMarkers[i].corners[k]-possibleMarkers[j].corners[k];
avg_distSquared+=p.dot(p);
}
if(avg_distSquared/4 <100){
closeMarkerIndexPair.push_back(pair<int,int>(i,j));
}
}
}
bool removeTable[possibleMarkers.size()]={false};//建立删除表
for(int i = 0 ;i<closeMarkerIndexPair.size();i++){
int index1 =closeMarkerIndexPair[i].first;
int index2 =closeMarkerIndexPair[i].second;
if(LengthOfPoly(possibleMarkers[index1])<LengthOfPoly(possibleMarkers[index2])){
//如果周长更短,加入删除表
removeTable[index1]=true;
}else{
removeTable[index2]=true;
}
}
for(int i = 0 ; i<possibleMarkers.size();i++){//滤去在删除表中的marker
if(!removeTable[i]){
finalMarkers.push_back(possibleMarkers[i]);
}
}
}void getMarkersWrapped(Mat& grayImg,vector<Marker>& markers){
Mat warppedMat;
Point2f * dst = GetP2farr(markers[0].marker_coordinate_2d);
int CellSize_Y= markers[0].markerSize.height/7;
int CellSize_X =markers[0].markerSize.width/7;
Point2f * src;
for(int i = 0 ;i<markers.size();i++){
src = GetP2farr(markers[i].corners);
// Mat markerImage = grayImg.clone();
// Mat markerSubImage = markerImage(boundingRect(markers[i].corners));
// imwrite("Source marker" + to_string(i) + ".png",markerSubImage);
Mat tranform_mat = getPerspectiveTransform(src,dst);
warpPerspective(grayImg,warppedMat,tranform_mat,markers[i].markerSize); // 从透视图转换成正视图
// imwrite("Marker " + to_string(i) + ".png",warppedMat);
threshold(warppedMat,warppedMat,125,255,THRESH_BINARY|THRESH_OTSU);//对正视图做OTSU二值化
Mat bit_matrix(5,5,CV_8UC1); //数值矩阵
for(int y =0;y<7;y++){ //遍历黑色边框
int step = (y==0||y==6)?1:6;//如果是第一行或者第6行,步长为1,否则设置为6
int cell_y = y*CellSize_Y; //计算Y坐标
for(int x = 0 ; x<7;x+=step){ //遍历X方向
int cell_x = x*CellSize_X; //计算x坐标
int count = countNonZero(warppedMat(Rect(cell_x,cell_y,CellSize_X,CellSize_Y)));//计算白色像素数
if(count>CellSize_X*CellSize_Y/4){ //如果白色像素占了超过1/4
goto _wrongmarker;//跳过这次检测
}
}
}
//边框检测通过,遍历单位格,得到矩阵
for (int y = 0; y < 5; ++y)
{
int cell_y = (y+1)*CellSize_Y;
for (int x = 0; x < 5; ++x)
{
int cell_x = (x+1)*CellSize_X;
int none_zero_count = countNonZero(warppedMat(Rect(cell_x, cell_y, CellSize_X, CellSize_Y)));
if (none_zero_count > CellSize_X*CellSize_Y/2)
bit_matrix.at<uchar>(y, x) = 1;
else
bit_matrix.at<uchar>(y, x) = 0;
}
}
//输出矩阵
cout<<bit_matrix<<endl;
_wrongmarker:
continue;Mat是OpenCV库提供的一个数据类型,本质是一个矩阵,里面存储着图像的数值信息
-
灰度图
-
多通道的图片,如BGR

附上Mat的官方使用文档,主要是 创建 存储 以及__导出__的方法
http://docs.opencv.org/3.2.0/d6/d6d/tutorial_mat_the_basic_image_container.html
-
cv::imread(const String & filename, int flags =
IMREAD_COLOR)-
filename – Name of file to be loaded.
-
flags –Flags specifying the color type of a loaded image:
-
CV_LOAD_IMAGE_ANYDEPTH -
若载入的图像的深度为16位或者32位,就返回对应深度的图像,否则,就转换为8位图像再返回。
-
CV_LOAD_IMAGE_COLOR 转换图像到彩色一体
-
CV_LOAD_IMAGE_GRAYSCALE 始终将图像转换成灰度
-
>0 返回BGR三通道的图
-
=0 返回灰度图
-
<0 返回alpha通道的值
-
-
-
Parameters
filename Name of the file. img Image to be saved. params Format-specific parameters encoded as pairs (paramId_1, paramValue_1, paramId_2, paramValue_2, ... .) see cv::ImwriteFlags
| double cv::threshold | ( | InputArray | src, |
|---|---|---|---|
| OutputArray | dst, | ||
| double | thresh, | ||
| double | maxval, | ||
| int | type | ||
| ) |
- InputArray类型的src,输入数组,填单通道 , 8或32位浮点类型的Mat即可。
- OutputArray类型的dst,函数调用后的运算结果存在这里,即这个参数用于存放输出结果,且和第一个参数中的Mat变量有一样的尺寸和类型。
- double类型的thresh,阈值的具体值。
- double类型的maxval,当第五个参数阈值类型type取 THRESH_BINARY 或THRESH_BINARY_INV阈值类型时的最大值.
- int类型的type,阈值类型。
- 0: THRESH_BINARY 当前点值大于阈值时,取Maxval,也就是第四个参数,下面再不说明,否则设置为0
- 1: THRESH_BINARY_INV 当前点值大于阈值时,设置为0,否则设置为Maxval
- 2: THRESH_TRUNC 当前点值大于阈值时,设置为阈值,否则不改变
- 3: THRESH_TOZERO 当前点值大于阈值时,不改变,否则设置为0
- 4: THRESH_TOZERO_INV 当前点值大于阈值时,设置为0,否则不改变
cvThreshold(image,image2,0,255,CV_THRESH_OTSU)
该函数会使用大律法OTSU得到的全局自适应阈值来进行二值化图片
OTSU算法也称最大类间差法,有时也称之为大津算法,由大津于1979年提出,被认为是图像分割中阈值选取的最佳算法,计算简单,不受图像亮度和对比度的影响,因此在数字图像处理上得到了广泛的应用。
它是按图像的灰度特性,将图像分成背景和前景两部分。因方差是灰度分布均匀性的一种度量,背景和前景之间的类间方差越大,说明构成图像的两部分的差别越大,当部分前景错分为背景或部分背景错分为前景都会导致两部分差别变小。因此,使类间方差最大的分割意味着错分概率最小。
寻找轮廓方法(FindContours)
| void cv::findContours | ( | InputOutputArray | image, |
|---|---|---|---|
| OutputArrayOfArrays | contours, | ||
| OutputArray | hierarchy, | ||
| int | mode, | ||
| int | method, | ||
| Point | offset = Point() |
||
| ) |
| image | Source, an 8-bit single-channel image. Non-zero pixels are treated as 1's. Zero pixels remain 0's, so the image is treated as binary . You can use cv::compare, cv::inRange, cv::threshold , cv::adaptiveThreshold, cv::Canny, and others to create a binary image out of a grayscale or color one. If mode equals to cv::RETR_CCOMP or cv::RETR_FLOODFILL, the input can also be a 32-bit integer image of labels (CV_32SC1). |
|---|---|
| contours | Detected contours. Each contour is stored as a vector of points (e.g. std::vector<std::vectorcv::Point >). |
| hierarchy | Optional output vector (e.g. std::vectorcv::Vec4i), containing information about the image topology. It has as many elements as the number of contours. For each i-th contour contours[i], the elements hierarchy[i][0] , hiearchy[i][1] , hiearchy[i][2] , and hiearchy[i][3] are set to 0-based indices in contours of the next and previous contours at the same hierarchical level, the first child contour and the parent contour, respectively. If for the contour i there are no next, previous, parent, or nested contours, the corresponding elements of hierarchy[i] will be negative. |
| mode | Contour retrieval mode, see cv::RetrievalModes |
| method | Contour approximation method, see cv::ContourApproximationModes |
| offset | Optional offset by which every contour point is shifted. This is useful if the contours are extracted from the image ROI and then they should be analyzed in the whole image context. |
| Mat cv::getPerspectiveTransform | ( | InputArray | src, |
|---|---|---|---|
| InputArray | dst | ||
| ) |
| void cv::warpPerspective | ( | InputArray | src, |
| OutputArray | dst, | ||
| InputArray | M, | ||
| Size | dsize, | ||
| int | flags = INTER_LINEAR, |
||
| int | borderMode = BORDER_CONSTANT, |
||
| const Scalar & | borderValue = Scalar() |
||
| ) |
| src | input image. |
|---|---|
| dst | output image that has the size dsize and the same type as src . |
| M | 3×3 transformation matrix. |
| dsize | size of the output image. |
| flags | combination of interpolation methods (INTER_LINEAR or INTER_NEAREST) and the optional flag WARP_INVERSE_MAP, that sets M as the inverse transformation ( dst→src ). |
| borderMode | pixel extrapolation method (BORDER_CONSTANT or BORDER_REPLICATE). |
| borderValue | value used in case of a constant border; by default, it equals 0. |

