In this project, I build a pipeline which can detect current lane of a car and compute the lane's area, curvature. The pipeline is robust enough such that it can perform well in various color and lighting conditions of roads and lane lines
My pipeline is composed by the following steps
1. Camera Calibration and Original Camera Image Undistortion
2. Mixed Technique Binary Thresholding of Undistorted Image
3. Bird View Perjection from Forward Facing Image
4. Line Search and Second Order Curve Fitting
5. Curvature Computation (Find Radius and Center Offset)
6. Project Results Back to Original Camera Image
Why camera calibration?
Modern camera uses lenses and lenses introduce distortion to images.
For example:
 As you can see, the chess board is curved. This is a distortion because in real life, this chess board has straight lines.
Camera calibration is the process which finds how much a given camera distorts its images from real life objects. Image Undistortion is the step which uses a given camera calibration information to undistort images taken by this camera.
Each camera has its own calibration. You can't use camera A's calibration to undistort images taken by camera B, unless camera A and B have the same calibration.
Chess board iamges are extremely useful for camera calibration, because we know the exact shape of a given chessboard and a chessboard has straing lines, which make the computation rather easy.
Our goal is to calibrate the camera which shot the driving video. Therefore, we gathered several chessboard images taken by the same camera.
1 | 2 | 3
:-------------------------:|:-------------------------:|:-------------------------:
 |
|  |
| 
 |
|  |
| 
 |
|  |
| 
I used 20 images in total. You can find all of them in this folder
In helper.py, you can find class Calibrator. I use this class to do both calibration and undistortion.
The 3 key functions are cv2.findChessboardCorners, cv2.calibrateCamera and cv2.undistort.
You can find the math equation at
You can run test_Calibrator function in test.py to test this class. test_Calibrator will write undistorted images to directory output_images/calibration
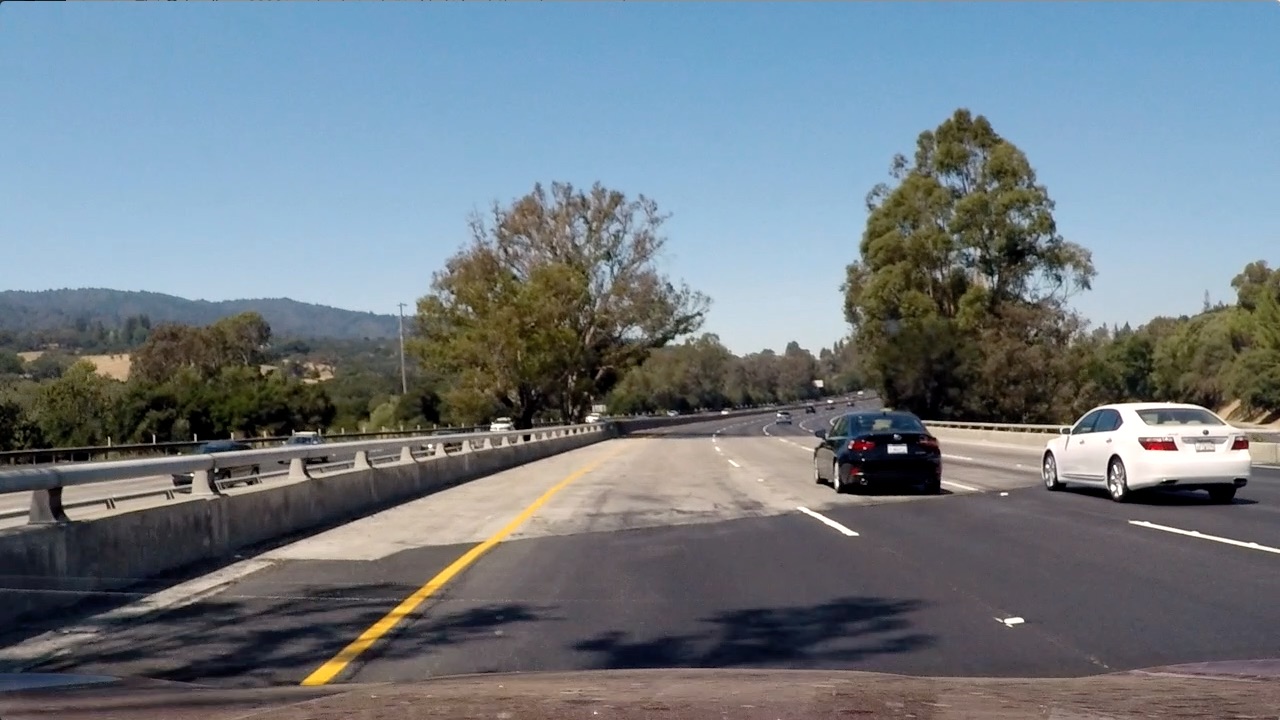
After first step, we need to binary thresholding this image so that we remove unnecessary information from this image.
| Undistored Color Image | Binary Thresholded Image |
|---|---|
 |
 |
 |
 |
As you can see, the thresholding is robust regardless the color, shadow and lighting of the line, road and environment.
I combined x-direction gradient threshold and S channel threshold of the HSL color space.
| Color | X Gradient | S Channel | Combined |
|---|---|---|---|
|
 |
 |
|
|
 |
 |
|
The reason to apply a combined threshold is that any single threshold technique is not robust enough to detect lines in various condition.
I applied sobel operator to compute the gradient. There are x direction and y direction gradient.


As you can see, sobel y catches the changes along the vertical direction. That is, horizontal lines are easily catches by sobel y because horizontal lines have very different color from its surrounding vertically.
But, since lane lines need to be more vertical than horizontal, we choose sobel x as our gradient threshold.
Binary threshold is a powerful tool to filter useful information. But the conventional grayscale threshold has a obvious disadvantage. Colors with very different appearance in the RGB space could have the same value in grayscale. For example, after be converted to graysale, yellow is just gray. But very often our lane lines are yellow, the road is gray. We need to find a better way to separate them.
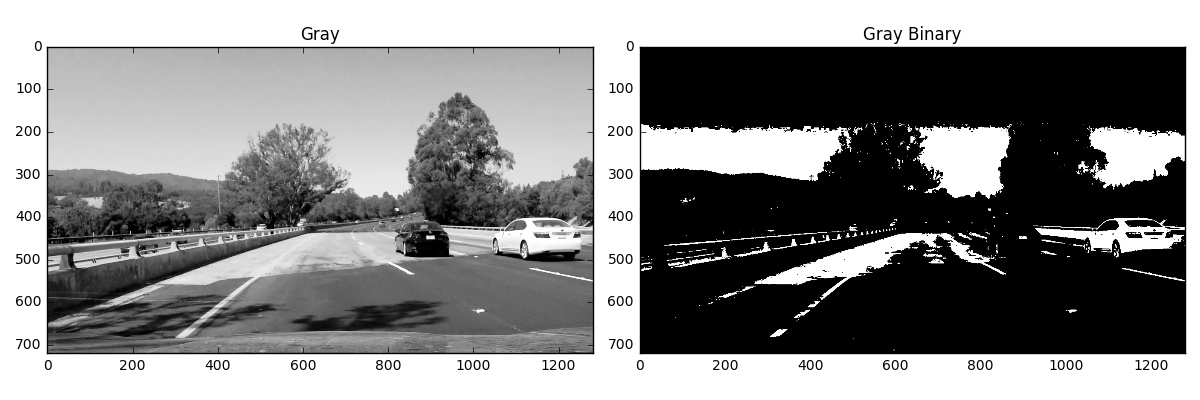
As you can see, yellow line is almost indistinguishable from the road and the threshold doesn't work well.
Of couse we can threshold R, G, B channel separately and see which channel's threshold works best for this image. But, if we are to deal with a video steam, it's hard to know which color channel works best beforehand.
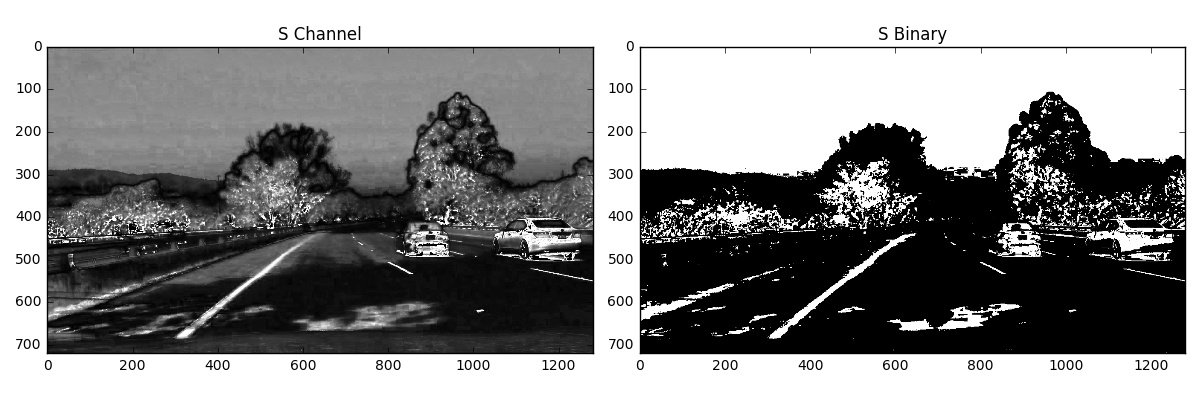
A better method is to convert a RGB color sapce image to HSL color space image. HSL stands for Hue, Saturation, and Light.
Here is a explanation from Udacity's lesson:
To get some intuition about these color spaces, you can generally think of Hue as the value that represents color independent of any change in brightness. So if you imagine a basic red paint color, then add some white to it or some black to make that color lighter or darker -- the underlying color remains the same and the hue for all of these colors will be the same.
On the other hand, Lightness and Value represent different ways to measure the relative lightness or darkness of a color. For example, a dark red will have a similar hue but much lower value for lightness than a light red. Saturation also plays a part in this; saturation is a measurement of colorfulness. So, as colors get lighter and closer to white, they have a lower saturation value, whereas colors that are the most intense, like a bright primary color (imagine a bright red, blue, or yellow), have a high saturation value. You can get a better idea of these values by looking at the 3D color spaces pictured below.
Saturation is a good channel because it measures how dense color is at a certain place. Lane line will probably have denser color than road.
You can refer to output_images/threshold to see threshold images on test iamges.
This 3 functions in helper.py implemented threshold:
s_threshold(img, color_space='BGR')
gradient_threshold(img, color_space='BGR')
combined_threshold(img, color_space='BGR')
You can run
test_s_threshold()
test_gradient_threshold()
test_combined_threshold()
Nowin test.py to test it.
In order to detect the degree of curvature of a lane, we need to project the forward facing image to a downward facing image, so say, a bird view image like this:
| Original Image | Bird View Image |
|---|---|
|
 |
This way, we are confident that the image is perpendicular to our view and we can measure the curvature correctly.
class Transformer in helper.py implemented the perspective transform. cv2.getPerspectiveTransform and cv2.warpPerspective are the 2 most important functions used there.
Run test_perspective_transform() in test.py to test it. All outputs are written to output_images/transform
After applying undistortion, threholding and perspective transform, we can get an image like this

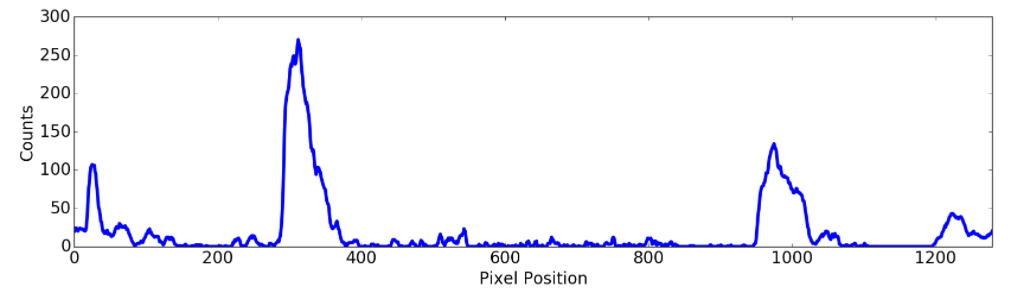

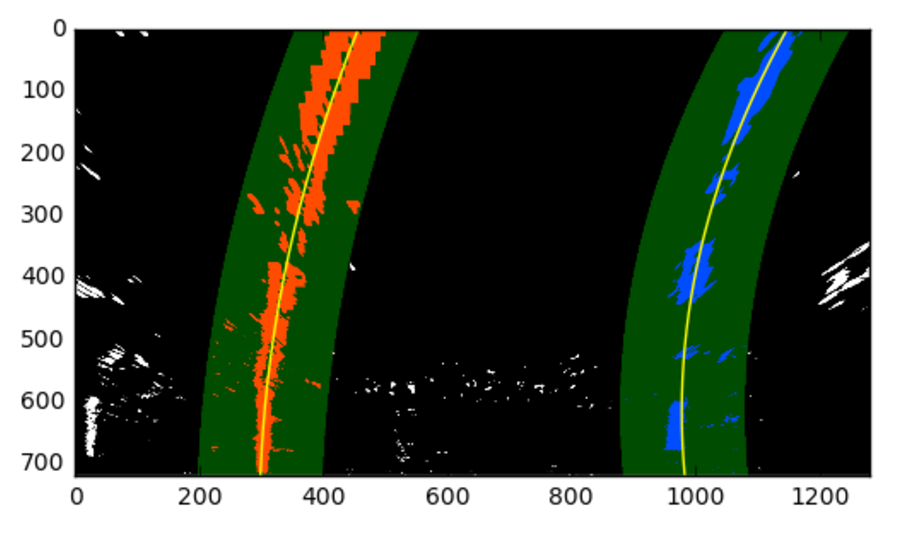
With all the peaks we found, we can do a second order polynomial fit. We don't need three order since it will introduce too much unstable curve.
Also, the polynomial fit is f(y) -> x instead of the conventional f(x) -> y, because we might have multiple y values for the same x. But, since our sliding window search is done row by row, it's impossible to have multiple x values for the same y.
We need to fit 2 polynomials. One for left line, one for right line.
The polinomial function is simple:
f(y)= Ay^2 + By + C
find_lines(binary_warped) and search_near_last_frame(binary_warped, left_fit, right_fit) in helper.py implemented the search and fit.
We can use coefficiencies of the polymonial to compute a radius of a curve assuming a circle could be placed at a certain place of this polynomial.
The math is:

Center Offset is easy to compute. It is the 640 - center of the road, where center of the road is the midpoint between left line and right line. 640 is the image center, assuming the camera is placed at the center of the car.
find_radius_and_center_offset(ploty, leftx, rightx, lefty, righty) in helper.py implemented this.
test_find_radius_and_center_offset() in tset.py is the test for this functionality.
Now we have everything we need. We can just project useful information back to the original image.
| Before | After |
|---|---|
 |
 |
|
 |
 |
 |
| As you can see, top left corner shows the radius, and a green area is also drawn to indicate where the current lane is. |
project_back(binary_warped, original_image, undistorted_image, inverse_perspective_transform_matrix,
             left_fitx, right_fitx, ploty)
in helper.py implemented this functionality.
Run test_project_back() in test.py to test it. You can see all the final images in output_images/project_back.
Now we have each component ready. We can make a pipeline to process videos. Please refer to video_pipeline.py to see the details.
Bascially, I have a callback function which calls above individually routines one by one. This callback function is passed into a video process function that process a video frame by frame treating each frame an independent image. Moviepy is the module of choice.
There are 4 versions of final output: 0. project_video_out.mp4
- project_video_out_v1.mp4
- project_video_out_v2.mp4
- project_video_out_v3.mp4
Only project_video_out.mp4 has the center offset. Please use project_video_out.mp4 as the final reference.
v1 treats each frame as a new image and search the entire image for peaks, which cause some unstable result if the color of the road changes suddently. (A peak signal is just a rapid change of color. Therefore, v1 mistakes such a such as a lane line)
v2 search for peaks in areas where lines are found in the last frame. Therefore, the reuslt is more stable when the color of the road is changing.
v3 applied a averaging window, that is, the current result will be the average of 5 closest historical results. This way, the result is more stable.
Run video_pipeline.py if you want to see the result yourself.
If you compare the outputs of project video, challenge video and harder challenge video, you will find that the pipeline perform terribly on challenge videos. First, the pipeline has no concept of "lane". The algorithm is just finding lines. In the challenge video, the road is divided by 2 materials where a obvious line is between 2 materials. The algorihtm mistake that line as the lane line. In the harder challenge, due the extreme lighting condition, the algorithm failed to detect useful lines for many times. No good recovery method is implemented in the pipeline.
There are a lot of rooms to improve. A good recovery mechanism and a good line likelihood should be implemented at least.s


