Notes and Blog
colla2me / notes Goto Github PK
View Code? Open in Web Editor NEWNotes and Blog
Notes and Blog

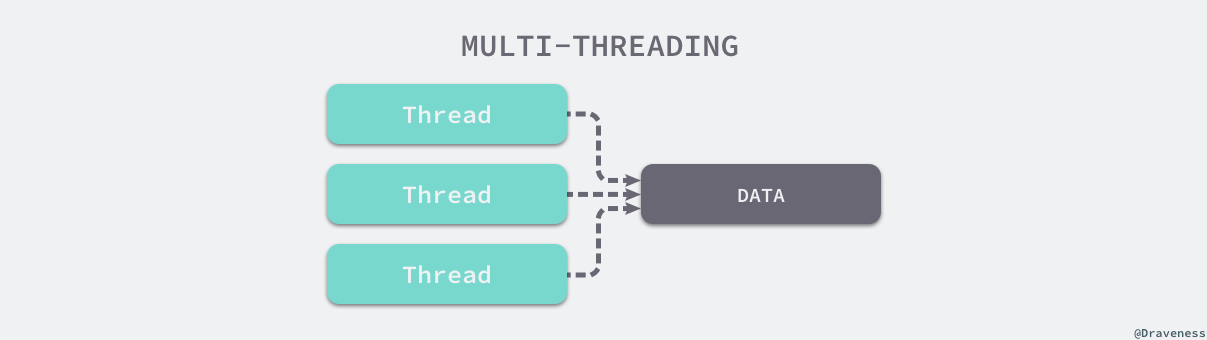
进程:操作系统在运行一个程序的时候就会为其创建一个进程(比如一个 Java 程序),进程是资源分配的最小单位,一个进程包含多个线程
线程:线程是 CPU 调度的最小单位,每个线程拥有各自的计数器,堆栈和局部变量等属性,并且能过访问共享的内存变量
多线程可以并行的执行多个任务,充分地利用CPU的多核处理能力,提高程序的执行性能。Java程序默认运行在主线程中,多线程可以避免那些耗时的操作阻塞主线程。
多线程模型带来的潜在问题: 竞争条件 (race condition) —— 如果计算机中的两个进程(线程同理)同时尝试修改一个共享内存的内容,在没有并发控制的情况下,最终的结果依赖于两个进程的执行顺序和时机,如果发生了并发访问冲突,最后的结果就会是不正确的。
引入了多线程,我们就必须要同时引入并发控制来保证在多个线程同时访问数据时程序行为的正确性,这就需要工程师额外维护并发控制的相关代码,例如,我们会需要在可能被并发读写的变量上增加互斥锁:
public class Demo {
    private int value = 0;
    private final static Object lock = new Object();
    public static void main(String[] args) {
        new Thread(Demo::modifySharedVariable).start();
        new Thread(Demo::modifySharedVariable).start();
    }

    private static void modifySharedVariable() {
        synchronized (lock) {
            value += 1;
        }
    }
}
在访问这些变量或者内存之前也需要先对获取互斥锁,一旦忘记获取锁或者忘记释放锁就可能会导致各种诡异的问题,管理相关的并发控制机制也需要付出额外的研发成本和负担。
Java 线程的生命周期总共包括6个阶段:
start() 方法synchronized 修饰的代码块或方法notify() 或 notifyAll() 进行唤醒在某一时刻,线程只能处于其中的一个状态。线程初始化后,调用 start() 方法变为运行状态,调用wait() 等方法,线程由运行状态变为等待状态,调用 notify() 或 notifyAll() 等方法,线程由等待状态变成运行状态,超时等待状态就是在等待状态基础上加了时间限制,超过规定时间,自动更改为运行状态。
| 方法名 | 描述 |
|---|---|
| notify() | 通知一个在对象上等待的线程,使其从 wait() 方法中返回,前提是该线程获得了对象的锁 |
| notifyAll() | 通知所有等待在该对象上的线程 |
| wait() | 调用该方法线程进入等待状态,只有等待另外线程的通知或被中断才会返回,调用该方法会释放对象的锁 |
| wait(long) | 超时等待一段时间(毫秒),如果超过时间就返回 |
| wait(long,int) | 对于超时时间细粒度的控制,可以达到纳秒 |
创建线程有三种方式:
public class MyThread extends Thread{

    @Override
    public void run() {
        // do something
    }

    public static void main(String[] args) {
        Thread thread = new MyThread();
        thread.start();
    }
}

public class MyRunner implements Runnable {

    @Override
    public void run() {
        // do something
    }

    public static void main(String[] args) {
        Runnable runnable = new MyRunner();
        new Thread(runnable,"MyRunner").start();
    }
}

public class MyCaller implements Callable<Integer> {

    @Override
    public Integer call() throws Exception {
        // do something
        return -1;
    }

    public static void main(String[] args) throws Exception {
        Callable callable = new MyCaller();
        FutureTask futureTask = new FutureTask(callable);
        new Thread(futureTask).start();
        System.out.println("result:" + futureTask.get());
    }
} /**
* This class provides thread-local variables. These variables differ from
* their normal counterparts in that each thread that accesses one (via its
* {@code get} or {@code set} method) has its own, independently initialized
* copy of the variable. {@code ThreadLocal} instances are typically private
* static fields in classes that wish to associate state with a thread (e.g.,
* a user ID or Transaction ID).
* ......
* <p>Each thread holds an implicit reference to its copy of a thread-local
* variable as long as the thread is alive and the {@code ThreadLocal}
* instance is accessible; after a thread goes away, all of its copies of
* thread-local instances are subject to garbage collection (unless other
* references to these copies exist).
*/
翻译过来就是,ThreadLocal 用于给线程提供私有变量,每个线程通过 set() 和 get() 来对这个局部变量进行操作,但不会和其他线程的局部变量进行冲突,实现了线程的数据隔离~。
这让我想起了 iOS 中的
NSThread.currentThread.threadDictionary,它也是存储只属于该线程相关的数据。
为了更好的理解 ThreadLocal,有必要了解其内部实现,这里我们以 set 方法看一看ThreadLocal 的实现原理。
public void set(T value) {
    // 获取当前线程
    Thread t = Thread.currentThread();
    // 获取当前线程的 threadLocals变量,该变量类型为ThreadLocalMap
    ThreadLocalMap map = getMap(t);
    if (map != null)
        // 如果当前线程的ThreadLocalMap不为空,则设置值
        map.set(this, value);
    else
        // 否则为当前线程创建ThreadLocalMap,并设置值
        createMap(t, value);
}
// 获取当前线程的threadLocals属性
ThreadLocalMap getMap(Thread t) {
    return t.threadLocals;
}
// 创建ThreadLocalMap,并赋值给当前线程的threadLocals属性
void createMap(Thread t, T firstValue) {
    t.threadLocals = new ThreadLocalMap(this, firstValue);
}
上面的的 getMap() 方法其实获取的是 Thread 对象的 threadLocals 变量
class Thread implements Runnable {
    /* ThreadLocal values pertaining to this thread. This map is maintained
     * by the ThreadLocal class. */
    ThreadLocal.ThreadLocalMap threadLocals = null;
}
总结:实际上 ThreadLocal 的值是放入了当前线程的一个 ThreadLocalMap 实例中,所以只能在本线程中访问,其他线程无法访问。
public T get() {
    // 获取当前线程
    Thread t = Thread.currentThread();
    // 获取当前线程的 threadLocals变量,该变量类型为ThreadLocalMap
    ThreadLocalMap map = getMap(t);
    if (map != null) {
        // 如果 threadLocals不为空,以this,也就是当前ThreadLocal实例作为key去取值
        ThreadLocalMap.Entry e = map.getEntry(this);
        if (e != null) {
            // 如果 取到的value不为空,则返回
            @SuppressWarnings("unchecked")
            T result = (T)e.value;
            return result;
        }
    }
    // 如果当前线程的 threadLocals变量为空,则去初始化
    return setInitialValue();
}
线程是通过各自的 threadLocals 属性去存储私有变量的,通过源码可以看到,threadLocals 是一个 ThreadLocalMap 类的对象。
public class ThreadLocal<T> {

    static class ThreadLocalMap {
        /**
         * The entries in this hash map extend WeakReference, using
         * its main ref field as the key (which is always a
         * ThreadLocal object).  Note that null keys (i.e. entry.get()
         * == null) mean that the key is no longer referenced, so the
         * entry can be expunged from table.  Such entries are referred to
         * as "stale entries" in the code that follows.
         */
        static class Entry extends WeakReference<ThreadLocal<?>> {
            /** The value associated with this ThreadLocal. */
            Object value;

            Entry(ThreadLocal<?> k, Object v) {
                super(k);
                value = v;
            }
        }

        // ...
    }

    // ...
}
通过上面我们可以发现的是 ThreadLocalMap 是 ThreadLocal 的一个静态内部类,而且 Entry 是 ThreadLocalMap 的一个静态内部类。用 Entry 类来进行存储,而 Entry 的 key 永远是一个 ThreadLocal 对象。所以 ThreadLocal 的 set 和 get 方法里面存取值都是以当前 ThreadLocal 实例,也就是 this 作为 key。
同时为了避免循环引用,ThreadLocalMap 在选择 key 的时候,并不是直接选择 ThreadLocal 实例,而是 ThreadLocal 实例的弱引用。
因为系统资源是有限的,而且创建和销毁线程的代价是昂贵的。为了防止资源不足,通过线程池来调度,管理,重用线程。
在 java.util.concurrent.Executors 包中提供了用于创建线程池几种工厂方法。
newCachedThreadPool 创建一个可缓存线程池,如果线程池长度超过处理需要,可灵活回收空闲线程,若无可回收,则新建线程。newFixedThreadPool 创建一个指定工作线程数量的线程池。每当提交一个任务就创建一个工作线程,如果工作线程数量达到线程池初始的最大数,则将提交的任务存入到池队列中。 public static void main(String[] args) {
ExecutorService fixedThreadPool = Executors.newFixedThreadPool(3);
for (int i = 0; i < 10; i++) {
final int index = i;
fixedThreadPool.execute(new Runnable() {
public void run() {
try {
System.out.println(index);
Thread.sleep(2000);
} catch (InterruptedException e) {
e.printStackTrace();
}
}
});
}
}newSingleThreadExecutor 创建一个单线程化的 Executor,即只创建唯一的工作者线程来执行任务,它只会用唯一的工作线程来执行任务,保证所有任务按照指定顺序(FIFO, LIFO, 优先级)执行。如果这个线程异常结束,会有另一个取代它,保证顺序执行。单工作线程最大的特点是可保证顺序地执行各个任务,并且在任意给定的时间不会有多个线程是活动的。 public static void main(String[] args) {
ExecutorService singleThreadExecutor = Executors.newSingleThreadExecutor();
for (int i = 0; i < 10; i++) {
final int index = i;
singleThreadExecutor.execute(new Runnable() {
public void run() {
try {
System.out.println(index);
Thread.sleep(2000);
} catch (InterruptedException e) {
e.printStackTrace();
}
}
});
}
}newScheduleThreadPool 创建一个定长的线程池,而且支持定时的以及周期性的任务执行。 public static void main(String[] args) {
ScheduledExecutorService scheduledThreadPool = Executors.newScheduledThreadPool(5);
scheduledThreadPool.schedule(new Runnable() {
public void run() {
System.out.println("delay 3 seconds");
}
}, 3, TimeUnit.SECONDS);
scheduledThreadPool.schedule((new Runnable() {
@Override
public void run() {
System.out.println("delay 1 seconds, and excute every 3 seconds");
}
}), 3, 1, TimeUnit.SECONDS);
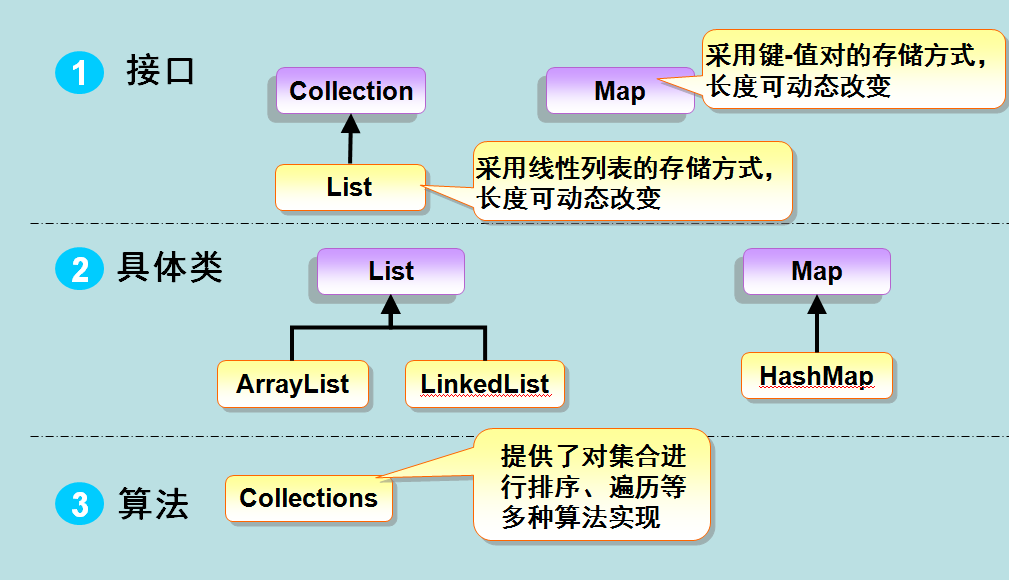
}Java 中内置了很多的集合类,它们都实现了一套 Collection 接口,其中一些是具体类,这些类可以直接拿来使用,而另外一些是抽象类,提供了接口的部分实现。
从上面的集合框架图可以看到,Java 集合框架主要包括两种类型的容器,一种是集合(Collection),存储一个元素集合,另一种是图(Map),存储键/值对映射。Collection 接口又有 3 种子类型,List、Set 和 Queue,再下面是一些抽象类,最后是具体实现类,常用的有 ArrayList、LinkedList、HashSet、LinkedHashSet、HashMap、LinkedHashMap 等等。
集合框架是一个用来代表和操纵集合的统一架构。所有的集合框架都包含如下内容:
接口:是代表集合的抽象数据类型。例如 Collection、List、Set、Map 等。之所以定义多个接口,是为了以不同的方式操作集合对象
实现(类):是集合接口的具体实现。从本质上讲,它们是可重复使用的数据结构,例如:ArrayList、LinkedList、HashSet、HashMap。
算法:是实现集合接口的对象里的方法执行的一些有用的计算,例如:搜索和排序。这些算法被称为多态,那是因为相同的方法可以在相似的接口上有着不同的实现。
除了集合,该框架也定义了几个 Map 接口和类。Map 里存储的是键/值对。尽管 Map 不是集合,但是它们完全整合在集合中。
Java 集合框架提供了一套性能优良,使用方便的接口和类,java 集合框架位于 java.util 包中, 所以当使用集合框架的时候需要进行导包。
一般遍历数组都是采用 for 循环或者增强 for,这两个方法也可以用在集合框架,但是还有一种方法是采用迭代器遍历集合框架,它是一个对象,实现了 Iterator 接口或 ListIterator 接口。
迭代器,使你能够通过循环来得到或删除集合的元素。ListIterator 继承了 Iterator,以允许双向遍历列表和修改元素。
TreeSet 和 TreeMap 按照 nature order 来存储元素, 然而通过 Comparator 可以自定义按照什么样的顺序排序。只要里面的元素实现了 Comparator 接口。
List 集合的特点就是:有序(存储顺序和取出顺序一致),可重复
List 集合常用的子类有三个:
ArrayList:底层数据结构是数组。线程不安全
LinkedList:底层数据结构是链表。线程不安全
Vector:底层数据结构是数组。线程安全
Set 集合的特点是:元素不可重复
HashSet:底层数据结构是哈希表(是一个元素为链表的数组)
TreeSet:底层数据结构是红黑树(是一个自平衡的二叉树);保证元素的排序方式
LinkedHashSet:底层数据结构由哈希表和链表组成。
Guava 是 Google 公司开源的一个工具类库,有着高效的集合操作API,被 Google 的开发者设计,实现和使用。
import CoreImage

public struct Filter {
    let name: String
    let ciFilterName: String?

    public init(name: String, ciFilterName: String?) {
        self.name = name
        self.ciFilterName = ciFilterName
    }
}

extension Filter: Equatable {
    public static func ==(lhs: Filter, rhs: Filter) -> Bool {
        return lhs.name == rhs.name
    }
}

extension Filter {
    static var all: [Filter] = [
        Filter(name: "Normal", ciFilterName: nil),
        Filter(name: "Chrome", ciFilterName: "CIPhotoEffectChrome"),
        Filter(name: "Fade", ciFilterName: "CIPhotoEffectFade"),
        Filter(name: "Instant", ciFilterName: "CIPhotoEffectInstant"),
        Filter(name: "Mono", ciFilterName: "CIPhotoEffectMono"),
        Filter(name: "Noir", ciFilterName: "CIPhotoEffectNoir"),
        Filter(name: "Process", ciFilterName: "CIPhotoEffectProcess"),
        Filter(name: "Tonal", ciFilterName: "CIPhotoEffectTonal"),
        Filter(name: "Transfer", ciFilterName: "CIPhotoEffectTransfer"),
        Filter(name: "Tone", ciFilterName: "CILinearToSRGBToneCurve"),
        Filter(name: "Linear", ciFilterName: "CISRGBToneCurveToLinear"),
        Filter(name: "Sepia", ciFilterName: "CISepiaTone"),
    ]
}import CoreImage
final class FilterProvider {
static let shared: FilterProvider = .init()
private init () {}
private let context = CIContext(options: nil)
func applyFilter(with image: UIImage, filter: Filter) -> UIImage {
guard let ciFilterName = filter.ciFilterName else {
return image
}
let sourceImage = CIImage(image: image)
let filter = CIFilter(name: ciFilterName)
filter?.setDefaults()
filter?.setValue(sourceImage, forKey: kCIInputImageKey)
let outputCGImage = context.createCGImage((filter?.outputImage!)!, from: (filter?.outputImage!.extent)!)
let filteredImage = UIImage(cgImage: outputCGImage!)
return filteredImage
}
}
extension UIImage {
static func resize(with image: UIImage, ratio: CGFloat = 0.2) -> UIImage {
let resizedSize = CGSize(width: Int(image.size.width * ratio), height: Int(image.size.height * ratio))
UIGraphicsBeginImageContext(resizedSize)
image.draw(in: CGRect(x: 0, y: 0, width: resizedSize.width, height: resizedSize.height))
let resizedImage = UIGraphicsGetImageFromCurrentImageContext()
UIGraphicsEndImageContext()
return resizedImage!
}
}A declarative, efficient, and flexible JavaScript library for building user interfaces.
🖖 Vue.js is a progressive, incrementally-adoptable JavaScript framework for building UI on the web.
TypeScript is a superset of JavaScript that compiles to clean JavaScript output.
An Open Source Machine Learning Framework for Everyone
The Web framework for perfectionists with deadlines.
A PHP framework for web artisans
Bring data to life with SVG, Canvas and HTML. 📊📈🎉
JavaScript (JS) is a lightweight interpreted programming language with first-class functions.
Some thing interesting about web. New door for the world.
A server is a program made to process requests and deliver data to clients.
Machine learning is a way of modeling and interpreting data that allows a piece of software to respond intelligently.
Some thing interesting about visualization, use data art
Some thing interesting about game, make everyone happy.
We are working to build community through open source technology. NB: members must have two-factor auth.
Open source projects and samples from Microsoft.
Google ❤️ Open Source for everyone.
Alibaba Open Source for everyone
Data-Driven Documents codes.
China tencent open source team.