
A free lightweight API analytics solution, complete with a dashboard.
Currently compatible with:
- Python: FastAPI, Flask, Django and Tornado
- Node.js: Express, Fastify and Koa
- Go: Gin, Echo, Fiber and Chi
- Rust: Actix, Axum and Rocket
- Ruby: Rails and Sinatra
Head to https://apianalytics.dev/generate to generate your unique API key with a single click. This key is used to monitor your API server and should be stored privately. It's also required in order to view your API analytics dashboard and data.
Add our lightweight middleware to your API. Almost all processing is handled by our servers so there is minimal impact on the performance of your API.
pip install fastapi-analyticsimport uvicorn
from fastapi import FastAPI
from api_analytics.fastapi import Analytics
app = FastAPI()
app.add_middleware(Analytics, api_key=<API-KEY>) # Add middleware
@app.get('/')
async def root():
return {'message': 'Hello World!'}
if __name__ == "__main__":
uvicorn.run("app:app", reload=True)pip install api-analyticsfrom flask import Flask
from api_analytics.flask import add_middleware
app = Flask(__name__)
add_middleware(app, <API-KEY>) # Add middleware
@app.get('/')
def root():
return {'message': 'Hello World!'}
if __name__ == "__main__":
app.run()pip install api-analyticsAssign your API key to ANALYTICS_API_KEY in settings.py and add the Analytics middleware to the top of your middleware stack.
ANALYTICS_API_KEY = <API-KEY>

MIDDLEWARE = [
    'api_analytics.django.Analytics',  # Add middleware
    ...
]pip install tornado-analyticsModify your handler to inherit from Analytics. Create a __init__() method, passing along the application and response along with your unique API key.
import asyncio
from tornado.web import Application
from api_analytics.tornado import Analytics

# Inherit from the Analytics middleware class
class MainHandler(Analytics):
    def __init__(self, app, res):
        super().__init__(app, res, <API-KEY>)  # Provide api key

    def get(self):
        self.write({'message': 'Hello World!'})

def make_app():
    return Application([
        (r"/", MainHandler),
    ])

if __name__ == "__main__":
    app = make_app()
    app.listen(8080)
    IOLoop.instance().start()
npm install node-api-analyticsimport express from 'express';
import { expressAnalytics } from 'node-api-analytics';
const app = express();
app.use(expressAnalytics(<API-KEY>)); // Add middleware
app.get('/', (req, res) => {
res.send({ message: 'Hello World' });
});
app.listen(8080, () => {
console.log('Server listening at http://localhost:8080');
})npm install node-api-analyticsimport Fastify from 'fastify';
import { fastifyAnalytics } from 'node-api-analytics;
const fastify = Fastify();
fastify.addHook('onRequest', fastifyAnalytics(<API-KEY>)); // Add middleware
fastify.get('/', function (request, reply) {
reply.send({ message: 'Hello World!' });
})
fastify.listen({ port: 8080 }, function (err, address) {
console.log('Server listening at http://localhost:8080');
if (err) {
fastify.log.error(err);
process.exit(1);
}
})npm install node-api-analyticsimport Koa from "koa";
import { koaAnalytics } from 'node-api-analytics';
const app = new Koa();
app.use(koaAnalytics(<API-KEY>)); // Add middleware
app.use((ctx) => {
ctx.body = { message: 'Hello World!' };
});
app.listen(8080, () =>
console.log('Server listening at http://localhost:8080')
);go get -u github.com/tom-draper/api-analytics/analytics/go/ginpackage main
import (
"net/http"
"github.com/gin-gonic/gin"
analytics "github.com/tom-draper/api-analytics/analytics/go/gin"
)
func root(c *gin.Context) {
jsonData := []byte(`{"message": "Hello World!"}`)
c.Data(http.StatusOK, "application/json", jsonData)
}
func main() {
router := gin.Default()
router.Use(analytics.Analytics(<API-KEY>)) // Add middleware
router.GET("/", root)
router.Run(":8080")
}go get -u github.com/tom-draper/api-analytics/analytics/go/echopackage main
import (
"net/http"
echo "github.com/labstack/echo/v4"
analytics "github.com/tom-draper/api-analytics/analytics/go/echo"
)
func root(c echo.Context) error {
jsonData := []byte(`{"message": "Hello World!"}`)
return c.JSON(http.StatusOK, jsonData)
}
func main() {
apiKey := getAPIKey()
router := echo.New()
router.Use(analytics.Analytics(<API-KEY>)) // Add middleware
router.GET("/", root)
router.Start(":8080")
}go get -u github.com/tom-draper/api-analytics/analytics/go/fiberpackage main
import (
"github.com/gofiber/fiber/v2"
analytics "github.com/tom-draper/api-analytics/analytics/go/fiber"
)
func root(c *fiber.Ctx) error {
jsonData := []byte(`{"message": "Hello World!"}`)
return c.SendString(string(jsonData))
}
func main() {
app := fiber.New()
app.Use(analytics.Analytics(<API-KEY>)) // Add middleware
app.Get("/", root)
app.Listen(":8080")
}go get -u github.com/tom-draper/api-analytics/analytics/go/chipackage main
import (
"net/http"
analytics "github.com/tom-draper/api-analytics/analytics/go/chi"
chi "github.com/go-chi/chi/v5"
)
func root(w http.ResponseWriter, r *http.Request) {
w.Header().Set("Content-Type", "application/json")
w.WriteHeader(http.StatusOK)
jsonData := []byte(`{"message": "Hello World!"}`)
w.Write(jsonData)
}
func main() {
router := chi.NewRouter()
router.Use(analytics.Analytics(<API-KEY>)) // Add middleware
router.GET("/", root)
router.Run(":8080")
}
cargo add actix-analyticsuse actix_web::{get, web, App, HttpServer, Responder, Result};
use serde::Serialize;
use actix_analytics::Analytics;
#[derive(Serialize)]
struct JsonData {
message: String,
}
#[get("/")]
async fn index() -> Result<impl Responder> {
let data = JsonData {
message: "Hello World!".to_string(),
};
Ok(web::Json(data))
}
#[actix_web::main]
async fn main() -> std::io::Result<()> {
HttpServer::new(|| {
App::new()
.wrap(Analytics::new(<API-KEY>)) // Add middleware
.service(index)
})
.bind(("127.0.0.1", 8080))?
.run()
.await
}
cargo add axum-analyticsuse axum::{
routing::get,
Json, Router,
};
use serde::Serialize;
use std::net::SocketAddr;
use tokio;
use axum_analytics::Analytics;
#[derive(Serialize)]
struct JsonData {
message: String,
}
async fn root() -> Json<JsonData> {
let data = JsonData {
message: "Hello World!".to_string(),
};
Json(data)
}
#[tokio::main]
async fn main() {
let app = Router::new()
.layer(Analytics::new(<API-KEY>)) // Add middleware
.route("/", get(root));
let addr = SocketAddr::from(([127, 0, 0, 1], 8080));
axum::Server::bind(&addr)
.serve(app.into_make_service())
.await
.unwrap();
}
cargo add rocket-analytics#[macro_use]
extern crate rocket;
use rocket::serde::json::Json;
use serde::Serialize;
use rocket_analytics::Analytics;
#[derive(Serialize)]
pub struct JsonData {
message: String,
}
#[get("/")]
fn root() -> Json<JsonData> {
let data = JsonData {
message: "Hello World".to_string(),
};
Json(data)
}
#[launch]
fn rocket() -> _ {
rocket::build()
.mount("/", routes![root])
.attach(Analytics::new(<API-KEY>))
}
gem install api_analyticsAdd the analytics middleware to your rails application in config/application.rb.
require 'rails'
require 'api_analytics'

Bundler.require(*Rails.groups)

module RailsMiddleware
  class Application < Rails::Application
    config.load_defaults 6.1
    config.api_only = true

    config.middleware.use ::Analytics::Rails, <API-KEY>  # Add middleware
  end
endgem install api_analyticsrequire 'sinatra'
require 'api_analytics'
use Analytics::Sinatra, <API-KEY> # Add middleware
before do
content_type 'application/json'
end
get '/' do
{message: 'Hello World!'}.to_json
endYour API will now log and store incoming request data on all valid routes. Your logged data can be viewed using two methods:
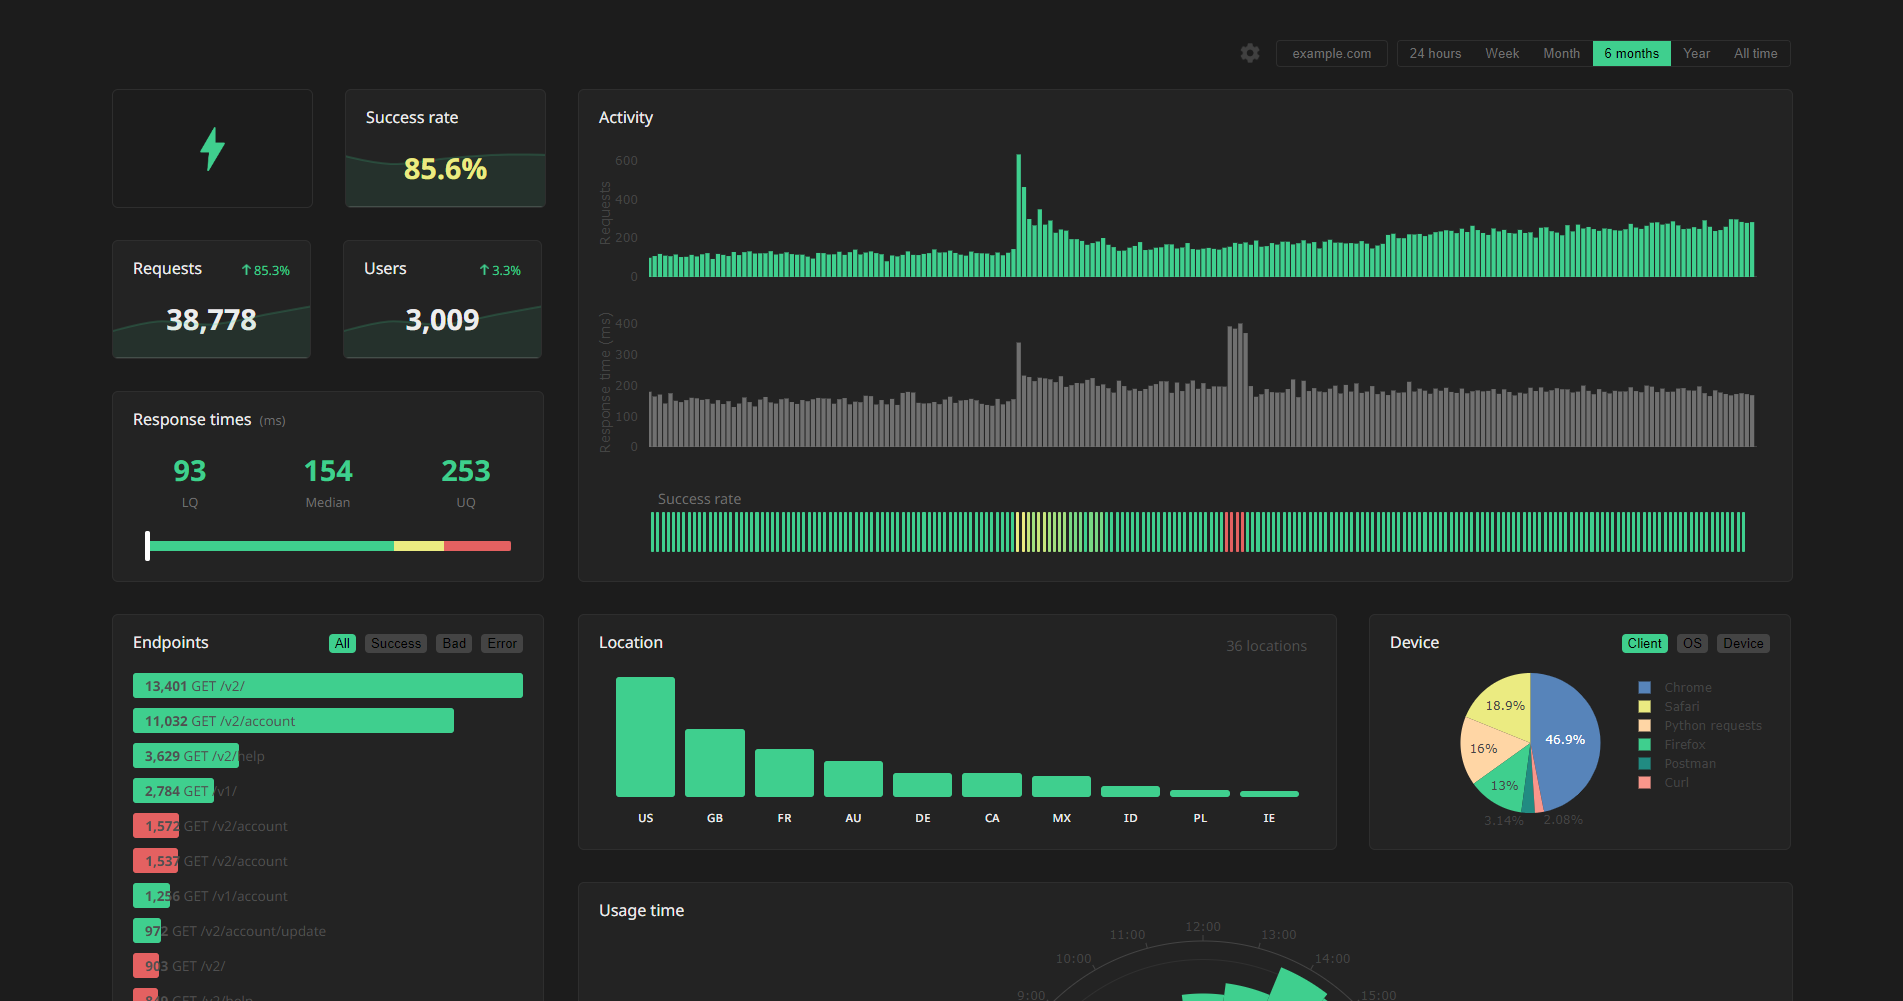
- Through visualizations and statistics on our dashboard
- Accessed directly via our data API
You can use the same API key across multiple APIs, but all your data will appear in the same dashboard. We recommend generating a new API key for each additional API server you want analytics for.
Head to https://apianalytics.dev/dashboard and paste in your API key to access your dashboard.
Demo: https://apianalytics.dev/dashboard/demo
Logged data for all requests can be accessed via our REST API. Simply send a GET request to https://apianalytics-server.com/api/data with your API key set as X-AUTH-TOKEN in headers.
import requests

headers = {
 "X-AUTH-TOKEN": <API-KEY>
}

response = requests.get("https://apianalytics-server.com/api/data", headers=headers)
print(response.json())fetch("https://apianalytics-server.com/api/data", {
headers: { "X-AUTH-TOKEN": <API-KEY> },
})
.then((response) => {
return response.json();
})
.then((data) => {
console.log(data);
});curl --header "X-AUTH-TOKEN: <API-KEY>" https://apianalytics-server.com/api/dataYou can filter your data by providing URL parameters in your request.
date- specifies a particular day the requests occurred on (YYYY-MM-DD)dateFrom- specifies the lower bound of a date range the requests occurred in (YYYY-MM-DD)dateTo- specifies the upper bound of a date range the requests occurred in (YYYY-MM-DD)ipAddress- an IP address string of the clientstatus- an integer status code of the responselocation- a two-character location code of the client
Example:
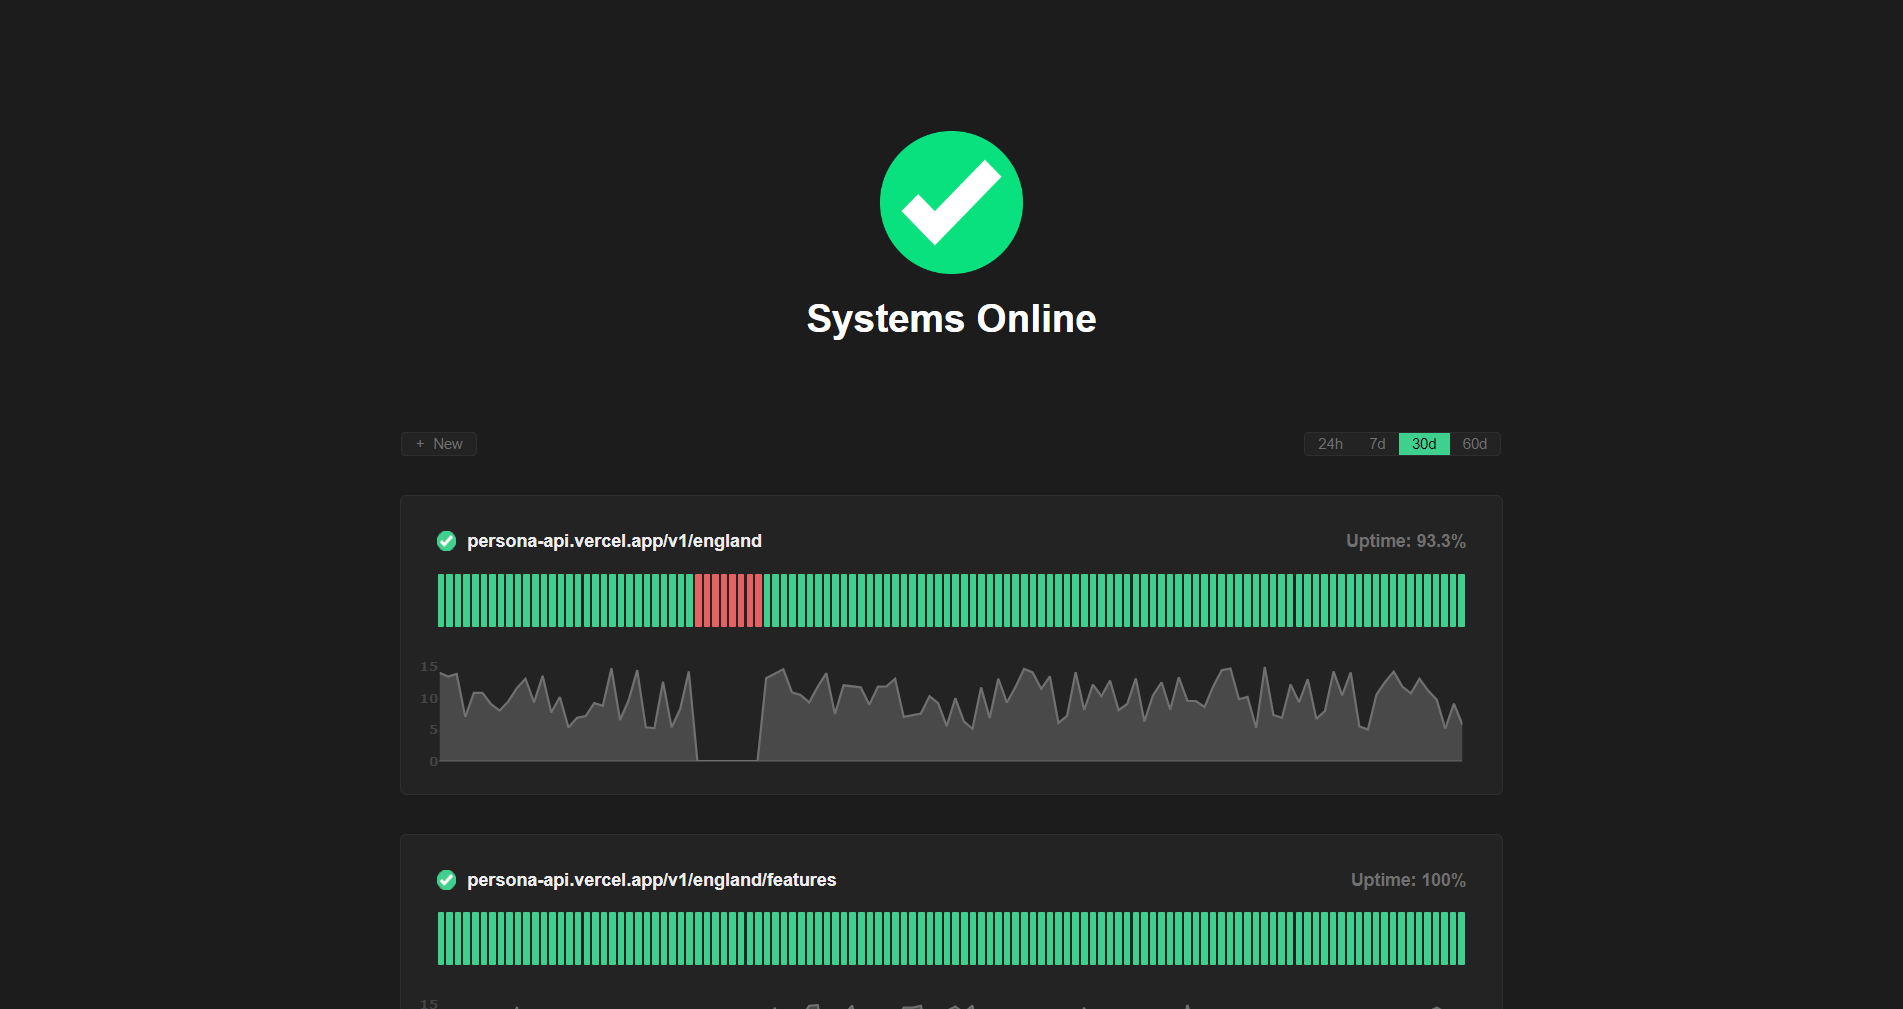
curl --header "X-AUTH-TOKEN: <API-KEY>" https://apianalytics-server.com/api/data?dateFrom=2022-01-01&dateTo=2022-06-01&status=200Active API monitoring can be set up by heading to https://apianalytics.dev/monitoring to enter you API key. Our servers will regularly ping chosen API endpoints to monitor uptime and response time.
All data is stored securely in compliance with The EU General Data Protection Regulation (GDPR).
For any given request to your API, data recorded is limited to:
- Path requested by client
- Client IP address
- Client operating system
- Client browser
- Request method (GET, POST, PUT, etc.)
- Time of request
- Status code
- Response time
- API hostname
- API framework (FastAPI, Flask, Express etc.)
Data collected is only ever used to populate your analytics dashboard. All stored data is anonymous, with the API key the only link between you and your logged request data. Should you lose your API key, you will have no method to access your API analytics.
At any time you can delete all stored data associated with your API key by going to https://apianalytics.dev/delete and entering your API key.
API keys and their associated logged request data are scheduled to be deleted after 6 months of inactivity.
Contributions, issues and feature requests are welcome.
- Fork it (https://github.com/tom-draper/api-analytics)
- Create your feature branch (
git checkout -b my-new-feature) - Commit your changes (
git commit -am 'Add some feature') - Push to the branch (
git push origin my-new-feature) - Create a new Pull Request


