- Build the image in your local machine
docker build -t ntu-asr-image . - Tag the image
docker tag ntu-asr-image ghcr.io/kaikiat/ntu-asr-image:latest - Create a personal access token for ghcr. Refer to link
- Store this token as CR_PAT
- Push to ghcr using
docker push ghcr.io/kaikiat/ntu-asr-image:latest - The image should appear at
https://github.com/kaikiat?tab=packages
- Create a project in gcp
- Enable billing and add a billing account
- Create a gcs bucket
tf-state-prod-12. Create a folder calledterraformand another inner folder calledstate
terraform {
  backend "gcs" {
    bucket  = "tf-state-prod-12"
    prefix  = "terraform/state"
  }
}
- Run
gcloud auth loginandgcloud auth application-default login - Set project id using
export PROJECT_ID=your-project-id - Remove .terraform folder
- Provision gcp resources using Terraform
# Terraform will set up application resources
cd Terraform_google || exit
terraform init
terraform validate
terraform plan
terraform apply -auto-approve
- Set up iam roles
gcloud iam roles create Terraform_role \
  --file=Terraform_role.yaml \
  --project $PROJECT_ID
- Bind policies
gcloud projects add-iam-policy-binding $PROJECT_ID \
    --member="serviceAccount:terraform-sa@${PROJECT_ID}.iam.gserviceaccount.com" \
    --role="projects/${PROJECT_ID}/roles/Terraform_role"
- Upload model to Google File Store
- Go to Gcloud console Compute Engine > VM instances and click one of the VMs
- Get the code to ssh to the VM
- ssh to the VM using a new terminal window
- Run the following to mount the filestore onto the VM
 mkdir mnt
 sudo mount <filstore ip>:/<filestore path> <mount directory>
 # Example: sudo mount 10.179.74.18:/modelshare mnt
 sudo chmod go+rw mnt
 pwd
- Keep the output from the pwd command
- Upload the models by running the following in our project root directory:
gcloud compute scp models/SingaporeCS_0519NNET3 <VM_ID>:<output_from_pwd> --project=<PROJECT_ID> --zone=asia-southeast1-a --recurse
gcloud compute scp models/SingaporeMandarin_0519NNET3 <VM_ID>:<output_from_pwd> --project=<PROJECT_ID> --zone=asia-southeast1-a --recurse
# Example:
gcloud compute scp models/SingaporeCS_0519NNET3 gke-gke-ntu-asr-clus-ntu-asr-node-poo-3196fc90-f9l9:/home/kaikiat/mnt --project=cube-11 --zone=asia-southeast1-a --recurse
Note: VM_ID looks something like this gke-gke-ntu-asr-clus-ntu-asr-node-poo-5a093a1f-fcd2
- Create a namespace
export KUBE_NAME=sgdecoding-online-scaled
export NAMESPACE=ntuasr-production-google
gcloud container clusters get-credentials gke-ntu-asr-cluster --zone asia-southeast1-a --project $PROJECT_ID
kubectl create namespace $NAMESPACE
kubectl config set-context --current --namespace $NAMESPACE
- Apply the secrets.yaml and the pv claims. Note: Remember to change the IP address of the file store. Now run
kubectl apply -f secret/run_kubernetes_secret.yaml
kubectl apply -f google_pv/  # need to change the ip address of the pvc, need to delete pv when rerunning
- Create docker secrets
kubectl create secret docker-registry regcred --docker-server=ghcr.io --docker-username=$GITHUB_USERNAME --docker-password=$CR_PAT --docker-email=$GITHUB_EMAIL --namespace $NAMESPACE
kubectl create secret docker-registry regcred2 --docker-server=registry.gitlab.com --docker-username=$GITLAB_USERNAME --docker-password=$GITLAB_PASSWORD --docker-email=$GITLAB_EMAIL --namespace $NAMESPACE
- Install argocd
brew install argocd - Create argocd namespace
kubectl create namespace argocd - Apply manifests files
kubectl apply -n argocd -f https://raw.githubusercontent.com/argoproj/argo-cd/stable/manifests/install.yaml - Port-forward argocd-server using
kubectl port-forward svc/argocd-server -n argocd 8080:443in another terminal tab. - Login through the UI. Password can be obtained from
kubectl -n argocd get secret argocd-initial-admin-secret -o jsonpath="{.data.password}" | base64 -d; echo, the username isadmin. - Login via cli using
argocd login localhost:8080 --username admin --password $(kubectl -n argocd get secret argocd-initial-admin-secret -o jsonpath="{.data.password}" | base64 -d) - Add github ssh key. Refer to github docs if ssh key has not be generated, otherwise run
argocd repo add [email protected]:kaikiat/fyp-cd.git --ssh-private-key-path ~/.ssh/id_rsa. This can be intepreted asargocd repo add GITHUB_SSH_URL --ssh-private-key-path /path/to/ssh/key, this command with add a github repository to argocd. - Verify using
argocd repo list - Apply the manifests file using
kubectl apply -f application.yaml
- Install argo cd notifications
kubectl apply -n argocd -f https://raw.githubusercontent.com/argoproj-labs/argocd-notifications/release-1.0/manifests/install.yaml - Setup SMTP server + Slack app beforehand.
- Add config.yaml which contains the credentials for SMTP server as well as Slack app.
kubectl apply -n argocd -f argo/manifests/config.yaml - Patch the app using
# Slack Email
kubectl patch app sgdecoding-online-scaled -n argocd -p '{"metadata": {"annotations": {"notifications.argoproj.io/subscribe.on-sync-succeeded.slack":"#argocd"}}}' --type merge
kubectl patch app sgdecoding-online-scaled -n argocd -p '{"metadata": {"annotations": {"notifications.argoproj.io/subscribe.on-sync-status-unknown.slack":"#argocd"}}}' --type merge
kubectl patch app sgdecoding-online-scaled -n argocd -p '{"metadata": {"annotations": {"notifications.argoproj.io/subscribe.on-sync-failed.slack":"#argocd"}}}' --type merge
kubectl patch app sgdecoding-online-scaled -n argocd -p '{"metadata": {"annotations": {"notifications.argoproj.io/subscribe.on-health-degraded.slack":"#argocd"}}}' --type merge

# SMTP Email
kubectl patch app sgdecoding-online-scaled -n argocd -p '{"metadata": {"annotations": {"recipients.argocd-notifications.argoproj.io":"[email protected]"}}}' --type merge
kubectl patch app sgdecoding-online-scaled -n argocd -p '{"metadata": {"annotations": {"notifications.argoproj.io/subscribe.on-sync-succeeded.gmail":"[email protected]"}}}' --type merge
kubectl patch app sgdecoding-online-scaled -n argocd -p '{"metadata": {"annotations": {"notifications.argoproj.io/subscribe.on-sync-failed.gmail":"[email protected]"}}}' --type merge
kubectl patch app sgdecoding-online-scaled -n argocd -p '{"metadata": {"annotations": {"notifications.argoproj.io/subscribe.on-sync-status-unknown.gmail":"[email protected]"}}}' --type merge
kubectl patch app sgdecoding-online-scaled -n argocd -p '{"metadata": {"annotations": {"notifications.argoproj.io/subscribe.on-health-degraded.gmail":"[email protected]"}}}' --type merge
kubectl patch app sgdecoding-online-scaled -n argocd -p '{"metadata": {"annotations": {"notifications.argoproj.io/subscribe.on-deployed.gmail":"[email protected]"}}}' --type merge
kubectl patch app sgdecoding-online-scaled -n argocd -p '{"metadata": {"annotations": {"notifications.argoproj.io/subscribe.on-sync-running.gmail":"[email protected]"}}}' --type merge
- By this time, you should also have received an notification from the SMTP server that the application has failed syncing. This is because argorollouts is not configured yet.
- Install rollouts plugin using
curl -LO https://github.com/argoproj/argo-rollouts/releases/latest/download/kubectl-argo-rollouts-darwin-amd64
chmod +x ./kubectl-argo-rollouts-darwin-amd64
sudo mv ./kubectl-argo-rollouts-darwin-amd64 /usr/local/bin/kubectl-argo-rollouts
- Run the following commands
kubectl create namespace prometheus
helm repo add prometheus-community https://prometheus-community.github.io/helm-charts
helm install prometheus monitoring/manifests/kube-prometheus-stack --namespace prometheus
# Upgrade (If required)
helm upgrade --install prometheus monitoring/manifests/kube-prometheus-stack --namespace prometheus
- Port forward Prometheus and Grafana
kubectl port-forward service/prometheus-kube-prometheus-prometheus 9090 -n prometheus
kubectl port-forward deployment/prometheus-grafana 3000 -n prometheus
- Install service monitor for argo cd
kubectl apply -f monitoring/manifests/service-monitor.yaml -n argocd - (Canary) Install service monitor for ntuasr application
kubectl apply -f monitoring/manifests/service-monitor-ntuasr.yaml -n ntuasr-production-google - (BlueGreen) Not sure if this step should take place before configuring blue green rollout ? Run
kubectl apply -f monitoring/manifests/service-monitor-ntuasr-preview.yaml -n ntuasr-production-google
- Only after completing step 1-3, then you can install argo rollouts.
NOTE: To view metrics exported, run kubectl port-forward svc/sgdecoding-online-scaled-master 8081, then go to localhost:8081/metrics
- Create namespace
kubectl create namespace argo-rollouts - Install argo rollouts using
helm install argo-rollouts argo/manifests/argo_rollouts --namespace argo-rollouts, can be interpreted ashelm install RELEASE_NAME FOLDER. - Install service monitor for argo rollouts
kubectl apply -f monitoring/manifests/service-monitor-argorollouts.yaml -n argo-rollouts, after installing helm. - Resync the app in argocd if needed since argo rollouts is installed. After that you should also receive an email notification
- Verify that rollout is working by running
kubectl argo rollouts dashboardto open the rollout web ui. Argo rollout runs athttp://localhost:3100/rollouts - To watch a rollout
kubectl argo rollouts get rollout sgdecoding-online-scaled-master --watch - To watch a rollout
kubectl argo rollouts get rollout sgdecoding-online-scaled-worker --watch
- Go to
http://localhost:3000/loginto view the Grafana Web UI. The username isadmin, the password isprom-operator - Go to
Dashboard>Import>Upload JSON file. Add 2 filesmonitoring/configuration/argocd-dashboard.jsonandmonitoring/configuration/argorollout-dashboard.json.
- Make sure that you have port forwarded argocd, Grafana and Prometheus.
- Run
kubectl apply -f analysis/manifests/analysis_request.yaml (-n ntuasr ??), set the address ashttp://34.87.79.104:9090pointing it to the external IP addressprometheus-kube-prometheus-prometheus. - Perform a commit and update the version number of the image.
- Run
python3 suite/canary.py - Run
kubectl get analysisrun <templatename> -o yamlor can view from argocd ui. Analysis run results should look something like
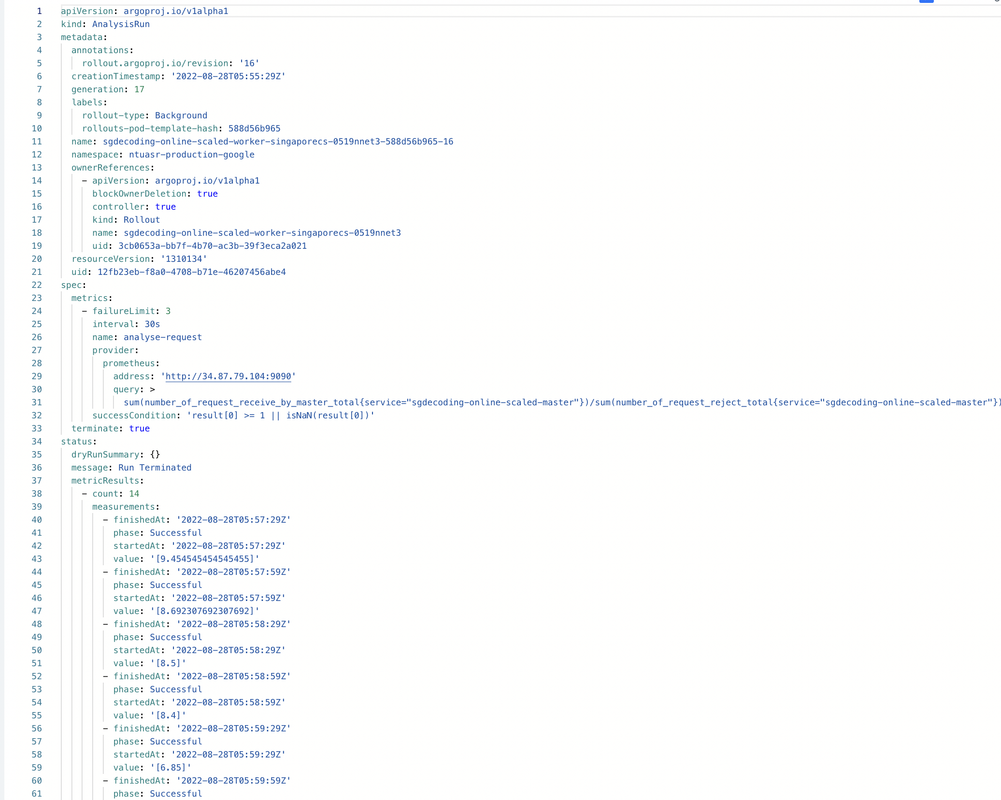
- Run
kubectl apply -n argocd -f https://raw.githubusercontent.com/argoproj-labs/argocd-image-updater/stable/manifests/install.yaml - Set debug level
kubectl patch configmap/argocd-image-updater-config \
  -n argocd \
  --type merge \
  -p '{"data":{"log.level":"debug"}}'
- Add config files
kubectl patch configmap/argocd-image-updater-config --patch-file image_uploader/argocd-image-updater-config.yaml -n argocd
kubectl apply -f image_uploader/secrets.yaml
- Make sure that application.yaml follows this format
apiVersion: argoproj.io/v1alpha1
kind: Application
metadata:
  annotations:
    argocd-image-updater.argoproj.io/image-list: ntuasr=ghcr.io/kaikiat/python-docker:latest
    argocd-image-updater.argoproj.io/ntuasr.update-strategy: latest # Needed ?
    argocd-image-updater.argoproj.io/write-back-method: git
    argocd-image-updater.argoproj.io/git-branch: main
- Point 4 is working. Use this instead
apiVersion: argoproj.io/v1alpha1
kind: Application
metadata:
  annotations:
    argocd-image-updater.argoproj.io/image-list: ntuasr=ghcr.io/kaikiat/python-docker
    argocd-image-updater.argoproj.io/write-back-method: git
    argocd-image-updater.argoproj.io/git-branch: main:image-updater{{range .Images}}-{{.Name}}-{{.NewTag}}{{end}}
- Helm chart need to follow the format below
image:
  repository: ghcr.io/kaikiat/python-docker
  tag: 0.0.1
  pullPolicy: Always
- Whenever you make a change to argo image updater, restart the deployment using
kubectl -n argocd rollout restart deployment argocd-image-updater - Follow the logs using
kubectl logs -n argocd -l app.kubernetes.io/name=argocd-image-updater -f - When a new image is pushed to ghcr, the logs should show information similar to this
time="2022-09-01T13:46:12Z" level=info msg="git checkout --force main" dir=/tmp/git-sgdecoding-online-scaled2528829494 execID=e24d1
time="2022-09-01T13:46:13Z" level=info msg=Trace args="[git checkout --force main]" dir=/tmp/git-sgdecoding-online-scaled2528829494 operation_name="exec git" time_ms=811.638547
time="2022-09-01T13:46:13Z" level=info msg="git clean -fdx" dir=/tmp/git-sgdecoding-online-scaled2528829494 execID=f9339
time="2022-09-01T13:46:13Z" level=info msg=Trace args="[git clean -fdx]" dir=/tmp/git-sgdecoding-online-scaled2528829494 operation_name="exec git" time_ms=14.616689000000001
time="2022-09-01T13:46:13Z" level=debug msg="target parameter file and marshaled data are the same, skipping commit." application=sgdecoding-online-scaled
time="2022-09-01T13:46:13Z" level=info msg="Successfully updated the live application spec" application=sgdecoding-online-scaled
time="2022-09-01T13:46:13Z" level=info msg="Processing results: applications=1 images_considered=1 images_skipped=0 images_updated=1 errors=0"
time="2022-09-01T13:48:13Z" level=info msg="Starting image update cycle, considering 1 annotated application(s) for update"
- Refer to manifest file in
canary/rollout/google_deployment_helm/helm/sgdecoding-online-scaled - Change the image in the values.yaml and commit to the main branch
- Run the folllowing commands to view the logs
# Original Master Pod (Ensure that there are no erroneous pods)
NAMESPACE=ntuasr-production-google && \
WORKER=$(kubectl get pods --sort-by=.metadata.creationTimestamp -o jsonpath="{.items[0].metadata.name}" -n $NAMESPACE) && \
kubectl logs $WORKER -f -n $NAMESPACE

# Preview Master Pod
NAMESPACE=ntuasr-production-google && \
WORKER=$(kubectl get pods --sort-by=.metadata.creationTimestamp -o jsonpath="{.items[2].metadata.name}" -n $NAMESPACE) && \
kubectl logs $WORKER -f -n $NAMESPACE
- Refer to manifest file in
blue_green/rollout/google_deployment_helm/helm/sgdecoding-online-scaled - Delete existing app in argocd using
argocd app delete sgdecoding-online-scaled - In
application.yamlunderspec.source.pathchange the path topath: blue_green/rollout/google_deployment_helm/helm/sgdecoding-online-scaled - In the secrets define
MASTER=sgdecoding-online-scaled-master - For the next git commit, change the value to
MASTER=sgdecoding-online-scaled-master-previewfor both secrets in thesecrets.yaml. Also, change to a new image. - Change the image in the values.yaml and commit to the main branch
- Verify that the preview service is created using
kubectl get svc - The rollout will be paused by default, to test the preview service, toggle between
$KUBE_NAME-master-previewand$KUBE_NAME-master"ingoogle_initial_setup.sh. - Meanwhile, open 2 terminal to view the logs for the original master pod and the preview master pod.
- Go to
Explorein the Grafana UI. - Input the following parameters as seen in the figure below
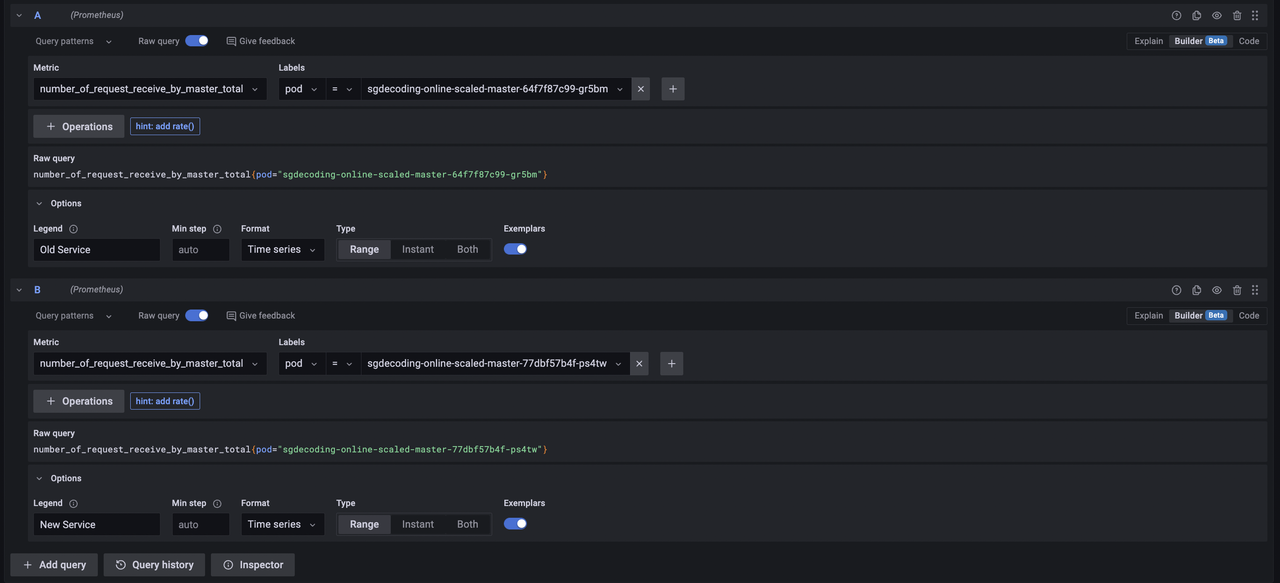
- For canary rollouts, use CLI
- For blue green rollouts, execute the following querries
# For successful requests
number_of_request_receive_by_master_total{service="sgdecoding-online-scaled-master-preview"}
number_of_request_receive_by_master_total{service="sgdecoding-online-scaled-master"}

# For failed requests
number_of_request_reject_total{service="sgdecoding-online-scaled-master"}
number_of_request_reject_total{service="sgdecoding-online-scaled-master-preview"}
- Uninstall prometheus charts https://github.com/prometheus-community/helm-charts/tree/main/charts/kube-prometheus-stack#uninstall-helm-chart
- kubectl config set-context --help, set context using
kubectl config use-context CONTEXT_NAME - Run
for p in $(kubectl get pods | grep Terminating | awk '{print $1}'); do kubectl delete pod $p --grace-period=0 --force;done
for p in $(kubectl get pods | grep Error | awk '{print $1}'); do kubectl delete pod $p --grace-period=0 --force;done
for p in $(kubectl get pods | grep Completed | awk '{print $1}'); do kubectl delete pod $p --grace-period=0 --force;done
- List context
kubectl config get-contexts - Get argocd app yaml
k get app sgdecoding-online-scaled -n argocd -o yaml
- Add terraform code here please
