This converts keys typed in a particular keyboard layout into QWERTY.
Currently the code supports
- Colmac to Qwerty
- Tarmak 1 to Qwerty
- Tarmak 2 to Qwerty
- Tarmak 3 to Qwerty
- Tarmak 4 to Qwerty
- Dvorak to Qwery
- Workman to Qwerty
This code base is known to work with Apple Keyboards. If you are interested in a software keymapper, check out https://github.com/shelbyd/tarmak
The code comes from two sources
- Arduino code that works on Apple Keyboards. This project allows you to use foot pedals as Shift/Alt/Command/Control modifiers for a keyboard: https://github.com/professor/ArduinoKeymapper
- HID code for mapping character codes to Colemac: https://github.com/darkytoothpaste/keymapper
If I had more time, I would figure out why the original HID example code does not work with Apple Keyboards and start from simplier source code. For today, we have this code base from two sources.
Runs on an Arduino that can act as a USB client:
- Leonardo
- Due (yes, the shield plugs straight into the Due despite the voltage differences). If using the Due, then you must include the Arduino SPI library like so:
#include <SPI.h>in your .ino file.
Requires the USB Host Shield 2 from Circuits at Home. https://www.circuitsathome.com/products-page/arduino-shields
Relies on the USB Host Shield 2 library: https://github.com/felis/USB_Host_Shield_2.0
The code is released under the GNU General Public License.
The hardware is a lot easier to assemble than it looks. The exposed electronics make these look much more scary than they really are. They are normally purchased by electronics enthusiasts but, I promise, the closest thing to "doing electronics" you need to do is the ten seconds it takes to simply plug two things together.
All you need to purchase is:
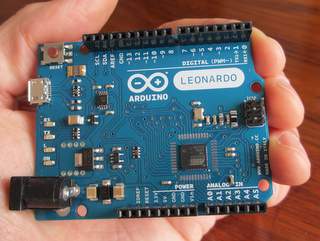
- One Arduino Leonardo (with headers): http://arduino.cc/en/Main/ArduinoBoardLeonardo (available on amazon.com)
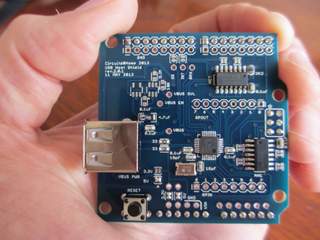
- One Circuits At Home USB Host Shield 2 (Assembled): http://www.circuitsathome.com/products-page/arduino-shields
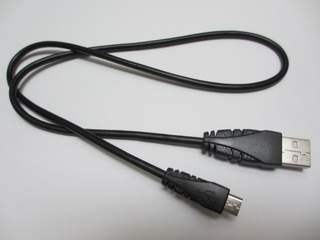
- One Micro B USB cable (unfortunately they don't normally come with the Arduino).
Make sure you purchase a Leonardo model Arduino. Currently, only the Leonardo, the Due, and the Micro can act as USB clients. The Due is bigger and more expensive than the Leonardo, and the makers of the USB shield do not guarantee that the shield will work with the Due without some fiddly modifications. The Micro is smaller, and I have no idea if it will work with any of the Circuits At Home USB shields.
So I highly recommend that you buy the Leonardo.
Two more warnings. Unless you actually enjoy soldering stuff:
- make sure that you purchase the Arduino Leonardo with "headers"
- and make sure you purchase a fully assembled USB Host shield
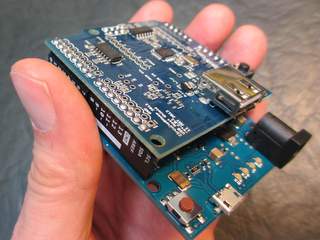
The fully assembled USB Host Shield has metal pins that plug straight into the "headers" of the Arduino. It is fairly obvious which way around the shield needs to be oriented relative to the Arduino. You should find that they plug together quite snugly to the point where none of the pins are exposed. Take care not to bend the pins, especially if/when you ever pull them apart again.
The Arduino cannot do anything until some software has been uploaded onto it. You only need to do this once. From then on, you can use your keyboard combiner on any Apple computer without installing or configuring anything on that computer.
You need to use a computer to upload the software to the Arduino. It does not have to be the same computer on which you plan to use it. It does not even have to be an Apple computer.
As mentioned, uploading the software to the Arduino is a bit fiddly. Remember, you only have to do this once, and so you could always find a friendly geek to do it for you. If you plan to do it yourself, then you should start by reading the "Getting Started" pages for the Arduino: http://arduino.cc/en/Guide/HomePage
Once you are ready (or found a geek friend to give you a hand):
-
Download and install the Arduino IDE: http://arduino.cc/en/Main/Software (The first time you run the IDE you may be asked to install Java. If you are on a Mac and have trouble with the Java install, you may need to use Apple's official Java for OS X: http://support.apple.com/kb/DL1572 -- search Apple's website for the most recent Java download)
-
Install the USB Host Shield 2 library: https://github.com/felis/USB_Host_Shield_2.0 :
-
Download https://github.com/felis/USB_Host_Shield_2.0/archive/master.zip
-
In the Arduino IDE, select "Sketch -> Import Library... -> Add Library..." and select the downloaded zip file.
-
Upload the keymapper code:
-
Open a new sketch window in the Arduino IDE: "File -> New"
-
Paste the contents of ArduinoKeymapper.ino into this sketch window (replacing what is already there if anything): https://raw.githubusercontent.com/professor/ArduinoKeymapper/master/ArduinoKeymapper.ino
-
Select the correct Arduino board: "Tools -> Board -> Arduino Leonardo"
-
Modify CurrentLayout to be the correct layout, e.g.
- KeyboardLayout CurrentLayout = tarmak2;
-
Verify the sketch: "Sketch -> Verify/Compile" (if using an Arduino Due, then uncomment the line that includes the SPI.h library)
-
If the Arduino is plugged in then unplug it.
-
Note what serial ports are currently in use: "Tools -> Serial Port"
-
Connect the Arduino to a USB port.
-
Select one of the newly listed serial ports under "Tools -> Serial Port"
-
Upload the sketch "File -> Upload"
- Plug the keyboard into the USB Host shield
- Plug the Arduino into the computer.
Also, here is an important quote from the "Getting Started" pages for the Leonardo:
The first time you plug a Leonardo or Micro into a Mac, the "Keyboard Setup Assistant" will launch. There's nothing to configure with the Leonardo, so you can close this dialogue by clicking the red button in the top left of the window.
It takes a few seconds for the keyboard combiner to "start up". The lights on your keyboard (caps-lock, num-lock, etc) should flash once to indicate that it is ready.
The keyboard mapping software was designed to work primarily with Mac keyboards. Most PC keyboards will work, except that the number pad, num-lock, and scroll lock keys are unlikely to work properly. For instance, the Number pad on a PC keyboard will always generate numbers regardless of the state of the num-lock key.
For both Mac and PC keyboards, some of the special keys for things like volume control and rewind/fast forward are also unlikely to work.
Any mouse or trackpad that you use should be plugged directly into your computer, not the keyboard combiner unless you are prepared to make some fiddly changes to the keyboard combiner code.
If the keyboard combiner is not working, there are a number of things that you could try:
If the keyboard combiner is not working, you could always try powering the Arduino with an external power supply plugged into the Arduino's power jack.
Alternatively, you could try using a powered USB hub either:
- between the computer and the keyboard combiner, or
- between the keyboard combiner and the keyboard and pedals.
Please report issues and submit and enhancement suggestions here https://github.com/professor/ArduinoKeymapper/issues
Please read the details here: https://github.com/davidbkemp/KeyboardCombinerArduinoSketch/blob/master/Instructions.md


