Touch-to-MIDI-synthesis code for multiple (up to 7) Bare Conductive Touch Boards.
Touch electrodes 0 to 11 on the primary board to play the first twelve notes in the notes variable.
Touch electrodes 0 to 11 on the first secondary board to play next twelve notes in the notes variable.
Touch electrodes 0 to 11 on the second secondary board to play third set of twelve notes in the notes variable and so on.
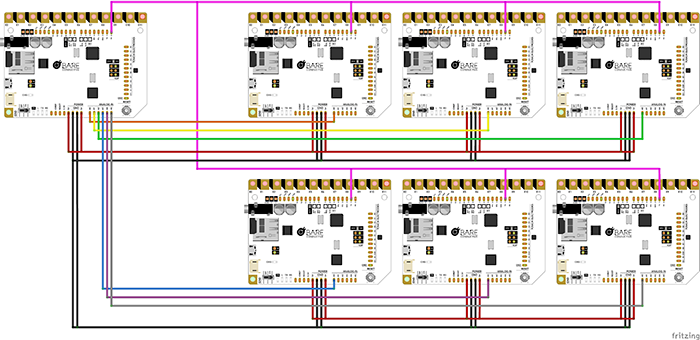
The maximum total number of boards is 7 (one primary board and six secondary boards). All boards must share a common ground connection, with TX on all the secondary boards commoned together and connected to RX on the primary board.
The primary board must have the two MIDI enabling solder blobs made, either using solder or Bare Conductive Electric Paint. These are located just below digital pin 10 and just above the 2x3 ICSP header land pattern on the right-hand side of the board.
The first secondary board must have a connection between its A0 and A0 on the primary board.
The second secondary board must have a connection between its A0 and A1 on the primary board, and so on.
Each board must also be powered, although up to 4 boards can share power by commoning up the 5V connection between them.
- You should make sure that you have followed our Setting up Arduino with your Touch Board tutorial before using this (or any other) of our code examples
-
Close the Arduino IDE if you have it open.
-
Download the .zip or clone the repository to your local machine - if downloading the .zip, extract the contents somewhere that suits you.
-
Take the primary_midi_board folder and the secondary_midi_board folder and move them to the Arduino Sketchbook Folder. This will be different for each operating system:
Windows
Libraries\Documents\Arduino
or
My Documents\Arduino
Mac
Documents/Arduino
Linux (Ubuntu)
Home/Arduino
If this folder does not exist, create it first.
-
Reopen the Arduino IDE - you should now be able to open the sketches in the File -> Sketchbook menu.