Coder Social home page Coder Social logo

arduino-examples's Introduction

arduino-examples's People

Contributors

agdl avatar cmaglie avatar damellis avatar dependabot[bot] avatar facchinm avatar fede85 avatar ffissore avatar fritzlb avatar jaimeiniesta avatar jogo- avatar karlsoderby avatar kengdahl avatar maqifrnswa avatar mcoms avatar mdxtinkernick avatar me-no-dev avatar miek avatar ocarneiro avatar paolop74 avatar per1234 avatar pfeerick avatar ricardojlrufino avatar shfitz avatar the-spellchecker avatar tigoe avatar ubidefeo avatar unh0lytigg avatar yakovl avatar zeveland avatar zfields avatar

Stargazers

 avatar  avatar  avatar  avatar  avatar  avatar  avatar  avatar  avatar  avatar  avatar  avatar  avatar  avatar  avatar  avatar  avatar  avatar  avatar  avatar  avatar  avatar  avatar  avatar  avatar  avatar  avatar  avatar  avatar  avatar  avatar  avatar  avatar  avatar  avatar  avatar  avatar  avatar  avatar  avatar  avatar  avatar  avatar  avatar  avatar  avatar  avatar  avatar  avatar  avatar  avatar  avatar  avatar  avatar  avatar  avatar  avatar  avatar  avatar  avatar  avatar  avatar  avatar  avatar  avatar  avatar  avatar  avatar  avatar  avatar  avatar  avatar  avatar  avatar  avatar  avatar  avatar  avatar  avatar  avatar  avatar  avatar  avatar  avatar  avatar  avatar  avatar  avatar  avatar

Watchers

 avatar  avatar  avatar  avatar  avatar  avatar  avatar  avatar  avatar  avatar  avatar

arduino-examples's Issues

Dimmer.ino does not work

Describe the problem

Dimmer.ino should change the brightness of a LED to the input value in terminal. But the brightness doesn't change with the value.

To reproduce

You can just run it following the instructions in the comment.

Expected behavior

The brightness of LED is fixed.

The examples version

main

Additional context

No response

Issue checklist

  • I searched for previous reports in the issue tracker
  • I verified the problem still occurs when using the latest version
  • My report contains all necessary details

11.ArduinoISP/ArduinoISP.ino: with 'void pulse(int pin, int times)', it typically pulses `times` + 1, which is unexpected

The following code typically loops one more time than times e.g. with 0, it loops once, with 1, it loops twice.

#define PTIME 30
void pulse(int pin, int times) {
  do {
    digitalWrite(pin, HIGH);
    delay(PTIME);
    digitalWrite(pin, LOW);
    delay(PTIME);
  } while (times--);
}

ADDITIONAL SUGGESTION#1: Decide whether it should loop 0 times or once, when times is set to 0; looping almost forever is probably not desired.
ADDITIONAL SUGGESTION#2: Add optional additional parameter int duration that defaults to PTIME or 30.

Servo Changeable Frequency Per Pin - For Better Servo Opperation With High End Servos

Describe the request

To have the frequency of a servo pin be adjustable depending on what Hz the Servo needs to operate properly

example code:

#include <Servo.h>

Servo myServo;

void setup() {

    myServo.attach(pin, min, max, hz);
//pin = "the number of the pin that the servo is attached to"
//min = "the pulse width, in microseconds, corresponding to the minimum (0 degree) angle on the servo"
//max = "the pulse width, in microseconds, corresponding to the maximum (180 degree) angle on the servo "
//hz = the operation frequency of the servo in hz

and have all the calculation done within the library

Describe the current behavior

The current and unchangeable frequency of the the library is set to 50Hz which works with the basic servos in the kit's and this is set for all servo not just individuals

The examples version

NOT ACTUALLY A PART OF THE "built-in examples" see additional context please

Additional context

the servo library from "Examples for any board"

I did not see a repository dedicated to "Examples for any board" so as it is pre-installed with the software I saw it fitting to put it under this repository

Issue checklist

  • I searched for previous requests in the issue tracker
  • I verified the feature was still missing when using the latest version
  • My request contains all necessary details

`Blink.ino` does not compile for Nicla Sense ME, unless `#include "Nicla_System"`

Describe the problem

The Blink sketch does not run without modification on the Nicla Sense ME. It is required to add the #include "Nicla_System.h" directive, in order for the sketch to compile and successfully upload.

To reproduce

  1. Open Blink.ino from File -> Examples -> 01.Basics -> Blink.
  2. Connect the Nicla Sense ME board and select from the drop down menu
  3. Compile. A message informing the user to include the Nicla_System.h library is given in the bottom right corner
    image
/tmp/.arduinoIDE-unsaved2023327-15341-54bj3y.wzmz7/Blink/Blink.ino: In function 'void setup()':
/tmp/.arduinoIDE-unsaved2023327-15341-54bj3y.wzmz7/Blink/Blink.ino:29:10: error: call to 'pinMode' declared with attribute error: Please include Nicla_System.h to use this pin
   pinMode(LED_BUILTIN, OUTPUT);
   ~~~~~~~^~~~~~~~~~~~~~~~~~~~~
/tmp/.arduinoIDE-unsaved2023327-15341-54bj3y.wzmz7/Blink/Blink.ino: In function 'void loop()':
/tmp/.arduinoIDE-unsaved2023327-15341-54bj3y.wzmz7/Blink/Blink.ino:34:15: error: call to 'digitalWrite' declared with attribute error: Please include Nicla_System.h to use this pin
   digitalWrite(LED_BUILTIN, HIGH);  // turn the LED on (HIGH is the voltage level)
   ~~~~~~~~~~~~^~~~~~~~~~~~~~~~~~~
/tmp/.arduinoIDE-unsaved2023327-15341-54bj3y.wzmz7/Blink/Blink.ino:36:15: error: call to 'digitalWrite' declared with attribute error: Please include Nicla_System.h to use this pin
   digitalWrite(LED_BUILTIN, LOW);   // turn the LED off by making the voltage LOW
   ~~~~~~~~~~~~^~~~~~~~~~~~~~~~~~

exit status 1

Compilation error: call to 'pinMode' declared with attribute error: Please include Nicla_System.h to use this pin
  1. Add #include "Nicla_System.h" just above the setup() function.
  2. Compile again, which will be successful.
Sketch uses 55788 bytes (10%) of program storage space. Maximum is 527616 bytes.
Global variables use 12256 bytes (19%) of dynamic memory, leaving 52032 bytes for local variables. Maximum is 64288 bytes.
  1. After uploading, all three RGB LEDs will start blinking together (white light)

Expected behavior

It is NOT required to add `#include "Nicla_System.h" to the sketch. Based on the selected FQBN, the compiler should add the directive if required.

The examples version

dfedf56

Additional context

The Blink sketch is the de-facto Hello World example, and often the first sketch users upload to their board.
Replicated on IDE 1 and Web Editor also.
image

Issue checklist

  • I searched for previous reports in the issue tracker
  • I verified the problem still occurs when using the latest version
  • My report contains all necessary details

ArduinoISP Example should be renamed "Arduino_as_ISP"

Describe the problem

I teach beginner programming and I ALWAYS have to make an excuse for the naming convention of "ArduinoISP" being the filename of the code that converts an Uno into an ISP programmer. Because when selecting this programmer from the Tools menu, you cannot select "ArduinoISP" which has the same name, but is in fact a completely different device. You must select "Arduino as ISP".

Even the official Arduino as ISP tutorial shows "ArduinoISP" as the example filename while telling you NOT to select ArduinoISP as the programmer device here: https://docs.arduino.cc/built-in-examples/arduino-isp/ArduinoISP#load-the-sketch

To reproduce

Try to run the "ArduinoISP" example code on an uno, then select "ArduinoISP" on the tools menu and try to talk to it via Tools-->Upload using Programmer. It will fail. Then change the programmer to "Arduino as ISP" and it will be able to talk to the programmer without issue.

Expected behavior

Select the code from File-->Examples-->11.Arduino_as_ISP. Then select "Arduino as ISP" from the tools menu to use that device.

The examples version

all versions

Additional context

No response

Issue checklist

  • I searched for previous reports in the issue tracker
  • I verified the problem still occurs when using the latest version
  • My report contains all necessary details

Problems with the Debounce tutorial

In the Debounce tutorial, a push button press is toggling a LED, which can lead people to think that the example shows how to reliably detect button presses. There are some problems with this:

  • First of all, this code does not detect short presses. From the comments,

    // whatever the reading is at, it's been there for longer than the debounce
    // delay, so take it as the actual current state
    

    The reading that is accepted as final is the current one, and it's taken at least 50ms from the first change (debounceDelay + time between first and last change). So in order for a press to register, the button should be held depressed for 50ms (or more!). I find that it's not hard to press a button for less than that. So the code doesn't detect button presses quite reliably.

    I was told that the reason for this behavior is to ignore random voltage spikes that could change the signal on the pin for a very short time. I think that this is a problem that is quite not related to debouncing, and if it is, must be mentioned in the description.

  • Also, the LED will only switch after 50ms (or more!). It is probably fine with LEDs, but totally unacceptable if you use buttons to play midi notes, some of the games and probably in many other applications.

These problems can be somewhat mitigated by using a lower debounceDelay value, if you have good buttons. Or straight away solved by firing event first, and waiting for the button to debounce later, e.g.

    check():
        current_reading = read_pin()

        if reading_is_settling():
            if last_reading != current_reading: 
                start_settling()

        else if current_reading != button_state:
            dispatch_change(current_reading)
            button_state = current_reading
            start_settling()

    reading_is_settling():
        return now - last_reading_change_time > SETTLE_TIME

    start_settling():
        last_reading = current_reading
        last_reading_change_time = now

If there's a need to detect voltage spikes, you can still do it by changing the logic of read_pin(), separating the concerns.

At the very least, the aforementioned problems and alternative solutions should be mentioned in the description.


Additionally, the example should probably use LED_BUILTIN instead of ledPin = 13 for clarity. And maybe not use confusing names such as lastDebounceTime.

01.Basics > Blink does not compile for Arduino Nicla Sense ME

Hello,

I followed the documentation published on link "Built-in Examples" of https://docs.arduino.cc/hardware/nicla-sense-me and attempted to build example "01.Basics > Blink" for the "Arduino Nicla Sense ME" target board.

However the compilation fails with the following error:

/tmp/.arduinoIDE-unsaved202194-7689-1pylxjm.qfj1/Blink/Blink.ino: In function 'void setup()':
/tmp/.arduinoIDE-unsaved202194-7689-1pylxjm.qfj1/Blink/Blink.ino:28:11: error: 'LED_BUILTIN' was not declared in this scope
   pinMode(LED_BUILTIN, OUTPUT);
           ^~~~~~~~~~~
/tmp/.arduinoIDE-unsaved202194-7689-1pylxjm.qfj1/Blink/Blink.ino: In function 'void loop()':
/tmp/.arduinoIDE-unsaved202194-7689-1pylxjm.qfj1/Blink/Blink.ino:33:16: error: 'LED_BUILTIN' was not declared in this scope
   digitalWrite(LED_BUILTIN, HIGH);   // turn the LED on (HIGH is the voltage level)
                ^~~~~~~~~~~
Compilation error: Error: 2 UNKNOWN: exit status 1

Any suggestions?

P.S.: My apologies if this is not the proper GitHub repository to report the issue. Please feel free to move elsewhere.
I am quite new with the Nicla and I believe there should be an easy fix, but I could not figure it out myself.

Also, if there is anything I can do to develop a fix I would be more than happy to give it a try and submit a PR.
Just need some guidance. Thanks!

tonePitchFollower schematic doesn't match text description

On https://www.arduino.cc/en/Tutorial/BuiltInExamples/tonePitchFollower

Text says: "Connect one terminal of your speaker to digital pin 9"
Schematic shows speaker connected to digital pin 8
Software: tone(9, thisPitch, 10);

Text says:
"Hardware Required...100 ohm resistor"
"Connect one terminal of your speaker to digital pin 9 through a 100 ohm resistor"
Schematic shows speaker connected through 10K ohm resistor

=====

When I completed this project, I connected the speaker through a 220 ohm resistor.
100 ohm resistor + 8 ohm speaker = 46.3 mA
220 ohm resistor + 8 ohm speaker = 21.93 mA

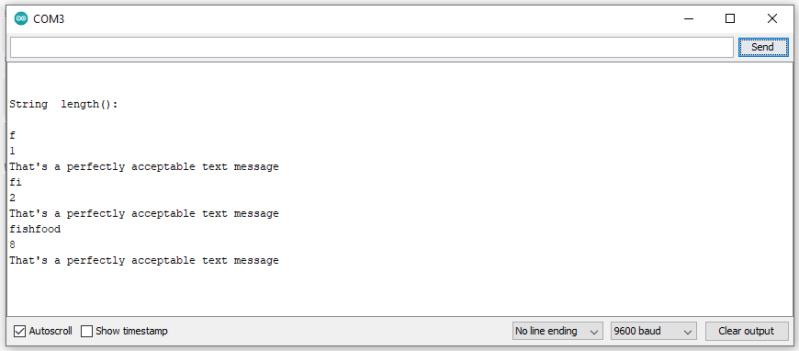
08.Strings > StringLength has several problems

The StringLength example has several problems.


It is the only example so far that shares a https://www.arduino.cc/en/Tutorial/BuiltInExamples page with another example, specifically StringLengthTrim. See http://www.arduino.cc/en/Tutorial/StringLengthTrim. When a user goes to this page, its code is completely different than the code in the IDE example for StringLength; this page shows the code for the StringLengthTrim example.

StringLength should have its own /www.arduino.cc/en/Tutorial/BuiltInExamples page like every other example.


The code in the IDE example for StringLength is very confusing for new users.

  • It outputs seemingly extraneous characters

Example:

I entered fishfood in the Serial Monitor, and here's the output that the code consistently produces:


The code should be similar to Examples > 04.Communication > SerialEvent

Here's code that I used instead for the StringLength example:
String txtMsg = "";                    // variable to hold incoming text
bool stringComplete = false;           // whether the string is ready to display

void setup() {
  // Open serial communications and wait for port to open:
  Serial.begin(9600);
  while (!Serial) {
    ; // wait for serial port to connect. Needed for native USB port only
  }

  // send an intro
  Serial.println("\n\nString  length():\n");

}

void loop() {

  // If the user wants to display the cumulative text message
  if (stringComplete) {

    // get length of the cumulative text message
    unsigned int txtMsgLength = txtMsg.length();

    // print the cumulative text message
    Serial.println(txtMsg);
    // print the length of the cumulative text message
    Serial.println(txtMsgLength);

    // if the cumulative text message is >= 140 characters, complain:
    if (txtMsgLength < 140) {
      Serial.println("That's a perfectly acceptable text message");
    } else {
      Serial.println("That's too long for a text message.");
    }

    // prepare for next chunk of the cumulative text message
    stringComplete = false;
  }
}

/*
  SerialEvent occurs whenever a new data comes in the hardware serial RX. This
  routine is run between each time loop() runs, so using delay inside loop can
  delay response. Multiple bytes of data may be available.
*/
void serialEvent() {
  while (Serial.available()) {
    // get the new byte:
    char inChar = (char)Serial.read();
    // if the incoming character is a newline
    if (inChar == '\n') {
      // set a flag to indicate that the user wants to display the cumulative text message
      stringComplete = true;
    // otherwise
    } else {
      // add the incoming character to the cumulative text message
      txtMsg += inChar;
    }
  }
}

  • It contains esoteric logic that is never explained

New users need to be told the purpose of this code. That the user should repeatedly enter text into the Serial Monitor until the cumulative text, which the program saves, reaches 140 characters.

the content of the example file ReadASCIIString.ino feels odd to me.

file: examples/04.Communication/ReadASCIIString/ReadASCIIString.ino
`
/*
...
It parses them into ints, and uses those to fade an RGB LED.
Circuit: Common-Cathode RGB LED wired like so:

  • red anode: digital pin 3 through 220 ohm resistor

  • green anode: digital pin 5 through 220 ohm resistor

  • blue anode: digital pin 6 through 220 ohm resistor

  • cathode: GND
    ...

    if (Serial.read() == '\n') {
    // constrain the values to 0 - 255 and invert
    // if you're using a common-cathode LED, just use "constrain(color, 0, 255);"
    red = 255 - constrain(red, 0, 255);
    green = 255 - constrain(green, 0, 255);
    blue = 255 - constrain(blue, 0, 255);
    ...
    "
    `

the implementation of this example file feels odd to me.
i mean the circuit wiring instruction part in the starting comment describes using a Common-Cathode RGB LED, i think people would assume the actual code implementation will be using a Common-Cathode RGB LED as well, but no, the code is actually for a Common-Anode RGB LED, plus the prior comment line confirms the starting comment. don't you feel odd about this? i think we should be consistent comments and code. (at least for me, this took some time to fully figure out the logic of the flow and understand what was going on... idk, maybe it's just me being dumb... :p )

Undefined behaviour (bug) in button debouncing tutorial code

The documentation page: https://www.arduino.cc/en/Tutorial/Debounce has an error in the code.

The variable buttonState at line 40 is uninitialized which will cause undefined behaviour the first time line 75 if (reading != buttonState) is executed.

Usually (based on testing) buttonState is not equal to reading which results in detection of a button press on startup that did not happen. Since reading is HIGH when the button is not pressed, the correct initial value for buttonState is also HIGH. When changing this, the example functions correctly and the LED is on after the program started.

[ACELL04] Include the Portenta X8 and Nicla Sense ME as part of the CI workflow

Describe the request

As boards that are included as part of the Arduino ecosystem, the Portenta X8 (fqbn: arduino:mbed_portenta:portenta_x8) and the Nicla Sense ME (fqbn: arduino:mbed_nicla:nicla_sense) and actively supported, they are not part of the CI compilation checks for the examples in this repository.

Including these two as part of the matrix strategy would help follow up with sketch compatibility on these boards (and document/fix as required). Specifically #63 and #74 .

Describe the current behavior

The boards included as part of matrix in the compile-examples.yml GitHub Workflow does not include the Portenta X8 or Nicla Sense ME boards.

The examples version

5d991a2

Additional context

No response

Issue checklist

  • I searched for previous requests in the issue tracker
  • I verified the feature was still missing when using the latest version
  • My request contains all necessary details

Better code for Tone() tutorial [imported]

This is Issue 443 moved from a Google Code project.
Added by 2011-01-01T08:42:15.000Z by [email protected].
Please review that bug for more context and additional comments, but update this bug.

Original labels: Type-Enhancement, Priority-Medium, Component-Examples

Original description

Addition of rest notes in melody[] by specifying a note with value 0.
Better name for noteDurations[], they are divisions, not durations.
Real melody as example.
Automatic counting of melody size with sizeof().
See attached file.

Sketches with `Serial.begin()` will not compile unmodified for `arduino:mbed_portenta:portenta_x8`

Describe the problem

Sketches involving the Serial.begin() will not compile, without adding #include "SerialRPC.h" at beginning of sketch. It will compile when #include "SerialRPC.h is added to the beginning of the sketch

To reproduce

From root of repository run

cd .\examples\01.Basics\AnalogReadSerial\
arduino-cli compile -b arduino:mbed_portenta:portenta_x8 -v
Output

PS C:\GitHub\Arduino\arduino-examples> cd .\examples\01.Basics\AnalogReadSerial\
PS C:\GitHub\Arduino\arduino-examples\examples\01.Basics\AnalogReadSerial> arduino-cli version
arduino-cli  Version: 1.0.0-rc.1 Commit: ba19a2d3 Date: 2024-05-20T08:22:20Z
PS C:\GitHub\Arduino\arduino-examples\examples\01.Basics\AnalogReadSerial> arduino-cli compile -b arduino:mbed_portenta:portenta_x8 -v

FQBN: arduino:mbed_portenta:portenta_x8
Using board 'portenta_x8' from platform in folder: C:\Users\Ali Jahangiri\AppData\Local\Arduino15\packages\arduino\hardware\mbed_portenta\4.1.3
Using core 'arduino' from platform in folder: C:\Users\Ali Jahangiri\AppData\Local\Arduino15\packages\arduino\hardware\mbed_portenta\4.1.3

Detecting libraries used...
C:\Users\Ali Jahangiri\AppData\Local\Arduino15\packages\arduino\tools\arm-none-eabi-gcc\7-2017q4/bin/arm-none-eabi-g++ -c -w -g3 -nostdlib @C:\Users\Ali Jahangiri\AppData\Local\Arduino15\packages\arduino\hardware\mbed_portenta\4.1.3\variants\PORTENTA_X8/defines.txt @C:\Users\Ali Jahangiri\AppData\Local\Arduino15\packages\arduino\hardware\mbed_portenta\4.1.3\variants\PORTENTA_X8/cxxflags.txt -mcpu=cortex-m4 -mfloat-abi=softfp -mfpu=fpv4-sp-d16 -w -x c++ -E -CC -DARDUINO=10607 -DARDUINO_PORTENTA_X8 -DARDUINO_ARCH_MBED_PORTENTA -DARDUINO_ARCH_MBED -DARDUINO_LIBRARY_DISCOVERY_PHASE=1 -IC:\Users\Ali Jahangiri\AppData\Local\Arduino15\packages\arduino\hardware\mbed_portenta\4.1.3\cores\arduino -IC:\Users\Ali Jahangiri\AppData\Local\Arduino15\packages\arduino\hardware\mbed_portenta\4.1.3\variants\PORTENTA_X8 -DCM4_BINARY_START=0x08100000 -DCM4_BINARY_END=0x08200000 -IC:\Users\Ali Jahangiri\AppData\Local\Arduino15\packages\arduino\hardware\mbed_portenta\4.1.3\cores\arduino/api/deprecated -IC:\Users\Ali Jahangiri\AppData\Local\Arduino15\packages\arduino\hardware\mbed_portenta\4.1.3\cores\arduino/api/deprecated-avr-comp -iprefixC:\Users\Ali Jahangiri\AppData\Local\Arduino15\packages\arduino\hardware\mbed_portenta\4.1.3\cores\arduino @C:\Users\Ali Jahangiri\AppData\Local\Arduino15\packages\arduino\hardware\mbed_portenta\4.1.3\variants\PORTENTA_X8/includes.txt C:\Users\Ali Jahangiri\AppData\Local\Temp\arduino\sketches\056DCEC076E532137E9F3A17145D1D1C\sketch\AnalogReadSerial.ino.cpp -o nul
Generating function prototypes...
C:\Users\Ali Jahangiri\AppData\Local\Arduino15\packages\arduino\tools\arm-none-eabi-gcc\7-2017q4/bin/arm-none-eabi-g++ -c -w -g3 -nostdlib @C:\Users\Ali Jahangiri\AppData\Local\Arduino15\packages\arduino\hardware\mbed_portenta\4.1.3\variants\PORTENTA_X8/defines.txt @C:\Users\Ali Jahangiri\AppData\Local\Arduino15\packages\arduino\hardware\mbed_portenta\4.1.3\variants\PORTENTA_X8/cxxflags.txt -mcpu=cortex-m4 -mfloat-abi=softfp -mfpu=fpv4-sp-d16 -w -x c++ -E -CC -DARDUINO=10607 -DARDUINO_PORTENTA_X8 -DARDUINO_ARCH_MBED_PORTENTA -DARDUINO_ARCH_MBED -DARDUINO_LIBRARY_DISCOVERY_PHASE=1 -IC:\Users\Ali Jahangiri\AppData\Local\Arduino15\packages\arduino\hardware\mbed_portenta\4.1.3\cores\arduino -IC:\Users\Ali Jahangiri\AppData\Local\Arduino15\packages\arduino\hardware\mbed_portenta\4.1.3\variants\PORTENTA_X8 -DCM4_BINARY_START=0x08100000 -DCM4_BINARY_END=0x08200000 -IC:\Users\Ali Jahangiri\AppData\Local\Arduino15\packages\arduino\hardware\mbed_portenta\4.1.3\cores\arduino/api/deprecated -IC:\Users\Ali Jahangiri\AppData\Local\Arduino15\packages\arduino\hardware\mbed_portenta\4.1.3\cores\arduino/api/deprecated-avr-comp -iprefixC:\Users\Ali Jahangiri\AppData\Local\Arduino15\packages\arduino\hardware\mbed_portenta\4.1.3\cores\arduino @C:\Users\Ali Jahangiri\AppData\Local\Arduino15\packages\arduino\hardware\mbed_portenta\4.1.3\variants\PORTENTA_X8/includes.txt C:\Users\Ali Jahangiri\AppData\Local\Temp\arduino\sketches\056DCEC076E532137E9F3A17145D1D1C\sketch\AnalogReadSerial.ino.cpp -o C:\Users\Ali Jahangiri\AppData\Local\Temp\1542543350\sketch_merged.cpp
C:\Users\Ali Jahangiri\AppData\Local\Arduino15\packages\builtin\tools\ctags\5.8-arduino11/ctags -u --language-force=c++ -f - --c++-kinds=svpf --fields=KSTtzns --line-directives C:\Users\Ali Jahangiri\AppData\Local\Temp\1542543350\sketch_merged.cpp
Compiling sketch...
"C:\\Users\\Ali Jahangiri\\AppData\\Local\\Arduino15\\packages\\arduino\\tools\\arm-none-eabi-gcc\\7-2017q4/bin/arm-none-eabi-g++" -c -w -g3 -nostdlib "@C:\\Users\\Ali Jahangiri\\AppData\\Local\\Arduino15\\packages\\arduino\\hardware\\mbed_portenta\\4.1.3\\variants\\PORTENTA_X8/defines.txt" "@C:\\Users\\Ali Jahangiri\\AppData\\Local\\Arduino15\\packages\\arduino\\hardware\\mbed_portenta\\4.1.3\\variants\\PORTENTA_X8/cxxflags.txt" -MMD -mcpu=cortex-m4 -mfloat-abi=softfp -mfpu=fpv4-sp-d16 -DARDUINO=10607 -DARDUINO_PORTENTA_X8 -DARDUINO_ARCH_MBED_PORTENTA -DARDUINO_ARCH_MBED -DARDUINO_LIBRARY_DISCOVERY_PHASE=0 "-IC:\\Users\\Ali Jahangiri\\AppData\\Local\\Arduino15\\packages\\arduino\\hardware\\mbed_portenta\\4.1.3\\cores\\arduino" "-IC:\\Users\\Ali Jahangiri\\AppData\\Local\\Arduino15\\packages\\arduino\\hardware\\mbed_portenta\\4.1.3\\variants\\PORTENTA_X8" -DCM4_BINARY_START=0x08100000 -DCM4_BINARY_END=0x08200000 "-IC:\\Users\\Ali Jahangiri\\AppData\\Local\\Arduino15\\packages\\arduino\\hardware\\mbed_portenta\\4.1.3\\cores\\arduino/api/deprecated" "-IC:\\Users\\Ali Jahangiri\\AppData\\Local\\Arduino15\\packages\\arduino\\hardware\\mbed_portenta\\4.1.\Ali Jahangiri\\AppData\\Local\\Temp\\arduino\\sketches\\056DCEC076E532137E9F3A17145D1D1C\\sketch\\AnalogReadSerial.ino.cpp.o"
C:\GitHub\Arduino\arduino-examples\examples\01.Basics\AnalogReadSerial\AnalogReadSerial.ino: In function 'void setup()':
C:\GitHub\Arduino\arduino-examples\examples\01.Basics\AnalogReadSerial\AnalogReadSerial.ino:16:15: error: call to 'ErrorSerialClass::begin' declared with attribute error:

****
Please include SerialRPC library to use Serial
****


   Serial.begin(9600);


Used platform         Version Path
arduino:mbed_portenta 4.1.3   C:\Users\Ali Jahangiri\AppData\Local\Arduino15\packages\arduino\hardware\mbed_portenta\4.1.3
Error during build: exit status 1

Expected behavior

In the Out of Box (OoB) experience for the Portenta X8, it is possible to compile and run Arduino example sketches (included in the IDE) using Serial functionality without any additional modification.

The Arduino website mentions the ability to run Arduino code on the auxiliary core of the Portenta X8 in many places, including:

The examples version

5d991a2

Additional context

Repeatable with Arduino IDE 2.3.2
image

Issue checklist

  • I searched for previous reports in the issue tracker
  • I verified the problem still occurs when using the latest version
  • My report contains all necessary details

ArduinoISP, PIN_MISO keeps the PULL_UP enabled after finish

Using ArduinoISP, when programming is over the PIN_MISO remain with the PULL_UP enable. This can interfere with other SPI devices connected at the same time on the SPI bus (as it happened in my case).

My solution was to add:
pinMode(PIN_MISO, INPUT);
in the end_pmode() method.

I recommend to add this line in the official ArduinoISP sketch.

Recommend Projects

  • React photo React

    A declarative, efficient, and flexible JavaScript library for building user interfaces.

  • Vue.js photo Vue.js

    ๐Ÿ–– Vue.js is a progressive, incrementally-adoptable JavaScript framework for building UI on the web.

  • Typescript photo Typescript

    TypeScript is a superset of JavaScript that compiles to clean JavaScript output.

  • TensorFlow photo TensorFlow

    An Open Source Machine Learning Framework for Everyone

  • Django photo Django

    The Web framework for perfectionists with deadlines.

  • D3 photo D3

    Bring data to life with SVG, Canvas and HTML. ๐Ÿ“Š๐Ÿ“ˆ๐ŸŽ‰

Recommend Topics

  • javascript

    JavaScript (JS) is a lightweight interpreted programming language with first-class functions.

  • web

    Some thing interesting about web. New door for the world.

  • server

    A server is a program made to process requests and deliver data to clients.

  • Machine learning

    Machine learning is a way of modeling and interpreting data that allows a piece of software to respond intelligently.

  • Game

    Some thing interesting about game, make everyone happy.

Recommend Org

  • Facebook photo Facebook

    We are working to build community through open source technology. NB: members must have two-factor auth.

  • Microsoft photo Microsoft

    Open source projects and samples from Microsoft.

  • Google photo Google

    Google โค๏ธ Open Source for everyone.

  • D3 photo D3

    Data-Driven Documents codes.