This project combines IoT, Serverless, and Mobile into a nice packaged solution that you can leverage to monitor temperature, pressure, images, and video of an industrial process – in this case, beer.
Consists of the following:
Here's a look at the app:

And the high-level architecture diagram:

- Monitor internal (beer) and external (ambient) temperature
- Monitor ambient humidity and pressure
- Use AI / Custom Vision Service to determine if your beer is fermenting
- Take a picture of your fermentation
- Take a video of your fermentation
This guide will break each repo down individually and guide you to the various resources needed to build the project. Let's get started!
This is broken down into 4 parts:
- Getting set up and configuring the BME280
- Setting up the camera
- Setting up the additional temperature sensor
- Building the relay and light
This project uses the code in this repo to get set up and connect the BME280 (temp, pressure, humidity) sensor. I highly recommend you visit that repo for the latest maintained version of the sample. I've included the instructions at the time of writing for convenience.
This repo contains the source code to help you get started with Azure IoT using the Microsoft IoT Pack for Raspberry Pi 3 Starter Kit. You will find the full tutorial on Docs.microsoft.com.
This repo contains a python application that runs on Raspberry Pi 3 with a BME280 temperature&humidity sensor, and then sends these data to your IoT hub. At the same time, this application receives Cloud-to-Device messages from your IoT hub, and takes actions according to the C2D command.
Follow this page to enable SSH on your Pi.
Follow this page to enable I2C on your Pi
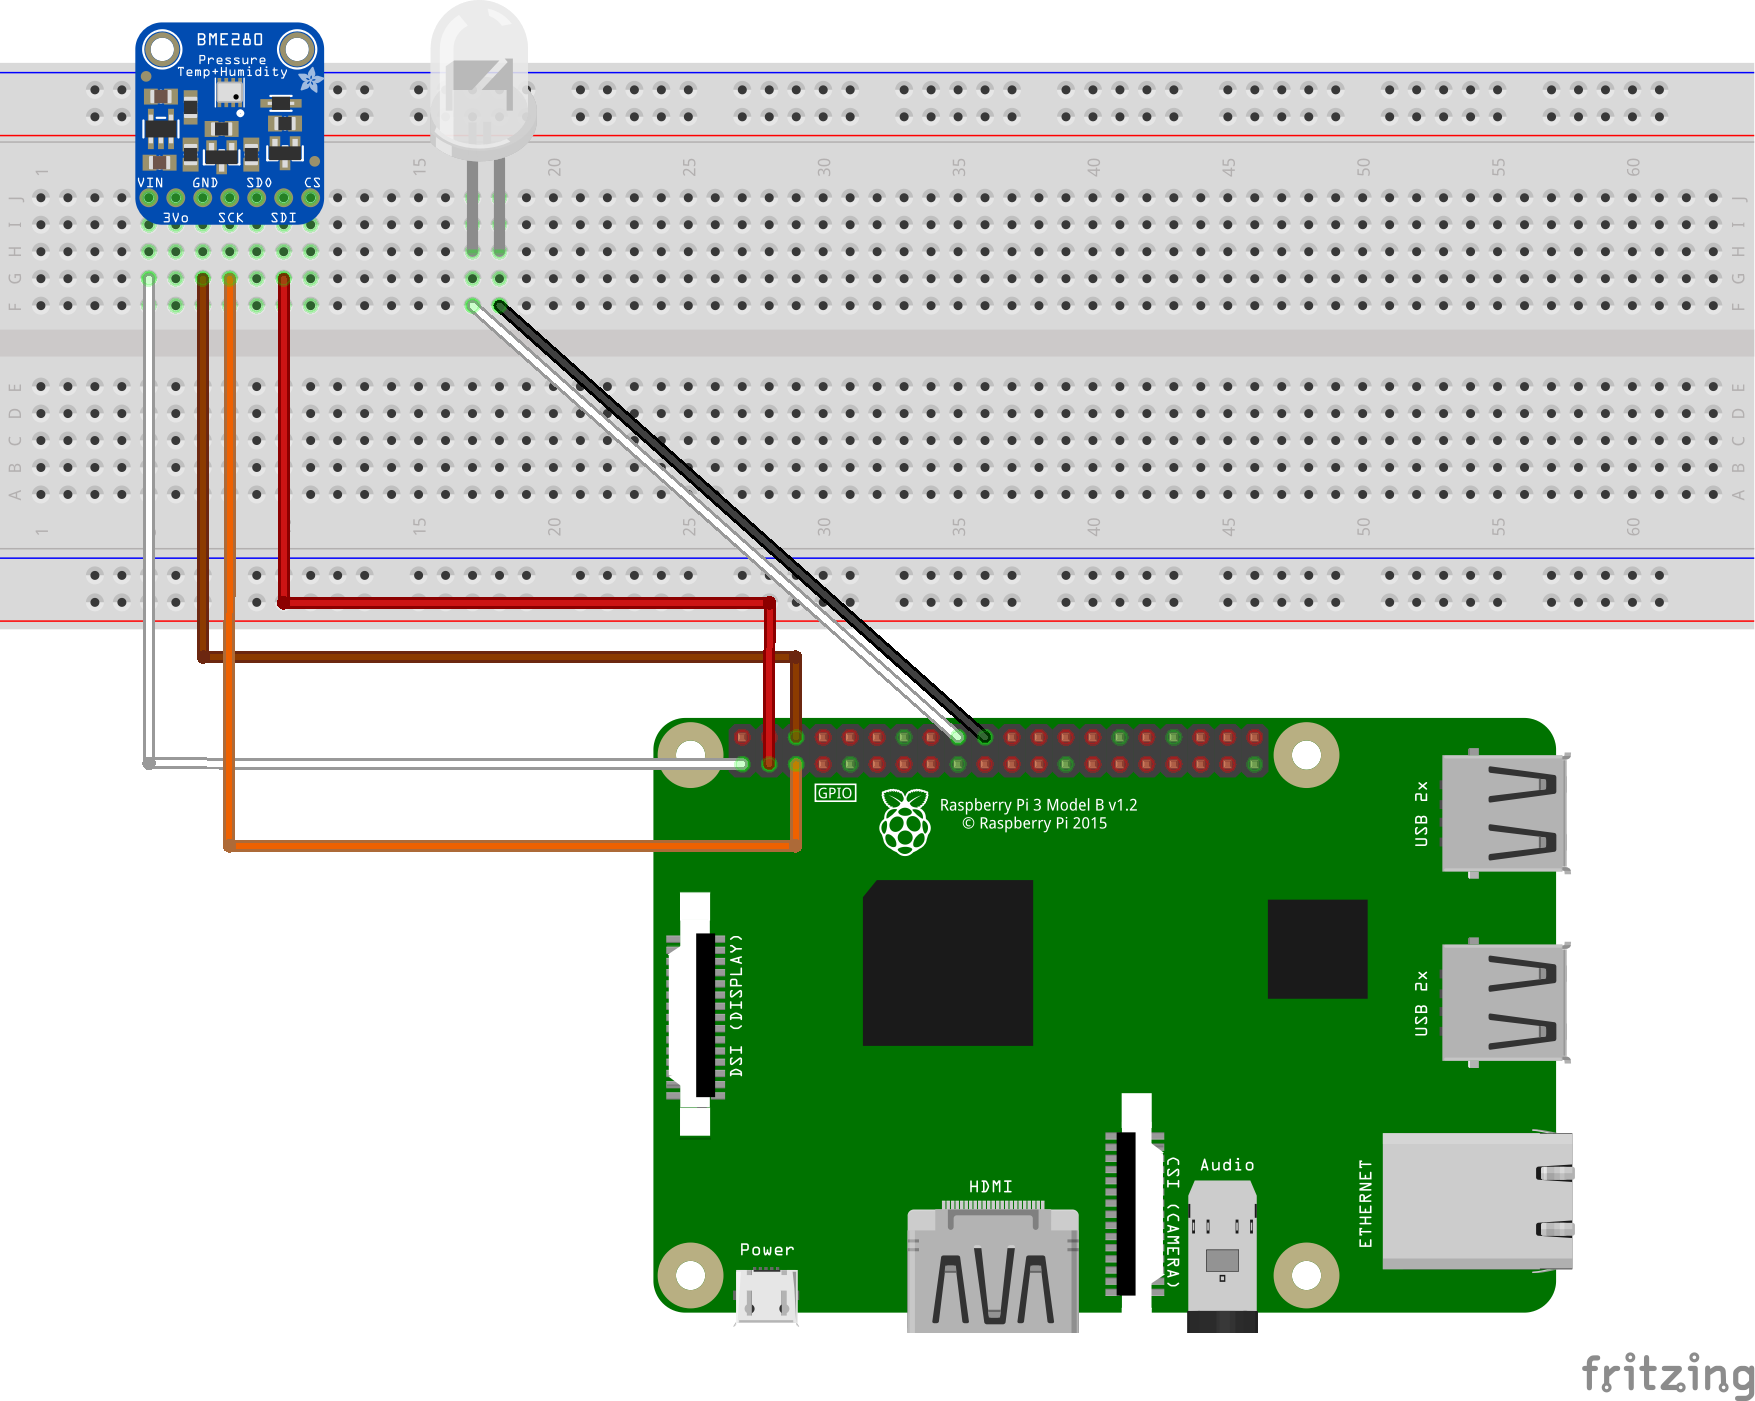
You can follow the image to connect your BME280 and an LED with your Raspberry Pi 3.
You can use the application to simulate temperature&humidity data and send to your IoT hub.
- Open the
config.pyfile. - Change the
SIMULATED_DATAvalue fromFalsetoTrue.
-
Clone the client application to local:
sudo apt-get install git-core git clone https://github.com/Azure-Samples/iot-hub-python-raspberrypi-client-app.git -
Because the Azure IoT SDKs for Python are wrappers on top of the [SDKs for C][azure-iot-sdk-c], you will need to compile the C libraries if you want or need to generate the Python libraries from source code.
cd ./iot-hub-python-raspberrypi-client-app
sudo chmod u+x setup.sh
sudo ./setup.sh
In the above script, we run ./setup.sh without parameter, so the shell will automatically detect and use the version of python installed (Search sequence 2.7->3.4->3.5). Alternatively, you can use a parameter to specify the python version which you want to use like this: sudo ./setup.sh [--python-version|-p] [2.7|3.4|3.5]
Known build issues:
1.) On building the Python client library (
iothub_client.so) on Linux devices that have less than 1GB RAM, you may see build getting stuck at 98% while buildingiothub_client_python.cppas shown below[ 98%] Building CXX object python/src/CMakeFiles/iothub_client_python.dir/iothub_client_python.cpp.oIf you run into this issue check the memory consumption of the device using
free -m commandin another terminal window during that time. If you are running out of memory while compiling iothub_client_python.cpp file you may have to temporarily increase the swap space to get more available memory to successfully build the Python client side device SDK library.
Run the client application, you'll need to provide your Azure IoT hub device connection string. Note your connection string should be quoted in the command:
python app.py '<your Azure IoT hub device connection string>'
If you use the python 3, then you can use the command below:
python3 app.py '<your Azure IoT hub device connection string>'
If the application works normally then you will see the screen like this:

- Follow this tutorial on how to set up the camera and
- this tutorial to upload it into Azure Blob storage
- Follow this tutorial. Note that I did not use the Pi Cobbler jumper cable.
- Follow this tutorial and be sure to do this safely.
Up next, we'll get some Azure Functions running to your IoT Hub.
The project repo is located here.
Each of these functions is responsible for a different aspect of functionality within the mobile app.
- GetInternalTemp
- GetTempHumidity
- TakeInternalTemp
- TakePicture
- TakeTempHumidity
- Take Video
- TempHumidityEventTrigger
Finally, we get to see all of our hard work in action.
Clone the innovation-monitor-mobile repo and enter your API keys into the Constants/Constants.cs folder and also search for any TODO: items and make sure those are filled out.
public class Constants
    {
        public const string StorageConnection = "Link to your storage connection";

        public const string TakePictureURL = "Link to your TakePicture Function URL";
        public const string TakeVideoURL = "Link to your TakeVideo Function URL";
        public const string TakeTempHumidityURL = "Link to your TakeTempHumidity URL";
        public const string GetTempHumidityURL = "Link to your GetTempHumidity URL";

        public const string GetTempHumidityAPI = "/GetTempHumidity?code=your-key-here";
        public const string TakeTempHumidityAPI = "/TakeTempHumidity?code=your-key-here";
    }
Deploy the app to a device or simulator and you should be good to go!


