Today we'll be introducing you to React Native, taking you from building a basic-app to whipping up one that does all sorts of amazing things. We'll also leave you with a tonne of goodies and things to keep in mind if you plan on pursuing React Native development in the future.
Basically, this'll be your one-stop-shop to becoming an ace React Native developer ;)
Since this document is slightly long, here's a short run down on what you'll find inside:
-
- Hello World!
- improving Hello World: Styling & other stuff!
- improving Hello World: Navigation!
-
- workflow
- debugging
-
Add-Ons to your dev environment
- upgrading Atom
- need a starter kit?
Before you go any further, fork and clone this repo if you haven't already.
You'll see that the workshop directory you now have in your system has the following tree structure:

The README and img directories you shouldn't really be concerned with - the GoingNative directory, though, is an example app that you'll be working towards making through this tutorial.
With that out of the way, let's get started!
- Homebrew (needed to install
Watchmanbelow) - Xcode
- node.js
- React Native command line tools
- Watchman
assuming you have node, Xcode (available from the App Store in case you don't have it), and homebrew (type /usr/bin/ruby -e "$(curl -fsSL https://raw.githubusercontent.com/Homebrew/install/master/install)" into the terminal to install it if you don't) installed, do the following:
-
brew install watchman(facebook file watcher, used for rebuilding upon changes - think hot reloading) -
npm install -g react-native-cli(performs a global install of the react native command line interface) -
react-native init GoneNative(this will take a minute; it creates a starter project called "GoneNative" in a directory named identically)
Now cd in to the GoneNative directory and type react-native run-ios in to the terminal to see a starter app/window run in an iOS simulator! Btw, it'll take a few seconds to open up for the first time - the simulator will stay on 'Loading from localhost:' for a bit.
You'll also now see another terminal window titled React Packager open. It'll instruct you to keep it open while you're developing the app - please follow said advice!
![]()
Before we begin coding up a few apps, let's firstly get rid of the default 'app' that the React Native folks have left in for us. Through the terminal,cd to the GoneNative directory, and type Atom .
Once in Atom, go to the index.ios.js file; this is the js file that produced the page you saw when running react-native run-ios for the first time. Go ahead and take a peek - there's no harm in having a quick look at it :).
If you do so, then your first impression of the code will probably be one of relief - it looks remarkably similar to the usual React we've been used to. As you now know, that's intentional, and pretty much the whole point of React Native!
Indeed, it's all there: the familiar import statements, render calls,ES6 classes, as well as the JSX we've been dealing with for quite a while. You have, though, probably noticed something that's familiar, but seemingly in the wrong place (CSS in the same file as javascript????? oh the horror 🙊 ).
Fear not, we'll get to that in a bit. First, though, 🚨 clear the page. We want a blank index.ios.js file to work off of. No cheating here ;)
In accordance with the ancient traditions of our people, we must first build an app that does nothing except say "Hello world".*
Here's how you'd do so:
First, you'll need to import a few things - namely React,Component,Text, and AppRegistry. Two of the previous four items should catch your eye - we've been importing React and Component an untold number of times over the past few weeks. Text and AppRegistry are, well, native to React Native, so we'll talk about them in a bit.
🚨 Basically, the following goes at the top of your file:
import React, { Component } from 'react';
import { AppRegistry, Text } from 'react-native';
Now, if we were doing vanilla react, and all we wanted to display was a 'hello world' message, we'd probably put that in a render function inside a component, right? Same here.
Just create a class GoneNative that extends Component (familiar, is it not?), and put in the usual render call inside it. Same style and syntax as vanilla React.
You'll need to return something in the render, though, right? The text "Hello World!" would seem a like a good idea, but we need something to put it in - maybe a div?
Wrong. That won't work in React Native; instead, you'll wrap your Hello World! inside a starting (<Text>) and ending (</Text>) UI component called Text. This brings us to an aside on Native UI Components in general - they're best understood as native UI widgets, necessary and crucial in facilitating making stuff appear and interact on your page in proper ways. Clearly, the <Text> component is for displaying text. You have a corresponding <Image> component for images, and more complex ones for things such as maps (the<MapView> component!). Just as we'd been using components in our React code, think of these as analagous to them in React Native, except for the fact that they're native to it.
Btw, in case there's any confusion: you can define normal components in React Native as well, and import/export/use them just as we did in React. In fact, our GoneNative class is a component in itself, and can be used accordingly. The above was just to emphasise the use of native UI components in React Native.
🚨 With the above addition, your class hopefully ends up looking like this:
class GoneNative extends Component {
  render() {
    return (
      <Text>Hello world!</Text>
    );
  }
}
Are we going to see stuff pop up yet? Nope - the final step before we see vaunted Hello World message is registering our app.
Fortunately, this kind of registration doesn't involve any bureacracy or paperwork - you just make a call to the registerComponent() function, passing in the name of the class, and an anonymous function that simply gets the component (the latter parameter is literally called getComponentFunc).
🚨 Like so:
AppRegistry.registerComponent('GoneNative', () => GoneNative);One think to keep in mind is that however large your app will be, you'll usually have only one AppRegistry.registerComponent( ... ) call; its function is to designate the root of your app. A crucial bit of boilerplate!
Finally done! Go and reload (Cmd-R) the simulator (if you've still got it running), or do react-native run-ios from the command line if you haven't.
Simple enough, right! One thing though - you'll notice that your Hello World! message is obscured by the carrier info. Just to make clear that our Hello World message really did work, why not add a newline in front of the Hello World! text. Take care of JSX syntax though!
🚨 Although this is just for aesthetics, you can basically switch out
<Text>Hello world!</Text>for
<Text>{"\n"}Hello world!</Text>Cmd-R and you'll now see the Hello World message appear within clear view!
🚨 There you have it - a simple React Native Hello World App. If you look over the overall code, it's miniscule:
import React, { Component } from 'react';
import { AppRegistry, Text } from 'react-native';

class GoneNative extends Component {
  render() {
    return (
      <Text>{"\n"}Hello world!</Text>
    );
  }
}

AppRegistry.registerComponent('GoneNative', () => GoneNative);
All we really did was create a GoneNative component and register it with our app. The component contains text, "Hello World!", and that's what appears on our screen.
*that line was blatantly stolen from facebook's react-native page (it was just too good to pass up). Apologies to facebook.
Before we move on and develop another app, let's take a moment to talk about something we pointed out in the starter app - styling in React Native.
A few basic things to keep in mind about styling in React Native:
-
styling is done via javascript, in a syntax usually identical to CSS (with certain exceptions - e.g. names are written like
backgroundColorinstead of likebackground-color) -
all core components (e.g.
<Text>from above) accept a prop namedstyle. The prop is usually a simple javascript object. This clearly encourages us to pass in a style object, and thus through it choose which style to apply to which component (although note that inline styles are possible). -
It is possible to pass in array of styles - the last style in the array has precedence (can help in inheritance of styles).
-
Usually, several styles are defined at once - for this, use the
StyleSheet.create(...)function, instead of nesting a plain javascript object.
Now, let's style our Hello World! app.
Let's start of with some very, very basic styling - changing the color of our text to red.
We'll make use of the style prop here: simply pass in an object that has style rule(s) - defined in CSS syntax - to change text color to red.
🚨 You could have done this multiple ways, but in the end you should end up with one of the following:
// inline style - NOT RECOMMENDED

// in its usual place
<Text style={{color: 'red'}}>{"\n"}Hello world!</Text>


######################### OR ################################

// Passing in an object - RECOMMENDED

// in its usual place
<Text style={redStyle}>{"\n"}Hello world!</Text>

// after class definition but before registering app ...
const redStyle = {
  color: 'red'
}
Having done that, let's now have a go at defining multiple styles - a clear chance to test out the StyleSheet.create(...) function.
First, though, let's take a step back - what use is it adding multiple styles if we have only one item to act on? Better to add some more text, and test out different styles on different items of text, right?
You could keep adding text to the current <Text> component, but since we want separate styles for separate chunks of text, it'd be easier to add more <Text> components to the mix. Add a few, and put whatever you want in them.
Most of you will have already appreciated the need for some sort of container for the <Text> components we now have -- JSX will raise hell if we leave adjacent tags without any context.
This is a nice chance to use the <View> component - it's the basic building block of UI in React-Native, and supports a bunch of cool features (flexbox, touch accessibility, etc.)
🚨 Note that to use it, you'll have to add View to your list of imports from react-native :
import { AppRegistry, Text, View } from 'react-native';Now nest all of your components inside starting and ending component tags.
🚨 With those changes, your render function could be return something like this:
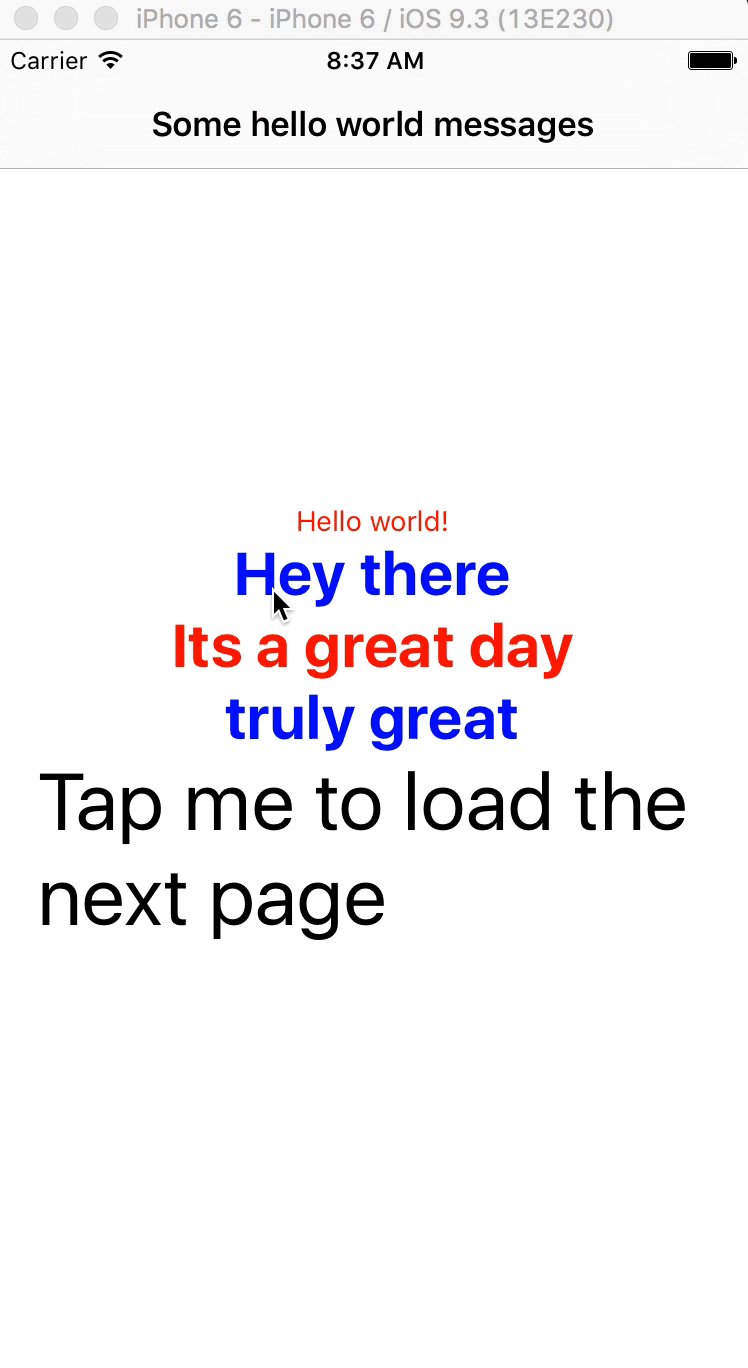
<View>
  <Text style={redStyle}>{"\n"}Hello world!</Text>
  <Text style={redStyle}>Hey there</Text>
  <Text style={redStyle}>Its a great day</Text>
  <Text style={redStyle}>truly great</Text>
</View>
Cmd-R the app and you'll see your text appear!
Note how up above i've given each of the <Text> components an identical style - the red text color we defined previously. Now's a chance to change that!
Let's get started with StyleSheet.create(...)!
🚨 Predictably, using the function requires you to import StyleSheet from react-native; you'll now have
import { AppRegistry, Text, View, StyleSheet } from 'react-native';Now to actually using it:
Think of the function as essentially producing a stylesheet - similar to those present in CSS. It also has many other benefits, as mentioned in its section in the API docs.
Say you have a set of possible styles - e.g. large, small, wide, long - that you want to make available through a single styles variable: you'd do the following:
const styles = StyleSheet.create({
  large: {
	// CSS rules
  },
  small: {
	// CSS rules
  },
  wide: {
	// CSS rules
  },
  long: {
	// CSS rules
  },
});
Then you can access your these style rules via styles.large, styles.small, and so on.
For our little app, do something similar!
🚨 As an example, consider the styles defined below, and their corresponding uses to style our components:
// in render func
<View>
<Text style={styles.red}>{"\n"}Hello world!</Text>
<Text style={styles.bigblue}>Hey there</Text>
<Text style={[styles.bigblue, styles.red]}>Its a great day</Text>
<Text style={[styles.red, styles.bigblue]}>truly great</Text>
</View>
// you know where this goes ..
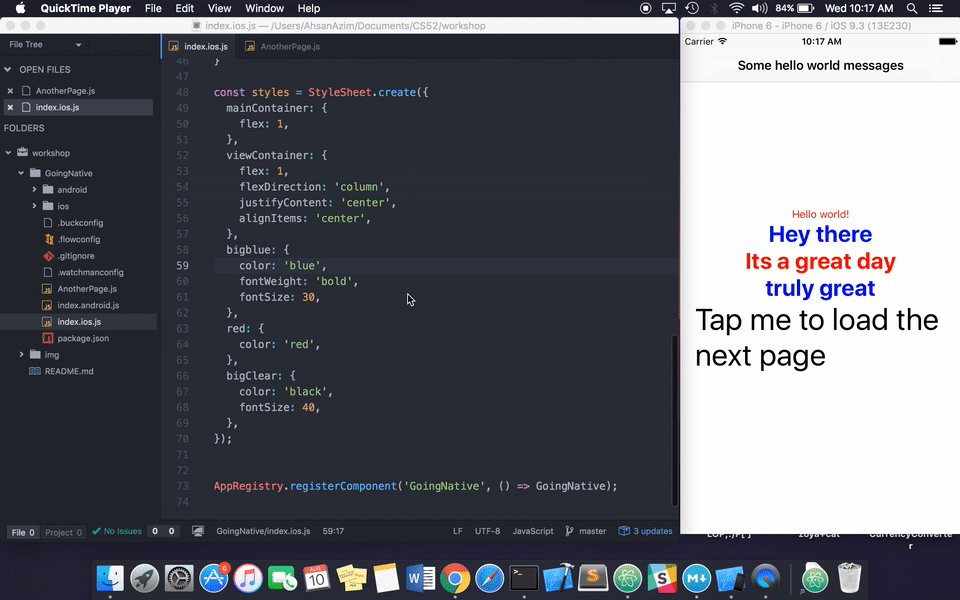
const styles = StyleSheet.create({
bigblue: {
color: 'blue',
fontWeight: 'bold',
fontSize: 30,
},
red: {
color: 'red',
},
});Pretty simple throughout ^ ! Do take note, though, of the 3rd and 4th <Text> components, where I passed styles through via an array. It's useful to understand which style gets applied, and which doesn't, and why.
There's a lot more to styling, but this should be enough for you guys to extrapolate from. The main issue with styling really is just understanding where it goes, plus the use of native UI components in appropriate situations. We've covered both, so you should be in good stead!
Say we want to add navigation to our app - for that we'd bring out the NavigatorIOS component (this component is specific to iOS - there's a cross-platform Navigator, but for reasons of ease and native-feel, we'll stick to NavigatorIOS for now).
🚨 As usual, import the component from react-native:
import { AppRegistry, Text, View, StyleSheet, NavigatorIOS } from 'react-native';To use it, we should take note that the NavigatorIOS component has an initialRoute prop (representing the initial screen your app navigates to); you'll give it a route object (which describes each scene that your app navigates to).
A route object is simply a javascript object with component and title properties. component is the name of the component that should show up initially, and title will be the text that shows up in the navigation bar at the top of the screen.
Right now, let's simply keep our Hello World! messages as the initial route, and have our app show that on startup. This'll also be a nice oppurtunity to refactor a bit - move the Hello World! message and assorted text components to a separate class (in the same file for now), call it anything you like (except for GoneNative, of course - you're keeping that class). Then you empty out the GoneNative class, and all you'll have the render function return is a <NavigatorIOS .. /> component with the appropriate prop values passed in.
Also, maybe add a bit of flexbox styling - this should be pretty straightforward by now.
🚨 We ended up with something like this:
// render function in GoneNative returns this now. Note mention of HelloWorld class.
  <NavigatorIOS
    initialRoute={{
      component: HelloWorld,
      title: 'Some hello world messages',
    }}
    style={styles.mainContainer}
  />

// refactored HelloWorld class, also added styling to View component
class HelloWorld extends Component {
  render() {
    return (
      <View style={styles.viewContainer}>
        <Text style={styles.red}>{"\n"}Hello world!</Text>
        <Text style={styles.bigblue}>Hey there</Text>
        <Text style={[styles.bigblue, styles.red]}>Its a great day</Text>
        <Text style={[styles.red, styles.bigblue]}>truly great</Text>
      </View>
    )
  }
}
That was cool, but it's really only the bare bones of navigation - all you have is an initial page. Let's get some actual navigation in to the mix.
Before we get it to navigate, we need something to navigate to.
🚨 Create a new js file in the GoneNative directory, call it anything you like - we chose the highly creative AnotherPage.js. Create an identically named class inside it, with the appropriate imports, and some filler content. This should be straightforward. We ended up with this:
import React, { Component } from 'react';
import { AppRegistry, View, Text, StyleSheet, NavigatorIOS } from 'react-native';


class AnotherPage extends Component {
  render() {
    return (
      <View style={styles.viewContainer}>
        <Text style={styles.text}>
          This is some filler text to tell you that youve
          navigated to another page.
        </Text>
      </View>
    );
  }
}

const styles = StyleSheet.create({
  viewContainer: {
    flex: 1,
    flexDirection: 'column',
    justifyContent: 'center',
    alignItems: 'center',
    padding: 10,
  },
  text: {
    color: 'green',
    fontSize: 40,
  },
});


export default AnotherPage
Now you have to link this page to the HelloWorld page. There are a few ways to do this - you can make the familiar blue arrows on the nav bar, or make something else on the page clickable such that it takes you to another page.
We'll do the latter, since it feels trivially cooler than the blue arrows ;)
To do this, you'll have to make some changes to the index.ios.js file we'd been working on throughout before this.
🚨 Firstly, import the other js file you created:
import AnotherPage from './AnotherPage.js';Now you'll actually begin working on some navigation. Navigation in React Native (and hence NavigatorIOS) works on the principle of acting on a navigator object. The object is automatically passed in as a prop to any component that is rendered by NavigatorIOS. You can then call the relevant methods to perform the navigation action you need.
There are two types of navigation actions: push (this.props.navigator.push({ ...});), and pop (this.props.navigator.pop({ ...});). You've probably figured out by now that there's a navigation stack which you push and pop on to, and that your current page is determined by what's currently on top of the stack.
Really, navigation with NavigatorIOS is just that simple. Now to turn that in to code!
In our case, you'll firstly need something on your initial page that you can click on. For this, the TouchableHighlight component is useful - it has nice configurations for on-screen touches.
🚨 You'll import the component from react-native (adding it to the already-long list of such imports):
import { AppRegistry, Text, View, StyleSheet, NavigatorIOS, TouchableHighlight } from 'react-native';🚨 and then you'll put starting and ending TouchableHighlight tags - with any content inbetween - inside the render method of your HelloWorld class (since that's where you want to navigate from). Crucially, you'll also want to pass in a function pointer to the onPress prop ("Called when the touch is released, but not if cancelled (e.g. by a scroll that steals the responder lock" - relevant API doc). We added a pointer to an _onForward function, since it handles when you - logically - want to go forward in your views. We set it up as follows:
// render method returns:
  <View style={styles.viewContainer}>

 	// everything else is the same as before  .. i.e. other <Text> components etc.

 	// added this:
    <TouchableHighlight onPress={this._onForward}>
      <Text style={styles.bigClear}>Tap me to load the next page</Text>
    </TouchableHighlight>
  </View>
Now about that _onForward function - first things first, it has an underscore at the start because that's convention in javascript for referring to functions that should be treated as a private part of the API. Since javascript doesn't support encapsulation out of the box, it's a pretty useful convention; it doesn't, though, cause the language to give any special meaning to a function with an _ identifier.
More to the point of this tutorial, _onForward's job is to call an action on the navigator prop, such that we're moved to the next page - i.e. our AnotherPage component. All of that means we should probably call this.props.navigator.push({ ...}); from inside it.
The question now is, how do we tell push what we want to push to the top of the stack? For this, the push function mentioned previously takes a javascript object with title and component properties - similar to initial route. It'll be implemented similarly.
🚨 We ended up with the following function:
  _onForward() {
    this.props.navigator.push({
      title: 'Here you have another page',
      component: AnotherPage
    });
  }
Now, before we move on, you'll notice that we haven't bound the function yet - do that! For that, you'll need a constructor, right? Note that in this situation, the constructor takes in not only props, but also context - currently an experimental feature, but something present in a lot of the example code we saw; it essentially helps in sending information down to a component.
🚨 This is what our constructor looked like:
  constructor(props, context) {
    super(props, context);
    this._onForward = this._onForward.bind(this);
  }
Finally, finally, you have everything set up to navigate to your other component. Give your code a spin -- it should work now!
This is what our version was doing by this point:
Note that the color changing to black upon clicking is an easy fix if you know the subtelties of TouchableHighlight. We won't go in to it now, but feel free to peruse the docs.
By now we've covered quite a few React Native concepts, and you have the skillset to code decently complex React Native apps - especially considering the background in React we all already have. From here on in, there are only a few minor improvements that you need to make get to the app that I demo-ed during the workshop. Just a bit of state, a TouchableHighlight, and you're set :) You've already learnt enough to get there! As mentioned before, the source code for said app is in the ./example/GoneNative directory anyway. If you want to run it, make sure to npm install, and then run like you did this app (react-native run-ios).
Although we could continue ploughing on and taking our app to ever-increasing levels of complexity, we felt it'd be better to move on and share some of the other things that we've learnt during out little sojourn into the world of React Native.
Onwards!
hot reloading increases dev speed ^
While most conventional iOS apps are developed exclusively through Xcode, and tested there as well, you'll probably want to take a different approach with react-native - unless, that is, you're in the truly infinitesimal minority that enjoys coding javascript in Xcode.
As we've been programming using Atom for a while, it's best we stick with that for actually typing our application code. In the future you may want to take a look at Nuclide (https://nuclide.io/docs/platforms/react-native/), which is essentially " Atom enhanced by Facebook for React development ". We also have a bit on it in the optional add-ons section.
To actually run your app, you'll do what you did previously - type the react-native run-iosfrom your project root directory. You won't have to do this multiple times - just keep the simulator running in the background when you're developing your app's core code.
Similar to the hot-reloading* we've been using in developing our web apps, react native also allows hot-reloading - a huge advantage over programming apps in swift/Obj-C or java. To enable it, just go to your simulator, press Cmd-D, and click 'Enable Hot Reloading'. Take note that although hot reloading will generally work stupendously well, there are a few subtleties you may want to keep in mind (https://facebook.github.io/react-native/docs/debugging.html)
That, in short, is a possible -- and decent, in our opinion :) -- react-native workflow! You'll be typing code into Atom, clicking save, and seeing the changes pop-up lightning fast in your simulator. Also take note that you'll keep the React Package Manager terminal window open in the background.
*yes, we haven't quite been using actual, full-spec hot-reloading. In this React Native you can/will though! As an aside, we highly recommend reading up on just why hot reloading is different from the usual reloading upon saving - it's really cool! Refer to the recommended readings section for more info.
You have a few options here, all of which thankfully avoid using Xcode's fairly off-putting debugger ;) Most are covered well at this (https://facebook.github.io/react-native/docs/debugging.html) link, but we'll provide a brief rundown:
- general developer menu :
Cmd-Dfrom simulator; gives access to various debugging tools such as a performance monitor and in-app inspector tool.- significantly, selecting
Debug JS in chromefrom here opens up a localhost chrome window than allows you to use the chrome dev tools on your react app.
- significantly, selecting
- app console logs :
react-native log-ios/react-native log-androidfrom terminalDebug → Open System Log...in the iOS Simulator

Nuclide is essentially a supercharged version of Atom, while still, at its simplest, being an Atom package. It was developed by Facebook, and they use it internally for all their react-native development. Suffice it to say, Nuclide is packed with useful features, and is highly recommended if you'll be doing a lot of react-native. Set it up by running
apm install nuclide from the command line. The next time you open Atom, you'll see everything you need!
follow this link for more info
Each of Ignite, Snowflake, and Pepperoni are react-native starter kits. They all provide lots of add-ons to the usual react-native dev experience, and expedite several processes that would otherwise take a relatively large amount of legwork. Which one you use really depends on personal preference; there doesn't seem to be a consensus out there yet as to which is better. We'll leave you with links to each:
Since we're used to a linter, why not go back to eslint? Setting it up is easy, follow this link or just go by the instructions below:
First, run the following from terminal:
npm install eslintnpm install eslint-plugin-reactnpm install eslint-plugin-react-native
Then configure:
Add each of the following to the respective sections in your package.json :
{
  "plugins": [
    "react",
    "react-native"
  ]
}
and
{
  "ecmaFeatures": {
    "jsx": true
  }
}
and
{
  "rules": {
    "react-native/no-unused-styles": 2,
    "react-native/split-platform-components": 2,
    "react-native/no-inline-styles": 2,
    "react-native/no-color-literals": 2,
  }
}- backed by facebook & already gained quite a bit of traction ➡️ won't die anytime soon
- backed by facebook & already gained quite a bit of traction & is young ➡️ will definitely improve beyond belief in the near-future
- it may just be the next big thing, and is in it's early stages (and you thought React was young!) ➡️ get in during the early stages & win big (i.e. 💰)
- in the unlikely event that it does all go up in flames, at least you've gotten a decent entry point to mobile app development. Keep in mind that many say Apple's swift looks remarkably similar to react-javascript ;)
official source: http://www.urbandictionary.com/define.php?term=RTFM
On occassion, simply following the first commandment of technology ^ just isn't enough - one then feels the need to read the works of others who've read the manual better than you have. Experience and know-how goes a long way, and this is where the links below come in. They range from especially useful sections of the official docs, to catch-all tutorials by those who've contributed to the development of React Native. Enjoy:
- the definitive react-native intro course:
https://egghead.io/courses/react-native-fundamentals - the official react-native docs:
https://facebook.github.io/react-native/docs/getting-started.html https://github.com/jondot/awesome-react-nativehttp://rickyreusser.com/2016/05/14/things-i-learned-the-hard-way-using-react-native/http://ruoyusun.com/2015/11/01/things-i-wish-i-were-told-about-react-native.htmlhttps://medium.com/@ilanasufrin/tips-and-tricks-for-working-with-react-native-8ed6b6a82243#.60sd6norvhttps://medium.com/the-react-native-log/tips-for-styling-your-react-native-apps-3f61608655eb#.a05iru4gz- for hot reloading read the first answer's hot-reloading relevent portion from this link:
https://forums.meteor.com/t/what-is-hot-reloading-and-code-splitting-webpack-webpack-vs-ecmascript-hot/19734 - navigation & routing:
http://blog.paracode.com/2016/01/05/routing-and-navigation-in-react-native/https://medium.com/@dabit3/react-native-navigator-navigating-like-a-pro-in-react-native-3cb1b6dc1e30#.hviawj6r2https://facebook.github.io/react-native/docs/using-navigators.htmlhttps://facebook.github.io/react-native/docs/navigatorios.html
- a great intro to react native talk
- Alexander Kotliarskyi's excellent Under the Hood talk


